Microsoft ASP .NET Fast & Easy Web Development phần 4 ppsx
Bạn đang xem bản rút gọn của tài liệu. Xem và tải ngay bản đầy đủ của tài liệu tại đây (1.36 MB, 24 trang )
error message that is displayed depending upon the width of the
form. Finally, the ErrorMessage property specifies the error
message that is displayed if a control is not validated successfully.
4. Repeat steps 1–3 to add another RequiredFieldValidator control for validating the
txtDescription control.
5. Add a RegularExpression Validator control to validate the txtURL control.
6. Change the ControlTo Validate, Display, and ErrorMessage properties to txtURL,
Dynamic, and Specify a Valid URL, respectively.
7. For the RegularExpression Validator control, you also need to specify the validation
expression. Click on the ValidationExpression property. An Ellipsis button will appear
next to the ValidationExpression property.
8. Click on the Ellipsis button. The Regular Expression Editor dialog box will open.
9. Click on the Internet URL option in the Standard Expressions list. The option will be
selected.
10. Click on OK. An expression that corresponds to an Internet URL will be added to the
ValidationExpression property.
Tip Often users do not include the http:// prefix when specifying a URL.
To accept a URL from the user without the http:// prefix, you can
change the ValidationExpression property from http://([\w-]+\.)+[\w-
]+(/[\w- ./?%&=]*)? to ([\w-]+\.)+[\w-]+(/[\w- ./?%&=]*)?
11. You also need to validate the optCategory, documentation, attachments, and picture
controls. Drag the CustomValidator control from the Toolbox to the form.
12. Change the ID property of the control to ValidateCategory. Change the Display
property to Dynamic, and change the ErrorMessage property to Select a Category.
Note You do not need to specify a value for the ControlToValidate
property of the CustomValidator control because you are declaring
a custom script that will be executed for the control.
13. Repeat steps 11 and 12 to add CustomValidator controls for the documentation,
attachments, and picture controls. The IDs for the validation controls should be
ValidateDoc, ValidateAtt, and ValidatePic, respectively.
For CustomValidator controls, you need to specify a validation script. The script is
executed every time the page is submitted. If the control with which the CustomValidator
control is associated is not validated successfully, an error message will be displayed. I
will now write the script for the CustomValidator controls that you added in steps 11–13.
Coding the Validation Logic
The validation logic for a CustomValidator control is coded in the Server_Validate event
of the control. To begin, write the validation logic for the ValidateCategory control.
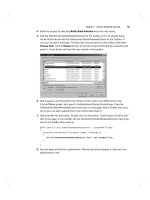
1. Double-click on the ValidateCategory control in Design view. The declaration for the
Server_Validate event will be created, and the code-behind file for the form will open.
2. Write the code for the Server_Validate event. The code written here determines
whether any option is selected in the optCategory list. When no option is selected in the
list, the value of the SelectedIndex property is −1. When the value is −1, the IsValid
property for the control that is being validated is set to False.
3. Write the code for the ValidateDoc CustomValidator control. The code written here
determines whether the user has a file name. If the user has not specified a file name
(which is determined by examining the PostedFile property of the documentation
control), the IsValid property of the control is set to False.
4. Use the GetExtension function of the Path class to check the file extension, which will
determine the validity of the file entered by the user. If the extension of the file is not .txt,
the IsValid property of the documentation control is set to False.
Note Make sure that you import the System.IO namespace into your
application before you use the Path class. To import the
System.IO namespace, specify the Imports System.IO statement
as the first line of the AddNew.aspx.vb file.
5. Write the code for the validation controls associated with the attachments and picture
controls. It is optional for the user to specify a value in these controls. Therefore, validate
the controls only when the user has specified values in the control. You should also
check whether the size of the uploaded file is less than 1 MB. This is determined by the
ContentLength property of the attachments control.
Running the Form
Now you can run the form to determine whether the validation controls work as desired.
Click on the Debug menu and select Start. When the application executes, type the
address of the AddNew.aspx form in your Web browser.
This completes our discussion of the validation controls. In the next two chapters, you
will learn about the basics of database access. You will use those concepts to code the
complete functionality of the forms in your application.
Chapter 8: SQL Server Basics
Overview
In addition to the source code of an application in ASP.NET, you also need databases
and tables in which to store data for the application. These databases need to be
compatible with the application to ensure that data can be easily added, modified, and
retrieved.
ASP.NET is compatible with SQL Server and can store and retrieve data from SQL
Server using SQL commands. Before you begin using SQL Server in ASP.NET
applications, you should know the basics of creating and managing SQL Server
databases. In this chapter, you’ll learn how to:
§ Create databases and tables using the SQL Server Enterprise Manager
§ Insert, update, and delete data from databases using the Query Analyzer
§ Retrieve data from databases using the Query Analyzer
§ Create stored procedures using the Query Analyzer
Creating Databases and Tables
Before you can store data for an ASP.NET application in SQL Server, you need to create
a database and add tables to it.
In this section, you will learn how to create a database in SQL Server using the SQL
Server Enterprise Manager. Then you will learn to create a table in the database.
Creating a Database
When you install SQL Server 2000, you can register more than one instance of SQL
Server on the same computer. After registering the SQL servers, you can use the SQL
Server Enterprise Manager to manage them. SQL Server Enterprise Manager is an
MMC (Microsoft Management Console)-based tool that provides a GUI (Graphical User
Interface) for managing SQL servers and databases. Two important tasks performed by
SQL Server Enterprise Manager are database and table creation.
You can open the SQL Server Enterprise Manager from the Microsoft SQL Server
submenu in the Programs menu. To create a database in SQL Server using the SQL
Enterprise Manager, follow these steps.
1. Click on the plus sign next to the Microsoft SQL Servers option. The list of SQL server
groups created on the computer will be displayed.
2. Click on the plus sign next to the SQL Server Group option. The list of SQL servers
installed on the computer will be displayed.
3. Click on the plus sign next to the server on which you want to create the database.
The components of the database will be displayed, and more buttons will appear on the
toolbar in the Console window.
4. Click on Action. The Action menu will appear.
5. Move the mouse pointer to New. The New submenu will appear.
6. Click on Database. The Database Properties dialog box will open.
7. Type the name of the database that you want to create. As you type the name, it will
appear in the title bar of the Database Properties dialog box.
8. Click on OK. The Database Properties dialog box will close, and a new database will
be created with the name you specified.
Creating a Table
To create a table in SQL Server using SQL Enterprise Manager, simply follow these
steps.
1. Click on the plus sign next to the Databases option. The databases on the server to
which you are connected will be displayed.
2. Click on the plus sign next to the database in which you want to create a table. The
contents of the database will be displayed.
3. Click on the Tables option. A list of all the tables in the selected database will be
displayed in the right pane of the console window.
4. Click on Action. The Action menu will appear.
5. Click on New Table. A new console window will appear.
6. In the rows contained in the window, specify the details of the fields that are to be
included in the table. For each field you need to specify the field name, the data type of
the field, the length of the field, and whether or not the field will contain null values.
7. Type the name of the first field in the table and press the Tab key. By default, the field
will be a character field with a size of 10 characters that allows null values.
8. Click on the down arrow in the first cell in the Data Type column. A list containing all
possible field types will be displayed.
9. Click on the data type that matches the requirements of the field. The specified data
type will be assigned to the field.
10. Double-click on the first cell in the Length column, type the field size, and press the
Tab key. The field size will be set, and the corresponding cell in the Allow Nulls column
will be selected.
11. Click on the check box in the first cell of the Allow Nulls column. The check mark in
the Allow Nulls column will be cleared. This ensures that you will not be able to specify
null values for the field.
Tip If you want to allow null values in a field, you should not clear the
check box in the Allow Nulls field.
12. Click on the Identity field in the Columns section. A down arrow will appear. This box
is active only if the int data type is specified for a field. Selecting this box ensures that
you cannot insert or edit values in the selected field, and that a value is automatically
specified for each new row.
13. Click on the down arrow in the Identity field. A drop-down list of options will appear.
14. Click on Yes. This will ensure that the selected field will contain integer values that
will be automatically incremented by 1 for each row of values.
15. Click on the Set Primary Key button. The selected field will be set as the primary field
of the table.
16. Create the rest of the fields of the database table the same way you created the first
field.
17. Click on Save. The Choose Name dialog box will open.
18. Type the name of the new table and click on OK. The table will be saved.
19. Click on Close. The window will close, and the updated table list for the selected
database will appear.
Managing Data
The main purpose for creating databases and tables is to ensure that application data
can be stored, updated, and deleted from the appropriate tables easily. You can insert,
update, and delete data from the tables in SQL Server by running SQL commands in the
Query Analyzer that can be displayed using the Query Analyzer option on the Microsoft
SQL Server submenu.
In this section, you will learn to insert, update, and delete data from a table in SQL
Server using the Query Analyzer.
Inserting Data
Before you insert data in a table using the Query Analyzer, you need to select the
database that contains the table into which you want to insert data. You can open the
Query Analyzer from the Microsoft SQL Server submenu in the Programs menu.
After you’ve opened the Query Analyzer, select the database that contains the
appropriate table.
1. Click on the down arrow for the Current Database list on the toolbar. A list of all of the
available databases will be displayed.
2. Click on the database to which you want to connect. The current database will change
to the specified one, which will ensure that all of the SQL commands specified in the
Query Analyzer will be run on that database.
After you connect to the database, you can type SQL commands in the Query window to
manage data in the current database. Use the INSERT INTO command to insert data
into a table using the Query Analyzer. The syntax of the command for inserting data into
a table that contains three fields is
INSERT INTO TableName (FieldOneName, FieldTwoName, FieldThreeName)
VALUES
(ValueOne,ValueTwo,ValueThree)
The TableName value represents the name of the table into which data will be added.
Replace TableName with the appropriate table name.
The FieldOneName, FieldTwoName, and FieldThreeName values represent the fields in
the table. Notice that these field names are enclosed in parentheses and separated by
commas. Replace these values with the names of fields to which data will be added.
After you specify the name of the table and the names of the fields into which data will be
added, you need to specify the values that will be added to each of the fields that follow
the VALUES keyword. In this example, the values to be added to the table are
represented by ValueOne, ValueTwo, and ValueThree. Notice that they are enclosed in
parentheses and separated by commas. These values should be in the same order as
the field names specified after the table name. In addition, they should be specified in
accordance with the data types for their respective fields.
Note You do not need to include all of the fields in the table in the
INSERT statement. You can omit the fields that contain null
values.
Tip If you want to insert values that require characters or dates, you
need to enclose them in quotes.
Updating Data
You often need to change data in tables. For example, when a user rates your article,
the rating should be reflected in the database. If the rating for an article already exists,
then it needs to be updated. In this section, I will examine the steps to update data in a
database.
Before you update data in a table using the Query Analyzer, you need to select the
database that contains the table you want to update. After you connect to the database,
you can type the SQL commands in the Query window to update table data.
1. Use the UPDATE command to update data in a table using the Query Analyzer. The
syntax of the command for updating data in a table containing three fields is
UPDATE TableName SET FieldOneName = ValueOne, FieldTwoName = ValueTwo,
FieldThreeName = ValueThree Where (FieldOne = Value1)
2. The TableName value represents the name of the table in which data will be updated.
Replace this value with the appropriate table name.
3. After you specify the name of the table, you need to specify the keyword SET.
FieldOneName, FieldTwoName, and FieldThreeName represent the fields in the table.
Replace these values with the names of the fields in which data will be updated.
Note You do not need to include all of the fields in the table in the
UPDATE statement. The fields that are not specified in the
UPDATE statement will retain their current values.
4. In this example, ValueOne, ValueTwo, and ValueThree represent values that need to
be updated in the database. Replace these values with the values that will be updated in
the database.
5. The WHERE clause determines the rows in which the updated values will be
specified. It contains field names and values. However, these values represent the value
that the specified field of an existing row should contain. The rows that match the criteria
specified in the WHERE clause are updated according to the SET clause. If you omit the
WHERE clause, the values of the specified fields are updated for all of the rows in the
table.
Deleting Data
When there is a redundancy in the data in a table, you might need to delete information.
1. Use the DELETE command in the Query Analyzer to delete data from a table. The
syntax of the command for deleting data from a table is
DELETE TableName Where (FieldOne = ValueOne) AND/OR/NOT (FieldTwo =
ValueTwo)
2. TableName represents the name of the table from which data will be deleted. Replace
TableName with the appropriate table name.
3. After you specify the table, you need to specify the WHERE clause. This clause is
used to determine the rows that need to be deleted from the specified table. If you have
multiple criteria, you can use the AND, OR, and NOT logical operators to select the rows
to be deleted.
§ AND. Use the AND clause to specify deletion for rows in the table that
meet all of the criteria in the WHERE clause.
§ OR. Use the OR clause to specify deletion for rows that meet any of the
criteria in the WHERE clause.
§ NOT. Use the NOT clause to specify deletion for rows that do not meet
the criteria in the WHERE clause.
Tip You can use parentheses to specify two or more criteria and
prioritize the logical operators.
Note If you omit the WHERE clause, all the rows of the specified table
will be deleted.
4. After you have typed the SQL command to delete rows from a specified table, execute
the command. The rows will be deleted from the table.
Retrieving Data
In an ASP.NET application, you often retrieve data from a database and display it on a
form using the SELECT statement. The SELECT statement can accept a parameter, or it
can be run without any specified parameters.
In this section, you will learn to retrieve data from a table in SQL Server using the
SELECT statement.
Retrieving Data Using the SELECT Query
The syntax for a simple SELECT query is
SELECT * FROM TableName
In this syntax, the * keyword signifies that all of the values from all rows of the table are
to be retrieved from the table specified by TableName. However, if you need to retrieve
only specific rows from the table, you can use the following syntax.
SELECT FieldOne, FieldTwo, FieldThree FROM TableName
Notice that a comma separates each field name. This syntax will retrieve the values from
only the specified fields of all rows in the table.
Retrieving Data Using a Conditional Query
To retrieve data from a table conditionally, use the SELECT command with the WHERE
clause. The syntax for a conditional query is
SELECT FieldOne FROM TableName WHERE (FieldTwo > 10)
This syntax specifies that the value in the FieldOne field is to be retrieved from the table
rows in which the FieldTwo value is greater than 10.
Tip You can use logical operators and parentheses with the WHERE
clause to specify multiple conditions.
Understanding Stored Procedures
In an application, many tasks are repetitive. For example, a task might involve canceling
an airline ticket. This task is not only repetitive, but it also involves updating a number of
tables in a database.
If you pass multiple SQL statements from an ASP.NET application to update a database,
you risk increasing the load on the network and introducing errors while updating data.
To prevent these problems, you can call a stored procedure, which includes one or more
SQL statements that can update a database. In this section, you will learn how to create
and execute a stored procedure.
Creating a Stored Procedure
A stored procedure contains the commands that are used to perform a specific task in an
application. These commands can be executed by executing the stored procedure. You
can create a stored procedure in a specific database by selecting the database in which
the procedure is to be created and using the CREATE PROCEDURE command.
The syntax for creating a stored procedure is
CREATE PROCEDURE ProcedureName
//declarations
AS
//variable definitions
BEGIN
//commands
END
In this syntax, ProcedureName specifies the name of the procedure that will be created.
After you specify the name of the procedure, you need to specify the variables that are
required to execute the procedure.
After you have declared the variables that are to be accepted from the user, use the AS
keyword to define variable declaration for the variables accepted from the user and other
variables required by the stored procedure.
After you complete the variable declarations, specify the SQL commands that constitute
the stored procedure. The commands start with the BEGIN keyword. After you have
specified the SQL commands, you need to specify all of the commands required by the
stored procedure. Use the END keyword to indicate that the stored procedure is
complete.
Executing a Stored Procedure
After you create a stored procedure, you can execute it to run all of the statements that
you specified in it. To execute the procedure, select the database in which the procedure
should be run, and then follow these steps.
1. Use the syntax for executing a stored procedure to run the procedure. The syntax for
executing a stored procedure is
EXEC ProcedureName Parameter1, Parameter2
2. Use the EXEC command to execute the procedure. Follow the command with the
name of the procedure that is to be executed. This example specifies that the values
represented by Parameter1 and Parameter2 are to be passed to the procedure. These
values need to be enclosed in quotation marks if they are not numeric values.
3. Execute the stored procedure that was created in the preceding section. Specify the
command in the Query Analyzer window and click on the Execute Query button to run
the stored procedure. The procedure will execute and the result will be displayed in the
Messages tab of the Query Analyzer window.
This completes the discussion on SQL Server basics. In the next chapter, you will be
introduced to the concepts of ADO.NET, one of the core components of data access in
ASP.NET.
Chapter 9: Getting Started with ADO.NET
Overview
You can store data in databases or other data sources, such as spreadsheets and text
files. This data can then be accessed by the various data-centric applications. To access
the data, these applications need to use a data access model. ADO.NET is one such
data access model, designed for Web-based applications. By catering to Web
applications specifically, ADO.NET allows you to implement data access in ASP.NET
applications.
ADO.NET enables you to access data from various data sources. By using ADO.NET as
a data access model, you can easily manipulate and update data. In this chapter, you’ll
learn how to:
§ Utilize the features and architecture of ADO.NET
§ Configure a data adapter
Understanding the Features of ADO.NET
ADO.NET is a highly efficient data access model based on the .NET Framework. It
provides a uniform data access technology for local, client-server, and Web applications.
In this section, I’ll discuss the main features that make ADO.NET an efficient data access
model.
Non-Dependency on a Persistent Connection
An important feature of ADO.NET is that it is not dependent on a persistent connection
with the database. This means that the applications connect to the database only when
they need to access or update data. To understand the importance of this feature, you
should be aware of how most traditional applications access data in a database.
In most of the traditional applications, a connection to the database is established and
then kept open while the application processes data. However, such open connections
might lead to:
§ Intensive use of system resources. The number of open connections
with the database might result in low performance of the application.
§ Limited scalability. A significant requirement of an ASP.NET Web
application is scalability, because the number of users accessing a Web
site might increase tremendously within a short period of time. However,
if connections are perpetually open, the site might no longer remain
scalable.
§ Non-viability. Exchange of data across applications is difficult and not
viable if connected architecture is used. In such a case, the two
components need to be perpetually connected to share data between
them.
Open connections are not feasible, particularly for ASP.NET Web applications where the
components are disconnected. In such applications, when a Web browser requests a
Web page, the Web server sends the page after processing the request. Then, the
server disconnects from the browser until it receives the next request. Therefore, open
connections to databases are not required because it cannot be determined whether the
client (the Web browser, in this case) needs any further access to data.
The architecture of ADO.NET promotes disconnected data architecture, thereby making
it an efficient data access model.
Data Commands
Working with a database can involve various operations. These operations include
reading or writing data and creating or modifying columns or tables in the database.
Another operation that you commonly perform in a database is the calculation of a total
or average by using aggregate functions. You perform these operations by executing
SQL statements or stored procedures.
When you use ADO.NET, you can perform database operations using data commands.
The data commands comprise a SQL statement or a stored procedure. This means that
you create a data command and then configure it either with the SQL statement text or
the stored procedure name that is used to perform the desired operation.
If you want to perform multiple database operations, you need to use multiple data
commands—a separate data command for each operation. In addition, you can include
parameters in data commands. Such parameters enable you to create parameterized
queries.
Datasets
There are situations when an application needs to display data on a Web form or further
process the data. Regardless of the way in which the application needs to use the data,
it has to first retrieve the data from a database. This data can be a record or a group of
records. Moreover, records might be stored in multiple tables in the database.
In such situations, the application needs to access the database multiple times to
process each record. As you have learned, this is not feasible in the case of
disconnected architecture. However, when you use ADO.NET, you have an alternative in
the form of a dataset.
An ADO.NET dataset temporarily stores records that are retrieved from the database. It
is a virtual miniature database that enables you to work with the data stored in it just as
you would work with data in the database.
A dataset can be made up of a single table or multiple tables. If the dataset contains
multiple tables, it also stores information about the relationships that exist between them.
Moreover, a dataset can also include information about the constraints set for the tables.
To put it simply, a dataset, like a database, consists of tables that contain data,
constraints, and relationships. Therefore, when an application works with data in a
dataset, it has access to all of the elements of the data source and it doesn’t need to
maintain a connection with the database. If you want to make any modification to the
data, you can do so in the dataset itself. These changes can later be written into the
database easily.
Although data retrieved from a database is stored in a dataset, the task of moving the
data between the database and the dataset is done using data adapters. A data adapter
usually contains four commands that are related to Select, Insert, Update, and Delete
statements. You will learn about these four commands later in this chapter. One or more
of these data commands contained in a data adapter is used to load data in a table in a
dataset and update the corresponding database table with the changes.
Another significant point that you should note is that a dataset is independent of the
database or data source from which it retrieves the data. Since the dataset does not
maintain any direct relationship with the original source, it is possible to store data from
various data sources in a single dataset.
Support for XML
As you know, the data from a database needs to be transferred to a dataset, and then
from the dataset to various other components. ADO.NET uses XML as the data format
for such a transfer.
XML is an industry-accepted standard, approved by W3C (World Wide Web
Consortium). It is used to store data in a text format. XML is commonly used to exchange
data between applications based on different platforms.
Because XML is an industry-accepted data format and is text-based, ADO.NET support
for XML makes ADO.NET the preferred data access model. Because conversion of data
into and out of XML is automated, you do not need to have any knowledge of XML to
work with data in ADO.NET.
ADO.NET uses XML as its internal data format. As a result, when you use ADO.NET,
XML is used as the format for any transfer of data. If you want to store data in a file, it is
stored as XML. You can also use an XML file as the data source for creating a dataset.
Now that you know about the main features of ADO.NET, I’ll discuss the ADO.NET
architecture.
Understanding the ADO.NET Architecture
The ADO.NET architecture consists of two main components that are designed to enable
data access and data manipulation. These two components are the dataset and the
.NET data provider.
In the following sections, I will discuss each component of the ADO.NET architecture
separately.
Datasets
A dataset acts as a primary component of the ADO.NET disconnected architecture. A
dataset in ADO.NET is represented by the DataSet class, which is available in the
System.Data namespace.
The tables contained by a dataset are represented by DataTable objects. The DataTable
objects contain DataRow and DataColumn objects that represent the rows and columns
of a table, respectively.
The .NET Data Provider
The .NET data provider is another essential component of the ADO.NET architecture. It
serves as a bridge between an application and the data source because it enables an
application to connect to the data source, execute commands, retrieve results, and later
update the data source with the changes. The .NET Framework currently provides two
.NET data providers.
Note A namespace refers to a naming scheme. It is used for logical
grouping of related types, such as classes and structures. In the
.NET Framework, namespaces follow a hierarchical, dot-syntax
naming scheme. Since ADO.NET is a data access model, it uses
data-related namespaces for accessing the data-related classes.
The main namespace used by ADO.NET is System.Data. When
you work with ADO.NET, you need to refer to this namespace in
your applications.
§ SQL Server .NET data provider. This data provider is designed
specifically for Microsoft SQL Server 7.0 or later databases. The
System.Data.SqlClient namespace stores the classes of this data
provider. You need to include this namespace in your applications when
you use the SQL Server .NET data provider. The names of the classes of
the SQL Server .NET data provider begin with the prefix “Sql.”
§ OLE DB .NET data provider. This data provider enables interaction with
any OLE DB data source. It provides support for various OLE DB
providers, such as SQLOLEDB (SQL OLE DB provider),
Microsoft.Jet.OLEDB.4.0 (Jet OLE DB provider), and MSDAORA (Oracle
OLE DB provider). The System.Data.OleDb namespace stores the
classes of the OLE DB .NET data provider. You must include this
namespace in your applications when you use the OLE DB .NET data
provider. The names of the classes of this provider begin with the prefix
“OleDb.”
The .NET data providers consist of four core components that enable you to manipulate
data and provide quick, read-only, and forward-only data access. The following sections
discuss these four components.
Connection Object
To enable an application to interact with a data source, you need to first establish a
connection with the data source. To accomplish this, you use the Connection object.
ADO.NET provides you with the following two Connection objects.
§ SqlConnection. The SqlConnection object enables you to directly
create and manage a connection to a Microsoft SQL Server 7.0 or
later database. The SqlConnection class, which indicates an open
connection with a Microsoft SQL Server database, is stored in the
System.Data.SqlClient namespace. Note that it is not possible to
inherit the SqlConnection class.
§ OleDbConnection. The OleDbConnection object enables you to
create and manage a connection to a data source that is accessible
through OLE DB. These data sources can be of various types, such as
databases, spreadsheets, or text files. The OleDbConnection class,
which indicates an open connection with the data source, is stored in
the System.Data.OleDb namespace.
Both the SqlConnection and OleDbConnection classes include several properties,
methods, and events. The members of both of the classes are almost identical. The most
commonly used members of these classes are
§ ConnectionString property. This property provides information
necessary to create and manage a connection with the data source.
Such information is in the form of a string that consists of several
clauses and their values. The most important parameters of a
connection string are Provider (which denotes the name of the data
provider), Data Source (which denotes the server name), Initial
Catalog or Database (which denote the database name), User ID or
UID (which denote the user name to log on), and Password or Pwd
(which denote the password).
Note When you use the SqlConnection object, the only data provider
that you use is SQL Server, so the SqlConnection object does not
support the Provider clause.
§ Open method. This method opens a connection to the data source by
making use of the information in the ConnectionString property.
§ Close method. This method closes a connection. Closing a
connection after you perform the desired operations is important to
minimize the use of valuable system resources.
Command Object
After you connect to the database, you need to process requests that are in the form of
database commands and then return results for these requests. The requests might
relate to retrieving data, modifying data, or executing stored procedures.
You can use the following two command objects to retrieve data.
§ SqlCommand. The SqlCommand class enables you to create a data
command object. This class, stored in the System.Data.SqlClient
namespace, denotes a Transact-SQL statement or a stored procedure
to be executed against a Microsoft SQL Server database.
§ OleDbCommand. The OleDbCommand class enables you to create a
data command object. This class, stored in the System.Data.OleDb
namespace, denotes a SQL statement or a stored procedure to be
executed against a data source.
DataReader Object
When you want to read data sequentially, you can use the DataReader object. This
object enables you to retrieve a read-only, forward-only data stream from the data
source. When you use the DataReader object, the performance of the application
improves, and the system overhead is considerably reduced. This is because at any
given time, there is only one row of data in the memory.
There are two data reader objects, including:
§ SqlDataReader. The SqlDataReader class provides you with a data
reader object for reading forward-only data from a Microsoft SQL
Server database.
§ OleDbDataReader. The OleDbDataReader class provides you with a
data reader object for reading forward-only data from any data source.
DataAdapter Object
To work with a dataset, you need to transfer data from the data source to the dataset
and later transfer it back to the data source to reflect the changes. To enable this
communication between the dataset and the data source, ADO.NET provides the
DataAdapter object.
If you want to use a data adapter, you need to first create and configure it. You have an
option to configure the data adapter when you create it or at any later stage. When you
configure a data adapter, you actually specify the SQL statements or stored procedures
to be used to read and write data to the data source.
The two DataAdapter objects that ADO.NET provides are
§ SqlDataAdapter. This object is used for communication between a
dataset and a Microsoft SQL Server 7.0 or later database.
§ OleDbDataAdapter. This object is used for communication between a
dataset and any data source accessible through OLE DB.
Both the SqlDataAdapter and OleDbDataAdapter classes include several properties,
methods, and events. The members of both classes are almost identical. The most
commonly used members are
§ SelectCommand property. This property enables you to select and
retrieve data from the data source.
§ InsertCommand property. This property allows you to insert data in
the data source.
§ UpdateCommand property. This property enables you to update
data in the data source.
§ DeleteCommand property. This property allows you to delete data
from the dataset.
Note The SelectCommand, InsertCommand, UpdateCommand, and
DeleteCommand properties are instances of the Command class.
Another point to remember is that in the case of
OleDbDataAdapter, these properties refer to either a SQL
statement or a stored procedure, whereas in the case of
SqlDataAdapter, they refer to a Transact-SQL statement or a
stored procedure.
§ TableMappings property. This property retrieves a collection that
represents mapping between a table in the data source and the
corresponding data table in the dataset.
§ Fill method. This method fills the dataset with data retrieved from the
data source. When the DataAdapter object calls this method, it uses
the SelectCommand property to select and retrieve the data with
which the dataset will be filled.
§ Update method. This method updates the data source with the
modifications made to the data in the dataset. When the DataAdapter
object calls this method, it uses the InsertCommand,
UpdateCommand, and DeleteCommand properties for inserting,
updating, and deleting data, respectively.
Now that I’ve explained the core components of the .NET data providers, I will discuss
the steps to use these components on a Web form.
Configuring a Data Adapter
Visual Studio .NET provides the Data Adapter Configuration wizard, which helps you
configure a connection and a data adapter to a data source. In this section, I will
describe the utility of the wizard and the steps to run the wizard to connect to a data
source.
Introducing the Data Adapter Configuration Wizard
The Data Adapter Configuration wizard provides you with simple steps to quickly create
and configure a data adapter. The wizard performs several tasks for you. It will
§ Create a new connection to a database. You can create a new
connection to a database using the Data Adapter Configuration wizard.
§ Use an existing connection. If you have already configured a
connection to a data source, you can use the connection while
configuring a data adapter.
§ Create SQL queries. You can use the Query Builder to create queries
that can be used for the Select, Insert, Update, and Delete commands of
a data adapter.
Running the Wizard
To use the Data Adapter Configuration wizard, first create a form on which you want to
run the wizard. Alternatively, open an existing form. Follow these steps to run the wizard.
1. Click on a DataAdapter object (either OleDbDataAdapter or SqlDataAdapter) on the
Data tab of the Toolbox and drag it to the form. An instance of the object will be created,
and the first dialog box of Data Adapter Configuration wizard will open.
2. Click on Next. The Choose Your Data Connection dialog box will open.
3a. Choose a connection from the list if you want to use an existing connection.
OR
3b. Click on New Connection if you want to create a new connection. The Data Link
Properties dialog box will open.
4. On the Connection tab, specify the server name, user name, password, and database
name.
5. Click on Test Connection. A message will appear if the connection is successfully
established.