Microsoft ASP .NET Fast & Easy Web Development phần 5 pdf
Bạn đang xem bản rút gọn của tài liệu. Xem và tải ngay bản đầy đủ của tài liệu tại đây (2.24 MB, 24 trang )
6. Click on OK. You will be returned to the Data Link Properties dialog box.
7. Click on OK. You will be returned to the Choose Your Data Connection dialog box.
8. Click on Next. The Choose a Query Type dialog box will open. This dialog box
provides you with three options to specify the type of the query. You can specify whether
you want to use SQL statements, create a new stored procedure, or use an existing
stored procedure to access the database. By default, the Use SQL Statements option
will be selected.
9. Click on Next. The Generate the SQL Statements dialog box will open. This dialog box
enables you to specify the Select statement that will be used to automatically create the
Insert, Update, and Delete statements.
10a. Type the Select statement in the box.
OR
10b. Click on Query Builder if you want to design the query. The Add Table dialog box
will open.
11. Click on the name of the table you want to use in your query, and then click on Add.
The columns of the selected table will appear in the Query Builder.
12. After you add all of the tables that you want to use in your query, click on Close. The
Add Table dialog box will close.
13. Click on the check box for each column that you want in your query. The selected
queries will be designed in the Query Builder.
14. Click on OK. The Query Builder will close, and the query will appear in the Generate
the SQL Statements dialog box of the wizard.
15. Click on Next. The View Wizard Results dialog box will open. This dialog box lists the
tasks performed by the wizard.
16. Click on Finish. The wizard will be completed and the configuration settings will be
applied to the data adapter. An instance of the connection and data adapter objects will
appear on the form.
The preceding steps used the Data Adapter Configuration wizard to configure a data
adapter for the application. You can also configure a data adapter for your application by
dragging a table from the Server Explorer to the form. See Chapter 10, “Managing Data
from ASP.NET Applications,” for more information on this technique.
After you complete the configuration of the data adapter using the Data Adapter
Configuration wizard, you can generate a dataset by following these steps.
1. Right-click on the instance of the data adapter on the form. A shortcut menu will
appear.
2. Click on Generate Dataset. The Generate Dataset dialog box will open.
3a. Click on Existing and select the name of a dataset if you want to use an existing
dataset.
OR
3b. Click on New if you want to generate a new dataset.
4. Click on OK. The dataset will be generated, and an instance of the dataset object will
appear on the form.
This completes the discussion on ADO.NET. In the next chapter, you will learn how to
use the components of the ADO.NET architecture to enable data access in an ASP.NET
application.
Chapter 10: Managing Data from ASP.NET
Applications
Overview
In Chapter 9, “Getting Started with ADO.NET,” you were introduced to the features and
advantages of the ADO.NET architecture. ADO.NET provides data access components
that are used for managing data in databases.
In ASP.NET, you can use the data access components that are provided by ADO.NET to
data-enable your Web applications. By data-enabling your Web applications, you can
add, update, retrieve, and delete data in data sources. This chapter describes the steps
to data-enable your application by interacting with a SQL Server database. In this
chapter, you’ll learn how to:
§ Add data to SQL Server databases
§ Retrieve data from SQL Server databases
Adding Data to SQL Server Databases
Adding data to a database is a three-step process. First, you need to identify the table in
the database to which you want to add data. Next, you need to design the form that will
accept information from users. Finally, you need to use the ADO.NET data components
to add data to the database.
In this section, you will learn to perform these three steps to add data to a database.
Designing a Database Table
You can create a database and add a table to it using SQL Server Enterprise Manager,
which is the administration tool for SQL Server. (See Chapter 8, “SQL Server Basics,” for
more information on creating a database and adding a table to it.)
The ArticleDetails table includes the following fields:
§ ArticleID. The ArticleID field is used to uniquely identify an article in the
ArticleDetails table. This field is a primary key for the table and is
automatically generated when a new article is added to the table.
§ ArticleTitle. The ArticleTitle field stores the title of the article, as
specified by the user.
§ Author. The Author field stores the name of the author of the article. As
you will see later, this value is automatically retrieved from the user’s
Windows 2000 user ID.
§ ArticleDescription. The ArticleDescription field stores a brief description
of the article.
§ ArticleURL. The ArticleURL field stores the address of a Web site to
which the author of the article would like to refer the readers.
§ Cat1–Cat5. The Cat1 to Cat5 fields store Boolean values that represent
the categories to which the article belongs. For example, if the value of
Cat1 is True, the article belongs to the first category. An article can
belong to one or more categories.
§ DiffLevel. Each article is rated in terms of difficulty level. An article can
be for beginning, intermediate, or advanced users. The DiffLevel field
stores an integer value that represents the difficulty level of the article.
§ Attachments and Picture. The Attachments and Picture fields store
Boolean values to specify whether the author has included an
attachment and image file with the article.
§ LastUpdate. The LastUpdate field stores the date and time when the
article was last updated.
Designing a Form to Accept Information
To add data to the ArticleDetails table, I have added the AddNew.aspx form to an
ASP.NET Web application. The form includes fields that correspond to each field in the
ArticleDetails table. I have also added validation controls to the form to ensure that the
user has specified valid information in all fields of the form.
Inserting Records into the Database Table
After you validate the data specified by a user, you can add the data to a database.
Adding data to the database is a three-step process. First, you need to configure a data
adapter for the form. Next, you need to configure the InsertCommand of the data
adapter. Finally, you need to write the code to add the record to the database. The
following sections will examine these steps one by one.
Adding a Data Adapter to the Form
You can use the SqlCommand object or the SqlDataAdapter object to add data to a
database. When you use the SqlDataAdapter object, you can use the InsertCommand
property of the object to specify the query for inserting records into the database.
I will use the SqlDataAdapter object to add data to the database. You can add the
SqlDataAdapter object to your form using the Data Adapter Configuration wizard. (See
Chapter 8, “SQL Server Basics,” for more information on using the Data Adapter
Configuration wizard.)
However, Visual Studio .NET offers another easy way to add the data adapter to your
form. You can simply drag the table for which you want to configure the data adapter
from the Server Explorer to the form.
1. Open the form for which you want to configure the data adapter. The form will open in
Design view.
2. Click on View. The View menu will appear.
3. Click on Server Explorer. The Server Explorer will appear.
4. Double-click on Servers. The name of the local computer will appear in the Servers
list.
5. Double-click on the name of the local computer. The components of the computer that
are accessible from Visual Studio .NET will appear.
6. Double-click on SQL Servers. The SQL servers that are registered on the computer
will appear.
7. Double-click on the server on which the database for the application is installed. A list
of databases available on the server will be displayed.
8. Double-click on the name of the database to be used in the application. The tables,
views, and stored procedures in the database will appear.
9. Double-click on the Tables option. The tables available in the database will appear.
10. Press and hold the mouse button on the ArticleDetails table and drag it to the form.
The SqlConnection1 and SqlDataAdapter1 controls will be added to the form.
Configuring the Data Adapter
After the SqlConnection1 and SqlDataAdapter1 controls have been added to the
component tray of the form, you need to configure the InsertCommand property of the
SqlDataAdapter1 control. To configure the property using the Properties window,
perform the following steps.
1. Right-click on SqlData Adapter1. A shortcut menu will appear.
2. Click on Properties. The Properties window for the control will appear.
3. Click on the plus (+) sign next to the InsertCommand property. The details of the
InsertCommand property will appear.
4. Move the mouse pointer to the CommandText property of InsertComamnd. The SQL
query that is associated with InsertCommand will appear as a tool tip. Notice that you
don’t need to change the command text here, because the query suits your
requirements.
Now that you have ensured that the data adapter control is configured, you can use the
data adapter to add data to the database.
Coding the Form to Add Data
The code to add a record to the database needs to be written in the Click event of the
Submit button. In the AddNew.aspx form, you need to perform the following tasks while
adding data to the database.
1. Retrieve data from the controls on the form and assign these values to the parameters
of InsertCommand.
2. Execute the query on the database to retrieve updated data in the database and the
ID of the article that is added.
3. Use the ID of the article to save the attachments of the article.
To assign values to the parameters of the InsertCommand property, you need to know
what the parameters are. To view the parameters of the InsertCommand property, follow
these steps.
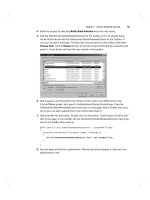
1. Click on the Ellipsis button in the Parameters property of InsertCommand. The
SqlParameter Collection Editor dialog box will open.
2. View the parameters expected by InsertCommand. Make a note of these parameters,
because you need to refer to them while coding your application.
3. Click on OK to close the SqlParameter Collection Editor dialog box.
The definition of the Click event of the Submit button is automatically created. In the
definition, write the code for assigning values to the parameters of InsertCommand. In
this example code, the following logic has been used to add values to parameters.
§ The third parameter, which represents the author of the article, is
retrieved from the user’s Windows 2000 domain account by using the
Context.User.Identity.Name property.
§ The fourth parameter, which represents the optional URL that the
author of the article can specify, is retrieved from the txtURL text box.
§ Parameters 5–9 are set depending on the options that the user has
selected in the optCategory CheckBoxList. If an option is checked in
the CheckBoxList control, the value of the corresponding parameter is
set to 1. Otherwise, the value is 0.
Note You can retrieve the user ID by using the
Context.User.Identity.Name property only when you have disabled
anonymous authentication on IIS. See Chapter 22, “Securing
ASP.NET Applications,” for more information on anonymous
authentication.
§ The current date and time are assigned to the thirteenth parameter,
which is the last parameter of the InsertCommand query.
After assigning values to parameters, you run the query. You will notice that the query
statement returns the article ID of the article that is added to the database. You need to
retrieve this value so you can save the attachments of the article using the ID.
After you store details of the article in the database, you can direct the user to another
Web form that displays the details of the article that has been added to the application. In
the MySourceCode application, I redirect the user to the Article.aspx form, which
displays the details of the article that the user has added to the Web site. While
redirecting the user to the Article.aspx form, I have added the article ID as a query string
parameter using the UrlEncode method of the HttpUtility class.
Retrieving Data from SQL Server Databases
To retrieve data from the data source, identify the table from which you want to retrieve
data and use the ADO.NET data objects to retrieve data from the database.
Tip Make sure that you have created an Articles folder in the root
directory of your Web application.
In this section, I will explain the steps to retrieve the details of an article that you added
to a database in the previous section. You will first learn to design the Article.aspx form,
which displays details of the article after retrieving them from the data source. Next, you
will implement the data access logic.
Designing the Form to Display Data
The Article.aspx form is essentially composed of Label and Literal controls that will be
used to display information retrieved from the database. Literal controls are similar to
Label controls, but they allow you to format data using HTML tags. For example, if you
specify <B>ASP.NET</B> for the Text property of the Literal control, the control will
display ASP.NET in bold font.
The following list explains a few important controls that I have added to the form.
§ lnkCode. The lnkCode Hyperlink control displays a hyperlink on the form
if the author of the article has included the article’s source code.
§ lblThankyou. The lblThankyou label displays a message to the user
after the user has rated an article.
§ imgLabel and ArtImg. The imgLabel and ArtImg controls display an
image file associated with a control.
§ txtArtDoc. The txtArtDoc Literal control displays the documentation that
accompanies new articles added to the Web site.
Tip The lblThankyou label is displayed after the user has rated an
article. To enable users to rate an article, you should create a
composite control. Refer to Chapter 13, “Creating a Composite
Control in ASP.NET,” for more information on creating composite
controls.
After you design the form to display data, proceed to the next section, which describes
the steps to retrieve data from the database and display it on the form.
Displaying Data on a Form
To retrieve and display data on a form, you need to use the same logic that you used for
adding data to the database. The only difference is that you need to use the
SelectCommand instead of the InsertCommand.
Drag the ArticleDetails table from the Server Explorer to the form. The SqlCommand1
and SqlDataAdapter1 controls will be configured for the form.
2. Select the SqlDataAdapter1 control and open the Properties window.
3. Click the Ellipsis button for the CommandText Property of the SelectCommand. The
Query Builder dialog box will open.
4. You need to retrieve the details of only one article for which the article ID has been
passed in the query string. Therefore, append the phrase “where ArticleID=@ArticleID”
in the SQL query.
5. Click on OK. The Query Builder dialog box will close.
6. Double-click on the form. The form will open in the Code Editor.
7. Write the code for the Load event of the form. Notice that I first check whether the
query string is valid. If the query string is not valid, the user is redirected to the
Default.aspx page, which is another page of the Web application. If the query string is
valid, I use the GetDocumentation and GetArticle methods to retrieve the details of the
article.
8. Write the code for the GetDocumentation method. This method reads the contents of
the article from a file and displays them in a Literal control.
Tip The Article.aspx form uses the StreamReader, File, and
sqlDataReader classes. These classes are available in the
System.IO and System.Data.SqlClient namespaces. Therefore, you
should import the System.IO and System.Data.SqlClient
namespaces into your application.
9. Write the code for the GetArticle method. The logic implemented by this code is not
much different than the logic to add records to the database. The only difference is that
the SelectCommand method is used to retrieve records, and the details of the article
(which are retrieved in the object of the SqlDataReader class) are displayed on the form.
Running the Application
After you write the code to add and retrieve records from the data source, run the
application to check its output.
You now have learned how to add and retrieve data from a database. The next chapter
explores the ways to format and display data using data binding server controls.
Chapter 11: Displaying Data Using Data
Binding Server Controls
Overview
Most often it is insufficient to retrieve data from a database and display it directly on a
form. You generally need to format the data before displaying it on the form. Formatting
data not only ensures that your form is visually appealing; it also ensures that the data is
well organized. On a well-organized form, only the information that is relevant to the user
is displayed at any given time. For example, you don’t need to display all of the details of
books available on your Web site. Instead, you can provide links to each book so the
user can click on a link to explore more about a specific book.
ASP.NET provides a number of data binding server controls that are highly
customizable. After you retrieve data from a data source, you can bind data to these
server controls and display it on a form in a variety of formats. This chapter includes a
detailed explanation about how to use each server control. In this chapter, you’ll learn
how to:
§ Use the DataGrid control
§ Use the Repeater control
§ Use the DataList control
Using the DataGrid Control
The DataGrid control is the simplest of all the data binding controls. You can use the
DataGrid control to display data in a tabular format. In this section, I will explain the steps
to add and customize a DataGrid control for a form.
Displaying Data in a DataGrid Control
The DataGrid control is available in the Web Forms tab of the Toolbox. To demonstrate
the use of the DataGrid control, I have added a Web form, ViewOwn.aspx, to the
MySourceCode application. The form is used to display the details of articles that have
been uploaded by a user who is logged on to the Web application.
Adding a DataGrid Control to a Form
To add a DataGrid control to a form, add a Web form to an application and then follow
these steps.
1. Click on the DataGrid control in the Toolbox. The control will be selected.
2. Press and hold the mouse button and drag the control to the form.
3. Right-click on the control. A shortcut menu will appear.
4. Click on Properties. The Properties window will appear.
5. Change the Width property to 100%. The DataGrid control will occupy the entire width
of the screen.
6. Optionally, change the ID property of the control so you can recognize it easily.
Changing the SelectCommand Property of a Data Adapter
After you add the SqlDataAdapter and SqlConnection controls to the form, you need to
change the SelectCommand property of the SqlDataAdapter control, because you don’t
need to retrieve all of the records from the database.
1. Click on the SqlDataAdapter1 control.
2. In the Properties window, click on the plus (+) sign next to the SelectCommand
property. The contents of the SelectCommand property will be displayed.
3. Type SELECT ArticleID, ArticleTitle, Author, ArticleDescription, LastUpdate
FROM ArticleDetails WHERE (Author = @Aid) as the query for the CommandText
property and press Enter. The Regenerate Parameters message box will appear.
4. When you change the query associated with a command, the parameters expected by
the query might change. To synchronize the parameters expected by the query with the
command text, click on Yes. The Microsoft Development Environment dialog box will
appear.
5. Click on Yes. The new query that you specified will be applied to the SelectCommand.
Generating a Dataset
After you configure the data adapter control, you need to generate a dataset to store
data that is retrieved from the database.
Note I did not use a dataset in Chapter 10, “Managing Data from
ASP.NET Applications,” because I did not need to store data in the
application. I simply retrieved the data and presented it to the user.
When you store data in the application, you need to use a dataset.
1. Click on the SqlDataAdapter control that was added to the form. The control will be
selected.
2. Click on Data. The Data menu will appear.
3. Click on Generate Dataset. The Generate Dataset dialog box will open.
4. Retain the default options, which allow you to create a new dataset, add a table to the
dataset, and add the dataset to the component designer. Click on OK. A new DataSet
control will be added to your application.
Binding Data to the DataGrid Control
Now you are ready to use the DataGrid control. A DataGrid control includes a
DataSource property that expects a DataView object as the data source.
When you configured the DataSet control in the preceding steps, you added the
ArticleDetails table to the dataset. This table has a default view associated with it that
can be assigned to the DataSource property of the DataGrid control. The steps to assign
the default view of the table to the DataGrid control follow.
1. Double-click on the ViewOwn.aspx form to open the Code Editor.
2. Now you need to write the code in the Load event of the form. Retrieve the user name
of the user who is currently logged on.
3. Assign the user name as a parameter to the SelectCommand and open the
connection to the data source.
4. Execute the Fill method of the SqlDataAdapter class to retrieve details of articles
uploaded by the user and add these details to the dataset.
5. Assign the default view of the dataset to the DataGrid control and call the DataBind
method to display data on the form.
Customizing a DataGrid Control
The DataGrid control presents many customization options. For example, you can
change the appearance of the DataGrid control to make it blend with the color scheme of
your Web application. In this section, I will show you how to customize the DataGrid
control by changing its properties.
Changing the Appearance of the DataGrid Control
You can change the appearance of a DataGrid control using the Properties window.
1. Click on the DataGrid control on the form and open the Properties window.
2. Change the style of the control. In this control, I have changed the CellPadding value
to 3, the Font to Verdana, and the BackColor of the HeaderStyle property to #DFA894.
Note The HeaderStyle property specifies the style of the header row in
the DataGrid control.
I have configured only a few properties of the DataGrid control. You can configure other
properties in the same manner. Take a moment to experiment with the properties, if
you’d like.
Sorting Data in a DataGrid Control
When you enable sorting in a DataGrid control, each column in the header row of the
DataGrid control appears as a hyperlink. When users click on a hyperlink, the data in the
DataGrid control is sorted by the selected column.
1. Double-click on the AllowSorting property in the Properties window. The value of the
property will change from False to True.
2. Switch to the Code Editor and select the DataGrid control from the list of controls. The
control will be selected.
3. From the list of events supported by the control, select SortCommand. An event
handler will be generated for the SortCommand event of the DataGrid control.
4. The SortExpression property specifies how the data in the DataGrid control should be
sorted. You can use the SortExpression property to sort the data in a DataView object
and associate the object with the DataGrid control, as shown here.
Using the Repeater Control
The Repeater control is a customizable control that offers a high degree of flexibility for
data presentation. In this section, you will examine the steps to configure a Repeater
control for displaying data on a Web site.
Displaying Data in a Repeater Control
To display data in a Repeater control, you need to define the format for displaying data
and then populate the Repeater control with data. In this section, I will describe the steps
to configure the Repeater control by performing these tasks.
Defining the Format for Displaying Data
As you can see, the Repeater control does not provide a default way to present data.
You need to configure how data should be displayed in the control. However, the
Repeater control does provide templates that specify how data should be displayed by
the control. At run time, when a data view is bound to the Repeater control, the template
is used to determine how each record in the data view should be displayed on the form.
The steps to configure the Repeater control follow.
1. Click on the HTML tab to open the HTML view of the Web form.
2. Locate the HTML code that corresponds to the Repeater control.
3. Add the definition of the ItemTemplate template. The ItemTemplate specifies how
each item in the Repeater control should be formatted. I have used the data binding
syntax to bind the ArticleID, ArticleTitle, and Author fields of the data source to the
ItemTemplate.
4. Switch back to the Design view of the form. The Databound fields that you created in
the HTML view are displayed here. Data will be populated in these fields at run time.
Populating a Repeater Control with Data
To populate the Repeater control with data, I used a simple logic. First, I added a
connection to the form. The connection can be opened whenever data needs to be
retrieved from the data source. Next, I used the SqlCommand object to configure the
search queries for different search parameters. Finally, I passed the SqlCommand object
to a function that executes the command by using the connection and displays the result
in the Repeater control. These steps are detailed below.
1. The quickest way to add a connection to the form is to drag the connection object from
the Server Explorer to the form.
2. After you add a connection to the form, switch to the Code Editor.
3. Create a SqlCommand object for each search parameter and execute the query to
retrieve the result in an SqlDataReader object.
4. Bind the SqlDataReader object to the Repeater control.