microsoft visual c 2008 step by step phần 5 doc
Bạn đang xem bản rút gọn của tài liệu. Xem và tải ngay bản đầy đủ của tài liệu tại đây (465.99 KB, 67 trang )
242 Part II Understanding the C# Language
When you implement an interface, you must ensure that each method matches its
corresponding interface method exactly, according to the following rules:
The method names and return types match exactly.
Any parameters (including ref and out keyword modifi ers) match exactly.
The method name is prefaced by the name of the interface. This is known as explicit
interface implementation and is a good habit to cultivate.
All methods implementing an interface must be publicly accessible. However, if you are
using explicit interface implementation, the method should not have an access qualifi er.
If there is any difference between the interface defi nition and its declared implementation,
the class will not compile.
The Advantages of Explicit Interface Implementations
Implementing an interface explicitly can seem a little verbose, but it does offer a
number of advantages that help you to write clearer, more maintainable, and more
predictable code.
You can implement a method without explicitly specifying the interface name, but this
can lead to some differences in the way the implementation behaves. Some of these
differences can cause confusion. For example, a method defi ned by using explicit in-
terface implementation cannot be declared as virtual, whereas omitting the interface
name allows this behavior.
It’s possible for multiple interfaces to contain methods with the same names, return
types, and parameters. If a class implements multiple interfaces with methods that have
common signatures, you can use explicit interface implementation to disambiguate the
method implementations. Explicit interface implementation identifi es which methods
in a class belong to which interface. Additionally, the methods for each interface are
publicly accessible, but only through the interface itself. We will look at how to do this
in the upcoming section “Referencing a Class Through Its Interface.”
In this book, I recommend implementing an interface explicitly wherever possible.
A class can extend another class and implement an interface at the same time. In this case,
C# does not denote the base class and the interface by using keywords as, for example,
Java does. Instead, C# uses a positional notation. The base class is named fi rst, followed by
Chapter 13 Creating Interfaces and Defi ning Abstract Classes 243
a comma, followed by the interface. The following example defi nes Horse as a class that is a
Mammal but that additionally implements the ILandBound interface:
interface ILandBound
{
}
class Mammal
{
}
class Horse : Mammal , ILandBound
{
}
Referencing a Class Through Its Interface
In the same way that you can reference an object by using a variable defi ned as a class that
is higher up the hierarchy, you can reference an object by using a variable defi ned as an in-
terface that its class implements. Taking the preceding example, you can reference a Horse
object by using an ILandBound variable, as follows:
Horse myHorse = new Horse( );
ILandBound iMyHorse = myHorse; // legal
This works because all horses are land-bound mammals, although the converse is not true,
and you cannot assign an ILandBound object to a Horse variable without casting it fi rst.
The technique of referencing an object through an interface is useful because it enables you
to defi ne methods that can take different types as parameters, as long as the types imple-
ment a specifi ed interface. For example, the FindLandSpeed method shown here can take any
argument that implements the ILandBound interface:
int FindLandSpeed(ILandBound landBoundMammal)
{
}
Note that when referencing an object through an interface, you can invoke only methods
that are visible through the interface.
244 Part II Understanding the C# Language
Working with Multiple Interfaces
A class can have at most one base class, but it is allowed to implement an unlimited number
of interfaces. A class must still implement all the methods it inherits from all its interfaces.
If an interface, a structure, or a class inherits from more than one interface, you write the
interfaces in a comma-separated list. If a class also has a base class, the interfaces are listed
after the base class. For example, suppose you defi ne another interface named IGrazable that
contains the ChewGrass method for all grazing animals. You can defi ne the Horse class like
this:
class Horse : Mammal, ILandBound, IGrazable
{
}
Abstract Classes
The ILandBound and IGrazable interfaces could be implemented by many different classes,
depending on how many different types of mammals you want to model in your C# ap-
plication. In situations such as this, it’s quite common for parts of the derived classes to
share common implementations. For example, the duplication in the following two classes is
obvious:
class Horse : Mammal, ILandBound, IGrazable
{
void IGrazable.ChewGrass()
{
Console.WriteLine(“Chewing grass”);
// code for chewing grass
};
}
class Sheep : Mammal, ILandBound, IGrazable
{
void IGrazable.ChewGrass()
{
Console.WriteLine(“Chewing grass”);
// same code as horse for chewing grass
};
}
Duplication in code is a warning sign. You should refactor the code to avoid the duplication
and reduce any maintenance costs. The way to achieve this refactoring is to put the common
Chapter 13 Creating Interfaces and Defi ning Abstract Classes 245
implementation into a new class created specifi cally for this purpose. In effect, you can insert
a new class into the class hierarchy. For example:
class GrazingMammal : Mammal, IGrazable
{
void IGrazable.ChewGrass()
{
Console.WriteLine(“Chewing grass”);
// common code for chewing grass
}
}
class Horse : GrazingMammal, ILandBound
{
}
class Sheep : GrazingMammal, ILandBound
{
}
This is a good solution, but there is one thing that is still not quite right: You can actually
create instances of the GrazingMammal class (and the Mammal class for that matter). This
doesn’t really make sense. The GrazingMammal class exists to provide a common default
implementation. Its sole purpose is to be inherited from. The GrazingMammal class is an
abstraction of common functionality rather than an entity in its own right.
To declare that creating instances of a class is not allowed, you must explicitly declare that
the class is abstract, by using the abstract keyword. For example:
abstract class GrazingMammal : Mammal, IGrazable
{
}
If you try to instantiate a GrazingMammal object, the code will not compile:
GrazingMammal myGrazingMammal = new GrazingMammal( ); // illegal
Abstract Methods
An abstract class can contain abstract methods. An abstract method is similar in principle to
a virtual method (you met virtual methods in Chapter 12) except that it does not contain a
method body. A derived class must override this method. The following example defi nes the
DigestGrass method in the GrazingMammal class as an abstract method; grazing mammals
might use the same code for chewing grass, but they must provide their own implementation
of the DigestGrass method. An abstract method is useful if it does not make sense to provide
246 Part II Understanding the C# Language
a default implementation in the abstract class and you want to ensure that an inheriting class
provides its own implementation of that method.
abstract class GrazingMammal : Mammal, IGrazable
{
abstract void DigestGrass();
}
Sealed Classes
Using inheritance is not always easy and requires forethought. If you create an interface or an
abstract class, you are knowingly writing something that will be inherited from in the future.
The trouble is that predicting the future is a diffi cult business. With practice and experience,
you can develop the skills to craft a fl exible, easy-to-use hierarchy of interfaces, abstract
classes, and classes, but it takes effort and you also need a solid understanding of the prob-
lem you are modeling. To put it another way, unless you consciously design a class with the
intention of using it as a base class, it’s extremely unlikely that it will function very well as a
base class. C# allows you to use the sealed keyword to prevent a class from being used as a
base class if you decide that it should not be. For example:
sealed class Horse : GrazingMammal, ILandBound
{
}
If any class attempts to use Horse as a base class, a compile-time error will be generated.
Note that a sealed class cannot declare any virtual methods and that an abstract class cannot
be sealed.
Note
A structure is implicitly sealed. You can never derive from a structure.
Sealed Methods
You can also use the sealed keyword to declare that an individual method in an unsealed
class is sealed. This means that a derived class cannot then override the sealed method. You
can seal only an override method. (You declare the method as sealed override.) You can think
of the interface, virtual, override, and sealed keywords as follows:
An interface introduces the name of a method.
A virtual method is the fi rst implementation of a method.
An override method is another implementation of a method.
A sealed method is the last implementation of a method.
Chapter 13 Creating Interfaces and Defi ning Abstract Classes 247
Implementing an Extensible Framework
In the following exercise, you will familiarize yourself with a hierarchy of interfaces and
classes that together implement a simple framework for reading a C# source fi le and clas-
sifying its contents into tokens (identifi ers, keywords, operators, and so on). This framework
performs some of the tasks that a typical compiler might perform. The framework provides a
mechanism for “visiting” each token in turn, to perform specifi c tasks. For example, you could
create:
A displaying visitor class that displays the source fi le in a rich text box.
A printing visitor class that converts tabs to spaces and aligns braces correctly.
A spelling visitor class that checks the spelling of each identifi er.
A guideline visitor class that checks that public identifi ers start with a capital letter and
that interfaces start with the capital letter I.
A complexity visitor class that monitors the depth of the brace nesting in the code.
A counting visitor class that counts the number of lines in each method, the number of
members in each class, and the number of lines in each source fi le.
Note
This framework implements the Visitor pattern, fi rst documented by Erich Gamma,
Richard Helm, Ralph Johnson, and John Vlissides in Design Patterns: Elements of Reusable
Object-Oriented Software (Addison Wesley Longman, 1995).
Understand the inheritance hierarchy and its purpose
1. Start Microsoft Visual Studio 2008 if it is not already running.
2. Open the Tokenizer project, located in the \Microsoft Press\Visual CSharp Step by Step\
Chapter 13\Tokenizer folder in your Documents folder.
3. Display the SourceFile.cs fi le in the Code and Text Editor window.
The SourceFile class contains a private array fi eld named tokens that looks like this and
is essentially a hard-coded version of a source fi le that has already been parsed and
tokenized:
private IVisitableToken[] tokens =
{
new KeywordToken(“using”),
new WhitespaceToken(“ “),
new IdentifierToken(“System”),
new PunctuatorToken(“;”),
};
U
nderstand the inheritance hierarch
y
and its purpos
e
248 Part II Understanding the C# Language
The tokens array contains a sequence of objects that all implement the IVisitableToken
interface (which is explained shortly). Together, these tokens simulate the tokens of a
simple “hello, world” source fi le. (A complete compiler would parse a source fi le, iden-
tify the type of each token, and dynamically create the tokens array. Each token would
be created using the appropriate class type, typically through a switch statement.) The
SourceFile class also contains a public method named Accept. The SourceFile.Accept
method has a single parameter of type ITokenVisitor. The body of the SourceFile.Accept
method iterates through the tokens, calling their Accept methods. The Token.Accept
method will process the current token in some way, according to the type of the token:
public void Accept(ITokenVisitor visitor)
{
foreach (IVisitableToken token in tokens)
{
token.Accept(visitor);
}
}
In this way, the visitor parameter “visits” each token in sequence. The visitor parameter
is an instance of some visitor class that processes the token that the visitor object visits.
When the visitor object processes the token, the token’s own class methods come into
play.
4. Display the IVisitableToken.cs fi le in the Code and Text Editor window.
This fi le defi nes the IVisitableToken interface. The IVisitableToken interface inherits from
two other interfaces, the IVisitable interface and the IToken interface, but does not de-
fi ne any methods of its own:
interface IVisitableToken : IVisitable, IToken
{
}
5. Display the IVisitable.cs fi le in the Code and Text Editor window.
This fi le defi nes the IVisitable interface. The IVisitable interface declares a single method
named Accept:
interface IVisitable
{
void Accept(ITokenVisitor visitor);
}
Each object in the array of tokens inside the SourceFile class is accessed using the
IVisitableToken interface. The IVisitableToken interface inherits the Accept method, and
each token implements the Accept method. (Recall that each token must implement the
Accept method because any class that inherits from an interface must implement all the
methods in the interface.)
6. On the View menu, click Class View.
Chapter 13 Creating Interfaces and Defi ning Abstract Classes 249
The Class View window appears in the pane used by Solution Explorer. This window
displays the namespaces, classes, and interfaces defi ned by the project.
7. In the Class View window, expand the Tokenizer project, and then expand the {}
Tokenizer namespace. The classes and interfaces in this namespace are listed. Notice the
different icons used to distinguish interfaces from classes.
Expand the IVisitableToken interface, and then expand the Base Types node. The
interfaces that the IVisitableToken interface extends (IToken and IVisitable) are displayed,
like this:
8. In the Class View window, right-click the Identifi erToken class, and then click Go To
Defi nition to display this class in the Code and Text Editor window. (It is actually located
in SourceFile.cs.)
The Identifi erToken class inherits from the DefaultTokenImpl abstract class and the
IVisitableToken interface. It implements the Accept method as follows:
void IVisitable.Accept(ITokenVisitor visitor)
{
visitor.VisitIdentifier(this.ToString());
}
Note The VisitIdentifi er method processes the token passed to it as a parameter in
whatever way the visitor object sees fi t. In the following exercise, you will provide an
implementation of the VisitIdentifi er method that simply renders the token in a particular
color.
The other token classes in this fi le follow a similar pattern.
250 Part II Understanding the C# Language
9. In the Class View window, right-click the ITokenVisitor interface, and then click Go To
Defi nition. This action displays the ITokenVisitor.cs source fi le in the Code and Text Editor
window.
The ITokenVisitor interface contains one method for each type of token. The result
of this hierarchy of interfaces, abstract classes, and classes is that you can create a
class that implements the ITokenVisitor interface, create an instance of this class, and
pass this instance as the parameter to the Accept method of a SourceFile object. For
example:
class MyVisitor : ITokenVisitor
{
public void VisitIdentifier(string token)
{
}
public void VisitKeyword(string token)
{
}
}
class Program
{
static void Main()
{
SourceFile source = new SourceFile();
MyVisitor visitor = new MyVisitor();
source.Accept(visitor);
}
}
The code in the Main method will result in each token in the source fi le calling the
matching method in the visitor object.
In the following exercise, you will create a class that derives from the ITokenVisitor interface
and whose implementation displays the tokens from our hard-coded source fi le in a rich text
box in color syntax (for example, keywords in blue) by using the “visitor” mechanism.
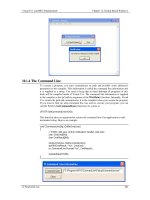
Write the ColorSyntaxVisitor class
1. In Solution Explorer (click the Solution Explorer tab below the Class View window),
double-click Window1.xaml to display the Color Syntax form in the Design View window.
W
r
i
te the
ColorSyntaxVisitor
c
l
ass
r
Chapter 13 Creating Interfaces and Defi ning Abstract Classes 251
You will use this form to test the framework. This form contains a button for opening a
fi le to be tokenized and a rich text box for displaying the tokens:
The rich text box in the middle of the form is named codeText, and the button is named
Open.
Note
A rich text box is like an ordinary text box except that it can display formatted
content rather than simple, unformatted text.
2. Right-click the form, and then click View Code to display the code for the form in the
Code and Text Editor window.
3. Locate the openClick method.
This method is called when the user clicks the Open button. You must implement this
method so that it displays the tokens defi ned in the SourceFile class in the rich text box,
by using a ColorSyntaxVisitor object. Add the code shown here in bold to the openClick
method:
private void openClick(object sender, RoutedEventArgs e)
{
SourceFile source = new SourceFile();
ColorSyntaxVisitor visitor = new ColorSyntaxVisitor(codeText);
source.Accept(visitor);
}
Remember that the Accept method of the SourceFile class iterates through all the
tokens, processing each one by using the specifi ed visitor. In this case, the visitor is the
ColorSyntaxVisitor object, which will render each token in color.
Note
In the current implementation, the Open button uses just data that is hard-coded in
the SourceFile class. In a fully functional implementation, the Open button would prompt
the user for the name of a text fi le and then parse and tokenize it into the format shown in
the SourceFile class before calling the Accept method.
252 Part II Understanding the C# Language
4. Open the ColorSyntaxVisitor.cs fi le in the Code and Text Editor window.
The ColorSyntaxVisitor class has been partially written. This class implements the
ITokenVisitor interface and already contains two fi elds and a constructor to initialize
a reference to the rich text box, named target, used to display tokens. Your task is to
implement the methods inherited from the ITokenVisitor interface and also create a
method that will write the tokens to the rich text box.
5. In the Code and Text Editor window, add the Write method to the ColorSyntaxVisitor
class exactly as follows:
private void Write(string token, SolidColorBrush color)
{
target.AppendText(token);
int offsetToStartOfToken = -1 * token.Length - 2;
int offsetToEndOfToken = -2;
TextPointer start =
target.Document.ContentEnd.GetPositionAtOffset(offsetToStartOfToken);
TextPointer end =
target.Document.ContentEnd.GetPositionAtOffset(offsetToEndOfToken);
TextRange text = new TextRange(start, end);
text.ApplyPropertyValue(TextElement.ForegroundProperty, color);
}
This code appends each token to the rich text box identifi ed by the target variable us-
ing the specifi ed color. The two TextPointer variables, start and end, indicate where the
new token starts and ends in the rich text box control. (Don’t worry about how these
positions are calculated. If you’re wondering, they are negative values because they are
offset from the ContentEnd property.) The TextRange variable text obtains a reference
to the portion of the text in the rich text box control displaying the newly appended
token. The ApplyPropertyValue method sets the color of this text to the color specifi ed
as the second parameter.
Each of the various “visit” methods in the ColorSyntaxVisitor class will call this Write
method with an appropriate color to display color-coded results.
6. In the Code and Text Editor window, add the following methods that implement the
ITokenVisitor interface to the ColorSyntaxVisitor class. Specify Brushes.Blue for key-
words, Brushes.Green for StringLiterals, and Brushes.Black for all other methods.
(Brushes is a class defi ned in the System.Windows.Media namespace.) Notice that this
code implements the interface explicitly; it qualifi es each method with the interface
name.
void ITokenVisitor.VisitComment(string token)
{
Write(token, Brushes.Black);
}
void ITokenVisitor.VisitIdentifier(string token)
{
Write(token, Brushes.Black);
Chapter 13 Creating Interfaces and Defi ning Abstract Classes 253
}
void ITokenVisitor.VisitKeyword(string token)
{
Write(token, Brushes.Blue);
}
void ITokenVisitor.VisitOperator(string token)
{
Write(token, Brushes.Black);
}
void ITokenVisitor.VisitPunctuator(string token)
{
Write(token, Brushes.Black);
}
void ITokenVisitor.VisitStringLiteral(string token)
{
Write(token, Brushes.Green);
}
void ITokenVisitor.VisitWhitespace(string token)
{
Write(token, Brushes.Black);
}
It is the class type of the token in the token array that determines which of these
methods is called through the token’s override of the Token.Accept method.
Tip
You can either type these methods into the Code and Text Editor window directly or
use Visual Studio 2008 to generate default implementations for each one and then modify
the method bodies with the appropriate code. To do this, right-click the ITokenVisitor iden-
tifi er in the class defi nition sealed class, ColorSyntaxVisitor : ITokenVisitor. On the shortcut
menu, point to Implement Interface and then click Implement Interface Explicitly. Each
method will contain a statement that throws a NotImplementedException. Replace this
code with that shown here.
7. On the Build menu, click Build Solution. Correct any errors, and rebuild if necessary.
8. On the Debug menu, click Start Without Debugging.
The Color Syntax form appears.
9. On the form, click Open.
254 Part II Understanding the C# Language
The dummy code is displayed in the rich text box, with keywords in blue and string
literals in green.
10. Close the form, and return to Visual Studio 2008.
Generating a Class Diagram
The Class View window is useful for displaying and navigating the hierarchy of classes
and interfaces in a project. Visual Studio 2008 also enables you to generate class dia-
grams that depict this same information graphically. (You can also use a class diagram
to add new classes and interfaces and to defi ne methods, properties, and other class
members.)
Note
This feature is not available in Visual C# 2008 Express Edition.
To generate a new class diagram, on the Project menu, click Add New Item. In the Add
New Item dialog box, select the Class Diagram template, and then click Add. This action
will generate an empty diagram, and you can create new types by dragging items from
the Class Designer category in the Toolbox. You can generate a diagram of all exist-
ing classes by dragging them individually from the Class View window or by dragging
the namespace to which they belong. The diagram shows the relationships between
the classes and interfaces, and you can expand the defi nition of each class to show its
contents. You can drag the classes and interfaces around to make the diagram more
readable, as shown in the image on the following page.
Chapter 13 Creating Interfaces and Defi ning Abstract Classes 255
Summarizing Keyword Combinations
The following table summarizes the various valid (yes), invalid (no), and mandatory (required)
keyword combinations when creating classes and interfaces.
Keyword Interface Abstract class Class Sealed class Structure
abstract
no yes no no no
new
yes
1
yes yes yes no
2
override
no yes yes yes no
3
private
no yes yes yes yes
protected
no yes yes yes no
4
public
no yes yes yes yes
sealed
no yes yes required no
virtual
no yes yes no no
1
An interface can extend another interface and introduce a new method with the same signature.
2
A structure implicitly derives from System.Object, which contains methods that the structure can hide.
3
A structure implicitly derives from System.Object, which contains no virtual methods.
4
A structure is implicitly sealed and cannot be derived from.
256 Part II Understanding the C# Language
If you want to continue to the next chapter:
Keep Visual Studio 2008 running, and turn to Chapter 14.
If you want to exit Visual Studio 2008 now:
On the File menu, click Exit. If you see a Save dialog box, click Yes (if you are using
Visual Studio 2008) or Save (if you are using Visual C# 2008 Express Edition) and save
the project.
Chapter 13 Quick Reference
To Do this
Declare an interface
Use the interface keyword. For example:
interface IDemo
{
string Name();
string Description();
}
Implement an interface Declare a class using the same syntax as class inheritance, and then
implement all the member functions of the interface. For example:
class Test : IDemo
{
public string IDemo.Name()
{
}
public string IDemo.Description()
{
}
}
Create an abstract class that
can be used only as a base class,
containing abstract methods
Declare the class using the abstract keyword. For each abstract method,
declare the method with the abstract keyword and without a method
body. For example:
abstract class GrazingMammal
{
abstract void DigestGrass();
}
Create a sealed class that
cannot be used as a base class
Declare the class using the sealed keyword. For example:
sealed class Horse
{
}
257
Chapter 14
Using Garbage Collection and
Resource Management
After completing this chapter, you will be able to:
Manage system resources by using garbage collection.
Write code that runs when an object is fi nalized by using a destructor.
Release a resource at a known point in time in an exception-safe manner by writing
a try/fi nally statement.
Release a resource at a known point in time in an exception-safe manner by writing
a using statement.
You have seen in earlier chapters how to create variables and objects, and you should
understand how memory is allocated when you create variables and objects. (In case you
don’t remember, value types are created on the stack, and reference types are given memory
from the heap.) Computers do not have infi nite amounts of memory, so memory must be
reclaimed when a variable or an object no longer needs it. Value types are destroyed and
their memory reclaimed when they go out of scope. That’s the easy bit. How about refer-
ence types? You create an object by using the new keyword, but how and when is an object
destroyed? That’s what this chapter is all about.
The Life and Times of an Object
First, let’s recap what happens when you create an object.
You create an object by using the new operator. The following example creates a new
instance of the TextBox class. (This class is provided as part of the Microsoft .NET Framework.)
TextBox message = new TextBox(); // TextBox is a reference type
From your point of view, the new operation is atomic, but underneath, object creation is
really a two-phase process:
1. The new operation allocates a chunk of raw memory from the heap. You have no
control over this phase of an object’s creation.
2. The new operation converts the chunk of raw memory to an object; it has to initialize
the object. You can control this phase by using a constructor.
258 Part II Understanding the C# Language
Note C++ programmers should note that in C#, you cannot overload new to control
allocation.
After you have created an object, you can access its members by using the dot operator (.).
For example, the TextBox class includes a member named Text that you can access like this:
message.Text = “People of Earth, your attention please”;
You can make other reference variables refer to the same object:
TextBox messageRef = message;
How many references can you create to an object? As many as you want! This has an im-
pact on the lifetime of an object. The runtime has to keep track of all these references. If the
variable message disappears (by going out of scope), other variables (such as messageRef)
might still exist. The lifetime of an object cannot be tied to a particular reference variable. An
object can be destroyed and its memory reclaimed only when all the references to it have
disappeared.
Note
C++ programmers should note that C# does not have a delete operator. The runtime
controls when an object is destroyed.
Like object creation, object destruction is a two-phase process. The two phases of
destruction exactly mirror the two phases of creation:
1. The runtime has to perform some tidying up. You can control this by writing a
destructor.
2. The runtime has to return the memory previously belonging to the object back to the
heap; the memory that the object lived in has to be deallocated. You have no control
over this phase.
The process of destroying an object and returning memory back to the heap is known as
garbage collection.
Writing Destructors
You can use a destructor to perform any tidying up required when an object is garbage
collected. A destructor is a special method, a little like a constructor, except that the runtime
calls it after the last reference to an object has disappeared. The syntax for writing a destruc-
tor is a tilde (~) followed by the name of the class. For example, here’s a simple class that
Chapter 14 Using Garbage Collection and Resource Management 259
counts the number of existing instances by incrementing a static variable in the constructor
and decrementing the same static variable in the destructor:
class Tally
{
public Tally()
{
this.instanceCount++;
}
~Tally()
{
this.instanceCount ;
}
public static int InstanceCount()
{
return this.instanceCount;
}
private static int instanceCount = 0;
}
There are some very important restrictions that apply to destructors:
Destructors apply only to reference types. You cannot declare a destructor in a value
type, such as a struct.
struct Tally
{
~Tally() { } // compile-time error
}
You cannot specify an access modifi er (such as public) for a destructor. You never call
the destructor in your own code—part of the the runtime called the garbage collector
does this for you.
public ~Tally() { } // compile-time error
You never declare a destructor with parameters, and the destructor cannot take any
parameters. Again, this is because you never call the destructor yourself.
~Tally(int parameter) { } // compile-time error
The compiler automatically translates a destructor into an override of the Object.Finalize
method. The compiler translates the following destructor:
class Tally
{
~Tally() { }
}
260 Part II Understanding the C# Language
into this:
class Tally
{
protected override void Finalize()
{
try { }
finally { base.Finalize(); }
}
}
The compiler-generated Finalize method contains the destructor body inside a try block,
followed by a fi nally block that calls the Finalize method in the base class. (The try and fi nally
keywords are described in Chapter 6, “Managing Errors and Exceptions.”) This ensures that a
destructor always calls its base class destructor. It’s important to realize that only the com-
piler can make this translation. You can’t override Finalize yourself, and you can’t call Finalize
yourself.
Why Use the Garbage Collector?
You should now understand that you can never destroy an object yourself by using C# code.
There just isn’t any syntax to do it, and there are good reasons why the designers of C# de-
cided to forbid you from doing it. If it were your responsibility to destroy objects, sooner or
later one of the following situations would arise:
You’d forget to destroy the object. This would mean that the object’s destructor (if it
had one) would not be run, tidying up would not occur, and memory would not be
deallocated back to the heap. You could quite easily run out of memory.
You’d try to destroy an active object. Remember, objects are accessed by reference.
If a class held a reference to a destroyed object, it would be a dangling reference. The
dangling reference would end up referring either to unused memory or possibly to a
completely different object in the same piece of memory. Either way, the outcome of
using a dangling reference would be undefi ned at best or a security risk at worst. All
bets would be off.
You’d try and destroy the same object more than once. This might or might not be
disastrous, depending on the code in the destructor.
These problems are unacceptable in a language like C#, which places robustness and security
high on its list of design goals. Instead, the garbage collector is responsible for destroying
objects for you. The garbage collector makes the following guarantees:
Every object will be destroyed and its destructors run. When a program ends, all
outstanding objects will be destroyed.
Every object will be destroyed exactly once.
Chapter 14 Using Garbage Collection and Resource Management 261
Every object will be destroyed only when it becomes unreachable—that is, when no
references refer to the object.
These guarantees are tremendously useful and free you, the programmer, from tedious
housekeeping chores that are easy to get wrong. They allow you to concentrate on the logic
of the program itself and be more productive.
When does garbage collection occur? This might seem like a strange question. After all,
surely garbage collection occurs when an object is no longer needed. Well, it does, but not
necessarily immediately. Garbage collection can be an expensive process, so the runtime col-
lects garbage only when it needs to (when it thinks available memory is starting to run low),
and then it collects as much as it can. Performing a few large sweeps of memory is more
effi cient than performing lots of little dustings!
Note
You can invoke the garbage collector in a program by calling the static method System.
GC.Collect. However, except in a few cases, this is not recommended. The System.GC.Collect
method starts the garbage collector, but the process runs asynchronously, and when the method
call is complete, you still don’t know whether your objects have been destroyed. Let the runtime
decide when it is best to collect garbage!
One feature of the garbage collector is that you don’t know, and should not rely upon, the
order in which objects will be destroyed. The fi nal point to understand is arguably the most
important: destructors do not run until objects are garbage collected. If you write a destruc-
tor, you know it will be executed, but you just don’t know when.
How Does the Garbage Collector Work?
The garbage collector runs in its own thread and can execute only at certain times—typically,
when your application reaches the end of a method. While it runs, other threads running in
your application will temporarily halt. This is because the garbage collector might need to
move objects around and update object references; it cannot do this while objects are in use.
The steps that the garbage collector takes are as follows:
1. It builds a map of all reachable objects. It does this by repeatedly following reference
fi elds inside objects. The garbage collector builds this map very carefully and makes
sure that circular references do not cause an infi nite recursion. Any object not in this
map is deemed to be unreachable.
2. It checks whether any of the unreachable objects has a destructor that needs to be run
(a process called fi nalization). Any unreachable object that requires fi nalization is placed
in a special queue called the freachable queue (pronounced “F-reachable”).
262 Part II Understanding the C# Language
3. It deallocates the remaining unreachable objects (those that don’t require fi nalization)
by moving the reachable objects down the heap, thus defragmenting the heap and
freeing memory at the top of the heap. When the garbage collector moves a reachable
object, it also updates any references to the object.
4. At this point, it allows other threads to resume.
5. It fi nalizes the unreachable objects that require fi nalization (now in the freachable
queue) by its own thread.
Recommendations
Writing classes that contain destructors adds complexity to your code and to the garbage
collection process and makes your program run more slowly. If your program does not con-
tain any destructors, the garbage collector does not need to place unreachable objects in
the freachable queue and fi nalize them. Clearly, not doing something is faster than doing it.
Therefore, try to avoid using destructors except when you really need them. For example,
consider a using statement instead. (See the section “The using Statement” later in this
chapter.)
You need to be very careful when you write a destructor. In particular, you need to be aware
that, if your destructor calls other objects, those other objects might have already had their
destructor called by the garbage collector. Remember that the order of fi nalization is not
guaranteed. Therefore, ensure that destructors do not depend on one another or overlap
with one another. (Don’t have two destructors that try to release the same resource, for
example.)
Resource Management
Sometimes it’s inadvisable to release a resource in a destructor; some resources are just too
valuable to lie around waiting for an arbitrary length of time until the garbage collector ac-
tually releases them. Scarce resources need to be released, and they need to be released as
soon as possible. In these situations, your only option is to release the resource yourself. You
can achieve this by creating a disposal method. A disposal method is a method that explicitly
disposes of a resource. If a class has a disposal method, you can call it and control when the
resource is released.
Note
The term disposal method refers to the purpose of the method rather than its name. A
disposal method can be named using any valid C# identifi er.
Chapter 14 Using Garbage Collection and Resource Management 263
Disposal Methods
An example of a class that implements a disposal method is the TextReader class from the
System.IO namespace. This class provides a mechanism to read characters from a sequen-
tial stream of input. The TextReader class contains a virtual method named Close, which
closes the stream. The StreamReader class (which reads characters from a stream, such as an
open fi le) and the StringReader class (which reads characters from a string) both derive from
TextReader, and both override the Close method. Here’s an example that reads lines of text
from a fi le by using the StreamReader class and then displays them on the screen:
TextReader reader = new StreamReader(filename);
string line;
while ((line = reader.ReadLine()) != null)
{
Console.WriteLine(line);
}
reader.Close();
The ReadLine method reads the next line of text from the stream into a string. The ReadLine
method returns null if there is nothing left in the stream. It’s important to call Close when you
have fi nished with reader to release the fi le handle and associated resources. However, there
is a problem with this example: it’s not exception-safe. If the call to ReadLine or WriteLine
throws an exception, the call to Close will not happen; it will be bypassed. If this happens of-
ten enough, you will run out of fi le handles and be unable to open any more fi les.
Exception-Safe Disposal
One way to ensure that a disposal method (such as Close) is always called, regardless of
whether there is an exception, is to call the disposal method inside a fi nally block. Here’s the
preceding example coded using this technique:
TextReader reader = new StreamReader(filename);
try
{
string line;
while ((line = reader.ReadLine()) != null)
{
Console.WriteLine(line);
}
}
finally
{
reader.Close();
}
264 Part II Understanding the C# Language
Using a fi nally block like this works, but it has several drawbacks that make it a less than ideal
solution:
It quickly gets unwieldy if you have to dispose of more than one resource. (You end up
with nested try and fi nally blocks.)
In some cases, you might have to modify the code. (For example, you might need to
reorder the declaration of the resource reference, remember to initialize the reference
to null, and remember to check that the reference isn’t null in the fi nally block.)
It fails to create an abstraction of the solution. This means that the solution is hard to
understand and you must repeat the code everywhere you need this functionality.
The reference to the resource remains in scope after the fi nally block. This means that
you can accidentally try to use the resource after it has been released.
The using statement is designed to solve all these problems.
The using Statement
The using statement provides a clean mechanism for controlling the lifetimes of resources.
You can create an object, and this object will be destroyed when the using statement block
fi nishes.
Important
Do not confuse the using statement shown in this section with the using directive
that brings a namespace into scope. It is unfortunate that the same keyword has two different
meanings.
The syntax for a using statement is as follows:
using ( type variable = initialization )
{
StatementBlock
}
Here is the best way to ensure that your code always calls Close on a TextReader:
using (TextReader reader = new StreamReader(filename))
{
string line;
while ((line = reader.ReadLine()) != null)
{
Console.WriteLine(line);
}
}
Chapter 14 Using Garbage Collection and Resource Management 265
This using statement is precisely equivalent to the following transformation:
{
TextReader reader = new StreamReader(filename);
try
{
string line;
while ((line = reader.ReadLine()) != null)
{
Console.WriteLine(line);
}
}
finally
{
if (reader != null)
{
((IDisposable)reader).Dispose();
}
}
}
Note The using statement introduces its own block for scoping purposes. This arrangement means
that the variable you declare in a using statement automatically goes out of scope at the end of the
embedded statement and you cannot accidentally attempt to access a disposed resource.
The variable you declare in a using statement must be of a type that implements the
IDisposable interface. The IDisposable interface lives in the System namespace and contains
just one method, named Dispose:
namespace System
{
interface IDisposable
{
void Dispose();
}
}
It just so happens that the StreamReader class implements the IDisposable interface, and its
Dispose method calls Close to close the stream. You can employ a using statement as a clean,
exception-safe, and robust way to ensure that a resource is always released. This approach
solves all of the problems that existed in the manual try/fi nally solution. You now have a
solution that:
Scales well if you need to dispose of multiple resources.
Doesn’t distort the logic of the program code.
Abstracts away the problem and avoids repetition.
Is robust. You can’t use the variable declared inside the using statement (in this case,
reader) after the using statement has ended because it’s not in scope anymore—you’ll
get a compile-time error.
266 Part II Understanding the C# Language
Calling the Dispose Method from a Destructor
When writing a class, should you write a destructor or implement the IDisposable interface? A
call to a destructor will happen, but you just don’t know when. On the other hand, you know
exactly when a call to the Dispose method happens, but you just can’t be sure that it will ac-
tually happen, because it relies on the programmer remembering to write a using statement.
However, it is possible to ensure that the Dispose method always runs by calling it from the
destructor. This acts as a useful backup. You might forget to call the Dispose method, but at
least you can be sure that it will be called, even if it’s only when the program shuts down.
Here’s an example of how to do this:
class Example : IDisposable
{
~Example()
{
Dispose();
}
public virtual void Dispose()
{
if (!this.disposed)
{
try {
// release scarce resource here
}
finally {
this.disposed = true;
GC.SuppressFinalize(this);
}
}
}
public void SomeBehavior() // example method
{
checkIfDisposed();
}
private void checkIfDisposed()
{
if (this.disposed)
{
throw new ObjectDisposedException(“Example: object has been disposed”);
}
}
private Resource scarce;
private bool disposed = false;
}