Visual C++ and MFC Fundamentals programming phần 5 doc
Bạn đang xem bản rút gọn của tài liệu. Xem và tải ngay bản đầy đủ của tài liệu tại đây (944.09 KB, 78 trang )
Visual C++ and MFC Fundamentals Chapter 12: Dialog-Based Windows
© FunctionX, Inc. 281
10.1.4 The Command Line
To execute a program, you must communicate its path and possibly some additional
parameters to the compiler. This information is called the command line information and
it is supplied as a string. You need to keep that in mind although all programs of this
book will be compiled inside of Visual C++. The command line information is supplied
to the compiler as the lpCmdLine argument of the WinMain() function. Internally, Visual
C++ creates the path and communicates it to the compiler when you execute the program.
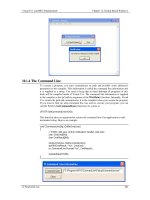
If you want to find out what command line was used to execute your program, you can
call the Win32's GetCommandLine() function. Its syntax is:
LPTSTR GetCommandLine(VOID);
This function takes no argument but returns the command line of an application as null-
terminated string. Here is an example:
void CCommandLineDlg::OnBtnCmdLine()
{
// TODO: Add your control notification handler code here
char CmdLine[80];
char CmdResult[80];
strcpy(CmdLine, GetCommandLine());
sprintf(CmdResult, "%s", CmdLine);
m_CommandLine.Format("%s", CmdResult);
UpdateData(FALSE);
}
Chapter 12: Dialog-Based Windows Visual C++ and MFC Fundamentals
282 © FunctionX, Inc.
10.1.5 Frame Display Options
The nCmdShow argument of the WinMain() function specifies whether and how you
want to display the window when the user attempts to open it. This is a constant value
that is actually passed to a function that is in charge of displaying the window.
Its possible values are:
Value Description
SW_SHOW Displays a window and makes it visible
SW_SHOWNORMAL Displays the window in its regular size. In most
circumstances, the operating system keeps track of the
last location and size a window such as Internet
Explorer or My Computer had the last time it was
displaying. This value allows the OS to restore it.
SW_SHOWMINIMIZED Opens the window in its minimized state, representing
it as a button on the taskbar
SW_SHOWMAXIMIZED Opens the window in its maximized state
SW_SHOWMINNOACTIVE
Opens the window but displays only its icon. It does
not make it active
SW_SHOWNA As previous
SW_SHOWNOACTIVATE Retrieves the window's previous size and location and
displays it accordingly
SW_HIDE Used to hide a window
SW_MINIMIZE Shrinks the window and reduces it to a button on the
taskbar
SW_MAXIMIZE Maximizes the window to occupy the whole screen
area
SW_RESTORE If the window was minimized or maximized, it would
be restored to its previous location and size
One of the ways you can use this value is to pass it to the WinExec() Win32 function
which can be used to open an application. The syntax of this function is:
UINT WinExec(LPCSTR lpCmdLine, UINT nCmdShow);
The lpCmdLine argument is a null-terminated string that specifies either the name of the
application or its complete path.
In the following example, the SW_MAXIMIZE nCmdShow value is passed to the
WinExec() function to open Solitaire maximized:
void CWindowDlg::OnOpenSolitaire()
{
WinExec("SOL.EXE", SW_MAXIMIZE);
}
10.1.6 Window Class Initialization
A win32 application is built using either the WNDCLASS or the WNDCLASSEX
classes.
The WNDCLASS class is defined as follows:
typedef struct _WNDCLASS {
UINT style;
Visual C++ and MFC Fundamentals Chapter 12: Dialog-Based Windows
© FunctionX, Inc. 283
WNDPROC lpfnWndProc;
int cbClsExtra;
int cbWndExtra;
HINSTANCE hInstance;
HICON hIcon;
HCURSOR hCursor;
HBRUSH hbrBackground;
LPCTSTR lpszMenuName;
LPCTSTR lpszClassName;
} WNDCLASS, *PWNDCLASS;
If you are creating an MFC application, you can declare a WNDCLASS variable in your
frame constructor. Here is an example:
#include <afxwin.h>
// The application class
class CExerciseApp : public CWinApp
{
public:
// Used to instantiate the application
BOOL InitInstance();
};
// The class that displays the application's window
// and gives it "physical" presence (Real Estate)
class CMainFrame : public CFrameWnd
{
public:
// The window class will be created in this constructor
CMainFrame();
};
CMainFrame::CMainFrame()
{
// Declare a window class variable
WNDCLASS WndCls;
}
BOOL CExerciseApp::InitInstance()
{
// Initialize the main window object
m_pMainWnd = new CMainFrame();
// Hoping everything is fine, return TRUE
return TRUE;
}
// The global application object
CExerciseApp theApp;
Upon declaring a WNDCLASS variable, the compiler allocates an amount of memory
space for it, as it does for all other variables. If you think you will need more memory
than allocated, assign the number of extra bytes to the cbClsExtra member variable.
Otherwise, the compiler initializes this variable to 0. If you do not need extra memory for
your WNDCLASS variable, initialize this member with 0. If you are creating an MFC
application, you can omit initializing the cbClsExtra member variable. Otherwise, you
can do it as follows:
Chapter 12: Dialog-Based Windows Visual C++ and MFC Fundamentals
284 © FunctionX, Inc.
CMainFrame::CMainFrame()
{
// Declare a window class variable
WNDCLASS WndCls;
WndCls.cbClsExtra = 0;
}
Creating an application, as we saw earlier, is equivalent to creating an instance for it. To
communicate to the WinMain() function that you want to create an instance for your
application, which is, to make it available as a resource, assign the WinMain()'s hInstance
argument to your WNDCLASS variable. We saw earlier that, to get an instance for your
application, you can call the AfxGetInstanceHandle(). You can use the return value of
this function to initialize the hInstance member variable of your WNDCLASS object:
CMainFrame::CMainFrame()
{
// Declare a window class variable
WNDCLASS WndCls;
WndCls.cbClsExtra = 0;
WndCls.hInstance = AfxGetInstanceHandle();
}
If you omit doing this, the framework would initialize it with the main instance of the
application. For this reason, you do not have to initialize the WNDCLASS::hInstance
variable.
When an application has been launched and is displaying on the screen, which means an
instance of the application has been created, the operating system allocates an amount of
memory space for that application to use. If you think that your application's instance
would need more memory than that, you can request that extra memory bytes be
allocated to it. Otherwise, you can let the operating system handle this instance memory
issue and initialize the cbWndExtra member variable to 0. For an MFC application, if you
want to specify the amount of extra memory your application's instance would need,
assign the desired number the same way:
CMainFrame::CMainFrame()
{
// Declare a window class variable
WNDCLASS WndCls;
WndCls.cbClsExtra = 0;
WndCls.cbWndExtra = 0;
WndCls.hInstance = AfxGetInstanceHandle();
}
The style member variable specifies the primary operations applied on the window class.
The actual available styles are constant values. For example, if a user moves a window or
changes its size, you would need the window to be redrawn to get its previous
characteristics. To redraw the window horizontally, you would apply the
CS_HREDRAW. In the same way, to redraw the window vertically, you can apply the
CS_VREDRAW.
Visual C++ and MFC Fundamentals Chapter 12: Dialog-Based Windows
© FunctionX, Inc. 285
The styles are combined using the bitwise operator OR (|). The CS_HREDRAW and the
CS_VREDRAW styles can be combined and assigned to the style member variable as
follows:
CMainFrame::CMainFrame()
{
// Declare a window class variable
WNDCLASS WndCls;
WndCls.style = CS_VREDRAW | CS_HREDRAW;
WndCls.cbClsExtra = 0;
WndCls.cbWndExtra = 0;
WndCls.hInstance = AfxGetInstanceHandle();
}
On a regular basis, while the application is running, its controls will receive instructions
from the user. This happens when the user clicks a mouse button or presses a keyboard
keys. These actions produce messages that must be sent to the operating system to do
something. Since there can be various messages for different reasons at any time, the
messages are processed in a global function pointer called a window procedure. To define
this behavior, you can create a pointer to function, also called a callback function. In this
case, the function must return a 32-bit value specially intended for window procedures. It
is called LRESULT. The name of the function is not important but it must carry some
required pieces of information that make a message relevant and complete. For a Win32
application, the message must provide the following four pieces of information:
?? The control that sent the message: Every object you will need in your program,
just like everything in the computer, must have a name. The operating system
needs this name to identify every object, for any reason. An object in Microsoft
Windows is identified as a Handle. For Win32 controls, the handle is called
HWND
?? The type of message: The object that sends a message must let the operating
system know what message it is sending. As we saw in Lesson 4 on Messages,
there are various types of messages for different circumstances. Nevertheless, to
make matters a little easier, we saw that each message is a constant positive
natural number (unsigned int) identified with a particular name. The message
identifier is passed as UINT
?? Accompanying items: Because there are so many types of messages, you must
provide two additional pieces of information to help process the message. These
two items depend on the type of message and could be different from one type
of message to another. The first accompanying item is a 32-bit type (unsigned
int) identified as WPARAM. The second accompanying item is a 32-bit type of
value (long) identified as LPARAM. Remember that these two can be different
things for different messages. For a Win32 application, the messages can be
carried in a function defined as follows:
LRESULT CALLBACK WindowProcedure(HWND hWnd, UINT uMsg, WPARAM wParam,
LPARAM lParam);
For a Win32 application, the hWnd argument is required because it specifies what
Windows control sent the message. On an MFC application, the class that manages the
controls knows what control sent the message, which means that you do not have to
specify the window handle. Therefore, the window procedure would be declared as
follows, omitting the HWND object because it is specified by the window that is sending
the message:
Chapter 12: Dialog-Based Windows Visual C++ and MFC Fundamentals
286 © FunctionX, Inc.
virtual LRESULT WindowProcedure(UINT message, WPARAM wParam, LPARAM lParam);
To process the messages, and because there can be so many of them, the window
procedure typically uses a switch control to list all necessary messages and process each
one in turn (some of the messages are those we reviewed in Lesson 4). After processing a
message, its case must return a value indicating whether the message was successfully
processed or not and how the message was processed.
Regardless of the number of messages you process, there will still be messages that you
did not deal with. It could be because they were not sent even though they are part of the
Windows control(s) used in your application. If you did not process some messages, you
should/must let the operating system take over and process it. This is done because the
operating system is aware of all messages and it has a default behavior or processing for
each one of them. Therefore, you should/must return a value for this to happen. The value
returned is typically placed in the default section of the switch condition and must simply
be a DefWindowProc() function. For a Win32 application, its syntax is:
LRESULT DefWindowProc(HWND hWnd, UINT uMsg, WPARAM wParam, LPARAM lParam);
For an MFC application, the syntax used for this function is:
virtual LRESULT DefWindowProc(UINT message, WPARAM wParam, LPARAM lParam);
This function is returned to Windows, saying "There are messages I couldn't process. Do
what you want with them". The operating system would simply apply a default
processing to them. The values returned by the DefWindowProc() function should be the
same passed to the procedure.
The most basic message you can process is to make sure a user can close a window after
using it. This can be done with a function called PostQuitMessage(). Its syntax is:
VOID PostQuitMessage(int nExitCode);
This function takes one argument which is the value of the LPARAM argument. To
close a window, you can pass the argument as WM_QUIT.
The name of the window procedure must be assigned to the lpfnWndProc member
variable of the WNDCLASS variable.
Because we are using MFC to visually build our applications, you usually will not need
to define a window procedure to process Windows messages, unless the control you are
using is lacking a message that you find relevant. The Windows controls we will use in
this book have messages and notifications that apply the most regular behaviors they
need to offer. If you do not process all messages of a control, which will happen most of
the time, their default behavior are part of the AfxWndProc procedure. Therefore, you
can simply assign it to the lpfnWndProc member variable of your WNDCLASS variable:
CMainFrame::CMainFrame()
{
// Declare a window class variable
WNDCLASS WndCls;
WndCls.style = CS_VREDRAW | CS_HREDRAW;
WndCls.lpfnWndProc = AfxWndProc;
WndCls.cbClsExtra = 0;
WndCls.cbWndExtra = 0;
Visual C++ and MFC Fundamentals Chapter 12: Dialog-Based Windows
© FunctionX, Inc. 287
WndCls.hInstance = AfxGetInstanceHandle();
}
In Lesson 3, we saw that an icon can be used to represent an application in My Computer
or Windows Explorer. To assign this small picture to your application, you can either use
an existing icon or design your own. To make your programming a little faster, Microsoft
Windows installs a few icons. The icon is assigned to the hIcon member variable using
the LoadIcon() function. For a Win32 application, the syntax of this function is:
HICON LoadIcon(HINSTANCE hInstance, LPCTSTR lpIconName);
The hInstance argument is a handle to the file in which the icon was created. This file is
usually stored in a library (DLL) of an executable program. If the icon was created as part
of your application, you can use the hInstance of your application. If your are using one
of the icons below, set this argument to NULL.
The lpIconName is the name of the icon to be loaded. This name is added to the resource
file when you create the icon resource. It is added automatically if you add the icon as
part of your resources; otherwise you can add it manually when creating your resource
script. Normally, if you had created and designed an icon and gave it an identifier, you
can pass it using the MAKEINTRESOURCE macro.
To make your programming a little faster, Microsoft Windows installs a few icons you
can use for your application. These icons have identification names that you can pass to
the LoadIcon() function as the lpIconName argument. The icons are:
ID Picture
IDI_APPLICATION
IDI_INFORMATION
IDI_ASTERISK
IDI_QUESTION
IDI_WARNING
IDI_EXCLAMATION
IDI_HAND
IDI_ERROR
If you designed your own icon (you should make sure you design a 32x32 and a 16x16
versions, even for convenience), to use it, specify the hInstance argument of the
LoadIcon() function to the instance of your application. Then use the
MAKEINTRESOURCE macro to convert its identifier to a null-terminated string. This
can be done as follows:
WndCls.hIcon = LoadIcon(hInstance, MAKEINTRESOURCE(IDI_STAPLE));
If you are creating an MFC application, to use a standard icon, you can call the
CWinApp::LoadIcon() method. It is provided in two versions as follows:
HICON LoadIcon(LPCTSTR lpszResourceName) const;
HICON LoadIcon(UINT nIDResource) const;
The icon can be specified by its name, which would be a null-terminated string passed as
lpszResourceName. If you had designed your icon and gave it an ID, you can pass this
identifier to the LoadIcon() method.
Chapter 12: Dialog-Based Windows Visual C++ and MFC Fundamentals
288 © FunctionX, Inc.
The LoadIcon() member function returns an HICON object that you can assign to the
hIcon member variable of your WNDCLASS object. Here is an example:
CMainFrame::CMainFrame()
{
WNDCLASS WndCls;
WndCls.style = CS_VREDRAW | CS_HREDRAW;
WndCls.lpfnWndProc = AfxWndProc;
WndCls.cbClsExtra = 0;
WndCls.cbWndExtra = 0;
WndCls.hInstance = AfxGetInstanceHandle();
WndCls.hIcon = LoadIcon(NULL, IDI_WARNING);
}
You can also declare an HICON handle and initialize it with
CWinApp::LoadStandardIcon() method as follows:
AfxGetApp()->LoadStandardIcon(StdIcon);
A cursor is used to locate the position of the mouse pointer on a document or the screen.
To use a cursor, call the Win32 LoadCursor() function. Its syntax is:
HCURSOR LoadCursor(HINSTANCE hInstance, LPCTSTR lpCursorName);
The hInstance argument is a handle to the file in which the cursor was created. This file is
usually stored in a library (DLL) of an executable program. If the cursor was created as
part of your application, you can use the hInstance of your application. If your are using
one of the below cursors, set this argument to NULL.
When Microsoft Windows installs, it also installs various standard cursors you can use in
your program. Each one of these cursors is recognized by an ID which is simply a
constant integers. The available cursors are:
ID Picture
Description
IDC_APPSTARTING
Used to show that something undetermined is going on or the
application is not stable
IDC_ARROW
This standard arrow is the most commonly used cursor
IDC_CROSS
The crosshair cursor is used in various circumstances such as drawing
IDC_HAND
The Hand is standard only in Windows 2000. If you are using a
previous operating system and need this cursor, you may have to create
your own.
IDC_HELP
The combined arrow and question mark cursor is used when providing
help on a specific item on a window object
IDC_IBEAM
The I-beam cursor is used on text-based object to show the position of
the caret
IDC_ICON This cursor is not used anymore
IDC_NO
This cursor can be used to indicate an unstable situation
IDC_SIZE This cursor is not used anymore
IDC_SIZEALL
The four arrow cursor pointing north, south, east, and west is highly
used to indicate that an object is selected or that it is ready to be moved
IDC_SIZENESW
The northeast and southwest arrow cursor can be used when resizing an
object on both the length and the height
IDC_SIZENS
The north - south arrow pointing cursor can be used when shrinking or
heightenin
g an object
Visual C++ and MFC Fundamentals Chapter 12: Dialog-Based Windows
© FunctionX, Inc. 289
heightening an object
IDC_SIZENWSE
The northwest - southeast arrow pointing cursor can be used when
resizing an object on both the length and the height
IDC_SIZEWE
The west - east arrow pointing cursor can be used when narrowing or
enlarging an object
IDC_UPARROW
The vertical arrow cursor can be used to indicate the presence of the
mouse or the caret
IDC_WAIT
The Hourglass cursor is usually used to indicate that a window or the
application is not ready
To use one of these cursors, if you are creating an MFC application, you can call the
CWinApp::LoadCursor() method to assign one of the above standard cursors to your
application. This method comes in two versions as follows:
HCURSOR LoadCursor(LPCTSTR lpszResourceName) const;
HCURSOR LoadCursor(UINT nIDResource) const;
The cursor can be specified using its name, which would be a null-terminated string
passed as lpszResourceName. If you had designed your cursor and gave it an ID, you can
pass this identifier to the LoadCursor() method.
The LoadCursor() member function returns an HCURSOR value. You can assign it to the
hCursor member variable of your WNDCLASS object. Here is an example:
CMainFrame::CMainFrame()
{
// Declare a window class variable
WNDCLASS WndCls;
WndCls.style = CS_VREDRAW | CS_HREDRAW;
WndCls.lpfnWndProc = AfxWndProc;
WndCls.cbClsExtra = 0;
WndCls.cbWndExtra = 0;
WndCls.hInstance = AfxGetInstanceHandle();
WndCls.hIcon = LoadIcon(NULL, IDI_WARNING));
WndCls.hCursor = LoadCursor(NULL, IDC_CROSS);
}
You can also call the CWinApp::LoadStandardCursor() method using the AfxGetApp()
function. Its syntax is:
HCURSOR LoadStandardCursor(LPCTSTR lpszCursorName) const;
To paint the work area of the window, you must specify what color will be used to fill it.
This color is created as an HBRUSH and assigned to the hbrBackground member
variable of your WNDCLASS object. The color you are using must be a valid HBRUSH
or you can cast a known color to HBRUSH. The Win32 library defines a series of colors
known as stock objects. To use one of these colors, call the GetStockObject() function.
For example, to paint the windows background in black, you can pass the
BLACK_BRUSH constant to the GetStockObject() function, cast it to HBRUSH and
assign the result to hbrBackground.
In addition to the stock objects, the Microsoft Windows operating system provides a
series of colors for its own internal use. These are the colors used to paint the borders of
frames, buttons, scroll bars, title bars, text, etc. The colors are named (you should be able
to predict their appearance or role from their name):
Chapter 12: Dialog-Based Windows Visual C++ and MFC Fundamentals
290 © FunctionX, Inc.
COLOR_ACTIVEBORDER,COLOR_ACTIVECAPTION,
COLOR_APPWORKSPACE, COLOR_BACKGROUND, COLOR_BTNFACE,
COLOR_BTNSHADOW, COLOR_BTNTEXT, COLOR_CAPTIONTEXT,
COLOR_GRAYTEXT, COLOR_HIGHLIGHT, COLOR_HIGHLIGHTTEXT,
COLOR_INACTIVEBORDER, COLOR_INACTIVECAPTION, COLOR_MENU,
COLOR_MENUTEXT, COLOR_SCROLLBAR, COLOR_WINDOW,
COLOR_WINDOWFRAME, and COLOR_WINDOWTEXT.
To use one of these colors, cast it to HBRUSH and add 1 to its constant to paint the
background of your window:
CMainFrame::CMainFrame()
{
// Declare a window class variable
WNDCLASS WndCls;
const char *StrWndName = "Windows Fundamentals";
WndCls.style = CS_VREDRAW | CS_HREDRAW;
WndCls.lpfnWndProc = AfxWndProc;
WndCls.cbClsExtra = 0;
WndCls.cbWndExtra = 0;
WndCls.hInstance = AfxGetInstanceHandle();
WndCls.hIcon = AfxGetApp()->LoadStandardIcon(IDI_WARNING);
WndCls.hCursor = AfxGetApp()->LoadStandardCursor(IDC_CROSS);
WndCls.hbrBackground = (HBRUSH)(COLOR_ACTIVECAPTION+1);
WndCls.hCursor = AfxGetApp()->LoadStandardCursor(IDC_CROSS);
}
To get the value of a system color, call the GetSysColor() function. Its syntax is:
DWORD GetSysColor(int nIndex);
The nIndex argument should be a valid name of one of the system color constants such as
COLOR_ACTIVECAPTION. When this function has executed, it returns the
COLORREF value of the nIndex color. If you provide a wrong or unrecognized value as
the nIndex argument, this function returns 0, which is also a color and can therefore
produce an unexpected result. If you want to consider only existing valid colors, call the
GetSysColorBrush() function instead. Its syntax is:
HBRUSH GetSysColorBrush( int nIndex);
This function returns the color value of the system color that is passed as nIndex. If the
value of nIndex is not valid, the function returns NULL, which is not 0 and therefore is
not a color, producing a more predictable result.
Practical Learning: Building a Window Class
1. Change the contents of the file as follows:
#include <windows.h>
//
LRESULT CALLBACK WndProc(HWND hWnd, UINT Msg,
WPARAM wParam, LPARAM lParam);
//
INT WINAPI WinMain(HINSTANCE hInstance, HINSTANCE hPrevInstance,
Visual C++ and MFC Fundamentals Chapter 12: Dialog-Based Windows
© FunctionX, Inc. 291
LPSTR lpCmdLine, int nCmdShow )
{
WNDCLASSEX WndClsEx;
WndClsEx.cbSize = sizeof(WNDCLASSEX);
WndClsEx.style = CS_HREDRAW | CS_VREDRAW;
WndClsEx.lpfnWndProc = WndProc;
WndClsEx.cbClsExtra = 0;
WndClsEx.cbWndExtra = 0;
WndClsEx.hInstance = hInstance;
WndClsEx.hIcon = LoadIcon(NULL, IDI_APPLICATION);
WndClsEx.hCursor = LoadCursor(NULL, IDC_CROSS);
WndClsEx.hbrBackground = (HBRUSH)(COLOR_BACKGROUND + 1);
WndClsEx.hIconSm = LoadIcon(NULL, IDI_APPLICATION);
return 0;
}
//
LRESULT CALLBACK WndProc(HWND hWnd, UINT Msg,
WPARAM wParam, LPARAM lParam)
{
switch(Msg)
{
case WM_DESTROY:
PostQuitMessage(WM_QUIT);
break;
default:
return DefWindowProc(hWnd, Msg, wParam, lParam);
}
return 0;
}
//
2. Save All
10.1.7 Window Registration
After initializing the window class, you must make it available to the other controls that
will be part of your application. This process is referred to as registration. If you are
creating a Win32 application using the WNDCLASS structure, to register the window
class, call the RegisterClass(). If you created your window class using the
WNDCLASSEX structure, call the RegisterClassEx() function. Their syntaxes are:
ATOM RegisterClass(CONST WNDCLASS *lpWndClass);
ATOM RegisterClassEx(CONST WNDCLASSEX *lpwcx);
The function simply takes as argument a pointer to a WNDCLASS or WNDCLASSEX.
If you are working on an MFC application, to register your window class, call the
AfxRegisterWndClass() function. Its syntax is:
LPCTSTR AFXAPI AfxRegisterWndClass(UINT nClassStyle, HCURSOR hCursor = 0,
HBRUSH hbrBackground = 0, HICON hIcon = 0);
This function expects the window class, the cursor to use to indicate the position of the
mouse, the color to paint the background, and an icon that represents the application.
Chapter 12: Dialog-Based Windows Visual C++ and MFC Fundamentals
292 © FunctionX, Inc.
These are the same values used to initialize the window class. Using these values as
initialized above, you can register the window class as follows:
CMainFrame::CMainFrame()
{
// Declare a window class variable
WNDCLASS WndCls;
WndCls.style = CS_VREDRAW | CS_HREDRAW;
WndCls.lpfnWndProc = AfxWndProc;
WndCls.cbClsExtra = 0;
WndCls.cbWndExtra = 0;
WndCls.hInstance = AfxGetInstanceHandle();
WndCls.hIcon = AfxGetApp()->LoadStandardIcon(IDI_WARNING);
WndCls.hCursor = AfxGetApp()->LoadStandardCursor(IDC_CROSS);
WndCls.hbrBackground = (HBRUSH)GetStockObject(BLACK_BRUSH);
WndCls.hCursor = AfxGetApp()->LoadStandardCursor(IDC_CROSS);
AfxRegisterWndClass(WndCls.style, WndCls.hCursor,
WndCls.hbrBackground, WndCls.hIcon);
}
Practical Learning: Registering a Window
1. Just above the return line of the WinMain() function, register the class using the
RegisterClassEx() function:
//
INT WINAPI WinMain(HINSTANCE hInstance, HINSTANCE hPrevInstance,
LPSTR lpCmdLine, int nCmdShow )
{
WNDCLASSEX WndClsEx;
. . .
WndClsEx.hIconSm = LoadIcon(NULL, IDI_APPLICATION);
RegisterClassEx(&WndClsEx);
return 0;
}
//
2. Save All
10.2 Window Creation
10.2.1 The Main Window
The WNDLCLASS and the WNDCLASSEX classes are only used to initialize the
application window class. To display a window, that is, to give the user an object to work
with, you must create a window object. This window is the object the user uses to interact
with the computer.
Visual C++ and MFC Fundamentals Chapter 12: Dialog-Based Windows
© FunctionX, Inc. 293
If you are creating a Win32 application, to create a window, you can call either the
CreateWindow() or the CreateWindowEx() function. Their syntaxes are:
HWND CreateWindow(
LPCTSTR lpClassName,
LPCTSTR lpWindowName,
DWORD dwStyle,
int x,
int y,
int nWidth,
int nHeight,
HWND hWndParent,
HMENU hMenu,
HINSTANCE hInstance,
LPVOID lpParam
);
HWND CreateWindowEx(
DWORD dwExStyle,
LPCTSTR lpClassName,
LPCTSTR lpWindowName,
DWORD dwStyle,
int x,
int y,
int nWidth,
int nHeight,
HWND hWndParent,
HMENU hMenu,
HINSTANCE hInstance,
LPVOID lpParam
);
You can simply call this function and specify its arguments after you have registered the
window class. Here is an example:
INT WINAPI WinMain(HINSTANCE hInstance, HINSTANCE hPrevInstance,
LPSTR lpCmdLine, int nCmdShow)
{
WNDCLASS WndCls;
. . .
RegisterClass(&WndCls);
CreateWindow(. . .);
}
If you are planning to use the window further in your application, you should retrieve the
result of the CreateWindow() or the CreateWindowEx() function, which is a handle to the
window that is being created. To do this, you can declare an HWND variable and
initialize it with the create function. This can be done as follows:
INT WINAPI WinMain(HINSTANCE hInstance, HINSTANCE hPrevInstance,
LPSTR lpCmdLine, int nCmdShow)
{
HWND hWnd;
WNDCLASS WndCls;
. . .
RegisterClass(&WndCls);
hWnd = CreateWindow(. . .);
}
Chapter 12: Dialog-Based Windows Visual C++ and MFC Fundamentals
294 © FunctionX, Inc.
If you are working on an MFC application, you can derive a class from CFrameWnd, as
we have done so far. Each window that can display on the computer screen is based on a
class equipped with a method called Create. The structure of this method is different from
one type of window to another. Nevertheless, because all window objects are based on
CWnd, the CWnd class provides the primary functionality used by all the other window
controls.
The process of creating a frame window in an MFC application is done by using the
class' constructor and calling its Create() method. As we have seen in the past, the main
window object you must create is a frame because it gives presence to your application.
The most basic frame is created using the CFrameWnd class. We have learned that this
is done by deriving your own class from CFrameWnd. Therefore, in the constructor of
your CFrameWnd-derived class, call the Create() method. As a reminder from Lesson
2, the syntax of the CFrameWnd::Create() method is as follows:
BOOL Create(LPCTSTR lpszClassName,
LPCTSTR lpszWindowName,
DWORD dwStyle = WS_OVERLAPPEDWINDOW,
const RECT& rect = rectDefault,
CWnd* pParentWnd = NULL,
LPCTSTR lpszMenuName = NULL,
DWORD dwExStyle = 0,
CCreateContext* pContext = NULL );
If the method succeeds in creating the window, it returns TRUE. If it fails, it returns
FALSE.
Practical Learning: Initiating Window Creation
1. Declare a handle to a window object as HWND and initialize it with the
CreateWindowEx() function:
//
INT WINAPI WinMain(HINSTANCE hInstance, HINSTANCE hPrevInstance,
LPSTR lpCmdLine, int nCmdShow )
{
HWND hWnd;
WNDCLASSEX WndClsEx;
. . .
RegisterClassEx(&WndClsEx);
hWnd = CreateWindowEx();
return 0;
}
//
2. Save All
10.2.2 The Window Class Name
To create a window, you must provide its name as everything else in the computer has a
name. There are two main types of class names you will use in your applications. If the
Visual C++ and MFC Fundamentals Chapter 12: Dialog-Based Windows
© FunctionX, Inc. 295
window you are creating is a known type of window, its class is already registered with
the operating system. In this case you can provided it. If you are creating your own fresh
class, which means you are in charge of its characteristics (properties), then define a null-
terminated string as the class' name.
For a Win32 application, the class name of your main window must be provided to the
lpszClassName member variable of your WNDCLASS or WNDCLASSEX variable.
You can provide the name to the variable or declare a global null-terminated string. The
name must also be passed to the lpClassName argument of either the CreateWindow()
or the CreateWindowEx() functions. Here is an example:
If you are creating an MFC application, the class name is passed as the first argument of
the CFrameWnd::Create() method. You can use a null terminated string as done for the
CreateWindow() or the CreateWindowEx() function. If you have initialized the
window class and registered it using AfxRegisterWndClass(), you may remember that
this function returns a null-terminated string. Therefore, you can pass its return value to
the Create() method. This can be done as follows:
CMainFrame::CMainFrame()
{
// Declare a window class variable
WNDCLASS WndCls;
. . .
const char *StrClass = AfxRegisterWndClass(WndCls.style, WndCls.hCursor,
WndCls.hbrBackground, WndCls.hIcon);
Create(StrClass, ;
}
Once an application is created, although you can, you should refrain from ever changing
the name of a class. It may take more than simply assigning a new value to the
AfxRegisterWndClass() function.
Practical Learning: Naming a Window Class
1. To provide a name for the window being created, declare a null-terminated string
variable. Initialize the lpszClassName member variable of your window application
and pass it to the CreateWindowEx() function:
#include <windows.h>
//
char StrClassName[] = "Win32Exercise";
//
LRESULT CALLBACK WndProc(HWND hWnd, UINT Msg,
WPARAM wParam, LPARAM
lParam);
//
INT WINAPI WinMain(HINSTANCE hInstance, HINSTANCE hPrevInstance,
LPSTR lpCmdLine, int nCmdShow )
{
HWND hWnd;
WNDCLASSEX WndClsEx;
. . .
WndClsEx.hbrBackground = (HBRUSH)(COLOR_ BACKGROUND + 1);
Chapter 12: Dialog-Based Windows Visual C++ and MFC Fundamentals
296 © FunctionX, Inc.
WndClsEx.lpszClassName = StrClassName;
WndClsEx.hIconSm = LoadIcon(NULL, IDI_APPLICATION);
RegisterClassEx(&WndClsEx);
hWnd = CreateWindowEx(0,
StrClassName, );
return 0;
}
//
2. Save All
10.2.3 The Window Name
We saw in Lesson 2 that every window should have a name to easily identify it. For a
main window, the name displays on the title bar of the frame.
The name is passed as the lpWindowName argument of either the CreateWindow() or
the CreateWindowEx() functions. To do this, you can provide a null-terminated string to
the argument or declare a global string. Here is an example:
const char *ClsName = "WndFund";
const char *WndName = "Application Name";
LRESULT CALLBACK WndProc(HWND hWnd, UINT Msg, WPARAM wParam, LPARAM
lParam);
INT WINAPI WinMain(HINSTANCE hInstance, HINSTANCE hPrevInstance,
LPSTR lpCmdLine, int nCmdShow)
{
WNDCLASS WndCls;
. . .
RegisterClass(&WndCls);
CreateWindow(ClsName, WndName,
}
If you are creating an MFC application, to provide a name for the window, pass a null-
terminated string as the second argument of the CFrameWnd::Create() method:
CMainFrame::CMainFrame()
{
WNDCLASS WndCls;
const char *StrWndName = "Application Name";
. . .
const char *StrClass = AfxRegisterWndClass(WndCls.style, WndCls.hCursor,
WndCls.hbrBackground, WndCls.hIcon);
Create(StrClass, StrWndName);
}
Visual C++ and MFC Fundamentals Chapter 12: Dialog-Based Windows
© FunctionX, Inc. 297
Practical Learning: Setting the Window Name
1. To provide a name for the window, declare and initialize a null-terminated string and
pass its value as the lpWindowName argument of the CreateWindowEx() function:
#include <windows.h>
//
char StrClassName[] = "Win32Exercise";
char StrWndName[] = "Simple Win32 Application";
//
LRESULT CALLBACK WndProc(HWND hWnd, UINT Msg,
WPARAM wParam, LPARAM
lParam);
//
INT WINAPI WinMain(HINSTANCE hInstance, HINSTANCE hPrevInstance,
LPSTR lpCmdLine, int nCmdShow )
{
HWND hWnd;
WNDCLASSEX WndClsEx;
. . .
RegisterClassEx(&WndClsEx);
hWnd = CreateWindowEx(0,
StrClassName,
StrWndName, );
return 0;
}
//
2. Save All
10.2.4 Windows Styles
We had a formal introduction to windows styles in Lesson 2 and we reviewed all
necessary styles to apply or not apply to a main window. Once again, a
WS_OVERLAPPEDWINDOW has a caption that displays the window name (if any). It
is also equipped with the system menu, a thick frame, a system Minimize button, a
system Maximize button, and a system Close button.
For a Win32 application, you can apply the WS_OVERLAPPEDWINDOW style as
follows:
CreateWindow(ClsName, WndName, WS_OVERLAPPEDWINDOW,
For an MFC application, this style can be added as follows:
CMainFrame::CMainFrame()
{
// Declare a window class variable
WNDCLASS WndCls;
const char *StrWndName = "Windows Fundamentals";
Chapter 12: Dialog-Based Windows Visual C++ and MFC Fundamentals
298 © FunctionX, Inc.
. . .
const char *StrClass = AfxRegisterWndClass(WndCls.style, WndCls.hCursor,
WndCls.hbrBackground, WndCls.hIcon);
Create(StrClass, StrWndName, WS_OVERLAPPEDWINDOW);
}
Remember that, to apply a combination of styles, use the bitwise OR operator.
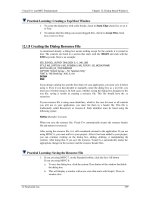
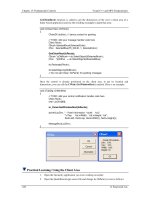
If you are designing a form or a dialog box, you can use the Properties window to
visually select the styles you want to apply to the window:
Practical Learning: Creating an Overlapped Window
1. To create borders and a title bar for the window, apply the
WS_OVERLAPPEDWINDOW style as follows:
//
INT WINAPI WinMain(HINSTANCE hInstance, HINSTANCE hPrevInstance,
LPSTR lpCmdLine, int nCmdShow )
{
. . .
hWnd = CreateWindowEx(0,
StrClassName,
StrWndName,
WS_OVERLA PPEDWINDOW, );
return 0;
}
//
2. Save all
10.2.5 Window's Location and Size
As we learned in Lesson 2, the location of a window is defined by the distance from the
left border of the monitor to the window's left border and its distance from the top border
of the monitor to its own top border. The size of a window is its width and its height.
These can be illustrated for a main window frame as follows:
Visual C++ and MFC Fundamentals Chapter 12: Dialog-Based Windows
© FunctionX, Inc. 299
For a Win32 application, the original distance from the left border of the monitor is
passed as the x argument to the CreateWindow() or the CreateWindowEx() function.
The distance from top is specified using the y argument. The x and y arguments define
the location of the window. The distance from the left border of the monitor to the right
border of the window is specified as the nWidth argument. The distance from the top
border of the monitor to the lower border of the window is specified with the nHeight
value.
If you cannot make up your mind for these four values, you can use the
CW_USEDEFAULT (when-Creating-the-Window-USE-the-DEFAULT-value) constant
for either one or all four arguments. In such a case, the compiler would select a value for
the argument.
For an MFC application, when calling the CFrameWnd::Create() method, the location
and size of the frame window is specified as a RECT or CRect rectangle as we saw in
Lesson 2. As done with the CW_USEDEFAULT constant, you can let the compiler
decide on the rectangle by passing the rect argument as rectDefault. Here is an example:
CMainFrame::CMainFrame()
{
// Declare a window class variable
WNDCLASS WndCls;
const char *StrWndName = "Windows Fundamentals";
. . .
const char *StrClass = AfxRegisterWndClass(WndCls.style, WndCls.hCursor,
Chapter 12: Dialog-Based Windows Visual C++ and MFC Fundamentals
300 © FunctionX, Inc.
WndCls.hbrBackground, WndCls.hIcon);
Create(StrClass, StrWndName, WS_OVERLAPPEDWINDOW, rectDefault);
}
At any time you can find out the location and size of a rectangle by calling the
CWnd::GetWindowRect() method. Its syntax is:
void GetWindowRect(LPRECT lpRect) const;
To use this method, pass it a RECT or a CRect variable as lpRect. The method returns
the rectangle properties of the window. Here is an example:
void CMainFrame::OnViewLocationandsize()
{
// TODO: Add your command handler code here
CRect Recto;
GetWindowRect(&Recto);
char Str[80];
sprintf(Str, "The window rectangle is:\nLeft: %d\nTop:
%d\nWidth: %d\nHeight: %d",
Recto.left, Recto.top, Recto.Width(), Recto.Height());
MessageBox(Str);
}
If you created your application using AppWizard, it sets a default rectangle for the frame
(actually the left and top values are randomly selected). Whether you created the frame
using the CFrameWnd::Create() method or AppWizard, you can redefine its location
and size from the PreCreateWindow() event. Because this event is called after
CFrameWnd::Create but before the window is displayed, its values are applied to the
window. The syntax of the CWnd::PreCreateWindow() event is (this event is inherited
from CWnd but CFrameWnd, like any other class that needs it, overrides it and provides
its own functionality as it relates to a window frame):
virtual BOOL PreCreateWindow(CREATESTRUCT& cs);
This event takes as argument a CREATESTRUCT object. This structure is defined as
follows:
typedef struct tagCREATESTRUCT {
LPVOID lpCreateParams;
HANDLE hInstance;
HMENU hMenu;
HWND hwndParent;
Visual C++ and MFC Fundamentals Chapter 12: Dialog-Based Windows
© FunctionX, Inc. 301
int cy;
int cx;
int y;
int x;
LONG style;
LPCSTR lpszName;
LPCSTR lpszClass;
DWORD dwExStyle;
} CREATESTRUCT;
As you can see, the member variables of this structure are very similar to the arguments
of the Win32's CreateWindow() and CreateWindowEx() functions. Its member variables
correspond as follows:
CREATESTRUCT
CreateWindow
and
CreateWindowEx
Meaning
x x
Distance from left border of monitor to left border of
window frame
Y y
Distance from top border of monitor to top border of
window frame
cx nWidth
Distance from left border of monitor to right border of
window frame
cy nHeight
Distance from top border of monitor to bottom border of
window frame
Therefore, in your CFrameWnd::PreCreateWindow() event, assign the desired values
for the location and size of the window. In the following example, the original
dimensions of the window are set to 450x325 (width x height):
BOOL CMainFrame::PreCreateWindow(CREATESTRUCT& cs)
{
if( !CFrameWnd::PreCreateWindow(cs) )
return FALSE;
// TODO: Modify the Window class or styles here by modifying
// the CREATESTRUCT cs
cs.cx = 450;
cs.cy = 325;
return TRUE;
}
Of course, you can also use the PreCreateWindow() event to customize the appearance
of the window frame.
Once a regular window, that is, an overlapped window, has been created, it displays a
title bar, its system buttons, and borders. As stated already, if you created an application
using AppWizard, the window may appear in a random location, which you can control.
If you want the window to be positioned in the center of the screen, call the
CWnd::CenterWindow() method. Its syntax is:
void CenterWindow(CWnd* pAlternateOwner = NULL);
By default, this window positioned the caller (the window that called it) in the middle-
center of the main window, also called its owner. For a main frame of a window, the
owner would be the monitor screen. As long as the window is owned by another, the
Chapter 12: Dialog-Based Windows Visual C++ and MFC Fundamentals
302 © FunctionX, Inc.
compiler can find out and position it accordingly. For this reason, you can omit the
pAlternateOwner argument.
You should call the CenterWindow() method in the event that creates the window. For a
frame this would be the OnCreate event. Here is an example:
int CMainFrame::OnCreate(LPCREATESTRUCT lpCreateStruct)
{
if (CFrameWnd::OnCreate(lpCreateStruct) == -1)
return -1;
// . . .
CenterWindow();
return 0;
}
If you want the caller to be centrally positioned relative to another window, obtain a
handle to that window and pass it as the pAlternateOwner argument.
Once a window is displaying on the screen, the user can change its location by dragging
its title bar. This would change its CREATESTRUCT::x or its rect::left argument. If you
do not want the user to change the location of a window, one thing you can do is to
prevent the mouse from capturing, that is, taking ownership, of the title bar. This can be
done calling the Win32's ReleaseCapture() function. Its syntax is:
BOOL ReleaseCapture(VOID);
When this function is called, the event in which it is accessed prevents the mouse from
capturing the object on which the mouse is positioned. Nevertheless, if the function
succeeds, it returns TRUE. If for some reason it fails, it returns FALSE. Because a
WM_MOVE message is sent when a window is moved, you can use it to call this
function. Here is an example:
void CMainFrame::OnMove(int x, int y)
{
CFrameWnd::OnMove(x, y);
ReleaseCapture();
// TODO: Add your message handler code here
}
To change the dimensions of a window, the user can click and drag one of its borders.
Imagine you do not want the user to change the size of the window. If you remove the
system buttons and/or the system menu(
BOOL CMainFrame::PreCreateWindow(CREATESTRUCT& cs)
{
if( !CFrameWnd::PreCreateWindow(cs) )
return FALSE;
// TODO: Modify the Window class or styles here by modifying
// the CREATESTRUCT cs
cs.style &= ~WS_SYSMENU;
return TRUE;
}
Visual C++ and MFC Fundamentals Chapter 12: Dialog-Based Windows
© FunctionX, Inc. 303
), the user is still able to resize it. One solution you can use is to call the
ReleaseCapture() function on the WM_SIZE event. That way, every time the user grabs
a border and starts dragging, the mouse would lose control of the border:
void CMainFrame::OnSize(UINT nType, int cx, int cy)
{
CFrameWnd::OnSize(nType, cx, cy);
ReleaseCapture();
// TODO: Add your message handler code here
}
Another way the user change the size of a window consists of minimizing it. As you
surely know already, to minimize the window, the user clicks the system Minimize
button . If at two time you want to find out whether a window is minimized, you can
call the CWnd::IsIconic() method. Its syntax is:
BOOL IsIconic( ) const;
This method returns TRUE if the window is minimized. Otherwise it returns FALSE.
If you do not want the user to be able to minimize a wndow, you can omit the
WS_MINIMIZEBOX style when creating the window.
If you want the user to be able to maximize the window, add the WS_ MAXIMIZEBOX
style. This can be done as follows:
CMainFrame::CMainFrame()
{
// Declare a window class variable
WNDCLASS WndCls;
const char *StrWndName = "Windows Fundamentals";
. . .
const char *StrClass = AfxRegisterWndClass(WndCls.style, WndCls.hCursor,
WndCls.hbrBackground, WndCls.hIcon);
Create(StrClass, StrWndName,
WS_OVERLAPPED | WS_CAPTION |
WS_SYSMENU | WS_THICKFRAME |
WS_MAXIMIZEBOX, rectDefault);
}
7.
At any time, to find out if the window is maximized, you can call the
CWnd::IsZoomed() method. Its syntax is:
BOOL IsZoomed( ) const;
This method returns TRUE if the window is maximized. Otherwise, it returns FALSE.
If you created the application using AppWizard, all system buttons are added to the
frame. If you want to remove a style, use the CFrameWnd::PreCreateWindow() event.
In the following example, the system Minimize button is removed on the frame:
Chapter 12: Dialog-Based Windows Visual C++ and MFC Fundamentals
304 © FunctionX, Inc.
BOOL CMainFrame::PreCreateWindow(CREATESTRUCT& cs)
{
if( !CFrameWnd::PreCreateWindow(cs) )
return FALSE;
// TODO: Modify the Window class or styles here by modifying
// the CREATESTRUCT cs
cs.style &= ~WS_MINIMIZEBOX;
return TRUE;
}
In the same way, you can remove the system maximize button.
If you allow the system buttons, the user can minimize and maximize the window at will.
To do this, besides using the system buttons, the user can also double-click the title bar of
the window or click its Maximize menu item either from the window's system icon or
after right-clicking its button on the Taskbar. When the window is maximized, the frame
is resized to occupy the whole monitor area, starting from the top-left corner as the
origin.
When the user decides to maximize a window, the frame sends a
WM_GETMINMAXINFO message which appears like "The user wants to maximize
me. What should I do?". This message produces the OnGetMinMaxInfo() event. If the
application does not give any specific instruction, the window gets maximized. If you
want to do something before the window is formally maximized, you can intercept
OnGetMinMaxInfo() event. Remember that, if you want to prevent the window from
being minimized or maximized, you should remove the Minimize
(WS_MINIMIZEBOX) or the Maximize (WS_MAXIMIZEBOX) buttons from its
style.
If you want to control the minimum and/or maximum size that a window can have when
the user wants to maximize it, set the desired size in the OnGetMinMaxInfo() event. It
syntax is:
afx_msg void OnGetMinMaxInfo(MINMAXINFO FAR* lpMMI);
The information pertinent to a window's maximized size, including the maximum size it
can have, is stored in a structure called MINMAXINFO. The MINMAXINFO structure is
defined as follows:
typedef struct tagMINMAXINFO {
POINT ptReserved;
POINT ptMaxSize;
POINT ptMaxPosition;
POINT ptMinTrackSize;
POINT ptMaxTrackSize;
} MINMAXINFO;
A variable of MINMAXINFO type is passed to the OnGetMinMaxInfo() event.
The ptReserved member variable is reserved and never used.
The ptMaxSize value is the maximum width and the maximum height. To specify this
value, you can call the x member variable of the point value of ptMaxSize and assign the
desired value. Here is an example:
Visual C++ and MFC Fundamentals Chapter 12: Dialog-Based Windows
© FunctionX, Inc. 305
void CMainFrame::OnGetMinMaxInfo(MINMAXINFO FAR* lpMMI)
{
// TODO: Add your message handler code here and/or call default
lpMMI->ptMaxSize.x = 450;
lpMMI->ptMaxSize.y = 325;
CFrameWnd::OnGetMinMaxInfo(lpMMI);
}
The ptMaxPosition member variable is the location of the window when it gets
maximized. Normally, when the window gets maximized, it starts occupying the monitor
screen from the top-left corner. The ptMaxPosition allows you to change that default
behavior. The ptMaxPosition.x is the distance from the left border of the monitor to the
left border of the maximized window. The ptMaxPosition.y is the distance from the top
border of the monitor to the top border of the maximized window.
The ptMinTrackSize member variable is the minimum size the window must assume
when it gets maximized. Normally, when a window frame gets maximized, it occupies
the whole screen area. This member variable can be used to control that size. The
ptMinTrackSize.x is the minimum width. The ptMinTrackSize.y is the minimum height.
The ptMaxTrackSize member variable is the maximum size the window must have when
it is maximized. The ptMaxTrackSize.x is the minimum width. The ptMaxTrackSize.y is
the minimum height.
Practical Learning: Setting the Window Location and Dimensions
1. Apply the default location and dimensions to the window with the
CW_USEDEFAULT constant as follows:
//
INT WINAPI WinMain(HINSTANCE hInstance, HINSTANCE hPrevInstance,
LPSTR lpCmdLine, int nCmdShow )
{
. . .
hWnd = CreateWindowEx(0,
StrClassName,
StrWndName,
WS_OVERLAPPEDWINDOW,
CW_USEDEFAULT,
CW_USEDEFAULT,
CW_USEDEFAULT,
CW_USEDEFAULT, );
return 0;
}
//
2. Save All
10.2.6 Window's Parenting
If the window you are creating has a parent, obtain its handle and pass it as the
hWndParent argument of the CreateWindow() or the CreateWindowEx() functions for a