Intro to Java Programming phần 4 pot
Bạn đang xem bản rút gọn của tài liệu. Xem và tải ngay bản đầy đủ của tài liệu tại đây (1.69 MB, 15 trang )
protected void fireActionEvent( )
{
if (actionListener != null)
actionListener.actionPerformed(new
ActionEvent(this,
ActionEvent.ACTION_PERFORMED, actionCommand));
}
This calls the actionPerformed method of all the registered listeners with a new
action event describing the details of the event, effectively broadcasting the action event
to all interested Listeners.
Now it’s time to implement getPreferredSize( ).
Back to top
Step 11 - Implementing getPreferredSize( )
Because our button selects images from an image pool, we don’t know at design time
how big to make the button. Thus, we implement a getPreferredSize method.
This method will be called by the layout manager of our container in order to calculate
the button size. We need to return a size based on the size of the image we are using.
/**
* Returns the preferred size of this component.
* @see #getMinimumSize
* @see LayoutManager
*/
public Dimension getPreferredSize( )
{
//If the current image is not null, then return the size of
//the image.
//If it is null, defer to the super class.
//Insert "ImageButton getPreferredSize"
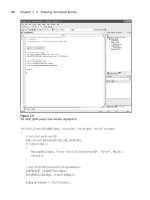
We are overriding the getPreferredSize( ) method from java.awt.Component. It
returns a Dimension object which specifies the preferred height and width of our
button. Locate the ImageButton getPreferredSize clipping in the ImageButton folder
and drag it directly below the last line of code shown above. Your code should now look
like this:
Building the Image Button Part 2
(12 of 15) [1/28/2000 1:32:09 PM]
/**
* Returns the preferred size of this component.
* @see #getMinimumSize
* @see LayoutManager
*/
public Dimension getPreferredSize( )
{
//If the current image is not null, then return the size of
//the image. If it is null, defer to the super class.
//Insert "ImageButton getPreferredSize"
if (image != null)
return new Dimension(image.getWidth(this),
image.getHeight(this));
return super.getPreferredSize( );
}
We want to return the size of our current image as the preferred size of the button. The
first thing we do is check to see if the image is null. If it is, we call
getPreferredSize( ) from our superclass so that we can use the default
component behavior. Otherwise, we return a new Dimension object that we create
using the height and width of our image object.
We are almost finished with this class. The only thing that remains is drawing our
button. This is done in the paint method.
Back to top
Step 12 - Implementing paint( )
Paint( ) is the routine that gets called to draw our object on the screen.
/**
* Paints the component. This method is called when the contents
* of the component should be painted in response to the
* component first being shown or damage needing repair. The
* clip rectangle in the Graphics parameter will be set to the
* area which needs to be painted.
* @param g the specified Graphics window
* @see #update
*/
public void paint(Graphics g)
{
//Let the super class draw, then handle drawing the current
//image.
//Insert "ImageButton paint"
Building the Image Button Part 2
(13 of 15) [1/28/2000 1:32:09 PM]
As you can see from the JavaDoc, the paint( ) method is called when the contents of
the component needs to be drawn due to invalidation of the component or a request for
an update. The Graphics parameter g is the graphics context the object needs to be
drawn in. Locate the ImageButton paint clipping in the ImageButton folder and drag it
directly below the last line of code shown above. Your code should now look like this:
/**
* Paints the component. This method is called when the contents
* of the component should be painted in response to the
* component first being shown or damage needing repair. The
* clip rectangle in the Graphics parameter will be set to the
* area which needs to be painted.
* @param g the specified Graphics window
* @see #update
*/
public void paint(Graphics g)
{
//Let the super class draw, then handle drawing the current
//image.
//Insert "ImageButton paint"
super.paint(g);
if (image != null)
g.drawImage(image, 0, 0, this);
}
First, we call the paint method of our base class to insure that any preparatory imaging
occurs. Then we check to see if the image is null. If it is not, we draw the current
image starting at location 0, 0. This means that we draw the image so that the top left
corner is 0 pixels from the top of the button bounds, 0 pixels from the left of the button
bounds, and we use the default image dimensions. That’s all there is to it!
Back to top
Summary
In review, we set up our class to be derived from Component. This allows us to inherit
some basic functionality such as being able to draw to the screen, having a bounds, etc.
We set up an interface that derived classes will implement to do things like respond to
action events. We set up a MouseListener and registered it with our button so that
we can respond to mouse events such as MousePressed, MouseReleased,
MouseEntered, and MouseExited. We wrote an inner class to send action events
so that our derived classes can respond appropriately to user interaction, and we laid
some groundwork for our derived classes such as several image routines for getting,
setting, adding and removing images. We wrote a preferredSize method so we can
tell layout managers how big we want to be, and we added a paint method so that we
could draw ourselves.
Building the Image Button Part 2
(14 of 15) [1/28/2000 1:32:09 PM]
That may seem like a lot of work, but a lot of it is to simplify the creation of our derived
classes which for the most part are much more simple than this class. We have
implemented the core functionality for our button, and the road is now much easier from
here.
Now we are ready to go back to our main tutorial file and prepare for the next step,
Building the Rollover button.
Previous Page
Building the Image Button Part 2
(15 of 15) [1/28/2000 1:32:09 PM]
Technical: Java
Building the Rollover Button
File: RolloverButton.java
Contents
Building the Rollover Button
(1 of 9) [1/28/2000 1:26:18 PM]
Overview
1) Declaring the Data Members
2) Initializing the Rollover Button
3) Implementing refreshImage( )
4) Implementing handleMousePressed(
)
5) Implementing handleMouseReleased(
)
6) Implementing handleRollover( )
Summary
Overview
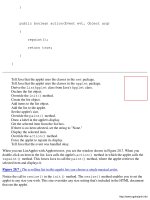
The RolloverButton is the second tier of a series of classes that encapsulates the
functionality of buttons for the slide show controller. As the image below demonstrates, this
class is derived from ImageButton.
While the ImageButton class contains
basic functionality such as MouseEvent
handling and methods to handle images
and paint the component (see Building the
Image Button), it defines several abstract
methods that are implemented in this class.
These methods are handleRollover(
) and handleMousePressed( ).
This class implements these methods in
order to provide rollover functionality; i.e.,
when the user hovers over a button, the
image changes. When the user clicks on
the button, the image changes to a
depressed button state. The state returns to
normal when the user leaves the button.
This class also defines a single abstract
function called initImages( ) which
must be implemented in the derived
classes ForwardButton,
BackwardButton, and PlayPauseButton.
Back to top
Building the Rollover Button
(2 of 9) [1/28/2000 1:26:18 PM]
Steps to Follow
Step 1 - Declaring the data members
The class RolloverButton is an abstract class. Like the ImageButton class, this means
that it cannot be directly instantiated. Only derived classes that implement the initImages(
) method which is declared as abstract (more on this later) may be instantiated. We are
extending ImageButton in order to take advantage of all of the basic image and event
handling behavior we implemented in that class.
You may notice that there are no import statements at the beginning of the class. That is because
we require no additional imports other than the implicit java.lang.* package. Our class knows
about the ImageButton class because these two classes are in the same package.
public abstract class RolloverButton extends ImageButton
{
//Declare data members
//Insert "RolloverButton data members"
Locate the RolloverButton data members clipping in the RolloverButton folder and drag it
directly below the last line of code shown above. Your code should now look like this:
public abstract class RolloverButton extends ImageButton
{
//Declare data members
//Insert "RolloverButton data members"
protected String upImage;
protected String downImage;
protected String rolloverImage;
We declare three data members, all of which are strings. These are the names of the images to
be used for the various states. The first, upImage is the default image to use when the user is
outside the bounds of the button and the button is not depressed. The second, downImage is
used when the user has clicked the mouse on the button and has not yet released the button.
Lastly, the rolloverImage is the name of the image to use when the user is hovering over
the button with the mouse cursor, but the button has not yet been pressed.
Now that we have our data members, it is time to look at the constructor.
Back to top
Step 2 - Initializing the Rollover Button
We initialize the button in the constructor.
Public RolloverButton( )
{
//Initialize the state of the button
//Insert "RolloverButton init state"
Building the Rollover Button
(3 of 9) [1/28/2000 1:26:18 PM]
Locate the RolloverButton init state clipping in the RolloverButton folder and drag it directly
below the last line of code shown above. Your code should now look like this:
public RolloverButton( )
{
//Initialize the state of the button
//Insert "RolloverButton init state"
upImage = "up";
downImage = "down";
rolloverImage = "rollover";
initImages( );
setImage(upImage);
}
We assign the three data members identifiers that we will be using to refer to the individual
images. For example, we associate the string “up” with the variable upImage. The string “up”
is what will be used as the key in the hashtable for the image to be used when the button is in its
up state.
Next we call our initImages( ) method. Again, this is an abstract method and is not
defined in this class. Subclasses must override this method and specify the actual images to be
used.
Finally, we call setImage( ) using the upImage as the key. If no image is specified, nothing
will happen. We recall from Step 7 in ImageButton that we check to see if an image is loaded. If
"up" was not found in our hashtable, it will be null, and thus setImage( ) won’t do
anything. Now it is time to look at refreshImages( ).
Back to top
Step 3 - Implementing refreshImage( )
When we need to update the state of the button, refreshImage( ) is used. It checks the
current button state and loads the correct image to display.
/**
* Sub classes need to define this to handle initializing their
* images, and state information.
*/
protected abstract void initImages( );
/**
* Sets the button to be in the correct configuration for the
* current state.
*/
Public void refreshImage( )
{
Building the Rollover Button
(4 of 9) [1/28/2000 1:26:18 PM]
//Handle determining the current state, and reacting
//appropriately
//Insert "RolloverButton refreshImage"
After the abstract declaration of initImages( ) which we previously discussed, we reach
refreshImage( ). This method is only called from our derived class
PlayPauseButton, but it could be useful to any future derived classes that might need this
functionality, which is why we have chosen to place it in this class rather than
PlayPauseButton. Locate the RolloverButton refreshImage clipping in the
RolloverButton folder and drag it directly below the last line of code shown above. Your code
should now look like this:
/**
* Sub classes need to define this to handle initializing their
* images, and state information.
*/
Protected abstract void initImages( );
/**
* Sets the button to be in the correct configuration for the
* current state.
*/
Public void refreshImage( )
{
//Handle determining the current state, and reacting
//appropriately
//Insert "RolloverButton refreshImage"
if (isMouseInside)
{
if (isMouseDown)
{
setImage(downImage);
}
else
{
setImage(rolloverImage);
}
}
else
{
setImage(upImage);
}
}
This is fairly self explanatory. We check to see if the mouse is inside the button (recall that the
Boolean isMouseInside is a data member from our base class, ImageButton) and then
Building the Rollover Button
(5 of 9) [1/28/2000 1:26:18 PM]
check to see if the mouse is down (isMouseDown is also from ImageButton). If the mouse
is down and inside our button, we set the image to our down image. If the mouse is inside the
button, but not down, we set the button image to the rollover image. If the mouse is not inside
our button, we set the image to the upImage.
Here is a logic table for our rollover button:
Mouse Inside Mouse Outside
Button Up rolloverImage upImage
Button Down downImage upImage
Now that we have our rollover behavior specified, it is time to define
handleMousePressed( ).
Back to top
Step 4 - Implementing handleMousePressed( )
As we recall from ImageButton, when we get a MouseEvent of the type MousePressed,
we set some internal flags and then call the abstract method handleMousePressed( ).
Here is where we implement that abstract method to respond to mouse presses.
/**
* Gets called when the mouse button is pressed on this button.
*/
Protected void handleMousePressed( )
{
//Set the image to the appropriate image for a mouse press.
//Insert "RolloverButton mousePressed"
Locate the RolloverButton mousePressed clipping in the RolloverButton folder and drag it
directly below the last line of code shown above. Your code should now look like this:
/**
* Gets called when the mouse button is pressed on this button.
*/
Protected void handleMousePressed( )
{
//Set the image to the appropriate image for a mouse press.
//Insert "RolloverButton mousePressed"
setImage(downImage);
}
When the button is pressed, we set the current image to the downImage. Pretty easy! You are
beginning to see how easy our underlying architecture is making the definition of this class.
Adding extra functionality is quite straightforward.
Now it’s time for handleMouseReleased( ).
Building the Rollover Button
(6 of 9) [1/28/2000 1:26:18 PM]
Back to top
Step 5 - Implementing handleMouseReleased( )
The handleMouseReleased( ) method is called when the mouse is released over the
button. It takes two Boolean parameters; the first indicates whether the mouse is inside the
button, and the second indicates whether the mouse was pressed inside the button before this
method was called.
/**
* Gets called when the mouse button is released on this button.
* @param isMouseInside, if true, the mouse is located inside
* the button area, if false the mouse is outside the button.
* @param wasMouseDown, if true the mouse was down inside this
* button before this method was called.
*/
Protected void handleMouseRelease(Boolean isMouseInside,
Boolean wasMouseDown)
{
//Set the image to the appropriate image for a mouse
//release, and calls the super classes version to include
//inherited functionality.
//Insert "RolloverButton mouseReleased"
Locate the RolloverButton mouseReleased clipping in the RolloverButton folder and drag it
directly below the last line of code shown above. Your code should now look like this:
/**
* Gets called when the mouse button is released on this button.
* @param isMouseInside, if true, the mouse is located inside
* the button area, if false the mouse is outside the button.
* @param wasMouseDown, if true the mouse was down inside this
* button before this method was called.
*/
Protected void handleMouseRelease(Boolean isMouseInside,
Boolean wasMouseDown)
{
//Set the image to the appropriate image for a mouse
//release, and calls the super classes version to include
//inherited functionality.
//Insert "RolloverButton mouseReleased"
if (isMouseInside)
{
setImage(rolloverImage);
}
super.handleMouseRelease(isMouseInside);
}
Building the Rollover Button
(7 of 9) [1/28/2000 1:26:18 PM]
If the user is inside the button we call setImage( ) with the rollover image. We then call our
superclass handleMouseRelease( ) method to inherit default button release behavior.
Regardless of the location of the mouse, we still want the superclass to execute its code.
Last but not least is the function handleRollover( ).
Back to top
Step 6 - Implementing handleRollover( )
The last method in this file is handleRollover( ). It is used to determine which image to
used based on the state information passed into the routine. It looks very similar to refresh(
) but uses parameterized information instead of stored state information.
/**
* Gets called when the mouse crosses into or out of the button
* area.
* @param isMouseInside, is true if the mouse is in the button
* area, false if it is outside.
* @param isMouseDown, is true if the mouse button is pressed,
* false if it is not.
*/
Protected void handleRollover(Boolean isMouseInside,
Boolean isMouseDown)
{
//Handle determining the current state, and reacting
//appropriately
//Insert "RolloverButton handleRollover"
Locate the RolloverButton handleRollover clipping in the RolloverButton folder and drag it
directly below the last line of code shown above. Your code should now look like this:
/**
* Gets called when the mouse crosses into or out of the button
* area.
* @param isMouseInside, is true if the mouse is in the button
* area, false if it is outside.
* @param isMouseDown, is true if the mouse button is pressed,
* false if it is not.
*/
Protected void handleRollover(Boolean isMouseInside,
Boolean isMouseDown)
{
//Handle determining the current state, and reacting
//appropriately
//Insert "RolloverButton handleRollover"
Building the Rollover Button
(8 of 9) [1/28/2000 1:26:18 PM]
if (isMouseInside)
{
if (isMouseDown)
{
setImage(downImage);
}
else
{
setImage(rolloverImage);
}
}
else
{
setImage(upImage);
}
}
This code should look quite familiar. If the mouse is inside the button and down, we see the
image to downImage. If it is inside, but not down, we set the image to rolloverImage. If
the mouse is not inside, set the image to upImage.
It happens that the logic for this method turns out to be the same for the refresh method, but this
does not necessarily have to be the case. So in order to keep the generality which makes for
robust classes, we have chosen not to combine these two methods.
Back to top
Summary
That completes the work we have to do on this file. As you can see, implementing the
RolloverButton was far easier than ImageButton. That is because we are taking
advantage of the basic behaviors of ImageButton and adding only the functionality necessary
to give rollover behavior to our button. We implemented two methods that were declared as
abstract from ImageButton, handleRollover( ), and handleMousePressed( )
as well as some additional methods for refreshing the state, and handling mouse released
messages.
Now it’s time to complete the final tier of our button classes, ForwardButton,
BackwardButton, and PlayPauseButton. Click here to return to the main tutorial
document.
Building the Rollover Button
(9 of 9) [1/28/2000 1:26:18 PM]
Technical: Java
Building the Forward Button
File: ForwardButton.java
Contents
Overview
1) Implementing initImages( )
Summary
Overview
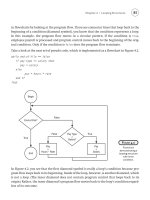
Up Rollover Down
The ForwardButton class is a subclass of
RolloverButton. It specifies a series of images that represent
the appearance of a "forward" or "next" control.
The image on the right shows the various images used by this button. This class
implements a single method, initImages( ) which is declared as abstract in
RolloverButton.
Steps to Follow
Step 1 - Implementing initImages( )
This class does not import any packages. It uses only the default package java.lang.*
and classes in its default package. This class is derived from RolloverButton which
we examined earlier.
public class ForwardButton extends RolloverButton
{
protected void initImages( )
{
//Initialize images for the ForwardButton
//Insert "ForwardButton initImages"
We have only a single method that was defined as an abstract method in
Building the Forward Button
(1 of 2) [1/28/2000 1:26:20 PM]
RolloverButton. This method specifies the images to be used for this button.
Locate the ForwardButton initImages clipping in the ForwardButton folder and drag it
directly below the last line of code shown above. Your code should now look like this:
public class ForwardButton extends RolloverButton
{
protected void initImages( )
{
//Initialize images for the ForwardButton
//Insert "ForwardButton initImages"
addImage("images/FFF.jpg", upImage);
addImage("images/FFFa.jpg", downImage);
addImage("images/FFFb.jpg", rolloverImage);
}
}
To implement this method, all we need to specify the images to be used, and the
identifying string. Now we can really see the benefits of our architecture!
Summary
The forward button class is extremely simple. We are benefiting from our
pyramid-based component architecture where we place basic functionality into large
base classes and then refine behavior in successive classes.
In the next step, we will implement the BackwardButton. Click here to return to the
main tutorial file.
Building the Forward Button
(2 of 2) [1/28/2000 1:26:20 PM]