Intro to Java Programming phần 10 ppsx
Bạn đang xem bản rút gọn của tài liệu. Xem và tải ngay bản đầy đủ của tài liệu tại đây (1.7 MB, 15 trang )
Technical: Java
Previous Section Table of Contents Next Section
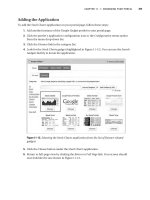
Step 11 - Adding the Image Resources
Now, that we have completed all of the
code for our tutorial, it is time to
configure our project to use the image
resources needed for our application. As
you can see from the picture (right), our
project has all of the images used by our
image buttons directly added to the
project in an images group. This was
accomplished by dragging the images
folder from the Finder into the project
window.
When you have an application that uses
image resources and you want them
bundled in to your application, it is a
good idea to add them to your project.
Once these resources are part of your
project, you can select all of the images,
and then click on the project inspector
button in the project
window so that you can tell
CodeWarrior to copy the image files directly into the output file for the
application.
The project inspector dialog is shown in the image below. For image files, you will need
to click the checkbox Merge Into Output. This tells CodeWarrior that you want to copy
the image file into the jar that is output when you build the application.
This is a much more desirable approach then having a folder of images used by your
application that the user could muck with an image editing tool, or move out from under
Intro to Java Programming - Step 11
(1 of 2) [1/28/2000 1:26:28 PM]
your application.
The project associated with this tutorial
should already be set up so that all of the
image files will be merged into the output
file. This is mentioned primarily for future
reference.
If you do not perform this step, the
SlideShow application will not be able to
find the image files when it looks for them.
Now that we have our image resources
configured, close the inspector windows.
Back to top
Previous Section Table of Contents Next Section
Search Tips | Site Map Extended Index
The Apple Store | Hot News | About Apple | Products | Support
Design & Publishing | Education | Developer | Where to Buy | Home
Contact Us - Developer Site Map
Copyright © 2000 Apple Computer, Inc. All rights reserved.
Intro to Java Programming - Step 11
(2 of 2) [1/28/2000 1:26:28 PM]
Search
Shortcut
Technical: Java
Previous Section Table of Contents Next Section
Step 12 - Building the Application
Now that all of the project sources are completed and the image resources and project
settings are configured properly, we are ready to build the application.
To compile all of the sources, choose Make from the Project menu or use the Command
key equivalent— <Command-M>.
You will see a build progress dialog similar to the one shown above. This dialog shows
the status of the build operation including the name of the file being compiled, and the
number errors or warnings encountered.
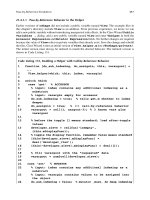
If you have any build errors, you will see a dialog that looks like the picture below. This
dialog will list all of the errors found by the compiler. At the top of the window is a stop
icon that shows the number of errors. The alert icon shows the number of warnings.
Intro to Java Programming - Step 12
(1 of 3) [1/28/2000 1:27:07 PM]
The pane at the top shows all of the errors and warnings in the file. If you select an error
from this list by clicking on the message, the bottom panel will show the line of code
where the error appears.
The picture illustrates two errors caused by a missing clipping. In this example, our code
references the variable label1, but the code where that data member is declared is
missing.
If you encounter compile errors, compare your modified skeleton source file with the
completed source file in the sources (completed) folder. You must eliminate any
compile errors before going to the next step.
Back to top
Previous Section Table of Contents Next Section
Intro to Java Programming - Step 12
(2 of 3) [1/28/2000 1:27:07 PM]
Search Tips | Site Map Extended Index
The Apple Store | Hot News | About Apple | Products | Support
Design & Publishing | Education | Developer | Where to Buy | Home
Contact Us - Developer Site Map
Copyright © 2000 Apple Computer, Inc. All rights reserved.
Intro to Java Programming - Step 12
(3 of 3) [1/28/2000 1:27:07 PM]
Search
Shortcut
Technical: Java
Previous Section Table of Contents Next Section
Making a Double-Clickable Application
Now that you have successfully built your application, you
should see a new file, “SlideShow.jar,” at the same level as
your project file (see picture right). This file is the output
file created when you perform a make operation on your
project. This file contains all of the compiled class files
and image resources needed by the application.
This file is a library file; it is not an application. In order to
make our application runnable in a convenient format, we
need to build a double-clickable Macintosh application. To
do so, we need to use a tool called JBindery which is part
of the MRJ SDK.
JBindery is located in the MRJ SDK folder in a
folder called JBindery. The application icon is
shown above. Launch JBindery by dropping the SlideShow.jar icon on the
JBindery icon. (If JBindery doesn’t accept the drop, that means that your desktop
database needs to be rebuilt. Double-click on the application icon, and follow the steps
carefully to make sure that the setting match). If you need additional information,
Intro to Java Programming - Making a Double-Clickable Application
(1 of 6) [1/28/2000 1:27:13 PM]
consult the JBindery Adobe Acrobat documentation file, Using JBindery, located in the
same folder as the application.
When JBindery launches, you will see a dialog box with the Command page showing.
If the Command page is not visible, click on the Command icon. The first text
field labeled “Class name” needs to match our application class that contains
the main entry point of the application, the main( ) routine. This field needs
to read “SlideShow” since that is our main class.
The additional fields allow us to specify arguments to main (the Optional parameters
textfield), and redirect either stdin or stdout (the console).
Since we don’t use these features, we can use the default values for these items.
Now click on the Classpath icon in the left column to go to the classpath page.
The classpath page contains a panel for adding class files, .jar files, and .zip
files that contain resources needed to run the application. The first item
$CLASSPATH is the implicit system path where Java classes are located. Any local
classes should be placed after this entry.
Intro to Java Programming - Making a Double-Clickable Application
(2 of 6) [1/28/2000 1:27:13 PM]
As the above shows, our SlideShow.jar needs to be added to the classpath so that our
application classes can be found by the class loader. If SlideShow.jar does not appear in
this list, you may add it by dragging it from the Finder into the window below the
$CLASSPATH line. Since we only have one .jar file for all of our classes, that is the only
entry that we need to add. If we had multiple class files or .jar archives, we would want
to add all of them here.
Now click on the Appearance icon in the left column to go to the appearance
page in JBindery.
The only item that needs to be changed is the checkbox that reads Size boxes intrude.
This
needs to be checked in order to make our application more Mac-like.
Lastly, click on the Application icon in the leftmost pane. Here, we will edit
the settings that will be used by the double-clickable application. We set the
4-character creator code of the application, minimum and maximum
application heap sizes, and specify the resource file to be used.
Intro to Java Programming - Making a Double-Clickable Application
(3 of 6) [1/28/2000 1:27:13 PM]
Type “SlyD” in the creator field. Minimum and Maximum heap sizes can be left at their
default values.
Drag the file “SlideShow.rsrc” from the Sources (skeleton) folder in the Finder to the
rectangular area below the Merge resources from checkbox. When this is successfully
completed, you should see the full path of the resource file in the non-editable text field.
This resource file has been pre-created for your convenience to include common
Macintosh resource types such as a version resource. We have also added two resource
types that you may wish to consider using in your own applications.
The first is a 'MENU' resource. We
add a 'MENU' resource with an ID of
1128 with an Apple icon as the menu,
and About SlideShow… as the sole
menu item. By using this special ID,
and registering our about handler, MRJ
knows to insert this resource as the first
menu item in the Apple Menu. Our
menu handler is called when this item
is chosen. This also removes the
default Quit menu item from the Apple
Menu, which is not preferred for
finished Macintosh applications.
It is important that the menu is created in exactly this manner, or it will not work
correctly. Additional information is provided in the Adobe Acrobat Document About
MRJ Toolkit that ships as part of the MRJ SDK.
The other main resource we added to the resource file was a 'BNDL' resource. This
resource tells the Finder what icons to use for the application and associated files. It also
tells the Finder what type of files your application can accept for drag and drop.
Intro to Java Programming - Making a Double-Clickable Application
(4 of 6) [1/28/2000 1:27:13 PM]
The image (left) shows the 'BNDL'
resource in ResEdit. We specify the
signature (which is needs to be the
same as the creator we specified in
the Application pane in JBindery).
Our bundle supports three different
types. The APPL type is our
application, and we specify the 1-bit,
4-bit, and 8-bit small and large icons
to be used. The '****' entry
specifies that we can handle any file
type (we don’t create this type, so
we didn’t specify a custom icon),
and the 'fold' item specifies that
we can accept folders. As you recall,
our OpenDocument handler knows
how to deal with folders and files.
Now that we have looked at the resources and specified the resource file to be used in
JBindery, we can build the application. Click on the Save Settings… button and save the
application in the same location as your project file using the name “SlideShow”.
A double-clickable application will be created and should have the icons we specified.
That’s it! Congratulations! You have made your first real Java-based application. Feel
free to launch your application and drop some image files on it to see how it works.
Back to top
Previous Section Table of Contents Next Section
Intro to Java Programming - Making a Double-Clickable Application
(5 of 6) [1/28/2000 1:27:13 PM]
Search Tips | Site Map Extended Index
The Apple Store | Hot News | About Apple | Products | Support
Design & Publishing | Education | Developer | Where to Buy | Home
Contact Us - Developer Site Map
Copyright © 2000 Apple Computer, Inc. All rights reserved.
Intro to Java Programming - Making a Double-Clickable Application
(6 of 6) [1/28/2000 1:27:13 PM]
Search
Shortcut
Technical: Java
Previous Section Table of Contents Next Section
Summary
We’ve covered a lot of ground here. First, we talked a little bit about our application and
configured our project correctly. We are building an application, so we needed to specify
“Application” as the project type and set the output format to use the “.jar” format. Once
our project was set up, we jumped right into the implementation of our classes.
We started out with the AboutBox, and then moved on to our button classes, which are
a classic example of good object-oriented programming methodology. We built broad
low-level functionality into the base class and then derived a series of subsequent classes
which successively refined the underlying classes.
Next, we implemented the Controller class which demonstrated event handling and
creating and managing floating windows. Finally, we implemented the Application
class where we learned about threads, menu management, and special MRJ handlers.
Once we built our .jar file, we used JBindery to create a double-clickable Macintosh
application.
Back to top
Previous Section Table of Contents Next Section
Intro to Java Programming - Summary
(1 of 2) [1/28/2000 1:27:15 PM]
Search Tips | Site Map Extended Index
The Apple Store | Hot News | About Apple | Products | Support
Design & Publishing | Education | Developer | Where to Buy | Home
Contact Us - Developer Site Map
Copyright © 2000 Apple Computer, Inc. All rights reserved.
Intro to Java Programming - Summary
(2 of 2) [1/28/2000 1:27:15 PM]
Search
Shortcut
Technical: Java
Previous Section Table of Contents
Where to Go From Here
Now that you have made your first application, there are many interesting places where
you can go to find out more about Java Programming, and Java on the Macintosh. The
following is a list of recommended links you can follow for additional information.
The best place to start is on Apple’s Java Developer page:
< />There you will find lots of useful information including introductory material at:
< />Sun has a wealth of Java Information on their Java pages:
< />There you can find the Java Tutorial:
< />as well as API documentation
< />I hope your journey was interesting and informative. If you encounter difficulty, errors,
or have suggestions on how to improve this tutorial, please enter your feedback in the
BugReporter tool.
Back to top
Intro to Java Programming - Where to Go From Here
(1 of 2) [1/28/2000 1:27:17 PM]
Previous Section Table of Contents
Search Tips | Site Map Extended Index
The Apple Store | Hot News | About Apple | Products | Support
Design & Publishing | Education | Developer | Where to Buy | Home
Contact Us - Developer Site Map
Copyright © 2000 Apple Computer, Inc. All rights reserved.
Intro to Java Programming - Where to Go From Here
(2 of 2) [1/28/2000 1:27:17 PM]
Search
Shortcut