Red Hat Linux unleashed Second Edition phần 4 docx
Bạn đang xem bản rút gọn của tài liệu. Xem và tải ngay bản đầy đủ của tài liệu tại đây (620.95 KB, 71 trang )
Configuring Other Servers
P
ART II
188
without runlevels (run man init to see whether your system uses an init), you should look
into the
/etc/rc and /etc/rc.d/rc.local files; you usually only have to remove comment signs
at the beginning of a line that calls
xdm. If no such line is present, you probably have a system
that has no preconfigured
xdm. In any event, xdm by default runs your .xinitrc file for you.
Configuration of the Window Manager
Window managers are a user- and site-specific issue. Several window managers are available
for Linux. The configuration of one window manager is quite different from that of another.
The window manager used in the configuration is usually explained in your
.xinitrc file, so
look there. The most commonly used window managers for Linux are
■
olwm or olvwm for the OPEN LOOK Window manager. (It is on the CD-ROM at the
back of this book.)
■
mwm for the Motif window manager, possibly the most common commercial window
manager. You have to buy it along with Motif.
■
twm. (It is part of the XFree86 distribution on the CD-ROM at the back of this book.)
■
fvwm95. (This seems to be the most popular freely available window manager and is on
the CD-ROM at the back of this book.)
I discuss
mwm in greater detail in Chapter 26, “Motif Programming.”
Compiling Programs That Use X
Before compiling any programs for X, please read the GCC-HOWTO file. This file can be found in
the
pub/Linux/docs/HOWTO directories of sunsite or under /usr/doc. Many questions on com-
piling programs with Linux are answered here.
If you have the source code for a program that uses X11, it is usually shipped with an
Imakefile
instead of a Makefile.
Imakefiles are files that create Makefiles for your system. Discussing Imakefiles is beyond
the scope of this book; however, you will have to work with
Imakefiles if you work at all with
X sources. Just remember the shell script
xmkmf, and you should be okay.
TIP
xmkmf is an abbreviation for X Make Makefile.
X Window
C
HAPTER 10
189
10
X WINDOW
CAUTION
The xmkmf shell script actually runs the imake command with a set of arguments. The most
common argument is the -DUseInstalled argument. If you examine xmkmf (look in /usr/
X11R6/bin/), you will see that the xmkmf script is a basic wrapper around a call to imake.
It’s very tempting to use imake on a command line by itself. Do not do so. Run the imake
command with the -DUseInstalled argument if you must run imake on the command line.
Of course, before ever running xmkmf, you should read the documentation that usually comes
with such packages.
Run
xmkmf in the directory that contains the Imakefile. If there is a hierarchy of directories
with
Imakefiles, you usually only have to run xmkmf in the root directory of that hierarchy.
The
xmkmf command builds the Makefiles in all directories in the hierarchy.
Then you should run the
make command with an argument to let make resolve its dependen-
cies, using the following command:
$ make depend
TIP
Don’t be afraid if include files, such as stddef.h, varargs.h, and so on, are not found.
They are gcc proprietary header files, and therefore not in the standard include
directories.
After that, you can make the program by running make, and you can install your new utility
(usually in
/usr/X11R6/bin) by running this line:
$ make install
The installation of the man pages is accomplished by running
$ make install.man
Some Common Problems
Some of the problems you might see when you work with XFree86 are outlined in the
following:
■ No windows—all you get is a gray background and no windows. This is due to
running without a window manager. Running X only starts the X server, not the
window manager. You should use the
startx script in usr/X11/R6/bin/startx.
Configuring Other Servers
P
ART II
190
■ Your Logitech serial mouse does not work. The keyword Logitech is reserved for older
Logitech serial mice. Use the keyword
MouseMan (or Microsoft) for newer mice.
Logitech serial mice plugged into a PS/2 port require the keyword
PS/2.
■ You get errors about not finding any font files. First check the
XF86Config file to see
whether the directories in the font path are named correctly and contain fonts. If they
are correct, run
mkfontdir in each of those directories to set them up for use with X.
■ After leaving X, your screen fonts are not restored. This is a known bug with some
servers. There are utilities called
runx or restoretext included with svgalib that can
help you in most cases. You can get them from
sunsite.unc.edu in the file /pub/
Linux/libs/graphics/svgalib-1.2.10.tar.gz
.
■ You will have some problems on uncommon, extremely new, or extremely old cards.
This is what you have to live with when you are dealing with freeware.
■ The server dies with the message
Cannot find a free VT. XFree86 needs a free virtual
terminal (VT) on which to run. So if you have put a
getty process on every virtual
console in your
/etc/inittab, XFree86 is not able to start. The common practice is to
leave /
dev/tty8 (for kernel messages) and /dev/tty7 (for XFree86) free of a getty
process.
This is not an exhaustive list. Read the
HOWTO documents in /usr/docs on the CD-ROM for
more information about other video card problems that are too specific to list here.
Compiling Sources for XFree86
You do not typically want to compile sources for XFree86 unless you really want to make changes
to the sources because something is not working. You will need a lot of disk space and CPU
time to do a complete build of the XFree86 system. Anything you need to know for compiling
XFree86, you can find in the following files (in
/usr/X11R6/lib/X11/doc): INSTALL, README,
and
README.Linux.
Note that you should not compile XFree86 to get rid of hard-coded restrictions (on the maxi-
mal pixel clock, for example) because without these restrictions, your hardware will probably
break down.
To build a server that includes only those drivers you need, you should use the
LinkKit instead
of compiling the complete system. This is a little easier than trying to build it from scratch.
The
LinkKit package is specific and complicated and is therefore beyond the scope of this chapter.
Read
/usr/X11R6/lib/Server/README for a description of how to use LinkKit. This file is not
included in the standard XFree86
tar files but is part of the file that includes the LinkKit. You
can find the
LinkKit at www.xfree86.org.
For adding drivers to the SVGA servers, you need the
LinkKit only.
The documentation on how to build servers can be found in the
/usr/X11R6/lib/Server/
VGADriverDoc
directory after installing the LinkKit package.
X Window
C
HAPTER 10
191
10
X WINDOW
Summary
This chapter covers the topic of configuring the XFree86 system. After reading this chapter,
you should have an idea of how to set up your
XF86Config file to generate your X environment.
Just remember to start with the basic configuration settings for VGA cards and then make en-
hancements. Keep backups of your work and do not change the video settings unless you know
what you are doing. If nothing works despite your best efforts, you have the recourse of know-
ing where to look for answers in FAQs, newsgroups, and FTP sites on the Internet for HOWTO
and other documents on Linux.
Configuring Other Servers
P
ART II
192
Hardware Connectivity
and Devices
P
ART
III
IN THIS PART
■ Filesystems, Disks, and Other
Devices 195
■ Printing with Linux 229
■ TCP/IP Network Management 243
C
HAPTER 11
195
11
FILESYSTEMS
,
D
ISKS
, AND
OTHER
DEVICES
Filesystems, Disks,
and Other Devices
by James Youngman
11
IN THIS CHAPTER
■ Block Devices 197
■ Filesystems 197
■ The
mount Command 198
■ Setting Up Filesystems 202
■ Creating New Filesystems 204
■ Repairing Filesystems 207
■ Hardware 209
■ Character Devices 217
Hardware Connectivity and Devices
P
ART III
196
One of the simplest and most elegant aspects of UNIX (and Linux) design is the way that ev-
erything is represented as a file. Even the devices on which files are stored are represented as
files.
Hardware devices are associated with drivers that provide a file interface; the special files rep-
resenting hardware devices (or just devices) are kept in the directory
/dev. Devices are either
block devices or character devices.
A character device is one from which you can read a sequence of characters—for example, the
sequence of keys typed at a keyboard or the sequence of bytes sent over a serial line. A block
device is one that stores data and offers access to all parts of it equally; floppy and hard disks are
block devices. Block devices are sometimes called random access devices, just as character de-
vices are sometimes called sequentially accessed devices. With the latter, you can get data from
any random part of a hard disk, but you have to retrieve the data from a serial line in the order
it was sent.
When you perform some operation on a file, the kernel can tell that the file involved is a device
by looking at its file mode (not its location). The device nodes are distinguished by having dif-
ferent major and minor device numbers. The major device number indicates to the kernel which
of its drivers the device node represents. (For example, a block device with major number 3 is
an IDE disk drive, and one with the major device number 8 is a SCSI disk.) Each driver is
responsible for several instances of the hardware it drives, and these are indicated by the value
of the minor device number. For example, the SCSI disk with the minor number 0 represents
the whole “first” SCSI disk, and the minor numbers 1 to 15 represent fifteen possible partitions
on it. The
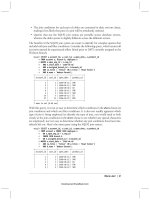
ls command prints the major and minor device numbers for you:
$ ls -l sort=none /dev/sda{,?,??} /dev/sdb
brw-rw 1 root disk 8, 0 Sep 12 1994 /dev/sda
brw-rw 1 root disk 8, 1 Sep 12 1994 /dev/sda1
brw-rw 1 root disk 8, 2 Sep 12 1994 /dev/sda2
brw-rw 1 root disk 8, 3 Sep 12 1994 /dev/sda3
brw-rw 1 root disk 8, 4 Sep 12 1994 /dev/sda4
brw-rw 1 root disk 8, 5 Sep 12 1994 /dev/sda5
brw-rw 1 root disk 8, 6 Sep 12 1994 /dev/sda6
brw-rw 1 root disk 8, 7 Sep 12 1994 /dev/sda7
brw-rw 1 root disk 8, 8 Sep 12 1994 /dev/sda8
brw-rw 1 root disk 8, 9 Sep 12 1994 /dev/sda9
brw-rw 1 root disk 8, 10 Sep 12 1994 /dev/sda10
brw-rw 1 root disk 8, 11 Sep 12 1994 /dev/sda11
brw-rw 1 root disk 8, 12 Sep 12 1994 /dev/sda12
brw-rw 1 root disk 8, 13 Sep 12 1994 /dev/sda13
brw-rw 1 root disk 8, 14 Sep 12 1994 /dev/sda14
brw-rw 1 root disk 8, 15 Sep 12 1994 /dev/sda15
brw-rw 1 root disk 8, 16 Sep 12 1994 /dev/sdb
The obscure options to this ls command ensure that the devices are presented in this order. If
just
ls -l had been used, the entries would have been sorted alphabetically, and /dev/sda10
would have come before /dev/sda2.
Filesystems, Disks, and Other Devices
C
HAPTER 11
197
11
FILESYSTEMS
,
D
ISKS
, AND
OTHER
DEVICES
The b at the far left indicates that all of these are block devices. (Character devices are indicated
by a
c.) The major and minor device numbers appear just before the time field, separated by
commas. (This is the position normally occupied in
ls -l output by the file’s size.)
Block Devices
If you had just one file of data to store, you could put it directly on a block device and read it
back. Block devices have some fixed capacity, though, and you would need some method of
marking the end of your data. Block devices behave in most respects just like ordinary files,
except that although an ordinary file has a length determined by how much data is in it, the
“length” of a block device is just its total capacity. If you wrote a megabyte to a 100MB block
device and read back its contents, you would get the 1MB of data followed by 99MB of its
previous contents. Bearing in mind this restriction, there are still several UNIX utilities that
encode the amount of data available in the file’s data rather than the file’s total length, and
hence are suitable for storing data directly on block devices—for example,
tar and cpio, which
are suitable for everybody; and
dump, which is suitable only for the system administrator (be-
cause it requires read access to the block device underlying the data to be backed up). To back
up the entire contents of your home directory to floppy disk, you would type the following:
$ tar cf /dev/fd0 $HOME
or
$ find $HOME -print0 | cpio create -0 format=crc >/dev/fd0
The -print0 and -0 options for find and cpio ensure that the names of the files to be backed
up that
find sends to cpio are separated by ASCII NULs, rather than newlines. This ensures
that any filenames containing a newline are correctly backed up.
NOTE
The only characters that are illegal in UNIX filenames are the slash and the ASCII NUL.
These backup utilities are written specifically to write their backups to any kind of file; in fact,
they were designed for sequentially accessed character devices—for example, tape drives.
Filesystems
When you have more than one item of data, it is necessary to have some method of organizing
files on the device. These methods are called filesystems. Linux enables you to choose any orga-
nizational method to marshal your files on their storage device. For example, you can use the
MS-DOS filesystem on a floppy, or the faster
ext2 filesystem on your hard disk.
Hardware Connectivity and Devices
P
ART III
198
Many different filesystems are supported by Linux; the ext2 filesystem is used most because it
is designed for Linux and is very efficient. Other filesystems are used for compatibility with
other systems; for example, it’s common to use the
msdos and vfat filesystems on floppies. (These
are the native filesystems of MS-DOS and Windows 95.) Under Red Hat Linux 4.2, some
filesystems are built into the kernel:
$ cat /proc/filesystems
ext2
msdos
nodev proc
And some filesystems are available as loadable modules:
$ ls /lib/modules/`uname -r`/fs
ext.o isofs.o ncpfs.o smbfs.o ufs.o vfat.o
hpfs.o minix.o nfs.o sysv.o umsdos.o xiafs.o
Some of these (nfs, ncpfs, and smbfs) are network filesystems that don’t depend on block de-
vices. Network filesystems are covered in Chapter 13, “TCP/IP Network Management.” There
are more filesystems that are supported by Linux but not provided by the standard kernel (for
example, NTFS).
The
mount
Command
To mount a block device into the filesystem, use the mount command. You need to specify
what device contains the filesystem, what type it is, and where in the directory hierarchy to
mount it.
A
mount command looks like this:
mount [-t type] [-o options] device mount-point
device
must be a block device, or, if it contains a colon, it can be the name of another machine
from which to mount a filesystem (see Chapter 13).
mount-point should be an existing directory;
the filesystem will appear at this position. (Anything previously in that directory will be hidden.)
The filesystem type and options are optional, and the variety and meaning of options depend
on the type of filesystem being mounted. If the filesystem you want to mount is specified in
the
/etc/fstab file, you need to specify only the mount point or the device name; the other
details will be read from
/etc/fstab by mount. Here is an example of the mount command being
used:
# mount /dev/fd1 -t vfat /mnt/floppy
mount: block device /dev/fd1 is write-protected, mounting read-only
# ls /mnt/floppy
grub-0.4.tar.gz
# umount /mnt/floppy
# ls /mnt/floppy
filesystem not mounted
In this example, I mounted a floppy containing a vfat filesystem at the mount point /mnt/
floppy
(and got an informational message). The directory /mnt/floppy already existed. I used
Filesystems, Disks, and Other Devices
C
HAPTER 11
199
11
FILESYSTEMS
,
D
ISKS
, AND
OTHER
DEVICES
ls to see what was on the disk and unmounted it again. I then ran ls again and the response I
got was simply the name of a file that I leave in the directory
/mnt/floppy on my hard disk to
remind me that there currently is nothing mounted there. This enables me to distinguish this
from having an empty floppy mounted.
Mounting a
vfat floppy like this caused the Linux kernel to automatically load the vfat driver
into the kernel while it was needed. These drivers are loaded by the system daemon
kerneld,
and when they become unused after the filesystem is unmounted, they are unloaded to recover
the memory that they occupied. See Chapter 5, “Configuring and Building Kernels,” for more
information about kernel modules.
Any one of several things can cause the
mount command to fail. It is possible to specify an in-
correct device name (that is, a device file that does not exist or one for which a driver is not
available in the kernel or for which the hardware is not present). Other error conditions in-
clude unreadable devices (for example, empty floppy drives or bad media) and insufficient
permissions (
mount commands other than those sanctioned by the administrator by listing them
with the option
user in /etc/fstab are forbidden to ordinary users). Trying to mount a device
at a mount point that does not already exist will also not work. Still more error conditions are
possible but unlikely (for example, exceeding the compiled-in limit to the number of mounted
filesystems) or self-explanatory (for example, most usage errors for the
mount command itself ).
There are some more unlikely error messages that chiefly relate to the loopback devices.
In order to mount a filesystem, the point at which it is to be mounted (that is, the mount point)
must be a directory. This directory doesn’t have to be empty, but after the filesystem is mounted,
anything “underneath” it will be inaccessible. Linux provides a singly rooted filesystem, in con-
trast to those operating systems that give each filesystem a separate drive letter. Although this
might seem less flexible, it is more flexible, because the size of each block device (that is, hard
disk or whatever) is hidden from programs, and things can be moved around. For example, if
you have some software that expects to be installed in
/opt/umsp, you can install it in
/big-disk/stuff/umsp and make /opt/umsp a symbolic link. There is also no need to edit a
myriad of configuration files that are now using the wrong drive letter after you install a new
disk drive, for example.
There are many options governing how a mounted filesystem behaves; for example, it can be
mounted read-only. There are options for filesystems such as
msdos that don’t have any con-
cept of users. The filesystems enable you to give each file a particular file mode (for security or
to allow access by everyone). When you mount an
nfs filesystem, there is so much flexibility
available that the options have a separate manual page (
man nfs), although the defaults are
perfectly reasonable. The
nfs filesystem is explained in more detail in Chapter 13.
Table 11.1 contains options useful for
mount, given in alphabetical order. Unless otherwise
indicated, these options are valid for all filesystem types, although asking for asynchronous writes
to a CD-ROM is no use! Options applicable only to NFS filesystems are not listed here; refer
to the
nfs manual page for those.
Hardware Connectivity and Devices
P
ART III
200
Table 11.1.
mount
options.
mount Option Description
async Write requests for the filesystem normally should wait until the
data has reached the hardware; with this option, the program
continues immediately instead. This does mean that the system is
slightly more prone to data loss in the event of a system crash,
but, on the other hand, crashes are very rare with Linux. This
option speeds up NFS filesystems by a startling extent. The
opposite of this option is
sync.
auto Indicates to mount that it should mount the device when given the
-a flag. This flag is used by the startup scripts to make sure that
all the required filesystems are mounted at boot time. The
opposite of this option is
noauto.
defaults Turns on the options rw, suid, dev, exec, auto, nouser, and
async.
dev Allows device nodes on the system to be used. Access to devices is
completely determined by access rights to the on-disk device
node. Hence, if you mount an
ext2 filesystem on a floppy and
you have previously placed a writable
/dev/kmem device file on the
disk, then you’ve just gained read/write access to kernel memory.
System administrators generally prevent this from happening by
mounting removable filesystems with the
nodev mount option.
exec Indicates to the kernel that it should allow the execution of
programs on the filesystem. This option is more frequently seen
as
noexec, which indicates to the kernel that execution of pro-
grams on this filesystem shouldn’t be allowed. This is generally
used as a security precaution or for NFS filesystems mounted
from another machine that contain executable files of a format
unsuitable for this machine (for example, being intended for a
different CPU).
noauto Opposite of auto; see above.
nodev Opposite of dev; see above.
noexec Opposite of exec; see above.
nosuid Opposite of suid; see below.
nouser Opposite of user; see below.
Filesystems, Disks, and Other Devices
C
HAPTER 11
201
11
FILESYSTEMS
,
D
ISKS
, AND
OTHER
DEVICES
remount Allows the mount command to change the flags for an already-
mounted filesystem without interrupting its use. You can’t
unmount a filesystem that is currently in use, and this option is
basically a workaround. The system startup scripts, for example,
use the command
mount -n -o remount,ro / to change the root
filesystem from read-only (it starts off this way) to read/write (its
normal state). The
-n option indicates to mount that it shouldn’t
update
/etc/fstab because it can’t do this while the root
filesystem is still read-only.
ro Mounts the filesystem read-only. This is the opposite of the
option
rw.
rw Mounts the filesystem read/write. This is the opposite of the
option
ro.
suid Allows the set user ID and set group ID file mode bits to take
effect. The opposite of this option is
nosuid. The nosuid option
is more usual; it is used for the same sorts of reasons that
nodev is
used.
sync All write operations cause the calling program to wait until the
data has been committed to the hardware. This mode of opera-
tion is slower but a little more reliable than its opposite, asyn-
chronous I/O, which is indicated by the option
async (see above).
user Allows ordinary users to mount the filesystem. When there is a
user option in /etc/fstab, ordinary users indicate which
filesystem they want to mount or unmount by giving the device
name or mount point; all the other relevant information is taken
from the
/etc/fstab file. For security reasons, user implies the
noexec, nosuid, and nodev options.
Options are processed by the
mount command in the order they appear on the command line
(or in
/etc/fstab). Thus, it is possible to allow users to mount a filesystem and then run set
user ID executables by using the options
user, suid in that order. Using them in reverse order
(
suid, user) wouldn’t work because the user option would turn the suid option off again.
There are many other options available, but these are all specific to particular filesystems. All
the valid options for
mount are detailed in its manual page. An example is the umask flag for the
vfat and fat filesystems, which allows you to make all the files on your MS-DOS or Windows
partitions readable (or even writable if you prefer) for all the users on your Linux system.
mount Option Description
Hardware Connectivity and Devices
P
ART III
202
Setting Up Filesystems
When the kernel boots, it attempts to mount a root filesystem from the device specified by the
kernel loader, LILO. The root filesystem is initially mounted read-only, and the boot process
proceeds as described in Chapter 4, “System Startup and Shutdown.” During the boot pro-
cess, the filesystems listed in the filesystem table
/etc/fstab are mounted. This file specifies
which devices are to be mounted, what kinds of filesystems they contain, at what point in the
filesystem the mount takes place, and any options governing how they are to be mounted. The
format of this file is described in
fstab.
The Red Hat File System Manager
An easy way of setting up filesystem entries in /etc/fstab is the configuration tool File System
Manager in the Red Hat Control Panel (though you can invoke it separately as
fstool). The
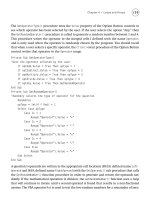
File System Manager is shown in Figure 11.1.
FIGURE 11.1.
The File System
Manager.
When you start fstool, it produces a window that contains all the entries in /etc/fstab. Each
entry shows the device name, mount point, filesystem type, size, space used, and space avail-
able. Additionally, each mounted filesystem is marked with an asterisk. The Info button dis-
plays extra information about the highlighted filesystem (the same information as is indicated
in
/etc/fstab and in the output of the df command).
Filesystems can be mounted or unmounted with the two buttons Mount and Unmount. Any
errors that occur are shown in a dialog box; this can happen if, for example, you try to mount
a CD-ROM when there is no disk in the drive. (Go ahead and try it.) The Format button
works only for hard disk partitions; for these, it runs
mkfs (see the section “Creating New
Filesystems,” later in this chapter). Other media (for example, floppy disks) are formatted dif-
ferently (see the section “Floppy Disks,” later in this chapter).
The Check button works only for
ext2 and minix filesystems. If you get the error fsck:
command not found
, this just means that the directory /sbin is not on your path, and you should
be able to fix this by running
su - root. (You might also need to do export DISPLAY=:0.0, if
that is necessary.) Checking a filesystem can take a while, and the result is shown in a dialog
Filesystems, Disks, and Other Devices
C
HAPTER 11
203
11
FILESYSTEMS
,
D
ISKS
, AND
OTHER
DEVICES
box afterward. It is very unusual for errors to be shown for hard disk filesystems here because
these are checked at boot time and don’t get corrupted during the normal operation of Linux.
The NFS menu is used to add and remove NFS network mounts, which are explained in Chapter
13. You can exit the File System Manager by selecting the Quit option from the FSM menu.
Editing
/etc/fstab
Manually
The filesystem table /etc/fstab is just a text file; it is designed to have a specific format that is
readable by humans and not just computers. It is separated into columns by tabs or spaces (it
doesn’t matter which you use). You can edit it with your favorite text editor—it doesn’t matter
which. You must take care, however, if you modify it by hand, because removing or corrupting
an entry will make the system unable to mount that filesystem next time it boots. For this rea-
son, I make a point of saving previous versions of this file using the Revision Control System
(a very useful program—see the manual page for
rcs).
My
/etc/fstab looks like this:
#
# /etc/fstab
#
# You should be using fstool (control-panel) to edit this!
#
#<device> <mountpoint> <filesystemtype> <options> <dump> <fsckorder>
/dev/hda1 / ext2 defaults 1 1
/dev/hdb5 /home ext2 defaults,rw 1 2
/dev/hda3 /usr ext2 defaults 1 2
/dev/hdb1 /usr/src ext2 defaults 1 3
/dev/hdc /mnt/cdrom iso9660 user,noauto,ro 0 0
/dev/sbpcd0 /mnt/pcd iso9660 user,noauto,ro 0 0
/dev/fd1 /mnt/floppy vfat user,noauto 0 0
/proc /proc proc defaults
/dev/hda2 none swap sw
The first four entries are the ext2 filesystems comprising my Linux system. When Linux is
booted, the root filesystem is mounted first; all the other local (that is, nonnetwork) filesystems
are mounted next. Filesystems appear in
/etc/fstab in the order they are mounted; /usr must
appear before
/usr/src, for example, because the mount point for one filesystem exists on the
other. The following three filesystems are all removable filesystems (two CD-ROMs and a floppy
drive). These have the
noauto option set so that they are not automatically mounted at boot
time. The removable devices have the
user option set so that I can mount and unmount them
without having to use
su all the time. The CD-ROMs have the filesystem type iso9660, which
is the standard filesystem for CD-ROMs, and the floppy drive has the filesystem type
vfat,
because I often use it for interchanging data with MS-DOS and Windows systems.
Hardware Connectivity and Devices
P
ART III
204
The last two filesystems are special; the first (/proc) is a special filesystem provided by the ker-
nel as a way of providing information about the system to user programs. The information in
the
/proc filesystem is used in order to make utilities such as ps, top, xload, free, netstat, and
so on work. Some of the “files” in
/proc are really enormous (for example, /proc/kcore) but
don’t worry—all the information in the
/proc filesystem is generated on-the-fly by the Linux
kernel as you read it; no disk space is wasted. You can tell that they are not real files because, for
example, root can’t give them away with
chown.
The final “filesystem” isn’t, in fact, a filesystem at all; it is an entry that indicates a disk parti-
tion used as swap space. Swap partitions are used to implement virtual memory. Files can also
be used for swap space. The names of the swap files go in the first column where the device
name usually goes.
The two numeric columns on the right relate to the operation of the
dump and fsck commands,
respectively. The
dump command compares the number in column five (the dump interval) with
the number of days since that filesystem was last backed up so that it can inform the system
administrator that the filesystem needs to be backed up. Other backup software—for example,
Amanda—can also use this field for the same purpose. (Amanda can be found at the URL
Filesystems without a dump interval
field are assumed to have a dump interval of zero, denoting “never dump.” For more information,
see the manual page for
dump.
The sixth column is the
fsck pass and indicates which filesystems can be checked in parallel at
boot time. The root filesystem is always checked first, but after that, separate drives can be
checked simultaneously, Linux being a multitasking operating system. There is no point, how-
ever, in checking two filesystems on the same hard drive at the same time, because this would
result in lots of extra disk head movement and wasted time. All the filesystems that have the
same pass number are checked in parallel, from 1 upward. Filesystems with a 0 or missing pass
number (such as the floppy and CD-ROM drives) are not checked at all.
Creating New Filesystems
When you install Red Hat Linux, the installation process makes some new filesystems and sets
the system up to use them. When you later come to set up new filesystems under Linux, you
will be coming to it for the first time.
Many operating systems don’t distinguish between the preparation of the device’s surface to
receive data (formatting) and the building of new filesystems. Linux does distinguish between
the two, principally because only floppy disks need formatting in any case, and also because
Linux offers as many as half a dozen different filesystems that can be created (on any block
device). Separately providing the facility of formatting floppy disks in each of these programs
would be poor design and would require you to learn a different way of doing it for each kind
of new filesystem. The process of formatting floppy disks is dealt with separately (see the sec-
tion “Floppy Disks,” later in this chapter).
Filesystems, Disks, and Other Devices
C
HAPTER 11
205
11
FILESYSTEMS
,
D
ISKS
, AND
OTHER
DEVICES
Filesystems are initially built by a program that opens the block device and writes some struc-
tural data to it so that, when the kernel tries to mount the filesystem, the device contains the
image of a pristine filesystem. This means that both the kernel and the program used to make
the filesystem must agree on the correct filesystem structure.
Linux provides a generic command,
mkfs, that enables you to make a filesystem on a block
device. In fact, because UNIX manages almost all resources with the same set of operations,
mkfs can be used to generate a filesystem inside an ordinary file! Because this is unusual, mkfs
asks for confirmation before proceeding. When this is done, you can even mount the resulting
filesystem using the loop device (see the section “Mounting Filesystems on Files,” later in this
chapter).
Because of the tremendous variety of filesystems available, almost all the work of building the
new filesystem is delegated to a separate program for each; however, the generic
mkfs program
provides a single interface for invoking them all. It’s not uncommon to pass options to the top-
level
mkfs (for example, -V to make it show what commands it executes or -c to make it check
the device for bad blocks). The generic
mkfs program also enables you to pass options to the
filesystem-specific
mkfs. There are many of these filesystem-dependent options, but most of
them have sensible defaults, and you normally would not want to change them. The only op-
tions you might want to pass to
mke2fs, which builds ext2 filesystems, are -m and -i. The -m
option specifies how much of the filesystem is reserved for root’s use (for example, for working
space when the system disk would otherwise have filled completely). The
-i option is more
rarely exercised and is used for setting the balance between inodes and disk blocks; it is related
to the expected average file size. As stated previously, the defaults are reasonable for most pur-
poses, so these options are used only in special circumstances:
# mkfs -t ext2 /dev/fd1
mke2fs 1.10, 24-Apr-97 for EXT2 FS 0.5b, 95/08/09
Linux ext2 filesystem format
Filesystem label=
360 inodes, 1440 blocks
72 blocks (5.00) reserved for the super user
First data block=1
Block size=1024 (log=0)
Fragment size=1024 (log=0)
1 block group
8192 blocks per group, 8192 fragments per group
360 inodes per group
Writing inode tables: done
Writing superblocks and filesystem accounting information: done
# mount -t ext2 /dev/fd1 /mnt/floppy
# ls -la /mnt/floppy
total 14
drwxr-xr-x 3 root root 1024 Aug 1 19:49 .
drwxr-xr-x 7 root root 1024 Jul 3 21:47
drwxr-xr-x 2 root root 12288 Aug 1 19:49 lost+found
# umount /mnt/floppy
Hardware Connectivity and Devices
P
ART III
206
Here, you see the creation and mounting of an ext2 filesystem on a floppy. The structure
of the filesystem as specified by the program’s defaults are shown. There is no volume label,
and there are 4096 bytes (4KB) per inode (360 × 4 = 1440). The block size is 1KB and 5 percent
of the disk is reserved for root. These are the defaults (which are explained in the
mke2fs manual
page). After you have created a filesystem, you can use
dumpe2fs to display information about
an
ext2 filesystem, but remember to pipe the result through a pager such as less because this
output can be very long.
After creating the filesystem on this floppy, you can include it in the filesystem table by chang-
ing the existing line referring to a
vfat filesystem on /dev/fd1 to the following:
/dev/fd1 /mnt/floppy ext2 user,sync,errors=continue 0 0
The first three columns are the device, mount point, and filesystem type, as shown previously.
The options column is more complex than previous ones. The
user option indicates that users
are allowed to mount this filesystem. The
sync option indicates that programs writing to this
filesystem wait while each write finishes, and only then continue. This might seem obvious,
but it is not the normal state of affairs. The kernel normally manages filesystem writes in such
a way as to provide high performance (data still gets written to the device of course, but it doesn’t
necessarily happen immediately). This is perfect for fixed devices such as hard disks, but for
low-capacity removable devices such as floppy disks it’s less beneficial. Normally, you write a
few files to a floppy and then unmount it and take it away. The unmount operation must wait
until all data has been written to the device before it can finish (and the disk can then be re-
moved). Having to wait like this is off-putting, and there is always the risk that someone might
copy a file to the floppy, wait for the disk light to go out, and remove it. With asynchronous
writes, some buffered data might not have yet been written to disk. Hence, synchronous writes
are safer for removable media.
The
ext2 filesystem has a configurable strategy for errors. If an ext2 filesystem encounters an
error (for example, a bad disk block) there are three possible responses to the error:
Remount the device read-only—For filesystems that contain mostly nonessential data
(for example,
/tmp, /var/tmp, or news spools), remounting the filesystem read-only so
that it can be fixed with
fsck is often the best choice.
Panic—Continuing regardless in the face of potentially corrupted system configura-
tion files is unwise, so a kernel panic (that is, a controlled crash—or emergency
landing, if you prefer) can sometimes be appropriate.
Ignore it—Causing a system shutdown if a floppy disk has a bad sector is a little
excessive, so the
continue option tells the kernel to “carry on regardless” in this
situation. If this actually does happen, the best thing to do is to use the
-c option of
e2fsck, for example, with fsck -t ext2 -c /dev/fd1. This runs e2fsck, giving it the
-c option, which invokes the command badblocks to test the device for bad disk
blocks. After this is done,
e2fsck does its best to recover from the situation.
Filesystems, Disks, and Other Devices
C
HAPTER 11
207
11
FILESYSTEMS
,
D
ISKS
, AND
OTHER
DEVICES
Repairing Filesystems
Some disk data is kept in memory temporarily before being written to disk, for performance
reasons (see the previous discussion of the
sync mount option). If the kernel does not have an
opportunity to actually write this data, the filesystem can become corrupted. This can happen
in several ways:
■ The storage device (for example, a floppy disk) can be manually removed before the
kernel has finished with it.
■ The system might suffer a power loss.
■ The user might mistakenly turn off the power or accidentally press the reset button.
As part of the boot process, Linux runs the
fsck program, whose job it is to check and repair
filesystems. Most of the time the boot follows a controlled shutdown (see the manual page for
shutdown), and in this case, the filesystems will have been unmounted before the reboot. In this
case,
fsck says that they are “clean.” It knows this because before unmounting them, the ker-
nel writes a special signature on the filesystem to indicate that the data is intact. When the
filesystem is mounted again for writing, this signature is removed.
If, on the other hand, one of the disasters listed takes place, the filesystems will not be marked
“clean,” and when
fsck is invoked, as usual, it will notice this and begin a full check of the
filesystem. This also occurs if you specify the
-f flag to fsck. To prevent errors creeping up on
it,
fsck also enforces a periodic check; a full check is done at an interval specified on the filesystem
itself (usually every 20 boots or 6 months, whichever comes sooner), even if it was unmounted
cleanly.
The boot process (see Chapter 4) checks the root filesystem and then mounts it read/write.
(It’s mounted read-only by the kernel;
fsck asks for confirmation before operating on a read/
write filesystem, and this is not desirable for an unattended reboot.) First, the root filesystem is
checked with the following command:
fsck -V -a /
Then all the other filesystems are checked by executing this command:
fsck -R -A -V -a
These options specify that all the filesystems should be checked (-A) except the root filesystem,
which doesn’t need checking a second time (
-R), and that operations produce informational
messages about what it is doing as it goes (
-V), but that the process should not be interactive
(
-a). The latter is done because, for example, there might not be anyone present to answer any
questions from
fsck.
Hardware Connectivity and Devices
P
ART III
208
In the case of serious filesystem corruption, the approach breaks down because there are some
things that
fsck will not do to a filesystem without your say-so. In this case, it returns an error
value to its caller (the startup script), and the startup script spawns a shell to allow the admin-
istrator to run
fsck interactively. When this has happened, this message appears:
*** An error occurred during the file system check.
*** Dropping you to a shell; the system will reboot
*** when you leave the shell.
Give root password for maintenance
(or type Control-D for normal startup):
This is a very troubling event, particularly because it might well appear if you have other
problems with the system—for example, a lockup (leading you to press the reset button) or a
spontaneous reboot. None of the online manuals are guaranteed to be available at this stage,
because they might be stored on the filesystem whose check failed. This prompt is issued if the
root filesystem check failed, or the filesystem check failed for any of the other disk filesystems.
When the automatic
fsck fails, you need to log in by specifying the root password and run the
fsck program manually. When you have typed in the root password, you are presented with
the following prompt:
(Repair filesystem) #
You might worry about what command to enter here, or indeed what to do at all. At least one
of the filesystems needs to be checked, but which one? The preceding messages from
fsck should
indicate which, but it isn’t necessary to go hunting for them. There is a set of options you can
give
fsck that tells it to check everything manually, and this is a good fallback:
fsck -A -V ; echo == $? ==
This is the same command as the previous one, but the -R option is missing, in case the root
filesystem needs to be checked, and the
-a option is missing, so fsck is in its “interactive” mode.
This might enable a check to succeed just because it can now ask you questions. The purpose
of the
echo == $? == command is to unambiguously interpret the outcome of the fsck opera-
tion. If the value printed between the equals signs is less than 4, all is well. If this value is
4 or
more, more recovery measures are needed. The meanings of the various values returned are as
follows:
0 No errors
1 Filesystem errors corrected
2 System should be rebooted
4 Filesystem errors left uncorrected
8 Operational error
16 Usage or syntax error
128 Shared library error
Filesystems, Disks, and Other Devices
C
HAPTER 11
209
11
FILESYSTEMS
,
D
ISKS
, AND
OTHER
DEVICES
If this does not work, this might be because of a corrupted superblock—fsck starts its disk check
and if this is corrupted, it can’t start. By good design, the
ext2 filesystem has many backup
superblocks scattered regularly throughout the filesystem. Suppose the command announces
that it has failed to clean some particular filesystem—for example,
/dev/fubar. You can start
fsck again, using a backup superblock by using the following command:
fsck -t ext2 -b 8193 /dev/fubar
8193 is the block number for the first backup superblock. This backup superblock is at the
start of block group 1 (the first is numbered 0). There are more backup superblocks at the start
of block group 2 (16385), and block group 3 (24577); they are spaced at intervals of 8192
blocks. If you made a filesystem with settings other than the defaults, these might change.
mke2fs
lists the superblocks that it creates as it goes, so that is a good time to pay attention if you’re not
using the default settings. There are further things you can attempt if
fsck is still not succeed-
ing, but these are very rare and usually indicate hardware problems so severe that they prevent
the proper operation of
fsck. Examples include broken wires in the IDE connector cable and
similar nasty problems. If this command still fails, you might seek expert help or try to fix the
disk in a different machine.
These extreme measures are very unlikely; a manual
fsck, in the unusual circumstance where
it is actually required, almost always fixes things. After the manual
fsck has worked, the root
shell that the startup scripts provide has done its purpose. Type
exit to exit it. At this point, in
order to make sure that everything goes according to plan, the boot process is started again
from the beginning. This second time around, the filesystems should all be error-free and the
system should boot normally.
Hardware
There are block devices under Linux for representing all sorts of random access devices—floppy
disks, hard disks (XT, EIDE, and SCSI), Zip drives, CD-ROM drives, ramdisks, and loopback
devices.
Hard Disks
Hard disks are large enough to make it useful to keep different filesystems on different parts of
the hard disk. The scheme for dividing these disks up is called partitioning. Although it is com-
mon for computers running MS-DOS to have only one partition, it is possible to have several
different partitions on each disk. The summary of how the disk is partitioned is kept in its
partition table.
The Partition Table
A hard disk might be divided up like this:
Hardware Connectivity and Devices
P
ART III
210
Device Name Disk Partition Filesystem Mounted At
/dev/hda1 11ext2 /
/dev/hda3
13ext2 /usr
/dev/hdb1
21ext2 /usr/src
/dev/hdb5
25ext2 /home
Note that the partitions on the first disk have names starting with /dev/hda, and those on the
second have names starting with
/dev/hdb. These prefixes are followed by the number of the
partition.
NOTE
All is not quite as simple as it could be in the partition table, however. Early hard disk drives
on PCs were quite small (about 10MB), so there was a need for only a small number of
partitions and the format of the partition table originally allowed for only four partitions.
Later on, this became a restriction, and the extended partition was introduced as a
workaround.
Inside each extended partition is another partition table. This enables this extended
partition to be divided, in the same way, into four logical partitions. Partitions that aren’t
inside an extended partition are sometimes referred to as primary partitions.
Running fdisk -l shows that my first hard disk is divided up like this:
Device Begin Start End Blocks ID System
/dev/hda1 1 1 244 122944 83 Linux native
/dev/hda2 245 245 375 66024 82 Linux swap
/dev/hda3 376 376 1060 345240 83 Linux native
In this case, there are three primary partitions, of which one is a swap partition.
Disk Geometry
The units of the table in the last section are cylinders. The partition table allocates a consecutive
block of cylinders to each partition. The term cylinder itself dates from the days when it was
possible to remove a disk pack from a UNIX machine and point to the various parts. That
can’t be done here, so here’s another way of looking at it.
Imagine that a hard disk is in fact a stack of pizzas. Each of the pizzas is a platter, a disk-shaped
surface with a magnetic coating designed to hold magnetic encodings. Both sides of these plat-
ters are used. These rotate around the spindle, like the spindle in a record player. (Don’t put
pizzas on a record player!) The hard disk has a movable arm containing several disk heads. Each
Filesystems, Disks, and Other Devices
C
HAPTER 11
211
11
FILESYSTEMS
,
D
ISKS
, AND
OTHER
DEVICES
side of each platter has a separate disk head. If you were to put your fingers between the pizzas
while keeping them straight, this would be the same as the arrangement of the heads on the
arm. All the parts of the platters that the heads pass over in one rotation of the disk is called a
cylinder. The parts of a single platter that one head passes over in one rotation is called a track.
Each track is divided into sectors, as if the pizzas had been already sliced for you. The layout of
a disk, its geometry, is described by the number of cylinders, heads, and sectors comprising the
disk. Another important feature is the rotational speed of the disk—generally, the faster this is,
the faster the hard disk can read or write data.
You can discover the geometry of one of your hard disks by using the
hdparm command, and
typical output might look like this:
# /sbin/hdparm -g /dev/hdc
/dev/hdc:
geometry = 6232/16/63, sectors = 6281856, start = 0
NOTE
IBM PCs with older BIOSes can have difficulty with large disks; see the Linux Large-Disk
mini-HOWTO.
Floppy Disks
Floppy disks are removable low-capacity storage media. As storage devices, they are far slower
than hard disks, but they have the advantage that they are removable and make good media for
transporting modest amounts of data.
The block devices corresponding to the floppy disks begin with the letters
fd; /dev/fd0 is the
first, and any additional ones have increasing numbers. There are many possible formats for a
floppy disk, and the kernel needs to know the format (geometry) of a disk to read it properly.
Linux can usually work out the correct format so the automatic devices
/dev/fd0 (plus /dev/
fd1
and so on for extra floppy drives) are usually sufficient, but if for some reason it is necessary
to specify the exact format, further device names are provided for indicating this. The device
/dev/fd0H1440, for example, denotes a 1.44MB high-density floppy. There are many more de-
vices indicating obscure formats, both older lower-capacity formats and other nonstandard extra–
high-capacity formats. You can even create your own floppy disk formats, using the
serfdprm
program.
The most common reason to use the specific-format device names is that you are formatting a
floppy for the first time. In this situation, the disk is not yet readable, so the kernel will not be
able to autoprobe an existing format. You need to use the name
/dev/fd0H1440, for example, to
Hardware Connectivity and Devices
P
ART III
212
denote a high-density 3.5-inch disk in the first floppy drive. For device names representing
other formats, refer to the
fd manual page. Section 4 of the manual is the section devoted to
devices and so on.
The process of formatting a floppy is completely destructive to the data on it, and because it
requires writing to the actual device itself, it requires root privileges. It is done like this:
# fdformat /dev/fd0H1440
Double-sided, 80 tracks, 18 sec/track. Total capacity 1440 kB.
Formatting done
Verifying done
After you have formatted a floppy, please don’t forget to use mkfs to build a filesystem on it
(see the section “Creating New Filesystems,” earlier in this chapter).
Another popular way of accessing floppy disks is to use the
mtools package, which is a suite of
programs designed to enable the user to manipulate DOS-format disks without needing to
mount them. The commands are designed specifically to be similar to MS-DOS commands.
Windows 95 filesystems are also supported. You will find an introduction to the use of
mtools
in the mtools manual page. mtools can also be used to access hard disks and disk image files,
and it supports many nonstandard disk formats.
CD-ROM Drives
The CD-ROM drive is fundamentally just another kind of read-only block device. These are
mounted in just the same way as other block devices. CD-ROMs almost always contain stan-
dard ISO 9660 filesystems, often with some optional extensions. There is no reason, however,
why any other filesystem should not be used. Once you have mounted your CD-ROM, it
behaves like any other read-only filesystem.
You can set up and mount your CD-ROM drive using the Red Hat File System Manager, as
explained previously, or by using the following
mount command:
# mount /dev/cdrom -t iso9660 /mnt/cdrom
The directory /mnt/cdrom is a very common place to mount one’s CD-ROM drive under Red
Hat Linux, because this is where the graphical package manager Glint expects to find the con-
tents of the Red Hat installation CD-ROM, for example.
The device name
/dev/cdrom is commonly used as a symbolic link to the actual device name
corresponding to the CD-ROM, because at the time the CD-ROM drive became available for
the PC, there was no cheap standard interface for these devices. Each manufacturer chose or
invented an interfacing scheme that was incompatible with everyone else’s. For this reason,
there are about a dozen different drivers for CD-ROM drives available in the Linux kernel.
SCSI would have been a sensible standard to have been used, but although SCSI CD-ROM
drives are available, they’re not particularly popular.