Securing and Optimizing Linux RedHat Edition phần 2 doc
Bạn đang xem bản rút gọn của tài liệu. Xem và tải ngay bản đầy đủ của tài liệu tại đây (669.56 KB, 48 trang )
Linux General Security 0
CHAPTER 3
Copyright 1999 - 2000 Gerhard Mourani, Open Network Architecture ® and OpenDocs Publishing
50
service names to these numbers (ports). The list is kept on each host and it is stored in the file
"/etc/services”. Only the "root" user is allowed to make modification in this file and it is rare to edit
the "/etc/services" file to make change since it already contains the more common service names
to port numbers. To improve security, we can immunize this file to prevent unauthorized deletion
or addition of services.
• To immunize the “/etc/services” file, use the command:
[root@deep /]# chattr +i /etc/services
The “/etc/securetty” file
The “/etc/securetty” file allows you to specify which TTY devices the “root” user is allowed to login
on. The “/etc/securetty” file is read by the login program (usually “/bin/login”). Its format is a list of
the tty devices names allowed, and for all others that are commented out or do not appear in this
file, root login is disallowed.
Disable any tty that you do not need by commenting them out (# at the beginning of the line).
Edit the securetty file (vi /etc/securetty) and comment out the following lines:
tty1
#tty2
#tty3
#tty4
#tty5
#tty6
#tty7
#tty8
Which means root is only allowed to login on tty1. This is my recommendation, allowing “root” to
log in only on one tty device and use the “su” command to switch to “root” if you need more.
devices to log in as “root”.
Special accounts
It is important to DISABLE ALL default vendor accounts that you don’t use on your system
(some accounts exist by default even if you have not installed the related services on your
server). This should be checked after each upgrade or new software installation. Linux provides
these accounts for various system activities, which you may not need if the services are not
installed on your server. If you do not need the accounts, remove them. The more accounts you
have, the easier it is to access your system.
We assume you are using the Shadow password suite on your Linux system. If you are not, you
should consider doing so, as it helps to tighten up security somewhat. This must already be set if
you’ve followed our Linux installation above and selected under the “Authentication Configuration”
the option to “Enable Shadow Passwords” (see chapter 2 Installation of your Linux Server for
more information).
• To delete user on your system, use the command:
[root@deep /]# userdel username
• To delete group on your system, use the command:
[root@deep /]# groupdel username
Step 1
Linux General Security 0
CHAPTER 3
Copyright 1999 - 2000 Gerhard Mourani, Open Network Architecture ® and OpenDocs Publishing
51
Type the following commands on your terminal to delete users listed bellow:
[root@deep /]# userdel adm
[root@deep /]# userdel lp
[root@deep /]# userdel sync
[root@deep /]# userdel shutdown
[root@deep /]# userdel halt
[root@deep /]# userdel news
[root@deep /]# userdel uucp
[root@deep /]# userdel operator
[root@deep /]# userdel games
(delete this user if you don’t use X Window Server).
[root@deep /]# userdel gopher
[root@deep /]# userdel ftp
(delete this user if you don’t use ftp anonymous server).
NOTE: By default, the “userdel” command will not delete a user’s home directory. If you want the
home directories of accounts to be deleted too, then add the “-r” option to the userdel command.
Step 2
Type the following commands on your terminal to delete the usersgroups listed below:
[root@deep /]# groupdel adm
[root@deep /]# groupdel lp
[root@deep /]# groupdel news
[root@deep /]# groupdel uucp
[root@deep /]# groupdel games
(delete this group if you don’t use X Window Server).
[root@deep /]# groupdel dip
[root@deep /]# groupdel pppusers
[root@deep /]# groupdel popusers
(delete this group if you don’t use pop server for email).
[root@deep /]# groupdel slipusers
Step 3
Add the necessary user to the system:
• To add a new user on your system, use the command:
[root@deep /]# useradd username
• To add or change password for user on your system, use the command:
[root@deep /]# passwd username
For example:
[root@deep /]# useradd admin
[root@deep /]# passwd admin
The output should look something like this.
Changing password for user admin
New UNIX password: somepasswd
passwd: all authentication tokens updated successfully
Step 4
The immutable bit can be used to prevent accidentally deleting or overwriting a file that must be
protected. It also prevents someone from creating a symbolic link to this file, which has been the
source of attacks involving the deletion of “/etc/passwd”, “/etc/shadow”, “/etc/group” or
“/etc/gshadow”.
• To set the immutable bit on the passwords and groups files, use the command:
Linux General Security 0
CHAPTER 3
Copyright 1999 - 2000 Gerhard Mourani, Open Network Architecture ® and OpenDocs Publishing
52
[root@deep /]# chattr +i /etc/passwd
[root@deep /]# chattr +i /etc/shadow
[root@deep /]# chattr +i /etc/group
[root@deep /]# chattr +i /etc/gshadow
NOTE: In the future, if you intend to add or delete users, passwords, usergroups, or group files,
you must unset the immutable bit on all those files or you will not be able to make your changes.
Also if you intend to install an RPM program that will automatically add a new user to the different
immunized passwd and group files, then you will receive an error message during the install if
you have not unset the immutable bit from those files.
Blocking anyone to su to root
The su (Substitute User) command allows you to become other existing users on the system. For
example you can temporarily become “root” and execute commands as the super-user “root”. If
you don’t want anyone to su to root or restrict “su” command to certain users then add the
following two lines to the top of your “su” configuration file in the “/etc/pam.d/” directory. We highly
recommend that you limit the person allowed to “su” to the root account.
Step 1
Edit the su file (vi /etc/pam.d/su) and add the following two lines to the top of the file:
auth sufficient /lib/security/pam_rootok.so debug
auth required /lib/security/pam_wheel.so group=wheel
After adding the two lines above, the “/etc/pam.d/su” file should look like this:
#%PAM-1.0
auth sufficient /lib/security/pam_rootok.so debug
auth required /lib/security/pam_wheel.so group=wheel
auth required /lib/security/pam_pwdb.so shadow nullok
account required /lib/security/pam_pwdb.so
password required /lib/security/pam_cracklib.so
password required /lib/security/pam_pwdb.so shadow use_authtok nullok
session required /lib/security/pam_pwdb.so
session optional /lib/security/pam_xauth.so
Which mean only those who are a member of the “wheel” group can su to root; it also includes
logging. Note that the “wheel” group is a special account on your system that can be used for this
purpose. You cannot use any group name you want to make this hack. This hack combined with
specifying which TTY devices root is allowed to login on will improve your security a lot on the
system.
Step 2
Now that we have defined the “wheel” group in our “/etc/pam.d/su” file configuration, it is time to
add some users allowed to “su” to “root” account. If you want to make, for example, the user
“admin” a member of the “wheel” group, and thus be able to su to root, use the following
command:
[root@deep /]# usermod -G10 admin
Which means “G” is a list of supplementary groups, where the user is also a member of. “10” is
the numeric value of the user’s ID “wheel”, and “admin” is the user we want to add to “wheel”
group. Use the same command above for all users on your system you want to be able to su to
“root” account.
Linux General Security 0
CHAPTER 3
Copyright 1999 - 2000 Gerhard Mourani, Open Network Architecture ® and OpenDocs Publishing
53
NOTE: If you can't su in a GNOME terminal, it’s because you’ve used the wrong terminal. (So don't
think that this advice doesn't work simply because of a terminal problem!)
Resource limits
The limits.conf file located under the “/etc/security” directory can be used to control and limit
resources for the users on your system. It is important to set resource limits on all your users so
they can't perform denial of service attacks (number of processes, amount of memory, etc).
These limits will have to be set up for the user when he or she logs in. For example, limits for all
users on your system might look like this.
Step 1
Edit the limits.conf file (vi /etc/security/limits.conf) and add or change the lines to read:
* hard core 0
* hard rss 5000
* hard nproc 20
This says to prohibit the creation of core files “core 0”, restrict the number of processes to 20
“nproc 20”, and restrict memory usage to 5M “rss 5000” for everyone except the super user “root”.
All of the above only concern users who have entered through the login prompt on your system.
With this kind of quota, you have more control on the processes, core files, and memory usage
that users may have on your system. The asterisk “*” mean: all users that logs in on the server.
Step 2
You must also edit the “/etc/pam.d/login” file and add the following line to the bottom of the file:
session required /lib/security/pam_limits.so
After adding the line above, the “/etc/pam.d/login” file should look like this:
#%PAM-1.0
auth required /lib/security/pam_securetty.so
auth required /lib/security/pam_pwdb.so shadow nullok
auth required /lib/security/pam_nologin.so
account required /lib/security/pam_pwdb.so
password required /lib/security/pam_cracklib.so
password required /lib/security/pam_pwdb.so nullok use_authtok md5 shadow
session required /lib/security/pam_pwdb.so
session required /lib/security/pam_limits.so
#session optional /lib/security/pam_console.so
More control on mounting a file system
You can have more control on mounting a file system like “/home” and “/tmp” partitions with some
nifty options like noexec, nodev, and nosuid. This can be setup in the “/etc/fstab” text file. The
fstab file contains descriptive information about the various file systems mount options; each line
addresses one file system.
Information related to security options in the fstab text file are:
defaults Allow everything (quota, read-write, and suid) on this partition.
noquota Do not set users quotas on this partition.
Linux General Security 0
CHAPTER 3
Copyright 1999 - 2000 Gerhard Mourani, Open Network Architecture ® and OpenDocs Publishing
54
nosuid Do not set SUID/SGID access on this partition.
nodev Do not set character or special devices access on this partition.
noexec Do not set execution of any binaries on this partition.
quota Allow users quotas on this partition.
ro Allow read-only on this partition.
rw Allow read-write on this partition.
suid Allow SUID/SGID access on this partition.
NOTE: For more information on options that you can set in this file (fstab), see the man pages
about mount (8).
Edit the fstab file (vi /etc/fstab) and change it depending on your needs. For example:
/dev/sda11 /tmp ext2 defaults 1 2
/dev/sda6 /home ext2 defaults 1 2
To read:
/dev/sda11 /tmp ext2 defaults,rw,nosuid,nodev,noexec 1 2
/dev/sda6 /home ext2 defaults,rw,nosuid,nodev 1 2
Meaning, <nosuid>, do not allow set-user-identifier or set-group-identifier bits to take effect,
<nodev>, do not interpret character or block special devices on this file system partition, and
<noexec>, do not allow execution of any binaries on the mounted file system. Take a note that we
have added the “rw” option to the modified lines above. This is because the default options for
these lines are defaults, which means to set quota, read-write, and suid, so we must add the “rw”
option to continue having read-write access on these modified file systems.
NOTE: For our example above, the “/dev/sda11” represent our “/tmp” directory partition on the
system, and “/dev/sda6” the “/home” directory partition. Of course this will be not the same for
you, depending on how you have partitioned your hard disk and what kind of disks are installed
on your system, IDE (hda, hdb, etc) or SCSI (sda, sdb, etc).
Move the binary RPM in a safe place or change its default permission
Once you have installed all the software that you need on your Linux server with the RPM
command, it’s a good idea for better security to move it to a safe place like a floppy disk or other
safe place of your choice. With this method if some one accesses your server and has the
intention to install evil software with RPM command, he shouldn’t be able. Of course, if in the
future you want to install or upgrade new software via RPM, all you have to do is to replace the
RPM binary to its original directory again.
• To move the RPM binary on the floppy disk, use the command:
[root@deep /]# mount /dev/fd0 /mnt/floppy/
[root@deep /]# mv /bin/rpm /mnt/floppy/
[root@deep /]# umount /mnt/floppy
NOTE: Never uninstall the RPM program completely from your system or you will be unable to
reinstall it again later, since to install RPM or other software you need to have RPM commands
available.
One more thing you can do is change the default permission of the “rpm” command from 755 to
700. With this modification, non-root users can’t use the “rpm” program to query, install etc; in
case you forget to move it to a safe place after installation of new programs.
• To change the default permission of “/bin/rpm”, use the command:
[root@deep /]# chmod 700 /bin/rpm
Linux General Security 0
CHAPTER 3
Copyright 1999 - 2000 Gerhard Mourani, Open Network Architecture ® and OpenDocs Publishing
55
Shell logging
To make it easy for you to repeat long commands, the bash shell stores up to 500 old commands
in the “~/.bash_history” file (where “~/” is your home directory). Each user that has an account on
the system will have this file “.bash_history” in their home directory. Reducing the number of old
commands the “.bash_history” files can hold may protect users on the server who enter by
mistake their password on the screen in plain text and have their password stored for a long time
in the “.bash_history” file.
Step 1
The HISTFILESIZE and HISTSIZE lines in the “/etc/profile” file determine the size of old
commands the “.bash_history” file for all users on your system can hold. For all accounts I would
highly recommend setting the HISTFILESIZE and HISTSIZE in “/etc/profile” file to a low value
such as 20.
Edit the profile file (vi /etc/profile) and change the lines to:
HISTFILESIZE=20
HISTSIZE=20
Which mean, the “.bash_history” file in each users home directory can store 20 old commands
and no more. Now, if a cracker tries to see the “~/.bash_history” file of users on your server to
find some password typed by mistake in plain text, he or she has less chance to find one.
Step 2
The administrator should also add into the “/etc/skel/.bash_logout” file the “rm -f
$HOME/.bash_history” line, so that each time a user logs out, its “.bash_history” file will be
deleted so crackers will not be able to use “.bash_history” file of users who are not presently
logged into the system.
Edit the .bash_logout file (vi /etc/skel/.bash_logout) and add the following line:
rm -f $HOME/.bash_history
NOTE: The above hack will only work for future users you’ll add in the server. If you already have
existing users in the “/etc/passwd” file, you must edit and add the above line into their
“.bash_logout” files manually.
The “/etc/lilo.conf” file
LILO is the most commonly used boot loader for Linux. It manages the boot process and can boot
Linux kernel images from floppy disks, hard disks or can even act as a "boot manager" for other
operating systems. LILO is very important in the Linux system and for this reason, we must
protect it the best we can. The most important configuration file of LILO is the “lilo.conf” file, and it
resides under the “/etc” directory. It is with this file that we can configure and improve the security
of our LILO program and Linux system. Following are three important options that will improve the
security of our valuable LILO program.
• Adding: timeout=00
This option controls how long (in seconds) LILO waits for user input before booting to the default
selection. One of the requirements of C2 security is that this interval be set to 0 unless the system
dual boots something else.
Linux General Security 0
CHAPTER 3
Copyright 1999 - 2000 Gerhard Mourani, Open Network Architecture ® and OpenDocs Publishing
56
• Adding: restricted
This option asks for a password only, if parameters are specified on the command line (e.g. linux
single). The option “restricted” can only be used together with the “password” option. Make sure
you use this one on each image.
• Adding: password=<password>
This option asks the user for a password when trying to load the Linux system in “single mode”.
Passwords are always case-sensitive, also make sure the “/etc/lilo.conf” file is no longer world
readable, or any user will be able to read the password. Here is an example of our protected LILO
with the “lilo.conf” file.
Step 1
Edit the lilo.conf file (vi /etc/lilo.conf) and add or change the tree options above as show:
boot=/dev/sda
map=/boot/map
install=/boot/boot.b
prompt
timeout=00
change this line to 00.
Default=linux
restricted
add this line.
password=<password>
add this line and put your password.
image=/boot/vmlinuz-2.2.12-20
label=linux
initrd=/boot/initrd-2.2.12-10.img
root=/dev/sda6
read-only
Step 2
Because the configuration file “/etc/lilo.conf” now contains unencrypted passwords, it should only
be readable for the super-user “root”.
[root@deep /]# chmod 600 /etc/lilo.conf
(will be no longer world readable).
Step 3
Now we must update our configuration file “/etc/lilo.conf” for the change to take effect.
[root@deep /]# /sbin/lilo -v (to update the lilo.conf file).
Step 4
One more security measure you can take to secure the “lilo.conf” file is to set it immutable, using
the chattr command.
• To set the file immutable simply, use the command:
[root@deep /]# chattr +i /etc/lilo.conf
And this will prevent any changes (accidental or otherwise) to the “lilo.conf” file. If you wish to
modify the “lilo.conf” file you will need to unset the immutable flag:
• To unset the immutable flag, use the command:
[root@deep /]# chattr -i /etc/lilo.conf
Disable the Control-Alt-Delete keyboard shutdown command
Linux General Security 0
CHAPTER 3
Copyright 1999 - 2000 Gerhard Mourani, Open Network Architecture ® and OpenDocs Publishing
57
Commenting out the line (with a “#”) listed below in your “/etc/inittab” file will disable the possibility
of using the Control-Alt-Delete command to shutdown your computer. This is pretty important if
you don't have the best physical security on the box.
To do this, edit the inittab file (vi /etc/inittab) and change the line:
ca::ctrlaltdel:/sbin/shutdown -t3 -r now
To read:
#ca::ctrlaltdel:/sbin/shutdown -t3 -r now
Now, for the change to take effect type in the following at a prompt:
[root@deep /]# /sbin/init q
Physical hard copies of all-important logs
One of the most important security considerations is the integrity of the different log files under
the “/var/log” directory on your server. If despite each of the security functions put in place on our
server a cracker can gain access to it, our last defense is the log file system, so it is very
important to consider a method of being sure of the integrity of our log files.
If you have a printer installed on your server, or on a machine on your network, a good idea
would be to have actual physical hard copies of all-important logs. This can be easily
accomplished by using a continuous feed printer and having the syslog program sending all logs
you seem important out to "/dev/lp0" (the printer device). Cracker can change the files, programs,
etc on your server, but can do nothing when you have a printer that prints a real paper copy of all
of your important logs.
As an example:
For logging of all telnet, mail, boot messages and ssh connections from your server to the printer
attached to this server, you would want to add the following line to the "/etc/syslog.conf" file:
Edit the syslog.conf file (vi /etc/syslog.conf) and add at the end of this file the following line:
authpriv.*;mail.*;local7.*;auth.*;daemon.info /dev/lp0
• Now restart your syslog daemon for the change to take effect:
[root@deep /]# /etc/rc.d/init.d/syslog restart
As an example:
For logging of all telnet, mail, boot messages and ssh connections from your server to the printer
attached to a remote server in your local network, then you would want to add the following line to
"/etc/syslog.conf" file on the remote server.
(If you don’t have a printer in your network, you can also copy all the log files to another machine;
simply omit the first step below of adding “/dev/lp0” to your “syslog.conf” file on remote and go
directly to the “-r” option step on remote. Using the feature of copying all the log files to another
machine will give you the possibility to control all syslog messages on one host and will tear down
administration needs.)
Edit the syslog.conf file (vi /etc/syslog.conf) on the remote server (for example: mail.openna.com)
and add at the end of this file the following line:
authpriv.*;mail.*;local7.*;auth.*;daemon.info /dev/lp0
Linux General Security 0
CHAPTER 3
Copyright 1999 - 2000 Gerhard Mourani, Open Network Architecture ® and OpenDocs Publishing
58
Since the default configuration of the syslog daemon is to not receive any messages from the
network, we must enable on the remote server the facility to receive messages from the network.
To enable the facility to receive messages from the network on the remote server, add the
following option “-r” to your syslog daemon script file (only on the remote host):
• Edit the syslog daemon (vi +24 /etc/rc.d/init.d/syslog) and change:
daemon syslogd -m 0
To read:
daemon syslogd -r -m 0
• Now restart your syslog daemon on the remote host for the change to take effect:
[root@mail /]# /etc/rc.d/init.d/syslog restart
Now, if we have a firewall on the remote server (you are supposed to have one), we must add or
verify the existence of the following lines:
ipchains -A input -i $EXTERNAL_INTERFACE -p udp \
-s $SYSLOG_CLIENT \
-d $IPADDR 514 -j ACCEPT
Where EXTERNAL_INTERFACE="eth0" in the firewall file.
Where IPADDR="208.164.186.2" in the firewall file.
Where SYSLOG_CLIENT=”208.164.168.0/24" in the firewall file.
• Now restart your firewall on the remote host for the change to take effect:
[root@mail /]# /etc/rc.d/init.d/firewall restart
This firewall rule will allow incoming UDP packet on port 514 (syslog port) on the remote server
that come from our internal client to be accepted. For more information on Firewall see Chapter 7
“Networking firewall”.
Finally, edit the syslog.conf file (vi /etc/syslog.conf) on the local server, and add at the end of this
file the following line:
authpriv.*;mail.*;local7.*;auth.*;daemon.info @mail
Where “mail” is the hostname of the remote server. Now if anyone ever hacks your box and
menaces to erase vital system logs, you still have a hard copy of everything. It should then be
fairly simple to trace where they came from and deal with it accordingly.
• Now restart your syslog daemon for the change to take effect:
[root@deep /]# /etc/rc.d/init.d/syslog restart
Same as on the remote host, we must add or verify the existence of the following lines in our
firewall script file on the local host:
ipchains -A output -i $EXTERNAL_INTERFACE -p udp \
-s $IPADDR 514 \
-d $SYSLOG_SERVER 514 -j ACCEPT
Where EXTERNAL_INTERFACE="eth0" in the firewall file.
Where IPADDR="208.164.186.1" in the firewall file.
Where SYSLOG_SERVER="mail.openna.com" in the firewall file.
• Now restart your firewall for the change to take effect:
[root@deep /]# /etc/rc.d/init.d/firewall restart
Linux General Security 0
CHAPTER 3
Copyright 1999 - 2000 Gerhard Mourani, Open Network Architecture ® and OpenDocs Publishing
59
This firewall rule will allow outgoing UDP packet on port 514 (syslog port) on the local server
destined to the remote syslog server to be accepted. For more information on Firewall see
chapter 7 “Networking firewall”.
NOTE: Never use your Gateway Server as a host to control all syslog messages; this is a very bad
idea. More options and strategies exist with the sysklogd program, see the man pages about
sysklogd (8), syslog(2), and syslog.conf(5) for more information.
Fix the permissions under “/etc/rc.d/init.d” directory for script files
Fix the permissions of the script files that are responsible for starting and stopping all your normal
processes that need to run at boot time.
[root@deep /]# chmod -R 700 /etc/rc.d/init.d/*
Which means just root is allowed to Read, Write, and Execute scripts files on this directory. I don’t
think regular users need to know what’s inside those script files.
NOTE: If you install a new program or update a program that use the init system V script located
under “/etc/rc.d/init.d/” directory, don’t forget to change or verify the permission of this script file
again.
The “/etc/rc.d/rc.local” file
By default, when you login to a Linux box, it tells you the Linux distribution name, version, kernel
version, and the name of the server. This is giving away too much info. We’d rather just prompt
users with a "Login:" prompt.
Step 1
To do this, Edit the "/etc/rc.d/rc.local" file and Place "#" in front of the following lines as shown:
# This will overwrite /etc/issue at every boot. So, make any changes you
# want to make to /etc/issue here or you will lose them when you reboot.
#echo "" > /etc/issue
#echo "$R" >> /etc/issue
#echo "Kernel $(uname -r) on $a $(uname -m)" >> /etc/issue
#
#cp -f /etc/issue /etc/issue.net
#echo >> /etc/issue
Step 2
Then, remove the following files: “issue.net” and “issue” under “/etc” directory:
[root@deep /]# rm -f /etc/issue
[root@deep /]# rm -f /etc/issue.net
NOTE: The “/etc/issue.net” file is the login banner that users will see when they make a networked
(i.e. telnet, SSH) connection to your machine. You will find it in the “/etc” directory, along with a
similar file called "issue", which is the login banner that gets displayed to local users. It is simply a
text file and can be customized to your own tastes, but be aware that as noted above, if you do
change it or remove it like we do, you'll also need to modify the “/etc/rc.d/rc.local” shell script,
which re-creates both the "issue" and "issue.net" files every time the system boots.
Linux General Security 0
CHAPTER 3
Copyright 1999 - 2000 Gerhard Mourani, Open Network Architecture ® and OpenDocs Publishing
60
Bits from root-owned programs
A regular user will be able to run a program as root if it is set to SUID root. All programs and files
on your computer with the ’s’ bits appearing on its mode, have the SUID (-rwsr-xr-x) or SGID (-r-
xr-sr-x) bit enabled. Because these programs grant special privileges to the user who is executing
them, it is important to remove the 's' bits from root-owned programs that won't absolutely require
such privilege. This can be accomplished by executing the command 'chmod a-s' with the
name(s) of the SUID/SGID files as its arguments.
Such programs include, but aren't limited to:
• Programs you never use.
• Programs that you don't want any non-root users to run.
• Programs you use occasionally, and don't mind having to su (1) to root to run.
We've placed an asterisk (*) next to each program we personally might disable and consider to
be not absolutely required for the duty work of our server. Remember that your system needs
some suid root programs to work properly, so be careful.
• To find all files with the ‘s’ bits from root-owned programs, use the command:
[root@deep]# find / -type f \( -perm -04000 -o -perm -02000 \) \-exec ls –lg {} \;
*-rwsr-xr-x 1 root root 35168 Sep 22 23:35 /usr/bin/chage
*-rwsr-xr-x 1 root root 36756 Sep 22 23:35 /usr/bin/gpasswd
*-r-xr-sr-x 1 root tty 6788 Sep 6 18:17 /usr/bin/wall
-rwsr-xr-x 1 root root 33152 Aug 16 16:35 /usr/bin/at
-rwxr-sr-x 1 root man 34656 Sep 13 20:26 /usr/bin/man
-r-s x x 1 root root 22312 Sep 25 11:52 /usr/bin/passwd
-rws x x 2 root root 518140 Aug 30 23:12 /usr/bin/suidperl
-rws x x 2 root root 518140 Aug 30 23:12 /usr/bin/sperl5.00503
-rwxr-sr-x 1 root slocate 24744 Sep 20 10:29 /usr/bin/slocate
*-rws x x 1 root root 14024 Sep 9 01:01 /usr/bin/chfn
*-rws x x 1 root root 13768 Sep 9 01:01 /usr/bin/chsh
*-rws x x 1 root root 5576 Sep 9 01:01 /usr/bin/newgrp
*-rwxr-sr-x 1 root tty 8328 Sep 9 01:01 /usr/bin/write
-rwsr-xr-x 1 root root 21816 Sep 10 16:03 /usr/bin/crontab
*-rwsr-xr-x 1 root root 5896 Nov 23 21:59 /usr/sbin/usernetctl
*-rwsr-xr-x 1 root bin 16488 Jul 2 10:21 /usr/sbin/traceroute
-rwxr-sr-x 1 root utmp 6096 Sep 13 20:11 /usr/sbin/utempter
-rwsr-xr-x 1 root root 14124 Aug 17 22:31 /bin/su
*-rwsr-xr-x 1 root root 53620 Sep 13 20:26 /bin/mount
*-rwsr-xr-x 1 root root 26700 Sep 13 20:26 /bin/umount
*-rwsr-xr-x 1 root root 18228 Sep 10 16:04 /bin/ping
*-rwxr-sr-x 1 root root 3860 Nov 23 21:59 /sbin/netreport
-r-sr-xr-x 1 root root 26309 Oct 11 20:48 /sbin/pwdb_chkpwd
• To disable the suid bits on selected programs above, type the following commands:
[root@deep /]# chmod a-s /usr/bin/chage
[root@deep /]# chmod a-s /usr/bin/gpasswd
[root@deep /]# chmod a-s /usr/bin/wall
[root@deep /]# chmod a-s /usr/bin/chfn
[root@deep /]# chmod a-s /usr/bin/chsh
[root@deep /]# chmod a-s /usr/bin/newgrp
[root@deep /]# chmod a-s /usr/bin/write
[root@deep /]# chmod a-s /usr/sbin/usernetctl
[root@deep /]# chmod a-s /usr/sbin/traceroute
[root@deep /]# chmod a-s /bin/mount
Linux General Security 0
CHAPTER 3
Copyright 1999 - 2000 Gerhard Mourani, Open Network Architecture ® and OpenDocs Publishing
61
[root@deep /]# chmod a-s /bin/umount
[root@deep /]# chmod a-s /bin/ping
[root@deep /]# chmod a-s /sbin/netreport
If you want to know what those programs do, type “man program-name” and read the man page.
As an example:
[root@deep /]# man netreport
The kernel tunable parameters
With the new version of Red Hat Linux 6.2 all kernel parameters available under the “/proc/sys”
subdirectory of Linux can be configured at runtime. You can now use the new “/etc/sysctl.conf”
file under Red Hat Linux 6.2 to modify and set kernel parameters at runtime. The “sysctl.conf” file
is read and loaded each time the system reboots. All settings are now stored in the
“/etc/sysctl.conf” file. All modifications to “/proc/sys” should be made through “/etc/sysctl.conf”,
because they are better for control, and are executed before “rc.local” or any other "users"
scripts. Below, we show you the networking security options that you must configure on your
server for Red Hat Linux version 6.1 and 6.2.
Prevent your system from responding to ping request
Preventing your system for responding to ping request can be a big improvement in your network
security since no one can ping on your server and receive an answer. The TCP/IP protocol suite
has a number of weaknesses that allows an attacker to leverage techniques in the form of covert
channels to surreptitiously pass data in otherwise benign packets. Preventing your server from
responding to ping requests can help to minimize this problem.
Under Red Hat Linux 6.1
An
[root@deep /]# echo 1 > /proc/sys/net/ipv4/icmp_echo_ignore_all
should do the job such that your system won't respond to ping on any interface. You can add
this line in your “/etc/rc.d/rc.local” file so the command will be automatically set if your system
reboots. Not responding to pings would at least keep most "crackers" out because they would
never even know it's there.
To turn it backs on, simply
[root@deep /]# echo 0 > /proc/sys/net/ipv4/icmp_echo_ignore_all
You can add this line in your “/etc/rc.d/rc.local” file so the command will be automatically set if
your system reboots.
Under Red Hat Linux 6.2
Edit the “/etc/sysctl.conf” file and add the following line:
# Enable ignoring ping request
net.ipv4.icmp_echo_ignore_all = 1
You must restart your network for the change to take effect. The command to restart the network
is the following:
• To restart all network devices manually on your system, use the following command:
[root@deep /]# /etc/rc.d/init.d/network restart
Setting network parameters [ OK ]
Bringing up interface lo [ OK ]
Linux General Security 0
CHAPTER 3
Copyright 1999 - 2000 Gerhard Mourani, Open Network Architecture ® and OpenDocs Publishing
62
Bringing up interface eth0 [ OK ]
Bringing up interface eth1 [ OK ]
Prevent your system from responding to broadcasts request
As for the ping request, it’s also important to disable broadcast request. When a packet is sent to
an IP broadcast address (i.e. 192.168.1.255) from a machine on the local network, that packet is
delivered to all machines on that network. Then all the machines on a network respond to this
ICMP echo request and the result can be severe network congestion or outages (denial-of-
service attacks). See the RFC 2644 for more information.
Under Red Hat Linux 6.1
[root@deep /]# echo 1 > /proc/sys/net/ipv4/icmp_echo_ignore_broadcasts
You can add this line in your “/etc/rc.d/rc.local” file so the command will be automatically set if
your system reboots.
Under Red Hat Linux 6.2
Edit the “/etc/sysctl.conf” file and add the following line:
# Enable ignoring broadcasts request
net.ipv4.icmp_echo_ignore_broadcasts = 1
You must restart your network for the change to take effect. The command to restart the network
is the following:
• To restart all networks devices manually on your system, use the following command:
[root@deep /]# /etc/rc.d/init.d/network restart
Setting network parameters [ OK ]
Bringing up interface lo [ OK ]
Bringing up interface eth0 [ OK ]
Bringing up interface eth1 [ OK ]
Routing Protocols
Routing and routing protocols can create several problems. The IP source routing, where an IP
packet contains details of the path to its intended destination, is dangerous because according to
RFC 1122 the destination host must respond along the same path. If an attacker was able to
send a source routed packet into your network, then he would be able to intercept the replies and
fool your host into thinking it is communicating with a trusted host. I strongly recommend that you
disable IP source routing to protect your server from this hole.
To disable IP source routing on your server, type the following command in your terminal:
Under Red Hat Linux 6.1
[root@deep /]# for f in /proc/sys/net/ipv4/conf/*/accept_source_route; do
> echo 0 > $f
> done
[root@deep /]#
Add the above commands to the “/etc/rc.d/rc.local” script file and you’ll not have to type it again
the next time you reboot your system.
Under Red Hat Linux 6.2
Edit the “/etc/sysctl.conf” file and add the following line:
Linux General Security 0
CHAPTER 3
Copyright 1999 - 2000 Gerhard Mourani, Open Network Architecture ® and OpenDocs Publishing
63
# Disables IP source routing
net.ipv4.conf.all.accept_source_route = 0
You must restart your network for the change to take effect. The command to restart the network
is the following:
• To restart all network devices manually on your system, use the following command:
[root@deep /]# /etc/rc.d/init.d/network restart
Setting network parameters [ OK ]
Bringing up interface lo [ OK ]
Bringing up interface eth0 [ OK ]
Bringing up interface eth1 [ OK ]
NOTE: Make a note that the above command for Red Hat Linux 6.1 or 6.2 will disable Source
Routed Packets on all your interfaces (lo, ethN, pppN etc).
Enable TCP SYN Cookie Protection
A "SYN Attack" is a denial of service (DoS) attack that consumes all the resources on your
machine, forcing you to reboot. Denial of service attacks (attacks which incapacitate a server due
to high traffic volume or ones that tie-up system resources enough that the server cannot respond
to a legitimate connection request from a remote system) are easily achievable from internal
resources or external connections via extranets and Internet. To enable it, you have to do:
Under Red Hat Linux 6.1
[root@deep /]# echo 1 > /proc/sys/net/ipv4/tcp_syncookies
Add the above commands to the “/etc/rc.d/rc.local” script file and you’ll not have to type it again
the next time you reboot your system.
Under Red Hat Linux 6.2
Edit the “/etc/sysctl.conf” file and add the following line:
# Enable TCP SYN Cookie Protection
net.ipv4.tcp_syncookies = 1
You must restart your network for the change to take effect. The command to restart the network
is the following:
• To restart all network devices manually on your system, use the following command:
[root@deep /]# /etc/rc.d/init.d/network restart
Setting network parameters [ OK ]
Bringing up interface lo [ OK ]
Bringing up interface eth0 [ OK ]
Bringing up interface eth1 [ OK ]
NOTE: If you receive an error message during execution of the above command, check that you
are enable the TCP syncookies option in your kernel configuration: IP: TCP syncookie support
(not enabled per default) (CONFIG_SYN_COOKIES) [Y/n/?].
Disable ICMP Redirect Acceptance
When hosts use a non-optimal or defunct route to a particular destination, an ICMP redirect
packet is used by routers to inform the hosts what the correct route should be. If an attacker is
able to forge ICMP redirect packets, he or she can alter the routing tables on the host and
Linux General Security 0
CHAPTER 3
Copyright 1999 - 2000 Gerhard Mourani, Open Network Architecture ® and OpenDocs Publishing
64
possibly subvert the security of the host by causing traffic to flow via a path you didn't intend. It’s
strongly recommended to disable ICMP Redirect Acceptance to protect your server from this
hole.
Under Red Hat Linux 6.1
[root@deep /]# for f in /proc/sys/net/ipv4/conf/*/accept_redirects; do
> echo 0 > $f
> done
[root@deep /]#
Add the above commands to the “/etc/rc.d/rc.local” script file and you’ll not have to type it again
the next time you reboot your system.
Under Red Hat Linux 6.2
Edit the “/etc/sysctl.conf” file and add the following line:
# Disable ICMP Redirect Acceptance
net.ipv4.conf.all.accept_redirects = 0
You must restart your network for the change to take effect. The command to restart the network
is the following:
• To restart all networks devices manually on your system, use the following command:
[root@deep /]# /etc/rc.d/init.d/network restart
Setting network parameters [ OK ]
Bringing up interface lo [ OK ]
Bringing up interface eth0 [ OK ]
Bringing up interface eth1 [ OK ]
NOTE: Make a note that the above command for Red Hat Linux 6.1 or 6.2 will disable Redirect
Acceptance Packets on all your interfaces (lo, ethN, pppN etc).
Enable always-defragging Protection
This protection must be enabled if you use your Linux server as a gateway to masquerade
internal traffic to the Internet (IP Masquerading).
Under Red Hat Linux 6.1
[root@deep /]# echo 1 > /proc/sys/net/ipv4/ip_always_defrag
Add the above commands to the “/etc/rc.d/rc.local” script file and you’ll not have to type it again
the next time you reboot your system.
Under Red Hat Linux 6.2
Edit the “/etc/sysctl.conf” file and add the following line:
# Enable always defragging Protection
net.ipv4.ip_always_defrag = 1
You must restart your network for the change to take effect. The command to restart the network
is the following:
• To restart all network devices manually on your system, use the following command:
[root@deep /]# /etc/rc.d/init.d/network restart
Setting network parameters [ OK ]
Linux General Security 0
CHAPTER 3
Copyright 1999 - 2000 Gerhard Mourani, Open Network Architecture ® and OpenDocs Publishing
65
Bringing up interface lo [ OK ]
Bringing up interface eth0 [ OK ]
Bringing up interface eth1 [ OK ]
Enable bad error message Protection
This option will alert you to all bad error messages in your network.
Under Red Hat Linux 6.1
[root@deep /]# echo 1 > /proc/sys/net/ipv4/icmp_ignore_bogus_error_responses
Add the above commands to the “/etc/rc.d/rc.local” script file and you’ll not have to type it again
the next time you reboot your system.
Under Red Hat Linux 6.2
Edit the “/etc/sysctl.conf” file and add the following line:
# Enable bad error message Protection
net.ipv4.icmp_ignore_bogus_error_responses = 1
You must restart your network for the change to take effect. The command to restart the network
is the following:
• To restart all network devices manually on your system, use the following command:
[root@deep /]# /etc/rc.d/init.d/network restart
Setting network parameters [ OK ]
Bringing up interface lo [ OK ]
Bringing up interface eth0 [ OK ]
Bringing up interface eth1 [ OK ]
Enable IP spoofing protection
The spoofing protection prevents your network from being the source of spoofed (i.e. forged)
communications that are often used in DoS Attacks.
Under Red Hat Linux 6.1
[root@deep /]# for f in /proc/sys/net/ipv4/conf/*/rp_filter; do
> echo 1 > $f
> done
[root@deep /]#
Add the above commands to the “/etc/rc.d/rc.local” script file and you’ll not have to type it again
the next time you reboot your system.
Under Red Hat Linux 6.2
Edit the “/etc/sysctl.conf” file and add the following line:
# Enable IP spoofing protection, turn on Source Address Verification
net.ipv4.conf.all.rp_filter = 1
You must restart your network for the change to take effect. The command to restart the network
is the following:
• To restart all network devices manually on your system, use the following command:
[root@deep /]# /etc/rc.d/init.d/network restart
Setting network parameters [ OK ]
Linux General Security 0
CHAPTER 3
Copyright 1999 - 2000 Gerhard Mourani, Open Network Architecture ® and OpenDocs Publishing
66
Bringing up interface lo [ OK ]
Bringing up interface eth0 [ OK ]
Bringing up interface eth1 [ OK ]
Log Spoofed Packets, Source Routed Packets, Redirect Packets
This protection will log all Spoofed Packets, Source Routed Packets, and Redirect Packets to
your log files.
Under Red Hat Linux 6.1
[root@deep /]# for f in /proc/sys/net/ipv4/conf/*/log_martians; do
> echo 1 > $f
> done
[root@deep /]#
Add the above commands to the “/etc/rc.d/rc.local” script file and you’ll not have to type it again
the next time you reboot your system.
Under Red Hat Linux 6.2
Edit the “/etc/sysctl.conf” file and add the following line:
# Log Spoofed Packets, Source Routed Packets, Redirect Packets
net.ipv4.conf.all.log_martians = 1
You must restart your network for the change to take effect. The command to restart the network
is the following:
• To restart all network devices manually on your system, use the following command:
[root@deep /]# /etc/rc.d/init.d/network restart
Setting network parameters [ OK ]
Bringing up interface lo [ OK ]
Bringing up interface eth0 [ OK ]
Bringing up interface eth1 [ OK ]
Unusual or hidden files
It is important to not forget to look everywhere on the system for unusual or hidden files (files that
start with a period and are normally not shown by the “ls” command), as these can be used to
hide tools and information (password cracking programs, password files from other systems,
etc.). A common technique on UNIX systems is to put a hidden directory or file in a user's
account with an unusual name, something like ' ' or ' ' (dot dot space) or ' ^G' (dot dot control-
G). The “find” program can be used to look for hidden files.
As an example:
[root@deep /]# find / -name " " -print -xdev
[root@deep /]# find / -name ".*" -print -xdev | cat -v
NOTE: Files with names such as '.xx' and '.mail' have been used (that is, files that might appear to
be normal).
Find all files with the SUID/SGID bit enabled
All SUID and SGID files that still exist on your system after we have removed those that won't
absolutely require such privilege are a potential security risk, and should be monitored closely.
Linux General Security 0
CHAPTER 3
Copyright 1999 - 2000 Gerhard Mourani, Open Network Architecture ® and OpenDocs Publishing
67
Because these programs grant special privileges to the user who is executing them, it is
necessary to ensure that insecure programs are not installed.
A favorite trick of crackers is to exploit SUID "root" programs, and leave a SUID program as a
backdoor to get in the next time. Find all SUID and SGID programs on your system, and keep
track of what they are so that you are aware of any changes, which could indicate a potential
intruder.
• Use the following command to find all SUID/SGID programs on your system:
[root@deep /]# find / -type f \( -perm -04000 -o -perm -02000 \) \-exec ls -lg {} \;
NOTE: See in this book under chapter 10 “Securities Software (Monitoring Tools)” for more
information about the software sXid that will do the job for you automatically each day and report
the results via mail.
Find group and World Writable files and directories
Group and world writable files and directories particularly system files (partions), can be a
security hole if a cracker gains access to your system and modifies them. Additionally, world-
writable directories are dangerous, since they allow a cracker to add or delete files as he or she
wishes in these directories. In the normal course of operation, several files will be writable,
including some from the “/dev”, “/var/catman” directories, and all symbolic links on your system.
• To locate all group & world-writable files on your system, use the command:
[root@deep /]# find / -type f \( -perm -2 -o -perm -20 \) -exec ls -lg {} \;
• To locate all group & world-writable directories on your system, use the command:
[root@deep /]# find / -type d \( -perm -2 -o -perm -20 \) -exec ls -ldg {} \;
NOTE: A file and directory integrity checker like Tripwire software can be used regularly to scan,
manage and find modified group or world writable files and directories easily. See in this book
under chapter 10 “Securities Software (Monitoring Tools)” for more information about Tripwire.
Unowned files
Don’t permit any unowned file. Unowned files may also be an indication that an intruder has
accessed your system. If you find unowned file or directory on your system, verify its integrity,
and if all looks fine, give it an owner name. Some time you may uninstall a program and get an
unowned file or directory related to this software; in this case you can remove the file or directory
safely.
• To locate files on your system that do not have an owner, use the following command:
[root@deep /]# find / -nouser -o -nogroup
NOTE: Once again, files reported under “/dev” directory don’t count.
Finding “.rhosts” files
Finding all the “.rhosts” files that could exist on your server should be a part of your regular
system administration duties, as these files should not be permitted on your system. Remember
that a cracker only needs one insecure account to potentially gain access to your entire network.
• You can locate all “.rhosts” files on your system with the following command:
Linux General Security 0
CHAPTER 3
Copyright 1999 - 2000 Gerhard Mourani, Open Network Architecture ® and OpenDocs Publishing
68
[root@deep /]# find /home -name .rhosts
You can also use a cron job to periodically check for, report the contents of, and delete
$HOME/.rhosts files. Also, users should be made aware that you regularly perform this type of
audit, as directed by policy.
• To use a cron job to periodically check and report via mail all “.rhosts” files, do the
following:
Create as “root” the find_rhosts_files script file under “/etc/cron.daily” directory (touch
/etc/cron.daily/find_rhosts_files) and add the following lines in this script file:
#!/bin/sh
/usr/bin/find /home -name .rhosts | (cat <<EOF
This is an automated report of possible existent “.rhosts” files on the server
deep.openna.com, generated by the find utility command.
New detected “.rhosts” files under the “/home” directory include:
EOF
cat
) | /bin/mail -s "Content of .rhosts file audit report" root
Now make this script file executable, verify the owner, and change the group to “root”.
[root@deep /]# chmod 755 /etc/cron.daily/find_rhosts_files
[root@deep /]# chown 0.0 /etc/cron.daily/find_rhosts_files
Each day mail will be sent to “root” with a subject:” Content of .rhosts file audit report” containing
potential new “.rhosts” files.
System has been compromised
If you believe that your system has been compromised, contact CERT ® Coordination Center or
your representative in FIRST (Forum of Incident Response and Security Teams).
Internet Email:
CERT Hotline: (+1) 412-268-7090
Facsimile: (+1) 412-268-6989
CERT/CC personnel answer 8:00 a.m. – 8:00 p.m. EST (GMT –5)/EDT (GMT –4)) on working
days; they are on call for emergencies during other hours and on weekends and holidays.
Copyright 1999 - 2000 Gerhard Mourani, Open Network Architecture ® and OpenDocs Publishing
69
Chapter 4 General System Optimization
In this Chapter
Linux General Optimization
Linux General Optimization 0
CHAPTER 4
Copyright 1999 - 2000 Gerhard Mourani, Open Network Architecture ® and OpenDocs Publishing
70
Linux General Optimization
Overview
At this stage of your configuration, you should now have a Linux server well configured and
secured. Our server contains the most essential package and programs installed to be able to
work properly and the most essential general security configuration. Before we continue in our
steps and begin to install the services we want to share with our customers, it is important to now
tune our Linux server. The tuning we will perform in the following parts will be applied to the
whole system. It also applies to present as well as future programs, such as services that we will
later install. Generally, if you don’t use a x386 Intel processor, Red Hat Linux out of the box is not
optimized for your specific CPU architecture (most people now run Linux on a Pentium
processor). The sections bellow will guide you through different steps to optimize your Linux
server for your specific processor, memory, and network, as well as your file system.
The “/etc/profile” file
The “/etc/profile” file contains system wide environment stuff and startup programs. All
customizations that you put in this file will apply for the entire variable environment on your
system, so putting optimization flags in this file is a good choice. To squeeze the most
performance from your x86 programs, you can use full optimization when compiling with the -O9
flag. Many programs contain -O2 in the Makefile. -O9 is the highest level of optimization. It will
increase the size of what it produces, but it runs faster.
NOTE: It is not always true that the “-O9” flag will make the best performance for your processor. If
you have an x686 and above processor, surely, but below x686, not necessarily.
When compiling, use the “-fomit-frame-pointer” switch for any kind of processor you may have.
This will use the stack for accessing variables. Unfortunately, debugging is almost impossible with
this option. You can also use the -mcpu=cpu_type and -march=cpu_type switch to optimize the
program for the CPU listed to the best of GCC’s ability. However, the resulting code will only be
run able on the indicated CPU or higher.
Below are the optimization flags that we recommend you put in your “/etc/profile” file depending
on your CPU architecture. The optimization options apply only when we compile and install a new
program in our server. These optimizations don’t play any role in our Linux base system; it just
tells our compiler to optimize the new programs that we will install with the optimization flags we
have specified in the “/etc/profile” file.
Step 1
For CPU i686 or PentiumPro, Pentium II, Pentium III
In the “/etc/profile” file, put this line for a PentiumPro, Pentium II and III Pro Processor family:
CFLAGS=’-O9 -funroll-loops -ffast-math -malign-double -mcpu=pentiumpro -march=pentiumpro -
fomit-frame-pointer -fno-exceptions’
For CPU i586 or Pentium
In the “/etc/profile” file, put this line for a Pentium Processor family:
CFLAGS=’-O3 -march=pentium -mcpu=pentium -ffast-math -funroll-loops -fomit-frame-pointer -
fforce-mem -fforce-addr -malign-double -fno-exceptions’
Linux General Optimization 0
CHAPTER 4
Copyright 1999 - 2000 Gerhard Mourani, Open Network Architecture ® and OpenDocs Publishing
71
For CPU i486
In the “/etc/profile” file, put this line for a i486 Processor family:
CFLAGS=’-O3 -funroll-all-loops -malign-double -mcpu=i486 -march=i486 -fomit-frame-pointer -fno-
exceptions’
Step 2
Now after the selection of your CPU settings (i686, i586, or i486) a bit further down in the
“/etc/profile” file, add "
CFLAGS LANG LESSCHARSET" to the "export" line:
export PATH PS1 HOSTNAME HISTSIZE HISTFILESIZE USER LOGNAME MAIL INPUTRC
CFLAGS LANG LESSCHARSET
Step 3
Log out and back in; after this, the new CFLAGS environment variable is set, and software and
other "configure" tool will recognize that. Pentium (Pro/II/III) optimizations will only work with egcs
or pgcc compilers. The egcs compiler is already installed on your Server by default so you don’t
need to worry about it.
Below is the explanation of the different optimization options we use:
• The “-funroll-loops”
The “-funroll-loops” optimization option will perform the optimization of loop unrolling and
will do it only for loops whose number of iterations can be determined at compile time or
run time.
• The “-funroll-all-loops”
The “-funroll-all-loops“ optimization option will also perform the optimization of loop
unrolling and is done for all loops.
• The “-ffast-math”
The “-ffast-math” optimization option will allow the GCC compiler, in the interest of
optimizing code for speed, to violate some ANSI or IEEE rules/specifications.
• The “-malign-double”
The “-malign-double” optimization option will control whether the GCC compiler aligns
double, long double, and long long variables on a two-word boundary or a one-word
boundary. This will produce code that runs somewhat faster on a `Pentium' at the
expense of more memory.
• The “-mcpu=cpu_type”
The “-mcpu=cpu_type” optimization option will set the default CPU to use for the machine
type when scheduling instructions.
• The “-march=cpu_type”
The “-march=cpu_type” optimization option will generate instructions for the machine and
cpu type. Specifying the “-march=cpu_type” option implies also to specify the “-
mcpu=cpu_type” option in your compilation.
• The “-fforce-mem”
The “-fforce-mem” optimization option will produce better code by forcing memory
operands to be copied into registers before doing arithmetic on them and by making all
memory references potential common subexpressions.
Linux General Optimization 0
CHAPTER 4
Copyright 1999 - 2000 Gerhard Mourani, Open Network Architecture ® and OpenDocs Publishing
72
• The “-fforce-addr”
The “-fforce-addr” optimization option will produce better code by forcing memory
address constants to be copied into registers before doing arithmetic on them.
• The “-fomit-frame-pointer”
The “-fomit-frame-pointer” optimization option, one of the most interesting, will allow the
program to not keep the frame pointer in a register for functions that don't need one. This
avoids the instructions to save, set up and restores frame pointers; it also makes an extra
register available in many functions and makes debugging impossible on most machines.
IMPORTANT NOTE: All future optimizations that we will describe in this book refer by default to a
Pentium II/III CPU family. So you must, if required, adjust the compilation flags for your specific
CPU processor type in the “/etc/profile” file and also during your compilation time.
Benchmark Results
Summaries by Architecture
Depending on your processor architecture and the version of your compiler (GCC/EGCS),
optimization results may vary. The charts below will help you to choose the best compilation flags
for your compiler/CPU architecture.
The compiler version installed on your Red Hat Linux version 6.1 and 6.2 is egcs 2.91.66, but be
sure to check it even so before choosing your compiler optimization options.
• To verify the compiler version installed on your system, use the command:
[root@deep /]# egcs version
egcs-2.91.66
NOTE: All benchmark results, and future results, can be retrieved from the GCC home page at the
following address: />Linux General Optimization 0
CHAPTER 4
Copyright 1999 - 2000 Gerhard Mourani, Open Network Architecture ® and OpenDocs Publishing
73
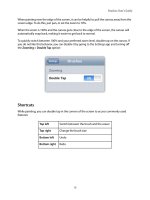
Now as an example :
For a Pentium II/III CPU (i686) with compiler version egcs-2.91.66, the best optimization options
would be: CFLAGS=’-O9 -funroll-loops -ffast-math -malign-double -mcpu=pentiumpro -
march=pentiumpro -fomit-frame-pointer -fno-exceptions’
Linux General Optimization 0
CHAPTER 4
Copyright 1999 - 2000 Gerhard Mourani, Open Network Architecture ® and OpenDocs Publishing
74
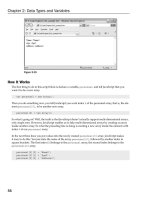
For a Pentium CPU (i586) with compiler version egcs-2.91.66, the best optimization options
would be: CFLAGS=’-O3 -march=pentium -mcpu=pentium -ffast-math -funroll-loops -fomit-
frame-pointer -fforce-mem -fforce-addr -malign-double -fno-exceptions’