Programming Visual Basic 2008 phần 2 pdf
Bạn đang xem bản rút gọn của tài liệu. Xem và tải ngay bản đầy đủ của tài liệu tại đây (555.03 KB, 79 trang )
58
|
Chapter 2: Introducing Visual Basic
Subroutines
Subroutines begin with a Sub declaration statement and end with an End Sub state-
ment. All of your subroutine’s logic appears in between these two mighty jaws.
01 Sub ShowIngredients(ByVal gender As Char)
02 Dim theMessage As String = "Unknown."
03 If (gender = "M"c) Then
04 theMessage = "Snips and snails and puppy dog tails."
05 ElseIf (gender = "F"c) Then
06 theMessage = "Sugar and spice and everything nice."
07 End If
08 MsgBox(theMessage)
09 End Sub
Line 01 shows the subroutine’s declaration line in its simplest form; throughout the
book, you will find that there are additional keywords that decorate procedure decla-
rations to change their behavior. The statement begins with the
Sub keyword (for
subroutine), followed by the name of the procedure,
ShowIngredients.
The parentheses following this name contain the subroutine’s parameters. Parame-
ters allow another block of code that will use this procedure to pass data into the
procedure, and optionally receive data back. You can include any number of parame-
ters in the subroutine definition; simply separate them by commas. Each parameter
specifies the name as it will be used in the procedure (
gender in the sample) and its
data type (
Char). The arguments are treated as declared variables within the proce-
dure, as is done with
gender on lines 03 and 05.
The values supplied by the calling code are known as arguments. All arguments are
passed by value or by reference. In the sample code, the argument passed into
gender
will be passed by value, as specified through the ByVal keyword. The related ByRef
keyword indicates an argument to be passed by reference. If you don’t include either
keyword,
ByVal is assumed. This passing method impacts whether changes made to
the argument within the local procedure are propagated back to the calling code.
However, the ability to update the original data is also influenced by whether the
data is a value type or a reference type. Table 2-3 indicates the behavior for each com-
bination of passing method and data type.
Table 2-3. Updating data, the .NET way
Passing method Data type Behavior
ByVal
Value type Changes made to the local version of the argument have no impact on the
original version.
ByVal
Reference type Changes made to members of the data object immediately impact the
original data object. However, the object itself cannot be changed or
replaced with a completely new data object.
Creating Your Own Procedures
|
59
In most cases, if you are interested in modifying the value of a parameter and having
the changes return to the caller, use
ByRef; otherwise, use ByVal.
Lines 02 through 08 in the sample code comprise the body of the procedure, where
all your logic appears. Any variables to be used solely in the routine are also defined
here, as with the
theMessage variable on line 02. The subroutine always concludes
with an
End Sub statement.
Functions
The syntax of a function differs only slightly from subroutines, to support a return
value.
01 Function IsPrime(ByVal source As Long) As Boolean
02 ' Determine whether source is a prime number.
03 Dim testValue As Long
04 If (source < 2) Then
05 Return False
06 ElseIf (source > 2) Then
07 For testValue = 2 To source \ 2&
08 If ((source Mod testValue) = 0) Then
09 Return False
10 End If
11 Next testValue
12 End If
13 Return True
14 End Function
As with subroutines, the function’s declaration line appears first (line 01), followed
by the body (lines 02 through 13) and the closing
End Function statement (line 14).
The declaration line includes an extra data type definition after the parameter list.
This is the data type of the final value to be returned to the calling code. Use this
return value in the calling code just like any other value or variable. For example, the
following line calls the
IsPrime function and stores its Boolean result in a variable:
primeResult = IsPrime(23)
To indicate the value to return, use the Return statement (described later in the chap-
ter). The sample code does this on lines 05, 09, and 13. (An older VB 6.0 syntax that
lets you assign the return value to the name of the function still works.)
ByRef
Value type Changes made to the local version are returned to the calling procedure,
and permanently impact the original data value.
ByRef
Reference type Changes made to either the data object or its members are also changed in
the original. It is possible to fully replace the object sent into the procedure.
Table 2-3. Updating data, the .NET way (continued)
Passing method Data type Behavior
60
|
Chapter 2: Introducing Visual Basic
Properties
A little earlier I mentioned fields, which are variables or constants that appear within
a class, but outside any procedure definition.
01 Class PercentRange
02 Public Percent As Integer
03 End Class
Properties are similar to fields; they are used like class-level variables or constants.
But they are programmed like functions, accepting parameters, having return values,
and including as much logic as you require.
Properties are often used to protect private class data with logic that weeds out inap-
propriate values. The following class defines a single property that provides access to
the hidden related field:
01 Class PercentRange
02 ' Stores a percent from 0 to 100 only.
03 Private savedPercent As Integer
04 Public Property Percent( ) As Integer
05 Get
06 Return savedPercent
07 End Get
08 Set(ByVal value As Integer)
09 If (value < 0) Then
10 savedPercent = 0
11 ElseIf (value > 100) Then
12 savedPercent = 100
13 Else
14 savedPercent = value
15 End If
16 End Set
17 End Property
18 End Class
The Percent property (lines 04 to 17) protects access to the savedPercent field (line
03), correcting any caller-supplied values that exceed the 0 to 100 range. Properties
include separate assignment and retrieval components, also called accessors. The
Get
accessor (lines 05 to 07) returns the property’s monitored value to the caller. The Set
accessor (lines 08 to 16) lets the caller modify the value of the property.
The property declaration statement (line 04) includes a data type that matches the
data type passed into the
Set accessor (line 08). This is the data type of the value set
or retrieved by the caller. To use this sample
Percent property, create an instance of
the
PercentRange class, and then use the property:
Dim activePercent As New PercentRange
activePercent.Percent = 107 ' An out-of-range Integer
MsgBox(activePercent.Percent) ' Displays "100", not "107"
Other Flow Control Features
|
61
You can create read-only or write-only properties by including the ReadOnly or
WriteOnly keyword just before the Property keyword in the declaration statement
(line 04), and leaving out the unneeded accessor.
Properties do not need to be tied to fields. You can use properties to get and set any
type of value, and store it or act upon it in any manner you wish.
Where to Put Your Procedures
Back in the good ol’ days of Visual Basic 6.0, procedures could appear just about
anywhere in your source code files. You would open a source file, type a function,
and go; it was that easy. With the move to .NET, all Visual Basic procedures must
now appear within a defined class (or a structure or module).
Class Employee
Sub StartVacation( )
End Sub
Function TotalVacationTaken( ) As Double
End Function
End Class
When you create instances of your class later in code, the methods can be called
directly through the object instance.
Dim executive As New Employee
executive.StartVacation( )
Chapter 8 shows you how to use and build classes.
Other Flow Control Features
The loops and conditional statements available in Visual Basic let you reroute your
code based on data. The language includes a few other statements that let you con-
trol the action in a more direct manner.
The GoTo Statement
The GoTo statement lets you jump immediately to some other location within the cur-
rent procedure. The destination of a jump is always a line label, a named line posi-
tion in the current procedure. All line labels appear at the start of a logical line, and
end with a colon.
PromptUser:
GetValuesFromUser(numerator, denominator)
If (denominator = 0) Then GoTo PromptUser
quotient = numerator / denominator
62
|
Chapter 2: Introducing Visual Basic
In this sample, the GoTo statement jumps back to the PromptUser label when the code
detects invalid data. Processing continues with the line immediately following the
PromptUser label. You can’t use the same label name twice in the same procedure,
although you can reuse label names in different procedures. If you want, include
another logic statement on the same line as your label, right after the colon, although
your code will be somewhat easier to read if you keep labels on their own lines.
LabelAlone:
MsgBox("It's all alone.")
LabelAndCode: MsgBox("Together again.")
It’s all right to include as many labels in your code as you need, but the GoTo state-
ment is one of those elements of Visual Basic that is monitored closely by pesky
international software agencies, such as the International Committee to Keep GoTo
Always Gone (ICK-GAG). That group also scans computer books looking for
derogatory references to its organization name—not that it would find anything
like that in this book. But its core issue is that overuse of
GoTo statements can lead
to spaghetti code, such as the following:
Dim importantMessage As String = "Do"
GoTo Step2
Step6: importantMessage &= "AG!"
GoTo Step7
Step3: importantMessage &= "wit"
GoTo Step4
Step2: importantMessage &= "wn "
GoTo Step3
Step5: importantMessage &= "CK-G"
GoTo Step6
Step4: importantMessage &= "h I"
GoTo Step5
Step7: MsgBox(importantMessage)
Some people say that such code is hard to read. Others call it job security. No mat-
ter what you call it, it does make code very hard to maintain and review. You should
probably keep an eye on your use of
GoTo statements; if you don’t, someone else
might.
Visual Basic itself places some limits on the use of
GoTo. You cannot jump into or out
of certain multiline statements that would result in improperly initialized code or
data values. For instance, you cannot jump into the middle of a
For Next state-
ment from outside the statement, since the loop counter variable and the starting
and ending ranges would not be properly initialized.
' This GoTo statement will fail.
GoTo InsideTheLoop
For counter = 1 to 10
InsideTheLoop:
MsgBox("Loop number: " & counter)
Next counter
Other Flow Control Features
|
63
However, once you are inside the loop, you can jump to line labels that also appear
in the loop, and it’s acceptable to jump out of the loop using
GoTo. Some other multi-
line structures impose similar restrictions.
The Return Statement
Not only can you jump around within a procedure using GoTo, but you can also jump
right out of a procedure anytime you want using the
Return statement. Normally, a
procedure exits when processing reaches the last line of code in the procedure; pro-
cessing then continues with the code that called the procedure. The
Return state-
ment provides a way to exit the procedure before reaching the end.
In subroutines, the
Return statement appears by itself as a standalone statement:
Return
In functions, the statement must include the value to be returned to the calling code:
a variable, a literal, or an expression that must match the specified return value data
type of the function.
Return 25
Pre NET releases of Visual Basic used an Exit statement to immediately leave a pro-
cedure. These are still supported in .NET. There are three variations:
Exit Sub
Exits a subroutine
Exit Function
Exits a function
Exit Property
Exits a property
When exiting from a function, the
Exit Function statement does not include a way to
specify a return value. You must set the return value separately by assigning the
return value to the name of the function.
Function SafeDivide(ByVal numerator As Double, _
ByVal denominator As Double) As Double
' The "#" sign makes a number a Double.
If (denominator = 0#) Then
' Return 0 on invalid division.
SafeDivide = 0#
Exit Function
End If
Return numerator / denominator
End Function
64
|
Chapter 2: Introducing Visual Basic
The End and Stop Statements
The End and Stop statements bring an immediate halt to your Visual Basic applica-
tion. The
End statement exits your program immediately, aborting all further code
and data processing (although certain acquired resources are cleaned up).
The
Stop statement suspends processing only when you are running your applica-
tion within a debugger, such as the Visual Studio development environment.
Stop
returns control to the environment, allowing the developer to examine and possibly
alter data and code before continuing on with the program. If a
Stop is encountered
in a standalone application running outside the debugger, it prompts the user to
debug the application using any debugger installed on the workstation. Needless to
say, the user will not be amused.
Events and Event Handlers
Visual Basic is an event-driven language. This is especially true of programs written to
run on the Windows desktop. After some important initialization, the user is gener-
ally in control of all actions in the program. Who knows what the crazy user will do.
He might click here. She might type there. It could be all mayhem and bedlam. But
whatever the user does, your program will learn about it through events.
Since the first days of Windows, desktop programs have used a message pump to
communicate user and system actions to your code. Mouse and keyboard input,
system-generated actions, and other notifications from external sources flow into a
program’s common message queue. The message pump draws these messages out
one by one, examines them, and feeds them to the appropriate areas of your code.
In traditional Windows programming, you craft the message pump yourself, includ-
ing code that makes direct calls to event-handling procedures based on the message
type. In a Visual Basic program (both in .NET and earlier), the language provides the
message pump for you. It analyzes the messages as they are pumped out of the mes-
sage queue, and directs them to the appropriate code. In .NET, this code appears
within classes. Once a class has a chance to analyze the message, it can generate an
event, which is ultimately processed by an event handler, a subroutine you write to
respond to the action. This calling of the event handler is known as firing an event.
So, there are two parts of an event: (1) some code that decides to fire the event; and
(2) an event handler that responds to the fired event.
Events are really just indirect calls to a procedure. Instead of having the main code
call another subroutine directly, it asks .NET to call the other subroutine for it, pass-
ing specific arguments that the calling code may wish to include. So, why would you
want to do this instead of just making the subroutine call directly? For one thing, this
indirect method lets you add event handlers long after the initial event-firing code
was written. This is good, since the event-firing code may be in a third-party assem-
bly that was written years ago. A second benefit is that one event can target multiple
Events and Event Handlers
|
65
event handlers. When the event fires, each event handler will be called, and each can
perform any custom logic found in the handler subroutine.
The code that fires the event passes event-specific data to the target event handler(s)
through the handler’s parameter list. For the indirect subroutine call to work, the
event handler needs to contain the correct number of arguments, in the right order,
each of a specific and expected data type. The
Event statement defines this contract
between the event and the handler.
Public Event SalaryChanged(ByVal NewSalary As Decimal)
This Event statement defines an event named SalaryChanged with a single argument,
a
Decimal value. Any event handler wishing to monitor the event must match this
argument signature.
Sub EmployeePayChanged(ByVal updatedSalary As Decimal)
Events can occur for any reason you deem necessary; they need not be tied to user or
system actions. In this sample class, an event fires each time a change is made to the
employee’s salary. The
RaiseEvent statement performs the actual firing of the event,
specifying the name of the event to fire, and a set of arguments in parentheses.
Public Class Employee
Public Name As String
Private currentSalary As Decimal
Public Property Salary( ) As Decimal
Get
Return currentSalary
End Get
Set(ByVal value As Decimal)
currentSalary = value
RaiseEvent SalaryChanged(currentSalary)
End Set
End Property
Public Event SalaryChanged(ByVal NewSalary As Decimal)
End Class
The event handlers are not added directly to the class. Instead, they are attached to
an instance of the class. The instance, declared as a class field, must be defined using
the special
WithEvents keyword, which tells Visual Basic that this instance will pro-
cess events.
Public WithEvents MonitoredEmployee As Employee
Event handlers are ordinary subroutines, but they include the Handles keyword to
indicate which event is being handled.
Private Sub EmployeePayChanged( _
ByVal updatedSalary As Decimal) _
Handles MonitoredEmployee.SalaryChanged
MsgBox("The new salary for " & _
MonitoredEmployee.Name & " is " & updatedSalary)
End Sub
66
|
Chapter 2: Introducing Visual Basic
All that is needed is something to kick off the action.
Public Sub HireFred( )
MonitoredEmployee = New Employee
MonitoredEmployee.Name = "Fred"
MonitoredEmployee.Salary = 50000 ' Triggers event
End Sub
When the salary is set, the Employee class’s Salary property fires the SalaryChanged
event using the Visual Basic RaiseEvent command. This generates a call to the
EmployeePayChanged event handler, which finally displays the message.
The events built into the Windows Forms classes in .NET work just like this, but
instead of watching with me for a salary increase, they are watching for mouse clicks
and keyboard clacks. All of these system events use a common argument signature.
Event EventName(ByVal sender As System.Object, _
ByVal e As System.EventArgs)
The sender argument identifies the instance of the object that is firing the event, in
case the caller needs to examine its members. The
e argument is an object that lets
the caller send event-specific data to the handler through a single class instance. The
System.EventArgs class doesn’t have much in the way of members, but many events
use a substitute class that is derived from
System.EventArgs.
As we pass through the chapters of this book, there will be no end to the number of
event examples you will see and experience. I will save the more involved and inter-
esting samples until then.
Namespaces
Classes, structures, modules, enumerations, interfaces, and delegates—the major .NET
types—don’t just float around in the code of your application. They must all be
grouped and managed into namespaces. As described in Chapter 1, namespaces pro-
vide a hierarchy for your types, sort of a tree-shaped condominium where each type
has a home. Some of those homes (or nodes), such as
System, get pretty crowded
with all those type families living there. Others, such as
System.Timers, may have
only a few types dwelling in their ample abodes. But every type must live in the hier-
archy; none of the types is adventurous enough to strike out on its own and build a
ranch house.
At the very root of the hierarchy is
Global, not a node itself, but a Visual Basic key-
word that indicates the root of all roots. You can include
Global when referencing
your namespaces, but its use is required only when leaving it out would cause confu-
sion between two namespace branches.
Namespaces
|
67
Directly under Global are the few top-level namespaces, including System and
Microsoft. Each top-level namespace contains subordinate namespaces, and each of
those can contain additional third-level namespaces, and so on. Namespace nodes
are referenced relative to one another using a “dot” notation.
System.Windows.Forms
This specifies the third-level Forms namespace. You could also have typed:
Global.System.Windows.Forms
which means the same thing. Relative namespaces are also supported:
Forms
However, to use relative namespaces, you must tell your Visual Basic code to expect
them. There are so many namespaces out there, and there may be several
Forms
namespaces somewhere in the hierarchy.
Referencing Namespaces
Before namespaces can be used in your code, they must be referenced and optionally
imported. Referencing a namespace identifies the DLL assembly file that contains
that namespace’s types. Perform both of these actions through the References tab of
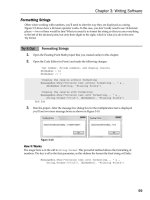
each project’s Properties form (see Figure 2-3).
Figure 2-3. References and imports for a project
68
|
Chapter 2: Introducing Visual Basic
Actually, you are not referencing the namespaces in the DLL, but rather the types, all
of which happen to live in specific namespaces. However, for the core type DLLs
supplied with the .NET Framework, it feels like the same thing. In fact, Microsoft
even named many of the DLLs to match the namespaces they contain. System.dll
contains types within the
System namespace. System.Windows.Forms.dll includes
types specific to Windows Forms applications, and all of these types appear in the
System.Windows.Forms namespace or one of its subordinates.
If you don’t reference a DLL in your project, none of its types will be available to you
in your code. Visual Studio loads several references into your project automatically
based on the type of project you create. Figure 2-3 shows the nine default references
included within a Windows Forms application:
System, System.Core, System.Data,
System.Data.DataSetExtensions, System.Deployment, System.Drawing, System.Windows.
Forms
, System.Xml, and System.Xml.Linq.
Once you have referenced a library of classes (or other types) in your code, access
any of its classes by specifying the full namespace to that class. For instance, the class
for an on-screen form is referenced by
System.Windows.Forms.Form. That’s three lev-
els down into the hierarchy, and some classes are even deeper. I hope that your
health insurance plan covers carpal tunnel syndrome.
To avoid typing all those long namespaces over and over again, Visual Basic includes
an imports feature. Imports are namespace-specific; once a namespace has been
imported, you can access any of the types in that namespace without specifying the
namespace name. If you import the
System.Windows.Forms namespace, you only have
to type “Form” to access the
Form class. The bottom half of Figure 2-3 shows how to
set these imports through the project’s properties. The “Imported namespaces” list
shows all available referenced namespaces. Simply check the ones you wish to
import;
System.Windows.Forms is already checked for you by default in Windows
Forms applications.
You can also import a namespace directly in your source code. Use the
Imports state-
ment at the very start of a source code file:
Imports System.Windows.Forms
The Imports statement supports namespace abbreviations, short names that repre-
sent the full namespace in your code. Using the statement:
Imports Fred = System.Windows.Forms
lets you reference the Form class as “Fred.Form.” Unlike the imports list in the
project’s properties, which impacts the entire project, the
Imports statement affects
only a single source code file.
The My Namespace
|
69
Namespaces in Your Project
By default, all the classes and types in your project appear in a top-level namespace
that takes on the name of your project. For a Windows Forms application, this
default namespace is called
WindowsApplication1. To specify a different top-level
namespace, modify it through the Application tab of the project’s properties, in the
“Root namespace” field. All the types in your project appear in this namespace; if
you specify an existing Microsoft-supplied namespace as your project’s root
namespace, all your types will appear in that specified namespace mixed in with the
preexisting types. For standalone applications, this mixture will be visible only from
your code.
From the root namespace, you can place types within subordinate namespaces by
using the
Namespace statement. Namespace is a block statement that ends with the End
Namespace
clause. Any types you create between the Namespace and End Namespace
clauses will be contained in that subordinate namespace. For example, if your root
namespace is
WindowsApplication1, the following statements create a class whose full
name is
WindowsApplication1.WorkArea.BasicStuff.BusyData:
Namespace WorkArea.BasicStuff
Class BusyData
End Class
End Namespace
You can include as many Namespace statements in your code as needed. Nesting of
namespaces is also supported:
Namespace WorkArea
Namespace BasicStuff
Class BusyData
End Class
End Namespace
End Namespace
The My Namespace
Visual Basic 2005 introduced a new “My” top-level namespace, designed to simplify
common programming tasks. Microsoft added it to the language in part to draw
holdout Visual Basic 6.0 stalwarts into the .NET fold. But most of it is really not that
dramatic.
My collects commonly used features that are currently sprinkled around the
Framework Class Library (FCL), and puts them in a mini-hierarchy for convenient
access. It’s really not much more complicated than that. The hierarchy is nicely orga-
nized, with sections for user, application, and computer-specific information. It’s
used just like any other part of the framework, although you cannot use the
Imports
keyword to access its components by a relative path.
70
|
Chapter 2: Introducing Visual Basic
Overall, My is very easy to use. To display the version number of your application, for
instance, use the following statement:
MsgBox(My.Application.Info.Version.ToString)
Some areas of the My namespace are dynamic; classes are added or removed as you
modify your source code. In Windows Forms applications, the
My.Forms branch
includes entries for each one of the project’s forms. As you add new forms, new
entries are added automatically. The
My.Forms object then makes a reference to each
form available for use in your code.
My.Forms.Form1.Text = "Welcome"
Summary
Sadly, this chapter has reached its conclusion. You may feel that it went by all too
fast; you may feel that you didn’t really learn how to write Visual Basic programs;
you may feel that a mild sedative would be right just about now. But don’t fret. This
chapter served as an introduction to the syntax and major features of Visual Basic.
Now begins the deeper training. As we start this book’s main focus—the Library
Project—you will encounter specific examples of all features covered only briefly in
this chapter.
Project
In this chapter, we will use the Code Snippets feature of Visual Studio to insert
source code into a basic sample code framework. Code Snippets is essentially a hier-
archical database of saved source code text. If you have installed the code for this
book, you will find code snippets for most chapters included right in Visual Studio.
In this chapter’s project, I will show you how to use them to add chapter-specific
code into your project.
Since we haven’t officially started the Library Project, this chapter’s project will sim-
ply extend the “Hello, World!” project we developed in Chapter 1, but with fun
parts added. I will include some of the language features we discovered throughout
this chapter.
PROJECT ACCESS
Load the Chapter 2 (Before) Code project, either through the New Project tem-
plates or by accessing the project directly from the installation directory. To see
the code in its final form, load Chapter 2 (After) Code instead.
Each chapter’s sample code includes a “Before” and “After” version. The “After” ver-
sion represents the code as it will look when all the changes in that chapter’s
Project
|
71
“Project” section have been applied. The “Before” version doesn’t have any of the
chapter’s project changes included, just placeholders where you will insert the code,
one block at a time.
Like the project in Chapter 1, this chapter’s project includes a basic Windows form
with a single button on it. Clicking on the button displays the same “Hello, World!”
message. However, this time, the message starts in an encoded form, and a separate
class decodes the message and triggers an event that displays the form.
Once the project is open, view the source code attached to
Form1. It should look
somewhat like the following:
Public Class Form1
' *** Insert Code Snippet #2 here.
Private Sub Button1_Click(ByVal sender As System.Object, _
ByVal e As System.EventArgs) Handles Button1.Click
' *** Insert Code Snippet #3 here.
End Sub
' *** Insert Code Snippet #4 here.
End Class
' *** Insert Code Snippet #1 here.
This sample uses a separate class to process the displayed message. The code for this
class appears as snippet number 1. To insert the snippet, move the cursor just after
the #1 snippet marker line, which reads:
' *** Insert Code Snippet #1 here.
To insert a snippet through the Visual Studio menus, select Edit ➝ IntelliSense ➝
Insert Snippet. The equivalent keyboard sequence is Ctrl-K, Ctrl-X. Or type a ques-
tion mark (
?) anywhere in the source code, followed by pressing the Tab key. Any of
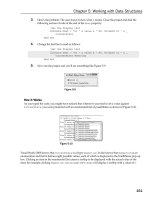
these methods displays the first level of snippets (see Figure 2-4).
Figure 2-4. Snip, snip, snip
72
|
Chapter 2: Introducing Visual Basic
From the snippet list, select Programming Visual Basic 2008, and then select
Chapter 2. A list of the available snippet items for this chapter appears (see
Figure 2-5).
Finally, select Item 1. The content magically appears within the source code. All
insertions of code snippets throughout this book occur in exactly this way.
Snippet 1 inserts the
SayHello class, part of the HelloStuff namespace, a portion of
which appears here:
Namespace HelloStuff
Friend Class SayHello
Private secretMessage As String
Private reverseFlag As Boolean
Private decoded As Boolean
Public Event MessageDecoded( _
ByVal decodedMessage As String)
Public Sub New(ByVal codedMessage As String, _
ByVal reverseIt As Boolean)
Public Sub DecodeMessage(ByVal rotationFactor As Integer)
Public Sub ReportMessage( )
End Class
End Namespace
The SayHello class includes three private fields (secretMessage, reverseFlag, and
decoded), which monitor the current status of the display message. A constructor
(
New) allows the user to create a new instance of SayHello with an initial message text,
and a flag that indicates whether the text should be reversed before display. The
DecodeMessage subroutine converts each letter of the encoded message to its final
form by shifting each letter a
rotationFactor number of places. If the letter E appears
and
rotationFactor is 3, the letter E is shifted three spaces forward, to H. A nega-
tive rotation factor shifts the letters lower in the alphabet. The alphabet wraps at
the A–Z boundary. Only letters are rotated, and upper- and lowercase are handled
independently.
Figure 2-5. Item, item, item
Project
|
73
The ReportMessage method fires the MessageDecoded event, sending the previously
decoded message to the event as an argument. So, where is this event handler? It’s
attached to an instance of
SayHello that will be added to the Form1 class.
INSERT SNIPPET
Insert Chapter 2, Snippet Item 2.
Private WithEvents HelloDecoder As HelloStuff.SayHello
The HelloDecoder class is an instance of the HelloStuff.SayHello class that we just
wrote, and the snippet makes it a member of the
Form1 class. The WithEvents key-
word says, “This instance will respond to events”; specifically, the
MessageDecoded
event from the SayHello class.
Let’s add the code that triggers the message to display when the user clicks on the
on-form button. This occurs in the button’s click event.
INSERT SNIPPET
Insert Chapter 2, Snippet Item 3.
HelloDecoder = New HelloStuff.SayHello("!iqwtB ,tqqjM", True)
HelloDecoder.DecodeMessage(-5)
HelloDecoder.ReportMessage( )
These three lines create an instance of the SayHello class, storing it in the
HelloDecoder class field. Can’t read the first argument in the constructor? It’s
encoded! It’s a secret! And the
True flag says that it’s been reversed to make it an
even bigger secret (you don’t know what it is!). The
DecodeMessage removes the
secrets by shifting each letter as needed, although the reversal doesn’t happen until
the call to
ReportMessage.
The
ReportMessage method doesn’t actually display the message. Instead, it fires an
event that makes the unscrambled message available to an event handler.
INSERT SNIPPET
Insert Chapter 2, Snippet Item 4.
Private Sub HelloDecoder_MessageDecoded( _
ByVal decodedMessage As String) _
Handles HelloDecoder.MessageDecoded
' Show the decoded message.
MsgBox(decodedMessage)
End Sub
74
|
Chapter 2: Introducing Visual Basic
The Handles keyword connects the subroutine with the fired event. The decoded
message comes into the handler through the
decodedMessage argument, and is
splashed all over the screen with a simple yet powerful call to the
MsgBox function.
That’s it for the sample code. Now it’s time to roll up your sleeves and embark on a
full Visual Basic 2008 project.
75
Chapter 3
CHAPTER 3
Introducing the Project3
You’re sitting in your office, surfing the I mean reading up on the latest technol-
ogy issues most pressing to software developers. You’re minding your own business,
when boom, someone walks up to your desk and offers to pay you money to write a
program. It happens every day, all over corporate America, and sometimes it just
makes me sick.
But enough about my health problems. This desk-hovering somebody informs you
that you must develop a software application, possibly a database application with a
user-friendly interface. Although the feature set will be specified by the primary
users, you, as the lead (or only) programmer, will design, document, develop, and
deliver discs dripping with distinguished, dazzling, and dynamic digital um soft-
ware. (Darn.)
Well, that’s what happened to me. A client of mine had a large collection of books
that they needed to organize as a traditional library. Seeing that I was a reasonably
codependent software architect, the client asked me to develop some software to
manage the books and such. Out of this request came the Library Project.
As you read through this chapter, you will have to keep my day job in mind. I write
custom Visual Basic applications for small to medium-size organizations. Most of the
projects are sized so that I can complete them by myself, including all design and
documentation requirements, in less than a year. All my projects involve a “key
user,” one person—or sometimes a very small group—who speaks for the user com-
munity. These projects also involve someone who has “signature authority,” a per-
son authorized to pay for the project, or decide on its continued existence. This
individual may be the same as the key user.
If you were developing, say, a replacement for Microsoft Word, you would likely
lack a “key user.” To obtain the specific requirements for the project, you may have
to conduct general user interviews with dozens of user candidates. Or you might cre-
ate a “persona,” a fictional person who represents your intended target audience.
(For Visual Studio, Microsoft used three personas named Einstein, Elvis, and Mort.)
76
|
Chapter 3: Introducing the Project
Whichever method applies to you, the general discussion in this chapter should
guide you to the happy conclusion: a design document that you will use to build the
application.
The Library Project
My client needed a program that would manage a database of books and media
items, and control how those items moved between bookshelves and patrons. The
software needed to have both patron- and administrator-focused features. It would
include various reports, including the printing of a receipt of checked-out items for
the patron. And most of all, it needed to both print and read bar codes.
It sounds like a lot for one man to do, and it is a sizable project. But I don’t have to
do it alone; you will help me. Together, through the pages of this book, you and I
will design that program, and develop that code, and bring joy to the users, and col-
lect that paycheck. Actually, I will collect the paycheck, although it wouldn’t hurt to
ask your boss to pay you to read this fine book.
The remainder of this section documents the key features of the Library manage-
ment application.
Library Item Features
The Library system will manage an inventory of books and other media items, locate
them, and manage the details and status of each copy of an item. To make this a real-
ity, the Library program will:
• Allow patrons or administrators to search for items currently in inventory. The
program allows searches based on several different properties of each item.
• Support multiple search methods, including by title, by author name, by subject
or topic, by a miscellaneous keyword, by the name of the related publisher, by
the name of a series or group that contains the item, or by a bar code number
attached to the actual item.
• Limit search results by the location of the item, or by the type of media (book,
CD, DVD, etc.).
• Support the definition and use of distinct physical locations. The client has
books and media stored at three different sites within their building, including a
storage closet for seldom-accessed items.
• Display the details of a retrieved item in a familiar browser-style interface. For
instance, when looking up a book by title, the user clicks on the author’s name
to access all other items by that same author.
• Allow access to each library item through a bar code scan. As is common in most
libraries today, the items in this library’s collection each have a bar code affixed,
which serves as a unique identifier for the individual item copy.
The Library Project
|
77
Patron Features
In addition to books and other items, the program manages a list of patrons, the
“customers” of the library who are permitted to check out items. To support interac-
tion with patrons, the application will include these patron-specific features:
• Items can be checked out to patrons, and checked back into the library inventory.
• All patrons are assigned a “PIN” that acts as their password.
• Patrons can check out items without librarian and administrator assistance.
They can use a bar code scanner to scan a patron library card and library items.
• The “media type” of an item determines its checkout (and subsequently its
renewal) duration.
• Patrons can view their library record, including all books currently checked out,
and a list of fines owed to the library.
• If permitted on a specific item, the patron can renew an item he has currently
checked out.
• Patron-centric online help is available through the standard F1 key. This help
file includes no information on administrative features, so as to reduce
experimentation.
• Patrons can be divided into “patron groups” for the reporting and processing
convenience of the administrative staff.
Administrative Features
Administrators include librarians, IT staff, and others who need advanced access to
application features. They are the primary users of the system, not the patrons. The
application includes the following administrator-specific features:
• A “login” feature provides access to the administrative features of the applica-
tion. Only authorized users can log in through an assigned password. The login
feature is normally hidden from view from ordinary patrons.
• Administrators can view patron details just like patrons can, but they also have
access to additional patron details. Specifically, administrators can add new
patrons and manage their identity and demographic details. Administrators can
also disable a patron record to prevent further item checkouts.
• Administrators collect and manage patron fines, including the ability to add
nonstandard fines or to dismiss unpaid fines.
• Administrators define the records for each item managed by the system’s inven-
tory database. This includes the basics of each item, such as title and authors.
Each item includes one or more copies, which represent physical items that can
be checked out. Bar codes are assigned to copies.
78
|
Chapter 3: Introducing the Project
• Beyond the items and copies, administrators define all supporting values and
lists, including author names and categories, the list of media types, publishers,
book series names, status codes that identify the disposition of each item copy,
and locations.
• Designated administrators can add, edit, and remove the accounts of other
administrators. Each account includes feature-specific authorization settings
(group rights).
• In addition to the scanning of bar codes, the program can assist administrators
in the design and printing of both patron and item bar codes.
• A simple program-managed process allows the administrative staff to process
overdue items and fines on a regular basis.
• The application allows holidays to be added and maintained. When a patron
checks out a book, the program adjusts the due date of the item to avoid holidays.
• Administrator-centric online help provides assistance to the enhanced features of
the application through the same F1 key available to patrons.
• The application includes some basic administrative reports, and the ability to
“plug in” reports as needed in the future without the need to update the pro-
gram itself.
The Application As a Whole
Beyond the basic features of the program as experienced by the patrons and adminis-
trators, there are a few other requirements:
• The program is “user-friendly” and easy to navigate, especially for patrons, with-
out much training or assistance.
• The application stores its data in a SQL Server database.
• Distribution of the application is done by administrative staff that has local admin-
istrative privileges, so a standard Windows installation package is sufficient.
• Configuration of the application uses standard XML methods.
Except for these general and feature-specific requirements, I was given design free-
dom. But where did the listed requirements come from? They came from the users,
the masters of the application. It was their needs—the needs of my customers and
theirs, who would be using the product day in and day out—that determined the list
of requirements.
The Needs of the Users
|
79
The Needs of the Users
Back in the old days of computers, there were no users. Who needed users? The only
ones manly enough to approach the hallowed inner sanctum of the computing sys-
tems were the programmers. Only they touched the vacuum tubes, connected the
cables, toggled the front panels, and fondled the punch cards that provided access to
the heart of the machine. These programmers were tough, and their programs,
tougher. “We don’t need no stinking users” was their mantra.
Then came the 1980s, with its Greatest American Hero-inspired attitude and its per-
sonal “personal” computers. Now there were users everywhere. They were like the
Blob, only with fewer computing skills. But they were the masters because most pro-
grams were written for them. Programmers rarely used the programs they wrote;
they were simply the interface between the user and the heart of the computer. Pro-
grammers provided the element of control needed by both the computer and the
users. In fact, that is a programmer’s job: to provide highly controlled access to the
computer and the data it contains.
Users have a lot of needs, most of which can’t be met by a computer. But for those
that can, the needs come in five parts: data and information, process, usability, com-
monality, and project-specific needs. The design process involves an examination of
these needs and the subsequent massaging of those needs into a software product. By
examining the current data and procedures, conducting user interviews, and per-
forming other need-extraction methods, you gather the details you require to craft
the right solution.
Data and Information
Your ability to provide convenient and specific access to the data and information
required by the user is what makes you, the programmer, so lovable. Most users got
along just fine before computers. They kept their information on 3 × 5 index cards, or
on legal pads, or on scrolls of parchment, or in hermetically sealed mayonnaise jars.
But they had a reason to move to a computer-based storage medium: the convenience.
Data is the raw information stored by your program: names, numbers, images, or
any other standalone values. Information is data in context: a customer record, an
order, a slide show. When you provide a quality program that moves data up to the
level of information, you are providing the level of convenience the user needs to
move from mayonnaise jars to silicon chips.
80
|
Chapter 3: Introducing the Project
Process
When the user demands her data back from the computer, you have three options:
• Dump every single byte of data to the screen, printer, or disk, and let the user
sort it out. Actually, this is the system that some users had before they started
using a computer.
• Protect the data from user access, insisting that the supplied password is invalid or
expired, or that the data is unavailable. “Abort, Retry, Fail” anyone? Actually, this
is the system that some other users had before they started using a computer.
• Present the data as information, in a format that is both usable and accessible.
Although the first two choices are indeed tempting, the third option is the best. And
given the amount of data that your application will likely manage, you will have to
dole out the interaction with it a bit at a time, and in an appropriate sequence. This
is process.
Through the implementation of a valid process, you control not only the user’s data,
but also the orderly interaction with that data. Most users need to supply or retrieve
only a small portion of their data at a time. But when they do, it will usually be in
the context of some process. For instance, in an order-taking situation, the user
(1) enters or confirms the customer’s contact information; (2) enters or updates the
order details; and (3) prints or electronically communicates the order information so
that it can be fulfilled. Your application (surprise!) manages this three-step process.
Usability
If your program presents data and information to the user, and in a specific arrange-
ment or order, but it is difficult to use, your users will hate you. They will loathe you.
They will spread mean stories about you, true or not. And when they appear in
groups, their vehemence can get downright ugly. I heard this story about an Excel
user’s group but perhaps it was just a rumor.
As a programmer, it is your job to make the computer, and the software that runs on
it, as usable as possible. And although you may not be able to control many of the
basic system features, you are the king when it comes to your own software.
The more ease and usability you design into your programs, the happier your users
will be. But I must warn you, ease of use for the user always means more work for
the developer. Always. It’s one of those unfair laws of the universe, and there is no
way around it. But sometimes we try—to the user’s peril.
Many, many years ago, I wrote some programs to demonstrate a hot new version of
BASIC that ran on the Motorola 6809 processor. This release could handle pro-
grams that were twice the size of the previous version: a whopping 32 KB of source
code. I was charged with testing the system, writing “big” programs that would show
The Needs of the Users
|
81
off the new functionality. I set to work in a fever of activity, but as my program
approached about 27 KB, things started to happen, things that involved a shaking
table and the smell of smoke. Seriously!
Since then, I have subconsciously feared the development of programs that I felt
were too large for a particular system. So, when I went to work on Visual Basic, I
brought to my projects some of this apprehension. I tried to make my programs easy
to use, but I also held back on the number of forms I would add to my projects. It
wasn’t an irrational fear; the original versions of Visual Basic did impose limits on
code size, the number of unique variable names, and the maximum number of
forms. I once hit the limit on the number of unique variable names, but I never came
close on the number of forms. Still, I held back. I was sure that if I added too many
forms, my users would require medical attention for smoke inhalation.
Unfortunately, my users were still suffering. I had put too much data on each form,
to the point where they were no longer communicating information. My phone
would ring constantly with the same user-sponsored question: “How do I use the
fields on such-and-such a form?” Of course, I always said, “Why don’t you press the
F1 key?” But it didn’t make a bit of difference, since my online help pages were as
long and complex as the forms they sought to simplify.
There did come a day when I escaped my phobia of form-laden applications. And on
that day, I came up with the following rules for my own programs:
• Don’t put too much information on a single form. When in doubt, move some
information to another form.
• Present only the most necessary information and data to the user by default.
Show additional information only if the user requests it.
• Make it easy for the user to access the enhanced data, but allow the program to
run properly without it.
• Use text, graphics, and colors to the user’s advantage.
• Simplify the application so that user documentation becomes unnecessary.
• Always provide user documentation. Make it simple enough so that calls to tech-
nical support become unnecessary.
These rules are generic enough to work with any type of application, and they are
in-your-face enough to make them meaningful to us, the programmers, and to them,
the users.
Commonality
Microsoft constantly touts innovation, and the ability to innovate has moved soft-
ware products forward at a tremendous pace. But unfortunately, users can handle
only so much innovation at a time. Consider the telephone. I inherited an old oak-
boxed telephone from my grandparents (see Figure 3-1).
82
|
Chapter 3: Introducing the Project
It’s a fun phone and so simple to use. When you want to make a call, you pick up
the handset and crank the handle on the side of the unit for about three or four sec-
onds. When the operator comes on the line, you tell her who you wish to call. What
could be simpler? What could be more user-friendly? What could be more expensive
than an operator-assisted call? But it was simple, and everyone instinctively knew
how to use it.
Today’s phones use buttons instead of cranks. Most of the buttons are simple digits
that let you directly dial a specific phone number. But there are other buttons as
well: Mute, Redial, Pause, Flash, #, and *. I’m afraid to push the Flash button, and
what’s with the SND and CLR buttons on cell phones? The problem is not the but-
tons themselves, but that every phone has a different selection of buttons. They have
lost the commonality that made crank phones easy to use. Sure, they have many
more features, but if the average person can’t figure out how to use that functional-
ity, what is the benefit?
Getting back to software: even new and innovative programs must retain some com-
monality with the operating system, and with other installed programs. As you speak
to users about their needs and think about the great advancements in software tech-
nology you will provide, don’t forget about commonality. Don’t forget about one of
the core needs of users: the need to not be overwhelmed by new ways of doing tasks
they thought they already could do. Users need consistency.
Figure 3-1. What a great phone!