Mastering Excel 2003 Programming with VBA phần 5 doc
Bạn đang xem bản rút gọn của tài liệu. Xem và tải ngay bản đầy đủ của tài liệu tại đây (1.65 MB, 61 trang )
4281book.fm Page 225 Sunday, February 29, 2004 5:12 PM
225
CHART MANIPULATION
With chrt
' use chart wizard to populate/format empty chart
.ChartWizard _
Source:=rgChartData, _
Gallery:=xlColumn, _
Format:=1, _
PlotBy:=xlColumns, _
CategoryLabels:=1, _
SeriesLabels:=1, _
HasLegend:=True, _
Title:="Gross Domestic Product Version I", _
CategoryTitle:="Year", _
ValueTitle:="GDP in billions of $"
End With
Set chrt = Nothing
Set rgChartData = Nothing
Set ws = Nothing
End Sub
You probably already know this, but a chart can assume two forms: it can be created as a chart
sheet or it can be embedded within a worksheet. One thing that is kind of odd regarding the process
of creating a chart is that you don’t have any control over what kind of chart is created when you use
Charts.Add. This statement creates an empty chart sheet. This is fine and dandy if you want a chart
sheet, but what if you want to embed it into a worksheet? That is what the Location method is for.
YourChartObject.Location([Where], [Name])
The Where parameter can be either xlLocationNewSheet (creates a chart sheet), xlLocationAsObject
(embeds in a worksheet), or xlLocationAutomatic. The Name parameter is the name of the new chart
sheet if you use xlLocationNewSheet. If you use xlLocationAsObject, the Name parameter should be
the name of the worksheet in which you want to embed the chart. Another somewhat peculiar aspect of
creating a chart is that Location creates a new Chart object from a programmatic perspective. If you are
using a Chart object variable to refer to a chart, you need to reset it when you use Location. That’s the
reason for the following statement in the CreateExampleChartVersionI procedure.
' embed chart in worksheet - this creates a new object
Set chrt = chrt.Location(xlLocationAsObject, ws.Name)
Now that you have the chart where you want it, it is time to employ the ChartWizard method to
give the chart some personality. As you can see in this example, the ChartWizard method has a lot
of parameters and you’ll probably use most of them. Note, however, that all of the parameters are
optional.
YourChartObject.ChartWizard [Source], [Gallery], [Format], _
[PlotBy], [CategoryLabels], [SeriesLabels], [HasLegend], _
[Title], [CategoryTitle], [ValueTitle], [ExtraTitle]
4281book.fm Page 226 Sunday, February 29, 2004 5:12 PM
226
CHAPTER 10 EXPLORING OTHER EXCEL OBJECTS
The parameters of the ChartWizard method are detailed in the following list.
Source This is an optional parameter that represents the range that contains the source data for
the chart.
Gallery Gallery is the type of chart to create. Choose from xlArea, xlBar, xlColumn, xlLine,
xlPie, xlRadar, xlXYScatter, xlCombination, xl3DArea, xl3DBar, xl3DColumn, xl3DLine,
xl3DPie, xl3DSurface, xlDoughnut, or xlDefaultAutoFormat.
Format The option number for the type of chart you specified using Gallery. This can be a num-
ber from 1 through 10 depending on the type of chart.
PlotBy Use xlRows or xlColumns to specify how the data is oriented.
CategoryLabels Use this parameter to indicate the number of rows or columns in the source
data range that consist of category labels.
SeriesLabels Use this parameter to indicate the number of rows of columns in the source data
range that contain series labels.
HasLegend HasLegend should be true to include a legend, false to exclude it.
Title The title of the chart can be specified with this parameter.
CategoryTitle The category axis title.
ValueTitle The value axis title.
ExtraTitle The series title for 3-D charts or the second value axis title for 2-D charts.
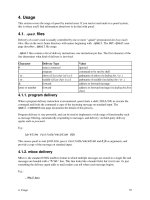
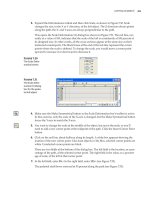
Figure 10.16 shows an example of a chart created using the ChartWizard method. This chart was
generated using the CreateExampleChartVersion1 procedure from Listing 10.9.
Figure 10.16
This is the chart cre-
ated by Listing 10.9.
4281book.fm Page 227 Sunday, February 29, 2004 5:12 PM
227
CHART MANIPULATION
You don’t necessarily need to use the ChartWizard method to create your chart. Well, technically
the ChartWizard doesn’t create the chart, but it certainly does all of the heavy lifting. Another way
to achieve the same result is to do it yourself using other properties and methods of the Chart object.
Take a look at Listing 10.10.
Listing 10.10: Creating a Chart Using the Chart Object
' creates a chart using basic Chart properties and methods
Sub CreateExampleChartVersionII()
Dim ws As Worksheet
Dim rgChartData As Range
Dim chrt As Chart
Set ws = ThisWorkbook.Worksheets("Basic Chart")
Set rgChartData = ws.Range("B1").CurrentRegion
' create a new empty chart
Set chrt = Charts.Add
' embed chart in worksheet—this creates a new object
Set chrt = chrt.Location(xlLocationAsObject, ws.Name)
With chrt
.SetSourceData rgChartData, xlColumns
.HasTitle = True
.ChartTitle.Caption = "Gross Domestic Product Version II"
.ChartType = xlColumnClustered
With .Axes(xlCategory)
.HasTitle = True
.AxisTitle.Caption = "Year"
End With
With .Axes(xlValue)
.HasTitle = True
.AxisTitle.Caption = "GDP in billions of $"
End With
End With
Set chrt = Nothing
Set rgChartData = Nothing
Set ws = Nothing
End Sub
4281book.fm Page 228 Sunday, February 29, 2004 5:12 PM
228
CHAPTER 10 EXPLORING OTHER EXCEL OBJECTS
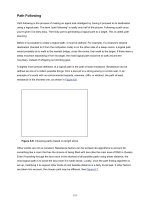
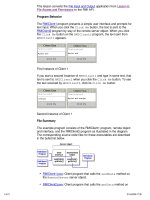
As you can see in Figure 10.17, this listing produces the same result as Listing 10.9. Personally, I
prefer this listing over the ChartWizard method. You have more flexibility doing it manually as we
do here, and I think it’s easier to read and understand.
Figure 10.17
An exact match. This
is the chart produced
by Listing 10.10.
Chart Hunting
As you know, a chart can take up residence in two locations: as a chart sheet in the workbook, or as
an embedded chart on a worksheet. Setting a reference to an existing chart varies according to what
kind of location the chart lives in. For chart sheets, you can refer to them almost like a worksheet as
the following code snippet demonstrates.
Dim chrt1 As Chart
Dim chrt2 As Chart
' set a reference to the chart sheet named Chart4
Set chrt1 = ThisWorkbook.Charts("Chart4")
' set a reference to the 2nd chart sheet in the wb
Set chrt2 = ThisWorkbook.Charts(2)
If your chart is embedded in a worksheet, however, you need to go through the ChartObjects col-
lection, which is a property of the Worksheet object that contains the embedded chart. An example
of this method is shown in the following snippet.
Dim chrt1 As Chart
Dim chrt2 As Chart
4281book.fm Page 229 Sunday, February 29, 2004 5:12 PM
229
CHART MANIPULATION
Dim ws As Worksheet
Set ws = ThisWorkbook.Worksheets(1)
' set a reference to the embedded chart named Chart4
Set chrt1 = ws.ChartObjects("Chart4").Chart
' set a reference to the 2nd embedded chart
Set chrt2 = ws.ChartObjects(2).Chart
Notice that to get to the actual chart object you need to locate a specific ChartObject first. You
can think of a ChartObject as a special object that exists merely to contain a chart on a worksheet.
Much like a flea needs a dog, a Chart needs a ChartObject to reside on a worksheet.
You can apply all of the techniques you learned about looking for specific worksheets in a work-
book to looking for chart sheets. Looking for embedded charts is another story due to two minor
complications. First, it isn’t practical to know the index order of the chart objects on a worksheet. If
you only have one chart on a worksheet, you’re fine (but who’s to say that another chart doesn’t get
added unbeknownst to you?). Second, unless you named the chart when you created it, you can’t refer
to it by name.
What to do? Simple, create a procedure that returns a chart based on some identifying character-
istic. For example, you could retrieve charts according to the chart title, one of the axis titles, the
source data range, or any of the other identifying characteristics. Listing 10.11 presents an example
of a procedure that searches for and returns a chart based on a chart title.
Listing 10.11: Seaching for Charts Using the Chart Title
' searches charts on a worksheet by chart title
Function GetChartByCaption(ws As Worksheet, sCaption As String) _
As Chart
Dim chtObj As ChartObject
Dim cht As Chart
Dim sTitle As String
Set cht = Nothing
' loop through all chart objects on the ws
For Each chtObj In ws.ChartObjects
' make sure current chart object chart has a title
If chtObj.Chart.HasTitle Then
sTitle = chtObj.Chart.ChartTitle.Caption
' is this title a match?
If StrComp(sTitle, sCaption, vbTextCompare) = 0 Then
4281book.fm Page 230 Sunday, February 29, 2004 5:12 PM
230
CHAPTER 10 EXPLORING OTHER EXCEL OBJECTS
' bingo
Set cht = chtObj.Chart
Exit For
End If
End If
Next
Set GetChartByCaption = cht
Set cht = Nothing
Set chtObj = Nothing
End Function
Sub TestGetChartByCaption()
Dim cht As Chart
Dim ws As Worksheet
Set ws = ThisWorkbook.Worksheets("Basic Chart")
Set cht = GetChartByCaption(ws, "I am the Chart Title")
If Not cht Is Nothing Then
MsgBox "Found chart"
Else
MsgBox "Sorry - chart not found"
End If
Set ws = Nothing
Set cht = Nothing
End Sub
This function works by looping through all of the ChartObjects and their associated charts on the
specified worksheet. For each chart, it checks to make sure the chart has a title, and if it does, the func-
tion checks the title for a match. The TestGetChartByCaption procedure provides an example of how
you could use the GetChartByCaption function. Basically, all you need to do is make sure that a chart
was found by comparing the result to Nothing.
Once you’ve found a chart to manipulate, the actual manipulation is quite easy now that you’re
familiar with what I’ve covered earlier in the chapter regarding the use of colors, the Font object, the Inte-
rior object, and the Border object. Listing 10.12 provides a basic example of some chart formatting.
After looking over this listing, I am quite confident that you’ll recognize the chart objects and the
chart elements to which they apply as shown in Figure 10.14. Also, notice how many of the chart
objects, being visual in nature, use the various objects that I covered earlier in the chapter.
4281book.fm Page 231 Sunday, February 29, 2004 5:12 PM
231
CHART MANIPULATION
Listing 10.12: Formatting a Basic Chart
Sub FormattingCharts()
Dim cht As Chart
Dim ws As Worksheet
Dim ax As Axis
Set ws = ThisWorkbook.Worksheets("Basic Chart")
Set cht = GetChartByCaption(ws, "GDP")
If Not cht Is Nothing Then
' format category axis
Set ax = cht.Axes(xlCategory)
With ax
.AxisTitle.Font.Size = 12
.AxisTitle.Font.Color = vbRed
End With
' format value axis
Set ax = cht.Axes(xlValue)
With ax
.HasMinorGridlines = True
.MinorGridlines.Border.LineStyle = xlDashDot
End With
' format plot area
With cht.PlotArea
.Border.LineStyle = xlDash
.Border.Color = vbRed
.Interior.Color = vbWhite
.Width = cht.PlotArea.Width + 10
.Height = cht.PlotArea.Height + 10
End With
' format misc other
cht.ChartArea.Interior.Color = vbWhite
cht.Legend.Position = xlLegendPositionBottom
End If
Set ax = Nothing
Set cht = Nothing
Set ws = Nothing
End Sub
4281book.fm Page 232 Sunday, February 29, 2004 5:12 PM
232
CHAPTER 10 EXPLORING OTHER EXCEL OBJECTS
Although all of this should appear relatively straightforward, I hope that you don’t have to do
much chart manipulation via code for the reasons given earlier. Creating presentation-quality charts
requires an iterative design approach that can only be done manually (at least the first time). The
approach is to design a nice chart manually that you then use as a template when you need to, reserving
any code manipulation for relatively minor changes such as changing titles, colors, or perhaps chang-
ing the source data range.
Summary
It’s easy to get so involved polishing your application from a programmatic standpoint that you
neglect the part most noticeable to users—the look. Though it may seem trivial, the formatting of
your various worksheets can go a long way toward influencing how your hard work is perceived
by your end users. Therefore, it pays to make sure you give this area some attention and don’t down-
play these issues.
One way that you can spice up a worksheet is by applying color to its various components. You
can color fonts, cell interiors, gridlines, drawing objects, and all of the visual chart-related objects and
borders, among other things. Any object that has a Color property also contains a ColorIndex prop-
erty. The difference is that you can specify Color using an RGB value, whereas you specify Color-
Index using an index that refers to a color occupying the workbook’s color palette.
Other ways that you can dress up a worksheet include using a pleasing mix of fonts (Font.Name),
font sizes (Font.Size), interior patterns (Interior.Pattern), and borders. To apply these effects, use the
appropriate object and property applied to a given Range object. Oh, and don’t forget about those
number formats. You can set them using the NumberFormat property of the Range object.
Regarding charts, although you can create them on the fly, it is best to create charts during the
development process and then use them as templates, so to speak. This is because creating visually
pleasing charts requires an iterative design process that requires your visual senses—a task that can’t
be replaced by a computer.
The conclusion of this chapter marks the end of the Excel object model section of this book. The
next section covers some more advanced topics including interacting with external programs, devel-
oping class modules, adding user personalization, and some Excel development best practices. I’ll kick
this section off with a chapter that teaches you how to create and use your own classes.
4281book.fm Page 233 Sunday, February 29, 2004 5:12 PM
Part
3
Advanced Excel
Programming
Techniques
In this section:
◆ Chapter 11: Developing Class Modules
◆ Chapter 12: Adding User Personalization to your
Application
◆ Chapter 13: Excel Development Best Practices
This page intentionally left blank
4281book.fm Page 235 Sunday, February 29, 2004 5:12 PM
Chapter 11
Developing Class Modules
“Uh-oh. Class modules? That sounds difficult. I don’t need no stinkin’ class modules—I’m cre-
ating wonderful applications without them. What do I need class modules for?”
Do you hear that voice? Don’t listen to it. Although it’s true that developing and then using class
modules requires you to think about programming in a different manner, that doesn’t mean it is more
difficult. Although you can create wonderful applications without using class modules, class modules
bring enough benefits to the table to warrant their use.
The objective of this chapter is threefold. First, I want you to understand exactly what class mod-
ules are. Second, I want you to recognize the benefits of using class modules. Finally, you’ll learn the
mechanics of creating your own objects using class modules.
Class Modules Are for Creating Objects
I dreamed I was on Jeopardy the other night playing against Bill Gates and Scott McNealy (CEO of
Sun Microsystems and a bitter, relentless Microsoft basher). I managed to take control of the game
after Scott insulted Bill’s mother and a Jerry Springer–style brawl ensued.
I said, “I’ll take programming paradigms for $1,000,000, Alex.”
“These modules are used for creating your own objects in VBA,” replied Alex.
Da, da, da, da, da, da, daaa (hum the Jeapoardy theme here).
For a million bucks I replied, “What are class modules?”
I was feeling pretty good about myself until Bill looked at me and chuckled, “My accountants con-
sider a million bucks a rounding error.”
Wouldn’t it be nice if it were just that simple? Well, it is that simple, I suppose, if you know what objects
are and you just want to know what class modules are for. One thing that my five-year-old boy has taught
me is that answers merely beget more questions. What are objects? That’s the real question. It is quickly fol-
lowed by these: How are objects any different from the collection of procedures I’ve tied together in regular
procedures throughout this book? Is this what they mean by object-oriented programming?
Throughout the book, you’ve been using objects that are intrinsic to Microsoft Excel. You’ve used
the Application, Workbook, Worksheet, Range, and other objects with nary a thought to the mindset
regarding the underlying paradigm. For the most part, didn’t it just feel natural to program in this
manner and use these objects? Can you imagine any other way to think about how you’d program
4281book.fm Page 236 Sunday, February 29, 2004 5:12 PM
236
CHAPTER 11 DEVELOPING CLASS MODULES
Microsoft Excel? If a Worksheet object didn’t exist, how would you manipulate a worksheet? Thank
goodness you, as an Excel developer, don’t have to learn C, Assembly language, or some other lower-
level language that doesn’t have as much correlation between how you think about a given object and
how you implement those thoughts programmatically.
The point is that, without realizing it, you’re already thinking in terms of objects. So far, you’ve
been consumers of objects that other programmers have thoughtfully created for you to shield you
from the underlying complexity of dealing with the inner workings of Excel. Wouldn’t it be nice to
create your own objects that allow this same level of convenience regarding the specifics of your appli-
cation? You can do it using class modules.
A Linguistic Foundation
Before I get too far, I should probably synchronize our vocabulary a bit. Until now, I’ve been a little
general regarding some of the terms used to describe object-oriented programming concepts. In order
to discuss object-oriented programming concepts in any detail, I need to be a little more precise with
my vocabulary. The following list represents the most common object-oriented terms that I’ll use in
this chapter and throughout the rest of the book.
Class A class is the programmatic definition of an object. A class doesn’t become an object until
a client application or process instantiates the class. The common metaphor is to think of a class
as a cookie cutter and an object as a cookie.
Class module A class module is your canvas, so to speak. It’s a special code module in the devel-
opment environment that is used solely to define classes.
Instantiate To instantiate an object is to give it life. Using the cookie cutter metaphor, a cookie is
instantiated when you use the cookie cutter to create the cookie by separating it from the mass of
cookie dough. There are a few ways that you can instantiate an object. Generally objects are instan-
tiated using the New keyword. I’ll show you the specifics of instantiation later in this chapter.
Interface An interface is the public face of a class. It represents the parts of the class that can be
accessed by external processes.
Member A member refers to either a method or a property. The members of a class are the com-
bination of all of the properties and methods of the class.
Method A method is an action that can be performed on or with an object.
Object To be precise, an object represents a specific instantiation of a class. However, many
times the term object is used in conversation (and in writing) to refer to what is technically a class.
Object-Oriented Programming This is a programming paradigm in which a program is devel-
oped by creating numerous objects that work together to provide the desired functionality. An
object comprises the data structures and algorithms necessary for the object to exhibit properties
and methods that model the natural characteristics and actions of the object. VBA lacks a few
capabilities that prevent it from being classified as a true object-oriented programming language.
4281book.fm Page 237 Sunday, February 29, 2004 5:12 PM
237
WHAT’S THE BIG DEAL? WHY USE OBJECTS?
Nonetheless, it has enough object-oriented features to allow you to think in terms of objects and
realize much of the value of object-oriented programming.
Property A property is a characteristic of an object such as color, height, or name.
What’s the Big Deal? Why Use Objects?
It took me a long time to appreciate the power that classes can provide. I believe part of the reason
that it takes beginning programmers a long time to fully comprehend the benefits of creating your
own classes is that until you are knee-deep in a runaway development effort, it’s hard to relate to the
problems that using classes can solve. The simple fact is that when you’re learning, you tend to work
with smaller, easier-to-understand programming tasks. If you shoot yourself in the foot developing
one of these applications, no big deal—you can recode it in a few hours. In larger development efforts,
you don’t have this luxury. A poorly implemented program may take days or weeks to correct.
In my experience, it’s a lot easier to appreciate problems and their solutions when you have first-
hand experience with the problem. Thus, until I experienced the problems that other programmers
had tried to warn me about, I didn’t care much about using classes. Hopefully you won’t follow my
footsteps; instead, I hope you’ll start experimenting with classes now.
Classes Unite
One of the benefits of developing classes is that they serve as a formal way to unite data and behavior
associated with a given object. Although you can informally try and imitate the same kind of thing
using a standard module and a collection of module-level variables, subroutines, and functions, the
resulting module would only be an object to you. Nothing would identify the “fake” object to VBA
or other programmers as an object. It would appear as just what it is: a collection of procedures and
variables with no explicit relationship.
By developing a class, you’re formally declaring the collection of variables and procedures as a
group of programmatic elements that are inherently related to each other and work symbiotically with
one another to provide a programmatic representation of a tangible or intangible object. Wow. That
was a mouthful. Sorry about that one.
By uniting a group of programmatic elements inside a class, you allow other procedures that need to
use the class to create a single, addressable object. This allows procedures to work with multiple copies
of the class where each copy is seen as a separate entity. This makes programming easier because you
don’t have to remember which module contains the procedure you’re looking for. With an object, all of
the appropriate properties and methods are available to you directly through the object variable.
For example, consider how hard it would be to develop Excel applications if Excel didn’t have an
object model. Instead of an object model, it would have a handful of modules, and each one would
contain hundreds of procedures. Or maybe one module would have thousands of procedures. If you
thought the Range object has a lot of properties and methods, just think about how difficult it would
be to look through an Auto List Members list of hundreds of procedures to find what you’re looking
for. Instead of Workbook.Name and Worksheet.Name to retrieve the name associated with each
object, you’d need to have special procedures such as GetWorkbookName, GetWorksheetName,
GetChartName, GetRangeName, GetAddInName, GetApplicationName, GetFontName, GetPivot-
TableName, and GetQueryRangeName. Well, you get the picture.
4281book.fm Page 238 Sunday, February 29, 2004 5:12 PM
238
CHAPTER 11 DEVELOPING CLASS MODULES
Classes Hide the Details
Another benefit of developing class modules is that they hide the details of their implementation. You
don’t care about hiding details because you’re a Draconian, paranoid programmer (well, maybe some
of you are). You care about hiding details to protect you from yourselves and your programming col-
leagues. When you instantiate an object from a class in a procedure (the consumer procedure or just
consumer), the consumer can only see or use those object members that the class developer deems
appropriate. This is a good thing because it allows you to create a layer of abstraction between the
interface (the procedures that can be seen by consumers) and the implementation of the interface.
Hiding the details prevents developers from calling procedures in your class that were never meant to
be used outside the class. This is great because as long as you keep the interface the same, you’re free to
change the implementation details without fear of breaking any dependent code in consumer procedures.
Hiding details is also helpful from a mental standpoint. Rather than re-creating a difficult process
and struggling through the specifics of the necessary code, you can develop a class that hides the
implementation complexities and exposes only a simpler, nicer interface for use in all future proce-
dures that need to use the object’s functionality.
Classes Enable Collaboration
In larger development efforts that require multiple developers, using classes makes collaboration eas-
ier. Developers can define the necessary interface that classes require and then split the development
chores between each other along class lines, with each developer coding under the assumption of the
agreed-upon interfaces. So long as they create classes that stick to the originally defined interface, it’s
easy to snap the classes in place as they are completed. Further, because a class is a discrete component,
it’s relatively easy to create test routines to test the classes individually.
Collaboration without using classes is much harder because you need to coordinate the process of
merging code into standard modules or else you’ll have a mish-mash of related procedures living in
separate modules. Also, it’s tempting for other programmers to use routines that weren’t meant to be
used by the original developer. If the original developer modifies the routine (not knowing that other
developers are building dependencies on the routine), dependent procedures may break.
Creating a Simple Object
Ok, let’s test the water by creating a simple object and then using it within a standard module. By the
powers vested in me, I hereby pronounce you a banker. Umm, make that a bank programmer. I know
you would prefer the banker’s hours, but without the well-oiled systems that you develop, those bankers
wouldn’t be able to get on the links so early (banker’s hours are traditionally 9:00
A
.
M
. to 3:00
P
.
M
.—
of course, these days bankers work just as hard as anyone else).
Your goal is to create a simple Loan object. So what are some ways to describe a loan? Principal
amount, interest rate, term, payment, and loan number (aka account number) are a few things that
come to mind. You’ll make all of these items properties.
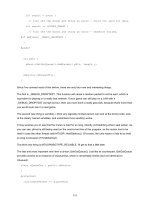
To begin, insert a new class module in the VBE. The first order of business is to name the class. I prefer
to use a name that’s as close as possible to how you’d normally refer to the object. For the simple Loan
object, set the name to SimpleLoan (not Loan because you’ll create a more complex Loan object later in
the chapter) as shown in Figure 11.1. Leave the Instancing property set to 1 - Private. This property is used
to allow the ability to share a class between VBA projects using project references.
4281book.fm Page 239 Sunday, February 29, 2004 5:12 PM
239
CREATING A SIMPLE OBJECT
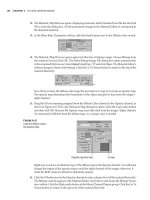
One advantage of using objects is that they have two event procedures you can attach code to: an
Initialize event and a Terminate event (see Figure 11.2). For your Loan object, you’ll take advantage
of the Initialize event to set default values for all of the Loan’s properties. To add the Initialize event
procedure, select the Class object from the Object drop-down list. The VBE will automatically enter
the Initialize event procedure for you. If you want to add the Terminate event procedure, you need
to select Terminate from the Procedure drop-down list.
Figure 11.1
The beginnings of
one fine Loan object
Figure 11.2
Class modules allow
you to attach event
procedures to the
Initialize and
Terminate events.
4281book.fm Page 240 Sunday, February 29, 2004 5:12 PM
240
CHAPTER 11 DEVELOPING CLASS MODULES
The easiest way to add properties to a class is to just declare some public variables. You can use this
method for all of your properties except the Payment property. Because a loan payment is a function of the
principal amount, term, and interest rate, it won’t suffice to use a public variable declaration to create this
property. Instead you’ll need to use another method of creating a property—you need to use a Property Get
procedure. This is a special kind of procedure used to create properties in class modules. You’ll take a
detailed look at this method later in the chapter. Listing 11.1 presents the SimpleLoan class in its entirety.
Listing 11.1: The SimpleLoan Class
Option Explicit
' Loan Properties
Public PrincipalAmount As Variant
Public InterestRate As Variant
Public LoanNumber As Variant
Public Term As Variant
Private Sub Class_Initialize()
' set default principal amount to 0
PrincipalAmount = 0
' set default interest rate to 8% annually
InterestRate = 0.08
' set loan number to 0
LoanNumber = 0
' set default term to 36 months
Term = 36
End Sub
Public Property Get Payment() As Variant
Payment = Application.WorksheetFunction.Pmt _
(InterestRate / 12, Term, -PrincipalAmount)
End Property
Are you surprised at all? I mean, that isn’t much code. Granted, this is a simple class, but the way
you hear some people talk, they’d have you believe that it takes a Ph.D. I know what you are thinking.
I mean, I think I know what you are thinking. You still don’t see how this can help you or how it’s
better than just throwing a simple CalculatePayment function in a procedure. Well, now that you
have something to experiment with, let’s see if you can’t demonstrate some of the advantages.
Using Your Object
Using your own objects is a little different than using intrinsic Excel objects. With all of the Excel
objects you’ve used, the object already existed before you used it. All you had to do was set a reference
4281book.fm Page 241 Sunday, February 29, 2004 5:12 PM
241
USING YOUR OBJECT
to the object using the Set keyword. When you did add a new Excel object such as a worksheet, you
used the Add method of one of the various Collection objects (such as Worksheets). Collection
objects provide methods for creating and adding a new object to the collection.
When you use your own object or, as you’ll see later, an object from a class library other than
Microsoft Excel, you need to use the New keyword to create or instantiate an object. You can instan-
tiate an object in one of two ways.
First, you can use the New keyword in the declaration of the variable that you’ll use to refer
to the object. The second way is to declare the variable as you would any other variable and then,
before using the variable, explicitly create the object and point the variable to it. Listing 11.2
shows an example of both methods. As you enter this listing, you’ll witness another minor ben-
efit of developing and using classes. Look at what you find in the Auto List Members drop-
down list. Do you see it in Figure 11.3? That new object named SimpleLoan that looks like it
is a native object in Excel?
Listing 11.2: Two Ways to Use an Object
Sub TestSimpleLoan()
' declare a loan variable and explicitly
' create the object that the variable
' will refer to.
Dim objLoan1 As New SimpleLoan
' declare a loan variable
Dim objLoan2 As SimpleLoan
' create the object that objLoan2
' will refer to.
Set objLoan2 = New SimpleLoan
' demonstrate that the two
' loans are separate objects
objLoan1.LoanNumber = 1
objLoan2.LoanNumber = 2
Debug.Print "objLoan1.LoanNumber is: " & objLoan1.LoanNumber
Debug.Print "objLoan2.LoanNumber is: " & objLoan2.LoanNumber
' terminate the objects and
' free the memory associated with
' the object variables
Set objLoan1 = Nothing
Set objLoan2 = Nothing
End Sub
4281book.fm Page 242 Sunday, February 29, 2004 5:12 PM
242
CHAPTER 11 DEVELOPING CLASS MODULES
Figure 11.3
By developing and
using classes, you
automatically get
the benefit of having
your classes appear
in the Auto List
Members list.
This listing produces the following output:
objLoan1.LoanNumber is: 1
objLoan2.LoanNumber is: 2
You may be tempted to use the method used for instantiating objLoan1. After all, it takes only one
line of code to do this versus two lines of code for the method used with objLoan2. In many cases,
absolutely nothing is wrong with this. However, it would be a good exercise for you to step through
this code in Break mode and observe the behavior of each method. What you’ll find is that when you
use the first method, the object is not instantiated when you declare the variable with the New key-
word. Instead, it’s instantiated the first time the variable is used. However, the second method instan-
tiates the object in the statement that sets the variable to refer to a newly created object.
The point to remember here is that when you use the one-line method of instantiation, it can be
difficult to know when the object is instantiated because it happens implicitly the first time the object
is used. The two-line method is much clearer because it makes instantiation an explicit occurrence.
I prefer to use the one-line method only in small simple procedures where the object is instantiated
and terminated all in the same procedure and is not passed to other procedures as a variable. Other-
wise, for debugging and mental simplification purposes, I prefer the two-line method.
A Better, Smarter Object
You get what you pay for, and creating object properties by simply declaring public variables inside
a class module is a good example. It’s quick and easy but doesn’t give you much in return. On the other
hand, you can create object properties using Property Get/Let/Set procedures. These types of pro-
cedures take a little more effort to set up, but they provide you with a lot more flexibility.
4281book.fm Page 243 Sunday, February 29, 2004 5:12 PM
243
A BETTER, SMARTER OBJECT
Property Get/Let/Set procedures give you two powerful capabilities. First, when you create an
object property using Property Get/Let/Set, you can decide whether the property is read/write, read-
only, or write-only by implementing one or two procedures (see Table 11.1). A Property Get procedure
provides read access to a property. A Property Let/Set procedure provides write access to a property.
You use Property Let when the property’s data type is one of the basic data types (Integer, String, Vari-
ant, etc.) and Property Set when the underlying data type is an object (Worksheet, Range, etc.).
Table 11.1: Implementing Read/Write Combinations with Properties
Read/Write Capability Implementation
Read/Write Property Get/Property Let
Read-only Property Get
Write-only Property Let
Second, when you use Property procedures, your class is aware of changes made to a property
value. If you use public variables, you have no way of knowing when a consumer procedure changes
a given property’s value. When you use Property Let to define write-access to a property, the only way
to change the property’s value is to go through the Property Let procedure. This allows you to do
things like perform data validation.
To demonstrate how to use Property procedures, let’s create a Loan object that has the same prop-
erties as SimpleLoan but uses Property procedures rather than public variables. Go ahead and insert
a new class module into your VBA project and name it Loan.
I prefer to add stubs for all of the Property procedures before adding any of the implementation
details. By stub, I’m referring to the opening and closing statement of each property. Let’s go ahead
and add all of the stubs.
1.
Select Insert
�
Procedure from the VBE menu.
2.
Enter PrincipalAmount in the Name text box.
3.
Select Property as the Type.
4.
Select Public as the Scope and click OK.
4281book.fm Page 244 Sunday, February 29, 2004 5:12 PM
244
CHAPTER 11 DEVELOPING CLASS MODULES
5.
Repeat steps 1–4 for interest rate (InterestRate), term (Term), payment (Payment), and loan
number (LoanNumber). Figure 11.4 shows a picture of the VBE after I’ve added the stubs for
the PrincipalAmount property.
So now you have stubs for all of the properties. You need to get a little more specific regarding
your specification before you go any further. Although you may consider what the loan payment will
be when you’re deciding on how much to borrow and for how long, ultimately the loan payment is
a function of the amount you borrow, the term or length of the loan (or number of payments), and
the interest rate. Therefore, it makes sense to make this a calculated amount and not an amount that
you can change—it’s a read-only property. As you recall, properties can be read/write, read-only, or
write only. In order to make the Payment property read-only, go ahead and delete the Property Let
stub for the Payment property. As an alternative, consider commenting out the Property Let stub in
case you decide to add it back later. This is a good idea because it makes it clear that you’re intending
to implement a read-only property.
' this stub should be deleted or commented out
Public Property Let Payment(ByVal vNewValue As Variant)
End Property
After the stubs are all ready, it’s time to add some private module-level variables to hold the value
associated with each property. The idea behind using private class variables is that it provides a level
of abstraction and ensures that all class implementation details are hidden. Enter the following code
underneath the Option Explicit statement at the top of the class module (you are using Option
Explicit, right?).
Figure 11.4
The Loan object is
taking shape. Here
you see the Loan ob-
ject with stubs for
the Initialize event
and the Principal-
Amount property.
4281book.fm Page 245 Sunday, February 29, 2004 5:12 PM
245
A BETTER, SMARTER OBJECT
' private class variables to hold property values
Dim mvPrincipalAmount As Variant
Dim mvInterestRate As Variant
Dim mvLoanNumber As Variant
Dim mvTerm As Variant
Now you’re ready to fill in the implementation details. First, let’s knock out the initialization event pro-
cedure. Locate the Class_Initialize procedure and modify it so that it matches the following procedure.
Private Sub Class_Initialize()
' set default principal amount to 0
mvPrincipalAmount = 0
' set default interest rate to 8% annually
mvInterestRate = 0.08
' set loan number to 0
mvLoanNumber = 0
' set term to 0
mvLoanNumber = 0
End Sub
You may be surprised, but many times it only takes a line or two to implement each of those Property
Let and Property Get procedures. Listing 11.3 shows the implementation of all of the Property procedures.
Listing 11.3: Loan Object Implementation Details
Public Property Get PrincipalAmount() As Variant
PrincipalAmount = mvPrincipalAmount
End Property
Public Property Let PrincipalAmount(ByVal vNewValue As Variant)
mvPrincipalAmount = vNewValue
End Property
Public Property Get InterestRate() As Variant
InterestRate = mvInterestRate
End Property
Public Property Let InterestRate(ByVal vNewValue As Variant)
mvInterestRate = vNewValue
End Property
Public Property Get LoanNumber() As Variant
LoanNumber = mvLoanNumber
End Property
Public Property Let LoanNumber(ByVal vNewValue As Variant)
mvLoanNumber = vNewValue
4281book.fm Page 246 Sunday, February 29, 2004 5:12 PM
246
CHAPTER 11 DEVELOPING CLASS MODULES
End Property
Public Property Get Term() As Variant
Term = mvTerm
End Property
Public Property Let Term(ByVal vNewValue As Variant)
mvTerm = vNewValue
End Property
Public Property Get Payment() As Variant
Payment = Application.WorksheetFunction.Pmt _
(mvInterestRate / 12, mvTerm, -mvPrincipalAmount)
End Property
As you can see, using Property procedures is a little more work, but not much, considering you can
now implement read/write, read-only, or write-only procedures. Plus, you can perform data valida-
tion on any incoming values before you officially accept the value by assigning it to the private module-
level variable created to store the value.
An Object Showdown
Is it possible to demonstrate any compelling benefits with such a simple object? Perhaps a few test sce-
narios will illustrate some clear benefits. With such a simple object, it is trivial to code a “normal”
set of procedures that deliver the main functionality that the Loan class delivers. To summarize, the
only thing the Loan class does is remember who it is (LoanNumber), how much it is for (Princi-
palAmount), what interest rate it carries (InterestRate), how long it is for (Term), and finally, what
the loan payment is (Payment).
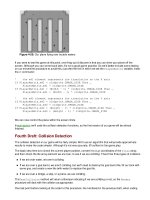
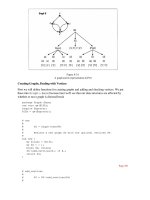
For the first scenario, you’ll just loop through a list of loans and calculate payment amounts. Figure 11.5
shows the worksheet I created for this example. Notice that it contains a named range “LoanListStart” that
refers to cell A1.
Figure 11.5
A list of loans for test-
ing the Loan object
4281book.fm Page 247 Sunday, February 29, 2004 5:12 PM
247
AN OBJECT SHOWDOWN
Listing 11.4 presents a procedure that loops through loan data on a worksheet and calculates the
payment amount associated with each loan.
Listing 11.4: Calculating the Loan Payments Using the Loan Object
Sub Test1LoanObject()
Dim rg As Range
Dim objLoan As Loan
Set rg = ThisWorkbook.Worksheets("Loans"). _
Range("LoanListStart").Offset(1, 0)
Set objLoan = New Loan
Do Until IsEmpty(rg)
With objLoan
.Term = rg.Offset(0, 1).Value
.InterestRate = rg.Offset(0, 2).Value
.PrincipalAmount = rg.Offset(0, 3).Value
rg.Offset(0, 4).Value = .Payment
End With
Set rg = rg.Offset(1, 0)
Loop
Set objLoan = Nothing
Set rg = Nothing
End Sub
This listing loops through the list of loans until it comes across an empty cell. For each loan, it
reads in the various loan values and assigns them to the appropriate loan property. The loan payment
is calculated and written to the worksheet before moving on to the next loan.
Listing 11.5 presents a procedure that duplicates the functionality found in Listing 11.4 except
that it doesn’t use the Loan object. For the purposes of this example, the only functionality that you
really need to replace is the Payment function.
Listing 11.5: Calculating Loan Payments without Using the Loan Object
Public Function Payment(vInterestRate As Variant, vTerm As Variant, _
vPrincipalAmount) As Variant
Payment = Application.WorksheetFunction.Pmt _
(vInterestRate / 12, vTerm, vPrincipalAmount)
End Function
Sub Test1NoObject()
4281book.fm Page 248 Sunday, February 29, 2004 5:12 PM
248
CHAPTER 11 DEVELOPING CLASS MODULES
Dim rg As Range
Dim vTerm As Variant
Dim vInterestRate As Variant
Dim vPrincipalAmount As Variant
Set rg = ThisWorkbook.Worksheets("Loans"). _
Range("LoanListStart").Offset(1, 0)
Do Until IsEmpty(rg)
vTerm = rg.Offset(0, 1).Value
vInterestRate = rg.Offset(0, 2).Value
vPrincipalAmount = rg.Offset(0, 3).Value
rg.Offset(0, 4).Value = _
Payment(vInterestRate, vTerm, vPrincipalAmount)
Set rg = rg.Offset(1, 0)
Loop
Set rg = Nothing
End Sub
This listing works much the same as the previous listing, except it doesn’t use the Loan object.
Therefore a subtle, yet mentally significant difference exists between these two. When the Loan
object is used, the variables that are attributable to a loan (such as variables representing the term and
interest rate) are directly attached to the Loan object. Without a Loan object, you need to use vari-
ables that, though appropriately named, have no inherent relationship to one another. Likewise, the
Payment function exists as just another function in a collection of procedures within a standard mod-
ule. Further, you need to be aware of the parameters required by the Payment function. Take a minute
to ponder these mental differences between the two listings.
Collecting Your Objects
One big advantage of using classes is that they lend themselves very nicely to using the Collection
object. You’ve seen collection objects earlier in the book, such as Workbooks and Worksheets. The
Collection object is an easy-to-use, generic object that you can use to contain a group of objects.
The advantage of using a collection of objects will be more apparent later on when you look at
reading/writing to external data sources. For now, imagine a scenario in which you need to hold more
than one Loan object in memory. By using the Collection object and classes, this is easily achieved.
Listing 11.6 demonstrates how to use the Collection object. The first procedure, TestCollection-
Object, calls the CollectLoanObjects procedure to retrieve a Collection object that contains all of the
loans in the list starting just below the range named LoanListStart. Then TestCollectionObject iter-
ates through all of the loans in the Collection object and outputs the loan number and payment
amount to the Immediate window.