Ivor Horton’s Beginning Visual C++ 2005 phần 4 potx
Bạn đang xem bản rút gọn của tài liệu. Xem và tải ngay bản đầy đủ của tài liệu tại đây (1.76 MB, 122 trang )
Try It Out Using structs
Now use another console application example to exercise a little further how referencing the members of
a
struct works. Suppose you want to write a program to deal with some of the things you might find
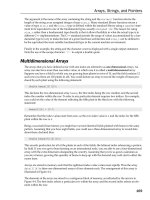
in a yard, such as those illustrated in the professionally landscaped yard in Figure 7-1.
Figure 7-1
I have arbitrarily assigned the coordinates 0,0 to the top-left corner of the yard. The bottom-right corner
has the coordinates 100,120. Thus, the first coordinate value is a measure of the horizontal position rela-
tive to the top-left corner, with values increasing from left to right, and the second coordinate is a mea-
sure of the vertical position from the same reference point, with values increasing from top to bottom.
House
Pool
Position 0,0
Position 100,120
Hut
70
30
10
25
25
70
90
110
40
80
10
30
Hut
326
Chapter 7
10_571974 ch07.qxp 1/20/06 11:44 PM Page 326
Figure 7-1 also shows the position of the pool and that of the two huts relative to the top-left corner of
the yard. Because the yard, huts, and pool are all rectangular, you could define a
struct type to repre-
sent any of these objects:
struct RECTANGLE
{
int Left; // Top left point
int Top; // coordinate pair
int Right; // Bottom right point
int Bottom; // coordinate pair
};
The first two members of the RECTANGLE structure type correspond to the coordinates of the top-left
point of a rectangle, and the next two to the coordinates of the bottom-right point. You can use this in an
elementary example dealing with the objects in the yard as follows:
// Ex7_01.cpp
// Exercising structures in the yard
#include <iostream>
using std::cout;
using std::endl;
// Definition of a struct to represent rectangles
struct RECTANGLE
{
int Left; // Top left point
int Top; // coordinate pair
int Right; // Bottom right point
int Bottom; // coordinate pair
};
// Prototype of function to calculate the area of a rectangle
long Area(RECTANGLE& aRect);
// Prototype of a function to move a rectangle
void MoveRect(RECTANGLE& aRect, int x, int y);
int main(void)
{
RECTANGLE Yard = { 0, 0, 100, 120 };
RECTANGLE Pool = { 30, 40, 70, 80 };
RECTANGLE Hut1, Hut2;
Hut1.Left = 70;
Hut1.Top = 10;
Hut1.Right = Hut1.Left + 25;
Hut1.Bottom = 30;
Hut2 = Hut1; // Define Hut2 the same as Hut1
MoveRect(Hut2, 10, 90); // Now move it to the right position
cout << endl
327
Defining Your Own Data Types
10_571974 ch07.qxp 1/20/06 11:44 PM Page 327
<< “Coordinates of Hut2 are “
<< Hut2.Left << “,” << Hut2.Top << “ and “
<< Hut2.Right << “,” << Hut2.Bottom;
cout << endl
<< “The area of the yard is “
<< Area(Yard);
cout << endl
<< “The area of the pool is “
<< Area(Pool)
<< endl;
return 0;
}
// Function to calculate the area of a rectangle
long Area(RECTANGLE& aRect)
{
return (aRect.Right - aRect.Left)*(aRect.Bottom - aRect.Top);
}
// Function to Move a Rectangle
void MoveRect(RECTANGLE& aRect, int x, int y)
{
int length = aRect.Right - aRect.Left; // Get length of rectangle
int width = aRect.Bottom - aRect.Top; // Get width of rectangle
aRect.Left = x; // Set top left point
aRect.Top = y; // to new position
aRect.Right = x + length; // Get bottom right point as
aRect.Bottom = y + width; // increment from new position
return;
}
The output from this example is:
Coordinates of Hut2 are 10,90 and 35,110
The area of the yard is 12000
The area of the pool is 1600
How It Works
Note that the struct definition appears at global scope in this example. You’ll be able to see it in the
Class View tab for the project. Putting the definition of the
struct at global scope allows you to declare
a variable of type
RECTANGLE anywhere in the .cpp file. In a program with a more significant amount of
code, such definitions would normally be stored in a
.h file and then added to each .cpp file where nec-
essary by using a
#include directive.
You have defined two functions to process
RECTANGLE objects. The function Area() calculates the area
of the
RECTANGLE object that you pass as a reference argument as the product of the length and the
width, where the length is the difference between the horizontal positions of the defining points, and the
328
Chapter 7
10_571974 ch07.qxp 1/20/06 11:44 PM Page 328
width is the difference between the vertical positions of the defining points. By passing a reference, the
code runs a little faster because the argument is not copied. The
MoveRect() function modifies the
defining points of a
RECTANGLE object to position it at the coordinates x, y which are passed as argu-
ments. The position of a
RECTANGLE object is assumed to be the position of the Left, Top point. Because
the
RECTANGLE object is passed as a reference, the function is able to modify the members of the RECT-
ANGLE
object directly. After calculating the length and width of the RECTANGLE object passed, the Left
and Top members are set to x and y respectively, and the new Right and Bottom members are calcu-
lated by incrementing
x and y by the length and width of the original RECTANGLE object.
In the
main() function, you initialize the Yard and Pool RECTANGLE variables with their coordinate
positions as shown in Figure 7-1. The variable
Hut1 represents the hut at the top-right in the illustration
and its members are set to the appropriate values using assignment statements. The variable
Hut2, cor-
responding to the hut at the bottom-left of the yard, is first set to be the same as
Hut1 in the assignment
statement
Hut2 = Hut1; // Define Hut2 the same as Hut1
This statement results in the values of the members of Hut1 being copied to the corresponding members
of
Hut2. You can only assign a struct of a given type to another of the same type. You can’t increment a
struct directly or use a struct in an arithmetic expression.
To alter the position of
Hut2 to its place at the bottom-left of the yard, you call the MoveRect() function
with the coordinates of the required position as arguments. This roundabout way of getting the coordi-
nates of
Hut2 is totally unnecessary and serves only to show how you can use a struct as an argument
to a function.
Intellisense Assistance with Structures
You’ve probably noticed that the editor in Visual C++ 2005 is quite intelligent — it knows the types of
variables, for instance. If you hover the mouse cursor over a variable name in the editor window, it pop
ups a little box showing its definition. It also can help a lot with structures (and classes, as you will see)
because not only does it know the types of ordinary variables, it also knows the members that belong to
a variable of a particular structure type. If your computer is reasonably fast, as you type the member
selection operator following a structure variable name, the editor pops a window showing the list of
members. If you click one of the members, it shows the comment that appeared in the original definition
of the structure, so you know what it is. This is shown in Figure 7-2 using a fragment of the previous
example.
Figure 7-2
329
Defining Your Own Data Types
10_571974 ch07.qxp 1/20/06 11:44 PM Page 329
Now there’s a real incentive to add comments, and to keep them short and to the point. If you double-
click on a member in the list or press the
Enter key when the item is highlighted, it is automatically
inserted after the member selection operator, thus eliminating one source of typos in your code. Great,
isn’t it?
You can turn any or all of the Intellisense features off if you want to via the Tools > Options menu item,
but I guess the only reason you would want to is if your machine is too slow to make them useful. You
can turn the statement-completion features on or off on the C/C++ editor page that you select in the
right options pane. If you turn them off, you can still call them up when you want too, either through
the
Edit menu or through the keyboard. Pressing Ctrl+J, for example, pops up the members for an
object under the cursor. The editor also shows the parameter list for a function when you are typing the
code to call it —it pops up as soon as you enter the left parenthesis for the argument list. This is particu-
larly helpful with library functions as its tough to remember the parameter list for all of them. Of course,
the
#include directive for the header file must already be there in the source code for this to work.
Without it the editor has no idea what the library function is. You will see more things that the editor can
help with as you learn more about classes.
After that interesting little diversion, let’s get back to structures.
The struct RECT
Rectangles are used a great deal in Windows programs. For this reason, there is a RECT structure prede-
fined in the header file
windows.h. Its definition is essentially the same as the structure that you defined
in the last example:
struct RECT
{
int left; // Top left point
int top; // coordinate pair
int right; // Bottom right point
int bottom; // coordinate pair
};
This struct is usually used to define rectangular areas on your display for a variety of purposes.
Because
RECT is used so extensively, windows.h also contains prototypes for a number of functions to
manipulate and modify rectangles. For example,
windows.h provides the function InflateRect() to
increase the size of a rectangle and the function
EqualRect() to compare two rectangles.
MFC also defines a class called
CRect, which is the equivalent of a RECT structure. After you understand
classes, you will be using this in preference to the
RECT structure. The CRect class provides a very exten-
sive range of functions for manipulating rectangles, and you will be using a number of these when you
are writing Windows programs using MFC.
Using Pointers with a struct
As you might expect, you can create a pointer to a variable of a structure type. In fact, many of the func-
tions declared in
windows.h that work with RECT objects require pointers to a RECT as arguments
330
Chapter 7
10_571974 ch07.qxp 1/20/06 11:44 PM Page 330
because this avoids the copying of the whole structure when a RECT argument is passed to a function. To
define a pointer to a
RECT object for example, the declaration is what you might expect:
RECT* pRect = NULL; // Define a pointer to RECT
Assuming that you have defined a RECT object, aRect, you can set the pointer to the address of this vari-
able in the normal way, using the address-of operator:
pRect = &aRect; // Set pointer to the address of aRect
As you saw when the idea of a struct was introduced, a struct can’t contain a member of the same
type as the
struct being defined, but it can contain a pointer to a struct, including a pointer to a
struct of the same type. For example, you could define a structure like this:
struct ListElement
{
RECT aRect; // RECT member of structure
ListElement* pNext; // Pointer to a list element
};
The first element of the ListElement structure is of type RECT, and the second element is a pointer to a
structure of type
ListElement —the same type as that being defined. (Remember that this element isn’t
of type
ListElement, it’s of type ‘pointer to ListElement’.) This allows object of type ListElement to
be daisy-chained together, where each
ListElement can contain the address of the next ListElement
object in a chain, the last in the chain having the pointer as zero. This is illustrated in Figure 7-3.
Figure 7-3
Each box in the diagram represents an object of type
ListElement and the pNext member of each
object stores the address of the next object in the chain, except for the last object where
pNext is 0. This
kind of arrangement is usually referred to as a linked list. It has the advantage that as long as you know
the first element in the list, you can find all the others. This is particularly important when variables are
created dynamically, since a linked list can be used to keep track of them all. Every time a new one is cre-
ated, it’s simply added to the end of the list by storing its address in the
pNext member of the last object
in the chain.
LE1
members:
aRect
pnext = &LE2
LE4
members:
aRect
pnext = &LE5
LE2
members:
aRect
pnext = &LE3
LE3
members:
aRect
pnext = &LE4
LE5
No next
element
members:
aRect
pnext = 0
331
Defining Your Own Data Types
10_571974 ch07.qxp 1/20/06 11:44 PM Page 331
Accessing Structure Members through a Pointer
Consider the following statements:
RECT aRect = { 0, 0, 100, 100 };
RECT* pRect = &aRect;
The first declares and defines the aRect object to be of type RECT with the first pair of members initial-
ized to (0, 0) and the second pair to (100, 100). The second statement declares
pRect as a pointer to type
RECT and initializes it with the address of aRect. You can now access the members of aRect through the
pointer with a statement such as this:
(*pRect).Top += 10; // Increment the Top member by 10
The parentheses to de-reference the pointer here are essential because the member access operator takes
precedence over the de-referencing operator. Without the parentheses, you would be attempting to treat
the pointer as a
struct and to de-reference the member, so the statement would not compile. After exe-
cuting this statement, the
Top member will have the value 10 and, of course, the remaining members
will be unchanged.
The method that you used here to access the member of a
struct through a pointer looks rather clumsy.
Because this kind of operation crops up very frequently in C++, the language includes a special operator
to enable you to express the same thing in a much more readable and intuitive form, so let’s look at that
next.
The Indirect Member Selection Operator
The indirect member selection operator, ->, is specifically for accessing members of a struct through a
pointer; this operator is also referred to as the indirect member access operator. The operator looks like
a little arrow (->)and is formed from a minus sign (-) followed by the symbol for greater than (>) You
could use it to rewrite the statement to access the
Top member of aRect through the pointer pRect, as
follows:
pRect->Top += 10; // Increment the Top member by 10
This is much more expressive of what is going on, isn’t it? The indirect member selection operator is also
used with classes, and you’ll be seeing a lot more of it throughout the rest of the book.
Data Types, Objects, Classes and Instances
Before I get into the language, syntax, and programming techniques of classes, I’ll start by considering
how your existing knowledge relates to the concept of classes.
So far, you’ve learned that native C++ lets you create variables that can be any of a range of fundamental
data types:
int, long, double and so on. You have also seen how you can use the struct keyword to
define a structure that you could then use as the type for a variable representing a composite of several
other variables.
332
Chapter 7
10_571974 ch07.qxp 1/20/06 11:44 PM Page 332
The variables of the fundamental types don’t allow you to model real-world objects (or even imaginary
objects) adequately. It’s hard to model a box in terms of an
int, for example; however, you can use the
members of a
struct to define a set of attributes for such an object. You could define variables, length,
width, and height to represent the dimensions of the box and bind them together as members of a Box
structure, as follows:
struct Box
{
double length;
double width;
double height;
};
With this definition of a new data type called Box, you define variables of this type just as you did with
variables of the basic types. You can then create, manipulate, and destroy as many
Box objects as you
need to in your program. This means that you can model objects using
structs and write your pro-
grams around them. So—that’s object-oriented programming all wrapped up then?
Well, not quite. You see, object-oriented programming (OOP) is based on a number of foundations
(famously encapsulation, polymorphism, and inheritance) and what you have seen so far doesn’t quite fit
the bill. Don’t worry about what these terms mean for the moment —you’ll be exploring that in the rest
of this chapter and throughout the book.
The notion of a
struct in C++ goes far beyond the original concept of struct in C —it incorporates the
object-oriented notion of a class. This idea of classes, from which you can create your own data types
and use them just like the native types, is fundamental to C++, and the new keyword
class was intro-
duced into the language to describe this concept. The keywords
struct and class are almost identical
in C++, except for the access control to the members, which you will find out more about later in this
chapter. The keyword
struct is maintained for backwards compatibility with C, but everything that
you can do with a
struct and more, you can achieve with a class.
Take a look at how you might define a class representing boxes:
class CBox
{
public:
double m_Length;
double m_Width;
double m_Height;
};
When you define CBox as a class you are essentially defining a new data type, similar to when you
defined the
Box structure. The only differences here are the use of the keyword class instead of
struct, and the use of the keyword public followed by a colon that precedes the definition of the
members of the class. The variables that you define as part of the class are called data members of the
class, because they are variables that store data.
You have also called the class
CBox instead of Box. You could have called the class Box, but the MFC
adopts the convention of using the prefix
C for all class names, so you might as well get used to it. MFC
also prefixes data members of classes with
m_ to distinguish them from other variables, so I’ll use this
333
Defining Your Own Data Types
10_571974 ch07.qxp 1/20/06 11:44 PM Page 333
convention too. Remember though that in other contexts where you might use C++ and in C++/CLI in
particular, this will not be the case; in some instances the convention for naming classes and their mem-
bers may be different, and in others there may be no particular convention adopted for naming entities.
The
public keyword is a clue as to the difference between a structure and a class. It just defines the
members of the class as being generally accessible, in the same way as the members of a structure are.
The members of a
struct, however, are public by default. As you’ll see a little later in the chapter,
though, it’s also possible to place restrictions on the accessibility of the class members.
You can declare a variable,
bigBox say, that represents an instance of the CBox class type like this:
CBox bigBox;
This is exactly the same as declaring a variable for a struct, or indeed for any other variable type. After
you have defined the class
CBox, declarations for variables of this type are quite standard.
First Class
The notion of class was invented by an Englishman to keep the general population happy. It derives
from the theory that people who knew their place and function in society would be much more secure
and comfortable in life than those who did not. The famous Dane, Bjarne Stroustrup, who invented C++,
undoubtedly acquired a deep knowledge of class concepts while at Cambridge University in England
and appropriated the idea very successfully for use in his new language.
Class in C++ is similar to the English concept, in that each class usually has a very precise role and a per-
mitted set of actions. However, it differs from the English idea because class in C++ has largely socialist
overtones, concentrating on the importance of working classes. Indeed, in some ways it is the reverse of
the English ideal, because, as you will see, working classes in C++ often live on the backs of classes that
do nothing at all.
Operations on Classes
In C++ you can create new data types as classes to represent whatever kinds of objects you like. As
you’ll come to see, classes (and structures) aren’t limited to just holding data; you can also define mem-
ber functions or even operations that act between objects of your classes using the standard C++ opera-
tors. You can define the class
CBox, for example, so that the following statements work and have the
meanings you want them to have:
CBox box1;
CBox box2;
if(box1 > box2) // Fill the larger box
box1.fill();
else
box2.fill();
You could also implement operations as part of the CBox class for adding, subtracting or even multiply-
ing boxes —in fact, almost any operation to which you could ascribe a sensible meaning in the context
of boxes.
334
Chapter 7
10_571974 ch07.qxp 1/20/06 11:44 PM Page 334
I’m talking about incredibly powerful medicine here and it constitutes a major change in the approach
that you can take to programming. Instead of breaking down a problem in terms of what are essentially
computer-related data types (integer numbers, floating point numbers and so on) and then writing a
program, you’re going to be programming in terms of problem-related data types, in other words
classes. These classes might be named
CEmployee, or CCowboy, or CCheese, or CChutney, each defined
specifically for the kind of problem that you want to solve, complete with the functions and operators
that are necessary to manipulate instances of your new types.
Program design now starts with deciding what new application-specific data types you need to solve the
problem in hand and writing the program in terms of operations on the specifics that the problem is con-
cerned with, be it
CCoffins or CCowpokes.
Terminology
I’ll first summarize some of the terminology that I will be using when discussing classes in C++:
❑ A class is a user-defined data type.
❑ Object-oriented programming (OOP) is the programming style based on the idea of defining
your own data types as classes.
❑ Declaring an object of a class type is sometimes referred to as instantiation because you are cre-
ating an instance of a class.
❑ Instances of a class are referred to as objects.
❑ The idea of an object containing the data implicit in its definition, together with the functions
that operate on that data, is referred to as encapsulation.
When I get into the detail of object-oriented programming, it may seem a little complicated in places, but
getting back to the basics of what you’re doing can often help to make things clearer, so always keep in
mind what objects are really about. They are about writing programs in terms of the objects that are spe-
cific to the domain of your problem. All the facilities around classes in C++ are there to make this as
comprehensive and flexible as possible. Let’s get down to the business of understanding classes.
Understanding Classes
A class is specification of a data type that you define. It can contain data elements that can either be vari-
ables of the basic types in C++, or of other user-defined types. The data elements of a class may be single
data elements, arrays, pointers, arrays of pointers of almost any kind, or objects of other classes, so you
have a lot of flexibility in what you can include in your data type. A class also can contain functions that
operate on objects of the class by accessing the data elements that they include. So, a class combines both
the definition of the elementary data that makes up an object and the means of manipulating the data
that belongs to individual objects of the class.
The data and functions within a class are called members of the class. Humorously enough, the mem-
bers of a class that are data items are called data members and the members that are functions are called
function members or member functions. The member functions of a class are also sometimes referred
to as methods; I will not use this term in this book but keep it in mind as you may see it used elsewhere.
335
Defining Your Own Data Types
10_571974 ch07.qxp 1/20/06 11:44 PM Page 335
The data members are also referred to as fields, and this terminology is used with C++/CLI, so I will be
using this terminology from time to time.
When you define a class, you define a blueprint for a data type. This doesn’t actually define any data
but it does define what the class name means, that is, what an object of the class will consist of and what
operations can be performed on such an object. It’s much the same as if you wrote a description of the
basic type
double. This wouldn’t be an actual variable of type double, but a definition of how it’s made
up and how it operates. To create a variable of a basic data type, you need to use a declaration statement.
It’s exactly the same with classes, as you will see.
Defining a Class
Take a look again at the class example mentioned earlier—a class of boxes. You defined the CBox data
type using the keyword
class as follows:
class CBox
{
public:
double m_Length; // Length of a box in inches
double m_Width; // Width of a box in inches
double m_Height; // Height of a box in inches
};
The name of the class appears following the class keyword, and the three data members are defined
between the curly braces. The data members are defined for the class using the declaration statements
that you already know and love and the whole class definition is terminated with a semicolon. The
names of all the members of a class are local to the class. You can therefore use the same names else-
where in a program without causing any problems.
Access Control in a Class
The public keyword looks a bit like a label, but in fact it is more than that. It determines the access
attributes of the members of the class that follow it. Specifying the data members as
public means that
these members of an object of the class can be accessed anywhere within the scope of the class object to
which they belong. You can also specify the members of a class as
private or protected. In fact, if you
omit the access specification altogether, the members have the default attribute,
private. (This is the
only difference between a class and a struct in C++ —the default access specifier for a struct is
public.)
You will be looking into the effect of these keywords in a class definition a bit later.
Remember that all you have defined so far is a class, which is a data type. You haven’t declared any
objects of the class type. When I talk about accessing a class member, say
m_Height, I’m talking about
accessing the data member of a particular object, and that object needs to be declared somewhere.
Declaring Objects of a Class
You declare objects of a class with exactly the same sort of declaration that you use to declare objects of
basic types, so you could declare objects of the
CBox class type with these statements:
CBox box1; // Declare box1 of type CBox
CBox box2; // Declare box2 of type CBox
336
Chapter 7
10_571974 ch07.qxp 1/20/06 11:44 PM Page 336
Both of the objects box1 and box2 will, of course, have their own data members. This is illustrated in
Figure 7-4.
Figure 7-4
The object name
box1 embodies the whole object, including its three data members. They are not initial-
ized to anything, however —the data members of each object will simply contain junk values, so we
need to look at how you can access them for the purpose of setting them to some specific values.
Accessing the Data Members of a Class
You can refer to the data members of objects of a class using the direct member selection operator that
you used to access members of a
struct. So, to set the value of the data member m_Height of the object
box2 to, say, 18.0, you could write this assignment statement:
box2.m_Height = 18.0; // Setting the value of a data member
You can only access the data member in this way in a function that is outside the class because the
m_Height member was specified as having public access. If it wasn’t defined as public, this statement
would not compile. You’ll see more about this shortly.
Try It Out Your First Use of Classes
Verify that you can use your class in the same way as the structure. Try it out in the following console
application:
// Ex7_02.cpp
// Creating and using boxes
#include <iostream>
using std::cout;
using std::endl;
class CBox // Class definition at global scope
{
public:
double m_Length; // Length of a box in inches
double m_Width; // Width of a box in inches
double m_Height; // Height of a box in inches
};
int main()
{
CBox box1; // Declare box1 of type CBox
box1
m_Length
8 bytes 8 bytes 8 bytes
m_Width m_Height
box2
m_Length
8 bytes 8 bytes 8 bytes
m_Widthm_Height
337
Defining Your Own Data Types
10_571974 ch07.qxp 1/20/06 11:44 PM Page 337
CBox box2; // Declare box2 of type CBox
double boxVolume = 0.0; // Stores the volume of a box
box1.m_Height = 18.0; // Define the values
box1.m_Length = 78.0; // of the members of
box1.m_Width = 24.0; // the object box1
box2.m_Height = box1.m_Height - 10; // Define box2
box2.m_Length = box1.m_Length/2.0; // members in
box2.m_Width = 0.25*box1.m_Length; // terms of box1
// Calculate volume of box1
boxVolume = box1.m_Height*box1.m_Length*box1.m_Width;
cout << endl
<< “Volume of box1 = “ << boxVolume;
cout << endl
<< “box2 has sides which total “
<< box2.m_Height+ box2.m_Length+ box2.m_Width
<< “ inches.”;
cout << endl // Display the size of a box in memory
<< “A CBox object occupies “
<< sizeof box1 << “ bytes.”;
cout <<endl;
return 0;
}
As you type in the code for main(), you should see the editor prompting you with a list of member
names whenever you enter a member selection operator following the name of a class object. You can
then select the member you want from the list by double-clicking it. Hovering the mouse cursor for a
moment over any of the variables in your code will result in the type being displayed.
How It Works
Back to console application examples again for the moment, so the project should be defined accord-
ingly. Everything here works as you would have expected from your experience with structures. The
definition of the class appears outside of the function
main() and, therefore, has global scope. This
enables you to declare objects in any function in the program and causes the class to show up in the
Class View tab once the program has been compiled.
You have declared two objects of type
CBox within the function main(), box1 and box2. Of course, as
with variables of the basic types, the objects
box1 and box2 are local to main(). Objects of a class type
obey the same rules with respect to scope as variables declared as one of the basic types (such as the
variable
boxVolume used in this example).
The first three assignment statements set the values of the data members of
box1. You define the values of
the data members of
box2 in terms of the data members of box1 in the next three assignment statements.
338
Chapter 7
10_571974 ch07.qxp 1/20/06 11:44 PM Page 338
You then have a statement that calculates the volume of box1 as the product of its three data members,
and this value is output to the screen. Next, you output the sum of the data members of
box2 by writing
the expression for the sum of the data members directly in the output statement. The final action in the
program is to output the number of bytes occupied by
box1, which is produced by the operator sizeof.
If you run this program, you should get this output:
Volume of box1 = 33696
box2 has sides which total 66.5 inches.
A CBox object occupies 24 bytes.
The last line shows that the object box1 occupies 24 bytes of memory, which is a result of having 3 data
members of 8 bytes each. The statement that produced the last line of output could equally well have
been written like this:
cout << endl // Display the size of a box in memory
<< “A CBox object occupies “
<< sizeof (CBox) << “ bytes.”;
Here, I have used the type name between parentheses, rather than a specific object name as the operand
for the
sizeof operator. You’ll remember that this is standard syntax for the sizeof operator, as you
saw in Chapter 4.
This example has demonstrated the mechanism for accessing the
public data members of a class. It also
shows that they can be used in exactly the same way as ordinary variables. You are now ready to break
new ground by taking a look at member functions of a class.
Member Functions of a Class
A member function of a class is a function that has its definition or its prototype within the class defini-
tion. It operates on any object of the class of which it is a member, and has access to all the members of a
class for that object.
Try It Out Adding a Member Function to CBox
To see how you access the members of the class from within a function member, create an example
extending the
CBox class to include a member function that calculates the volume of the CBox object.
// Ex7_03.cpp
// Calculating the volume of a box with a member function
#include <iostream>
using std::cout;
using std::endl;
class CBox // Class definition at global scope
{
public:
double m_Length; // Length of a box in inches
double m_Width; // Width of a box in inches
double m_Height; // Height of a box in inches
339
Defining Your Own Data Types
10_571974 ch07.qxp 1/20/06 11:44 PM Page 339
// Function to calculate the volume of a box
double Volume()
{
return m_Length*m_Width*m_Height;
}
};
int main()
{
CBox box1; // Declare box1 of type CBox
CBox box2; // Declare box2 of type CBox
double boxVolume = 0.0; // Stores the volume of a box
box1.m_Height = 18.0; // Define the values
box1.m_Length = 78.0; // of the members of
box1.m_Width = 24.0; // the object box1
box2.m_Height = box1.m_Height - 10; // Define box2
box2.m_Length = box1.m_Length/2.0; // members in
box2.m_Width = 0.25*box1.m_Length; // terms of box1
boxVolume = box1.Volume(); // Calculate volume of box1
cout << endl
<< “Volume of box1 = “ << boxVolume;
cout << endl
<< “Volume of box2 = “
<< box2.Volume();
cout << endl
<< “A CBox object occupies “
<< sizeof box1 << “ bytes.”;
cout << endl;
return 0;
}
How It Works
The new code that you add to the CBox class definition is shaded. It’s just the definition of the Volume()
function, which is a member function of the class. It also has the same access attribute as the data mem-
bers:
public. This is because every class member that you declare following an access attribute will
have that access attribute, until another one is specified within the class definition. The
Volume() func-
tion returns the volume of a
CBox object as a value of type double. The expression in the return state-
ment is just the product of the three data members of the class.
There’s no need to qualify the names of the class members in any way when you accessing them in mem-
ber functions. The unqualified member names automatically refer to the members of the object that is
current when the member function is executed.
340
Chapter 7
10_571974 ch07.qxp 1/20/06 11:44 PM Page 340
The member function Volume() is used in the highlighted statements in main(), after initializing the
data members (as in the first example). Using the same name for a variable in
main() causes no conflict
or problem. You can call a member function of a particular object by writing the name of the object to be
processed, followed by a period, followed by the member function name. As noted previously, the func-
tion automatically accesses the data members of the object for which it was called, so the first use of
Volume() calculates the volume of box1. Using only the name of a member will always refer to the
member of the object for which the member function has been called.
The member function is used a second time directly in the output statement to produce the volume of
box2. If you execute this example, it produces this output:
Volume of box1 = 33696
Volume of box2 = 6084
A CBox object occupies 24 bytes.
Note that the CBox object is still the same number of bytes. Adding a function member to a class doesn’t
affect the size of the objects. Obviously, a member function has to be stored in memory somewhere, but
there’s only one copy regardless of how many class objects you create, and the memory occupied by mem-
ber functions isn’t counted when the
sizeof operator produces the number of bytes that an object occupies.
The names of the class data members in the member function automatically refer to the data members of
the specific object used to call the function, and the function can only be called for a particular object of
the class. In this case, this is done by using the direct member access operator with the name of an object.
If you try to call a member function without specifying an object name, your program will not compile.
Positioning a Member Function Definition
A member function definition need not be placed inside the class definition. If you want to put it outside
the class definition, you need to put the prototype for the function inside the class. If we rewrite the pre-
vious class with the function definition outside, the class definition looks like this:
class CBox // Class definition at global scope
{
public:
double m_Length; // Length of a box in inches
double m_Width; // Width of a box in inches
double m_Height; // Height of a box in inches
double Volume(void); // Member function prototype
};
Now you need to write the function definition, but because it appears outside the definition of the class,
there has to be some way of telling the compiler that the function belongs to the class
CBox. This is done
by prefixing the function name with the name of the class and separating the two with the scope resolu-
tion operator,
::, which is formed from two successive colons. The function definition would now look
like this:
// Function to calculate the volume of a box
double CBox::Volume()
{
return m_Length*m_Width*m_Height;
}
341
Defining Your Own Data Types
10_571974 ch07.qxp 1/20/06 11:44 PM Page 341
It produces the same output as the last example; however, it isn’t exactly the same program. In the sec-
ond case, all calls to the function are treated in the way that you’re already familiar with. However,
when you define a function within the definition of the class as in
Ex7_03.cpp, the compiler implicitly
treated the function as an inline function.
Inline Functions
With an inline function, the compiler tries to expand the code in the body of the function in place of a
call to the function. This avoids much of the overhead of calling the function and, therefore, speeds up
your code. This is illustrated in Figure 7-5.
Figure 7-5
Of course, the compiler ensures that expanding a function inline doesn’t cause any problems with vari-
able names or scope.
The compiler may not always be able to insert the code for a function inline (such as with recursive func-
tions or functions for which you have obtained an address), but generally it will work. It’s best used for
very short, simple functions, such as our function
Volume() in the CBox class because such functions exe-
cute faster and inserting the body code does not significantly increase the size of the executable module.
With the function definition outside of the class definition, the compiler treats the function as a normal
function and a call of the function will work in the usual way; however, it’s also possible to tell the com-
piler that, if possible, you would like the function to be considered as inline. This is done by simply plac-
ing the keyword
inline at the beginning of the function header. So, for this function, the definition
would be as follows:
// Function to calculate the volume of a box
inline double CBox::Volume()
{
return m_Length*m_Width*m_Height;
}
int main(void)
{
function();
{ body }
function();
{ body }
}
Function declared as
inline in a class
inline void function()
{ body }
The compiler replaces calls
of inline funtion with body
code for the function,
suitably adjusted to avoid
problems with variable
names or scope.
342
Chapter 7
10_571974 ch07.qxp 1/20/06 11:44 PM Page 342
With this definition for the function, the program would be exactly the same as the original. This enables
you to put the member function definitions outside of the class definition, if you so choose, and still
retain the execution performance benefits of inlining.
You can apply the keyword
inline to ordinary functions in your program that have nothing to do with
classes and get the same effect. Remember, however, that it’s best used for short, simple functions.
You now need to understand a little more about what happens when you declare an object of a class.
Class Constructors
In the previous program example, you declared the CBox objects, box1 and box2, and then laboriously
worked through each of the data members for each object in order to assign an initial value to it. This is
unsatisfactory from several points of view. First of all, it would be easy to overlook initializing a data
member, particularly with a class which had many more data members than our
CBox class. Initializing
the data members of several objects of a complex class could involve pages of assignment statements.
The final constraint on this approach arises when you get to defining data members of a class that don’t
have the attribute
public —you won’t be able to access them from outside the class anyway. There has
to be a better way, and of course there is — it’s known as the class constructor.
What Is a Constructor?
A class constructor is a special function in a class which is called when a new object of the class is cre-
ated. It therefore provides the opportunity to initialize objects as they are created and to ensure that data
members only contain valid values. A class may have several constructors enabling you to create objects
in various ways.
You have no leeway in naming the constructors in a class—they always have the same name as the class
in which they are defined. The function
CBox(), for example, is a constructor for our class CBox. It also
has no return type. It’s wrong to specify a return type for a constructor; you must not even write it as
void. The primary purpose of a class constructor is to assign initial values to the data elements of the
class, and no return type for a constructor is necessary or permitted.
Try It Out Adding a Constructor to the CBox class
Let’s extend our CBox class to incorporate a constructor.
// Ex7_04.cpp
// Using a constructor
#include <iostream>
using std::cout;
using std::endl;
class CBox // Class definition at global scope
{
public:
double m_Length; // Length of a box in inches
double m_Width; // Width of a box in inches
double m_Height; // Height of a box in inches
343
Defining Your Own Data Types
10_571974 ch07.qxp 1/20/06 11:44 PM Page 343
// Constructor definition
CBox(double lv, double bv, double hv)
{
cout << endl << “Constructor called.”;
m_Length = lv; // Set values of
m_Width = bv; // data members
m_Height = hv;
}
// Function to calculate the volume of a box
double Volume()
{
return m_Length* m_Width* m_Height;
}
};
int main()
{
CBox box1(78.0,24.0,18.0); // Declare and initialize box1
CBox cigarBox(8.0,5.0,1.0); // Declare and initialize cigarBox
double boxVolume = 0.0; // Stores the volume of a box
boxVolume = box1.Volume(); // Calculate volume of box1
cout << endl
<< “Volume of box1 = “ << boxVolume;
cout << endl
<< “Volume of cigarBox = “
<< cigarBox.Volume();
cout << endl;
return 0;
}
How It Works
The constructor CBox() has been written with three parameters of type double, corresponding to the
initial values for the
m_Length, m_Width and m_Height members of a CBox object. The first statement in
the constructor outputs a message so that you can tell when it’s been called. You wouldn’t do this in pro-
duction programs, but because it’s very helpful in showing when a constructor is called, it’s often used
when testing a program. I’ll use it regularly for the purposes of illustration. The code in the body of the
constructor is very simple. It just assigns the arguments that you pass to the constructor when you call it
to the corresponding data members. If necessary, you could also include checks that valid, non-negative
arguments are supplied and, in a real context, you probably would want to do this, but our primary
interest here is in seeing how the mechanism works.
Within
main(), you declare the object box1 with initializing values for the data members m_Length,
m_Width, and m_Height, in sequence. These are in parentheses following the object name. This uses the
functional notation for initialization that, as you saw in Chapter 2, can also be applied to initializing
ordinary variables of basic types. You also declare a second object of type
CBox, called cigarBox, which
also has initializing values.
344
Chapter 7
10_571974 ch07.qxp 1/20/06 11:44 PM Page 344
The volume of box1 is calculated using the member function Volume() as in the previous example and
is then displayed on the screen. You also display the value of the volume of
cigarBox. The output from
the example is:
Constructor called.
Constructor called.
Volume of box1 = 33696
Volume of cigarBox = 40
The first two lines are output from the two calls of the constructor CBox(), once for each object declared.
The constructor that you have supplied in the class definition is automatically called when a
CBox object
is declared, so both
CBox objects are initialized with the initializing values appearing in the declaration.
These are passed to the constructor as arguments, in the sequence that they are written in the declara-
tion. As you can see, the volume of
box1 is the same as before and cigarBox has a volume looking sus-
piciously like the product of its dimensions, which is quite a relief.
The Default Constructor
Try modifying the last example by adding the declaration for box2 that we had previously:
CBox box2; // Declare box2 of type CBox
Here, we’ve left box2 without initializing values. When you rebuild this version of the program, you get
the error message:
error C2512: ‘CBox’: no appropriate default constructor available
This means that the compiler is looking for a default constructor for box2 (also referred to as the no-arg
constructor because it doesn’t require arguments when it is called) because you haven’t supplied any ini-
tializing values for the data members. A default constructor is one that does not require any arguments
to be supplied, which can be either a constructor that has no parameters specified in the constructor defi-
nition, or one whose arguments are all optional. Well, this statement was perfectly satisfactory in
Ex7_02.cpp, so why doesn’t it work now?
The answer is that the previous example used a default no-argument constructor that was supplied by
the compiler, and the compiler provided this constructor because you didn’t supply one. Because in this
example you did supply a constructor, the compiler assumed that you were taking care of everything
and didn’t supply the default. So, if you still want to use declarations for
CBox objects that aren’t initial-
ized, you have to include the default constructor yourself. What exactly does the default constructor
look like? In the simplest case, it’s just a constructor that accepts no arguments; it doesn’t even need to
do anything:
CBox() // Default constructor
{} // Totally devoid of statements
You can see such a constructor in action.
345
Defining Your Own Data Types
10_571974 ch07.qxp 1/20/06 11:44 PM Page 345
Try It Out Supplying a Default Constructor
Let’s add our version of the default constructor to the last example, along with the declaration for box2,
plus the original assignments for the data members of
box2. You must enlarge the default constructor
just enough to show that it is called. Here is the next version of the program:
// Ex7_05.cpp
// Supplying and using a default constructor
#include <iostream >
using std::cout;
using std::endl;
class CBox // Class definition at global scope
{
public:
double m_Length; // Length of a box in inches
double m_Width; // Width of a box in inches
double m_Height; // Height of a box in inches
// Constructor definition
CBox(double lv, double bv, double hv)
{
cout << endl << “Constructor called.”;
m_Length = lv; // Set values of
m_Width = bv; // data members
m_Height = hv;
}
// Default constructor definition
CBox()
{
cout << endl << “Default constructor called.”;
}
// Function to calculate the volume of a box
double Volume()
{
return m_Length*m_Width*m_Height;
}
};
int main()
{
CBox box1(78.0,24.0,18.0); // Declare and initialize box1
CBox box2; // Declare box2 - no initial values
CBox cigarBox(8.0, 5.0, 1.0); // Declare and initialize cigarBox
double boxVolume = 0.0; // Stores the volume of a box
boxVolume = box1.Volume(); // Calculate volume of box1
cout << endl
346
Chapter 7
10_571974 ch07.qxp 1/20/06 11:44 PM Page 346
<< “Volume of box1 = “ << boxVolume;
box2.m_Height = box1.m_Height - 10; // Define box2
box2.m_Length = box1.m_Length / 2.0; // members in
box2.m_Width = 0.25*box1.m_Length; // terms of box1
cout << endl
<< “Volume of box2 = “
<< box2.Volume();
cout << endl
<< “Volume of cigarBox = “
<< cigarBox.Volume();
cout << endl;
return 0;
}
How It Works
Now that you have included your own version of the default constructor, there are no error messages
from the compiler and everything works. The program produces this output:
Constructor called.
Default constructor called.
Constructor called.
Volume of box1 = 33696
Volume of box2 = 6084
Volume of cigarBox = 40
All that the default constructor does is display a message. Evidently, it was called when you declared the
object
box2. You also get the correct value for the volumes of all three CBox objects, so the rest of the pro-
gram is working as it should.
One aspect of this example that you may have noticed is that you now know we can overload construc-
tors just as you overloaded functions in Chapter 6. You have just executed an example with two con-
structors that differ only in their parameter list. One has three parameters of type
double and the other
has no parameters at all.
Assigning Default Parameter Values in a Class
When discussing functions, you saw how you could specify default values for the parameters to a func-
tion in the function prototype. You can also do this for class member functions, including constructors. If
you put the definition of the member function inside the class definition, you can put the default values
for the parameters in the function header. If you include only the prototype of a function in the class def-
inition, the default parameter values should go in the prototype.
If you decided that the default size for a
CBox object was a unit box with all sides of length 1, you could
alter the class definition in the last example to this:
class CBox // Class definition at global scope
{
public:
347
Defining Your Own Data Types
10_571974 ch07.qxp 1/20/06 11:44 PM Page 347
double m_Length; // Length of a box in inches
double m_Width; // Width of a box in inches
double m_Height; // Height of a box in inches
// Constructor definition
CBox(double lv = 1.0, double bv = 1.0, double hv = 1.0)
{
cout << endl << “Constructor called.”;
m_Length = lv; // Set values of
m_Width = bv; // data members
m_Height = hv;
}
// Default constructor definition
CBox()
{
cout << endl << “Default constructor called.”;
}
// Function to calculate the volume of a box
double Volume()
{
return m_Length*m_Width*m_Height;
}
};
If you make this change to the last example, what happens? You get another error message from the
compiler, of course. Amongst a lot of other stuff, you get these useful comments from the compiler:
warning C4520: ‘CBox’: multiple default constructors specified
error C2668: ‘CBox::CBox’: ambiguous call to overloaded function
This means that the compiler can’t work out which of the two constructors to call —the one for which
you have set default values for the parameters or the constructor that doesn’t accept any parameters.
This is because the declaration of
box2 requires a constructor without parameters and either constructor
can now be called without parameters. The immediately obvious solution to this is to get rid of the con-
structor that accepts no parameters. This is actually beneficial. Without this constructor, any
CBox object
declared without being explicitly initialized will automatically have its members initialized to 1.
Try It Out Supplying Default Values for Constructor Arguments
You can demonstrate this with the following simplified example:
// Ex7_06.cpp
// Supplying default values for constructor arguments
#include <iostream>
using std::cout;
using std::endl;
class CBox // Class definition at global scope
{
public:
double m_Length; // Length of a box in inches
348
Chapter 7
10_571974 ch07.qxp 1/20/06 11:44 PM Page 348
double m_Width; // Width of a box in inches
double m_Height; // Height of a box in inches
// Constructor definition
CBox(double lv = 1.0, double bv = 1.0, double hv = 1.0)
{
cout << endl << “Constructor called.”;
m_Length = lv; // Set values of
m_Width = bv; // data members
m_Height = hv;
}
// Function to calculate the volume of a box
double Volume()
{
return m_Length*m_Width*m_Height;
}
};
int main()
{
CBox box2; // Declare box2 - no initial values
cout << endl
<< “Volume of box2 = “
<< box2.Volume();
cout << endl;
return 0;
}
How It Works
You only declare a single uninitialized CBox variable —box2 — because that’s all you need for demon-
stration purposes. This version of the program produces the following output:
Constructor called.
Volume of box2 = 1
This shows that the constructor with default parameter values is doing its job of setting the values of
objects that have no initializing values specified.
You should not assume from this that this is the only, or even the recommended, way of implementing
the default constructor. There will be many occasions where you won’t want to assign default values in
this way, in which case you’ll need to write a separate default constructor. There will even be times
when you don’t want to have a default constructor operating at all, even though you have defined
another constructor. This would ensure that all declared objects of a class must have initializing values
explicitly specified in their declaration.
349
Defining Your Own Data Types
10_571974 ch07.qxp 1/20/06 11:44 PM Page 349
Using an Initialization List in a Constructor
Previously, you initialized the members of an object in the class constructor using explicit assignment.
You could also have used a different technique, using what is called an initialization list. I can demon-
strate this with an alternative version of the constructor for the class
CBox:
// Constructor definition using an initialization list
CBox(double lv = 1.0, double bv = 1.0, double hv = 1.0):
m_Length(lv), m_Width(bv), m_Height(hv)
{
cout << endl << “Constructor called.”;
}
The way this constructor definition is written assumes that it appears within the body of the class defini-
tion. Now the values of the data members are not set in assignment statements in the body of the con-
structor. As in a declaration, they are specified as initializing values using functional notation and
appear in the initializing list as part of the function header. The member
m_Length is initialized by the
value of
lv, for example. This can be more efficient than using assignments as you did in the previous
version. If you substitute this version of the constructor in the previous example, you will see that it
works just as well.
Note that the initializing list for the constructor is separated from the parameter list by a colon and each
of the initializers is separated by a comma. This technique for initializing parameters in a constructor is
important, because, as you will see later, it’s the only way of setting values for certain types of data
members of an object. The MFC also rely heavily on the initialization list technique.
Private Members of a Class
Having a constructor that sets the values of the data members of a class object but still admits the possi-
bility of any part of a program being able to mess with what are essentially the guts of an object is almost
a contradiction in terms. To draw an analogy, after you have arranged for a brilliant surgeon such as Dr.
Kildare, whose skills were honed over years of training, to do things to your insides, letting the local
plumber or bricklayer have a go hardly seems appropriate. You need some protection for your class data
members.
You can get the security you need by using the keyword
private when you define the class members.
Class members that are
private can, in general, be accessed only by member functions of a class.
There’s one exception, but we’ll worry about that later. A normal function has no direct means of access-
ing the
private members of a class. This is shown in Figure 7-6.
Having the possibility of specifying class members as
private also enables you to separate the interface
to the class from its internal implementation. The interface to a class is composed of the
public mem-
bers and the
public member functions in particular because they can provide indirect access to all the
members of a class, including the
private members. By keeping the internals of a class private, you
can later modify them to improve performance for example without necessitating modifications to the
code that uses the class through its public interface. To keep data and function members of a class safe
from unnecessary meddling, it’s good practice to declare those that don’t need to be exposed as
private. Only make public what is essential to the use of your class.
350
Chapter 7
10_571974 ch07.qxp 1/20/06 11:44 PM Page 350