Microsoft Office 2003 Super Bible phần 2 potx
Bạn đang xem bản rút gọn của tài liệu. Xem và tải ngay bản đầy đủ của tài liệu tại đây (1.06 MB, 64 trang )
41Chapter 2 ✦ Paragraph Formatting in Word
you want from the predefined choices. Your choices include Arabic numbers,
Roman numerals, and letters, with periods, parentheses, or double parentheses to
separate the numbers from the list text. Click OK.
• Click the Numbered List button on the toolbar.
3. To add additional numbered items to your list, move the insertion point to the end of
a line formatted with a number and press Enter.
4. Move the insertion point to the end of the last numbered item in your list. Press
Enter and then Del, or press Enter and click the Numbering button on the Formatting
toolbar, to turn off the number formatting.
You can quickly convert a numbered list to a bulleted list by selecting the numbered list
and then clicking the Bullets button on the Formatting toolbar, and vice versa.
Customizing numbered lists
You can customize an existing numbered list or apply your own specifications to the
number format using the Customize button in the Numbered tab of the Bullets and
Numbering dialog box. Click on one of the number-style boxes and then click the
Customize button to display the Customize Numbered List dialog box (see Figure 2-25).
Table 2-9 explains the Numbered List options in this dialog box.
Tip
Figure 2-25: The Customize Numbered List dialog box.
42 Part I ✦ Getting Functional with Office 2003
Table 2-9
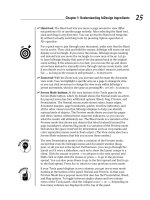
Numbered List Options
Option Action
Number format Types the characters, if any, that you want to come before each
number. If you want each number enclosed in parentheses, for
example, type an opening parenthesis before the number in this box.
Do not type over this number in this box!
If you do so, even replacing
it with another number, you will break the automatic numbering; each
number in the list will be the same.
Number style Specifies the numbering style that you want. Choices include Arabic
numerals, uppercase and lowercase Roman numerals, uppercase and
lowercase alphabet letters, and word series (1st, One, and First). You
can also choose no numbers at all, killing the sequential numbering.
(Why? So that you can retain the indentation without the numbers.)
Font Specifies the special font or font attributes (such as bold, italic, and
underline) and the point size for the numbers. A standard Font dialog
box appears when this button is chosen.
Start at Indicates the starting number for your list. If you’re using a series of
lists, the starting number may be something other than 1.
Number position Chooses the alignment of the number at the Aligned At position. For
instance, if you select Left, the number begins at the Aligned At
position; if right, the number ends there.
Aligned at Sets the distance from the left margin that Word places the number.
Tab Space After The distance between the Aligned At number position and the text on
the first line.
Indent at The left-most position of the text on subsequent lines.
Restarting and continuing numbering
You can tell Word whether to restart or continue numbering. Notice, in the Bullets and
Numbering dialog box on the Numbered tab, the Restart Numbering and Continue Previous
List option buttons. When you use the dialog box to create a list, or when you open the box
while the list is selected, these option buttons are enabled and one is selected:
. Restart Numbering: Starts the numbering sequence over from 1. You might use
this to place two numbered lists one after the other. Word will want to continue the
second list with the next number in sequence from the previous list; this option tells
it not to. Also, there are times when Word gets a little confused and starts a brand
new list, many paragraphs away from the last list, with the next number in sequence.
This option slaps its hand and tells it not to.
. Continue Previous List: Tells Word you want to begin your list where the last one
left off. For instance, you may want to create a very long procedural description,
with paragraphs of unnumbered text within the list. This allows you to create lots of
individual numbered lists, but link them all together.
43Chapter 2 ✦ Paragraph Formatting in Word
Another way to use these commands is to right-click on the first entry in the list and
select from the pop-up menu Restart Numbering or Continue Numbering.
Adding unbulleted or unnumbered paragraphs to a list
Sometimes the topic of a bulleted list or a numbered item cannot be discussed conveniently
in a single paragraph. If you require more than one paragraph to describe a single topic in a
bulleted list, only the first paragraph for that topic should have a bullet. The remaining
subordinate paragraphs for that topic don’t need bullets, but they do need the same hanging
indent as the bulleted paragraphs in the list. There are a couple of ways in which you can
create these indented subordinate paragraphs:
. Press Shift+Enter to make a line break (press twice if you want a blank line between
the blocks of text) and continue typing. The new block of text will not be preceded
by a bullet or number because Word regards it as part of the same paragraph (and
only places a bullet or number at the beginning of each paragraph).
. Click on a line from which you want to remove a bullet or number; then click the
Bullets or Numbering button on the toolbar to do so. Then use the Left Indent
marker on the ruler to line up the text of the subordinate paragraph with the text of
the previous paragraph.
Ending bulleted or numbered lists
As mentioned previously, the formatting for a paragraph is stored in the paragraph mark.
Therefore, as with other paragraph formatting, the bulleted or numbered list format carries
forward each time you press Enter to begin a new paragraph. If you create a bulleted list
by pressing Enter, you need to end the bullet or numbered list formatting when you finish
with the list. To end a bulleted or numbered list, press Enter at the end of a list and take
one of the following actions:
. Press Delete to remove the number and bullet, leaving the insertion point on the
line immediately below the last list entry and moved back to the style’s left
margin.
. Press Enter again. The same as pressing Delete, except that you’ll get a blank
line between the list and the line on which the insertion point is placed.
. Press Backspace to remove the bullet and place the insertion point on the line
below the last entry, at the bullet position.
. Press Ctrl+Shift+N return to the Normal style.
. Press Ctrl+Q to return to whatever style was applied to the text immediately
before you began the bulleted or numbered list.
. Click the Bullets button to remove the bullet or the Numbering button to
remove the number from the paragraph, returning the insertion point to the
style’s left margin.
Tip
44 Part I ✦ Getting Functional with Office 2003
Creating outline numbered lists
Outline numbered lists are similar to numbered or bulleted lists, but in these multilevel lists,
the number or bullet of each paragraph changes according to its level of indention. With
outline numbered lists, you can mix numbered and bulleted paragraphs based on the
indentation level. You can create multilevel lists with as many as nine levels. Use the outline
numbered list format if you want your list to have numbered items with indented, bulleted
subparagraphs; for example, many types of technical and legal documents require each
paragraph and indentation level to be numbered sequentially. Multilevel lists are created using
the Outline Numbered tab in the Bullets and Numbering dialog box (see Figure 2-26).
Outline Numbered
is a misnomer. In fact these outline lists may be either numbered
or bulleted.
Note
Figure 2-26: The Outline Numbered tab in the Bullets and Numbering dialog box.
As with bullets and numbering, you can set the outline numbering first and then begin
typing, or type and then select the text and apply the formatting. To create subordinate
paragraphs, simply increase the indentation using the Increase Indent button on the
Formatting toolbar, or by pressing Shift+Alt+right arrow — Word automatically switches
to the subordinate numbering system. To switch back to a higher level, use the Decrease
Indent button or Shift+Alt+Left Arrow.
Customizing outline numbered lists
You can customize an outline numbered list format by clicking Customize in the Outline
Numbered tab, which displays the Customize Outline Numbered List dialog box (see
Figure 2-27). You can see additional options by clicking More. Table 2-10 describes the
available options in the Customize Outline Numbered List dialog box.
45Chapter 2 ✦ Paragraph Formatting in Word
Continued
Figure 2-27: The Customize Outline Numbered List dialog box.
Table 2-10
Options in the Customize Outline Numbered List Dialog Box
Option Description
Level Determines which level to modify.
Number format Determines which characters (if any) come before each
number or bullet at this indentation level.
Number style Determines the numbering or bullet style used. Choices
include a combination of the numbering choices available
for numbered lists and the bullet choices available for
bulleted lists or even no number or bullet at all.
Start at Determines the starting number for paragraphs at the
selected level of indentation.
Previous Level Number If you selected Level 2 or lower, and have chosen a
numbering format (rather than a bullet), this drop-down list
box is enabled. It displays a list of the levels for which you
have customized a format. If you select a previous level
number, Word will include that level number along with the
level number for the selected format. (More explanation of
this point follows the table.)
Font button Determines any special font or font attributes (such as bold,
italic, and underline) or the point size for the numbers or
bullets used at this indentation level.
Number Position - Aligned At The indentation at which the number is placed.
Text Position - Tab Space After How far Word tabs before beginning the text on the first line
after the number.
Indent at The left position of the subsequent lines.
46 Part I ✦ Getting Functional with Office 2003
Table 2-9 (continued)
Option Description
Link level to style Applies the selected style to the text used at this numbering
level
Follow Number With Tells Word to place a Tab after the number, to use spaces,
or to place nothing between the text and the number (in
which case the Tab Space After setting is disabled).
Legal style numbering Converts Roman numerals (IV, V) to Arabic numerals
(4, 5) — the Number Style box is disabled.
Apply Changes To If you are modifying an existing numbered list, you can
choose to modify the Whole List, from This Point Forward,
or the Current Paragraph.
The Previous Level Number tells Word to include the number of the previous level
along with the number of the level you are modifying. For instance, the first level would
be 1, the next level down would be 1.1, the next 1.1.1, the next at the same level 1.1.2,
and so on. This is a common outlining style for many government and military docu-
ments, for instance.
Creating list styles
Word also lets you customize lists by creating special list styles. Click the List Styles tab
in the Bullets and Numbering dialog box (see Figure 2-28). This dialog box lists all the
outline list styles that have been created — select one and click OK to apply that style to
your Outline list.
Figure 2-28: The List Styles tab of the Bullets and Numbering dialog box.
47Chapter 2 ✦ Paragraph Formatting in Word
Note
You can use the Add button to add another style, or Modify to change one you’ve selected.
When you click one of these buttons, you see the New Style or Modify Style dialog box (see
Figure 2-29). You can learn more about these dialog boxes in the Microsoft Word 2003
Bible’s discussion of styles (Chapter 13 in that book). For now, just know that you can create
a style that encompasses all levels of an outline list, defining exactly what font should be
used, how much indentation, whether to use a bullet or number, what number to start with,
and so on. Simply provide the style a name, select a starting number, select the level you want
to define, and then make all your selections. Then go back and do the next level.
Figure 2-29: The New Style dialog box.
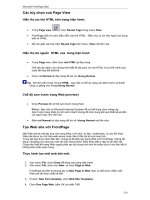
Paragraphs and Pagination
Word automatically creates page breaks as you write, but you can control how paragraphs
are positioned relative to these page breaks. For example, you may want to prevent page
breaks within boxed or shaded paragraphs. To control paragraph positions relative to page
breaks, use the Line and Page Breaks tab in the Paragraph dialog box (see Figure 2-30).
Table 2-11 describes the options in the Line and Page Breaks tab.
The page breaks created by Word are very different from the page breaks you can cre-
ate yourself using Ctrl+Enter or the Insert
_
Break command. Word’s page breaks are
placed according to how much text is on the page, the page margins, and so on. On the
other hand, the breaks you enter are fixed. If you place a break immediately before a
paragraph, it doesn’t matter how much text you add before the paragraph, the break
remains there.
48 Part I ✦ Getting Functional with Office 2003
Figure 2-30: The Line and Page Breaks tab in the Paragraph dialog box.
Table 2-11
Line and Page Breaks Tab Options
in the Paragraph Dialog Box
Option Action
Widow/Orphan control Instructs Word not to let a single line from a paragraph appear
by itself at the top or bottom of a page. This option is on by
default. A
widow
is the final line of a paragraph that jumps to the
top of the next page because it doesn’t fit on the current one. An
orphan
is the first line of a paragraph that falls at the end of a
page with the remainder of the paragraph appearing on the next
page.
Keep lines together Instructs Word not to split the paragraph into separate pages.
This is useful when working with lists.
Keep with next Instructs Word to keep the paragraph with the next paragraph.
This is useful when working with captions and lists.
Page break before Instructs Word to place the paragraph on top of the next page.
This is useful when working with figures, tables, and graphics.
Suppress line numbers Instructs Word to remove line numbers from the selected text if
your document displays line numbers.
Don’t hyphenate Instructs Word to exclude the selected paragraph from auto-
matic hyphenation.
49Chapter 2 ✦ Paragraph Formatting in Word
Hyphenation
Speaking of hyphenation, it’s time to cover that subject. Hyphenation reduces ragged right
edges on blocks of text (it also allows you to get more words on a page, though only
slightly). Hyphenation is the process of breaking words between lines, so part of a word
appears on the right side of one line, with a hyphen placed after it, while the rest of the
word appears on the left side of the next line. Why not use paragraph justification to create
nice straight right edges? Because justified text is hard to read. But hyphenation can even
be used with justified text, to reduce the amount of white space inserted between words.
The following sections look at four types of hyphenation:
. Automatic hyphenation
. Manual hyphenation
. Optional hyphenation
. Nonbreaking hyphenation
Using automatic hyphenation
Automatic hyphenation inserts optional hyphens. An optional hyphen is a hyphen that
Word uses only when a word or a phrase appears at the end of a line. If the word or phrase
moves to a different position because of editing, the optional hyphen is removed.
Normally, optional hyphens are not visible in your document. You can view optional hy-
phens by choosing Tools
_
Options and then clicking the View tab. Under Formatting
Marks, select the Optional Hyphens check box.
To select automatic hyphenation, follow these steps:
1. Choose Tools_Language_Hyphenation to open the Hyphenation dialog box (see
Figure 2-31).
2. Select the Automatically Hyphenate Document check box.
3. If you do not want to hyphenate words in uppercase letters, leave the Hyphenate
Words in CAPS check box blank.
4. Set a value in the Hyphenation Zone. This value is the distance in inches between
the end of the last complete word in a line of text and the margin — in other words,
the degree of raggedness Word should allow. Word uses this measurement to
determine if a word should be hyphenated. Large values decrease the number of
hyphens; low values increase the number of hyphens but reduce the raggedness of
the right margin.
5. If you don’t want consecutive lines to have hyphens — it can make a document look
a little strange — set a limit in the Limit Consecutive Hyphens To box.
6. Click OK.
Note
50 Part I ✦ Getting Functional with Office 2003
Figure 2-31: The Hyphenation dialog box.
If you don’t want certain paragraphs to be hyphenated automatically, select those para-
graphs and then choose Format
_
Paragraph. In the Paragraph dialog box, select the
Line and Page Breaks tab and then the Don’t Hyphenate check box.
Using manual hyphenation
Using manual hyphenation, you have more control over what is hyphenated and how it is
hyphenated. You can select which parts of the document are hyphenated and where a
hyphen appears in specific words. This is a huge hassle for a large document, but it does
allow you to do a better job than Word might do automatically — Word sometimes
hyphenates words in positions that don’t look good.
To select manual hyphenation, follow these steps:
1. Select the text you want to hyphenate manually. If you want to hyphenate manually
the entire document, don’t select anything.
2. Choose Tools_Language_Hyphenation to open the Hyphenation dialog box.
3. Click the Manual button, and Word immediately begins scanning the selection or the
document for words to be hyphenated. When such a word is located, Word displays
the Manual Hyphenation dialog box (see Figure 2-32).
4. To hyphenate the word at a point other than that suggested in the Hyphenate At box,
click where you want the hyphen to appear.
5. To accept the suggestion, click Yes.
6. To skip the word and move on, click No.
7. To stop the manual hyphenation, click Cancel.
Tip
Figure 2-32: The Manual Hyphenation dialog box.
51Chapter 2 ✦ Paragraph Formatting in Word
Using nonbreaking and optional hyphens
Use nonbreaking hyphens to hyphenate phrases or terms that you don’t want to wrap to
another line (for example, 02-12-03). With nonbreaking hyphens, the entire phrase or term
wraps to the next line instead of breaking.
To insert a nonbreaking hyphen, do the following:
1. Position the insertion point where you want to place the nonbreaking hyphen.
2. Press Ctrl+Shift+- (hyphen).
Use an optional hyphen when you want to break specific lines of text. For example, if a
lengthy word wraps to the next line and leaves a large amount of white space, you can
insert an optional hyphen in that specific word so that the first part appears on the first
line. If the word later moves to a different position because of editing, the optional hyphen
does not print. If further editing moves the word back into a hyphenation zone, the hyphen
reappears.
To insert an optional hyphen, do the following:
1. Position the insertion point where you want the optional hyphen to appear.
2. Press Ctrl+- (hyphen).
Summary
Mastering paragraph fundamentals is essential for creating just about any document in
Word. Even when you work with graphics, basic paragraph formatting is used to place the
images. Because of the importance of paragraphs, Word provides several ways to apply
paragraph formats. In this chapter, you learned the key elements of formatting paragraphs,
including how to
. Apply paragraph formatting using the Formatting toolbar or Format Paragraph
dialog box (Format_Paragraph).
. Remove paragraph formatting by pressing Ctrl+Q to return the text to the current
style’s default settings or Ctrl+Shift+N to apply the Normal style to the paragraph.
. Align paragraphs using the following shortcut keys: Ctrl+L for left-align, Ctrl+R for
right-align, Ctrl+E for center-align, and Ctrl+J for justified text. You can also use the
alignment buttons on the Formatting toolbar.
. Set tabs using the horizontal ruler by clicking the Tab Alignment button at the far-
left end to choose the tab style that you want and then clicking the ruler at the point
where you want to insert the tab. You can also use the Tabs dialog box
(Format_Tabs) to set tabs.
. Add borders and shading to paragraphs by clicking the Border button on the
Formatting toolbar to display the Border toolbar or by choosing Format_Borders
and Shading to display the Borders and Shading dialog box.
52 Part I ✦ Getting Functional with Office 2003
. Insert horizontal lines using the Horizontal Line button in the Borders and Shading
dialog box (Format_Borders and Shading).
. Create bulleted and numbered lists using the Bullets and Numbering buttons on the
Formatting toolbar, or the Bullets and Numbering dialog box (Format_Bullets and
Numbering).
. Use the Hyphenation dialog box to automatically or manually create hyphens
(Tools_Language_Hyphenation).
3
3
In This Chapter
Configuring e-mail
accounts
Adding data files
Creating and managing
Outlook profiles
Configuring message
delivery options
CHAPTER
Configuring
Outlook 2003
S
imilar to most applications, Outlook configures itself
automatically using a host of settings based on specific
assumptions that Microsoft has made about how you will use
Outlook. Although those assumptions are based on usability
research, there is no guarantee those default settings will suit your
needs or preferences. What’s more, you’ll need to set up your
own e-mail accounts because, all privacy jokes aside, Microsoft
can’t possibly know what accounts you use.
It isn’t difficult to set up an account, a profile, and a new file in
which to store your Outlook data. In this chapter you learn how to
perform each of these tasks as well as configure Outlook to
function the way you want. Some of these tasks include adding
other data storage files to your profile, creating additional
profiles, and defining the way Outlook delivers messages.
Configuring E-mail Accounts
Although you could use Outlook solely for tasks other than e-
mail, it’s likely that you’ll want to use Outlook for at least one e-
mail account. Before you can send or receive e-mail with
Outlook, you must set up the account.
Outlook 2000 offered two modes—Internet Mail Only (IMO) and
Corporate Workgroup (CW)—that were designed for two
different uses. IMO was targeted at non-Exchange Server users,
and CW was targeted primarily to Exchange Server users. These
two modes made it difficult to manage multiple account types.
In Outlook 2002, Microsoft did away with these two modes, and
introduced a single unified mode that enabled Outlook users to
work with multiple account types in a single profile. This
capability carries over to Outlook 2003, making it easy, for
example, to work with an Exchange Server account, a POP3
account, and a Hotmail account, all in one profile.
54 Part I ✦ Getting Functional with Office 2003
The following sections explain how to add accounts to an existing profile. For information
on adding profiles, see “Creating and Managing Outlook Profiles” later in this chapter.
Using the E-mail Accounts Wizard
Outlook provides a wizard to help you add e-mail accounts to a profile. This section
explains how to use the wizard; the following sections explain how to configure specific
types of e-mail accounts.
Follow these steps to launch the E-mail Accounts Wizard:
1. Close Outlook, right-click the Outlook icon on the desktop (or in the Start menu),
and then choose Properties, or open the Mail applet from the Control Panel. Either
action opens the Mail Setup — Outlook dialog box.
2. In the Mail Setup — Outlook dialog box, click E-mail Accounts to start the wizard.
3. To add a new account, choose the Add a New E-mail Account option. You can
choose the type of account to add to the existing profile (Figure 3-1). To modify an
existing account, choose View or Change Existing E-mail Accounts; then click Next.
You can add or modify accounts with Outlook running. Choose Tools
_
E-mail Accounts to open
the wizard.
At this point in the wizard, you can choose the type of account to add or select an existing
account to modify (Figure 3-2). The following sections explain how to configure specific
types of accounts.
Tip
Figure 3-1: Choose the type of account to add to the existing profile.
55Chapter 3 ✦ Configuring Outlook 2003
Figure 3-2: You can modify existing accounts with the wizard.
Configuring Exchange Server accounts
It’s relatively easy to set up an Exchange Server account in Outlook because you need to
specify only a handful of settings, such as the server name and the account name. You don’t
have to worry about the e-mail address or other settings as you do with a POP or IMAP
account because these settings are configured at the server by the Exchange Server
administrator.
1. Run the E-mail Accounts Wizard as explained in the previous section.
2. From the Server Type page of the wizard, choose Microsoft Exchange Server and
then click Next.
3. In the Exchange Server Settings page (Figure 3-3), enter the server name or IP
address in the Microsoft Exchange Server field.
4. In the User Name field, type the mailbox name or the account alias (this is often the
logon account name).
5. Choose the Use Local Copy of Mailbox option if you want to work with Ex-
change Server in cached local mode (explained later in the section, “Setting
advanced options”).
You can enter the NetBIOS name for the server in the Microsoft Exchange Server field, or
specify the Fully Qualified Domain Name (FQDN) for the server.
Tip
56 Part I ✦ Getting Functional with Office 2003
Figure 3-3: Set the server and account name on the Exchange Server Settings page.
At this point you can click Next and then click Finish to add the account with default
settings. In many cases, however, you will need to configure some additional settings. You
can do this when adding the account, or change the settings afterward. On the Exchange
Server Settings Wizard page, click More Settings to open the Microsoft Exchange Server
property sheet shown in Figure 3-4. The following sections explain the options available in
this property sheet.
Figure 3-4: Use the General page to configure connection settings.
57Chapter 3 ✦ Configuring Outlook 2003
Setting general properties
The General page controls basic settings and the connection state for the account. The
following list summarizes the options:
Exchange Account. Specify the name by which you want the account to appear in
the profile’s account list. By default, the name is Microsoft Exchange Server.
Automatically Detect Connection State. Let Outlook choose the connection state
automatically. Choose this option if you never disconnect your computer from the
network, or if you simply want Outlook to detect the connection state by itself.
Manually Control Connection State. This option enables you to control whether
Outlook uses the Exchange Server mailbox or the locally cached copy, rather than
allow Outlook to control the connection state. If you do not choose the option
Choose the Connection Type When Starting, Outlook automatically uses the
connection method specified by the Default Connection State options.
Choose the Connection Type When Starting. Select this option to have Outlook
prompt you at startup to select the type of connection method to use.
Connect with the Network. Use this option to have Outlook connect to the server
through the local area network, whether through a hardwired connection or existing
dial-up.
Work Offline and Use Dial-Up Networking. Have Outlook dial a specified dial-up
connection to connect to the Exchange Server.
Seconds Until Server Connection Timeout. Set the amount of time Outlook will
wait for responses from the Exchange Server before timing out. Increase the value if
you are working over a slow link, such as a dial-up connection, that frequently
causes Outlook to timeout and disconnect.
Setting advanced options
The Advanced page (Figure 3-5) enables you to open one or more other mailboxes along
with your own. For example, an assistant for a small group of users might open the
mailboxes of those other users to manage their schedules or handle mail processing. Or,
perhaps you want to keep your mail in separate mailboxes for different purposes. Whatever
the case, you can click Add to specify a mailbox name, and add it to the list of mailboxes
that Outlook will open at startup.
58 Part I ✦ Getting Functional with Office 2003
Figure 3-5: Use the Advanced page to configure mailbox settings.
You can also open a single folder from another user’s mailbox by choosing File
_
Open
_
Other
User’s Folder. With either method, you must either own the mailbox or have been given del-
egate access to it.
The settings under the Mailbox Settings group let you specify how Outlook downloads
messages from the mailbox, and whether it uses a local copy of the mailbox or works only
from the server:
Use Local Copy of Mailbox. Select this option to use Cached Exchange Mode (CEM),
which directs Outlook to create a local copy of the mailbox on your computer.
Download Only Headers. Used with CEM, this option directs Outlook to download
only headers to the local cache, and leave the item bodies and attachments on the
server.
Download Headers Followed by the Full Item. Outlook first downloads all headers
and then begins downloading the item bodies and attachments.
Download Full Items. Outlook downloads each item in its entirety.
The option you choose depends on how much of the item you need and your current
connection state. Download only the headers if you’re working over a slow link or have a
large amount of data in the mailbox and want to speed up offline synchronization. If you
choose the option Download Headers Followed by the Full Item, Outlook will be able to
synchronize the headers fairly quickly so you can see what items the mailbox contains. If the
synchronization is interrupted, you will at least be able to see what’s in the mailbox, even if
you can’t see the contents of some of the items. Choose the Download Full Items option if
you don’t have connection problems or are working from a fast connection, and you want all
of the items downloaded.
Tip
59Chapter 3 ✦ Configuring Outlook 2003
Setting the offline store location
Outlook uses an offline store (OST) file to store the offline mailbox cache. You can use an
OST whether or not you work in cached mode. When you use an OST without CEM,
Outlook functions just as it did in previous versions with an OST file. Synchronization
doesn’t take place until you perform a send/receive for the Exchange Server account, either
manually or at a scheduled send/receive. Outlook uses the OST only if it can’t connect to the
Exchange Server.
With CEM, Outlook defaults to using the OST and handles synchronization automatically
based on the settings you provided in the Mailbox Settings group on the Advanced property
page. The main distinction between the two, therefore, is that with CEM, Outlook always
uses the OST and handles synchronization for you.
When you enable CEM, Outlook automatically creates an OST to contain the offline cache.
You can’t directly change the location of the OST, which you might want to do if you’re
running low on disk space where the OST resides. You can, however, disable offline storage
and then re-enable it to change the location. Follow these steps to accomplish the change:
1. Close Outlook, and start the E-mail Accounts Wizard from the Mail applet in the
Control Panel.
2. Click E-mail Accounts; then choose View or Change Existing E-mail Accounts,
and click Next.
3. Select the Exchange Server account, and click Change.
4. Clear the Use Local Copy of Mailbox option, and click Next; then click Finish.
5. Repeat steps 2 and 3.
6. Click More Settings and then click the Advanced tab.
7. Click Offline Folder File Settings, click Disable Offline Use, and click Yes when
prompted.
8. Click OK; then Next and then Finish.
9. Repeat steps 2, 3, and 6.
10. Click Offline Folder File Settings, click Browse, and specify a new path and
location for the OST; then click Open.
11. Click OK and then click Yes when prompted to create the new OST (assuming you
specified a new one and not an existing one).
12. Enable the option Use Local Copy of Mailbox on the Advanced page; then click
OK.
13. Click Next and then Finish; then Close.
When you start Outlook, it will use the new OST and will synchronize it accordingly.
If you want to use Outlook with an OST file but without CEM, you can follow the
previous steps 1 through 11 to create a new OST file. Close the account properties without
60 Part I ✦ Getting Functional with Office 2003
enabling the Use Local Copy of Mailbox option. Keep in mind that you must manually
perform a synchronization, or use a scheduled send/receive to synchronize the OST before
Outlook can use it.
Configuring security settings
You can configure a small number of security settings for an Exchange Server account on
the Security page of the account’s properties (Figure 3-6).
Figure 3-6: Use the Security page to enable encryption and specify authentication
settings.
Following is an explanation of these settings:
Encrypt Information. Use this option to enable encryption to secure transmission
between the client and server computers. Always Prompt for User Name and Pass-
word. Select this option to require Outlook to prompt you for your account and
password, rather than caching it and logging on automatically. You should use this
option if you leave your computer unattended or share a computer with others.
Logon Network Security. Choose the authentication method required by your server.
Use Password Authentication (NTLM) if your Exchange Server is running on Windows
NT or you need to use NTLM when accessing a Windows 2000 or Windows 2003
Server. Choose Kerberos if your Exchange Server supports Kerberos-based authentica-
tion. Kerberos is the default authentication mechanism for Windows 2000 and Win-
dows 2003 Server platforms.
The Distributed Password Authentication (DPA) option available in Outlook 2002 is not included
with Outlook 2003.
Note
61Chapter 3 ✦ Configuring Outlook 2003
Configuring connection settings
Use the Connection page of the Exchange Server’s additional settings (Figure 3-7) to tell
Outlook how to connect to the Exchange Server. Choose an option based on the following list:
Connect Using My Local Area Network. Select this option if you connect through a
LAN, or want to use a dial-up connection that is already dialed and connected.
Connect Using My Phone Line. Select this option to use a specific dial-up connection
to the Internet or server’s network. Use the Modem group of controls on the page to
select the dial-up connection and set its properties.
Connect Using Internet Explorer’s or a 3rd Party Dialer. Select this option to use
the dialer configured in Internet Explorer, or to use a third-party dialer included with
other network client software.
Figure 3-7: Use the Connection page to specify how Outlook connects to the Exchange
Server.
The option Connect to my Exchange Mailbox Using HTTP lets you connect to the server
across the LAN or Internet using the HTTP protocol. This connection method enables you to
connect to an Exchange Server sitting behind a firewall that blocks traffic other than HTTP
(port 80). It’s also a handy mechanism for remote users who need to access an Exchange
Server across the Internet but don’t want to use Outlook Web Access (OWA) or when OWA
isn’t supported on the server.
Click Exchange Proxy Settings to open the Connection dialog box (Figure 3-8), which
enables you to specify proxy settings for the connection to the server. These settings are
self-explanatory.
62 Part I ✦ Getting Functional with Office 2003
Figure 3-8: Use the Connection dialog box to configure proxy settings for the connection.
Configuring Remote Mail settings
You can use the Remote Mail page to configure general options for using Remote Mail with
the Exchange Server account. Remote Mail enables you to retrieve headers only and/or
retrieve only those messages that fit the filter criteria you specify.
Configuring POP3 and IMAP accounts
Post Office Protocol 3 (POP3) has long been the primary protocol used by Internet mail
servers. POP3 is gradually being replaced by Internet Mail Access Protocol (IMAP), and by
HTTP-based mail, such as that used by Hotmail and Yahoo!. Both POP3 and IMAP are
standards-based, public protocols supported by a wide variety of mail servers. Most Internet
Service Providers (ISPs) that offer mail accounts support both POP3 and IMAP.
POP3 is primarily an offline protocol, which means you download the messages from the
server and work with them locally. IMAP, by contrast, is primarily an online protocol. You
work with your IMAP folders and messages from the server. The fact that the messages
remain on the server simplifies the synchronization problems (such as having messages
scattered on different computers) you would otherwise face if you needed to access the same
POP3 account from more than one computer. Another useful benefit to IMAP is the
capability it gives you to selectively process messages and attachments without downloading
them from the server; however, you can gain most of these advantages for all account types
by using Outlook’s Remote Mail features.
63Chapter 3 ✦ Configuring Outlook 2003
IMAP offers better security than POP3 because it uses a challenge-response mechanism to
authenticate the user, rather than passing the password across the network as plain text.
If your server supports both POP3 and IMAP, this author recommends using IMAP. The
configuration process is essentially the same for each.
1. Start the E-mail Accounts Wizard from the Mail applet in the Control Panel and then
click E-mail Accounts. Alternatively, choose Tools_E-mail Accounts in Outlook.
2. Choose Add a New E-mail Account and then click Next.
3. Choose POP3 if adding a POP3 account, or IMAP if adding an IMAP account; then
click Next.
4. On the Internet E-mail Settings page (Figure 3-9), specify settings according to the
following list:
Your Name. Specify your name as you want it to appear in the From field of messages
that others receive from you through this account.
E-mail Address. Enter the e-mail address for the account in the form
account@domain, such as
Incoming Mail Server. Specify the IP address or DNS name of the server where your
mailbox is located.
Outgoing Mail Server. Specify the IP address or DNS name of the SMTP server that
this account should use for sending outgoing mail. The outgoing and incoming servers
need not be the same, and in the case of large ISPs such as CompuServe, are often
different.
User Name. Enter the name of your mailbox or logon name on the server. Typically,
this is the first part of your e-mail address. Do not include the @domain portion of the
address.
Password. Specify the password associated with the account you entered in the User
Name field.
Remember Password. Select this option to have Outlook cache the password. Clear
the option if you want Outlook to prompt you for the password each time it connects to
the server. Clearing this option provides better security and prevents others from
retrieving your mail when you are away from the computer.
Log On Using Secure Password Authentication (SPA). Select this option if the mail
server requires SPA for authentication. Most mail servers do not.
Tip
64 Part I ✦ Getting Functional with Office 2003
Figure 3-9: Use the Internet E-mail Settings page to configure basic account properties
for POP3 and IMAP accounts.
You can click Test Account Settings when creating a POP3 account to send a test message
through a specified outgoing mail server and attempt a logon to the incoming mail server. This
helps you verify your settings before you finish creating the account.
In most situations you can click Next and then Finish at this point to create the account;
however, you can configure additional settings, if needed. Click More Settings to display the
Internet E-mail Settings property sheet. The General, Outgoing Server, and Connection
pages are the same for POP3 and IMAP accounts. Most of the options on the Advanced page
are the same, with a few exceptions. The following sections describe the available options.
General settings
Use the Mail Account field on the General page to specify the account name as you want it
to appear in Outlook’s list of accounts. You can add a company or organization name in the
Organization field. These settings are optional.
Use the Reply E-mail field to specify the reply to message property for the account. By
default, the account uses the e-mail address you specify in the E-mail Address field for the
account as the reply address. In some situations, however, you might want these to be
different. For example, you might want replies sent to a discussion list rather than to your
own mail address.
Tip
65Chapter 3 ✦ Configuring Outlook 2003
Outgoing server settings
Use the settings on the Outgoing Server page to enable authentication for your SMTP server.
You can use the same authentication credentials as for the incoming server, or specify a
different account and password. You can also configure the account to use Secure Password
Authentication (SPA) for the outgoing server, if required.
POP3 accounts have an additional setting on this page: Log on to incoming mail server
before sending mail. Enable if your account is serviced by the same server for incoming and
outgoing mail, and requires that you authenticate to send messages.
Connection settings
Use the Connection page to specify how Outlook should connect to the server(s) to send and
receive messages. Use the LAN option if you connect through a network, or want to use
whatever dial-up connection is already established at the time you perform a send/receive.
The option Connect via modem when Outlook is offline, if enabled, causes Outlook to dial
the connection specified by the Modem options when Outlook detects that the server is
offline. Check your operating system’s Help documentation if you need help configuring a
dial-up account.
Advanced settings
The Advanced page differs slightly between POP3 and IMAP accounts. Figure 3-10 shows
the POP3 version.
Figure 3-10: The Advanced page for POP3 accounts.