Microsoft Office 2003 Super Bible phần 9 doc
Bạn đang xem bản rút gọn của tài liệu. Xem và tải ngay bản đầy đủ của tài liệu tại đây (1.07 MB, 64 trang )
489Chapter 20 ✦ Analyzing Data with Pivot Tables in Excel
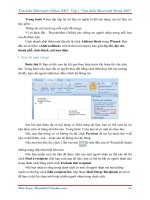
Figure 20-21: This pivot table uses calculated items for quarterly totals.
Figure 20-22:The pivot table, after rearranging the calculated items.
A calculated item appears in a pivot table only if the field on which it is based also appears. If
you remove or pivot a field from either the Row or Column category into the Data category, the
calculated item does not appear.
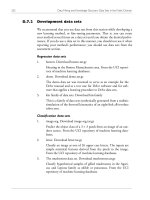
It’s also possible to get quarterly summaries by grouping items. Because the month names
are not actual dates, the grouping must be done manually. Figure 20-23 shows the pivot
table after creating four groups. You create the first group by selecting the Jan, Feb, and Mar
items. Then you right-click, and choose Group and Show Detail _ Group from the shortcut
menu. Excel inserted the default name, Group 1 — which you then change to Qtr 1. Next,
right-click the group item and chose Field Settings to display the PivotTable Field dialog
box. In this dialog box, you would specify the Sum function to summarize the grouped data.
Finally, you then repeat this process for the other three quarters.
Note
490 Part III ✦ Beyond Mastery: Initiative within Office
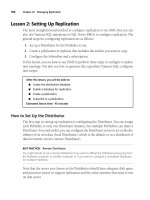
Figure 20-23: Grouping items to show quarterly summary information.
Summary
This chapter demonstrated the powerful capabilities of Excel’s pivot tables. Hopefully, you
now have the knowledge and ability to create the kind of reports and calculations that will
make your work easier. Key points from the chapter include:
✦ After you create a pivot table, you can rearrange the information in almost any way
imaginable and even insert special formulas that perform new calculations.
✦ You can create a pivot table from a database by executing the following steps:
Specifying the data location, specifying the data, and specifying how you want to
display the relationship between that data and completing the table.
✦ One of the more useful features of a pivot table is the ability to combine items into
groups. To group items, select them, right-click, and choose Group and Outline _
Group from the shortcut menu that appears.
✦ A calculated field is basically a way to display new information in a pivot table. It
essentially presents an alternative to creating a new Data field in your source
database. A calculated field cannot be used as a Row, Column, or Page field.
✦✦✦
21
21
In This Chapter
Creating user
interaction
Adding hyperlinks
to slides
Placing action
buttons
Distributing
user-interactive
presentations
CHAPTER
Designing
User-Interactive
PowerPoint
Presentations
S
elf-running presentations do their jobs without any
intervention from the audience or from you. If a self-running
presentation runs at a trade show and there is no one to hear it, it
runs nonetheless.
In contrast, user-interactive shows also lack a human facilitator or
speaker, but they rely on an audience’s attention. The audience
presses buttons, clicks a mouse, or clicks graphics or hyperlinks
on-screen to advance the show from one slide to the next, and
they might even be able to control which content is displayed.
(See the “Interactive Presentation Ideas” section at the end of this
chapter for some usage ideas.)
What Is a Hyperlink?
The navigational controls you place in your presentation take
various forms, but are all hyperlinks. A hyperlink object is a bit of
text or a graphic that you (or your audience) can click to jump
somewhere else. When you click a hyperlink, you might jump to
a different slide in the same presentation, to a different
presentation, to another program on your computer, or even to an
Internet Web page.
Most people associate the word
hyperlink
with the Internet be-
cause of their familiarity with the Web and with hyperlinks on Web
pages. However, a hyperlink is simply a link to somewhere else;
it does not necessarily refer to an Internet location.
Note
492 Part III ✦ Beyond Mastery: Initiative within Office
The most common type of hyperlink is underlined text. Hyperlink text is typically
underlined and a different color than the rest of the text on-screen. In addition, followed
links may be a different color from ones that you have not yet checked out, depending on the
program.
If you want a hyperlink that never changes its color, place a transparent object over it, such as
a rectangle, and apply the hyperlink to that object rather than the text. The user will think he is
clicking the text, but he will actually be clicking the rectangle. You can also assign a hyperlink to
a whole text box (manual text boxes only, not placeholder text boxes) as opposed to the text
within it.
You are not limited to underlined bits of text for your hyperlinks. You can also use graphics
or any other objects on your slides as hyperlinks. PowerPoint provides some special-purpose
graphics called action buttons that serve very well with hyperlinks. For example, you can
assign a hyperlink to the next slide to the action button that looks like a right arrow, as you
see in Figure 21-1 in the following section.
Navigational Control Choices
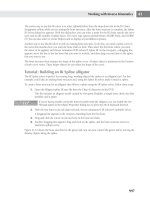
Figure 21-1 shows a slide with several types of navigational controls, any of which you can
use in your own slides.
Figure 21-1: Use one or more of the navigational aids shown here.
Tip
493Chapter 21 ✦ Designing User-Interactive PowerPoint Presentations
✦ Action buttons: These graphics come with PowerPoint. You can set them up so
that clicking them moves to a different slide in the presentation. The ones in Figure
21-1 move forward (to the next slide) and back (to the previous slide).
✦ Hyperlink with helper text: The text “Click here to learn more” in Figure 21-1,
for example, provides built-in instructions for less technically sophisticated users.
The hyperlink could refer to a Web site, as in Figure 21-1, to a hidden slide in the
same presentation, or to any other location.
✦ Hyperlink without helper text: The text “Customer Satisfaction Surveys” in
Figure 21-1 is a hyperlink, but the audience must know enough about computers to
know that clicking those underlined words jumps to the slide containing more
information.
✦ ScreenTip: Pointing at a hyperlink displays a pop-up note listing the address to
which the hyperlink refers. Viewers can jot it down for later exploration if they
don’t want to visit the page right now.
✦ Bare Internet hyperlink: The Internet address in Figure 21-1,
, is also a hyperlink — in this case, to
a Web page on the Internet. This kind of hyperlink can be intimidating for begin-
ners who don’t recognize Internet syntax, but it is very good for the advanced
audience member because it lists the address up front. No clicking or pointing is
required to determine the address.
✦ Instructions: If you do not build specific navigation controls into the presentation,
you may want to add instructions on the slide that tell the reader how to move
forward and backward in the presentation. The instruction box at the bottom of
Figure 21-1 does just that.
Choosing Appropriate Controls for Your Audience
Before you dive into building an interactive presentation, you must decide how the audience
will navigate from slide to slide. There is no one best way; the right decision depends on
your audience’s comfort level with computers and with hyperlinks. Consider these points:
✦ Is the audience technically savvy enough to know that they should press a key or
click the mouse to advance the slide, or do you need to provide that instruction?
✦ Does your audience understand that the arrow action buttons mean forward and
back, or do you need to explain that?
✦ Does your audience understand hyperlinks and Web addresses? If they see under-
lined text, do they know that they can click it to jump elsewhere?
✦ Is it enough to include some instructions on a slide at the beginning of the show, or
do you need to repeat the instructions on every slide?
Think about your intended audience and their needs and come up with a plan. Here are some
sample plans:
494 Part III ✦ Beyond Mastery: Initiative within Office
✦ For a beginner-level audience: Begin the presentation with an instructional slide
explaining how to navigate. Place action buttons on the same place on each slide
(using the Slide Master) to help them move forward and backward, and include a
Help action button that they can click to jump to more detailed navigation instruc-
tions.
✦ For an intermediate-level audience: Place action buttons on the same place on
each slide, along with a brief note on the first slide (such as the instruction in
Figure 21-1) explaining how to use them.
✦ For an advanced audience: Include other action buttons on the slide that allow the
users to jump around freely in the presentation — go to the beginning, to the end,
to the beginning of certain sections, and so on. Advanced users understand and can
take advantage of a more sophisticated system of action buttons.
Understanding Kiosk Mode
Kiosk mode places the keyboard and mouse in limited functionality mode during the
presentation, to give you more control over the audience’s experience.
Specifically, here’s what happens when you use Kiosk mode:
✦ The keyboard does not work, except for the Esc key (which exits the presentation).
✦ The mouse can be used to click on action buttons and hyperlinks, but clicking in
general does not do anything.
✦ The control buttons do not appear in the bottom left corner of the display, and you
cannot right-click to open their menu. Right-clicking does nothing.
To turn on Kiosk mode, do the following:
1. Choose Slide Show_Set Up Show. The Set Up Show dialog box opens.
2. Click Browsed at a Kiosk (Full Screen).
3. Click OK.
If you turn on Kiosk mode, you must use action buttons or hyperlinks in your presentation.
Otherwise users will not be able to move from slide to slide.
Using Action Buttons
Action buttons, which you saw in Figure 21-1, are the simplest kind of user-interactivity
controls. They enable your audience members to move from slide to slide in the presentation
with a minimum of fuss. PowerPoint provides many preset action buttons that already have
hyperlinks assigned to them, so all you have to do is place them on your slides.
Caution
495Chapter 21 ✦ Designing User-Interactive PowerPoint Presentations
Continued
The action buttons that come with PowerPoint are shown in Table 21-1, along with their
preset hyperlinks. As you can see, some of them are all ready to go; others require you to
specify to where they jump. Most of the buttons have a default action assigned to them, but
you can change any of these as needed.
At first glance, there seems little reason to use action buttons that simply move the slide show
forward and backward. After all, isn’t it just as easy to use the keyboard’s Page Up and Page
Down keys, or to click the left mouse button to advance to the next slide? Well, yes, but if you
use Kiosk mode, described in the preceding section, you cannot move from slide to slide using
any of the conventional keyboard or mouse methods. The only thing the mouse can do is click
on action buttons and hyperlinks.
Table 21-1
Action Buttons
Button Name Hyperlinks to
None Nothing, by default. You can add text or fills to the
button to create custom buttons.
Home First slide in the presentation. (Home is where you
started, and it’s a picture of a house, get it?)
Help Nothing, by default, but you can point it toward a
slide containing help.
Information Nothing, by default, but you can point it to a slide
containing information.
Back or Previous Previous slide in the presentation (not necessarily
the last slide viewed; compare to Return).
Forward or Next Next slide in the presentation.
Beginning First slide in the presentation.
End Last slide in the presentation.
Return Last slide viewed, regardless of normal order. This
is useful to place on a hidden slide that the
audience will jump to with another link (such as
Help), to help them return to the main presenta-
tion when they are finished.
Document Nothing, by default, but you can set it to run a
program that you specify.
Tip
496 Part III ✦ Beyond Mastery: Initiative within Office
Table 21-1 (continued)
Button Name Hyperlinks to
Sound Plays a sound that you specify. If you don’t
choose a sound, it plays the first sound on
PowerPoint’s list of standard sounds (Applause).
Movie Nothing, by default, but you can set it to play a
movie that you specify.
Setting up action buttons
To place an action button, follow these steps:
1. If you want to place the button on the Slide Master, display it
(View_Master_Slide Master).
Some action buttons are best placed on the Slide Master, such as Next and Previous; others,
such as Return, are special-use buttons that are best placed on individual slides.
2. Choose Slide Show_Action Buttons. A palette of buttons appears, corresponding
to the buttons you saw in Table 21-1. See Figure 21-2.
Figure 21-2: Choose a button from the Slide Show menu.
Tip
497Chapter 21 ✦ Designing User-Interactive PowerPoint Presentations
3. Click the button that you want to place. Your mouse pointer turns into a crosshair.
You can drag the Action Buttons palette off the Slide Show menu, making it into a floating
toolbar.
4. To create a button of a specific size, drag on the slide (or Slide Master) where you
want it to go. Or, to create a button of a default size, simply click once where you
want it. You can resize the button at any time later, the same as you can any object.
If you are going to place several buttons, and you want them all to be the same size, place them
at the default size to begin with. Then select them all, and resize them as a group. That way
they will all be exactly the same size.
5. The Action Settings dialog box appears. Make sure the Mouse Click tab is on top.
See Figure 21-3.
Figure 21-3: Specify what should happen when you click the action button.
6. Confirm or change the hyperlink set up there:
• If the action button should take the reader to a specific location, make sure the
correct slide appears in the Hyperlink To box. Refer to the right column in Table
21-1 to see the default setting for each action button. Table 21-2 lists the choices
you can make and what they do.
Tip
Tip
498 Part III ✦ Beyond Mastery: Initiative within Office
Continued
• If the action button should run a program, choose Run program and enter the
program’s name and path, or click Browse to locate it. For example, you could
open a Web browser window from an action button. The executable file that runs
Internet Explorer is iexplore.exe.
• If the action button should play a sound, click None in the Action on Click
section, make sure the Play Sound check box is marked, and choose the correct
sound from the Play Sound drop-down list (or pick a different sound file by
choosing Other Sound).
You can also run macros with action buttons. This is not all that common, however, because
most of the macros you record in PowerPoint apply to
building
a presentation, not showing one.
For example, you might create a macro that formats text a certain way. You would almost never
need to format text while a presentation was being shown to an audience.
7. Click OK. The button has been assigned the action you specified.
8. Add more action buttons as desired by repeating these steps.
9. If you are working in Slide Master view, exit it by clicking the Close button.
10. Test your action buttons in Slide Show view to make sure they jump where you
want them to.
To edit a button’s action, right-click it and choose Action Settings to reopen this dialog box
at any time.
Table 21-2
Hyperlink to Choices in the Action Settings Dialog Box
Drop-Down
Menu Choice Result
Previous Slide
Next Slide
First Slide
Last Slide
Last Slide Viewed These choices all do just what their names say. These are the
default actions assigned to certain buttons you learned about in
Table 21-1.
End Show Sets the button to stop the show when clicked.
Custom Show . . . Opens a Link to Custom Show dialog box, where you can
choose a custom show to jump to when the button is clicked.
Slide . . . Opens a Hyperlink to Slide dialog box, where you can choose
any slide in the current presentation to jump to when the button
is clicked.
Tip
499Chapter 21 ✦ Designing User-Interactive PowerPoint Presentations
Table 21-2 (continued)
Drop-Down
Menu Choice Result
URL . . . Opens a Hyperlink to URL dialog box, where you can enter a
Web address to jump to when the button is clicked.
Other PowerPoint
Presentation . . . Opens a Hyperlink to Other PowerPoint Presentation dialog box,
where you can choose another PowerPoint presentation to
display when the button is clicked.
Other File . . . Opens a Hyperlink to Other File dialog box, where you can
choose any file to open when the button is clicked. If the file
requires a certain application, that application will open when
needed. (To run another application without opening a specific
file in it, use the Run Program option in the Action Settings
dialog box instead of Hyperlink To.)
Adding text to an action button
The blank action button you saw in Table 21-1 can be very useful. You can place several of
them on a slide and then type text into them, creating your own set of buttons.
To type text into a blank button, follow these steps:
1. Place a blank action button on the slide.
2. Right-click the action button and choose Add Text. An insertion point appears in it.
(You can also select the button and simply start typing.)
3. Type your text. Format it as desired using the normal text formatting commands
and buttons.
4. When you are finished, click outside of the button to stop.
5. Resize the button, if needed, to contain the text more neatly. You can drag a
button’s side selection handles to make it wider.
6. If you need to edit the text later, simply click the text to move the insertion point
back into it, just as you do with any text box.
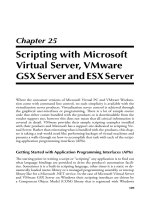
Figure 21-4 shows some examples of custom buttons you can create with your own text.
500 Part III ✦ Beyond Mastery: Initiative within Office
Figure 21-4: You can create any of these sets of action buttons by typing and formatting
text on blank buttons.
Creating your own action buttons
You can create an action button out of any object on your slide: a drawn shape, a piece of
clip art, a photograph, a text box — anything. To do so, just right-click the object and
choose Action Settings. Then, set it to Hyperlink To, Run Program, or Play Sound, just as
you did for the action buttons in the preceding sections.
Make sure you clearly label the object that you are using as an action button so that the users
will know what they are getting when they click it. You can add text to the object directly
(for example, with an AutoShape), or you can add a text box next to the button that explains
its function.
Adding Text-Based Hyperlinks to Slides
Now that you know that hyperlinks are the key to user interactivity, you will want to add
some to your presentation. You can start with text-based hyperlinks since they’re the easiest.
You can either add them bare or with explanatory text.
501Chapter 21 ✦ Designing User-Interactive PowerPoint Presentations
Typing a bare hyperlink
The most basic kind of hyperlink is an Internet address, typed directly into a text box. When
you enter text in any of the following formats, PowerPoint automatically converts it to a
hyperlink:
✦ Web addresses: Anything that begins with http://.
✦ E-mail addresses: Any string of characters with no spaces and an @ sign in the
middle somewhere.
✦ FTP addresses: Anything that begins with ftp://.
Figure 21-5 shows some examples of these “bare” hyperlinks. They are called bare because
you see what’s underneath them — the actual address — right there on the surface. There is
no friendly “click here” text that the link hides behind. For example, the text
is a hyperlink that sends e-mail to that address. In contrast, a
link that reads “Click here to send e-mail to me” and contains the same hyperlink address is
not bare, because you do not see the address directly.
If PowerPoint does not automatically create hyperlinks, the feature may be disabled. Choose
Tools
_
AutoCorrect Options. Click the AutoFormat As You Type tab, and make sure the Internet
and network paths with hyperlinks checkbox is marked.
Note
Figure 21-5: Some examples of bare Internet hyperlinks.
502 Part III ✦ Beyond Mastery: Initiative within Office
You do not have to do anything special to create these hyperlinks; when you type them and
press Enter or the space bar, PowerPoint converts them to hyperlinks. You know the
conversion has taken place because the text becomes underlined and different-colored. (The
exact color depends on the color scheme in use.)
FTP stands for File Transfer Protocol. It’s a method of transferring files via the Internet. Up
until a few years ago, FTP was a totally separate system from the Web, but nowadays,
most Web browsers have FTP download capabilities built in, so anyone who has
a Web browser can receive files via FTP. However, to
send
files via FTP, the user must
have a separate FTP program.
Creating text hyperlinks
A text hyperlink is a hyperlink comprised of text, but not just the bare address. For
example, in Figure 21-1, “Click here to learn more” is a text hyperlink. So is “Customer
Satisfaction Surveys.”
You can select already-entered text and make it a hyperlink, or you can enter new text.
Either way, follow these steps:
These steps take you through the process generically; see the sections in “Choosing the Hyperlink
Address” later in the chapter for specific information about various kinds of hyperlinks you can
create.
1. To use existing text, select the text or its text box. Otherwise, just position the
insertion point where you want the hyperlink.
2. Choose Insert_Hyperlink or press Ctrl+K. The Insert Hyperlink dialog box opens.
See Figure 21-6.
Note
Note
Figure 21-6: Insert a hyperlink by typing the text to display and choosing the address of
the slide or other location to jump to.
503Chapter 21 ✦ Designing User-Interactive PowerPoint Presentations
3. In the Text to Display field, type or edit the hyperlink text. This text is what will
appear underlined on the slide. Any text you’ve selected will appear in this field by
default; changing the text here changes it on your slide as well.
4. Enter the hyperlink or select it from one of the available lists. (See the following
section, “Choosing the Hyperlink Address,” to learn about your options in this
regard.)
5. (Optional) The default ScreenTip for a hyperlink is its address (URL). If you want
the ScreenTip to show something different when the user points the mouse at the
hyperlink, click the ScreenTip button and enter the text for the ScreenTip. See
Figure 21-7.
Figure 21-7: Enter a custom ScreenTip if desired.
Internet Explorer supports ScreenTips (in version 4.0 and higher), but other browsers may not.
This is not an issue if you plan to distribute the presentation in PowerPoint format, but if you
plan to convert it to Web pages, it might make a difference.
6. Click OK to close the Set Hyperlink ScreenTip dialog box.
7. Click OK to accept the newly created hyperlink.
Choosing the hyperlink address
You can use the Insert Hyperlink dialog box to create a hyperlink to any address that’s
accessible via the computer where the presentation will run. Although many people think of
a hyperlink as an Internet address, it can actually be a link to any file, application, Internet
location, or slide.
A hyperlink will not work if the person viewing the presentation does not have access to the
needed files and programs or does not have the needed Internet or network connectivity. A
hyperlink that works fine on your own PC might not work after the presentation has been trans-
ferred to the user’s PC.
Caution
Caution
504 Part III ✦ Beyond Mastery: Initiative within Office
Possible addresses to hyperlink to include the following:
✦ Other slides in the current presentation
✦ Slides in other presentations (if you provide access to those presentations)
✦ Documents created in other applications (if the user has those applications installed
and those document files are available)
✦ Graphic files (if the user has access to an application that can display them)
✦ Internet Web pages (if the user has an Internet connection and a Web browser)
✦ E-mail addresses (if the user has an Internet connection and an e-mail program)
✦ FTP site addresses (if the user has an Internet connection and a Web browser or an
FTP program)
Creating a link to a slide in this presentation
The most common kind of link is to another slide in the same presentation. There are lots of
uses for this link type; you might, for example, hide several backup slides that contain extra
information. You can then create hyperlinks on certain key slides that allow the users to
jump to one of those hidden slides to peruse the extra facts.
To create a link to another slide, follow these steps:
1. To use existing text, select the text or its text box. Otherwise, just position the
insertion point where you want the hyperlink.
2. Choose Insert_Hyperlink or press Ctrl+K. The Insert Hyperlink dialog box opens.
3. In the Text to Display field, type or edit the hyperlink text. This text is what will
appear underlined on the slide. Any text you’ve selected will appear in this field by
default; changing text here changes it on your slide as well.
4. Click the Place in This Document button. The dialog box controls change to show a
list of the slides in the presentation. See Figure 21-8.
Figure 21-8: Select the slide that the hyperlink should refer to.
505Chapter 21 ✦ Designing User-Interactive PowerPoint Presentations
5. Select the slide you want.
6. (Optional) If you want the presentation to continue from the original spot after
showing this slide, mark the Show and Return check box. If you prefer that the
presentation continue from the new location forward, leave it unmarked.
7. Click OK.
Creating a link to an existing file
You can also create a hyperlink to any file available on your PC’s hard disk or on your
local area network. This can be a PowerPoint file or a data file for any other program,
such as a Word document or an Excel spreadsheet. Or, if you don’t want to open a particu-
lar data file, you can hyperlink to the program file itself, so that the other application
simply opens.
For example, perhaps you have some detailed documentation for your product in Adobe
Acrobat format (PDF). This type of document requires the Adobe Acrobat reader. So you
could create a hyperlink with the text “Click here to read the documentation” and link to the
appropriate PDF file. When your audience member clicks that link, Adobe Acrobat Reader
opens and the documentation displays.
To link to a file, follow these steps:
1. To use existing text, select the text or its text box. Otherwise, just position the
insertion point where you want the hyperlink.
2. Choose Insert_Hyperlink or press Ctrl+K. The Insert Hyperlink dialog box opens.
3. In the Text to Display field, type or edit the hyperlink text. This text is what will
appear underlined on the slide.
4. In the Insert Hyperlink dialog box, click the Existing File or Web Page button.
5. Do one of the following:
Click Current Folder to display a file management interface from which you can
select any folder or drive on your system. Then navigate to the location containing
the file and select the file. See Figure 21-9.
OR
Click Recent Files to display a list of the files you have recently opened on this PC
(all types). Then click the file you want from the list.
You are not limited to only the folder on your local drives if you choose Current Folder; you can
open the Look In list and choose My Network Places to browse the network. However, make
sure that the PC on which the presentation will be displayed will also have access to this same
location.
Note
506 Part III ✦ Beyond Mastery: Initiative within Office
Figure 21-9: Select any file to hyperlink to.
6. Click OK to return to the Insert Hyperlink dialog box.
7. Click OK to insert the hyperlink.
Using a hyperlink to an executable file can result in a warning message each time it is clicked if
the file being linked to is executable or is a data file containing macros. To avoid this, first ensure
that macro security is set to Low (Tools
_
Macro
_
Security). Then, instead of using a hyperlink,
use an Action Setting and choose Run Program as the action. For the program to run, use the
full path to the application, in quotation marks, followed by a space and then the full path to the
document, also in quotation marks. Because you must enter the full paths to each of these, the
link will probably not work when the presentation is run on a different computer.
Creating a link to a Web or FTP site
If you want to link to a Web or FTP site, as you learned earlier in the chapter, you can
simply type the address directly into any text box. Alternatively, you can use the Insert
Hyperlink command to create the link, as follows:
1. To use existing text, select the text or its text box. Otherwise, just position the
insertion point where you want the hyperlink.
2. Choose Insert_Hyperlink or press Ctrl+K. The Insert Hyperlink dialog box opens.
3. In the Text to Display field, type or edit the hyperlink text. This text is what will
appear underlined on the slide. Any text you’ve selected will appear in this field by
default; changing text here changes it on your slide as well.
4. From the Insert Hyperlink dialog box, click the Existing File or Web Page button.
Tip
507Chapter 21 ✦ Designing User-Interactive PowerPoint Presentations
5. If you know the exact Web or FTP address that you want to link to, type it in the
Address box. Then click OK. Otherwise, go to Step 6.
6. Click Browsed Pages to display a list of pages you have visited recently (including
pages from PowerPoint’s Help system). See Figure 21-10.
Figure 21-10: You can select recently viewed or recently linked files from the list, or click
Browse the Web to open a Web browser from which to find the desired page.
7. If the address you want appears as a result of Step 6, click it and click OK. Other-
wise, go on to Step 8.
8. Click the Browse the Web button to browse for the page you want. Internet Ex-
plorer (or your default Web browser) opens.
If the Dial-Up Connection dialog box appears prompting you to connect to the Internet, enter
your username and password, if needed, and then click Connect.
9. In Internet Explorer, navigate to the page that you want to hyperlink to. You can
use your Favorites list or look up the page with a search site such as the one found
at www.google.com.
10. When you have arrived at the page you want, copy the URL from the address bar in
your browser, and then jump back to PowerPoint by clicking its button on your
Windows task bar. Paste the URL in the Address box of the PowerPoint dialog box
using Ctrl+V.
11. Click OK to create the link.
Note
508 Part III ✦ Beyond Mastery: Initiative within Office
Creating a link to a new document
Perhaps you want the audience to be able to create a new document by clicking a
hyperlink. For example, perhaps you would like them to be able to provide information
about their experience with your Customer Service department. One way to do this is to
let them create a new document using a program that they have on their system, such as a
word processor.
Be careful to set up a new document hyperlink to create a new document using a program that
you are sure your audience members will have access to.
To create a link to a new document, follow these steps:
1. To use existing text, select the text or its text box. Otherwise, just position the
insertion point where you want the hyperlink.
2. Choose Insert_Hyperlink or press Ctrl+K. The Insert Hyperlink dialog box opens.
3. In the Text to Display field, type or edit the hyperlink text. This text is what will
appear underlined on the slide.
4. From the Insert Hyperlink dialog box, click Create New Document. The dialog box
controls change, as shown in Figure 21-11.
Caution
Figure 21-11: PowerPoint prompts you to enter the new document name and location.
5. Enter the name of the new document that you want to create. The type of document
created depends on the extension you include. For example, to create a Word
document, use the .DOC extension. See Table 21-3 for other extensions.
If you provide this presentation to multiple users, each one will use the same file name for the
new document. This can be a problem because one file may overwrite another. It might be
easier and less trouble-free to collect information from multiple users using an E-Mail Address
hyperlink (discussed later in this chapter).
Caution
509Chapter 21 ✦ Designing User-Interactive PowerPoint Presentations
6. If the path where it should be stored is not correct in the Full Path area, click the
Change button. Navigate to the desired location, and click OK to return.
7. Click the Edit the New Document Later option.
8. Click OK.
The most important part about adding a link to create a new file is to make sure that you use
an extension that corresponds to a program that users have on the PCs where they will be
viewing the presentation. When a program is installed, it registers its extension (the three-
character code after the period in a file’s name) in the Windows Registry, so that any data
files with that extension are associated with that program. For example, when you install
Microsoft Word, it registers the extension .DOC for itself, and PowerPoint registers .PPT for
its own use. Table 21-3 lists some of the more common file types and their registered
extensions on most PCs. Also make sure that the location you specify for the Full Path will
always be accessible whenever the presentation is run.
Table 21-3
Commonly Used Extensions for Popular Programs
Extension Associated Program
DOC Microsoft Word, or WordPad if Word is not installed. Use for docu-
ments if you are not sure whether your audience has Word, but you
are sure they at least have Windows 95.
WRI Write, the predecessor to WordPad. WordPad and Word also open
these if Write is not installed. Safest to use for documents if you do
not know which version of Windows your audience will be using.
TXT Notepad, a plain text editor. Creates text files without any formatting.
Not my first choice for documents unless you specifically need them
to be without formatting.
WPD WordPerfect, a competitor to Word.
BMP Microsoft Paint (which comes free with Windows), or some other
more sophisticated graphics program if one is installed.
MDB Microsoft Access, a database program.
MPP Microsoft Project, a project management program.
PPT Microsoft PowerPoint (you know what that is!).
XLS Microsoft Excel, a spreadsheet program.
Creating a link to an e-mail address
You can also create a link that opens the user’s e-mail program and addresses an e-mail to
a certain recipient. For example, perhaps you would like the user to e-mail feedback to
you about how he liked your presentation or send you requests for more information about
your product.
510 Part III ✦ Beyond Mastery: Initiative within Office
For an e-mail hyperlink to work, the person viewing the presentation must have an e-mail appli-
cation installed on his or her PC and at least one e-mail account configured for sending e-mail.
This isn’t always a given, but it’s probably more likely than betting that they have a certain
application installed (as in the preceding section).
To create an e-mail hyperlink, follow these steps:
1. To use existing text, select the text or its text box. Otherwise, just position the
insertion point where you want the hyperlink.
2. Choose Insert_Hyperlink or press Ctrl+K. The Insert Hyperlink dialog box opens.
3. In the Text to Display field, type or edit the hyperlink text. This text is what will
appear underlined on the slide.
4. From the Insert Hyperlink dialog box, click the E-mail Address button. The dialog
box changes to show the controls in Figure 21-12.
Figure 21-12: Fill in the recipient and subject of the mail-to link.
5. In the E-mail Address box, enter the e-mail address. PowerPoint automatically adds
mailto: in front of it. (You can also select from one of the addresses on the
Recently Used E-Mail Addresses list if there are any.)
6. In the Subject field, enter the text that you want to be automatically added to the
Subject line of each e-mail.
7. Click OK. The hyperlink appears on the slide.
Caution
511Chapter 21 ✦ Designing User-Interactive PowerPoint Presentations
Editing a Hyperlink
If you need to change the displayed text for the hyperlink, simply edit it just as you do any
text on a slide. Move the insertion point into it and press Backspace or Delete to remove
characters; then retype new ones.
If you need to change the link to which the hyperlink points, follow these steps:
1. Right-click the hyperlink.
2. On the shortcut menu that appears, choose Edit Hyperlink. The Edit Hyperlink
dialog box appears. It is exactly the same as the Insert Hyperlink dialog box except
for the name.
3. Make changes to the hyperlink. You can change the displayed text, the address it
points to, or the ScreenTip.
4. Click OK.
Removing a Hyperlink
If you decide not to hyperlink in a particular spot, you can delete the displayed text,
effectively deleting the hyperlink attached to it. But if you want to leave the displayed text
intact and remove the hyperlink only, follow these steps:
1. Right-click the hyperlink.
2. On the shortcut menu that appears, choose Remove Hyperlink.
Creating Graphics-Based Hyperlinks
There are two ways to create a graphics-based hyperlink. Both involve skills that you have
already learned in this chapter. Both work equally well, but you may find that you prefer one
to the other. The Action Settings method is a little bit simpler, but the Insert Hyperlink
method allows you to browse for Web addresses more easily.
Creating a hyperlink with Action Settings
A graphics-based hyperlink is really no more than a graphic with an action setting attached
to it. You set it up just as you did with the action buttons earlier in this chapter:
1. Place the graphic that you want to use for a hyperlink.
2. Right-click it and choose Action Settings.
3. Choose Hyperlink To.
512 Part III ✦ Beyond Mastery: Initiative within Office
4. Open the Hyperlink To drop-down list and choose a URL to enter an Internet
address, or choose one of the other options from Table 21-2 to link to some other
location or object.
5. Click OK.
Now the graphic functions just like an action button in the presentation; the audience can
click on it to jump to the specified location.
Creating a hyperlink with the Insert Hyperlink feature
If you would like to take advantage of the superior address-browsing capabilities of the
Insert Hyperlink dialog box when setting up a graphical hyperlink, follow these steps instead
of the preceding ones:
1. Place the graphic that you want to use for a hyperlink.
2. Right-click it and choose Hyperlink. The Insert Hyperlink dialog box appears.
3. Choose the location, as you learned earlier in this chapter for text-based hyperlinks.
The only difference is that the Text to Display box is unavailable because there is
no text.
4. Click OK.
Distributing a User-Interactive Presentation
One of the easiest and best ways to distribute a user-interactive presentation is via CD. You
can also distribute the presentation to people within the same company by placing it on a
shared network drive and then inviting people to access it. Or you can attach the
presentation to an e-mail message and distribute it that way.
Another way is to make the presentation available as a Web page (or series of pages). This is
good for information delivery, and it doesn’t require the audience to have any special
software, but you do lose some of the animation and special effects.
You can also place the PowerPoint file on a Web server and then create a link to it from a
Web page. This lets people run the presentation in PowerPoint itself (or the PowerPoint
Viewer) with all the bells and whistles.
If you are interested in learning how to use the Internet to distribute or present a PowerPoint
Presentation, Wiley’s
PowerPoint 2003 Bible
covers it in depth in chapter 30.
Interactive Presentation Ideas
You have probably thought of some good ideas for interactive presentations as you worked
through this chapter. Here are some more:
Note
513Chapter 21 ✦ Designing User-Interactive PowerPoint Presentations
✦ Web resource listings: Include a slide that lists Web page addresses that the users
can visit for more information about various topics covered in your presentation.
Or, include Web cross-references throughout the presentation at the bottom of
pertinent slides.
✦ Product information: Create a basic presentation describing your products, with
For More Information buttons for each product. Then, create hidden slides with the
detailed information, and hyperlink those hidden slides to the For More Information
buttons. Don’t forget to put a Return button on each hidden slide so users can easily
return to the main presentation.
✦ Access to custom shows: If you have created custom shows, as described in
Chapter 24, set up action buttons or hyperlinks that jump the users to them on
request. Use the Action Settings dialog box’s Hyperlink To command and choose
Custom Show; then choose the custom show you want to link to.
✦ Quizzes: Create a presentation with a series of multiple-choice questions. Create
custom action buttons for each answer. Depending on which answer the user clicks,
set it up to jump either to a Congratulations, You’re Right! slide or a Sorry, Try
Again slide. From each of those, include a Return button to go on with the quiz.
✦ Troubleshooting information: Ask the users a series of questions and include
action buttons or hyperlinks for the answers. Set it up to jump to a slide that further
narrows down the problem based on their answers, until they finally arrive at a
slide that explains the exact problem and proposes a solution.
✦ Directories: Include a company directory with e-mail hyperlinks for various people
or departments so that anyone reading the presentation can easily make contact.
Summary
In this chapter, you learned how to create action buttons and hyperlinks in your presentation
that can help your audience jump to the information they want in a self-service fashion. Now
you can design great-looking presentations that anyone can work their way through on their
own, without assistance.
✦✦✦