Microsoft SQL Server 2000 Weekend Crash Course phần 3 docx
Bạn đang xem bản rút gọn của tài liệu. Xem và tải ngay bản đầy đủ của tài liệu tại đây (328.15 KB, 41 trang )
114840-9 ch05.F 8/28/01 12:52 PM Page 60
Session Checklist
✔
Understanding the SQL Server system databases
✔
Exploring the SQL Server sample databases
✔
Learning the basics of relational-database design
E
very SQL Server installation comes with several preconfigured system and
sample databases. In this session you will learn about them, their purpose,
and what you can do with them. I will explain the database-design funda-
mentals as well as rules of normalization to help you get started with database
design.
Understanding the SQL Server System Databases
Every newborn SQL Server database system initially contains only six databases:
Master, TempDB, Model, MSDB, Pubs, and Northwind. The first four of these are
databases; Pubs and Northwind are sample databases provided to help you master
relational-database concepts. I describe these two in the next section.
SESSION
SQL Server Databases
6
124840-9 ch06.F 8/28/01 12:52 PM Page 61
Although it is possible, you should never try to modify any sys-
tem database directly through the use of Transact-SQL state-
ments, as this may — and often will — render your RDBMS
unusable. Consider any system database (especially Master!) a
sanctum sanctorum and treat it accordingly.
The Master database
The Master database contains information about your whole SQL Server system:
login accounts, configuration settings, and a record of every custom database (and
its location) that you might have created. It also contains initialization informa-
tion that SQL Server uses on startup, system stored procedures (precompiled
chunks of Transact-SQL programs that perform various administrative tasks),
extended stored procedures (external compiled programs callable from within SQL
Server), and more.
System stored procedures are discussed further in Session 11 and
Session 23.
Always maintain a current backup of your Master database.
Create a new backup (as covered in Session 18) every time you
change system settings (such as collation order, default lan-
guage, and so on).
The TempDB database
TempDB holds all temporary tables (for intermediate results of sorting, for exam-
ple), static cursors (covered in Session 13), and temporary stored procedures. It is
a global workspace for every SQL Server process, available if any of those processes
requires some type of temporary storage. Unlike every other database in SQL
Server, TempDB is recreated, not recovered, every time SQL Server is started. This
means that SQL Server gets a clean copy of TempDB on startup; consequently,
TempDB never contains any information about previous SQL Server sessions.
Operations in TempDB are logged with just enough information that they can be
rolled back if necessary (all other databases log information sufficient for recovery).
Tip
Cross-Ref
Note
Saturday Morning62
124840-9 ch06.F 8/28/01 12:52 PM Page 62
This behavior is new in SQL Server (starting from version 7) and is intended to
increase performance.
Otherwise, TempDB behaves just like any other database in the system: It auto-
matically increases in size as needed (unless restricted to a particular size), is
capable of setting access rights, and so on.
Set a sufficient initial size for TempDB in order to boost your
SQL Server performance. Because TempDB is recreated at startup
with the Model database as a template, make sure that the size
of your Model database is the size you want your TempDB to be.
The Model database
The Model database is simply a template for all databases created on a system. A
newly created database will inherit all the objects and properties of the Model
database: permissions, sizes, tables, rules, datatypes, stored procedures, and so on.
You can modify the Model database to include certain character-
istics you’d like to see in your custom databases and in TempDB;
the latter is created with the Model database as a template.
The MSDB database
SQL Server Agent (covered in Session 24) uses the MSDB database for scheduling
alerts, jobs, backups, and replication tasks.
You cannot easily delete any system database; it is not even an
option in the Enterprise Manager console. You can delete physi-
cal files containing system databases in many ways, but there is
not a single reason why you would.
In SQL Server 2000 each database — system databases included — is placed into
a separate non-shared file. Each system database consists of at least two files, a
data file and a log file. Table 6-1 is modeled after the table from Books Online; it
provides the names and default sizes of the system databases. The default size of
the database is dependent on the setup type.
Note
Tip
Tip
Session 6—SQL Server Databases 63
Part II—Saturday Morning
Session 6
124840-9 ch06.F 8/28/01 12:52 PM Page 63
Table 6-1
SQL Server 2000 System File Names and Locations
Database file Physical file name Default size, typical setup
Master data Master.mdf 11.0MB
Master log Mastlog.ldf 1.25MB
TempDB data TempDB.mdf 8.0MB
TempDB log Templog.ldf 0.5MB
Model data Model.mdf 0.75MB
Model log Modellog.ldf 0.75MB
MSDB data Msdbdata.mdf 12.0MB
MSDB log Msdblog.ldf 2.25MB
You should make any changes to system databases using the administrative
tools provided by SQL Server system.
Though it is possible, do not code Transact-SQL statements that
directly query the system tables unless that is the only way to
obtain the information required by the application. In most
cases applications should obtain catalogues and system informa-
tion from INFORMATION_SCHEMA views (see Session 23).
Exploring the SQL Server Sample Databases
Each installation of SQL Server 2000, regardless of type, will include two sample
databases: Pubs and Northwind. These are databases for two fictitious companies,
created by Microsoft to illustrate its database concepts and features. Both data-
bases are referred to extensively throughout SQL Server documentation and Books
Online.
The Pubs database
The Pubs database is intentionally simple. It takes approximately 2MB of your
hard-drive space and can be deleted safely. I recommend leaving it, however, as it
Tip
Saturday Morning64
124840-9 ch06.F 8/28/01 12:52 PM Page 64
provides you with a safe environment within which to master your database
skills — especially Transact-SQL usage. You can do with the Pubs database and the
data it contains as you please, as you can restore this database any time by run-
ning a script in the SQL Query Analyzer window. You’ll find the file —
instpubs.sql — in the \Install sub-directory of your main SQL Server installation
directory.
The Northwind database
The Northwind database was originally developed for MS Access (and is still
shipped with it as a sample database) and demonstrates more advanced concepts
than Pubs. It takes twice as much space (around 4MB) but can be deleted from
your SQL Server system just as safely. Just as with the Pubs database, too, I recom-
mend leaving the Northwind database: Some samples in this book (and in a lot of
others) will use it. Feel free to use the database however you like, as you can
restore it to its original state by running the script instnwnd.sql.
Learning the Basics of Relational Database Design
While the sample databases Northwind and Pubs are useful, obviously they were
not your main reason for installing SQL Server. At some time or another you will
want to store and manage your own data and luckily, that is what a database
server does best. At some point you will need to design a database.
A database does not exist in a vacuum; it serves some specific business purpose.
A database for a pet store would be much different from a database for an automo-
bile manufacturer, and must be designed (and implemented) differently.
Database design is still more of an art than an exact science. If you design a
database from scratch you had better establish and follow the proper procedure for
analyzing requirements and collecting and analyzing data. The topic of database
design is well beyond the scope of this book — numerous books, some of which are
listed in the recommended reading section, are dedicated solely to this art.
Relational database management systems (RDBMSes) are in the business of stor-
ing and retrieving data, ideally — any data. Before you can store anything in a
relational database you need to tame the chaos by structuring your data in such a
way that they can be represented in a table format as a set of rows and columns.
The basic building unit of a database is the table.
In database-modeling jargon a table stores data concerning an entity, or object.
The Pubs database was designed to represent the business model of a small pub-
lishing company. If you look at the list of the tables inside Pubs you’ll see such
Session 6—SQL Server Databases 65
Part II—Saturday Morning
Session 6
124840-9 ch06.F 8/28/01 12:52 PM Page 65
tables as Departments, Employees, and Authors. They all represent entities: The
Departments table contains information about the different departments in the
company, the Employees table contains information about each employee, and the
Authors table contains information about the authors the company deals with.
Each row in these tables corresponds to one and only one department, employee,
or author, respectively.
When you first start analyzing business requirements for your database, you try
to identify entities in the specific business model; each entity is a prime candidate
for being a table in your database.
Once you’ve identified the tables, think of their attributes. An attribute is
something that defines an entity. For the Employee entity you might think of
something that identifies an employee, such as Social Security number, name, or
age. These attributes become columns in your table. Figure 6-1 shows the relation-
ship between entities and attributes.
Figure 6-1
Defining an entity and attributes.
Give meaningful names to your tables: it will simplify develop-
ment and maintenance, and might provide some insights into
your database structure. Usually table names are construed in
the plural, which reflects their purpose: Employees rather than
Employee, for example.
Relational databases are all about tables and the relationships among them.
Relationships are defined in terms of the parent/child paradigm, are derived from
the business model the database is designed for, and are implemented as
primary/foreign key pairs. Unlike in the real world, in the world of relational data-
bases it is the responsibility of a child to keep track of its parent. A parent table
contains the primary key, which becomes the foreign key in the child table.
Take a look at the Pubs database. Each employee from the Employees table is
assigned to do a specific job: these jobs are listed in the Jobs table. In order to
keep track of which employee has been assigned to which job, you have the col-
umn Job_ID in the Employees table and the Jobs table; this column is the primary
key in Jobs and the foreign key in Employees. If you think about it, Job_ID fits
naturally into the concept of the Jobs table and is external to the Employees
Tip
Employees
First Name
Last Name
Date Of Birth
Saturday Morning66
124840-9 ch06.F 8/28/01 12:52 PM Page 66
table — tomorrow a new job may be assigned and the Job_ID column may hold a
different value.
Should the business model require that many jobs be assigned to one employee,
the distribution of foreign/primary keys is different: The Jobs table contains an
Employee_ID column in addition to the Job_ID column, and the Employees table
does not have a Job_ID column at all. The strange-looking lines and shapes in
Figure 6-2 describe a one-to-many relationship.
Figure 6-2
Defining a one-to-many relationship.
Figure 6-2 is a diagram of a system wherein an employee can be assigned to one
and only one job (this is an example of a one-to-one relationship, indicated by the
notation 1:1), and one job can be assigned to one or more employees (one-to-
many, or 1:N). The special case of the many-to-many (N:N) relationship is resolved
with an intermediate table: If every employee can be assigned to one or more jobs
at the same time and each job can be assigned to one or more employees, then you
need to convert one N:N relationship into two 1:N relationships.
Take a look at the diagram in Figure 6-3: the Employees table contains nothing
to link it to the Jobs table, and the Jobs table does not contain a foreign key for
Employees. Instead there is a third table, Employee_Jobs, which links them
through the use of the primary keys of both tables: Employee_ID and Job_ID,
respectively.
Figure 6-3
Resolving a many-to-many relationship.
Employees
Employee_ID
Employee_ID
Jobs
Employees_Jobs
Job_ID
Job_ID
Employees
Employee_ID
Jobs
Job_ID
Employee_ID
Session 6—SQL Server Databases 67
Part II—Saturday Morning
Session 6
124840-9 ch06.F 8/28/01 12:52 PM Page 67
Get normal
Once you have established relationships in your database it is time for the normal-
ization process. Normalizing a database means disassembling large tables into
smaller ones in order to prevent data duplication. Some relationships may disap-
pear and new ones be added as you go through this process.
A normal form is a set of rules that you apply to a table to ensure its compli-
ance. At each level of normalization specific problems are addressed and solved.
The five normal forms measure the degree of normalization, but levels beyond
the third normal form are of mostly theoretical interest and are rarely applied (if
at all).
The first normal form deals with repeating groups. Consider the previous exam-
ple of the Employees and Jobs tables. You can combine both tables to hold the
same information, and the table structure (its fields) would look like what is
shown in Figure 6-4.
Figure 6-4
Combining two tables into one.
Surprisingly, this structure would actually work if it weren’t for the fact that
several jobs can be assigned to one employee. To amend the table structure to take
this fact into account, you have to add more fields to this table to record jobs
assigned to an employee, as shown in Figure 6-5.
Figure 6-5
Assigning several jobs to one employee.
The inefficiency of this design is obvious: If an employee is assigned fewer jobs
than there are fields in the table, some fields remain empty; if an employee is
assigned more jobs, you need to change the table’s structure.
Employee_ID Job_ID1 Job_ID2 Job_ID
Employee_ID Job_ID
Saturday Morning68
124840-9 ch06.F 8/28/01 12:52 PM Page 68
Job_ID fields comprise a repeating group, and once discovered such a group is a
prime candidate for a separate table — Jobs, in this case. The two-table design is
efficient and elegant. You need to analyze every table in your database and make
sure that none has repeating groups.
The second normal form establishes that there can be no non-key attributes
(fields) that depend on a portion of the primary key. Now, what does that really
mean? A primary key is a field or a group of fields within the table that uniquely
identifies the record; it cannot be repeated in any subsequent row no matter how
many rows are added. A group of fields that together serve as a primary key are
called the composite key, and your second normal form really concerns itself with
composite fields. If your table contains fields identifiable only by part of the pri-
mary key then those fields really should be put in a table of their own.
Let’s take a look at the Employees_Jobs table from the previous example of a
many-to-many (N:N) relationship. You could define a composite primary key con-
taining two fields: Employee_ID and Job_ID. Now, if you add some more fields to
this table, such as Job_Description (depends on Job_ID only), or Employee_Name
(depends on Employee_ID only), this table is in direct violation of the second nor-
mal form. Put these fields where they belong — into the Jobs and Employees
tables. Your database design becomes clearer as the N:N relationship between the
Employees and Jobs tables becomes clearer.
The third normal form declares that there should not be attributes (fields)
depending upon other non-key attributes. That means that only relevant informa-
tion describing an entity has a place in your table. Though it might be tempting to
consider, a Job_Description field would be completely out of place in the
Employees table; it belongs to the Jobs table. It might take some practice to figure
out what is relevant information and what is not.
Most database designs stop at the third normal form, as a higher
degree of normalization negatively reflects on the performance
of the database. Even the third normal form should be
approached with caution, as normalizing increases the number of
tables in the database and degrades performance as a result. In
some cases denormalization of a database may increase perfor-
mance considerably as the number of joins needed to collect
data decreases.
Note
Session 6—SQL Server Databases 69
Part II—Saturday Morning
Session 6
124840-9 ch06.F 8/28/01 12:52 PM Page 69
Common pitfalls of database design
If the only tool you have is a hammer, every problem starts to look like a nail.
Nothing could be more true with regard to the mistakes people often make while
trying their hands at database design. It is previous experience that bogs us down
while we’re trying to learn new things. Programmers with previous experience in
non-relational databases may tend to design databases that resemble flat files or
spreadsheets.
Flat-file design
Flat-file design derives its name from the early days when data were stored without
structure in computer files, much as you store your records in a file cabinet. If
your table is designed this way it will have one or more of the following problems:
¼
Duplicate fields that present the same evil that the first normal form is
supposed to eliminate.
¼
Calculated fields, wherein the table contains fields whose values can be
calculated from the other fields existing in the table — such as an Age
field in addition to a Date of Birth field.
¼
Multipart fields, such as a field called Address containing the street
address, ZIP code, and city. Such fields are very inefficient, as in order to
find the ZIP (for example) you have to parse the field’s value to extract
this piece of information.
In addition, you may find that the table is difficult or virtually impossible to
index, as there is no single field or group of fields to uniquely identify the record,
and that it tends to represent more than one subject.
Spreadsheet design
Recall that a spreadsheet can’t serve as a substitute for a database. It suffers from
the same problems as the flat file and adds more of its own — such as an inability
to deal with many-to-many relationships.
Design tied to a particular RDBMS implementation
It can be really tempting to use every single hack a system might offer in order to
get better performance. Each system has its own features — documented or other-
wise — that you can use to improve performance, but at a price. The feature you
are using might not be supported in future releases, your company might migrate
Saturday Morning70
124840-9 ch06.F 8/28/01 12:52 PM Page 70
to a totally different RDBMS. Your database would need to be amended at best or
redesigned from scratch at worst — a sobering thought. There is no substitute for
good design principles, which you must apply with a full understanding of what
the results will be.
REVIEW
¼
Every SQL Server 2000 installation comes with predefined system databases
containing all the information about your server. This installation also
includes two sample databases, Northwind and Pubs, that you can use to
study relational-database concepts.
¼
Once you start building your own database you should follow the rules of
relational-database design. Each table in your database should go through
the normalization procedure to at least the second normal form.
¼
Never use non-relational paradigms such as flat files and spreadsheets
when designing a relational database.
QUIZ YOURSELF
1. How many system databases are installed with SQL Server 2000?
2. What is the purpose of the Master database?
3. What serves as a template for each database created in SQL Server?
4. How does TempDB differ from every other database in SQL Server — either
system or custom?
5. What is a normalization process?
6. What is a normal form?
7. What are some of the problems inherent in flat-file design?
Session 6—SQL Server Databases 71
Part II—Saturday Morning
Session 6
124840-9 ch06.F 8/28/01 12:52 PM Page 71
124840-9 ch06.F 8/28/01 12:52 PM Page 72
Session Checklist
✔
Creating a new database in SQL Server 2000
✔
Modifying database and transaction-log properties
✔
Deleting a database
N
ow that you know your way around the sample databases Northwind and
Pubs, you can start storing and managing your own data. This session will
teach you how to create, modify, and delete a database with the Create
Database Wizard. I’ll explain the most common options and some of the considera-
tions involved in selecting them. Successfully creating and manipulating database
properties is the foundation of success with SQL Server.
Creating a New Database in SQL Server 2000
SQL Server 2000 gives you three ways to create your very own custom database:
¼
The Database Wizard visual interface — This is the best method for
beginning database users. The Database Wizard provides step-by-step guid-
ance with a short explanation of every step.
SESSION
Creating and Using a
Custom Database
7
134840-9 ch07.F 8/28/01 12:52 PM Page 73
¼
The Databases node (right-click menu option New Database) — This is a
visual interface for more experienced users that combines all the Database
Wizard steps on one screen. It also enables you to make use of the more
advanced option settings, such as collation order.
¼
Direct Transact SQL commands — This method is for advanced users and
those creating databases through a command-line connection; it will be
covered in Session 9, once you’ve mastered Transact-SQL basics.
These three methods are essentially the same, as behind the
scenes your Database Wizard builds and executes the T-SQL
statements that create your database.
There are at least two major components of each database: the data component
(which includes database objects like rules, roles, stored procedures, and so on)
and the transaction-log component. As I mentioned before, in SQL Server 2000 a
database is physically stored in separate non-shared files — one (or more) for the
data (default extension .mdf), and one (or more) for the transaction log (default
extension .ldf). The database can span several files; by convention, the extension
of the primary file is .mdf and that of each secondary data file is .ndf. These files
are exactly the same as any Windows file and are treated as such by the operating
system.
You can give your database file any extension you want, though
adhering to conventional standards reduces confusion and makes
file management easier.
Let’s create a database using the Database Wizard interface. You can access it
from the Enterprise Manager Tools ➪ Wizards menu.
1. Select Create Database Wizard and click OK. The first screen explains the
steps you’re going to take to create your database. Click OK.
2. The second screen prompts you to specify a name for your database as
well as a location for the files for your primary database file and transac-
tion log. Click Next to continue.
If you leave the default Unrestricted file growth option selected,
SQL Server will enlarge your database file as necessary automati-
cally. It’s a good idea to stick with the default values until you
have a little more experience in creating databases, but keep in
mind that unrestricted file growth can affect your system’s
performance.
Tip
Tip
Note
Saturday Morning74
134840-9 ch07.F 8/28/01 12:52 PM Page 74
3. The next screen prompts you to name your database file. By default SQL
Server will name your database file <your database name>_Data.mdf and
will name your transaction-log file <your database name>_Log.ldf. You
can change the name of the file to whatever you want. By default, also,
the initial size of these files will be 1MB; change this value to something
in line with your expected database size.
If you want all new databases in your SQL Server System to pos-
sess certain properties (such as initial size or data type), you
may specify these properties in your Model database and every
custom database you subsequently create will inherit it. (After
you are through with the database-creation process, try modify-
ing your Model database, setting its database size to 10MB and
its log to 2MB and recreating your custom database, to see how
this affects the new database properties.)
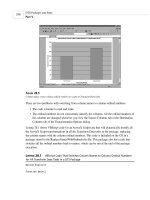
4. Now it is time to specify some properties of your yet-to-be-created data-
base (see Figure 7-1). I recommend leaving the Automatically grow the
database files option selected. The last option on this screen deals with
the file-growth restriction: If you choose to restrict file growth, the file
will grow only until it reaches a specified limit. This is an important
option because unrestricted file growth can potentially chew up all your
hard-drive space. Click Next.
One of my pet peeves is the option to increase file size by per-
cents. Doing this can result in your running out of space, as you
have no control over the number of megabytes allocated once the
maximum capacity is reached. If your database occupies 1GB, a
10 percent increase means an increase of 100MB to accommo-
date only 1MB of new data. Specifying growth in megabytes gives
you greater control over space usage. It is also a good idea to
specify the maximum possible size for the transaction log so it
does not fill up quickly.
5. Essentially, you repeat the same operations for your new database trans-
action log: choosing the name and initial size. In selecting the initial size
(and in using the file-growth option on the next screen) the rule of
thumb is to keep log size at approximately 25 percent of data-file size.
Click Next.
6. The same considerations for Step 4 apply to the option selection for this
step. Click Next.
Tip
Tip
Session 7—Creating and Using a Custom Database 75
Part II—Saturday Morning
Session 7
134840-9 ch07.F 8/28/01 12:52 PM Page 75
Figure 7-1
Set your database properties.
7. Now you see a summary screen displaying all the options you selected in
the previous steps. It’s a good idea to go through this summary and make
sure that the options specified are the ones you want. You can still go
back and change them or cancel the whole operation.
After you click Finish, SQL Server will create your database, which you will be
able to see on your Enterprise Manager console under the Databases node. If you
used the wizard interface, SQL Server will prompt you to create a database mainte-
nance plan; while it is a very good idea to have one, the topic of maintenance
plans is beyond the scope of this session and will be covered in Sessions 21, 26,
and 27.
Most of the time SQL Server will succeed. If SQL Server is unable
to create your database it will display an error message and an
error code you can use to find a more detailed explanation in
Books Online (for example, SQL Server displays the error message
“There is not enough disk space” and the error code 112 if you
attempt to create a 100GB database on a 20GB hard drive).
Note
Saturday Morning76
134840-9 ch07.F 8/28/01 12:52 PM Page 76
If you followed me through this session you should have a brand new database
showing under the Databases node on your Enterprise Manager console. Let’s take
a closer look at all the objects that make up your database.
You can create a database simply by issuing a Transact-SQL com-
mand from the SQL Query Analyzer window:
create database
<database_name>
. The size and all the properties will be the
same as those of the Model database, and the default file
names will be the same as those that appear in Step 3 of the
Create Database Wizard: <database_name>_Data.mdf and
<database_name>_Log.ldf. The files will be physically located in
the default directory of your SQL Server installation under that
name.
At this point all you have is an empty shell ready to be filled with your data-
base content. It contains 19 system tables, roles, and user(s) inherited from the
Model database. I will show you how to add your own tables, views, rules, and
stored procedures in Sessions 9, 11, and 16.
Modifying Database and Transaction Log Properties
You can examine (and modify) the properties of your newly created database by
locating the database in your SQL Server Manager console under the Databases
node and selecting the Properties option. You’ll see a screen like the one shown in
Figure 7-2.
There are six tabs on this screen. The first tab, General, displays some informa-
tion about your database, such as free space and time of last backup. This informa-
tion is for display only — you cannot modify anything from here. The next tab,
Data Files, combines steps 3 and 4 of the Create Database Wizard. Here you can
increase allocated space and change file-growth properties.
You cannot decrease the size of either the database file or
transaction-log file to be less than its initial size when created.
The Transaction Log tab gives you access to the same options as the Data Files
tab, only for transaction-log files.
Note
Note
Session 7—Creating and Using a Custom Database 77
Part II—Saturday Morning
Session 7
134840-9 ch07.F 8/28/01 12:52 PM Page 77
Figure 7-2
Adjust your database properties.
The Filegroups tab displays information about the filegroup a data file belongs
to. By default all data files are placed into the PRIMARY group. The idea behind
filegroups is to improve performance for large databases (usually over 1GB); sec-
ondary files can be placed on different servers and have access to additional
resources there.
The Options tab is probably the most important. Here you can restrict access to
the database so that only members of a specific group have access, or put the
database in single-user mode, thus denying access to anyone but you (which can
be useful for troubleshooting).
These options are for advanced users. You should familiarize
yourself with the concepts involved before attempting to modify
any of them. I recommend that you at least finish this book first.
Note
Saturday Morning78
134840-9 ch07.F 8/28/01 12:52 PM Page 78
The Recovery option enables you to specify how you intend to recover your
database in case of corruption, data loss, server crash, or some other unforeseen
disaster. Later, in Sessions 21 and 27, I will explain what your choices are and how
to choose the one that’s best for you. For now, I recommend leaving the default
setting, which is Full. The remaining eight options in the Settings group of the
Options tab require more than a basic understanding and you will be better off if
you leave them intact for the moment.
SQL Server 2000 provides four levels of compatibility with previous versions of
SQL Server. The default is obviously SQL Server 2000 itself (level 80); there are also
levels 70, 65, and 60, each representing a major version of SQL Server. The compat-
ibility levels are provided to ensure that legacy applications can still use the data-
base or be ported to it from the previous versions without much hassle. Unless you
are planning on using legacy databases, I recommend leaving this option at its
default, which is SQL Server 2000 itself.
The last tab on the screen, Permissions, enables you to control the use of your
database. With it you can restrict rights to create a table or view, or rights to per-
form database backup. I cover Permissions in more detail in Session 28.
Once you’ve changed any of the settings described above, you need to click OK
to finalize the change.
Deleting a Database
Selecting the database node from the Enterprise Manager console and choosing
Delete from the right-click menu deletes the database and corresponding log files.
You will be asked whether you want to delete the backup and restore the database
history; unless you really need this information for future reference, answer yes to
remove it. You do not have to restart SQL Server after deleting a database. SQL
Server removes data files, transaction-log files, and all database objects (such as
tables, rules, and so forth).
You can also drop a database by issuing a Transact-SQL command from the SQL
Query Analyzer (covered in Session 9):
drop database <database name>[, n]
You have to be in the context of the Master database to execute the query
(make sure that the combo box on the Query Analyzer toolbar reads Master); make
sure that you are not currently viewing the database you want to delete in the
Enterprise Manager and that no clients are connected to it, as you cannot delete a
database that is in use. You must also have sufficient permissions in order to drop
Session 7—Creating and Using a Custom Database 79
Part II—Saturday Morning
Session 7
134840-9 ch07.F 8/28/01 12:52 PM Page 79
a database — you must be a member of the sysadmin or dbcreator group. You can
drop multiple databases with the same command by specifying a comma-delimited
list of the database names from the Query Analyzer window.
No system database — meaning Master, Msdb, Model, or
TempDB — can be dropped; SQL Server effectively prevents it
from happening. Hacking your way around this protection is not
recommended.
Be absolutely sure about your decision to delete: all your data will be lost, and
you will only be able to restore it if you performed a full backup immediately prior
to deleting.
REVIEW
¼
The Create Database Wizard makes creating a custom database much easier
by guiding you step by step through the whole process.
¼
You can modify any custom database in a number of ways or drop it alto-
gether.
¼
Modifying database properties through the Database Properties window is
relatively easy but requires a thorough understanding of SQL Server.
QUIZ YOURSELF
1. What are the three ways of creating a database with SQL Server 2000?
2. Do databases behave in different ways if they are created differently?
3. What is a transaction log? Why do you need one?
4. Why would you want to allow a database file to automatically increase in
size?
5. What is the default compatibility level for SQL Server 2000?
Note
Saturday Morning80
134840-9 ch07.F 8/28/01 12:52 PM Page 80
Session Checklist
✔
Learning about Transact-SQL
✔
Using the SELECT keyword
✔
Working with JOIN and UNION keywords
✔
Using the INSERT, UPDATE, and DELETE keywords
✔
Knowing about additional Transact-SQL keywords and functions
T
his session will introduce you to the basic concepts of Transact-SQL, with an
emphasis on obtaining immediate results. You’ll learn the fundamentals of
data manipulation and running SQL queries, as well as how to use built-in
functions and operators.
Learning about Transact SQL
Now it is time to take a closer look at the heart of Microsoft SQL Server —
Transact-SQL (or T-SQL). I mentioned in Session 5 that T-SQL is a dialect of the
standard ANSI SQL supported both by Microsoft and Sybase. It is a programming
SESSION
Transact-SQL
Programming Language
8
144840-9 ch08.F 8/28/01 12:52 PM Page 81
language used exclusively for communicating with RDBMSes. Though many dialects
exist, they all are required to comply with at least entry-level ANSI SQL guidelines.
T-SQL is a third-generation procedural language and, as such, is lacking all the
features of the object-oriented programming model found in more advanced lan-
guages (such as C++, Java, and Visual Basic). T-SQL is all about data and how to
manipulate them; unlike other programming languages, you cannot use it to cre-
ate stand-alone programs — its statements can only be understood and executed in
the context of SQL Server. T-SQL statements can be executed directly through the
Query Analyzer utility, passed from the command line, or submitted to SQL Server
via a custom client application. T-SQL was designed specifically for querying and
modifying data in relational databases, and that is what it does best.
T-SQL keywords also include built-in functions like COUNT (which
returns a number of records) or AVG (which calculates the aver-
age for a particular field). One of the new features of SQL Server
2000 is the ability to define your own custom functions, thus
expanding the T-SQL vocabulary.
All T-SQL keywords are grouped into four categories:
¼
Data Definition Language (DDL) — Contains keywords dealing with
defining database structures — creating a table or index, or dropping or
modifying various objects within SQL Server.
¼
Data Manipulation Language (DML) — Contains keywords for manipulat-
ing data.
¼
Data Query Language (DQL) — Contains one keyword — SELECT — that is
used to compose queries that extract data from the SQL database.
¼
Data Control Language (DCL) — Contains keywords controlling access to
the database objects.
This session is concerned primarily with the DML and DQL groups.
Using the SELECT Keyword
In previous sessions, you learned about the two sample databases supplied with
Microsoft SQL Server 2000 — Pubs and Northwind. Now, it’s time to use the data
that these databases contain.
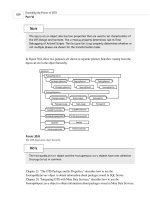
Suppose you want to get a list of all authors from the Authors table in the Pubs
database, as shown in Figure 8-1.
Note
Saturday Morning82
144840-9 ch08.F 8/28/01 12:52 PM Page 82
Figure 8-1
View the Authors table from the Pubs database.
The T-SQL command you would use looks like this:
SELECT * FROM authors
Except for the asterisk (
*
) — which stands for “every single field in the
table”—this command looks a lot like a plain English statement. If you run this
statement from the Query Analyzer window, you will see a result set containing all
23 rows in the Authors table and all fields in each row. The result set (sometimes
called the recordset) represents a virtual copy of the Authors table.
If you know the structure of the table you are querying, you can be more
specific:
SELECT au_fname, au_fname, phone from Authors
The query will partition the underlying table vertically, returning a subset of
the 23 Authors records — namely the author’s first name, last name, and phone
number — and leaving out all other fields.
But while it is useful for producing lists of records, you will sometimes need the
SELECT statement to be more precise, more specific. What if the table contains mil-
lions of records? To filter through the records, to partition the table horizontally,
you can use the WHERE clause.
The syntax of the WHERE clause is very intuitive. Suppose that you want a list
of all the authors living in the state of California. The following is the statement
that will return the first name, last name, and phone number of every author in
the database who lives in California. This query returns only 15 records out of 23
present in the table, as shown in Figure 8-2.
SELECT au_fname, au_fname, phone, state from Authors WHERE
state = ‘CA’
Session 8—Transact-SQL Programming Language 83
Part II—Saturday Morning
Session 8
144840-9 ch08.F 8/28/01 12:52 PM Page 83
Figure 8-2
Records returned from the Authors table.
Let’s be even more selective. Here is the query that returns one record only:
SELECT au_fname, au_lname , phone, state from Authors WHERE
state = ‘CA’
AND au_fname = ‘Cheryl’
Of course, if you have more than one Cheryl in your database, and all of them
happen to live in California, T-SQL will return more than one record. As you can
see, issuing very selective commands requires a thorough knowledge of the table
structure.
If you happen to have a table that contains duplicate records, T-SQL enables
you to filter them with a DISTINCT keyword: T-SQL will return only the first occur-
rence of the record, ignoring the rest, as in the following example:
SELECT DISCTINCT au_fname, au_lname , phone, state from
Authors
WHERE state = ‘CA’ AND au_fname = ‘Cheryl’
So far you’ve learned query basics: the SELECT statement, the FROM clause, the
WHERE clause, and the AND clause; you also learned that
*
means “all fields in the
table,” and that if you request specific fields, you must separate them from each
other with commas. The following query will select information about all authors
in the Pubs database living either in California or in Utah:
SELECT au_fname, au_lname , phone, state from Authors WHERE
state = ‘CA’
OR state = ‘UT’
What if you do not know what state Cheryl Carson lives in? You can combine
several modifiers, such as AND and OR, in the same query.
Saturday Morning84
144840-9 ch08.F 8/28/01 12:52 PM Page 84