Microsoft SQL Server 2000 Weekend Crash Course phần 6 pptx
Bạn đang xem bản rút gọn của tài liệu. Xem và tải ngay bản đầy đủ của tài liệu tại đây (449.17 KB, 41 trang )
¼
Read committed — Allows the transaction to see the data after they are
committed by any previous transactions. This is the default isolation level
for SQL Server 2000.
¼
Repeatable read — Ensures just that: Reading can be repeated.
¼
Serializable — The highest possible level of isolation, wherein transactions
are completely isolated from one another.
Table 16-1 outlines the behavior exhibited by transactions at the different levels
of isolation.
Table 16-1
Data Availability at Different Isolation Levels
Isolation Level Dirty Read Non-Repeatable Read Phantom Read
Read uncommitted Yes Yes Yes
Read committed No Yes Yes
Repeatable read No No Yes
Serializable No No No
Dirty read refers to the ability to read records that are being modified; since the
data are in the process of being changed, dirty reading may result in unpredictable
results.
Phantom read refers to the ability to “see” records that have already been
deleted by another transaction.
When designing transactions keep them as short as possible, as
they consume valuable system resources.
Introducing SQL Server Locks
Locking is there to protect you. It is highly unlikely that you have the luxury of
being the only user of your database. It is usually a case of tens, hundreds, or — in
case of the Internet — thousands of concurrent users trying to read or modify the
data, sometimes exactly the same data. If not for locking, your database would
quickly lose its integrity.
Tip
Session 16—Understanding Transactions and Locks 183
Part III—Saturday Afternoon
Session 16
244840-9 ch16.F 8/28/01 12:54 PM Page 183
Consider a scenario wherein two transactions are working on the same record. If
locking is not used the final results will be unpredictable, because data written by
one user can be overwritten or even deleted by another user.
Fortunately, SQL Server automatically applies locking when certain types of
T-SQL operations are performed. SQL Server offers two types of locking control:
optimistic concurrency and pessimistic concurrency.
Use optimistic concurrency when the data being used by one process are
unlikely to be modified by another. Only when an attempt to change the data is
made will you be notified about any possible conflicts, and your process will then
have to reread the data and submit changes again.
Use pessimistic concurrency if you want to leave nothing to chance. The
resource — a record or table — is locked for the duration of a transaction and can-
not be used by anyone else (the notable exception being during a deadlocking sit-
uation, which I discuss in greater detail later in this session).
By default, SQL Server uses pessimistic concurrency to lock
records. Optimistic concurrency can be requested by a client
application, or you can request it when opening a cursor inside a
T-SQL batch or stored procedure.
Exploring Lock Types
The following basic types of locks are available with SQL Server:
¼
Shared locks — Enable users to read data but not to make modifications.
¼
Update locks — Prevent deadlocking (discussed later in this session).
¼
Exclusive locks — Allow no sharing; the resource under an exclusive lock
is unavailable to any other transaction or process.
¼
Schema locks — Used when table-data definition is about to change — for
example, when a column is added to or removed from the table.
¼
Bulk update locks — A special type of lock used during bulk-copy opera-
tions (Bulk-copy operations are discussed in Session 17).
Usually SQL Server will either decide what type of lock to use or go through the
lock-escalation process, whichever its internal logic deems appropriate.
Note
Saturday Afternoon184
244840-9 ch16.F 8/28/01 12:54 PM Page 184
Lock escalation converts fine-grained locks into more coarsely
grained locks (for example, from row-level locking to table-level
locking) so the lock will use fewer system resources.
You can override SQL Server’s judgment by applying lock hints within your T-SQL
batch or stored procedure. For example, if you know for sure that the data are not
going to be changed by any other transaction, you can speed up operation by speci-
fying the NOLOCK hint:
SELECT account_value FROM savings WITH (NOLOCK)
Other useful hints include ROWLOCK, which locks the data at row
level (as opposed to at the level of a full table), and HOLDLOCK,
which instructs SQL Server to keep a lock on the resource until
the transaction is completed, even if the data are no longer
required. Use lock hints judiciously because: they can speed your
server up or slow it down, or even stall it. Use coarse-grained
locks as much as possible, as fine-grained locks consume more
resources.
Another option you may want to consider when dealing with locks is setting
the LOCK_TIMEOUT parameter. When this parameter is set the lock is released after
a certain amount of time has passed, instead of being held indefinitely. This set-
ting applies to the entire connection on which the T-SQL statements are being
executed. The following statement instructs SQL Server to release its lock after
100 milliseconds:
SET LOCK_TIMEOUT 100
You can check the current timeout with the system function @@LOCK_TIMEOUT.
Dealing with Deadlocks
Strictly speaking, deadlocks are not RDBMS-specific; they can occur on any system
wherein multiple processes are trying to get a hold of the same resources.
In the case of SQL Server, deadlocks usually look like this: One transaction holds
an exclusive lock on Table1 and needs to lock Table2 to complete processing;
Tip
Note
Session 16—Understanding Transactions and Locks 185
Part III—Saturday Afternoon
Session 16
244840-9 ch16.F 8/28/01 12:54 PM Page 185
another transaction has an exclusive lock on Table2 and needs to lock Table1 to
complete. Neither transaction can get the resource it needs, and neither can be
rolled back or committed. This is a classic deadlock situation.
SQL Server periodically scans all the processes for a deadlock condition. Once a
deadlock is detected, SQL Server does not allow it to continue ad infinitum and
usually resolves it by arbitrarily killing one of the processes; the victim transaction
is rolled back. A process can volunteer to be a deadlock victim by having its
DEADLOCK_PRIORITY parameter set to LOW: the client process usually does this
and subsequently traps and handles the error 1205 returned by SQL Server.
Deadlocks should not be ignored. The usual reason for deadlocks is a poorly
designed stored procedure or poorly designed client application code, although
sometimes the reason is an inefficient database design. Any deadlock error should
prompt you to examine the potential source.
The general guidelines for avoiding deadlocks, as recommended by Microsoft, are
as follows:
¼
Access objects in the same order — In the previous example, if both
transactions try to obtain a lock on Table1 and then on Table2, they are
simply blocked; after the first transaction is committed or rolled back, the
second gains access. If the first transaction accesses Table1 and then
Table2, and the second transaction simultaneously accesses Table2 and
then Table1, a deadlock is guaranteed.
¼
Avoid user interaction in transactions — Accept all parameters before
starting a transaction; a query runs much faster than any user interaction.
¼
Keep transactions short and in one batch — The shorter the transaction
the lesser the chance that it will find itself in a deadlock situation.
¼
Use a low isolation level — In other words, when you need access to only
one record on a table, there is no need to lock the whole table. If the read
committed is acceptable, do not use the much more expensive serializable.
REVIEW
¼
Transactions are T-SQL statements executed as a single unit. All the
changes made during a transaction are either committed or rolled back. A
database is never left in an inconsistent state.
¼
ACID criteria are applied to every transaction.
¼
Transactions can either be implicit or explicit. SQL statements that modify
data in the table are using implicit transactions by default.
Saturday Afternoon186
244840-9 ch16.F 8/28/01 12:54 PM Page 186
¼
Distributed transactions execute over several servers and databases. They
need a Distributed Transaction Coordinator (DTC) in order to execute.
¼
Isolation levels refer to the visibility of the changes made by one transac-
tion to all other transactions running on the system.
¼
A transaction can place several types of locks on the resource. Locks are
expensive in terms of system resources and should be used with caution.
¼
Avoid deadlock situations by designing your transactions carefully.
QUIZ YOURSELF
1. What does the acronym ACID stand for?
2. What are two possible outcomes of a transaction?
3. What is the difference between explicit and implicit transactions?
4. What SQL Server component do distributed transactions require in order
to run?
5. What are the four isolation levels supported by SQL Server 2000?
6. What are the two forms of concurrency locking offered by SQL Server 2000?
7. What is a deadlock?
Session 16—Understanding Transactions and Locks 187
Part III—Saturday Afternoon
Session 16
244840-9 ch16.F 8/28/01 12:54 PM Page 187
1. How does a stored procedure differ from a T-SQL batch?
2. Where is a stored procedure stored?
3. What is the scope of the stored procedure?
4. What is the scope of the @@ERROR system function?
5. What is a nested stored procedure?
6. What are the advantages and disadvantages of using stored procedures?
7. How is a trigger different from a stored procedure? From a T-SQL batch?
8. What events can a trigger respond to?
9. What are the two virtual tables SQL Server maintains for triggers?
10. What does the INSTEAD OF trigger do?
11. What is a SQL Server cursor?
12. What are the four different cursor types?
13. What is concurrency and how does it apply to cursors?
14. What is an index in the context of SQL Server?
15. What is the difference between a clustered and a non-clustered index?
16. How many clustered indices can you define for one table? Non-clustered?
17. Would it be a good idea to create an index on a table that always con-
tains 10 records? Why or why not?
18. What columns would you use for a non-clustered index?
19. What are the four types of integrity?
20. What types of integrity are enforced by a foreign-key constraint?
PART
#
PART
Saturday
Afternoon
III
254840-9 pr3.F 8/28/01 12:54 PM Page 188
21. When can you add the CHECK constraint to a table?
22. In order for a RULE to be functional what do you need to do after it is
created?
23. What is a NULL in SQL Server? How does it differ from zero?
24. What is a transaction?
25. What do the letters in the acronym ACID stand for?
26. What are explicit and implicit transactions?
27. What are the two types of concurrency?
28. What are the four isolation levels?
29. What is locking escalation? When does it occur?
30. What is a deadlock? How do you avoid deadlocks?
Part III—Saturday Afternoon Part Review 189
254840-9 pr3.F 8/28/01 12:54 PM Page 189
PART
Saturday
Evening
IV
Session 17
Data Transformation Services
Session 18
SQL Server Backup
Session 19
SQL Server Replication
Session 20
User Management
264840-9 po4.F 8/28/01 12:54 PM Page 190
Session Checklist
✔
Learning about Data Transformation Services
✔
Importing and exporting data through DTS
✔
Maintaining DTS packages
✔
Using the Bulk Copy command-line utility
T
his session deals with SQL server mechanisms for moving data among differ-
ent, sometimes heterogeneous data sources. Data Transformation Services
provide you with a powerful interface that is flexible enough to transform
data while moving them.
Introducing Data Transformation Services
Data Transformation Services (DTS) were introduced in SQL Server 7.0 and
improved in the current version of SQL Server 2000. They were designed to move
data among different SQL Servers (especially those with different code pages,
SESSION
Data Transformation Services
17
274840-9 ch17.F 8/28/01 12:54 PM Page 191
collation orders, locale settings, and so on), to move data among different data-
base systems (for example, between ORACLE and SQL Server), and even to extract
data from non-relational data sources (such as text files and Excel spreadsheets).
The DTS components installed with SQL Server are DTS wizards and support tools.
The important part of Data Transformation Services is the database drivers — small
programs designed to provide an interface with a specific data source, such as an
ASCII text file or Access database. These drivers come as OLE DB providers (the lat-
est Microsoft database interface) and Open Database Connectivity (ODBC) drivers.
The basic unit of work for DTS is a DTS package. A DTS package is an object
under SQL Server 2000 that contains all the information about the following:
¼
Data sources and destinations
¼
Tasks intended for the data
¼
Workflow procedures for managing tasks
¼
Data-transformation procedures between the source and the destination as
needed
SQL Server 2000 provides you with DTS wizards to help you create packages for
importing and exporting the data, and with DTS Designer to help you develop and
maintain the packages.
You can also use DTS to transfer database objects, create programmable objects,
and explore the full advantages of ActiveX components (COM objects).
Importing and Exporting Data through DTS
Creating a DTS package can be a daunting task. I recommend that you stick to the
basics for now and explore DTS’s more advanced features once you’ve gained some
experience.
To create a simple DTS Export package using the DTS Import/Export Wizard, fol-
low these steps:
1. Select DTS Export Wizard from the Tools ➪ Wizards menu.
You can access the DTS Import/Export Wizard in several different
ways. You can choose Start ➪ Program Files ➪ Microsoft SQL
Server ➪ Import and Export Data; you can go to the Enterprise
Manager Console, right-click on the Data Transformation Services
node, and choose All Tasks; or you can even enter dtswiz from
the prompt on the command line.
Tip
Saturday Evening192
274840-9 ch17.F 8/28/01 12:54 PM Page 192
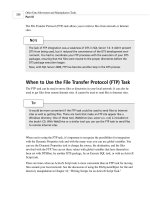
Let’s say you want to export data from your SQL Server into a plain
comma-delimited file. Figure 17-1 shows the screen after the one that
greets you into the Import/Export Wizard. The dialog prompts you to
select the data source, authentication (security mode for establishing a
connection to this source), and database (since your data source is
RDBMS in this case).
Figure 17-1
Selecting a data source.
2. Select your local server (you can use this wizard to import or export data
from any server you have access to on your network) and the Pubs data-
base. Click Next.
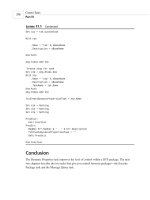
3. The next screen (shown in Figure 17-2) prompts you to select a destina-
tion. Initially, it will be almost identical to the screen shown in Figure
17-1. The specifics of the screen you see depend on the data source you
selected. Select Text File as a data source (your screen should now look
Session 17—Data Transformation Services 193
Part IV—Saturday Evening
Session 17
274840-9 ch17.F 8/28/01 12:54 PM Page 193
exactly like the one shown in Figure 17-2) and enter the name of the file
in which you wish to save the data. You can browse for a specific file or
type in the name and the absolute path. Click Next.
Figure 17-2
Selecting a destination for the data.
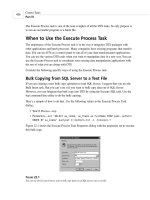
From the screen you see in Figure 17-3 you can either export a single
table or specify a T-SQL query of which the results will be saved into the
specified file. Of course, choosing to export data into a file prevents you
from transferring database objects like indexes, constraints, and such;
only data and data structure will be exported.
4. Specify the Authors table as the one you want to export, and then select
the destination file format — (ANSI or UNICODE), the row delimiter, the
column delimiter, and the text qualifier. You also can decide whether or
not the first row will represent column names for the exported table. The
default column mapping (which you can change in the Transformation
dialog) will be that of the source: that is, the au_id column of the source
will be mapped to the au_id column of the destination.
Saturday Evening194
274840-9 ch17.F 8/28/01 12:54 PM Page 194
Figure 17-3
Specifying the format of the data in the destination file.
The Transform button takes you to a screen wherein you can specify addi-
tional data transformation for each column being exported. For example,
you can specify that every number be converted into a string of type var-
char, or instruct the package to ignore columns or to export them under a
different name. You can also apply an ActiveX script — usually written in
VBScript — to implement more complex transformation rules. Transform is
an advanced feature and deserves a book of its own: Here I just mention
its existence and encourage you to explore it — carefully. Click Next.
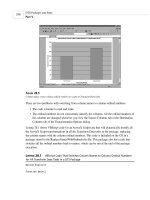
5. From the dialog shown in Figure 17-4 you can select whether you want to
run this package immediately or schedule it for future (possibly recur-
rent) execution. You can also save the package here if you wish. The Save
option is probably the most confusing one: It takes advantage of SQL
Server’s ability to preserve the script in a variety of formats. The impor-
tant point to remember here is that saving with SQL Server or SQL Server
Metadata Services saves the package as an object inside the SQL Server,
while the two other options (Structured Storage File and Visual Basic File)
Session 17—Data Transformation Services 195
Part IV—Saturday Evening
Session 17
274840-9 ch17.F 8/28/01 12:54 PM Page 195
save the package outside it. If you are familiar with Visual Basic you may
want to look into the contents of a file saved as a Visual Basic module to
see what is really happening behind the scenes.
Figure 17-4
Saving and scheduling the package.
Using Meta Data Services is beyond the scope of this book. This
is an advanced topic, which involves tracing the lineage of a par-
ticular package and cataloging the metadata of the databases
referenced in the package.
6. If you schedule the package it will also be automatically saved. Let’s say
you wish to save the package with SQL Server and run it immediately.
Click Next.
7. The next screen will prompt you for the name and description of the pack-
age you are about to create. Select some descriptive name: As you accumu-
late a number of packages they might help you maintain your sanity. You
also may choose to protect your package from unauthorized use with pass-
words: one for the owner, one for the user (the owner can modify the
Note
Saturday Evening196
274840-9 ch17.F 8/28/01 12:54 PM Page 196
package while the user can only run it). Scheduling a recurring task is
self-explanatory: The options enable you to schedule the execution daily,
weekly, or monthly. You can schedule multiple executions within one day,
and specify the start and expiration date.
8. The last screen will present a summary of all your choices. From here you
still can go back and change your selections. When you click Finish, SQL
Server will save your package and then run it. If you followed all the
steps properly and the export was successful, you should receive the fol-
lowing message: “Successfully copied 1 table(s) from Microsoft SQL Server
to Flat File.”
You can open the resulting file in Notepad or Microsoft Excel and
view the way in which the exported data were saved.
Following similar steps you may move the data among various data sources. The
import procedure is very similar to the export procedure.
Maintaining DTS Packages
Once a package has been created you can modify it, extend its functionality, add
and delete packages, and so on. To edit a data package you use the DTS Designer.
This tool enables you to visually design new packages and modify existing ones.
The interface (shown in Figure 17-5) borrows heavily from other Microsoft Visual
Studio tools. Tasks and connections are represented by small icons in the toolbox;
you assemble a package by dragging the icons and dropping them into the designer
pane, where they are treated as objects. Once you have done this you can right-
click an object and select the Properties option to customize it.
The DTS Designer tries to hide as much complexity as possible from you.
However, if you plan to use it for anything but trivial tasks, you’ll need an under-
standing of the process as well as some experience.
All local packages are assembled under the Local Packages node
of Data Transformation Services.
If you open the package you just created in this session (select the pop-up
menu option Design Package), you’ll see that it is represented by two connection
Note
Tip
Session 17—Data Transformation Services 197
Part IV—Saturday Evening
Session 17
274840-9 ch17.F 8/28/01 12:54 PM Page 197
objects — one SQL Server (source) and one flat file (destination). Examining their
properties will reveal all the specifications you made during the creation process.
The fat arrow pointing from the source to the destination is also an object — a
Task object. Its properties maintain all the transformation procedures, data
description, and such; it is quite enlightening to explore its five-tab property
sheet (available from the right-click menu).
Figure 17-5
Exploring DTS Designer.
Designing and modifying the package requires intimate knowledge of the
processes and data involved as well as some basic programming skills. Until
you acquire these, I recommend using the simpler (though just as powerful)
Import /Export Wizard interface.
Using the Bulk Copy Command-Line Utility
In the dawning era of SQL Server, the Bulk Copy Program (BCP) was the one and
only tool to use to get data in and out of the SQL Server database. The tradition
Saturday Evening198
274840-9 ch17.F 8/28/01 12:54 PM Page 198
continues virtually unchanged. The BCP utility is included with every SQL Server
installation. It is best used for importing data from a flat file into SQL Server, and
exporting data from SQL Server into a flat file.
This program uses the low-level DB-Lib interface of SQL Server (the one that C
programmers use to code their client programs); for SQL Server 7.0 and 2000 it
uses ODBC (Open Database Connectivity). As a result it is extremely fast and effi-
cient. Its main drawback is rigid, arcane, unforgiving syntax. It is also gives you
relatively few options for transferring data between heterogeneous data sources.
The basic syntax for BCP is as follows:
Bcp pubs authors out authors.txt –c –U sa –P password
This essentially means “Export data from the Authors table in the Pubs database
into a flat file named authors.txt, the user ID is -sa and the password is password.”
The parameter -c specifies that data will be exported to a non–SQL Server destina-
tion (ASCII file).
To import data with BCP, use this syntax:
Bcp pubs authors in authors.txt –c –U sa –P password
When you’re importing data with BCP constraints will be enforced, though trig-
gers will not be fired.
Command-line arguments for BCP are case-sensitive: -c and -C
represent different parameters.
BCP supports three different modes of data format:
¼
Character mode (-c) is used for importing from or exporting to an ASCII text.
¼
Native mode (-n) is a SQL Server proprietary binary format; it is used when
both the source and the destination are SQL Server databases.
¼
Wide mode (-w) is used for importing from or exporting to a UNICODE text.
You can incorporate BCP commands into MS-DOS batch files or
VBScript files (extension .vbs, executed in Windows Scripting
Host) to create powerful data import/export procedures. You also
can schedule the execution of these procedures with the
NT/Windows 2000 at service.
Tip
Note
Session 17—Data Transformation Services 199
Part IV—Saturday Evening
Session 17
274840-9 ch17.F 8/28/01 12:54 PM Page 199
BCP supports about 40 different parameters and switches, and as you find your-
self more involved with DBA daily routines you will decide for yourself which ones
you find most useful. Please refer to Books Online for the full list of these switches
and their uses.
One of the important parameters to use with BCP is a
compatibility-level switch. When you’re importing into
SQL Server 7.0/2000 data that were exported in a native
format out of an earlier version of SQL Server, this switch tells
BCP to use compatible data types so the data will be readable.
To make the data compatible set the -6 switch.
REVIEW
¼
Data Transformation Services (DTS) is a powerful mechanism for moving
data and objects in and out of different data sources .
¼
The easiest way to create and schedule DTS packages is through the
Import/Export Wizard.
¼
You can maintain, modify, and enhance a DTS package using DTS Designer,
a visual-development environment provided by SQL Server.
¼
The BCP utility is a small legacy utility that enables you to import and
export data to and from SQL Server and some other data sources.
QUIZ YOURSELF
1. What are two methods of importing and exporting data with SQL Server?
2. What can be transferred using Data Transformation Services?
3. What are acceptable destinations for data being transferred from SQL
Server?
4. How can you transform data while transferring it from the source?
5. What is BCP and what can you use it for?
6. How can you schedule a BCP import/export execution?
Tip
Saturday Evening200
274840-9 ch17.F 8/28/01 12:54 PM Page 200
Session Checklist
✔
Implementing backup and recovery planning
✔
Using different backup strategies
✔
Selecting a recovery mode
✔
Restoring a database
✔
Managing backups
I
n this session I’ll discuss the SQL Server backup and recovery procedures. You
will learn about the different backup methods, the various recovery models,
and how to create, perform, and restore a backup.
Implementing Backup and Recovery Planning
Before you can begin to set up a backup procedure, you need to determine which
databases need to be backed up, how often they should be backed up, and more.
You should consider the following questions when creating a plan:
SESSION
SQL Server Backup
18
284840-9 ch18.F 8/28/01 12:54 PM Page 201
¼
What type of database are you backing up? User databases will need to
be backed up frequently, while the system database will not. The master
database will only need to be backed up after a database is created, con-
figuration values are changed, or any other activity is performed that
changes this database. If the master database becomes corrupt the whole
server ceases to function.
¼
How important is the data? A development database may be backed up
weekly, while a production database should be backed up at least daily.
¼
How often are changes made to the database? The frequency of change
will determine the frequency of backups. If the database is read-only there
is no reason to back it up frequently. A database that is updated con-
stantly should be backed up much more often.
¼
How much downtime is acceptable? Mission-critical databases will have
to be up and running almost immediately. In these cases you need to back
up to disk rather than to tape. You may even have to use multiple backup
devices.
¼
What are your off-peak hours? The best time to back up is when data-
base usage is low. This will allow the backup to complete in the shortest
time possible. You must always schedule your backups carefully.
Using Different Backup Strategies
When backing up a database you will need to use a variety of techniques to ensure
a full and valid database recovery in the event of a failure.
The basic types of backups include the following:
¼
Complete database backup — Backs up the entire database, including all
objects, system tables, and data. The backup also incorporates all changes
logged to the transaction log up to the time of completion of the backup.
This ensures that you can recover the complete state of the data up to the
time the backup finishes.
¼
Differential backup — Backs up all data that have changed since the last
complete backup. This kind of backup runs much faster than a full backup.
Saturday Evening202
284840-9 ch18.F 8/28/01 12:54 PM Page 202
You can use a differential backup only in conjunction with a full backup,
and it is not allowed on the Master database.
¼
Transaction-log backups — When you back up a transaction log, the
backup contains the changes that have occurred since the last transaction-
log backup. After completion the log is flushed of all transactions. This
type of backup records the state of the transaction log when it starts,
unlike the two previous backups, which record the state of the log when
they end.
¼
File and file-group backup — Enables you to back up specific database
files and file groups rather than the entire database.
Complete database backups
The easiest way to perform a backup is to go through the Backup Wizard and fol-
low these steps:
1. Select Enterprise Manager Tools ➪ Wizards. Then, from the Management
node on the general wizards menu, select Backup Wizard.
The welcome screen describes the steps you are about to be guided
through. Click Next.
2. Choose a database to back up from the drop-down combo box. Only data-
bases managed by this instance of Enterprise Manager will appear there.
Select a database and click Next.
3. You are prompted for the name and description of your yet-to-be-created
backup. You will need this name down the road in order to manage your
backups. Specify the requested information and click Next.
On this screen (shown in Figure 18-1) you need to select the type of
backup you wish to perform. Click Next.
This screen (shown in Figure 18-2) requires further explanation. If you
have a tape device installed, by all means use it; this is the most common
way to preserve frequent backups. The second choice is a file; select it
and the backup will be saved on your drive — local or remote.
Session 18—SQL Server Backup 203
Part IV—Saturday Evening
Session 18
284840-9 ch18.F 8/28/01 12:54 PM Page 203
Figure 18-1
Selecting backup type.
4. Next you must choose a backup device. In its simplest form a backup
device is a structured storage file stored on your hard drive or tape; the
only difference between it and a backup file is that while organizing
devices, inside it you may create a logical device to be referred to. The
device has a name under which SQL Server knows it: By this name SQL
Server stores information about the physical location of the backup
device. It is much easier to keep track of Employees_Backup than it is to
keep track of C:\dir1\dir2\dir3\emp1.bak. If you have no devices defined
for the system, select New Backup Device from the drop-down Backup
Device combo box; you will be prompted to create a new device.
Alternatively, you can create a new backup device from the Enterprise
Manager console Management/Backup node.
The Properties area of the screen shown in Figure 18-2 asks you how you
wish to handle your sequential backups. If a backup already exists you
can either overwrite it or append it to the existing file. Your choice
depends on your business needs, considerations presented earlier in the
Saturday Evening204
284840-9 ch18.F 8/28/01 12:54 PM Page 204
section “Implementing Backup and Recovery Planning,” the amount of
free space you have, and so on. Also, make sure to check Read and Verify
Data Integrity of Backup After Backup; this will ensure that your backup
is valid and readable. Click Next.
Figure 18-2
Setting backup properties.
5. If you have chosen to overwrite the backup media option, the next
screen will prompt you for media initialization. You may choose to keep
the old option (this is the default) or re-initialize. Click Next.
If you selected Append To the Backup Media from the screen shown in
Figure 18-2, this option also appears after you click Next and come to the
screen you see in Figure 18-3. Here you can to check the Media Set
option (otherwise a backup may be written into the wrong place), and to
schedule a backup to be performed periodically. The Backup Set
Expiration option will be enabled if you selected Overwrite the backup
media from the screen shown in Figure 18-2. Click Next.
Session 18—SQL Server Backup 205
Part IV—Saturday Evening
Session 18
284840-9 ch18.F 8/28/01 12:54 PM Page 205
Figure 18-3
Verifying and scheduling backup.
6. The last screen will present you with a summary of the steps you took.
Click Finish to start your backup. If you scheduled this backup it will be
performed periodically and will appear under the Jobs node of SQL Server
Agent in your Enterprise Management console.
The Backup Wizard does the job for you by creating Transact-SQL statements
behind the scenes. If you feel adventurous you can examine these statements or
perform a backup manually. The following code creates a logical device called
Pubs_Backup on the disk (hard drive) and performs a full backup on it.
EXECUTE sp_addumpdevice ‘disk’, ‘Pubs_BackUP’, DISK =’C:\Program
Files\Microsoft SQL Server\MSSQL\BACKUP\PubsBackup.dat’
Back up the full Pubs database.
BACKUP DATABASE Pubs TO Pubs_BackUP’
The full syntax for creating and executing a backup can be quite intimidating
if you specify all the options. Please refer to SQL Server Books Online for this
information.
Saturday Evening206
284840-9 ch18.F 8/28/01 12:54 PM Page 206
You also can perform a backup by selecting a database node in
the Enterprise Manager console, and selecting All Tasks and then
Backup from its right-click menu.
Differential backup
A differential backup records all changes to the database since the last database
backup. These are smaller and faster than full database backups and can therefore
be run more frequently. You need to have performed at least one full backup
before you can run a differential one. The steps for performing a differential
backup with the Backup Wizard are essentially the same as those for performing a
full backup: Just select the Differential database option on the screen shown in
Figure 18-1.
Transaction-log backup
A transaction-log backup contains a sequential record of all transactions since the
last differential or database backup. These enable you to recover the database up
to an exact point in time (that is, up to the last time you performed a transaction-
log backup). These backups generally use fewer resources than the previous types
of backups and should be run the most frequently.
You can run a transaction-log backup or schedule it to run by selecting
Transaction log from the screen shown in Figure 18-1 during the process of creat-
ing a backup with the Backup Wizard.
By having different transaction-log and database backups you
can recover to a specific point in time (that is, you can restore
the database to its state a day, week, or year ago).
Selecting a Recovery Mode
The recovery model is a database property. It defines the method you wish to use
when recovering your database; depending on the mode you select, different
amounts of information will be preserved for each backup. When a database is cre-
ated it follows the default simple-recovery model; the other two choices are full
recovery and bulk-logged recovery.
Tip
Note
Session 18—SQL Server Backup 207
Part IV—Saturday Evening
Session 18
284840-9 ch18.F 8/28/01 12:54 PM Page 207