filemaker pro 11 the missing manual phần 9 pps
Bạn đang xem bản rút gọn của tài liệu. Xem và tải ngay bản đầy đủ của tài liệu tại đây (1.7 MB, 91 trang )
704
FM P : T M M
Putting a Complex
Script Together
Putting a Complex Script Together
Building a complicated script takes time and planning. Because scripting gives you
so much flexibility, you often have many ways to solve the same problem. Your job
is to find the way that best meets your business needs and is the simplest to under-
stand, fix and maintain later. As your skills grow, the approach you take to solving
problems will change.
In this section, you’ll make a script that generates an invoice for a job. You want to
gather all the unbilled expenses and timeslips for the job, and then add the appropri-
ate line items to the invoice. To make a script like this, you need to cover all your
bases:
• Planning. Before you even start writing the script, you have to decide upon a
general approach. Outline all the things your script will do, and in what order.
This process usually evolves from the general to the specific. The most specific
version is the script itself, where you tell FileMaker exactly what to do.
• Exceptions. What kinds of things can go wrong? Think about how you’ll check
for errors and prevent problems.
• Efficiency. Are you doing the same things several places in the script? Are there
other reasons to break your script into multiple smaller scripts?
Note: The rest of this chapter is one long exercise. Here, you’ll get a chance to put theoretical concepts
to practical use. Since each section builds on the one before it, this complex script is best digested if you
work straight through from here to the end—without skipping parts or jumping around. And while you
may not need this exact process in your real life databases, the techniques you’ll learn are applicable to
any complex scripting situations.
Planning the Script
Planning a big script is usually an iterative process. You start by outlining the steps
the script will take in very general terms. You then go in and fill in more and more
detail with each pass. When you’re done adding detail, you know exactly what steps
your script will use. Using the invoicing script as an example, you’ll see how File-
Maker gives you the tools to plan and execute your new script.
You can do this planning on paper, or in a word processor, or with any other tool you
choose. But one good place you may not think of is the script itself. Since the plan-
ning process involves a series of steps, and since it naturally produces the finished
script when it’s done, make notes with comment script steps. As you work, replace
a comment line with real script steps, and perhaps more comments explaining the
process. That way, you never get lost or forget essential steps because you always
have a comment to tell you what you still need to add, and where it should go. When
you’re done, the script is written and commented for posterity.
705
:
Putting a Complex
Script Together
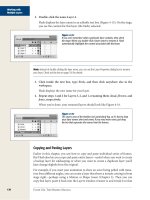
For this script, take a look at the script shown in Figure 16-17. To save you time, it’s
already created for you in the sample database for this chapter (Invoice START.fp7).
Figure 16-17:
This first draft of your
script doesn’t do any-
thing yet. It’s just a se-
ries of comments that
map out, at the most
general level, what
the script is going to
do. You’ll add more
and more details as
you go. Since these
comments are place-
holders for the real
steps and comments
you’ll build, each
one starts with the
word TODO. Use any
marker you want, as
long as you can easily
tell these placeholder
comments apart from
the real comments
you’ll add later.
Considering Exceptions
One of the most critical steps in script writing—planning for exceptions—is often
forgotten. But the old saw “A stitch in time saves nine” truly applies to scripting.
Spend a few minutes at the beginning of the process thinking ahead to what might
go wrong and planning how to prevent problems. These few minutes can save you
hours of troubleshooting and repair work on your data later.
Look at what your script is supposed to do and try to think of reasonable exceptions—
situations where your script might not be able to do its job. Thinking of exceptions
is important for two reasons:
• If your script always assumes ideal circumstances, it can wreak havoc if your
assumptions are wrong when it runs. The last thing you need is a wild script
running amok in your data, changing and deleting the wrong things.
• If a script gets halfway through its job, and then discovers that it can’t continue,
you may be left with half-finished work. It’s usually best to look for the problems
up front, so the script can simply refuse to run if it won’t be able to finish. (For
more detail, see the box on page 707.)
706
FM P : T M M
Putting a Complex
Script Together
For example, the Invoice creation script may run into two potential problems:
• How does the script know which job to create an invoice for? This problem is
easy to solve: Make the script available only through a button on the Job layout.
That way, people can run the script only from the right context. In other words,
the script always runs on the job record the user is looking at. Make a comment
at the top of your script that reminds you how the script is run.
• What if the job has no timeslips or expenses that haven’t been billed? You wind
up with an invoice that has no line items, and you don’t want to send that to
your customer nor do you want that laying around in your database. You can go
ahead and create the invoice, and then delete it if it’s empty. But this approach
uses up an invoice number, and it means your script has to go through all the
work of creating an invoice only to throw it away when it’s done. Instead, have
the script check first to be sure there’s something to bill. Then it can display an
informative message and skip all the hard work when there’s nothing to bill.
Figure 16-18 shows how to edit your script to take these two problems into account.
Figure 16-18:
Your first pass at edit-
ing the script shows
where you’ll put the
test that determines
whether an invoice
needs to be created.
And since you want to
show the user a mes-
sage if no invoice is
made, add the Show
Custom Dialog script
step to the If part of
the test.
• The If step doesn’t need a fully realized test yet. Put a commented calculation
(page 381) as your test for now, just to remind yourself what needs to be tested.
You can put the real test in later.
• Add feedback by putting a custom dialog step in the true part of the If step.
If you don’t give feedback here, the person using the database may become con-
fused, since nothing happens when he clicks the button to create an invoice for
the job. The dialog box should explain why FileMaker isn’t creating an invoice.
707
:
Putting a Complex
Script Together
• Add an Else step. Since you don’t want to create an invoice if there aren’t any
billable items for the job, put an Else step after the Show Custom Dialog step
and put the remaining TODO items in the Else part of the If test. The End If
step should be at the end of the script.
UP TO SPEED
The Problem with Problems
Although detecting problems up front is usually best, it isn’t
always possible. Sometimes you can’t find out about prob-
lems until your script has run partway through.
Most database systems handle this problem with some-
thing called a transaction, a chunk of work that’s held in
limbo until you tell the database to make it permanent. In
a nutshell, you open a transaction, and you then can do
anything you want, but your changes don’t get saved until
you commit the record. If you decide you don’t want the
changes after all, you can undo the transaction.
FileMaker uses this transaction concept under the hood to
handle record changes, but unfortunately you have no easy
way to tap into the transaction system from a script. Here’s
why: When you first enter a record—using the Open Re-
cords/Requests script step, for instance—FileMaker begins
a transaction for you. When you exit the record—Commit
Records/Requests—FileMaker commits the transaction,
writing all changes to the database. If you revert the record
instead—Revert Record/Request—FileMaker essentially rolls
back the transaction, leaving the database untouched. Just
remember that each transaction is linked to a record. For
example, you can’t begin a transaction, then make changes
to five different customer records and eleven invoices, and
then roll back all those changes—you can only roll back
the last one.
But if you create, edit, or delete records in portal rows
while you’re still in the record, all your changes happen in
one transaction.
Try this exercise in the Invoices file to explore how the
transaction works. Have two windows open (Choose
Windows➝New Window)—one showing the Invoice lay-
out and the other showing the Line Items layout. Create
a new invoice record and add a few line items. Notice that
FileMaker creates the new line item records when you add
items to the Line Item portal on the Invoice layout. Being
very careful not to commit the record (that is, don’t hit the
Enter key or click anywhere outside the fields onto your lay-
out), choose Records➝Revert Record. The parent invoice
record disappears, and all the child line items disappear,
too. You’ve just witnessed FileMaker’s version of transactions.
Knowing this, you can use the Open Record/Request script
step on an invoice record, and then make changes to doz-
ens of line items. Then if your script detects a problem,
you can revert the invoice record, and toss out all your
line item changes as well. If you absolutely, positively must
have control over your transactions, arrange your scripts so
they do everything through relationships from one single
record.
Creating Subscripts
Now that you’ve figured out how to solve problems your script might encounter,
you’ve come to a fork in the road. You can write a script containing all the necessary
steps, but it’ll be long and hard to follow. For example, the End If steps at the end of
the script will be a long way from their If and Else counterparts, making it hard to
figure out where they belong. The script will be easier to read if you break it up into
smaller, more manageable pieces.
708
FM P : T M M
Putting a Complex
Script Together
When you’re trying to decide whether to write one long script or several shorter
ones, you might consider a few other things. If you have several small scripts, you
can run any one of them individually. This method gives you the chance to try out
parts of the script to see if they work properly. Also, since you can pass errors, or
script results (page 684) to scripts via script parameters (page 686), using subscripts
to do some jobs often saves you the trouble later on. But in the end, either approach
is perfectly valid. Some people really like short, simple scripts, even if it means more
of them. Others prefer to put everything controlling a single process into the same
script, no matter how long the script gets.
Creating subscript placeholders
For this example, you’ll be creating subscripts. Use the comment steps you wrote
earlier to figure out what subscripts you’ll need. Then you can create placeholders
for them by putting Perform Script steps underneath the appropriate comments.
Figure 16-19 shows a repeat of your script-in-progress with places for subscripts
clearly identified.
Each of these scripts is relatively short and easy to understand, but you’ll have five
scripts in all. (See the box on page 711 for some tips for breaking up long scripts into
subscripts.)
Figure 16-19:
Each empty Perform
Script step marks a
place for a subscript
you’ll create later. The
first subscript will find
the unbilled expenses
and timeslips; the
second will create the
new invoice record
that’s related to the
job; the third will
loop through all the
timeslips and add the
necessary line items;
the fourth will do the
same thing for each
expense.
709
:
Putting a Complex
Script Together
Creating skeleton subscripts
Next, you’ll create all the subscripts you need—but that doesn’t mean writing them
all yet. You just need to create scripts in the Manage Scripts window, and then make
some placeholder comments to remind you what they should do.
Start by adding a new script called Find Unbilled Activity. You can see the Find Un-
billed Activity script in its planning stage form in Figure 16-20.
Figure 16-20:
You’ll create the Find
Unbilled Activity
subscript first. Since
a subscript is just
another script, ap-
proach it like you did
the “Create Invoice
for Job” script: Start
with a plan. You’ll
come back later and
implement the actual
script steps.
Note: Since the script you’re building actually consists of several connected scripts, you can use a folder
to keep things organized. Just click the little triangle by the New button in the Manage Scripts window,
choose Folder, and then give your folder a nice name like “Create Invoices.” Now you can keep the main
script and all its helper scripts in a tidy package.
Now create the comments for the Create Invoice Record subscript. Here are the
comments to help you remember the process when it’s time to flesh this script out:
• TODO: Switch to the Invoice layout.
• TODO: Create a new invoice record that’s related to the current Job.
• TODO: Return to the original layout.
• TODO: Send script results to the parent script.
710
FM P : T M M
Putting a Complex
Script Together
The Process Expenses and Process Timeslips scripts are almost exactly the same.
The context is different, because the data is in different tables and the data each
script moves is different. But the process you’ll use to find and process totals is very
similar, so your comments notes can be the same for now. You’ll create the custom
pieces for each script in later exercises. Create those two subscripts shown now. Here
are the comments you need to write for the Process Timeslips subscript:
• TODO: Check to see if there are unprocessed timeslip records.
• TODO: Make an Invoice Line Item record related to the new invoice.
• TODO: Loop through found records to gather total billable hours.
• TODO: Set the total in the new Invoices Line Item record.
Here are the comments for the Process Expenses subscript:
• TODO: Check to see if there are unprocessed expense records.
• TODO: Loop through found expense records.
• TODO: Make an Invoice Line Item record for each expense record.
These two processes are nearly the same, except they operate on different tables. To
get more practice in the following section, you’ll write each script from start to fin-
ish. But as you get more scripting experience, you may find that it makes sense to
write one script, test it thoroughly, and then when you’re sure it’s perfect, duplicate
the script and edit the steps appropriately for the second process.
To recap: In this section, you just created all four Perform Script steps in the Create
Invoice for Job script, and then you made four skeleton subscripts. In the real world,
you could create each Perform Script step, and then start writing the subscript while
you’re thinking about that specific process. You could even start with the last sub-
script and work your way backwards, if that makes sense to you. The order in which
you tackle the individual steps isn’t as important as finding a method that keeps you
from forgetting part of a process or getting steps out of sequence.
It’s also common to start out intending to write one long script, and then as it grows,
realize that you’ve got a set of steps that deserves its own subscript. Select and copy
the steps for the process (cut doesn’t work in the Edit Script dialog box, unfortunately),
create a new script, and then paste them into the subscript. Give the subscript a
descriptive name, and then save it. Back in the parent script, delete the steps you
moved to the new subscript, and then add a Perform Script step to call it. See the box
on page 711 to learn when a new subscript is called for.
Note: Now that all your skeleton subscripts are finished, you could go back to the main script and change
each empty Perform Script step to specify its proper subscript. But if you hook up each subscript as you
finish it, the main script serves as a To Do list. You can tell at a glance which scripts you’ve done and which
ones still need attention.
711
:
Putting a Complex
Script Together
UP TO SPEED
The Right Way to Create Subscripts
When you think about ways to break your script into smaller
pieces, you should be thinking about tasks. It makes good
sense to create a smaller script to do one of the tasks
needed in the larger script. It doesn’t make sense to sim-
ply take a long script and break it in two, so that the last
step in the first script simply performs the second script.
Breaking scripts up that way has all the disadvantages of
multiple scripts (more windows to work in, more scripts to
scroll through) and none of the advantages (neither script
is particularly simple or self-contained, and neither can be
run individually for testing purposes). Also, as you look for
places to use subscripts, look for opportunities for reuse. In
other words, look for things the script has to do more than
once in two different places. It almost always makes sense
to use a subscript in this situation.
In almost every case, the right way to subdivide a script
is to create one master script that starts and finishes the
process. The “Create Invoice for Job” script does just that. It
starts by finding unbilled line items, and finishes by show-
ing the invoice. Along the way, it relies on other simple
scripts to get the whole job done.
There’s no problem with a subscript having subscripts of its
own. In fact, subscripts often do. But you should structure
the entire set of scripts so that the top-level script imple-
ments the highest-level logic and behavior of the entire
script itself. Each subscript should, in turn, do some par-
ticular task from start to finish. If the task is particularly
complex, then the subscript itself might implement only it’s
highest level of logic, calling on more subscripts to handle
parts of the task. Since you’re in the habit of naming scripts
descriptively, each subscript’s name can provide nearly as
much information as a comment. When you complete the
“Create Invoice for Job” script, even though it’s somewhat
complex, you can easily follow its structure. The script al-
most reads like a book, describing exactly what it’s doing.
Finishing the Subscripts
You’ve created a series of subscripts that have placeholder comments to remind you
what process the script will perform. Now it’s time to finish each subscript and turn
them into working scripts by replacing those comments with real script steps.
The Find Unbilled Activity subscript
Before you leap into finishing this script, a short refresher about what you’re trying
to accomplish is in order. The Find Unbilled Activity subscript is the first step in the
“Create Invoice for Job” master script, which runs when a user clicks a button on
the Job layout. You’ll use a script parameter to send a Job ID to the subscript, so it
can find the right items. As the name says, it finds unbilled activity by searching the
Timeslips and Expenses tables for items related to this job.
The first TODO item inside the script is a cinch: Just use the “Go to Layout” script
step to switch to the appropriate layout. Next, for the current job, you need to find
expenses that don’t have a line item ID. You’ll use a combination of Enter Find [Re-
store], “Set Field with the Job ID” (from your script’s parameter), and Perform Find,
712
FM P : T M M
Putting a Complex
Script Together
to make sure you don’t get items that have already been billed. Then, the script will
count the found items so it can send that value back to the main script. Finally, you’ll
do the same thing for the Timeslips table.
1. In the Manage Scripts window, double-click the Find Unbilled Activity script
to edit it. Add the “Go to Layout” script step to the script.
If necessary, drag the “Go to Layout” step just below your first comment. Re-
member, if a script step is selected, any new step you create lands just below it.
2. In the “Go to Layout” Script Step Options area’s Specify pop-up menu, click
the layout popup menu, and then choose Layout to show the Specify Layout
window. Choose Expenses, and then click OK.
As always, context is one of the most important concepts in getting a process
right.
3. Add an Enter Find Mode script step after the Go to Layout step. Turn off the
Pause checkbox, and then turn on the “Specify find requests” option.
The Enter Find Mode script step appears in the step list, and then the Specify
Find Requests dialog box opens.
4. If any requests are showing in the list, click Delete until they’re all gone. Click
the New button.
The Edit Find Request window appears.
5. From the “Find records when” pop-up menu, choose Expenses, and then click
the Line Item ID field.
The selected field is now highlighted.
6. Click the Insert Operator button, and then choose “= match whole word (or
match empty)” from the resulting menu. Click the Add button. Click OK, and
then click OK again to get back to your script.
Just as the menu says, an equal sign, used alone, tells FileMaker you want re-
cords where the Line Item ID field matches nothing. These are all your expenses
that haven’t been billed.
7. Add the Set Field script step to the script, and then turn on the “Specify target
field” checkbox. Select the Expenses::Job ID field, and then click OK.
The step should appear after the Enter Find Mode step. If it doesn’t, move it
there now.
8. Click the Specify button to the right of “Calculated result.” In the calculation
box, type "==" & Get ( ScriptParameter ). Click OK.
This calculation puts the Job ID (from the script parameter) into the field, with
"==" before it, telling FileMaker you want to find records that match this ID
exactly. Added to the find request above, the script finds unbilled activity for
the current job.
713
:
Putting a Complex
Script Together
9. Add the Set Error Capture script step to the script, and then make sure its
“On” option is selected.
You’re about to perform a find, and you don’t want the database user to see an
error message if there are no unbilled expenses.
10. Add the Perform Find script step to the script.
The script step belongs below the Set Error Capture step. Make sure you don’t
select Perform Find/Replace by accident.
11. Add another copy of the Set Error Capture step to the script, this time with
the “Off” option selected.
You can select the existing Set Error Capture step, click the duplicate button,
then drag the new step into place, and then set the option to “Off.” Once the Per-
form Find step is finished, you want FileMaker to stop capturing error messages.
12. Add a Set Variable script step below Set Error Capture [Off]. Name the vari-
able $unbilledItems. Set its value to Get ( FoundCount ). Save the script.
Remember, you want to make sure you have unbilled items for this job before
you create an invoice. By grabbing this value now, and passing it to the main
script later on, the main script will have the information it needs to decide
whether to create an invoice.
Your script should now look like the one in Figure 16-21.
Figure 16-21:
The Find Unbilled
Activity script is half
done. You’ve got
helpful comments,
plus the steps to find
unbilled line items
that should be billed
to the job for which
you’re creating an
invoice. Refine your
script further by
removing the “TODO”
from your first com-
ment, so you can
see that it’s now an
explanation of what
should be happening,
instead of reminders
of what you still need
to do.
714
FM P : T M M
Putting a Complex
Script Together
Copying and editing existing script steps
Since the timeslips-half of the script is almost a duplication of what you did in the
last tutorial, you could repeat all those steps above and you’d be done. But it’s a lot
faster to duplicate those steps, and then make a few changes so that your duplicated
steps operate on the Timeslips table, not on the Expenses table. Here’s how:
1. Click the “Go to Layout” line in the script. With the Shift key held down, click
the Set Variable step, and then click Duplicate.
FileMaker creates an exact copy of all the selected steps. They all wind up below
the first set.
2. Move the “TODO: Find and count all unbilled timeslip records for the cur-
rent job” comment above the duplicated steps.
This helps you keep track of where you are in the process.
3. Select the “Go to Layout” script step, and then change it so it goes to Timeslips
instead of Expenses.
This time you want to work with Timeslips records, so you need to go to the
Timeslips layout.
4. Double-click the next step: Enter Find Mode. Double-click the find request in
the list. Change its criterion to search the Timeslips::Line Item ID field.
You’re changing the find request so that it searches for empty Line Item IDs in
the Timeslips table instead of in Expenses. The line in the criteria list changes to
show Timeslips::Line Item ID instead of Expenses::Line Item ID.
5. Click OK, click Change, and then OK again.
These two clicks close the Edit Find Request and Specify Find Requests win-
dows, respectively. You’re back in the script.
6. Double-click the next Set Field step, and then change the targeted field to
Timeslips:: Job ID instead of Expenses::Job ID.
Your Calculated result is just fine and so are the Set Error Capture and Perform
Find steps, so you skip ahead to the last step.
7. Select the second Set Variable step (the last non-comment step), and click the
Specify button. Change the value calculation to read: $unbilledItems + Get
( FoundCount ). Then click OK.
You don’t want to replace the value in the script variable, you want to add the
found count of timeslips to the existing found count of expenses.
8. Remove the “TODO:” from the timeslips comment.
When you start writing complex scripts, more comments are better. As you get
more experience, you may prefer to have fewer comments.
715
:
Putting a Complex
Script Together
9. After the last comment, add a “Go to Layout” step and set it to go to original
layout.
Once the script is done finding things, it needs to return to the layout it started
on so the script that ran this one won’t be surprised by a layout change. It’s usu-
ally best when a subscript puts things back the way they were when it started.
10. Add an Exit Script step at the end of the script. Click the Specify button, and
then type $unbilledItems in the calculation box. Save and then close the script.
You’re telling the subscript to pass the value in the $unbilledItems variable back
to the main script.
Whew! Finally, the Find Unbilled Activity script is finished. It should look like the
one in Figure 16-22.
Figure 16-22:
The completed “Find
Unbilled Activity”
subscript. It finds
and counts the
expenses, and then
does the same for
timeslips. This serves
two purposes in
the final process:
The $unbilledItems
variable helps the
“Create Invoice for
Job” script decide
whether it should cre-
ate an invoice or not,
and FileMaker uses
the found sets later to
create line items.
Note: Notice the highlighted comment at the top of the script. Some developers like to make a note at
the top of any script that uses a script parameter telling them what should be in the parameter. It can save
time later when you’re troubleshooting because you can use Script Debugger and the Data Viewer to
make sure the script parameter is being set and it contains the proper value.
716
FM P : T M M
Putting a Complex
Script Together
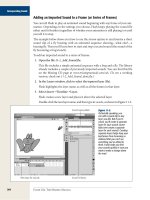
Adding a script parameter to a Perform Script step
You’ve just written a script that uses a script parameter containing a Job ID when it
finds unbilled timeslip and expense records. Now you have to make sure the script
gets the Job ID when it runs. The main script (“Create Invoice for Job”), will be run
by a button on the Job layout. You could set the Job ID in a script parameter on
that button (page 686), but since script parameters aren’t passed to subscripts, that
doesn’t help Find Unbilled Activity do its work. So you have to pass the Job ID to the
subscript when it’s run. You do that in the Perform Script step.
1. In the Manage Scripts window, double-click the “Create Invoice for Job” script
to edit it. Select the first Perform Script [<unknown>] step.
The Script Step Options area shows a Specify button.
2. Click Specify. Select the Find Unbilled Activity script. In the “Optional script
parameter” box, type Jobs::Job ID.
If you don’t like typing field names, click Edit instead, and then add the field in
the Specify Calculation window. Then, close the Specify Calculation window by
clicking OK. Leave the script itself open, though. You’ve still got information to
pass along in the next tutorial.
You’ve passed the Find Unbilled Items subscript a Job ID value. In turn, that sub-
script has a value to pass back to the Create Invoice for Job script about the number
of unbilled items it found.
Checking a subscript’s result
When you run a subscript, the main script often needs to know what happened
when the subscript was run. That’s why the Find Unbilled Items subscript set a script
result as its last step (page 684). But just as script parameters aren’t passed to sub-
scripts unless you specifically pass them in their Perform Script step, you have to
grab the subscript’s result so you can use it in the calling script. In this case, you’ll
put the subscript’s result into a variable, and then test the variable’s contents in the If
step you created back on page 706.
1. Add a Set Variable step below the first Perform Script set. Name the variable
$unbilledItems, and set its value to Get ( ScriptResult ).
This step completes the job of passing the variable’s value from the subscript up
to the main script.
2. Double-click the If test to edit it. Set its calculation to $unbilledItems = 0.
This tells the script to test the count of found items made by the subscript.
3. Save your script.
Now the script can find and count unbilled activities for the current job, and
then perform a test on the count so it can decide whether to create an invoice,
or tell the user that no invoice is necessary (Figure 16-23).
717
:
Putting a Complex
Script Together
Figure 16-23:
The main script now
has one completed
subscript with a script
parameter. It also
tests the subscript’s
results and branches
based on the value it
finds. The remaining
TODO comments
and Perform Script
[<unknown>] steps
give you a perfect
roadmap of the work
ahead.
Finishing the Create Invoice Record subscript
The Create Invoice Record script needs to switch to the Invoices layout, create a
new record, attach it to the job (by filling in its Job ID field), grab the new Invoice’s
ID, and then switch back to the original layout. And like the last subscript, this one
needs the Job ID in its script parameter, when you hook it up.
Since you’re used to removing the “TODO:” part of your existing comments and
placing the appropriate script steps just below them, the remaining tutorials in this
chapter will skip those instructions for simplicity’s sake. Now you’re ready to polish
off the Create Invoice Record script itself:
1. Double-click the Create Invoice Record script in the Manage Scripts window
to edit it.
The Edit Script window opens. You’ll replace your TODO comments with real
script steps now.
2. Add the “Go to Layout” script step at the top of the script. Set the step to go
to the Invoices layout.
You can’t add an invoice record from the Jobs layout, so you’re switching to a
layout attached to the Invoices table first.
718
FM P : T M M
Putting a Complex
Script Together
3. Add the New Record/Request step after the second comment step.
Keep it consistent: “real” steps go after the comments.
4. Add the Set Field step to the script. The target field is the Invoices::Job ID
field in the list, and the calculated result is Get ( ScriptParameter ).
You’re matching the new invoice to the Job ID. Of course this means you have to
pass the Job ID to the script when you run it from the parent script.
5. Add a Set Variable script step after the Set Field. Name the variable $invoiceId,
and then set its value to Invoices::Invoice ID.
You’re grabbing the new invoice’s ID now, while you’re still on the Invoice lay-
out, so you can put it in the line item records later.
6. Add the “Go to Layout” step to the script and choose “original layout” from
the Specify pop-up menu.
Subscripts should always return the database to its previous state, so the main
script doesn’t get lost in the wrong context.
7. Add an Exit Script step at the end of your script. Its result is $invoiceID. Save,
and then close the subscript.
Your script will look like Figure 16-24. Since you set the new invoice’s ID in a
local variable, you’ll pass it back to the main script with a script result.
Figure 16-24:
The finished Create
Invoice Record sub-
script has almost as
many comments as
it has working script
steps, yet its task is
relatively simple.
It makes a new
invoice record for a
specific job. But even
if you understand
the process perfectly,
it’s good to leave
comments intact.
Someone else who
doesn’t have your
experience may take
over the database
some day, and your
comments will serve
as a tutorial.
Now that the subscript is done, you have to call it from the parent script. You have to
pass the Job ID along to the subscript, and then you’ll need to grab the subscript’s result.
719
:
Putting a Complex
Script Together
1. In the “Create Invoice for Job” script, set the first Perform Script step under
the Else to run the Create Invoice Record subscript, with a script parameter
of Jobs::Job ID.
You’re passing the Job ID to the subscript, so it knows which job it’s creating an
invoice for.
2. Add a Set Variable script step below Perform Script [“Create Invoice Record”;
Parameter: Jobs::Job ID]. Name the variable $invoiceId, and then set its value
to Get ( ScriptResult ). Save the script.
The subscript will pass the ID for the invoice it’s just created back to the main
script so it can create related line items in the next subscripts.
Finishing the Process Timeslips subscript
Now you’ll tackle the subscript that processes your unbilled timeslips. This script
creates a line item record and puts the Line Item ID into the unbilled timeslip, so
it’s related to the line item record and won’t be found next time you run the script.
(Remember, your Find Unbilled Activity script looks for all timeslip and expense
records that don’t have a Line Item ID.) Then the script grabs the time worked from
the record, and then loops through the found set of unbilled timeslips and adds the
time worked from each record. After the last timeslip record is processed, the script
puts the time value in the line item record.
Most steps are variations on what you’ve been doing—switching layouts, doing If
tests, creating records, and setting data into records from variables. Working through
a found set of records requires a new scripting tool: the loop. To get ready to adapt
your script to a loop, use Figure 16-25 to create the basic process in your script.
Creating a looping script. A loop runs a set of script steps over and over again.
There’s an art to getting the right set of steps between the Loop and End Loop steps.
Most times, you have to do a little prep work to get the database ready to enter the
loop. Then inside the loop you put the steps that are repeated once for each record.
And you must always have a way for the loop to stop. In this case, since you’re work-
ing on a found set of records, you’ll use a “Go to Record” step that exits after the last
record (see page 444).
Here’s what to do:
1. Add a “Go to Layout” step below the Set Variable step. Specify Timeslips for
the target layout.
The script was just on the Line Items layout, so you need to make sure the loop
will happen in the proper context.
2. Add a “Go to Record/Request/Page” step below “Go to Layout”. Make sure
First is selected in the Specify pop-up menu.
You want to make sure your loop starts with the first record in your found set.
These first two steps are common preparation for starting a loop.
720
FM P : T M M
Putting a Complex
Script Together
Figure 16-25:
The Process Timeslips
subscript goes to the
Timeslips layout to
see if the Find Un-
billed Items subscript
found any records.
If the found count
contains records, the
script switches to the
Line Items layout and
makes a new record
with the Invoice ID
that’s passed via the
subscript’s parameter.
Finally, it puts the
new line item’s ID in
a variable so that you
can put the ID into
each timeslip record.
3. Add a Set Variable step below “Go to Record.” Name the variable $totalHours,
and then set its value to 0.
This variable will add up hours as it loops through the found set of timeslip
records.
4. Add a Loop step below the Set Variable step.
You also get a matching End Loop step. The next few script steps will go be-
tween this pair.
5. Add a Set Field step as the first step of your loop. The target field is Timeslips::
Line Item ID, and the calculated result is $lineItemId.
When you put a Line Item ID into a timeslip record, you’re relating the Line
Item and Timeslips table. With the right TOs, you can look at any timeslip re-
cord and see any line item related to it, and you can look at a line item record
and see any timeslip related to it. You’ll use this relationship later on to move
data without switching layouts.
6. Add a Set Variable step below the Set Field step. Name the variable $total-
Hours, and then set its value to $totalHours + Timeslips::Duration.
The script will add the hours worked on each timeslip record to the value that’s
already in the variable. On the first record, the variable will have 0 in it, so the
result of the first calculation will be the same as the duration. But every time
the loop runs again, the value in the variable will increment by the amount in
the current record.
721
:
Putting a Complex
Script Together
7. Add a “Go to Record/Request/Page” step after the Set Variable. Specify Next
in the pop-up menu, and then select the “Exit after last” option.
Now the script goes to the next record in the found set. It exits the loop auto-
matically after it performs the looped steps on the last record. The rest of your
script steps will go after the comment following the End Loop step.
8. Add a “Go to Layout” step below the End Loop step. Set it to go to the Line
Items layout.
You’re putting the data you gathered into your new line item record, so make
sure you’re back on the Line Item layout.
9. Add a Set Field step next. Set the target field to Line Items::Price Each, and
then set the calculated result to 50.
This step tells the line item record how much money to charge for each hour
worked. If your hourly rate changes, you’ll update this script step to reflect the
new rate.
10. Add a second Set Field step below the first one. Set the target field to Line
Items::Quantity, and then set the calculated result to $totalHours.
This step tells the line item record how many hours were worked on the job.
11. Add a third Set Field step below the second one. Set the target field to Line
Items::Description, and then set the calculated result to “Labor”. Edit your
TODO items, and then save the script.
Your time line items are labeled with static text describing the charge.
12. Add a Go to Layout step at the end of the script. Set it to go to the original
layout.
Your looping script is finished when it returns the parent script to its starting
point.
Your finished script should look like Figure 16-26. Now that you’re done, change the
main script’s Perform Script step to run the Process Timeslips subscript and set its
parameter to $invoiceID.
The Process Expenses subscript
Most of the lessons you learned in the Process Timeslips subscript apply to the Pro-
cess Expenses subscript, but there are some important differences. First, according
to your business rules, all labor is combined into one line item per invoice, and each
expense is billed separately. So the steps that create a new line item will fall inside
this script’s loop. Second, you’re gathering more bits of data for each expense, so the
steps that set data into Line Item fields are different from what you did for Timeslips.
But the overall process is still very similar. Here’s what to do:
722
FM P : T M M
Putting a Complex
Script Together
Figure 16-26:
Here’s how your
finished Process
Timeslips script looks
when you’re done.
The tutorial told you
how to prepare the
database to start the
loop, which steps
belong inside the
loop, and what steps
to take when the
loop was finished.
But in the real world,
a good technique
for writing a looping
script is to create it as
if it were working on
a single record. Then
when you’ve got it
working properly for
one record, you can
add the Loop and End
Loop steps to make
the process repeat.
1. Add a “Go to Layout” step to the top of your script. Set the target layout to
Expenses.
You need to be on a layout tied to the Expenses table so you can check to see if
any records need to be processed.
2. Add an If test and set its calculation to Get ( FoundCount ) > 0. Drag the End
If step down below your last comment placeholder.
The expense item processing steps shouldn’t run if there are no expenses for the
current job.
3. Add a “Go to Record/Request/Page” step after the If step. Set the “Go to Re-
cord” option to First.
You want to make sure the loop begins with the first record in the found set so
nothing gets missed.
4. Add a Loop step below the “Go to Record” step.
You’ll also get an End Loop step. Most of the rest of your script’s steps will go
between the Loop and End Loop steps.
723
:
Putting a Complex
Script Together
5. Add a Set Variable step as the first step in the loop. Name the variable
$description, and then set its value to Expenses::Expense.
You’re grabbing data to put into the new line item record you’ll be creating later
in this script.
6. Add a Set Variable step. Name the variable $amount, and then set its value to
Expenses::Amount.
Grab all the data you need from Expenses before you leave the layout.
7. Add a “Go to Layout” step. Set it to go to the Line Items layout.
The context has to be right to create your new record.
8. Add a New Record/Request step.
It doesn’t have any options.
9. Add a Set Field step. The target field is Line Items::Invoice ID and the calcu-
lated result is Get ( ScriptParameter).
You need to remember to set this script’s parameter when you hook it up to the
main script later.
10. Add a Set Field step. The target field is Line Items::Description and the calcu-
lated result is "Expense:" & $description.
You have to include the quote marks since you want the calculation to set the
static text Expense: into the field, and then add the contents of your $descrip-
tion variable.
11. Add a Set Field step. The target field is Line Items::Price Each and the calcu-
lated result is $amount.
The amount is how much you spent.
12. Add a Set Field step. The target field is Line Items::Quantity and the calcu-
lated result is 1.
Don’t include the quotes this time, since 1 is a number. You need the value so
your Extended Price can perform its math properly.
13. Add a Set Variable step. Name the variable $lineitemID, and set its value to
LineItems::Line Item ID.
You’re grabbing the Line Item ID now so you can put it into the expense record
next. This step creates the relationship between the Line Item and Expenses
tables, and it ensures that the next time you run the script, this same expense
record won’t be found again.
14. Add a “Go to Layout” step. Set it to go to the Expenses layout.
The script will return to the expense record it started the loop on.
724
FM P : T M M
Putting a Complex
Script Together
15. Add a Set Field step. The target is Expenses::Line Item ID and the calculated
result is $linteItemID.
The value in $lineItemID links the expense record to the Line Item record the
script just created.
16. Add a “Go to Record/Request/Page” step. Specify Next in the pop-up menu,
and then select the “Exit after last” option.
This step makes sure you’re working through the found set, and can get out of
the loop after the script has worked on the last record.
17. Add a “Go to Layout” step at the end of your script. Set it to go to “original
layout.” Edit your TODO comments, move them into place, and then save the
script.
Don’t get so caught up in the complexity of a script that you forget to make
helpful comments.
Compare your script with Figure 16-27. Now you can hook up the last Perform
Script step in the “Create Invoice for Job” script (don’t forget the $invoiceID script
parameter). Then add a Go to Layout [“Invoices” (Invoices)] step at the end to show
the new invoice. Finally, all five scripts are done! You’re ready to test the script.
Testing Scripts
To test your script, first go to a job record that has unbilled timeslips and expenses
(or create a new job record, plus new unbilled timeslips and expenses, if necessary).
Once you’re on the job record, run the “Create Invoice for Job” script. To make your
testing as much like the conditions your users will see, create a button for running
the script. In a flash, you should see a new invoice, properly assigned to the customer
and containing line items for each unbilled item.
Note: If the script doesn’t work, you have options. First, check your data to make sure you have appropri-
ate timeslips and expenses for the script to work on. Second, you can surf over to this book’s Missing CD
page at www.missingmanual.com/cds and compare your scripts to the ones in this chapter’s finished file.
But if you have FileMaker Pro Advanced, you should also read about the Script Debugger and Data Viewer
in Chapter 12. These tools can make hunting down script problems a breeze, and few serious scripters
work without them.
In this chapter, you walked through a lengthy task where the steps and outcome were
known. Out there on the mean streets of development, you won’t always have a road
map to follow. Still, the concepts of planning, exception handling, and efficiency will
get you out of a lot of sticky script situations.
Tip: And even if your database doesn’t handle invoicing, it’s very common to create related records and
move data via scripts so that you can retain control over data. Just adapt these scripts to meet your needs.
725
:
Putting a Complex
Script Together
Figure 16-27:
The finished Process
Expenses script looks
like this example.
These comments
are different from
the placeholder
comments you cre-
ated originally. Here
comments group
the script steps into
logical chunks so
it’s easier to see the
reason for all the
layout changes. If
you have to grab and
set more data from
the expense record
later on, it’ll be easy
to see where to grab
the new data from
and where it needs
to be set. Work out
your own system of
commenting scripts,
and then stick with it
consistently.
When you’re first scripting, or if you’re attempting to do something that you aren’t
quite sure will work, following a approach like the one you just learned will serve you
well. In addition to creating your scripts in comment and subscript form, you can
break scripting down even further. Create a few script steps, and then test them to
make sure they behave as you expect. If they don’t work properly, tweak them until
they do. Then add a few more script steps and test again. If a new problem arises, you
know it’s in the new steps you’ve just added.
Finally, don’t forget that the state of your database can influence what happens when
you test a script. For example, a button on the Jobs layout ensures that your users can
run only the “Create Invoice for Jobs” script from the proper context. But in the heat
of testing, you might accidentally run the script from the Manage Scripts window
while you’re on the wrong layout. If you do, the script won’t have a Job ID to work
with and all kinds of havoc will be loosed in the script: it won’t know which unbilled
items to search for and could create an Invoice that’s not attached to any job at all.
As you gain experience, you’ll find that planning, finding exceptions, and subscript-
ing becomes second nature. You’ll start envisioning scripts of increasing complexity,
and soon you’ll be making them your own way, without following a rigid plan.
726
FM P : T M M
Putting a Complex
Script Together
POWER USERS’ CLINIC
Referential Integrity
By now, it’s ingrained in your developer’s brain that rela-
tionships work because there’s a match between key fields
in the related tables. But what if you absolutely, positively
have to change the value in a key field? Say you inherit
a file that uses telephone numbers as key fields, and you
want to bring the database up to par by using a serial num-
ber field instead. You know it’ll break up relationships, be-
cause as soon as you change the value in the “one” side
of the relationship, all the “to-many” records are no longer
related to their parent records (or to any other record). In
other words, they’re orphaned.
If you changed the value in key fields manually, it’d be
fairly easy to figure out how to keep this from happening.
You use the existing relationship to find the child records,
change their keys, and only then, go back to the parent
record and change its key. The record family is reunited
and everybody’s happy.
Here’s a script that handles that grunt work for you:
Allow User Abort [Off]
Go to Layout [″Customers″ (Customers)]
Set Variable [$newID; Value:Customers::Ne
wCustomerID]
Go to Related Record [Show only re-
lated records; From table:″Jobs″; Using
layout:″Jobs″(Jobs)]
Loop
Set Field [Jobs::Customer ID; $newID]
Go to Record/Request/Page [Next; Exit af-
ter last]
End Loop
Go to Layout [″Customers″ (Customers)]
Set Field [Customers::Customer ID; $newID]
There’s some brainwork that this script doesn’t handle, like
making sure your NewCustomerID value is unique before
you use it. If you’re changing your key field value, it’s prob-
ably not a surrogate key (page 200), so you’ll have to know
how your business policy creates and insures unique key
values, and then apply that logic to your script. And you
need to ensure that each related record is unlocked and
available for your script to change (page 44). Using this
script as a foundation, add the logic you need in the appro-
priate spots. Work in a copy of your database until you get
all the kinks worked out, and then use the Import button
in the Manage Script dialog box to move the finished script
into your original file.
v
Part Five: Integration and
Security
Chapter 17: Sharing Your Database
Chapter 18: Adding Security
Chapter 19: Sharing Data with Other Systems