access 2003 in pictures phần 7 docx
Bạn đang xem bản rút gọn của tài liệu. Xem và tải ngay bản đầy đủ của tài liệu tại đây (561.39 KB, 22 trang )
WORKING WITH FORMS
130
3. Click-and-drag the box to line it up with the other boxes.
Then release the mouse button.
The form should now look like this:
4. Position the cursor over the move handle of the Address 2 label.
WORKING WITH FORMS
131
5. Drag the label to line it up with the other labels.
Then release the mouse button.
The form should now look like this:
WORKING WITH FORMS
132
6. On the Toolbar, click the icon.
The form should now look like this:
7. On the Toolbar, click the icon to return to Design View.
WORKING WITH FORMS
133
Adjust size of fields
1. Click the Address 1 box.
2. Press and hold down the SHIFT key, then click the Address 2
text box.
Both objects should be selected:
WORKING WITH FORMS
134
3. On the Menu Bar, click Format, then Size, then To Widest.
The form should now look like this:
WORKING WITH FORMS
135
Change caption
1. Double-click the Address 1 label.
The Properties window should appear:
Tip:
Access automatically creates names when something is
added to a form. Don’t worry if your computer has given the label
a name different from the one above.
WORKING WITH FORMS
136
2. Click the Format tab.
3. Click the Caption item to highlight it.
4. Type:
Street Address
then press ENTER.
WORKING WITH FORMS
137
5. On the Toolbar, click the icon.
The label should look like this:
6. On the Toolbar, click the icon to return to Form View.
WORKING WITH FORMS
138
Add/delete records
Add a new record
1. Click the button.
WORKING WITH FORMS
139
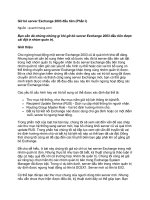
2. Fill in the following information:
Amy Preston
Preston Publishing
1214 North Ave.
Suite 118
Redmond, WA 98049
4255556113
4255557441
Tip:
Using the
TAB
key to move through the form doesn’t
access the field in the right sequence.
To correct this, click the
icon to enter Design View.
Then on the Menu Bar, click
View, then Tab Order
.
3. When the Tab Order window appears, click and drag the row
headers to place the fields in correct order.
WORKING WITH FORMS
140
The record should look like this:
4. Click the button to save the record and advance to a new
one.
WORKING WITH FORMS
141
Delete records
1. Click the button to go back to record number 9, the one you
just added.
2. On the Toolbar, click the icon.
3. When the alert window appears, click the button.
WORKING WITH FORMS
142
Edit records
Navigate to a specific record number
1. Click in the Current Record box.
2. Highlight the current record number, then type:
2
3. Press the ENTER key.
The form should now show record number 2:
WORKING WITH FORMS
143
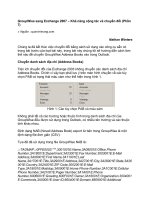
Edit data in a record
1. Delete the contents of the Street Address field.
2. Type:
476 New York Ave.
WORKING WITH FORMS
144
3. Press the TAB key.
The record should look like this:
WORKING WITH FORMS
145
Find records
1. Click the button.
2. Click in the Company Name box to place the cursor there.
3. On the Toolbar, click the icon.
WORKING WITH FORMS
146
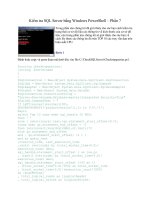
4. When the Find and Replace window appears, type:
Metro-Corp
in the Find What box.
5. Click the button.
The window should look like this:
WORKING WITH FORMS
147
6. Click the button.
WORKING WITH FORMS
148
Filter records
1. Click in the State box.
WORKING WITH FORMS
149
2. On the Toolbar, click the icon.
The form should now look like this:
Tip:
Notice the number of records now reads
1 of 1 (Filtered).
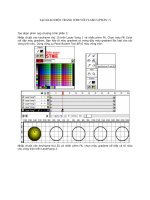
3. On the Toolbar, click the icon.
4. On the menu bar, click File, then Close.
When the Alert window appears, click the button.
WORKING WITH FORMS
150
The database window should now look like this:
5. On the Menu Bar, click File, then Exit to close Access.
WORKING WITH QUERIES
151
Working with Queries
In this section, you’ll learn how to:
• Create queries
• Sort results
• Add criteria
• Employ Boolean operators
• Find duplicate records
• Create Update queries
• Create Delete queries