access 2003 in pictures phần 10 pot
Bạn đang xem bản rút gọn của tài liệu. Xem và tải ngay bản đầy đủ của tài liệu tại đây (753.78 KB, 30 trang )
WORKING WITH REPORTS
196
Format reports
1. Open a web browser and go to:
www.inpics.net/books/acc2003
2. Right-click the FoodStore2.mdb link and save that database in
the Practice Access Files folder.
3. Close the web browser and start Access.
4. On the Toolbar, click the icon.
WORKING WITH REPORTS
197
5. Navigate to the Practice Access Files folder, then click
FoodStore2.mdb.
6. Click the button.
WORKING WITH REPORTS
198
7. Click the button in the database window.
The FoodStore2 database should look like this:
8. In the Objects list, click Reports.
WORKING WITH REPORTS
199
9. Double-click Customer Orders.
The Customer Orders report should look like this:
WORKING WITH REPORTS
200
10. Click the icon.
The report’s Design View should look like this:
WORKING WITH REPORTS
201
Edit label captions
1. Click the label with the caption Orders.
2. Click the label again.
Now the label can be edited.
WORKING WITH REPORTS
202
3. Edit the label to read Customer Orders.
Then press ENTER.
4. Click the CustomerID label in the Customer ID Header section.
5. Click it again.
WORKING WITH REPORTS
203
6. Edit the label to read Customer Name:
Then press ENTER.
It should look like this:
WORKING WITH REPORTS
204
7. Click the icon.
The report should look like this:
WORKING WITH REPORTS
205
8. Click on the report.
The view should zoom in:
WORKING WITH REPORTS
206
Change font size
1. Click the icon.
2. Place the cursor in the vertical ruler bar beside the Customer
Name label.
WORKING WITH REPORTS
207
3. Click the mouse button, then drag the cursor to just above the
Order ID Header section.
Release the mouse button.
Everything in the Customer ID Header section should be
selected:
WORKING WITH REPORTS
208
4. On the Formatting toolbar, click the down arrow next to the Font
Size box.
When the list appears, click 10.
The report should now look like this:
WORKING WITH REPORTS
209
5. Click the icon, then click on the report to zoom out.
The report should now look like this:
WORKING WITH REPORTS
210
Set page margins
1. On the Menu Bar, click File, then Page Setup.
WORKING WITH REPORTS
211
2. When the Page Setup window appears, type:
0.5
in the Top box, and
0.5
in the Bottom box.
Then click the button.
WORKING WITH REPORTS
212
The report should now look like this:
3. On the Menu Bar, click File, then Close.
4. When the alert window appears, click the button.
WORKING WITH REPORTS
213
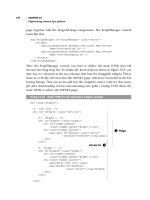
Create mailing labels
1. On the toolbar, click the icon.
2. When the New Report window appears, click Label Wizard.
WORKING WITH REPORTS
214
3. In the drop down list, click the Customers table.
Then click the button.
WORKING WITH REPORTS
215
4. In the Filter by manufacturer box, click Avery.
5. In the list of labels, under Product number, click Avery USA
5160.
WORKING WITH REPORTS
216
6. Click the button.
7. Click the button again.
WORKING WITH REPORTS
217
8. In the Available Fields list, double-click First Name.
9. Press the SPACE bar on the keyboard.
10. Double-click Last Name, then press the ENTER key.
The label window should look like this:
WORKING WITH REPORTS
218
11. Double-click Company Name, then press ENTER.
It should look like this:
12. Double-click Street Address, then press the ENTER key.
13. Double-click City, then type a comma and a space on the
keyboard.
14. Double-click State, then type two spaces.
15. Double-click Zip, then press ENTER.
The label window should look like this:
16. Click the button.
WORKING WITH REPORTS
219
17. When the next screen appears, double-click Last Name.
Then click the button.
WORKING WITH REPORTS
220
18. When the next screen appears, type:
Shipping Labels
in the box.