Expert Spring MVC and Web Flow phần 5 pot
Bạn đang xem bản rút gọn của tài liệu. Xem và tải ngay bản đầy đủ của tài liệu tại đây (495.32 KB, 42 trang )
This controller has a complex work flow, and we will break it down into its core compo-
nents. Then, we will show you the best extension points for altering the work flow in the
controller. We begin by illustrating all possible paths through the controller.
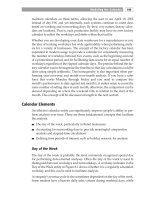
Figure 6-1 illustrates the many paths through the work flow of handling forms with
SimpleFormController.
Figure 6-1. SimpleFormController activity diagram
We will focus on the initial retrieval of the HTML form first. The controller uses the
method isFormSubmission() to determine if the HTTP request is either a form viewing or
form submission. The default implementation of this method merely checks the HTTP
method, and if it is a POST then isFormSubmission() returns true. The controller does not
consider a HTTP GET request a form submission. However, this method is not final, so your
implementation is free to define whatever criteria is appropriate to indicate the request
should be treated as a submission. If indeed the request is not a form submission, the
Resource requested
Retrieve form object from session
Everything from AbstractController
Is a form submission?
Is a session form?
Is form bean in session?
Yes
Yes Yes
Create form object
Create and init binder
No
Create NewForm object
Create and init binder
No
No
Remove from session
Bind request parameters to form object
Bind to form object
Store form in session
Should bind on NewForm?
Yes
No
Validate form object
Yes
onBindAndValidate
Validate on bind?
Suppress validation?
Yes
No
No
Yes
Collect reference data
No
Is a session form?
Display form view
Handle form submit
No
Errors from binding or validation?
Yes
Done
CHAPTER 6 ■ THE CONTROLLER MENAGERIE 151
584X_Ch06_FINAL 1/30/06 1:40 PM Page 151
controller will then consider this request as the first of two requests (the second being the
actual form submission). It will create an instance of the form object (a.k.a. command bean)
using the formBackingObject() method. By default, this method will return an instance of the
class specified with setCommandClass(). The formBackingObject() method is not final, so you
will use this method to configure, if necessary, the form object class, possibly setting any
dependencies or properties. This is the time to manipulate the form object before it enters
the work flow.
Once the instance of the form object is ready, the controller then creates the DataBinder
and calls the initBinder() life cycle method. Override this method to register any custom
PropertyEditors required when binding to the form object. By default, this method does
nothing.
Now that the DataBinder instance is ready, you have the choice of performing a binding
using any parameters sent with this initial HTTP GET request. This action is determined by the
bindOnNewForm property, enabled by (you guessed it) calling the setBindOnNewForm() method.
Typically, on the first view of a form, no parameters have been sent with the request, so it is safe
to leave bindOnNewForm equal to false (the default). However, if you set the property to true,
and any errors occurred from the binding process, those errors will be available to the initial
form view.
The SimpleFormController has the ability to store the form object in the session for the
duration of the controller’s work flow. That is, the form will live in the session between the ini-
tial form view and the form submission. To enable this feature, simply call setSessionForm()
with a value of true. Once the form object has been created, and after it is possibly bound by
the DataBinder, it will be stored in the session if this property is true.
If you load the form bean from persistence using an object-relational mapping (ORM) tool,
you may find the session form functionality useful. Many ORM tools support the concept of
reattaching, or merging, a detached bean back into persistence. If you require this type of behav-
ior, using the session form functionality is a nice way to load the form bean only once during
initial form view. That same instance will then be used during the form submission stage, avoid-
ing the need to pull the instance from persistence again. Most persistence strategies can handle
pulling the instance twice (once on form view and once on form submission), so weigh the pros
with the cons of increased memory usage for the session, among other issues.
■Caution Storing the form in the session should not be chosen lightly if the application is to be clustered.
Typically, in a clustered environment, session data is serialized and often replicated among different nodes in
the cluster. Serialization is a costly procedure, and it can place a heavy burden on cluster bandwidth. Check
with your application server’s clustering strategies, and be sure to understand the impact of session storage.
At this point, the form view is about to be returned to the user. Before the view is ren-
dered, the referenceData() callback is called. This life cycle method allows you to assemble
and return any auxiliary objects required to render the view. The form object will automati-
cally be sent to the form view, so use this method to put anything else into the model the
form page might need. By default, this method does not manipulate the model in any way.
CHAPTER 6 ■ THE CONTROLLER MENAGERIE152
584X_Ch06_FINAL 1/30/06 1:40 PM Page 152
If you’ve made it this far, the Controller will assemble the full model with the form object,
any possible errors from potential binding, and the model from referenceData(). It will then
send this combined model to the View named by the formView property. This is the name of the
View that contains the actual HTML form.
Form Submission with SimpleFormController
The SimpleFormController has completed half of its job by displaying the HTML form to the
user. Once the user hits the submit button of the form, the SimpleFormController roars back
to life to handle the submission. It will bind the request parameters to the form bean, validate
the bean, and choose to show either the original form again if there were errors or the form
success view if everything worked as expected. We will walk you through this process now,
pointing out the useful life cycle callback methods along the way.
The first method in this controller that determines the form bean’s fate is again the
isFormSubmission() method. Your HTML forms should use the POST method for form submis-
sions for both technical (it can handle much more data) and architectural (POST actions are
intrinsically non-idempotent) reasons. Also, the default implementation of isFormSubmission()
returns true if the action is a POST. You are free to override this method to further define what a
form submission looks like, but the default should work fine for most situations.
In this case, because we are tracking the form submission work flow, this method will
return true. The SimpleFormController will now check whether or not the form bean is stored
in the session, via the isSessionForm() method. If the form bean is stored in the session, then
the Controller will retrieve the form bean, put there originally when the user viewed the form.
The Controller then removes the form bean from the session, as it is likely the form bean will
be successfully submitted during this work flow (thus no longer needed in the session). If, in
fact, there are errors during the submission process, the form bean will be placed back into
the session later.
If the form bean was not stored in the session, then the controller will simply create
another instance of the form bean using the formBackingObject() method. This is the same
method used to create the form bean during the initial form view.
■Tip If your form bean requires dependencies to be injected by Spring’s ApplicationContext, overriding
formBackingObject() provides the opportunity to request the bean from the BeanFactory. Of course, to
avoid having to manually pull the bean using the
getBean() method on the BeanFactory you can use
Spring’s support for method injection (refer to Pro Spring by Rob Harrop and Jan Machacek (Apress, 2005)
for more information). In any case, don’t restrict your form beans to simple POJOs as you may use Spring’s
dependency injection for your form beans quite easily.
At this point, the form bean instance has been obtained. The Controller now creates the
DataBinder and calls the initBinder() callback method. As with the work flow for viewing
the form, use this method to register any custom PropertyEditors you need during binding.
CHAPTER 6 ■ THE CONTROLLER MENAGERIE 153
584X_Ch06_FINAL 1/30/06 1:40 PM Page 153
With the form bean created, and the DataBinder created with custom PropertyEditors regis-
tered, the request parameters are now bound to the form bean. The binding process will also
capture any binding errors, such as type conversion errors or any configured required fields.
Of course, most forms require more complicated validation than what is provided
by the DataBinder. At this point in the work flow, the Controller consults the method
isValidateOnBinding() to determine if it should now run the form bean through the
Validators. This method defaults to true, and it is marked final so the only way to change
its behavior is through setValidateOnBinding().
If your situation requires a more exact control over when validation is performed after a
binding, you may override the suppressValidation() method. While this method defaults to
false, this method allows you to choose on a request-by-request basis whether or not to run
through the validators.
By default, the controller will allow each configured validator to validate the form bean.
After all the validators have run, the controller will then call the onBindAndValidate() life cycle
method. This callback method is your chance to perform any custom validation logic or gen-
eral logic after binding and validation.
■Note The onBindAndValidate() method will run even if suppressValidation() returns true or if
isValidateOnBinding() returns false. In other words, onBindAndValidate() will always run, even if
validation did not.
After onBindAndValidate() runs, the Controller makes a decision based on whether any
errors exist. These errors would have resulted from the binding process or through automatic
validation or custom validation in onBindAndValidate(). If there are any errors, the Controller
then begins the process of displaying the original form. If no errors exist, then the form bean
can finally be processed.
If errors are present and the isSessionForm() method returns true, then the form bean is
placed back into the session. Remember that the form bean is removed from the session at the
beginning of the form submission handling work flow. However, when there are errors, the
original form is displayed again, and so the form bean is stored in the session again to be
bound again once the errors are addressed by the user. The referenceData() method is called
once more to populate the model with objects for the form. Finally, the form view is displayed
again, with the errors and the form bean.
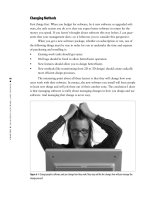
If there are no errors, the controller then calls the onSubmit() life cycle method. This sig-
nals that the form bean is ready to be processed. There are several overloaded onSubmit()
methods, each method simply calling the other with one fewer method argument. This flow,
illustrated in Figure 6-2, is arranged this way to allow you to pick the method with the exact
number of parameters you will need to process the form. There is no need to implement all
onSubmit() methods; just choose the one that will work for you.
There is also a very simple doSubmitAction(), which is the most simple callback method
to override and implement. If you do not implement any of the onSubmit() methods, you will
need to implement this method. This method simply provides the form bean to be processed.
You may use this method when there is no model to construct and when the default success
view is appropriate. If you need to construct a model, or if you need to choose the view to
show dynamically, implement one of the onSubmit() methods.
CHAPTER 6 ■ THE CONTROLLER MENAGERIE154
584X_Ch06_FINAL 1/30/06 1:40 PM Page 154
Figure 6-2. Order in which callback methods are called
■Tip Choose the best form submit callback to implement based on which objects you need and whether
the default success view is always appropriate. Implement only one callback method.
SimpleFormController Examples
It is time to see the SimpleFormController in action. To begin, we will create a form for a sim-
ple person. This example brings together what we have covered from the DataBinder and the
work flow of the SimpleFormController.
The Person class used in this example (shown in Listing 6-39) has three properties: a Name,
when he was born, and his favorite programming language. To make things more interesting,
the name property is an example of a nested Name object (shown in Listing 6-40), and the bornOn
property will require a custom PropertyEditor.
Listing 6-39. Person Bean
public class Person {
private Name name = new Name();
private Date bornOn;
private String favoriteProgrammingLanguage;
public Date getBornOn() {
return bornOn;
}
public void setBornOn(Date bornOn) {
this.bornOn = bornOn;
}
onSubmit(request, response, formBean, errors)
onSubmit(formBean, errors)
onSubmit(formBean)
doSubmitAction(formBean)
CHAPTER 6 ■ THE CONTROLLER MENAGERIE 155
584X_Ch06_FINAL 1/30/06 1:40 PM Page 155
public String getFavoriteProgrammingLanguage() {
return favoriteProgrammingLanguage;
}
public void setFavoriteProgrammingLanguage(String favoriteProgrammingLanguage) {
this.favoriteProgrammingLanguage = favoriteProgrammingLanguage;
}
public Name getName() {
return name;
}
public void setName(Name name) {
this.name = name;
}
@Override
public String toString() {
StringBuffer sb = new StringBuffer();
sb.append("Name: [");
sb.append(name.toString());
sb.append("], ");
sb.append("Born On: [");
sb.append(bornOn);
sb.append("], ");
sb.append("Favorite Programming Language: [");
sb.append(favoriteProgrammingLanguage);
sb.append("]");
return sb.toString();
}
}
Listing 6-40. Name Bean
public class Name {
private String first;
private String last;
public String getFirst() {
return first;
}
public void setFirst(String first) {
this.first = first;
}
public String getLast() {
return last;
}
public void setLast(String last) {
this.last = last;
}
@Override
public String toString() {
CHAPTER 6 ■ THE CONTROLLER MENAGERIE156
584X_Ch06_FINAL 1/30/06 1:40 PM Page 156
return first + " " + last;
}
}
Listing 6-41 contains the XHTML that matches the Person object, while Figure 6-3 shows
how the form is rendered. Note that Listing 6-41 deliberately omits the use of the <spring:bind>
tags, in order to illustrate the raw XHTML required. This is the XHTML as the browser would see
it. Obviously, this also illustrates that the use of <spring:bind> and related tags are not required,
though they are recommended for any real projects.
Listing 6-41. XHTML Form for Person
<?xml version="1.0" encoding="ISO-8859-1" ?>
<!DOCTYPE html PUBLIC "-//W3C//DTD XHTML 1.0 Strict//EN"
" /><html xmlns=" /><head>
<title>Person Form</title>
</head>
<body>
<form method="post" action="">
<table>
<tr>
<td>First Name:</td>
<td><input type="text" name="name.first" /></td>
</tr>
<tr>
<td>Last Name:</td>
<td><input type="text" name="name.last" /></td>
</tr>
<tr>
<td>Born On:</td>
<td><input type="text" name="bornOn" /></td>
</tr>
<tr>
<td>Favorite Programming Language:</td>
<td><input type="text" name="favoriteProgrammingLanguage" /></td>
</tr>
<tr>
<td />
<td><input type="submit" /></td>
</tr>
</table>
</form>
</body>
</html>
CHAPTER 6 ■ THE CONTROLLER MENAGERIE 157
584X_Ch06_FINAL 1/30/06 1:40 PM Page 157
Figure 6-3. Initial form view
The XHTML shown in Listing 6-41 has some interesting aspects. First, notice that we are
using the POST method for the form. This should be the preferred method for form submis-
sions, as discussed earlier. Second, notice how we used action="" instead of specifying a
particular URI. This is a convenience trick to avoid specifying the page’s URI, which would
tightly couple the page to the URI that indicates it. By not specifying an action, the browser
will submit the form back to the originating URI (which, in the case of SimpleFormController,
is just what we want). Lastly, notice how the form input element names correspond to the
property names from the Person object. This should be familiar from the discussion about
the DataBinder.
Next, we show the SimpleFormController implementation (Listing 6-42) for the form in
Listing 6-41. For our example, it will simply print out the Person via toString(), but it’s easy to
imagine using a data access object to persist the person.
Listing 6-42. PersonFormController
public class PersonFormController extends SimpleFormController {
public PersonFormController() {
setCommandName("person");
setCommandClass(Person.class);
setFormView("newPerson");
setSuccessView("newPersonSuccess");
}
@Override
protected void initBinder(HttpServletRequest request,
ServletRequestDataBinder binder) throws Exception {
binder.registerCustomEditor(Date.class,
new CustomDateEditor(new SimpleDateFormat("yyyy-MM-dd"), false));
}
@Override
CHAPTER 6 ■ THE CONTROLLER MENAGERIE158
584X_Ch06_FINAL 1/30/06 1:40 PM Page 158
protected void doSubmitAction(Object command) throws Exception {
Person person = (Person) command;
// persist the object, or some other business logic
}
}
The bornOn parameter of the Person object is of type java.util.Date, so we are required
to use a custom PropertyEditor to convert the string parameter into a true Date object. This
Controller relies on the default behavior of forwarding to the successView once the form is
submitted, so we chose to implement doSubmitAction() because it requires the least amount
of code.
By default, the form bean will placed into the model on successful form submission.
Therefore, the form success view can access the form bean with the identifier set via
setCommandName(). The following XHTML page (Listing 6-43) shows this in action.
Listing 6-43. newPersonSuccess XHTML Page
<?xml version="1.0" encoding="ISO-8859-1" ?>
<!DOCTYPE html PUBLIC "-//W3C//DTD XHTML 1.0 Strict//EN"
" /><html xmlns=" /><head>
<title>New Person Success</title>
</head>
<body>
<p>${person}</p>
</body>
</html>
Listing 6-43’s JSP page will render the following result to the browser (Figure 6-4).
Figure 6-4. Form success view
CHAPTER 6 ■ THE CONTROLLER MENAGERIE 159
584X_Ch06_FINAL 1/30/06 1:40 PM Page 159
The Controller in this example is using logical View names to identify which views should be
rendered. This provides a nice decoupling between the controller and how the Views are actually
implemented. The DispatcherServlet will delegate these View names to a ViewResolver to resolve
the actual View instances. For our example, we will use an InternalResourceViewResolver. This
ViewResolver works well with JSP files and lets us hide the actual JSP files behind the /WEB-INF
directory to prohibit unauthorized client access.
■Tip You should place any restricted or otherwise hidden files inside the /WEB-INF directory of your web
application. That directory, and all of its subdirectories, is protected by the servlet container.
The ViewResolver is declared and configured with a prefix and suffix, used to create a fully
qualified filename for the view. This bean definition (Listing 6-44) will typically reside in the
spring-servlet.xml file with the rest of the controller definitions and other web-specific beans.
Listing 6-44. ViewResolver Configuration
<bean id="jspViewResolver"
class="org.springframework.web.servlet.view.InternalResourceViewResolver">
<property name="viewClass" value="org.springframework.web.servlet.view.JstlView"/>
<property name="prefix" value="/WEB-INF/jsp/"/>
<property name="suffix" value=".jsp"/>
</bean>
With our example controller using a view name of newPerson, the ViewResolver in Listing
6-45 will attempt to locate the file /WEB-INF/jsp/newPerson.jsp.
We obviously haven’t mentioned Validators or what happens if there is a validation error.
Validation is a large topic, so we are postponing a full discussion about validation to Chapter 9.
To continue with this example, we now want to modify the code to restrict the choices of
favorite programming language. The predetermined choices must be loaded before the initial
page view; thus we will override the referenceData() method.
First, we will create the list of approved languages to pick a favorite from. For the example,
the List’s contents are static, so we will create a simple array to be shared among requests.
It is common to require objects from persistence to be returned by referenceData(). If
that information is static, for performance reasons, load the objects only once at startup. This
will save on pulling them from the database for every request. In this case, your controller may
implement InitializingBean, which is a Spring-specific interface indicating that the bean
requires initializing before servicing requests.
■Tip For more information about the InitializingBean interface, consult the book Pro Spring or the
online documentation. An alternative to
InitializingBean is the init-method attribute in the XML bean
definition, which avoids the need to implement a framework interface.
CHAPTER 6 ■ THE CONTROLLER MENAGERIE160
584X_Ch06_FINAL 1/30/06 1:40 PM Page 160
Listing 6-45 contains the entire PersonFormController code, highlighting the
referenceData() method.
Listing 6-45. PersonFormController with Reference Data
public class PersonFormController extends SimpleFormController {
private String[] languages = new String[]{"Java", "Ruby", "Python"};
public PersonFormController() {
setCommandName("person");
setCommandClass(Person.class);
setFormView("newPerson");
setSuccessView("newPersonSuccess");
}
@Override
protected Map referenceData(HttpServletRequest req) throws Exception {
Map data = new HashMap();
data.put("languages", languages);
return data;
}
@Override
protected void initBinder(HttpServletRequest request,
ServletRequestDataBinder binder) throws Exception {
binder.registerCustomEditor(Date.class,
new CustomDateEditor(new SimpleDateFormat("yyyy-MM-dd"), false));
}
@Override
protected void doSubmitAction(Object command) throws Exception {
Person person = (Person) command;
}
}
Now that we are providing a list of favorite languages, we can modify our form XHTML to
loop through them to build the <select> and <option> tags, as shown in Listing 6-46.
Listing 6-46. XHTML Snippet of Favorite Programming Languages
<tr>
<td>Favorite Programming Language:</td>
<td>
<select name="favoriteProgrammingLanguage">
<c:forEach items="${languages}" var="language">
CHAPTER 6 ■ THE CONTROLLER MENAGERIE 161
584X_Ch06_FINAL 1/30/06 1:40 PM Page 161
<option>${language}</option>
</c:forEach>
</select>
</td>
</tr>
Of course, it’s common to return extra information to the View after a form submission.
You may, for example, want to provide a confirmation message after the submission com-
pletes. In our example so far, we have implemented the doSubmitAction() method, which does
not allow for any model to be returned. Again, the doSubmitAction() method is useful when
the default success view is sufficient. When you need to return objects required by the success
view, you will need to implement an onSubmit() method.
For example, we will extend our PersonFormController to persist the person instance into
the database, and we will recommend a book to read based on their favorite programming
language. We will remove our doSubmitAction() method and override onSubmit() so that we
may return a model with the book recommendation, as shown in Listing 6-47.
Listing 6-47. PersonFormController with onSubmit()
public class PersonFormController extends SimpleFormController {
private String[] languages = new String[]{"Java", "Ruby", "Python"};
private PersonDao personDao;
public PersonFormController() {
setCommandName("person");
setCommandClass(Person.class);
setFormView("newPerson");
setSuccessView("newPersonSuccess");
}
public void setPersonDao(PersonDao personDao) {
this.personDao = personDao;
}
@Override
protected Map<String, String[]> referenceData(HttpServletRequest req)
throws Exception {
Map<String, String[]> data = new HashMap<String, String[]>();
data.put("languages", languages);
return data;
}
CHAPTER 6 ■ THE CONTROLLER MENAGERIE162
584X_Ch06_FINAL 1/30/06 1:40 PM Page 162
@Override
protected void initBinder(HttpServletRequest request,
ServletRequestDataBinder binder) throws Exception {
binder.registerCustomEditor(Date.class,
new CustomDateEditor(new SimpleDateFormat("yyyy-MM-dd"), false));
}
@Override
protected ModelAndView onSubmit(Object command) throws Exception {
Person person = (Person) command;
personDao.persist(person);
Map<String, String> model = new HashMap<String, String>();
model.put("suggestedBook",
suggestBook(person.getFavoriteProgrammingLanguage()));
model.put(getCommandName(), person);
return new ModelAndView(getSuccessView(), model);
}
private String suggestBook(String favoriteProgrammingLanguage) {
Language language = Language.create(favoriteProgrammingLanguage);
return language.recommendBookTitle();
}
}
As you may have noticed, the controller now delegates persistence to a PersonDao class.
Thus, a setter method is provided, setPersonDao(), so that the ApplicationContext can easily
inject an instance.
The old doSubmitAction() is now replaced with the more flexible onSubmit() method,
allowing us to return a ModelAndView object. Notice how we simply call getSuccessView() to
return the configured success view. We are also now required to manually add the person
object into the model, which was previously automatically added.
■Tip If you return null from onSubmit(),a default ModelAndView will be created with getSuccessView()
and errors.getModel().
The business logic of choosing a recommended book title is delegated to a Language
object. This follows the recommendations of delegating any business logic to the service layer
or other POJOs in the system.
CHAPTER 6 ■ THE CONTROLLER MENAGERIE 163
584X_Ch06_FINAL 1/30/06 1:40 PM Page 163
All objects in the model are exposed to the View instance, so the success view XHTML
page can now easily display the recommended book, as shown in Listing 6-48.
Listing 6-48. XHTML for Recommended Book Title
<body>
Welcome, ${person.name}! You chose ${person.favoriteProgrammingLanguage}
as your favorite programming language. Therefore, we can recommend you
check out ${suggestedBook}.
</body>
Redirect After Submit Pattern
There is a common problem with the way we are handling the display of the confirmation
page, which needs to be fixed. The success view is rendered in the same request as the initial
POST, leaving the browser in a state with the ability to replay the form submit. In other words,
after the success view is shown, the user can simply reload the page, resubmitting the form.
This can lead to inconsistencies, with the best-case scenario of a confused user and a worst-
case scenario of multiple identical Person instances being saved into the database.
Any form that alters data in persistence, or performs any type of potentially destructive
operation, is at risk of being resubmitted. Multiple solutions exist that can ensure that the user
must view the form before submitting, thus preventing double submissions. We will cover one
of the most common solutions, the Redirect After Submit pattern, in the next example. This
pattern simply redirects the user to the success view instead of internally forwarding the
request. The redirect forces the browser to obtain a new page, and any reloads will now safely
reload the new page instead of the form page.
■Caution A client redirect is not the same as a RequestDispatcher.forward() or RequestDispatcher.
include()
. These two methods internally redirect a request to another handler inside the servlet container.
A client redirect instructs the client to issue another GET request.
This pattern is implemented via browser redirects, which are initiated from the server and
are built into the HTTP protocol. This means this technique can be used independent of the
view technologies used. To initiate a client redirect, the server will send a 302 response code
(or 303 if HTTP/1.1 only) plus a Location: header to the client. The HTTP response code 302
indicates that a resource
4
has temporarily moved or that the browser should look elsewhere
for the resource. When the browser encounters a 302, it will look for a Location: header to
indicate where the resource can now be found.
CHAPTER 6 ■ THE CONTROLLER MENAGERIE164
4. More accurately, that the representation of the resource has moved.
584X_Ch06_FINAL 1/30/06 1:40 PM Page 164
■Tip For the exact differences between 302 and 303 response codes, please consult the HTTP RFC at
The 303 response code was added to
HTTP/1.1 specifically for the redirect after post pattern, but is only understood by HTTP/1.1 clients. Luckily,
most HTTP/1.1 clients will treat a 302 response identically to a 303.
There are at least three different ways to accomplish a client redirect with Spring MVC
and the Servlet API. The first method, HttpServletResponse.sendRedirect(), uses the Servlet
API to correctly send the redirect response. You may use this method only if the response has
not been committed, however.
Spring MVC treats redirects as just another type of view with its org.springframework.
web.servlet.view.RedirectView class. This class encapsulates the redirect, the conversion of
model objects to query parameters, and the logic to handle a HTTP/1.0 or HTTP/1.1 redirect.
This view is then resolved like all other Views in the system, hiding the exact view details from
the controller.
While the RedirectView is very simple to use, if your application is already using an
InternalResourceViewResolver, you will need to create another view resolver that is able to
resolve non-file system views. Because we already have an InternalResourceViewResolver
configured, we will need to chain the ViewrResolvers allowing each the chance to resolve the
view name. Once a resolver is able to handle the View name, resolving stops and the view
instance is returned.
To handle a RedirectView, we will define an XmlViewResolver (Listing 6-49), which
reads its list of view names from a Spring XML file. This ViewResolver will be defined inside
spring-servlet.xml alongside the InternalResourceViewResolver. The XmlViewResolver,
however, will be configured to appear before the InternalResourceViewResolver in the chain,
so that it has a chance to resolve the view names first. We also specify where the resolver will
find its configuration (in this case, in /WEB-INF/views.xml).
Listing 6-49. Two View Resolvers, Chained
<bean id="jspViewResolver"
class="org.springframework.web.servlet.view.InternalResourceViewResolver">
<property name="viewClass" value="org.springframework.web.servlet.view.JstlView"/>
<property name="prefix" value="/WEB-INF/jsp/"/>
<property name="suffix" value=".jsp"/>
</bean>
<bean id="auxViewResolver"
class="org.springframework.web.servlet.view.XmlViewResolver">
<property name="order" value="1"/>
<property name="location" value="/WEB-INF/views.xml"/>
</bean>
CHAPTER 6 ■ THE CONTROLLER MENAGERIE 165
584X_Ch06_FINAL 1/30/06 1:40 PM Page 165
Now it is simply a matter of defining the RedirectView instance in views.xml (as shown
in Listing 6-50). The bean’s name will match the view name the controller is using (i.e.,
newPersonSuccess). We are setting contextRelative to true so that the RedirectView will
prepend the context path name for the web application to the URL value.
Listing 6-50. views.xml
<?xml version="1.0"?>
<!DOCTYPE beans PUBLIC
"-//SPRING//DTD BEAN//EN"
" /><beans>
<bean id="newPersonSuccess"
class="org.springframework.web.servlet.view.RedirectView">
<property name="contextRelative" value="true" />
<property name="url" value="/personSuccess" />
</bean>
</beans>
One of the benefits of the RedirectView is that it will convert each object from the model
and place them in the query string of the full URL. However, for this to work correctly, those
objects are converted to Strings. Therefore, if you will be using the RedirectView with objects
in the model, ensure that the next page expects only Strings from the model. We will now
slightly modify our Controller (as shown in Listing 6-51), explicitly adding each property we
will need for the success page.
Listing 6-51. Modified onSubmit Using Only Strings in the Model
Map<String, Object> model = new HashMap<String, Object>();
model.put("suggestedBook",
suggestBook(person.getFavoriteProgrammingLanguage()));
model.put("personName", person.getName());
model.put("personFavoriteProgrammingLanguage",
person.getFavoriteProgrammingLanguage());
Our success page’s message (shown in Listing 6-52) will now be changed to reference
the new model properties. Notice how we are accessing the model objects from the request
parameters (as indicated by the param prefix). This is because the objects in the model are sent
to the next page via the query string, such as /personSuccess?personName=joe&suggestedBook=
title automatically by the RedirectView.
Listing 6-52. New Success Page Text
Welcome, ${param.personName}! You chose ${param.personFavoriteProgrammingLanguage}
as your favorite programming language. Therefore, we can recommend you
check out ${param.suggestedBook}.
CHAPTER 6 ■ THE CONTROLLER MENAGERIE166
584X_Ch06_FINAL 1/30/06 1:40 PM Page 166
And finally, we will add a Controller to handle the new success page. Why do we need a
Controller for a simple JSP page? A Controller can hide the implementation of the View from
the client, and it provides a uniform URL address space. For consistency’s sake, it’s a good idea
to front even simple Views with a Controller. As you’ll see, Spring MVC make this a straight-
forward process.
The view name newPersonSuccess is now being used for the redirect view, which
redirects to the controller identified by /personSuccess. In this case, we simply wish to
display the success message so we aren’t interested in coding up a Controller just to forward
to a JSP page. Luckily, Spring MVC provides an org.springframework.web.servlet.mvc.
UrlFilenameViewController that can convert the last part of the request URL to a view name.
This avoids the need to write a custom Controller for resources that are only implemented
as Views.
For instance, given the URL /app/address.x, the UrlFilenameViewController will convert
the URL into the view name address. This is a very easy way to expose View resources such as
JSP pages while continuing to hide their implementation technology.
■Tip For resources that are only views, hide them behind simple controllers such as
UrlFilenameViewController or ParameterizableViewController. This hides implementation
revealing clues, such as the .jsp extension, and can provide a uniform URL address space. This also allows
you to place your view files in the protected /WEB-INF directory.
For the example, we now add the bean definition for the /personSuccess resource (shown
in Listing 6-53), which the client will be redirected to upon successful form submission. This
definition should go in spring-servlet.xml with the other web-specific beans.
Listing 6-53. /personSuccess Bean Definition
<bean name="/personSuccess"
class="org.springframework.web.servlet.mvc.UrlFilenameViewController" />
With this last change, the Controller now correctly redirects the client after the form
submission. We accomplished this by using a RedirectView and an XmlViewResolver, which is
a good strategy when you wish to keep the Controller unaware of the implementations of any
views.
However, quite a bit of infrastructure was required for this configuration. Spring MVC pro-
vides shorthand for redirect views, allowing you to forgo the definition of any RedirectViews or
the configuration of an explicit XmlViewResolver. The UrlBasedViewResolver (the superclass for
InternalResourceViewResolver) recognizes the special prefix redirect:, which simply triggers a
client redirect instead of being resolved through the standard process.
Converting the PersonFormController to use this shorthand is quite easy, and involves
mostly deleting code we just created. The Controller’s success view name will now be changed
to use the redirect: prefix (as shown in Listing 6-54), alleviating the need for a RedirectView
definition or an XmlViewResolver definition.
CHAPTER 6 ■ THE CONTROLLER MENAGERIE 167
584X_Ch06_FINAL 1/30/06 1:40 PM Page 167
Listing 6-54. Person Controller Constructor with Redirect:Pprefix
public PersonFormController() {
setCommandName("person");
setCommandClass(Person.class);
setFormView("newPerson");
setSuccessView("redirect:/app/personSuccess");
}
Redirect After Submit Summary
The redirect after submit pattern, sometimes known as redirect after POST, is a method to pro-
tect the client from resubmitting a form. By sending a HTTP redirect, the client is sent to a
different page after the form is submitted, effectively leaving the original form’s page. Any
attempts to reload the page will simple reload the success page instead of the original form.
MultiActionController
SimpleFormController is great when you need to model a form work flow with one page view
and one form submission. There are, however, some situations where you might want one
Controller to handle more than one work flow. For instance, you may have a logical group of
read-only operations, and subclassing an AbstractController for each operation might be a
bit verbose for your application. The MultiActionController provides a way to group multiple
actions, or request handlers, together in one controller.
The benefits of the MultiActionController include
• fewer physical controllers, thus fewer classes in the system
• logical grouping of actions in one class
• flexible mapping for action methods.
The disadvantages of MultiActionController include
• form handling work flow isn’t explicit, unlike SimpleFormController
• possibility for large, confusing controllers handling many tasks
• no compile-time checks can be performed due to the use of reflection.
So when does using MultiActionController make sense? We believe it is a perfect way to
consolidate actions that have a similar theme into one controller, when those actions do not
require a full form handling work flow. It’s also useful when the actual processing is performed
by a shared delegate. However, be wary of putting too many request handling methods inside
one MultiActionController, for it can quickly become too large and unwieldy.
■Note The MultiActionController is similar in nature to Struts’ DispatchAction, only much more
flexible.
CHAPTER 6 ■ THE CONTROLLER MENAGERIE168
584X_Ch06_FINAL 1/30/06 1:40 PM Page 168
The MultiActionController has the following capabilities:
• flexible action method mapping, defaulting to URL to method name mapping
• command bean binding
• support for one or more Validators
• per-action “last modified” timestamp control
•exception handling
■Caution Even though this Controller supports Validators and command bean binding, it does not
define a form handling work flow.
On initialization, this class searches all of its methods for any that conform to the request
handler signature. Any method that will handle a request must conform to the following
features:
•returns ModelAndView
• accepts an HttpServletRequest as a first parameter
• accepts an HttpServletResponse as a second parameter
• optionally, accept either an HttpSession or an Object (to be treated as the command
bean) as a third parameter
■Note The name of the method does not matter when locating potential request handling methods.
Listing 6-55 contains a simple MultiActionController with three different but valid
request handling methods.
Listing 6-55. Example Request Handling Method Signature
public class MyMultiController extends MultiActionController {
public ModelAndView doStuff(HttpServletRequest req,
HttpServletResponse res) { … }
public ModelAndView doOtherStuff(HttpServletRequest req,
HttpServletResponse res, HttpSession session) { … }
public ModelAndView doStuff(HttpServletRequest req,
HttpServletResponse res, CommandBean command) { … }
}
CHAPTER 6 ■ THE CONTROLLER MENAGERIE 169
584X_Ch06_FINAL 1/30/06 1:40 PM Page 169
Now the question becomes, how does MultiActionController know which method
to call when it handles a request? This decision process is encapsulated into the strategy
MethodNameResolver, whose job it is to take an HttpServletRequest and return a method
name as a String.
InternalPathMethodNameResolver
The default strategy, if none is specified, is the org.springframework.web.servlet.mvc.
multiaction.InternalPathMethodNameResolver. To quote the Javadocs, this strategy is a
“Simple implementation of MethodNameResolver that maps URL to method name.” This class
will convert the last path section of the URL, ignoring any file extensions, into a method name.
For instance, it will turn /app/account/delete.x into the method name delete.
If the method names in your controller vary in a uniform way from the URL path section,
then a prefix or suffix can be configured. For instance, if your method name is dodelete, but
you want to continue to use /app/account/delete.x, then you can configure the prefix prop-
erty of InternalPathMethodNameResolver to equal “do.”
Because this strategy is the default, no configuration is required if you choose to use it.
However, if you want to configure a prefix or suffix, then you will have to specify its bean defi-
nition. Listing 6-56 contains a sample configuration.
Listing 6-56. Example Configuration of an InternalPathMethodNameResolver
<bean id="methodNameResolver"
class="o.s.web.servlet.mvc.multiaction.InternalPathMethodNameResolver">
<property name="prefix" value="do" />
</bean>
<bean name="/account/*"
class="com.apress.expertspringmvc.flight.web.ViewAccountController">
<property name="methodNameResolver" ref="methodNameResolver" />
<property name="accountService" ref="accountService" />
</bean>
ParameterMethodNameResolver
If you are looking for behavior that matches Struts’ DispatchAction, then you can use the
org.springframework.web.servlet.mvc.multiaction.ParameterMethodNameResolver. This
strategy actually is a combination of two separate strategies, both looking at request parame-
ters for method name resolution.
The first strategy will look for a parameter by name, and its value will be treated as the
method name. By default, the name of the parameter is action, but you can change it by call-
ing setParamName(). Unlike InternalPathMethodNameResolver, there are no prefix and suffix
capabilities, so the value of the action parameter must match exactly the method name.
The second strategy is to look for the mere presence of a request parameter, whose name
will point to the method name. The ParameterMethodNameResolver will look for any parameter
whose name is found in the methodParamNames array, and the first match wins.
CHAPTER 6 ■ THE CONTROLLER MENAGERIE170
584X_Ch06_FINAL 1/30/06 1:40 PM Page 170
■Tip The second strategy will take precedence over the first, even if the first successfully resolves a match.
Over time, code gets refactored and URL links change, so the ParameterMethodNameResolver
supports a mapping between request parameter and the true method name found in the con-
troller. The strategy includes a logicalMappings java.util.Properties, containing a map
between the request parameter name or value and the actual method name. This can come
in very handy if you do not wish to expose real method names to the view layer.
Finally, this ParameterMethodNameResolver can be configured with a default method name,
if no other method name can be resolved. To configure a default method name, configure the
defaultMethodName property.
An example usage of this MethodNameResolver is contained in Listing 6-57, configuring a
list of parameters to look for and their mappings to real method names.
Listing 6-57. Example of ParameterMethodNameResolver
<bean id="methodNameResolver"
class=
"org.springframework.web.servlet.mvc.multiaction.ParameterMethodNameResolver">
<property name="methodParamNames">
<list>
<value>hello</value>
</list>
</property>
<property name="logicalMappings">
<props>
<prop key="hello">index</prop>
</props>
</property>
</bean>
With the example in Listing 6-57, if a URL like /app/controller?hello=true is used, the
index() method will be called on the controller. Note that the value of the hello parameter
does not matter when using the methodParamNames matching strategy, as only the presence of
the parameter is what matters.
PropertiesMethodNameResolver
A third option for method name resolution is the org.springframework.web.servlet.mvc.
multiaction.PropertiesMethodNameResolver, which happens to be the most flexible of the
strategies. As its name implies, the mapping is done via java.util.Properties, with URL
paths acting as keys and the values as method names. The URL path can use the same
Ant-style pattern matching you’ve seen with other URL path matching strategies.
This strategy will first attempt an exact match on the URL path, excluding the web app
contact name and the servlet mapping, but including the mapping for the Controller. If this
exact match does not work, all the mappings will be attempted in iteration order through the
Properties instance until a match is found.
CHAPTER 6 ■ THE CONTROLLER MENAGERIE 171
584X_Ch06_FINAL 1/30/06 1:40 PM Page 171
Listing 6-58 contains an example bean definition and configuration of a
PropertiesMethodNameResolver.
Listing 6-58. Example of PropertiesMethodNameResolver
<bean id="methodNameResolver"
class=
"org.springframework.web.servlet.mvc.multiaction.PropertiesMethodNameResolver">
<property name="mappings">
<props>
<prop key="/account/findByUsername">findByUsername</prop>
<prop key="/account/*">index</prop> <! treated as default >
</</props>
</property>
</bean>
<bean name="/account/*"
class="com.apress.expertspringmvc.flight.web.ViewAccountController">
<property name="methodNameResolver" ref="methodNameResolver" />
<property name="accountService" ref="accountService" />
</bean>
The default case, in the preceding listing as /account/*, should be the last property
specified, so it will attempted last. Also, notice how the mapping path begins with the
mapping specified for the controller. If you wish to change this behavior, consult the
AbstractUrlMethodNameResolver superclass for options on how to configure the treatment
of the URL path.
MethodNameResolver Summary
You’ve seen three distinct strategies for mapping a request to a method on a
MultiActionController. The InternalPathMethodNameResolver will parse the URL path for the
last element and use it as a method name. The ParameterMethodNameResolver looks for request
parameters, either by value or by name, to resolve a method name. This strategy also supports
a default method name if no name was resolved. Finally, the PropertiesMethodNameResolver is
the least restrictive of the bunch, as it allows for a mapping of arbitrary URL paths to method
names.
Which one should you use? As with everything Spring Framework, the choice is ultimately
yours, and the framework doesn’t lean toward any preference. You should weigh how much
configuration each strategy will take under your circumstances, as generally less configuration
is better. We favor not relying on request parameters for method names, as we feel URL paths
are cleaner and generally friendlier to work with.
MultiActionController Example
For an example of the MultiActionController, we will create a ViewAccountController that
exposes many different ways to find an Account. For instance, a user may want to find an
Account by username or first name or last name. These are simple read-only methods without
CHAPTER 6 ■ THE CONTROLLER MENAGERIE172
584X_Ch06_FINAL 1/30/06 1:40 PM Page 172
complex form handling, so it’s a perfect chance to consolidate these three actions into one
controller. We’ll also take advantage of the built-in exception handling and rudimentary vali-
dation provided by the DataBinder, later in this example.
Listing 6-59 contains a full example of a MultiActionController.
Listing 6-59. ViewAccountController Example
public class ViewAccountController extends MultiActionController {
private AccountService accountService;
public ViewAccountController() throws ApplicationContextException {
setSupportedMethods(new String[]{METHOD_GET});
}
public void setAccountService(AccountService accountService) {
this.accountService = accountService;
}
public ModelAndView findByUsername(HttpServletRequest request,
HttpServletResponse response, SearchCriteria criteria) {
Account account = accountService.findAccountByUsername(
criteria.getSearchBy());
return new ModelAndView("viewAccount", "account", account);
}
public ModelAndView findByFirstName(HttpServletRequest request,
HttpServletResponse response, SearchCriteria criteria) {
List<Account> accounts = accountService.findAccountsByFirstName(
criteria.getSearchBy());
return new ModelAndView("viewAccounts", "accounts", accounts);
}
public ModelAndView findByLastName(HttpServletRequest request,
HttpServletResponse response, SearchCriteria criteria) {
List<Account> accounts = accountService.findAccountsByLastName(
criteria.getSearchBy());
return new ModelAndView("viewAccounts", "accounts", accounts);
}
public static class SearchCriteria {
private String searchBy;
public String getSearchBy() {
return searchBy;
}
CHAPTER 6 ■ THE CONTROLLER MENAGERIE 173
584X_Ch06_FINAL 1/30/06 1:40 PM Page 173
public void setSearchBy(String searchBy) {
this.searchBy = searchBy;
}
}
}
Let’s chat a bit about this example, which highlights the strengths and weaknesses of this
Controller type. A strength of this Controller is that its superclass AbstractController pro-
vides helpful facilities such as enforcing allowed HTTP methods (as done in the constructor
in Listing 6-59). A shortcoming of this ability is that the allowed HTTP methods are common
across all request handlers inside the class, as there is no way to declaratively configure the
list of allowed request methods on a per–request handling basis. In this example, where all
requests are read-only, globally restricting to GET makes sense. If your MultiActionController
can handle different request methods at different times, you will have to declare those allowed
HTTP methods inside each handler method. For instance, the code from Listing 6-60 can be
used.
Listing 6-60. Ensure HTTP Methods
private void ensureMethod(HttpServletRequest request, String methods)
throws RequestMethodNotSupportedException {
for (String method : methods) {
if (request.getMethod().equals(method)) {
return;
}
}
throw new RequestMethodNotSupportedException("The request method " +
request.getMethod() + " is not allowed");
}
You can use such a method at the beginning of each request handling method (as shown
in Listing 6-61), but be sure to propagate the RequestMethodNotSupportedException as the
superclass knows how to deal with it.
Listing 6-61. Example of Ensuring HTTP Method for a Request Handling Method
public ModelAndView findByUsername(HttpServletRequest request,
HttpServletResponse response, SearchCriteria criteria)
throws RequestMethodNotSupportedException {
ensureMethod(request, METHOD_GET);
Account account = accountService.findAccountByUsername(
criteria.getSearchBy());
return new ModelAndView("viewAccount", "account", account);
}
CHAPTER 6 ■ THE CONTROLLER MENAGERIE174
584X_Ch06_FINAL 1/30/06 1:40 PM Page 174
■Tip This technique is nice because it fails fast and can protect the semantics of your request handling
method. Plus, it generates the appropriate HTTP error code (405) so that clients know exactly what the
error was.
A second strength you can see is that MultiActionController supports binding the
request to a command bean. For this example each request is using the same bean class,
SearchCriteria, but in fact each request handling method can use a different command bean
class. We are using a static inner class for convenience, but any type of JavaBean can be used.
The MultiActionController will, by default, create an instance of the specified command
bean by simply calling Class.newInstance(). A new instance of the command object is created
for every request. If you wish to change this behavior, override newCommandObject() in your
subclass. Options for alternate object creation include pulling an instance from a BeanFactory
or using method injection to transparently return a new instance.
A downside of using command beans is that, as we’ve mentioned before, the
MultiActionController doesn’t provide a form handling work flow. This means that if there
is a data binding error, there is no way to trap that exception inside the controller itself. The
exception handling facilities alluded to earlier only apply to exceptions thrown from inside the
request handling methods. Any data binding exceptions, or errors generated from validation,
are thrown outside the class. From there you can use the DispatcherServlet’s exception map-
ping and handling facilities, but this can become complicated. Our advice is to simply not
attempt to emulate a form handling, or intelligent command data binding, work flow with
MultiActionController. It is because of this that you do not see the use of Validators in this
example.
However, this controller does provide exception handling capabilities, useful for
business logic exceptions. We will now append our example (shown in Listing 6-62) to
include the handling of a AccountNotFoundException, which can be thrown by AccountService.
findAccountByUsername() in the event that the provided username did not locate an account.
Listing 6-62. Handling the AccountNotFoundException
public ModelAndView accountNotFound(HttpServletRequest request,
HttpServletResponse response, AccountNotFoundException e) {
List<String> errorMessages = new ArrayList<String>();
errorMessages.add("No account found for " +
request.getParameter("searchBy"));
return new ModelAndView("accountFindError", "errorMessages",
errorMessages);
}
The name of the method, in this case accountNotFound, has no bearing on the work flow
involved. The exception handling method must, however, return ModelAndView and have three
parameters: HttpServletRequest, HttpServletResponse, and an instance of Throwable.
If no exception handling method is found for a type of exception, a method for its super-
class will be searched for, until the class Throwable is encountered. This allows you to write
one exception handling method to encompass an entire exception class hierarchy.
CHAPTER 6 ■ THE CONTROLLER MENAGERIE 175
584X_Ch06_FINAL 1/30/06 1:40 PM Page 175