GWT in Practice phần 3 ppsx
Bạn đang xem bản rút gọn của tài liệu. Xem và tải ngay bản đầy đủ của tài liệu tại đây (672.42 KB, 37 trang )
57Running a completed project
development. Then we’ll move on to compiling things with
GWTCompiler
, which is
what is normally used as part of a build process to turn your Java into JavaScript and
create a deployable artifact for web mode.
2.4.1 Hosted mode and the GWT shell
When we ran
ApplicationCreator
, GWT created some shortcut scripts for invoking
GWTShell
and
GWTCompiler
with our project (as we noted in section 2.1). First we’ll
execute
GWTShell
using the
[PROJECT_HOME]/Calculator-shell
script (it will have a
platform-dependent extension).
Whether you have been following along and manually building the code for the
calculator sample in this chapter, or have downloaded it from the Manning web site,
the next step is to ensure that your environment is configured as it needs to be to sup-
port
GWT and the project itself, and then invoke
Calculator-shell
. This should
successfully invoke the example in the shell as shown in figure 2.8.
The background window in figure 2.8 is the
GWT shell, and the foreground is the
hosted mode browser running
CalculatorWidget
. The GWT shell, as noted in chapter 1,
includes a logging console where any problems will be displayed. This includes excep-
tions, which are passed up the call stack. The shell also includes buttons for manipu-
lating the log and launching the hosted mode browser.
Figure 2.8 The GWT shell and hosted mode browser running CalculatorWidget
58 CHAPTER 2 A New Kind of Client
Recall that the shell and the hosted mode browser execute your project as Java byte-
code, as opposed to JavaScript, when executed in web mode (which we’ll get to in a
moment). This means that from hosted mode, in addition to being able to quickly
recompile your code with the Refresh button, you can also use Java debuggers and
profilers, as you normally would with any Java project.
To connect to the
GWT shell for the purposes of debugging, you can use the Java
Platform Debugger Architecture (
JPDA), which is built into most JVM implementa-
tions, and your favorite
IDE. By invoking
com.google.gwt.dev.GWTShell
with the fol-
lowing command-line options, you can force the
GWT shell to delay startup until a
debugger has connected:
-Xdebug -Xnoagent -Djava.compiler=NONE
-Xrunjdwp:transport=dt_socket,server=y,address=8888,suspend=y
Using this technique, you can run the shell outside of your IDE, and then connect to it
with Eclipse, or NetBeans, or such, at
localhost:8888
. Once this connection is made,
the socket listener resets to the
HTTP listener from the shell and you can continue
your step-through debugging as you normally would.
Within the hosted mode browser, you’ll notice the standard browser navigation
buttons and a special Compile/Browse button that invokes the
GWT compiler for the
project. This takes you out of hosted mode (Java) and into web mode (JavaScript).
2.4.2 Web mode and the GWT compiler
GWTCompiler
, which we addressed in some detail in chapter 1, is the GWT facility that
compiles your Java source path code into JavaScript, and bundles it with your public
path resources in a deployable project form.
The Compile/Browse button made available in the
GWT shell will compile your
project, deploy it in a stripped-down development version of Apache Tomcat on the
local host (actually, the
GWT shell also uses this mini Tomcat for any service servlets
involved), and launch the project in the default configured browser for the machine.
As the screenshot in figure 2.9 shows, the browser used for web mode can be specified
(the machine default can be configured), so it can be different from the system
browser that hosted mode must use inside the shell.
Can the GWT shell browser be specified?
When you launch the GWT shell, you’ll notice that the hosted mode browser is the
system browser for the platform you are using. This means Internet Explorer on Win-
dows, Safari on Mac, and Mozilla Firefox on Linux. The hosted mode browser is actu-
ally based on SWT browser components, so it is not currently possible to specify or
configure which browser is used when running the shell. (This will change in the near
future with out-of-process hosted mode, which will allow you to use any supported
browser on a platform.)
59Summary
With the compile step, you are switching out of hosted mode and into web mode—
running your code as JavaScript instead of directly as Java. In addition to the Compile/
Browse button in the shell, the shortcut
ProjectName-compile
script, created by
ApplicationCreator
, can also be used to compile your project (which will place it
by default in the [
PROJECT_HOME]/www location).
You can, of course, also use the
GWT compiler manually, or with an IDE plugin, or
by using build tools such as Ant or Maven. Building and deploying projects, and the
related tools, are concepts we’ll address in chapter 8.
At this point we have a completed first project, which covered important basic
GWT concepts and patterns for client-side development, and we have run it in both
hosted and web modes.
2.5 Summary
In this chapter, we built a project with GWT the old fashioned way—on the command
line using the provided
GWT scripts and a text editor. Convenience and productivity
are important, so we’ll start using tools such as
IDEs in the next chapter, but the steps
we followed in this chapter should help you understand exactly what is going on
behind the scenes when you use those tools. Going through the motions manually the
first time, especially on a simple foundational project, will help your overall under-
standing in the long run.
You should now have a good general feel for the type of development possible with
GWT, and what the default layout and basic components of a GWT application are.
Understanding concepts such as modules, entry points, host pages, and the
GWT com-
pilation and bootstrapping process is essential when working on any
GWT application.
Although we stuck to the client side of the picture in this chapter, we still covered a lot
of ground with our first example. By creating a calculator as a reusable component,
we have demonstrated interface reuse. Within our calculator, we addressed layout,
Figure 2.9
CalculatorWidget
running in web mode,
using Firefox on a Mac,
after clicking the
Compile/Browse button
in the GWT shell
60 CHAPTER 2 A New Kind of Client
user input elements, event-driven design, and we implemented some very important
patterns on the client side.
While a basic calculator is a simplified example of the overall concepts, as it has a
minimal data model and very few actions to control, it does serve to demonstrate how
GWT can be used on the web tier as an entirely new kind of client: a client that includes
its own data and logic, and its own controller, in addition to a view. This client is inde-
pendent of the server tier, though still capable of server communications for data pur-
poses, and it is not based on pages rendered on a server and sent down with every user
action. This type of development, and the
MVC approach it employs, allows us to begin
migrating toward a more robust and responsive browser-based application.
In the next chapter, we’ll look at an example that communicates with a server
using
GWT RPC. This will follow up on the techniques presented in this chapter and
the basic concepts we introduced in chapter 1.
61
Communicating
with the Server
In general, an implementation must be conservative in its sending behavior, and
liberal in its receiving behavior.
—Jon Postel
In the last chapter, we examined the
MVC architectural pattern on the client and
created a simple client-side
GWT application. Naturally, the next thing we need to
do is learn how to communicate with server resources.
GWT provides a simple and asynchronous RPC and object-serialization mecha-
nism that allows the client and server to talk. This
RPC mechanism is the canonical
means of enabling client-server communications within
GWT, but it’s not the only
way. We’ll stay focused on standard
GWT RPC in this chapter, and we’ll cover the
other means in chapter 5, once we have a bit more background.
This chapter covers
■
Making RPCs with GWT
■
Using Tomcat Lite for development
■
Using an external development server
62 CHAPTER 3 Communicating with the Server
To work with the RPC support provided by the toolkit, we’ll also need to revisit the
core
GWT tools, the GWT shell and GWT compiler. The shell drives RPC development
by providing the server in which that development takes place—a stripped down ver-
sion of Apache Tomcat 5.0.x that hosts server resources. This embedded Tomcat Lite
can take some getting used to, even for experienced Tomcat users. The
GWT com-
piler, in turn, provides all the support for translating Java code into JavaScript. This
means that when we want to transfer a true object across the wire using
RPC, rather
than just using untyped
String
s, we need to know a bit about the compiler to do it
most effectively.
To begin building a
GWT application that can communicate with server resources,
we’ll start with a very simple “Hello World”
RPC project. Once we set up the code por-
tions of the project and lay out the
GWT RPC details, we’ll then step into the shell and
compiler in turn. By the time we reach the end of the example, you should have a
much better understanding of the core tools and
RPC technologies you’ll be working
with in
GWT. So let’s get started with “Hello Server.”
3.1 Making GWT Remote Procedure Calls
GWT enables client applications to communicate with server resources through its
own
RPC and object-serialization mechanism. This communication process involves
each side of the conversation implementing a very straightforward
GWT service inter-
face and sending/receiving special
GWT serialized data. The server side exposes
resources, and the client side invokes those resources asynchronously.
GWT intentionally keeps things very basic and optimizes the translation of data
from Java to JavaScript and vice versa. While this mechanism is really easy to work with
and to understand, it’s a
GWTism. That is to say, GWT does not use a standard or exist-
ing idiomatic approach—no
XML-RPC, SOAP, or REST is involved. But despite using its
own approach,
GWT can also communicate with existing services in additional ways to
facilitate integration, such as using plain
XML over HTTP (POX), or JSON. These are
additional methods, though; the native mechanism for
GWT client-server communica-
tion is
GWT RPC.
3.1.1 Starting the HelloServer project
We’ll use GWT RPC in our sample “Hello Server” application, aptly named HelloServer.
We’ll first define the data we want to pass across the wire, then create a server end-
point, which outlines a method that uses that data, and finally implement a client to
complete the process. Figure 3.1 shows what our completed HelloServer application
will look like.
In the last chapter, we used the
GWT
ApplicationCreator
utility to create our
basic project. We’ll use the same approach here, but we’ll also use the
GWT
Project-
Creator
utility to make Eclipse project files. After we use
ApplicationCreator
and
ProjectCreator
, we’ll build the example using Eclipse.
The
ProjectCreator
usage options are shown here and described in table 3.1.
63Making GWT Remote Procedure Calls
ProjectCreator [-ant projectName] [-eclipse projectName] [-out dir]
[-overwrite] [-ignore]
Let’s start by creating our application with
ApplicationCreator
, and then obtaining
our Eclipse project configuration with
ProjectCreator
, as follows:
mkdir [PROJECT_HOME]
cd [PROJECT_HOME]
[GWT_HOME]/ApplicationCreator \
com.manning.gwtip.helloserver.client.HelloServer
[GWT_HOME]/ProjectCreator -eclipse HelloServer
Running
ApplicationCreator
and
ProjectCreator
as shown will create your default
project template files and will create Eclipse-centric .project and .classpath files. From
there, you can open Eclipse and use the File > Import > Existing Projects Into Work-
space feature to import the HelloServer project.
Table 3.1 ProjectCreator parameters
Parameter Description
-ant
Generates an Ant build file to compile source (.ant.xml will be appended).
-eclipse
Generates an Eclipse project.
-out
The directory to which output files will be written (defaults to the current directory).
-overwrite
Overwrites any existing files.
-ignore
Ignores any existing files; does not overwrite them.
Figure 3.1
The HelloServer sample
application demonstrating
GWT server communications.
The last line on the screen
shows the server’s response
to the user’s input.
64 CHAPTER 3 Communicating with the Server
Once you have the HelloServer project in your Eclipse Navigator, you should see the
standard
GWT layout within it. Figure 3.2 displays the imported HelloServer project in
the Eclipse Resource perspective.
You should recall this standard layout from chapters 1 and 2, and the
-shell
and
-compile
script shortcuts should also be familiar. If you execute
HelloServer-shell
,
you’ll invoke
GWTShell
and you’ll see the standard template, “Click Me—Hello
World,” which every default
GWT project starts with.
With the basic project in place, we’re ready to move on to implementing Hello-
Server. We’ll start by defining our simple data model and looking at
GWT’s serializa-
tion mechanism.
3.1.2 Defining GWT serializable data
The first class we need to create is a simple data class, which we’ll call
Person
. Before
our
Person
objects can be passed from a GWT client application to an RPC service,
they must be marked with either the
com.google.gwt.user.client.rpc.IsSerial-
izable
or the
java.io.Serializable
interface. This is conceptually analogous to reg-
ular Java serialization, but in this case it’s used in a manner specific to
GWT. Also as in
regular serialization,
GWT will honor the transient modifier on class properties, allow-
ing them to be omitted if they are not themselves serializable.
NOTE While
IsSerializable
doesn’t define any methods, it’s imperative that your
IsSerializable
implementations declare a no-arguments constructor.
The
IsSerializable
interface is both important and problematic. It’s important
because it gives the
GWT compiler better information on what classes need to support
serialization. It’s problematic because it introduces a
GWT-specific dependency into
model classes, as you can see in listing 3.1, the
Person
class. While this is not a big
problem if you’re working entirely within the realm of your
GWT application, it could
quickly become a deal breaker if you wish to share object models with other Java proj-
ects in your organization.
Figure 3.2
The HelloServer project layout in the Eclipse
Resource perspective after
ProjectCreator
has generated the Eclipse project
65Making GWT Remote Procedure Calls
package com.manning.gwtip.helloserver.client;
import com.google.gwt.user.client.rpc.IsSerializable;
public class Person implements IsSerializable{
public String name;
public String address;
public Person(){
this(null, null);
}
public Person(String name, String address ) {
super();
this.name = name;
this.address = address;
}
}
Because of this GWT-dependency on
IsSerializable
, GWT 1.4 added support so that
java.io.Serializable
could be used in place of
IsSerializable
. This allows these
two marker interfaces to act interchangeably in a
GWT context. Generally, this helps
to ensure that model classes can be created without direct
GWT dependencies. Yet, it’s
important to understand that such model objects still need to be otherwise
GWT trans-
latable. That means they need no-argument constructors, and they cannot use Java 5
language features (for now).
Also, it’s important to understand that the
GWT implementation of
java.io.
Serializable
, though convenient, is just a marker interface meaning the same thing as
IsSerializable
—this is not the same as actual Java serialization support. The documen-
tation for the
GWT version of
java.io.Serializable
puts it this way: “public interface
Serializable
: Provided for interoperability; RPC treats this interface synonymously with
IsSerializable
. The Java serialization protocol is explicitly not supported.”
The bottom line is that you can use either
IsSerializable
or
Serializable
, and
they mean exactly the same thing to
GWT—this class is RPC translatable. The GWT
Serializable
emulation can help you avoid the GWT-specific
IsSerializable
dependency, but your model classes are still limited to what is possible with GWT.
Because of this, we’ll use the
IsSerializable
marker in this book’s examples to
make the association explicit. Keep in mind, though, that in real life you may be bet-
ter off using
Serializable
as long as you’re disciplined enough to remember the
implicit
GWT limitations.
In chapter 5, we’ll cover serialization in more detail, including the use of collec-
tions and
GWT JavaDoc style annotations to convey type information. We’ll also look at
using Data Transfer Objects (
DTOs) to move between different object models in chap-
ter 9. For this introductory example, though, we’ll keep the model simple, with just
our
Person
bean. We want to create our simple service infrastructure to illustrate the
GWT RPC basics.
Listing 3.1 The Person data object class
Declare no-args
constructor
66 CHAPTER 3 Communicating with the Server
3.1.3 Creating RPC services
GWT includes a GWT RPC package for enabling communications with server
resources. Constructing an
RPC service entails building two interfaces and a service
implementation.
You begin by creating a synchronous service interface, which extends the
GWT
RemoteService
interface and defines the methods your service exposes. Next, you cre-
ate an asynchronous interface based on the first synchronous one. This asynchronous
interface will have the same name as the synchronous interface, but with an Async suffix.
Importantly, the asynchronous interface does not extend
RemoteService
itself. The
asynchronous interface must have all the same methods as the synchronous one, except
that each of the asynchronous methods must declare a
void
return type, throw no excep-
tions, and have an additional final reference parameter of type
AsyncCallback
. These
two interfaces—one synchronous, one asynchronous—are the client side of the picture.
Finally, you must create a server-side implementation of your client-side synchronous
RemoteService
interface. This must extend the GWT
RemoteServiceServlet
class.
These three parts, the synchronous client service interface, asynchronous client
service interface, and server implementation service servlet, are the backbone of
GWT
RPC
. Table 3.2 restates these RPC components for reference.
In our example, we’ll add one more element to the mix in order to decouple our
implementation just a bit and make things more flexible. We’re going to put our
server-side
RemoteService
implementation in a separate class, apart from our
Remote-
ServiceServlet
implementation. This could be done in a single step—we could have
a server-side implementation that both implements
RemoteService
and extends
RemoteServiceServlet
in one fell swoop. However, we’ll separate these two as a best
practice, because in a larger project you may want to use the service implementation
outside of the context of your
GWT classes. With the
RemoteServiceServlet
separated,
Table 3.2 Components involved in creating a GWT RPC service
Required interface Extension Purpose
MyService RemoteService
Client side. Synchronous interface, used inter-
nally by GWT.
MyServiceAsync
None Client side. Asynchronous interface which, by
convention, backs the synchronous interface. It
must have the same name with an Async suffix,
must declare
void return type on all methods,
must throw no exceptions, and must include
AsyncCallback as the last parameter in
all methods.
MyServiceImpl RemoteServiceServlet
Server side. An implementation of the client-
side synchronous interface, which by convention
will be accessible in the client through the asyn-
chronous interface.
67Making GWT Remote Procedure Calls
you’re free to implement the
RemoteService
interface class itself in a Spring bean, an
Enterprise JavaBean (
EJB), or even through a SOAP service.
Figure 3.3 reinforces these points and also shows the structure we’ll use for our
HelloServer example.
It’s important to remember that all of the classes you use as arguments or returns
from the methods defined by your
RemoteService
interface must be GWT-serializable,
as we discussed in section 3.1.2. In addition, your remote interface and all the data
you wish to serialize must be part of your source path so that
GWTCompiler
finds these
resources and creates the appropriate JavaScript versions.
Getting into the
RPC code, we’ll start with the client-side synchronous interface,
HelloService.java
, which is displayed in listing 3.2.
package com.manning.gwtip.helloserver.client;
import com.google.gwt.user.client.rpc.RemoteService;
public interface HelloService extends RemoteService {
String sayHello(Person p);
}
Listing 3.2 HelloService.java
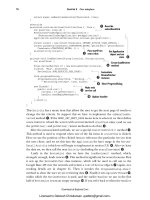
RemoteService
RemoteServiceServlet
HelloService
HelloServlet
RemoteServiceAsync
HelloServiceImpl
Person
AsyncCallback
<<depends>>
derived from
<<realize>>
Client Server
Figure 3.3 GWT RPC class diagram for HelloServer. Notice that the RemoteServiceAsync
class is not directly related to our service implementation or servlet; it’s associated
by convention.
Return a String,
accept Person
as input
68 CHAPTER 3 Communicating with the Server
Next, we need to create our client-side asynchronous interface, which is almost identi-
cal to the synchronous one with the previously noted exceptions (Async suffix,
void
return type,
AsyncCallback
as a parameter—the callback will be used to return the
value). Note that both of these client-side interfaces are in the default source path, the
.client
package. Listing 3.3 shows our
HelloServiceAsync.java
interface.
package com.manning.gwtip.helloserver.client;
import com.google.gwt.user.client.rpc.AsyncCallback;
public interface HelloServiceAsync {
void sayHello(Person p, AsyncCallback callback);
}
Last, we need to create the server-side implementation of our client-side
Remote-
Service
interface. Our service implementation is just going to be a plain old Java
object (
POJO), though again you could use many different techniques at this point.
This code for
HelloServiceImpl.java
is shown in listing 3.4.
package com.manning.gwtip.helloserver.server;
import com.manning.gwtip.helloserver.client.HelloService;
import com.manning.gwtip.helloserver.client.Person;
public class HelloServiceImpl implements HelloService {
public HelloServiceImpl() {
}
public String sayHello(Person p) {
return "Hello " + p.name + ". How is the weather at " + p.address +
"?";
}
}
Note that even though we created two client-side interfaces, one synchronous and one
asynchronous,
GWT doesn’t support synchronous communications with your client
application. You’ll never use the synchronous one.
The reason for this is browser-related, and technical, and you might be familiar
with it if you have done Ajax work in the past. The
XMLHttpRequest
object is asynchro-
nous; however, the JavaScript interpreter in many browsers is a single execution
thread. This means that if you tried to send a request and “spin” while waiting for the
callback event to execute, you’d spin forever. The callback event wouldn’t fire while
the JavaScript interpreter was spinning.
Now we have three classes, but we’re not quite done yet. The final piece is our
RemoteServiceServlet
implementation. This is the actual servlet that the web appli-
cation exposes, and with which the client-side classes communicate. Listing 3.5 shows
the code for our service servlet,
HelloServlet.java
.
Listing 3.3 HelloServiceAsync.java
Listing 3.4 HelloServiceImpl.java
Return type void,
AsyncCallback
parameter
included
Place in
server
package
69Making GWT Remote Procedure Calls
package com.manning.gwtip.helloserver.server;
import com.google.gwt.user.server.rpc.RemoteServiceServlet;
import com.manning.gwtip.helloserver.client.HelloService;
import com.manning.gwtip.helloserver.client.Person;
public class HelloServlet
extends RemoteServiceServlet
implements HelloService {
private HelloService impl = new HelloServiceImpl();
public HelloServlet() {
super();
}
public String sayHello(Person p) {
return impl.sayHello(p);
}
}
This completes our service: two simple interfaces on the client, one implementation
class on the server, and a service servlet to host and invoke the server-side implementa-
tion. Now that we have a basic service, we’ll explore the options available from the
RemoteServiceServlet
class.
3.1.4 Expanding on RemoteServiceServlet
While we’re wrapping our implementation, there are certain features provided by the
servlet specification we might want. Indeed, we might want to do a lot of things to a
request before it goes to the actual service implementation. The
RemoteServiceServlet
includes several methods you can call from within your servlet to access these features.
The important ones are outlined in table 3.3.
Listing 3.5 HelloServlet.java
Table 3.3 Selected methods of the RemoteServiceServlet
Method Function
getThreadLocalRequest()
Called from a service method to get the
HttpServletRequest, and HttpSession objects. It
can be used for server-side state with session or customizing
responses.
getThreadLocalResponse()
Called from a service method to get the
HttpServletResponse object. It can be used to custom-
ize the response, such as for setting custom headers.
onBeforeRequestDeserialized
(String)
Called before the request objects are deserialized, with the
serialization payload as an argument.
onAfterResponseSerialized
(String)
Called before the response serialized object is returned to
the client, with the serialized payload as an argument.
Implement service
interface
Instantiate
implementation
Pass through
from servlet to
implementation
70 CHAPTER 3 Communicating with the Server
The most important of the methods in table 3.3 are the two
ThreadLocal
methods,
which let you access the session state. For instance, if you were proxying the calls into
the
RPC service to a SOAP service, you could check the session and authenticate the user
with the
SOAP service on the first call, using the user information available in the
HttpServletRequest
object. From there, you could store the connect stub for the user
in the
Session
object, giving each user his own instance of the actual business object.
NOTE We’re skipping over service security in general in this section, for the
sake of simplicity, as this is our first
RPC example. However, it should be
kept in mind—the old saw, “never trust the client,” still applies. We’ll
cover more aspects of
RPC security in part 3.
You might not need the other methods listed in table 3.3 often, but they can be useful.
It’s important to remember that the Google serialization classes are available to you in
your application in the form of the
com.google.gwt.user.server.rpc.impl.Server-
SerializationStreamReader
and
ServerSerializationStreamWriter
. If, for instance,
you wish to change the service state based on information contained in the client
request, you can overload the methods in table 3.3 and inspect the message to the
server beforehand. Unfortunately these methods don’t provide you with the option
to filter or modify the serialization payload. To do that, you’d need to overload the
entire
processCall()
method and then make your changes before invoking the super-
class method.
All of this takes place on the server, but we also want to make calls from the client.
3.1.5 Calling the server from the client
In order to invoke our RPC services on the client, we need to get the asynchronous ser-
vice interface from the static
GWT.create()
method, bind it to a relative URL for our
HelloServlet
, create a callback handler, and make our call. Listing 3.6 demonstrates
this directly within the
EntryPoint
class,
HelloServer
. This class, now in our Eclipse
project, was initially created by the
ApplicationCreator
utility. We have entirely
replaced what was in the default HelloServer.java file with our code here. (For the
purposes of this example, we’re doing things directly in the entry point. We’re not
trying to develop with reuse in mind, as we did with our calculator example in
chapter 2.)
shouldCompressResponse
(HttpServletRequest,
HttpServletResponse,
String)
Called to determine whether Gzip compression should be
used on the response. The default behavior is
true if the cli-
ent accepts it and the response is greater than 256 bytes.
processCall(String)
Called to deserialize incoming payloads, call the appropriate
service method, and return a string response payload.
Table 3.3 Selected methods of the
RemoteServiceServlet (continued)
Method Function
71Making GWT Remote Procedure Calls
public class HelloServer implements com.google.gwt.core.client.EntryPoint {
private HelloServiceAsync service;
private TextBox name = new TextBox();
private TextBox address = new TextBox();
private Label response = new Label();
private AsyncCallback serviceCallback =
new AsyncCallback() {
public void onSuccess(Object result) {
String string = (String) result;
response.setText(string);
}
public void onFailure(Throwable caught) {
Window.alert("There was an error: " + caught.toString());
}
};
public HelloServer() {
super();
}
public void onModuleLoad() {
service = (HelloServiceAsync)
GWT.create(HelloService.class);
ServiceDefTarget endpoint = (ServiceDefTarget) service;
endpoint.setServiceEntryPoint(
GWT.getModuleBaseURL() +
"/HelloService");
RootPanel root = RootPanel.get();
root.add(new Label("Name"));
root.add(name);
root.add(new Label("Address"));
root.add(address);
Button button = new Button("Hello!",
new ClickListener() {
public void onClick(Widget sender) {
service.sayHello(new Person(name.getText(),
address.getText()), serviceCallback);
}
});
root.add(button);
root.add(response);
}
}
Our
HelloServer
entry point is intended to wire together our example with UI and event
handling. Within it, we create an
AsyncCallback
object to handle the return values from
our service
b
. (This could also have been done anonymously.) Then we use the static
GWT.create()
method to obtain a runtime reference to our service
c
, and implement a
ClickListener
to connect the click on the
Button
with the
sayHello()
service call
d
.
Listing 3.6 HelloServer.java
Create callback for
success and failure
b
Obtain Async service
for interface
c
Bind service
to HTTP path
Implement
ClickListener
to call service
d
72 CHAPTER 3 Communicating with the Server
The final step we need to complete is to set up our module file, Hello-
Server.gwt.xml, with our servlet mapped to
/HelloService
. If we take a look at the
existing HelloServer.gwt.xml file created by
ApplicationCreator
, we can see a single
<inherits>
element and a single
<entry-point>
class element. We need to add to
that a
<servlet>
element to represent our service, as shown in listing 3.7.
<module>
<inherits name='com.google.gwt.user.User'/>
<entry-point
class='com.manning.gwtip.helloserver.client.HelloServer'/>
<servlet path="/HelloService"
class=
"com.manning.gwtip.helloserver.server.HelloServlet"
/>
</module>
We now have a complete, working GWT application that makes a call back to the server!
While our example is not visually impressive, you should now be familiar with all the
moving parts involved in making an asynchronous invocation to server-side code.
To run this example in hosted mode, you can simply invoke
GWTShell
via the
HelloServer-shell
shortcut script. (This script was either created when you manu-
ally ran
ApplicationCreator
, if you have been following along and building the proj-
ect, or is provided with the code for this example on the Manning web site.) When
you run the example, the client will call the server, and, under the hood, Java objects
are being converted to the
GWT wire format and passed into JavaScript.
Figure 3.4 provides a visual overview of the entire
RPC process: from the user to the
client service interface, across the wire into the remote service servlet, and then to
the service implementation—and then back again.
Figure 3.5 shows an example request in hexadecimal format so that you can
see the special characters used during a service call invocation. While it’s not
important for you to have a complete understanding of the hexadecimal values,
this demonstrates an important point about the operation of the compiler in rela-
tion to the server.
As you can see in figure 3.5, the class name is the important information used in
the transfer and it’s followed by the properties and a sequence to identify which values
belong to which property. In
GWT (and unlike JSON) property names on objects can
change from compilation to compilation, but the
GWT client will always know the Java
class name of the object.
Now for the response:
{OK}[1,["Hello John Doe. How is the weather at Anytown, NA, 55555"],0,2]
First, we have the response code of the call to the server, followed by our single
return value. Since we’re returning a simple string value, it’s returned in the native
Listing 3.7 HelloServer.gwt.xml module with servlet entry added
Add servlet entry
to module
73Making GWT Remote Procedure Calls
User : ServiceInterface : RemoteServiceServlet : ServiceImplementation :
Initiates event
Calls HTTP service
Serializes and returns
Shows results to user
Deserializes and invokes method
Returns isSerializable
GWT stub deserializes
result and invokes
AsyncCallback
Figure 3.4 An overview of the complete RPC process. Notice that the user’s browser lifeline is freed
while the service call is executed; it’s monopolized again as the call is returned.
Figure 3.5
A GWT RPC request in
hexadecimal format.
Notice that the type
information is passed
for deserialization on
the server, along with
the attribute values.
74 CHAPTER 3 Communicating with the Server
JavaScript form. Once values are returned, they will frequently update the model
level of your Ajax application.
3.1.6 Troubleshooting server communication
If you begin getting errors in the form of “Deferred binding result type ‘module.client.
MyService’ is not instantiable” when you start creating
GWT RPC services, try the fol-
lowing. First, turn your
-logLevel
option up on the shell logging console to provide
additional clues as to what went wrong. Then, run through this checklist:
■
Make sure you’re casting your call to
GWT.create()
to
MyServiceAsync
and
not
MyService
.
■
Make sure your
MyService
interface extends
RemoteService
.
■
Make sure your return types and arguments all implement
IsSerializable
or
Serializable
.
■
Make sure the classes used as return types and arguments all have no-args
constructors.
■
Make sure the return types on methods in your
MyServiceAsync
class are
all
void
.
In addition to the plumbing of
GWT server communications and issues with regard to
naming and types, you may also be curious about handling synchronization and multi-
ple outstanding callbacks. Developers familiar with the issues surrounding asynchro-
nous, message-based programming will possibly look at the asynchronous nature of
Ajax messaging and overthink the issues of synchronization at the model level in their
GWT applications.
One important thing to remember is that all JavaScript on a page is executed
within the scope of a single thread. This means that while you might have multiple
outstanding callbacks waiting for invocation, only one will be called at a time. Unlike
invoking web services via the Java
API for XML Web Services (JAX-WS) from a Swing
application, there is no need to shift
UI changes from the thread invoking the call-
back to the painting thread, since all JavaScript is executed on the painting thread. To
borrow an analogy from Brian Glick (
single_threaded_javascript_multi):
With the single threaded browser environment, I think about a colony of bees. (WARNING:
Extremely strained metaphor coming!) The queen bee (the application) can tell the worker
bees (
XMLHttpRequest), “Go get me food.” However, when the bees return, only one can
give the food to the queen at a time. The rest have to sit in line and wait. From the bee
keeper’s standpoint, the environment is multi-threaded. All of these bees are swarming
around at the same time. However, we need to look at it from the perspective of the queen,
who only has to deal with one worker bee at a time.
That is to say, the problems usually associated with multithreaded programming in
Java don’t apply. Your Java will always execute in a single thread. You’ll never have
75The development server—Tomcat Lite
multiple callbacks executing on the client at the same time. Attributes will never be
modified outside of the current call stack. In opposition to the standard Servlet
API,
your client-side
GWT code will be single threaded across all the instances you create in
the code; it will be fundamentally static. There is no Swing event-dispatching thread.
There are no daemon timers. There is a single execution thread that all code will run
in, no matter the callback order.
Now that we have a working client/server communications example and have
explored object serialization and noted some troubleshooting techniques, let’s go
back and take a closer look at the development mode server that makes
GWT RPC
work in the shell—Tomcat Lite.
3.2 The development server—Tomcat Lite
As we have seen previously, the GWT shell uses a stripped-down and somewhat custom-
ized version of the Apache Tomcat servlet container as its development mode server.
While this is a Tomcat instance,
GWT sets things up differently to automate certain ele-
ments and facilitate quick and easy development mode use and testing.
GWT’s deployment of applications to the local Tomcat can be somewhat confusing.
Saying that
GWT uses Tomcat is much like saying that your favorite driver drives a
Camaro in
NASCAR races. It might look like a Camaro, people might even call it
a Camaro, but driving it’s not like driving the Camaro your local
GM dealer will sell
you.
GWT’s Tomcat has a custom deployment descriptor, web.xml, which includes the
configuration for the special
GWTShellServlet
. This servlet is used in hosted mode
only to automatically dispatch servlet entries from your module file into the appropri-
ate classes.
In addition,
GWT’s Tomcat doesn’t honor any Tomcat context-configuration infor-
mation (context.xml) stored in your application. Instead, the
GWT Tomcat instance
uses
ROOT.xml (its own variation of context.xml) and a set of pseudo-Tomcat home
directories. This can be limiting and frustrating for developers who want to include
additional container or application-level configuration for use inside Tomcat Lite.
The first thing you’re likely to want to modify to your own liking is web.xml.
3.2.1 The web.xml file
The Tomcat Lite development server won’t honor your application’s local web.xml
deployment descriptor by default, so this is usually the first thing you have to deal with
when it comes to setting up application-related parameters that you want in hosted
mode. In order to enable such resources as filters or custom security constraints in
your application in hosted mode, you can have your project’s build file create or mod-
ify the appropriate [
PROJECT_HOME]/tomcat structure.
The [
PROJECT_HOME]/tomcat directory, where the GWT shell’s development-
mode Tomcat Lite server is installed by default, has the following default structure:
76 CHAPTER 3 Communicating with the Server
[PROJECT_HOME]/tomcat
conf
web.xml (see listing 3.8)
gwt
localhost
ROOT.xml
webapps
ROOT
WEB-INF
web.xml (see listing 3.9)
With that structure in mind, we’ll take a look at the files themselves to understand
where to make modifications, should the need arise. The first web.xml file, shown in
listing 3.8, is the one global to the whole server. By default,
GWT sets this file up as a
stripped-down version of the Tomcat base web.xml file that just includes some com-
mon
MIME-type mappings. While the purist might argue that any MIME types you’re
going to use in your application should be included in your custom web.xml file,
many people don’t do this consistently.
<?xml version="1.0" encoding="ISO-8859-1" ?>
<! A tweaked version of the default Tomcat web.xml file
to remove everything except the stuff we want to use >
<web-app version="2.4">
<mime-mapping>
<extension>abs</extension>
<mime-type>audio/x-mpeg</mime-type>
</mime-mapping>
<! stuff omitted >
<mime-mapping>
<extension>zip</extension>
<mime-type>application/zip</mime-type>
</mime-mapping>
</web-app>
The second web.xml file, displayed in listing 3.9, is the GWT-generated mapping for
servlets specified in the module’s gwt.xml file through the previously noted special
servlet,
GWTShellServlet
. This effectively proxies servlet mappings for use in hosted
mode. (This servlet should never be deployed with your application—it’s only useful
for hosted mode.)
<?xml version="1.0" encoding="ISO-8859-1" ?>
<web-app version="2.4">
<servlet>
<servlet-name>shell</servlet-name>
Listing 3.8 The structure of the default server web.xml file
Listing 3.9 The special GWTShellServlet mapping web.xml file
77The development server—Tomcat Lite
<servlet-class>
com.google.gwt.dev.shell.GWTShellServlet
</servlet-class>
</servlet>
<servlet-mapping>
<servlet-name>shell</servlet-name>
<url-pattern>/*</url-pattern>
</servlet-mapping>
</web-app>
Working with these GWT-specific files and having your own web.xml configuration
ignored in a development context is, of course, limiting in a number of ways.
GWT
won’t honor your security parameters or filter chains. Nor will GWT inject resource
references into your
JNDI tree. Synchronizing the servlet entries in both your GWT
module file and a separate deployment descriptor that will later be included with your
deployed application is also a pain, and prone to “fat-finger” errors.
The solution is to somehow modify the Tomcat Lite web.xml files to include your
application’s local configuration information when you launch
GWTShell
. You can do
this by hand, but it’s much more convenient to have a build process that inspects a
local web.xml file (one that’s included in the source for your project, intended to be
used outside of the hosted mode when you deploy) and includes your configuration
information in the
GWT files automatically.
Because you don’t want to define servlet elements in two places, and you ulti-
mately want to have a web.xml file that’s deployed with your application that also
matters to the
GWT development server, you have a two-sided problem. That is, you
may have
GWT servlet elements defined in your module, and you may also have
other application resources, such as security realm information, defined in your
application’s web.xml. Yet you need configuration information from both sources to
be available in both places (in hosted mode for Tomcat Lite, and outside of hosted
mode in standard container format when deployed). To accomplish this, you can
inject your configuration into the Tomcat Lite web.xml for hosted mode use, and
you can copy the
<servlet>
elements from your module file into your web.xml for
standard deployment.
In order to make this happen, you can add some intelligence to your build process
to create a new web.xml file for hosted mode use. You can then use this new file to
replace the
GWT default webapps/ROOT/web.xml file. We’ll look into this and pro-
vide such an automated build process when we discuss using Ant and Maven to build
GWT applications in chapter 7.
The important thing to keep in mind here is that, regardless of how you do it, you
can modify the Tomcat Lite web.xml file for hosted mode configuration. You can also
modify the Tomcat context.xml context descriptor in the same manner.
3.2.2 The context.xml file
If you want to include configuration resources at the Tomcat context level when work-
ing with the embedded Tomcat instance, and also have those resources available in
78 CHAPTER 3 Communicating with the Server
hosted mode, you again have to manipulate the GWT Tomcat files. As an example,
we’ll deal with a common problem: defining
JNDI
DataSource
entries at the context
level. We provide a sample method for getting around the overall issue.
First off, let’s talk about dependencies.
GWTShell
’s Tomcat instance does not
include the libraries needed to load
DataSource
implementations into the JNDI tree
on its own. If you want to use Tomcat’s
DataSource
handling, you need to include
(from the Jakarta Commons project, ) the Commons-
DBCP
and Commons-Pool JAR files in the startup classpath for your project. You also need
to include the appropriate
JDBC driver for your particular database.
Once you have the dependencies in place, you have to start
GWTShell
once to get it
to write out a [
PROJECT_HOME]/tomcat directory tree. This is effectively what you’d
expect from
$CATALINA_HOME
in a regular Tomcat installation. Once this has hap-
pened, you can create or modify the main Tomcat Lite context file, which is renamed
ROOT.xml in GWT. This file can be used to define your
DataSource
s:
[PROJECT_HOME]/tomcat/conf/gwt/localhost/ROOT.xml
You can add your
DataSource
information to the ROOT.xml location, or copy a cus-
tom
META-INF/context.xml from your project into that location and rename it. The
configuration shown in listing 3.10 can be used as a reference.
<Resource name="jdbc/demogwt" auth="Container"
type="javax.sql.DataSource"/>
<ResourceParams name="jdbc/demogwt">
<parameter>
<name>factory</name>
<value>org.apache.commons.dbcp.BasicDataSourceFactory</value>
</parameter>
<parameter>
<name>driverClassName</name>
<value>com.mysql.jdbc.Driver</value>
</parameter>
<parameter>
<name>url</name>
<value>jdbc:mysql://localhost:3306/myDatabase</value>
</parameter>
</ResourceParams>
</Resource>
When you do this, of course, you’re duplicating your context information and once
again manipulating the Tomcat Lite files, rather than resources local to your project
as you might normally expect. This is ugly, but it does get around the issue of includ-
ing context resources and still makes development mode resources available as they
would be in production, because they will be present once things are deployed. (This
example is based on Tomcat 5.0.x. If you deploy to a newer version or a different plat-
form, you’ll have to deal with configuration differences.)
Listing 3.10 Example DataSource configuration for Tomcat 5.0.x context.xml
79Using an external development server
NOTE GWT will also let you specify a base Tomcat directory using the
cat-
alina.base
system property. You can use this behavior to specify an alter-
native internal Tomcat location, which gives you many options with
regard to creating and maintaining the internal Tomcat structure.
As an alternative to configuring the
GWT-embedded Tomcat server, you can also use
the hosted mode browser in standalone mode with an external servlet container by
passing the
-noserver
switch to
GWTShell
on the command line.
3.3 Using an external development server
GWTShell
includes the
-noserver
command-line option, which instructs the toolkit
not to start or use the embedded Tomcat instance. If you use
-noserver
, you’re essen-
tially telling
GWT that you’ll handle the server-side resources on your own, like a base-
ball player in the outfield calling a fly ball—“I got this one.”
There are pros and cons to this approach. On the plus side, it is very flexible, allow-
ing you to run any servlet container you want, with any configuration you need, all
within hosted mode. On the downside, the configuration is up to you, and it makes
sharing projects that involve
RPC more difficult when the embedded Tomcat is not uti-
lized. Overall, using
-noserver
is a great way to extend the server-side possibilities, as
long as you’re aware of the difficulties it can pose.
If you want to use
-noserver
, you’ll need to configure an external server and con-
text, and host a few files for your project there. To operate with the shell in hosted
mode, you’ll need to copy four files, at a minimum, from the compiled version of your
GWT module into your external context. These files are listed in table 3.4.
With your external container and context in place, you then simply need to invoke
GWTShell
with the
-noserver
option and specify the correct port and path. This
instructs the shell to point to the external server. Listing 3.11 shows a shell script for
the Mac platform that demonstrates the use of these options.
#!/bin/sh
ENTRY_POINT=com.manning.gwtip.calculator.Calculator
HOST_PAGE=Calculator.html
Table 3.4 Required external container files for GWTShell -noserver usage
File Purpose
ModuleName.html Host page
ModuleName.nocache.html GWT nocache initialization script
gwt.js Core GWT JavaScript (not application specific)
hosted.html Core hosted mode JavaScript (not application specific)
Listing 3.11 Example shell script for use with an external container
80 CHAPTER 3 Communicating with the Server
APPDIR=`dirname $0`;
CPGWT=$APPDIR/src
CPGWT=$CPGWT:$GWT_HOME/gwt-user.jar
CPGWT=$CPGWT:$GWT_HOME/gwt-dev-mac.jar
java -XstartOnFirstThread \
-cp $CPGWT com.google.gwt.dev.GWTShell \
-logLevel DEBUG -noserver -port 8080 "$@" \
$ENTRY_POINT/$HOST_PAGE
When you start the shell in this manner, it will invoke the hosted mode browser and
direct it to the specified path: http://localhost:8080/
ENTRY_POINT/HOST_PAGE. If
you wanted to, you could also not specify the port and path when you invoke the shell
(simply start it with only
-noserver
), and then manually launch the hosted mode
browser and type the correct
URL in the address bar.
As the hosted mode browser connects to the
HTML host page, it will look for a
module bootstrap reference and execute the Java code it finds on its classpath. Be
advised, though, that when using
-noserver
, server-side resources are completely out
of the realm of
GWT. This means server-side resources won’t instantly update to
changes like client-side resources do, and connecting a debugger, which can still be
done, must be done outside the shell. Also remember that you have to set up server-
side resources such as servlets, even for
GWT RPC, on your own.
Throughout most of this book, we’ll be using the Tomcat Lite instance as our host.
While we think the
-noserver
switch can be helpful, we also feel that working with
and understanding the embedded Tomcat instance is important. The reason not to
abandon Tomcat Lite and always use other options is that once you’re creating shared
GWT projects that include server-side resources, you end up passing the configuration
problem on. If you share
GWT RPC resources, and they don’t work in the stock toolkit,
or in some automated fashion with the stock toolkit, the usability, acceptance, and
adoption of your resources will likely plummet.
Later in the book, you’ll see a detailed example of using
DataSource
s, the Java Per-
sistence
API, and other common technologies within Tomcat Lite, and in chapter 7
we’ll cover the automation for manipulating your hosted mode configuration.
3.4 Summary
Being able to communicate with servers in a statically typed and asynchronous man-
ner is a great benefit of
GWT development. Your Ajax application, which can use MVC
on many layers (including on the client, as we saw in chapter 2), can include data
transfer of typed objects, collections, and exceptions.
In this chapter we looked at communicating with server-side resources using
GWT
RPC
, and at the GWT shell’s Tomcat Lite instance, how you can use it to speed your
own development, and how you can use an external server.
At this point, you should have a good working knowledge of the core technologies in
the toolkit. The
GWT shell will become your friend. It replaces your desktop servlet con-
tainer and web browser while you’re doing development tasks. And the
GWT compiler is
Use XstartOfFirstThread
on Macs only
Start shell with -noserver
and -port 8080
81Summary
a technical tour de force, allowing you to work on, and with, your object model in
Java, and still hand that off seamlessly to a JavaScript environment, making use of the
browser platform and all the advantages it provides.
Beyond basic
UI, client MVC, and GWT RPC, the toolkit also provides some useful
features that help handle things like state in an Ajax application, the ability to inte-
grate nicely with existing JavaScript tools and libraries, internationalization, and test-
ing. In the next chapter, we’ll take the technologies from the
GWT world and look at
how we can combine the
MVC architectural pattern, RPC service, and your existing
Java
EE knowledge in a typical application.