joomla for dummies phần 4 ppt
Bạn đang xem bản rút gọn của tài liệu. Xem và tải ngay bản đầy đủ của tài liệu tại đây (1.21 MB, 36 trang )
90
Part II: Joomla at Work
Figure 4-4:
Menu Item
Manager.
Figure 4-5:
Selecting an
internal link.
91
Chapter 4: Adding Web Pages to Your Site
Figure 4-6:
Selecting
an article
layout.
Figure 4-7:
The Article
Layout
page.
92
Part II: Joomla at Work
Setting the menu item’s attributes
To set various attributes of the menu item you’re creating, follow these steps:
1. In the Title and Alias text boxes, enter the title and alias, respectively,
of the new menu item.
For this exercise, type Privacy Policy as the menu item’s title and
privacy-policy as its alias.
2. Make sure that the Display In drop-down menu is set to the correct
menu.
In this example, Main Menu should be selected, because you clicked the
Menu Item(s) icon in the Main Menu row to create the new menu item in
the first place.
3. Make a selection in the Parent Item list to specify whether the new
menu item should be in a submenu.
You can make your new menu item a submenu item — that is, the child
of a parent menu. If you leave Top selected, your new menu item will be
a normal menu; if you select any other menu in this list, your new menu
item becomes a child item of that menu (and the user can see it by click-
ing the parent menu item).
4. In the Access Level list, set the access level of the new menu item.
You can choose among three levels:
• Public: visible to everyone
• Registered: visible to logged-in users
• Special: visible to administrators
For this exercise, accept the default setting (Public).
5. In the On Click, Open In list, specify how Joomla should display the
article when the user clicks your new menu item.
You have these choices:
• Parent Window with Browser Navigation
• New Window with Browser Navigation
• New Window without Browser Navigation
For this exercise, accept the default setting (Parent Window with
Browser Navigation).
93
Chapter 4: Adding Web Pages to Your Site
Linking the menu item to an article
The last step is linking the new menu item to a specific article. Follow these
steps:
1. Click the Select button in the Parameters - Basic section of the Article
Layout page (refer to Figure 4-7).
The article-selection page opens on top of the Article Layout page, as
shown in Figure 4-8.
Figure 4-8:
The article-
selection
page.
Note the Section and Category drop-down menus in Figure 4-8. You can
assign the new menu item to a section and category in this page, but leave
the menus alone for this exercise, because the article is uncategorized.
2. Select the Privacy Policy article.
The article-selection page closes.
3. Click the Save button to close the Article Layout page.
You return to Menu Item Manager, which displays a message that the
menu item was saved.
94
Part II: Joomla at Work
Testing the new menu item
But was your menu item really saved? Is it really active? Take a look at the
front page now (refreshing it, if necessary) to check. As you see in Figure 4-9,
the Main menu has a new item — Privacy Policy — at the bottom. Great!
Figure 4-9:
The front
page with
the new
menu item.
Clicking the new Privacy Policy menu item opens the Privacy Policy page
(created on the fly by Joomla), as you see in Figure 4-10.
What’s an ad doing on your new page? That ad is the product of the Banners
module, which displays banner ads. To remove those ads, unpublish the
Banners module in Module Manager — that is, click the green check mark in
its Enabled column to change it to a red X. (For more information on using
Module Manager, refer to Chapter 3.)
Congratulations — you’ve added a new Web page to the SuperDuperMegaCo
site. The head Web designer would be very proud. (Only 9,999 more pages
to go!)
Now that you’ve created an uncategorized article, you’re ready to create one
that fits into a category for easier navigation by users. That’s coming up next.
95
Chapter 4: Adding Web Pages to Your Site
Figure 4-10:
The new
page.
Organizing with Sections
You can add new articles to existing Joomla sections and categories, of
course. All you need to do is select an existing section and category when
you create a new article. Joomla comes with three built-in sections:
✓ About Joomla
✓ News
✓ FAQs
But it doesn’t come with the sections you need for the example
SuperDuperMegaCo site, which requires Ice Cream, Sandwiches, and Ocean
Liners sections. So how do you create them? This section shows you how.
Creating a new section
In Joomla, you create new sections with Section Manager. In this part of the
chapter, you use it to create a new section for the example Web site. Follow
these steps:
96
Part II: Joomla at Work
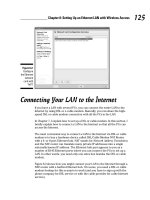
1. Click the Section Manager icon in the control panel, or choose
Content➪Section Manager in any back-end page.
Section Manager opens (see Figure 4-11).
Figure 4-11:
Section
Manager.
2. Click the New button.
The New Section page opens. The Scope option is already set to content,
meaning that the section will contain article content.
3. Enter the new section’s title in the Title text box.
For this exercise, type Ice Cream.
4. Enter an alias in the Alias text box, if you want to use one.
For this exercise, type ice-cream.
5. In the Published section, make sure that the Yes radio button is
selected.
This option specifies whether the section is published — that is, visible
to users.
6. Select an option in the Access Level list — Public, Registered, or
Special — to specify who can access the articles in the section.
For this exercise, select Public.
97
Chapter 4: Adding Web Pages to Your Site
7. If you want to give the section an image (see “Selecting a section image,”
later in this chapter), choose it from the Image drop-down menu.
For this exercise, choose articles.jpg.
8. If you chose an image in Step 7, set its position by making a choice
from the Image Position drop-down menu: Center, Left, or Right.
For this exercise, choose Left.
9. In the Description window, enter a description of your new section.
For this exercise, type This is SuperDuperMegaCo’s Ice Cream Section.
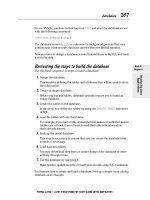
10. Click the Save button.
The New Section page closes, and you return to Section Manager, which
displays the new section (see Figure 4-12).
Figure 4-12:
A new
section in
Section
Manager.
Selecting a section image
The default Joomla installation comes with several image files:
✓ articles.jpg
✓ clock.jpg
98
Part II: Joomla at Work
✓ ext_com.png
✓ ext_lang.png
✓ ext_mod.png
✓ ext_plugin.png
✓ joomla-dev_cycle.png
✓ key.jpg
✓ pastarchives.jpg
✓ powered_by.png
✓ taking_notes.jpg
✓ web_links.jpg
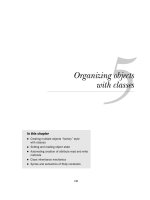
You can apply any of these images to a section in Section Manager. To pre-
view an image, select it in the New Section page of Section Manager (refer to
the preceding section), and Joomla displays it, as you see in Figure 4-13.
Figure 4-13:
Previewing
an image.
Organizing with Categories
The default Joomla installation comes with these nine categories (organized
in these sections):
99
Chapter 4: Adding Web Pages to Your Site
✓ The Project (section: About Joomla!)
✓ The CMS (section: About Joomla!)
✓ The Community (section: About Joomla!)
✓ General (section: FAQs)
✓ Current Users (section: FAQs)
✓ New to Joomla! (section: FAQs)
✓ Languages (section: FAQs)
✓ Latest (section: News)
✓ Newsflash (section: News)
Want to change the section a category is assigned to? Just click the category’s
name in Category Manager, choose the new section from the Section drop-
down menu, and then click the Save button.
For the example site you’re building, though, none of these categories will
work. The Ice Cream section you just created needs three categories: Bars,
Cartons, and Cones. In this section, you create a new category and assign
articles to it.
Creating a new category
To create a new category, follow these steps:
1. Click the Category Manager icon in the control panel, or choose
Content➪Category Manager in any back-end page.
Category Manager opens (see Figure 4-14).
2. Click the New button.
The New Category page opens.
3. Enter a title for the category in the Title text box.
For this exercise, type Cartons.
4. Enter an alias in the Alias text box, if you want to use one.
For this exercise, type cartons.
5. In the Published section, make sure that the Yes radio button is
selected.
6. From the Section drop-down menu, choose the section you want this
category to go in.
For this exercise, choose Ice Cream.
100
Part II: Joomla at Work
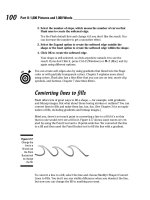
Figure 4-14:
Category
Manager.
7. Select an option in the Access Level list — Public, Registered, or
Special — to specify who can access the articles in the section.
For this exercise, select Public.
8. If you want to give the category an image (refer to “Selecting a section
image,” earlier in this chapter), choose it from the Image drop-down
menu.
For this exercise, choose articles.jpg.
9. If you chose an image in Step 8, set its position by making a choice
from the Image Position drop-down menu: Center, Left, or Right.
For this exercise, choose Left.
10. In the Description window, enter a description of your new section.
For this exercise, type This is SuperDuperMegaCo’s Ice Cream Cartons
category.
At this point, your settings should look like Figure 4-15.
11. Click the Save button.
The New Category page closes, and you return to Category Manager,
where you see the new category (line 8 in Figure 4-16).
Great — now you’ve added a new section (Ice Cream) and a new category
(Cartons) to your site. Now how about adding some articles to that new sec-
tion and category?
101
Chapter 4: Adding Web Pages to Your Site
Figure 4-15:
Creating a
category.
Figure 4-16:
A new
category in
Category
Manager.
102
Part II: Joomla at Work
Adding articles to a new category
In this section, you continue this process by creating new articles and adding
them to the new category.
For your example site, you get an e-mail from SuperDuperMegaCo, indicat-
ing that the company offers the finest ice cream in three flavors: chocolate,
vanilla, and sardine. You need to create new articles for each of these flavors
and then add those articles to the Cartons category of the Ice Cream section.
And you do just that in this section.
Adding one article
To add an article to a category, follow these steps:
1. Click the Add New Article icon in the control panel.
The Add New Article page opens.
2. Enter a title for the new article in the Title text box.
For this exercise, type Chocolate Ice Cream.
3. Enter an alias for the new article in the Alias text box.
For this exercise, type chocolate-ice-cream.
4. Choose Ice Cream from the Section drop-down menu.
5. Choose Cartons from the Category drop-down menu.
6. In the text window at the bottom of the page, enter a description.
At this point, your settings should look like Figure 4-17.
7. Click the Save button.
The Add New Article page closes, and Article Manager opens, displaying
the new article (line 37 in Figure 4-18).
Adding more articles
You can continue adding articles to a category by repeating the steps in the
preceding section.
For the example Web site, repeat the procedure twice to add these articles:
✓ A Vanilla Ice Cream article in the Ice Cream section and the Cartons
category
✓ A Sardine Ice Cream article in the Ice Cream section and the Cartons
category
Now all three articles — Chocolate Ice Cream, Vanilla Ice Cream, and Sardine
Ice Cream — appear in Article Manager, as you see in Figure 4-19.
103
Chapter 4: Adding Web Pages to Your Site
Figure 4-17:
Creating a
new article.
Figure 4-18:
A new arti-
cle in Article
Manager.
104
Part II: Joomla at Work
Figure 4-19:
Three new
articles
in Article
Manager.
As you may recall from “Linking Articles to Menu Items,” earlier in this chap-
ter, to make these three new articles visible on your site, you have to connect
them to menu items. You do that in the following section.
Choosing a Menu Structure
Now it’s time to link your categorized articles to menu items.
For the example site you’re building, you need to make the Chocolate
Ice Cream, Vanilla Ice Cream, and Sardine Ice Cream articles visible to
users. You’ll link them to the Main menu, because ice cream is one of
SuperDuperMegaCo’s main products.
You have three choices:
1. Add the three articles to the Main menu as three separate menu items.
2. Add an item to the Main menu that points to the Ice Cream section.
3. Add an item to the Main menu that points to the Cartons category.
You consider these choices.
105
Chapter 4: Adding Web Pages to Your Site
Option 1: Adding three menu items
The first choice works like this:
Main Menu Articles
| | | Chocolate |
|Chocolate Ice Cream | >| Ice Cream |
| | | |
| |
| |
| | | Vanilla |
| Vanilla Ice Cream | >| Ice Cream |
| | | |
| |
| |
| | | Sardine |
| Sardine Ice Cream | >| Ice Cream |
| | | |
But this choice — add three new items to the Main menu, for chocolate ice
cream, vanilla ice cream, and sardine ice cream — doesn’t seem like such a
good idea. As you added more articles, you’d need more menu items. And if
SuperDuperMegaCo really is planning a site with 10,000 pages . . . well, that
would be a lot of menu items.
Option 2: Adding a menu item
that points to a section
The second choice works like this:
Main Menu Section Articles
| | | | | Chocolate |
|Ice Cream Flavors | >| Chocolate| >| Ice Cream |
| | | |
| | | |
| | | | | Vanilla |
| | | Vanilla | >| Ice Cream |
| | | |
| | | |
| | | | | Sardine |
| | | Sardine | >| Ice Cream |
| | | |
106
Part II: Joomla at Work
This option — creating a menu item that points to the Ice Cream section —
seems as though it might work. The problem is that such a menu item would
take the user to a page that summarizes all the articles in the section, regard-
less of category. If you add the Bars and Cones categories to the Ice Cream
section, not only are you going to have a lot of articles, but also, you may
get the user mixed up. Which articles are for bars, which are for cones, and
which are for cartons?
Option 3: Adding a menu item
that points to a category
The third idea works like this (note that the example links to just a category,
not a whole section):
Main Menu Category Articles
| | | | | Chocolate |
|Ice Cream Flavors | >| Cartons | >| Ice Cream |
| | | |
| | | |
| | | | | Vanilla |
| | | | >| Ice Cream |
| | | |
| | | |
| | | | | Sardine |
| | | | >| Ice Cream |
| | | |
This plan — create a menu item for the Cartons category — seems to be the
most workable. That way, all the flavors in that category will be summarized
in a single page, and the user can choose among them. Ice cream bars and
cones can have their own menu items, which will take the user to their own
article summary pages.
In the following section, you put this plan to work.
Linking Categories to Menu Items
When you decide how you want to structure your menus to point to articles
in specific categories, you’re ready to do the actual linking.
For your example site, you want to create an Ice Cream Flavors item in the
Main menu and link that item to the Cartons category. The link will display a
summary of the three ice-cream-flavor articles, and users can select the one
they want to read. The following sections show you how.
107
Chapter 4: Adding Web Pages to Your Site
Creating the category menu item
To create a new menu item that points to a specific category on your site,
follow these steps:
1. Click the Menu Manager icon in the control panel or choose
Menus➪Menu Manager.
Menu Manager opens.
2. Click the icon in the Menu Item(s) column of the Main Menu row.
Menu Item Manager opens.
3. Click the New button.
Joomla displays the New Menu Item page.
4. Expand the node tree by clicking Internal Link➪Articles➪Category
(see Figure 4-20).
Figure 4-20:
The
expanded
tree in the
New Menu
Item page.
5. Below the Category node, click Category Blog Layout.
The Category Blog Layout page opens.
This page doesn’t actually create a blog. Blog Layout is Joomla’s way of
saying that each article will be summarized (the first sentence or two will be
displayed) and that you can add a Read More link so that users can read the
rest of the article. (See “Creating Read More Links,” later in this chapter.)
108
Part II: Joomla at Work
6. Enter a title for the new menu item in the Title text box.
For this exercise, type Ice Cream Flavors.
7. Enter an alias for the new menu item in the Alias text box.
For this exercise, type ice-cream-flavors.
8. On the right side of the page, click Parameters - Basic to expand that
section, and choose Ice Cream/Cartons from the Category drop-down
menu.
At this point, your choices should look like Figure 4-21.
Figure 4-21:
Creating a
new cat-
egory menu
item.
9. Click Save.
The Category Blog Layout page closes.
10. View the front page in a browser or click the Preview link in any back-
end page.
You see the new menu item — Ice Cream Flavors, in this example.
11. Click the new menu item to display the new category page (see
Figure 4-22).
If you scroll up and down the page, you can see all the articles: choco-
late ice cream, vanilla ice cream, and even sardine ice cream. Looks
good, right?
109
Chapter 4: Adding Web Pages to Your Site
Figure 4-22:
A new cat-
egory page.
Creating Read More Links
What Joomla calls blog layout is really called that because it presents a sum-
mary of each article followed by a Read More link — not because you’re actu-
ally writing a blog. In this section, you see how to add Read More links to a
category page, so that you don’t have to display the entire text of each article
on the front page.
To add Read More links to a category page, follow these steps:
1. Click the Article Manager icon in the control panel or choose
Content➪Article Manager in any back-end page.
Article Manager opens.
2. Open an article that you want to add a Read More link to.
For this exercise, open the Chocolate Ice Cream article in Article
Manager.
3. Scroll to the bottom of the page, where you find the Read More button.
4. Click the place in your article’s text where you want that link to
appear; then click the Read More button.
For this exercise, click after the second sentence.
Joomla inserts a red dotted line (black in this book!), as you see in
Figure 4-23.
110
Part II: Joomla at Work
Figure 4-23:
Inserting a
Read More
link.
5. Repeat Steps 2–4 for any other articles to which you want to add links.
For this exercise, add links for the Vanilla Ice Cream and Sardine Ice
Cream articles.
6. View your front page again, and click the link to the category page for
which you added Read More links.
For this exercise, click the Ice Cream Flavors link in the Main Menu pane.
The category page opens, displaying your new Read More links (see
Figure 4-24).
7. Click a link to open the corresponding article in full (see Figure 4-25).
That’s great — but you may have noticed that Joomla got the order of your ice
cream articles in the category page wrong. SuperDuperMegaCo wants this order:
✓ Chocolate
✓ Vanilla
✓ Sardine
111
Chapter 4: Adding Web Pages to Your Site
Figure 4-24:
A category
page with
Read More
links.
Figure 4-25:
The full
article.
112
Part II: Joomla at Work
But Joomla gave you this order:
✓ Sardine
✓ Vanilla
✓ Chocolate
This arrangement is in reverse because by default, the most recently created
article goes at the top of the category. How can you fix the order? You see
how in the following section.
Adjusting Article Order
How can you alter the position of articles? You use Article Manager (click
the Article Manager icon in the control panel or choose Content➪Article
Manager in any back-end page). As Figure 4-26 shows, however, Article
Manager displays too many articles to work with conveniently.
Figure 4-26:
Articles
displayed
in Article
Manager.
Now you see another advantage of dividing your articles into sections and
categories: You can use those divisions to filter articles in Article Manager
and work with just the ones you want.
113
Chapter 4: Adding Web Pages to Your Site
Joomla currently has only two levels of organization: sections and categories.
But plans are afoot to make the organizational levels infinite (presumably by
numbering them) in future versions of Joomla.
Filtering articles
Chapter 3 also discusses filtering articles, but we give you a refresher in this
section. To filter articles in Article Manager, choose the section and category
you want to view from the Section and Category drop-down menus at the top
of the page.
For this exercise, choose the Ice Cream section and Cartons category. Article
Manager displays just those articles (see Figure 4-27).
Figure 4-27:
Filtered
articles
in Article
Manager.
Reordering articles in Article Manager
When you’ve filtered Article Manager to display just the articles you want to
work with, you’re ready to change their order. Follow these steps:
1. In the Order column (refer to Figure 4-27), click the green up and
down arrows to position articles where you want them, or enter ordi-
nal numbers in the text boxes.
114
Part II: Joomla at Work
For this exercise, enter 1 for Chocolate Ice Cream, 2 for Vanilla Ice
Cream, and 3 for Sardine Ice Cream.
2. Click the floppy-disk icon at the top of the Order column.
Joomla displays the articles in the new order (see Figure 4-28).
Figure 4-28:
Reordered
articles.
You did it, right? Actually, no. Changing the order of articles in Article
Manager only changes the order of articles in Article Manager. If you look at
the category page for the Cartons category, you see that the article order is
unchanged.
To change the order in which articles appear in the category page, you need
to use Menu Manager, as we show you in the following section. (For more
information on Menu Manager, refer to “Creating the menu item,” earlier in
this chapter; also see Chapter 3.)
Reordering articles in the category page
To reorder articles in the category page, follow these steps:
1. Click the Menu Manager icon in the control panel or choose
Menus➪Menu Manager in any back-end page.
The Menu Manager opens.