joomla for dummies phần 6 docx
Bạn đang xem bản rút gọn của tài liệu. Xem và tải ngay bản đầy đủ của tài liệu tại đây (1.48 MB, 36 trang )
162
Part II: Joomla at Work
Figure 6-16:
Table of
contents.
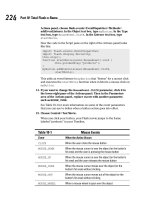
In Figure 6-16, notice that Joomla uses the article’s title as the title of the first
page in the article. The text links are the names of page breaks, and Joomla
displays << Prev and Next >> links to let users navigate from page to page.
The All Pages link in the table of contents displays the whole article without
page breaks.
Back (And Forth) to the Future:
Publishing at Different Times
You may have articles that need to appear on a certain schedule. Perhaps
you’re promoting a picnic (and need to take down the notice about it when
the picnic is over) or a theatrical production (and need to display the notice
only when tickets are available). Joomla helps with this task.
Publishing articles in the future
You can create articles that will be published at some future time. Suppose
that your not-for-profit organization is running a raffle from now until
163
Chapter 6: Mastering Web Page Creation
March 2, 2010, and you want to publicize the raffle You create this article by
clicking the Add New Article icon in the control panel or by clicking the New
button in Article Manager.
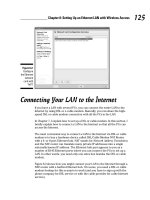
Suppose, however, that you don’t want this article to appear until December.
To make sure of that, set the publication details in the Parameters - Article
section on the right side of the article editor. To start publishing on
December 1, 2009, at midnight, for example, enter 2009-12-01 in the Start
Publishing text box (see Figure 6-17).
Be sure to use yyyy-mm-dd format when you enter the date.
Figure 6-17:
Setting a
date to start
publishing
an article.
Stopping publishing in the future
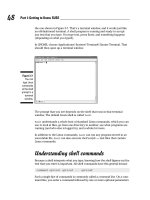
You can also end the publication of an article on a date in the future. To
continue the example in the preceding section, perhaps the raffle ends
March 2, 2010, so you’d want to stop publication on that date.
That’s easy enough to do. To make Joomla end the publication of an
article (or unpublish the article, taking it off the site), enter the stop date
in the Finish Publishing text box of the Parameters - Article section (see
Figure 6-18).
164
Part II: Joomla at Work
Figure 6-18:
Automati-
cally ending
publication
of an article.
Unpublishing now
Finally, you can unpublish an article in the present — right now or an hour
from now, for example.
To unpublish an article in Joomla, follow these steps:
1. Click the Article Manager icon in the control panel or choose
Content➪Article Manager in any back-end page to open Article
Manager.
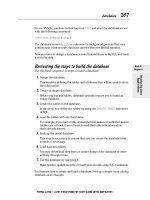
2. In the article’s Published column, click its green check mark to
change it to a red X.
Figure 6-19 shows the Privacy Policy article being unpublished.
Unpublishing an article doesn’t remove the menu item that points to
it, however. The menu item is still listed in its original menu, and if
users click that item, they get an error page. So you have to unpublish
the menu item as well.
3. To unpublish the menu item, click the Menu Manager icon in the
control panel or choose Menus➪Menu Manager in any back-end page
to open Menu Manager.
4. In the Published column of the appropriate menu item, click the green
check mark to change it to a red X.
You’ve unpublished both the article and its menu item.
165
Chapter 6: Mastering Web Page Creation
Figure 6-19:
Unpub-
lishing an
article in
Article
Manager.
Now you’re ready to tackle a big topic: user interaction. One of the appealing
things about Joomla sites is that they promote interaction, which means
that users can submit their own articles to you. How you actually handle
submissions is up to you.
Making Your Joomla Site Interactive
When it comes to being a back-end administrator, you’re all-powerful in
Joomla. You can sweep down from the heavens and change just about
anything on the site. Your power is enormous.
But where does that leave the site’s users? Part of making a site grow is
getting people involved; that’s how viral marketing works, for example.
Joomla is up to the challenge.
Three levels of users don’t have back-end privileges, but they can submit
and work with the content in your site if you allow them to:
✓ Authors can submit articles.
✓ Editors can submit articles and make changes to them.
✓ Publishers can submit, change, and publish articles.
166
Part II: Joomla at Work
Authors can submit articles, but someone in the back end has to approve
them before they appear. Editors can submit and edit articles. And
publishers can submit articles, edit articles, and publish them. (For more
details on these roles, see “Authors and Editors and Publishers, Oh My!”,
later in this chapter.)
We’ve found that editors are more common than authors except on very large
sites. Site administrators seem to like enabling users to edit site content,
which saves the administrators all the trouble of doing it themselves.
Adding and managing users
To add users to your site and assign roles to them, you employ User
Manager. Follow these steps:
1. Click the User Manager icon in the control panel or choose Site➪User
Manager in any back-end page to open User Manager.
2. Click the New button.
An Edit User page opens.
3. In the User Details section, enter the user’s name, username, e-mail
address, and password.
4. To give the user author, editor, or publisher privileges, select the
appropriate role in the Group list (see Figure 6-20).
Figure 6-20:
Creating a
new author.
167
Chapter 6: Mastering Web Page Creation
5. Click the Save or Apply button.
Creating new users is just that quick. The full details on User Manager are
laid out in detail in Chapter 9, if you’re interested.
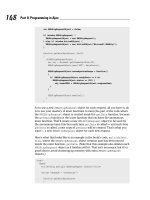
To illustrate the discussion in this section, we created three new users:
author, editor, and publisher, shown in User Manager in Figure 6-21. As you
might guess, these users’ privilege levels match their names, as you see in
the Group column.
To let your new users submit content, you need an article submission page,
which you create in the following section.
Figure 6-21:
Three new
users:
author,
editor, and
publisher.
Creating an article submission page
Article submission pages let authors, editors, and publishers write their own
content and submit it. You create an article submission page by creating a
new menu item that points to an article submission layout.
168
Part II: Joomla at Work
Take a look at the default Joomla’s site’s front page, shown in Figure 6-22. A
Key Concepts menu appears right above the login form that authors, editors,
and publishers use to log in from the front end.
You can add a menu item to the Key Concepts menu and link that new menu
item to an article submission page. To create that new menu item in the Key
Concepts menu, follow these steps:
1. Click the Menu Manager icon in the control panel or choose
Menus➪Menu Manager in any back end page to open Menu Manager.
2. Click the icon in the Menu Item(s) column of the Key Concepts row.
Menu Item Manager opens (see Figure 6-23).
3. Click the New button.
The New Menu Item page opens.
4. Click Internal Link➪Articles➪Article➪Article Submission Layout (see
Figure 6-24).
The Article Submission Layout page opens.
Figure 6-22:
The Key
Concepts
menu.
169
Chapter 6: Mastering Web Page Creation
Figure 6-23:
Menu Item
Manager.
Figure 6-24:
Creating
an article
submission
page.
170
Part II: Joomla at Work
5. In the Menu Item Details section, enter a title in the Title text box,
and select a setting in the Access Level list (bottom-left corner of
Figure 6-25).
Here are your access-level choices:
• Public: Everybody
• Registered: Logged-in users
• Special: Authors, editors, publishers, and administrators
6. Click the Apply or Save button to create your new menu item.
Congratulations — you’ve also created a new article submission page.
Figure 6-25:
Configuring
a new
article
submission
page.
Viewing the link to the article
submission page
How do you access the new article submission page? If a casual user (without
site privileges) looks at the menu, he won’t see anything special. For this
example, he’d see just the same Key Concepts menu shown in Figure 6-22,
earlier in this chapter.
But if the user named author used the login form on the front page to
log in, she’d find the new menu item in the Key Concepts menu (see
Figure 6-26). Cool!
171
Chapter 6: Mastering Web Page Creation
Figure 6-26:
The new
menu item,
visible after
login.
Authors and Editors and
Publishers, Oh My!
In this section, we take a look at the capabilities enjoyed by the special users:
authors, editors, and publishers. Different levels of users have different levels
of options available to them.
Authors can write articles
Assuming that you’re logged in as an author, and you click the appropriate
menu item, the article submission page appears. Then you can enter and edit
text, as shown in Figure 6-27.
Figure 6-27:
Creating a
new article.
172
Part II: Joomla at Work
In the figure, the author is submitting a new article named Neighborhood
watch, with the dotted line indicating a Read More link. (For details on Read
More links, see Chapter 4.)
Submitting an article (author)
Farther down the page, you can select the proposed article’s section and
category. (In Figure 6-28, the author has selected the News section and the
Latest category.) You can enter metadata for the article as well.
When you’re done with the new article, click the Save button. Joomla
takes you back to the front page and displays a thank-you message
(see Figure 6-29).
To log out as author, click the Logout button that appears on the front page
after you log in.
Figure 6-28:
Selecting
a new
article’s
section and
category.
Approving an article (administrator)
So how do administrators learn about new article submissions? Log in to
the back end as an administrator and check the mail icon in the top-right
corner of the page. If you see a number next to this icon, you have mail
waiting (see Figure 6-30).
173
Chapter 6: Mastering Web Page Creation
Figure 6-29:
Submitting a
new article.
Figure 6-30:
A new mail
message
for an
admini-
strator of a
Joomla site.
Mail icon
174
Part II: Joomla at Work
The number next to the people icon in the top-right corner tells you how many
people are logged on currently.
Click the mail icon to open the page you see in Figure 6-31, and select the title
to open the message — in this case, a new article.
You can read the submitted article in Article Manager as well by clicking the
article’s title in that page.
Figure 6-31:
A new
message.
Editors can make changes
Unlike authors, when editors log in, they see a page like the one shown in
Figure 6-32. Notice the difference? An Edit icon at the top of all articles allows
editors to revise articles.
If you’ve logged in as an editor, click an article’s Edit icon to open its editing
page. (Figure 6-33 shows an example.) Make any changes to the article that
you want; then click the Save button. The changes are saved and appear on
the site immediately.
175
Chapter 6: Mastering Web Page Creation
Figure 6-32:
The Edit
icon.
Figure 6-33:
Editing an
article.
176
Part II: Joomla at Work
Sometimes when an editor tries to edit an article, he gets a message from
Joomla saying that the article can’t be edited because someone else is already
editing it — even if nobody is. This situation can happen when editors don’t
click the Save or Apply button to save their changes to an article before leav-
ing the editor window. To check in all checked-out articles — and make them
accessible to editors — choose Tools➪Global Checkin in any back-end page.
Publishers can post articles
The last of the front-end-content manipulators are publishers. In practical
terms, publishers are the same as editors, except that they can also publish
articles to the site.
If you log in as a publisher and then create or edit an article, you see the
two options that set publishers apart from editors: the Published and Show
on Front Page radio buttons (see Figure 6-34). (Start Publishing and Finish
Publishing options are also available to publishers, as you see in the figure.)
Those two options, which don’t appear for authors or editors, allow
publishers to publish articles to the site — even on the front page.
Figure 6-34:
Publishing
options.
Stand Up and Be Counted:
Tracking Page Hits
You can track the number of hits a page on your site has received. Just check
the Hits column in Article Manager (see Figure 6-35).
177
Chapter 6: Mastering Web Page Creation
Figure 6-35:
Checking
the number
of hits each
page has
received.
Hits
How can you reset the number of hits an article has to zero? Open the article
in the article editor, and click the Reset button on the right side, next to the
hit counter (the third item down on the right side).
See You Later, Alligator:
Taking the Site Offline
One day, you may get a call from a client, who screams into the phone,
“We’re not ready! Take the site offline!”
Take the site offline? How do you do that? You can use the Global
Configuration feature. Follow these steps:
1. Choose Site➪Control Panel in any back-end page to open the control
panel; then double-click the Global Configuration icon.
or
Choose Site➪Global Configuration in any back-end page.
Either way, the Global Configuration page appears, open to the Site tab.
Notice the first option in the Site Settings pane: Site Offline. That setting
is the one you want.
178
Part II: Joomla at Work
2. Select the Yes radio button in the Site Offline section.
3. Click Apply.
4. Click the Save button.
Your site is down, and surfers see the message shown in Figure 6-36.
Figure 6-36:
The site is
down.
Want to bring the site back up? Follow these steps:
1. Reopen the Global Configuration page.
2. In the Site Offline section of the Site tab, select the No radio button.
3. Click Apply; then click Save.
Your site is back in business.
Part III
Working with
Joomla Modules
and Templates
In this part . . .
T
his part has fun with Joomla modules and templates.
Modules are those items that appear around the
periphery of your page: menus, polls, newsflashes,
banners, search boxes, custom HTML, and more. Joomla
comes with dozens of built-in modules, and this part of
the book is where you master them.
We also cover working with Joomla templates in this part.
Templates determine every aspect of the layout of your
pages, from where the modules go to the images and colors
they use. Although Joomla comes with limited template
choices, you can download thousands of additional
templates from the Internet.
Chapter 7
Fun with Modules: Advertisements,
Archives, Banners, Custom
HTML, and More
In This Chapter
▶ Understanding modules
▶ Working with ads
▶ Archiving articles
▶ Providing breadcrumbs
▶ Making a Custom HTML module
▶ Adding an RSS feed to your site
J
oomla modules are those great embedded applications that appear
around the edges of your pages. The newsflash (see Chapter 3), which
rotates news stories on the front page, is a module. So is the poll that
appears on the front page. So are the very advertisements that can appear on
Joomla pages.
In fact, even menus are modules in Joomla.
The chapters in Parts I and II of this book provide a tour of content handling
in Joomla. This chapter and the next one, however, cover modules.
All about Modules
You handle modules in Joomla with Module Manager, which you open by
choosing Extensions➪Module Manager in any back-end page. Figure 7-1
shows Module Manager in the default Joomla installation.
This tool is the main one we use in this chapter and Chapter 8.
182
Part III: Working with Joomla Modules and Templates
Figure 7-1:
The default
Joomla
Module
Manager.
To work with an individual module, click its name in Module Manager; a cus-
tomization page for that module opens.
Here are the modules in the default Joomla installation, arranged alphabetically:
Advertisement
Archive
Banners
Breadcrumbs
Example Pages
Feed Display
Footer
Joomla! Stuff
Key Concepts
Latest News
Login Form
Main Menu
Newsflash
Polls
Popular
Random Image
Related Items
Search
Sections
Statistics
Syndication
Top Menu
User Menu
Who’s Online
Wrapper
183
Chapter 7: Fun with Modules
Module Manager has ten columns for each module:
✓ #: The number of the module in Module Manager
✓ [Selection Box]: Option enabling you to work with modules en masse
✓ Module Name: The name of the module
✓ Enabled: Option indicating whether the module is enabled
✓ Order: The order of the module in its subgroup; sets the order of the
menu modules on a page
✓ Access Level: The access levels for various users: Public (everyone),
Registered (logged-in users), or Special (authors and above)
✓ Position: The position on the page where the module should appear
✓ Pages: The pages on which the module is visible
✓ Type: The type of the module; sets the module’s subgroup and then
allows to set the position of the module in its subgroup via the Order
column.
✓ ID: The Joomla ID of the module
In the rest of this chapter, you jump into some modules to see what they
offer and what makes them tick.
The Advertisement Module:
For Sale; Buy Now!
The Advertisement module shows . . . well, advertisements. You can see it at
work on the right side of Figure 7-2. (You can’t miss it; it’s the module titled
Advertisement.)
You open the Advertisement module’s administration page by choosing
Extensions➪Module Manager to open Module Manager and then clicking the
module’s name.
Touring the module
Figure 7-3 shows the Advertisement module’s administration page. We take a
few pages here to describe it because it’s typical of Joomla modules.
184
Part III: Working with Joomla Modules and Templates
Figure 7-2:
The Adver-
tisement
module.
Figure 7-3:
Admin-
istration
page for
the Adver-
tisement
module.
185
Chapter 7: Fun with Modules
The most important options are in the Details pane:
✓ Title: Sets the title you want to display above the module.
✓ Show Title: Specifies whether to display the title.
✓ Enabled: Allows you to enable or disable the module.
✓ Position: Sets the position of the module on the page:
• breadcrumb: The breadcrumb position (see “The Breadcrumbs
Module: Like Hansel and Gretel,” later in this chapter)
• debug: The debug module’s location
• footer: The footer of the page
• left: The left side of the page
• right: The right side of the page
• syndicate: The syndicate position
• top: The top of the page
• user1: At user-defined position user1 (depends on template)
• user2: At user-defined position user2 (depends on template)
• user3: At user-defined position user3 (depends on template)
• user4: At user-defined position user4 (depends on template)
✓ Order: Specifies the order of multiple modules on a page.
Joomla lists the modules that are already in the position you speci-
fied and allows you to select the order of the current module. For the
Advertisement module, you can set the order of the module in this list:
• 0::Polls
• 2::Who’s Online
• 3::Advertisement
• 4::Random Image
✓ Access Level: Sets the access level of the module (Public, Registered, or
Special)
The Position and Order options allow you to place your module on the page
consistent with where the template you’re using places modules when you
select right, left, and so on. For details on using templates, see Chapter 9.
186
Part III: Working with Joomla Modules and Templates
Putting ads on certain pages
So far, so good — but how do you set what pages the module appears on?
You assign them in the Menu Assignment pane of the administration page
(see Figure 7-4).
Figure 7-4:
Menu
Assignment
options.
You may be puzzled for a moment: You set what pages the module appears in
with a menu assignment? But in Joomla, pages are created only when a menu
item is accessed. So you specify what pages a module appears in by specifying
the menu items that point to those pages.
If you want a module to appear on all pages, select the All radio button. If you
want to specify what pages the module appears on, select the radio button
marked Select Menu Item(s) from the List; then select multiple items in the
Menu Selection list. Selecting just the Home item corresponds to the front
page, so if you select that item, the Advertisement module appears only on
the front page.
Configuring the module
Now check out the Parameters section in Figure 7-5, which allows you to set
the specific parameters of a module.
In the case of the Advertisement module, you see options specific to advertis-
ing. The setting in the Target drop-down menu, for example, specifies where
the new page opens when the user clicks an ad.