Red Hat Linux Networking and System Administration Third Edition phần 4 ppsx
Bạn đang xem bản rút gọn của tài liệu. Xem và tải ngay bản đầy đủ của tài liệu tại đây (2.24 MB, 103 trang )
■■ Similarly, overall disk and network performance improves if you dis-
tribute exported file systems across multiple servers rather than concen-
trate them on a single server. If it is not possible to use multiple servers,
at least try to situate NFS exports on separate physical disks and/or on
separate disk controllers. Doing so reduces disk I/O contention.
When identifying the file systems to export, keep in mind a key restriction
on which file systems can be exported and how they can be exported. You can
export only local file systems and their subdirectories. To express this restric-
tion in another way, you cannot export a file system that is itself already an
NFS mount. For example, if a client system named userbeast mounts /home
from a server named homebeast, userbeast cannot reexport /home. Clients
wishing to mount /home must do so directly from homebeast.
Configuring an NFS Server
This section shows you how to configure an NFS server, identifies the key files
and commands you use to implement, maintain, and monitor the NFS server,
and illustrates the server configuration process using a typical NFS setup.
On Fedora Core and Red Hat Enterprise Linux systems, the /etc/exports
file is the main NFS configuration file. It lists the file systems the server
exports, the systems permitted to mount the exported file systems, and the
mount options for each export. NFS also maintains status information about
existing exports and the client systems that have mounted those exports in
/var/lib/nfs/rmtab and /var/lib/nfs/xtab.
In addition to these configuration and status files, all of the daemons, com-
mands, initialization scripts, and configuration files in the following list are
part of NFS. Don’t panic because the list is so long, though; you have to con-
cern yourself with only a few of them to have a fully functioning and properly
configured NFS installation. Notice that approximately half of the supporting
files are part of NFSv4 — presumably the price one pays for added features.
■■ Daemons
■■ rpc.gssd (new in NFSv4)
■■ rpc.idmapd (new in NFSv4)
■■ rpc.lockd
■■ rpc.mountd
■■ rpc.nfsd
■■ rpc.portmap
The Network File System 273
18_599496 ch12.qxd 8/30/05 6:42 PM Page 273
■■ rpc.rquotad
■■ rpc.statd
■■ rpc.svcgssd (new in NFSv4)
■■ Configuration files (in /etc)
■■ exports
■■ gssapi_mech.conf (new in NFSv4)
■■ idmapd.conf (new in NFSv4)
■■ Initialization scripts (in /etc/rc.d/init.d)
■■ nfs
■■ rpcgssd (new in NFSv4)
■■ rpcidmapd (new in NFSv4)
■■ rpcsvcgssd (new in NFSv4)
■■ Commands
■■ exportfs
■■ nfsstat
■■ showmount
■■ rpcinfo
NFS Server Configuration and Status Files
The server configuration file is /etc/exports, which contains a list of file sys-
tems to export, the clients permitted to mount them, and the export options that
apply to client mounts. Each line in /etc/exports has the following format:
dir [host](options) [ ]
dir specifies a directory or file system to export, host specifies one or more
hosts permitted to mount dir, and options specifies one or more mount
options. If you omit host, the listed options apply to every possible client sys-
tem, likely not something you want to do. If you omit options, the default
mount options (described shortly) will be applied. Do not insert a space
between the hostname and the opening parenthesis that contains the export
options; a space between the hostname and the opening parenthesis of the
option list has four (probably unintended) consequences:
1. Any NFS client can mount the export.
2. You’ll see an abundance of error messages in /var/log/messages.
274 Chapter 12
18_599496 ch12.qxd 8/30/05 6:42 PM Page 274
3. The list options will be applied to all clients, not just the client(s) identi-
fied by the host specification.
4. The client(s) identified by the host specification will have the default
mount options applied, not the mount options specified by options.
host can be specified as a single name, an NIS netgroup, a subnet using
address/net mask form, or a group of hostnames using the wildcard charac-
ters ? and *. Multiple host(options) entries, separated by whitespace, are
also accepted, enabling you to specify different export options for a single dir
depending on the client.
TIP The exports manual (man) page recommends not using the wildcard
characters * and ? with IP addresses because they don’t work except by accident
when reverse DNS lookups fail. We’ve used the wildcard characters without
incident on systems we administer, but, as always, your mileage may vary.
When specified as a single name, host can be any name that DNS or the
resolver library can resolve to an IP address. If host is an NIS netgroup, it is
specified as @groupname. The address/net mask form enables you to specify
all hosts on an IP network or subnet. In this case the net mask can be specified
in dotted quad format (/255.255.252.0, for example) or as a mask length
(such as /22). As a special case, you can restrict access to an export to only
those clients using RPCSEC_GSS security by using the client specification
gss/krb5. If you use this type of client specification, you cannot also specify
an IP address. You may also specify the host using the wildcards * and ?.
Consider the following sample /etc/exports file:
/usr/local *.example.com(ro)
/usr/devtools 192.168.1.0/24(ro)
/home 192.168.0.0/255.255.255.0(rw)
/projects @dev(rw)
/var/spool/mail 192.168.0.1(rw)
/opt/kde gss/krb5(ro)
The first line permits all hosts with a name of the format somehost.
example.com to mount /usr/local as a read-only directory. The second
line uses the address/net mask form in which the net mask is specified in Class-
less Inter-Domain Routing (CIDR) format. In the CIDR format, the net mask is
given as the number of bits (/24, in this example) used to determine the net-
work address. A CIDR address of 192.168.1.0/24 allows any host with an IP
address in the range 192.168.1.1 to 192.168.1.254 (192.168.1.0 is excluded because
it is the network address; 192.168.1.255 is excluded because it is the broadcast
address) to mount /usr/devtools read-only. The third line permits any host
The Network File System 275
18_599496 ch12.qxd 8/30/05 6:42 PM Page 275
with an IP address in the range 192.168.0.1 to 192.168.0.254 to mount /home in
read-write mode. This entry uses the address/net mask form in which the net
mask is specified in dotted quad format. The fourth line permits any member of
the NIS netgroup named dev to mount /projects (again, in read-write
mode). The fifth line permits only the host whose IP address is 192.168.0.1 to
mount /var/mail. The final line allows any host using RPCSEC_GSS security
to mount /opt/kde in read-only mode.
TIP If you have trouble remembering how to calculate IP address ranges
using the address/net mask format, use the excellent ipcalc utility created by
Krischan Jodies. You can download it from his Web site (jodies.de/ipcalc/)
or from the Web site supporting this book, wiley.com/go/redhat-admin3e.
The export options, listed in parentheses after the host specification, deter-
mine the characteristics of the exported file system. Table 12-1 lists valid val-
ues for options.
Table 12-1 Nfs Export Options
OPTION DESCRIPTION
all_squash Maps all requests from all UIDs or GIDs to the UID or
GID, respectively, of the anonymous user.
anongid=gid Sets the GID of the anonymous account to gid.
anonuid=uid Sets the UID of the anonymous account to uid.
async Allows the server to cache disk writes to improve
performance.
fsid=n Forces NFS’s internal file system identification (FSID)
number to be n.
hide Hides an exported file system that is a subdirectory of
another exported file system.
insecure Permits client requests to originate from unprivileged
ports (those numbered 1024 and higher).
insecure_locks Disables the need for authentication before activating
lock operations (synonym for no_auth_nlm).
mp[=path] Exports the file system specified by path only if the
corresponding mount point is mounted (synonym for
mountpoint[=path]).
no_all_squash Disables all_squash.
no_root_squash Disables root_squash.
276 Chapter 12
18_599496 ch12.qxd 8/30/05 6:42 PM Page 276
Table 12-1 (continued)
OPTION DESCRIPTION
no_subtree_check Disables subtree_check.
no_wdelay Disables wdelay (must be used with the sync option).
nohide Does not hide an exported file system that is a
subdirectory of another exported file system.
ro Exports the file system read-only, disabling any operation
that changes the file system.
root_squash Maps all requests from a user ID (UID) or group ID (GID)
of 0 to the UID or GID, respectively, of the anonymous
user (-2 in Red Hat Linux).
rw Exports the file system read-write, permitting operations
that change the file system.
secure Requires client requests to originate from a secure
(privileged) port, that is, one numbered less than 1024.
secure_locks Requires that clients requesting lock operations be
properly authenticated before activating the lock
(synonym for auth_nlm).
subtree_check If only part of a file system, such as a subdirectory, is
exported, subtree checking makes sure that file requests
apply to files in the exported portion of the file system.
sync Forces the server to perform a disk write before notifying
the client that the request is complete.
wdelay Instructs the server to delay a disk write if it believes
another related disk write may be requested soon or if
one is in progress, improving overall performance.
TIP Recent versions of NFS (actually, of the NFS utilities) default to exporting
directories using the sync option. This is a change from past practice, in which
directories were exported and mounted using the async option. This change
was made because defaulting to async violated the NFS protocol specification.
The various squash options, and the anonuid and anongid options require
additional explanation. root_squash prevents the root user on an NFS client
from having root privileges on an NFS server via the exported file system. The
Linux security model ordinarily grants root full access to the file systems on a
host. However, in an NFS environment, exported file systems are shared
resources that are properly “owned” by the root user of the NFS server, not by
The Network File System 277
18_599496 ch12.qxd 8/30/05 6:42 PM Page 277
the root users of the client systems that mount them. The root_squash option
remaps the root UID and GID (0) on the client system to a less privileged UID
and GID, -2. Remapping the root UID and GID prevents NFS clients from inap-
propriately taking ownership of NFS exports by. The no_root_squash option
disables this behavior, but should not be used because doing so poses signifi-
cant security risks. Consider the implications, for example, of giving a client
system root access to the file system containing sensitive payroll information.
The all_squash option has a similar effect to root_squash, except that it
applies to all users, not just the root user. The default is no_all_squash,
however, because most users that access files on NFS exported file systems are
already merely mortal users, that is, they have unprivileged UIDs and GIDs,
so they do not have the power of the root account. Use the anonuid and
anongid options to specify the UID and GID of the anonymous user. The
default UID and GID of the anonymous user is -2, which should be adequate
in most cases.
subtree_check and no_subtree check also deserve some elaboration.
When a subdirectory of file system is exported but the entire file system is not
exported, the NFS server must verify that the accessed file resides in the
exported portion of the file system. This verification, called a subtree check, is
programmatically nontrivial to implement and can negatively impact NFS
performance. To facilitate subtree checking, the server stores file location infor-
mation in the file handles given to clients when they request a file.
In most cases, storing file location information in the file handle poses no
problem. However, doing so becomes potentially troublesome when an NFS
client is accessing a file that is renamed or moved while the file is open. Moving
or renaming the file invalidates the location information stored in the file han-
dle, so the next client I/O request on that file causes an error. Disabling the
subtree check using no_subtree_check prevents this problem because the
location information is not stored in the file handle when subtree checking is
disabled. As an added benefit, disabling subtree checking improves perfor-
mance because it removes the additional overhead involved in the check. The
benefit is especially significant on exported file systems that are highly
dynamic, such as /home.
Unfortunately, disabling subtree checking also poses a security risk. The
subtree check routine ensures that files to which only root has access can be
accessed only if the file system is exported with no_root_squash, even if the
file’s permissions permit broader access.
The manual page for /etc/exports recommends using no_subtree_
check for /home because /home file systems normally experiences a high
level of file renaming, moving, and deletion. It also recommends leaving sub-
tree checking enabled (the default) for file systems that are exported read-only;
file systems that are largely static (such as /usr or /var); and file systems
from which only subdirectories and not the entire file system, are exported.
278 Chapter 12
18_599496 ch12.qxd 8/30/05 6:42 PM Page 278
The hide and nohide options mimic the behavior of NFS on SGI’s IRIX. By
default, if an exported directory is a subdirectory of another exported direc-
tory, the exported subdirectory will be hidden unless both the parent and child
exports are explicitly mounted. The rationale for this feature is that some NFS
client implementations cannot deal with what appears to be two different files
having the same inode. In addition, directory hiding simplifies client- and
server-side caching. You can disable directory hiding by specifying nohide.
The final interesting mount option is mp. If set, the NFS server will not
export a file system unless that file system is actually mounted on the server.
The reasoning behind this option is that a disk or file system containing an
NFS export might not mount successfully at boot time or might crash at run-
time. This measure prevents NFS clients from mounting unavailable exports.
Here is a modified version of the /etc/exports file presented earlier:
/usr/local *.example.com(mp,ro,secure)
/usr/devtools 192.168.1.0/24(mp,ro,secure)
/home 192.168.0.0/255.255.255.0(mp,rw,secure,no_subtree_check)
/projects @dev(mp,rw,secure,anonuid=600,anongid=600,sync,no_wdelay)
/var/mail 192.168.0.1(mp,rw,insecure,no_subtree_check)
/opt/kde gss/krb5(mp,ro,async)
The hosts have not changed, but additional export options have been
added. All file systems use the mp option to make sure that only mounted file
systems are available for export. /usr/local, /usr/devtools, /home, and
/project can be accessed only from clients using secure ports (the secure
option), but the server accepts requests destined for /var/mail from any port
because the insecure option is specified. For /projects, the anonymous user
is mapped to the UID and GID 600, as indicated by the anonuid=600 and
anongid=600 options. The wrinkle in this case is that only members of the
NIS netgroup dev will have their UIDs and GIDs mapped because they are the
only NFS clients permitted to mount /projects.
/home and /var/mail are exported using the no_subtree_check
option because they see a high volume of file renaming, moving, and deletion.
Finally, the sync and no_wdelay options disable write caching and delayed
writes to the /project file system. The rationale for using sync and
no_wdelay is that the impact of data loss would be significant in the event the
server crashes. However, forcing disk writes in this manner also imposes a
performance penalty because the NFS server’s normal disk caching and
buffering heuristics cannot be applied.
If you intend to use NFSv4-specific features, you need to be familiar with
the RPCSEC_GSS configuration files, /etc/gssapi_mech.conf and /etc
/idmapd.conf. idmapd.conf is the configuration file for NFSv4’s idmapd
daemon. idmapd works on the behalf of both NFS servers and clients to trans-
late NFSv4 IDs to user and group IDs and vice versa; idmapd.conf controls
The Network File System 279
18_599496 ch12.qxd 8/30/05 6:42 PM Page 279
idmapd’s runtime behavior. The default configuration (with comments and
blank lines removed) should resemble Listing 12-1.
[General]
Verbosity = 0
Pipefs-Directory = /var/lib/nfs/rpc_pipefs
Domain = localdomain
[Mapping]
Nobody-User = nobody
Nobody-Group = nobody
[Translation]
Method = nsswitch
Listing 12-1 Default idmapd configuration.
In the [General] section, the Verbosity option controls the amount of
log information that idmapd generates; Pipefs-directory tell idmapd
where to find the RPC pipe file system it should use (idmapd communicates
with the kernel using the pipefs virtual file system); Domain identifies the
default domain. If Domain isn’t specified, it defaults to the server’s fully qual-
ified domain name (FQDN) less the hostname. For example, if the FQDN is
coondog.example.com, the Domain parameter would be example.com; if
the FQDN is mail.admin.example.com, the Domain parameter would be
the subdomain admin.example.com. The Domain setting is probably the
only change you will need to make to idmapd’s configuration.
The [Mapping] section identifies the user and group names that corre-
spond to the nobody user and group that NFS server should use. The option
Method = nsswitch, finally, tells idmapd how to perform the name resolu-
tion. In this case, names are resolved using the name service switch (NSS) fea-
tures of glibc.
The /etc/gssapi_mech.conf file controls the GSS daemon (rpc
.svcgssd). You won’t need to modify this file. As provided in Fedora Core
and RHEL, gssapi_mech.conf lists the specific function call to use to ini-
tialize a given GSS library. Programs (in this case, NFS) need this information
if they intend to use secure RPC.
Two additional files store status information about NFS exports, /var
/lib/nfs/rmtab and /var/lib/nfs/etab. /var/lib/nfs/rmtab is the
table that lists each NFS export that is mounted by an NFS client. The daemon
rpc.mountd (described in the section “NFS Server Daemons”) is responsible
for servicing requests to mount NFS exports. Each time the rpc.mountd dae-
mon receives a mount request, it adds an entry to /var/lib/nfs/rmtab.
Conversely, when mountd receives a request to unmount an exported file sys-
tem, it removes the corresponding entry from /var/lib/nfs/rmtab. The fol-
lowing short listing shows the contents of /var/lib/nfs/rmtab on an NFS
280 Chapter 12
18_599496 ch12.qxd 8/30/05 6:42 PM Page 280
server that exports /home in read-write mode and /usr/local in read-only
mode. In this case, the host with IP address 192.168.0.4 has mounted both
exports:
$ cat /var/lib/nfs/rmtab
192.168.0.4:/home:0x00000001
192.168.0.4:/usr/local:0x00000001
Fields in rmtab are colon-delimited, so it has three fields: the host, the
exported file system, and the mount options specified in /etc/exports.
Rather than try to decipher the hexadecimal options field, though, you can
read the mount options directly from /var/lib/nfs/etab. The exportfs
command, discussed in the subsection titled “NFS Server Scripts and Com-
mands,” maintains /var/lib/nfs/etab. etab contains the table of cur-
rently exported file systems. The following listing shows the contents of
/var/lib/nfs/etab for the server exporting the /usr/local and /home
file systems shown in the previous listing (the output wraps because of page
width constraints).
$ cat /var/lib/nfs/etab
/usr/local
192.168.0.4(ro,sync,wdelay,hide,secure,root_squash,no_all_squash,
subtree_check,secure_locks,mapping=identity,anonuid=-2,anongid=-2)
/home
192.168.0.2(rw,sync,wdelay,hide,secure,root_squash,no_all_squash,
subtree_check,secure_locks,mapping=identity,anonuid=-2,anongid=-2)
As you can see in the listing, the format of the etab file resembles that of
/etc/exports. Notice, however, that etab lists the default values for options
not specified in /etc/exports in addition to the options specifically listed.
NOTE Most Linux systems use /var/lib/nfs/etab to store the table of
currently exported file systems. The manual page for the exportfs command,
however, states that /var/lib/nfs/xtab contains the table of current
exports. We do not have an explanation for this — it’s just a fact of life that
the manual page and actual usage differ.
The last two configuration files to discuss, /etc/hosts.allow and
/etc/hosts.deny, are not, strictly speaking, part of the NFS server. Rather,
/etc/hosts.allow and /etc/hosts.deny are access control files used by
the TCP Wrappers system; you can configure an NFS server without them and
the server will function perfectly (to the degree, at least, that anything ever
functions perfectly). However, using TCP Wrappers’ access control features
helps enhance both the overall security of the server and the security of the
NFS subsystem.
The Network File System 281
18_599496 ch12.qxd 8/30/05 6:42 PM Page 281
The TCP Wrappers package is covered in detail in Chapter 19. Rather than
preempt that discussion here, we suggest how to modify these files, briefly
explain the rationale, and suggest you refer to Chapter 19 to understand the
modifications in detail.
First, add the following entries to /etc/hosts.deny:
portmap:ALL
lockd:ALL
mountd:ALL
rquotad:ALL
statd:ALL
These entries deny access to NFS services to all hosts not explicitly permit-
ted access in /etc/hosts.allow. Accordingly, the next step is to add entries
to /etc/hosts.allow to permit access to NFS services to specific hosts. As
you will learn in Chapter 19, entries in /etc/hosts.allow take the form:
daemon:host_list [host_list]
TIP The NFS HOWTO ( />html#CONFIG) discourages use of the ALL:ALL syntax in /etc/hosts.deny,
using this rationale: “While [denying access to all services] is more
secure behavior, it may also get you in trouble when you are installing new
services, you forget you put it there, and you can’t figure out for the life of you
why they won’t work.”
We respectfully disagree. The stronger security enabled by the ALL:ALL
construct in /etc/hosts.deny far outweighs any inconvenience it might pose
when configuring new services.
daemon is a daemon such as portmap or lockd, and host_list is a list of
one or more hosts specified as hostnames, IP addresses, IP address patterns
using wildcards, or address/net mask pairs. For example, the following entry
permits all hosts in the example.com domain to access the portmap service:
portmap:.example.com
The next entry permits access to all hosts on the subnetworks 192.168.0.0
and 192.168.1.0:
portmap:192.168.0. 192.168.1.
You need to add entries for each host or host group permitted NFS access
for each of the five daemons listed in /etc/hosts.deny. So, for example, to
282 Chapter 12
18_599496 ch12.qxd 8/30/05 6:42 PM Page 282
permit access to all hosts in the example.com domain, add the following
entries to /etc/host.allow:
portmap:.example.com
lockd :.example.com
mountd :.example.com
rquotad:.example.com
statd :.example.com
Therefore, a name of the form .domain.dom matches all hosts, including
hosts in subdomains like .subdom.domain.dom.
NFS Server Daemons
Providing NFS services requires the services of six daemons: /sbin/portmap,
/usr/sbin/rpc.mountd, /usr/sbin/rpc.nfsd, /sbin/rpc.statd,
/sbin/rpc.lockd, and, if necessary, /usr/sbin/rpc.rquotad. They
are generally referred to as portmap, mountd, nfssd, statd, lockd, and
rquotad, respectively. If you intend to take advantage of NFSv4’s enhance-
ments, you’ll also need to know about rpc.gssd, rpc.idmapd, and rpc
.svcgssd. For convenience’s sake, we’ll refer to these daemons using the
shorthand expressions gssd, idmapd, and svcgssd. Table 12-2 briefly
describes each daemon’s purpose.
Table 12-2 Nfs Server Daemons
DAEMON FUNCTION
gssd Creates security contexts on RPC clients for exchanging RPC
information using SecureRPC (RPCSEC) using GSS
idmapd Maps local user and group names to NFSv4 IDs (and vice versa)
lockd Starts the kernel’s NFS lock manager
mountd Processes NFS client mount requests
nfsd Provides all NFS services except file locking and quota management
portmap Enables NFS clients to discover the NFS services available on a
given NFS server
rquotad Provides file system quota information NFS exports to NFS clients
using file system quotas
statd Implements NFS lock recovery when an NFS server system crashes
svcgssd Creates security contexts on RPC servers for exchanging RPC
information using SecureRPC (RPCSEC) using GSS
The Network File System 283
18_599496 ch12.qxd 8/30/05 6:42 PM Page 283
The NFS server daemons should be started in the following order to work
properly:
1. portmap
2. nfsd
3. mountd
4. statd
5. rquotad (if necessary)
6. idmapd
7. svcgssd
The start order is handled for you automatically at boot time if you have
enabled NFS services using Service Configuration Tool (/usr/bin/system-
config-services).
Notice that the list omits lockd. nfsd starts it on an as-needed basis, so you
should rarely, if ever, need to invoke it manually. Fortunately, the Red Hat
Linux initialization script for NFS, /etc/rc.d/init.d/nfs, takes care of
starting up the NFS server daemons for you. Should the need arise, however,
you can start NFS yourself by executing the handy service utility script
directly:
# service nfs start
Starting NFS services: [ OK ]
Starting NFS quotas: [ OK ]
Starting NFS daemon: [ OK ]
Starting NFS mountd [ OK ]
You can also use:
# /etc/rc.d/init.d/nfs start
Starting NFS services: [ OK ]
Starting NFS quotas: [ OK ]
Starting NFS daemon: [ OK ]
Starting NFS mountd [ OK ]
By default, the startup script starts eight copies of nfsd to enable the server
to process multiple requests simultaneously. To change this value, edit
/etc/sysconfig/nfs and add an entry resembling the following (you need
to be root to edit this file):
RPCNFSDCOUNT=n
Replace n with the number of nfsd processes you want to start. Busy servers
with many active connections might benefit from doubling or tripling this
284 Chapter 12
18_599496 ch12.qxd 8/30/05 6:42 PM Page 284
number. If file system quotas for exported file systems have not been enabled
on the NFS server, it is unnecessary to start the quota manager, rquotad, but
be aware that the initialization script starts rquotad whether quotas have
been enabled or not.
TIP If /etc/sysconfig/nfs does not exist, you can create it using your
favorite text editor. In a pinch, you can use the following command to create it
with the RPCNFSDCOUNT setting mentioned in the text:
# cat > /etc/sysconfig/nfs
RPCNFSDCOUNT=16
^d
^d is the end-of-file mark, generated by pressing the Control key and d
simultaneously.
NFS Server Scripts and Commands
Three initialization scripts control the required NFS server daemons,
/etc/rc.d/init.d/portmap, /etc/rc.d/init.d/nfs, and /etc/rc.d
/init.d/nfslock. The exportfs command enables you to manipulate the
list of current exports on the fly without needing to edit /etc/exports. The
showmount command provides information about clients and the file systems
they have mounted. The nfsstat command displays detailed information
about the status of the NFS subsystem.
The portmap script starts the portmap daemon, frequently referred to as
the portmapper. All programs that use RPC, such as NIS and NFS, rely on the
information the portmapper provides. The portmapper starts automatically at
boot time, so you rarely need to worry about it, but it is good to know you can
control it manually. Like most startup scripts, it requires a single argument,
such as start, stop, restart, or status. As you can probably guess, the
start and stop arguments start and stop the portmapper, restart restarts
it (by calling the script with the start and stop arguments, as it happens),
and status indicates whether the portmapper is running, showing the
portmapper’s PID if it is running.
The primary NFS startup script is /etc/rc.d/init.d/nfs. Like the
portmapper, it requires a single argument, start, stop, status, restart,
or reload. start and stop start and stop the NFS server, respectively. The
restart argument stops and starts the server processes in a single command
and can be used after changing the contents of /etc/exports. However, it is
not necessary to reinitialize the NFS subsystem by bouncing the server dae-
mons in this way. Rather, use the script’s reload argument, which causes
exportfs, discussed shortly, to reread /etc/exports and to reexport the
The Network File System 285
18_599496 ch12.qxd 8/30/05 6:42 PM Page 285
file systems listed there. Both restart and reload also update the time-
stamp on the NFS lock file (/var/lock/subsys/nfs) used by the initializa-
tion script. The status argument displays the PIDs of the mountd, nfsd, and
rquotad daemons. For example:
$ service nfs status
rpc.mountd (pid 4358) is running
nfsd (pid 1241 1240 1239 1238 1235 1234 1233 1232) is running
rpc.rquotad (pid 1221) is running
The output of the command confirms that the three daemons are running
and shows the PIDs for each instance of each daemon. All users are permitted
to invoke the NFS initialization script with the status argument, but all the
other arguments (start, stop, restart, and reload) require root privi-
leges.
NFS services also require the file-locking daemons lockd and statd. As
explained earlier, nfsd starts lockd itself, but you still must start statd sep-
arately. You can use an initialization script for this purpose, /etc/rc.d
/init.d/nfslock. It accepts almost the same arguments as /etc/rc.d
/init.d/nfs does, with the exception of the reload argument (because
statd does not require a configuration file).
To tie everything together, if you ever need to start the NFS server manually,
the proper invocation sequence is to start the portmapper first, followed by
NFS, followed by the NFS lock manager, that is:
# service portmap start
# service nfs start
# service nfslock start
Conversely, to shut down the server, reverse the start procedure:
# service nfslock stop
# service nfs stop
# service portmap stop
Because other programs and servers may require the portmapper’s service,
we suggest that you let it run unless you drop the system to run level 1 to per-
form maintenance.
You can also find out what NFS daemons are running using the rpcinfo
command with the -p option. rpcinfo is a general-purpose program that
displays information about programs that use the RPC protocol, of which NFS
is one. The -p option queries the portmapper and displays a list of all regis-
tered RPC programs. The following listing shows the output of rpcinfo -p
on a fairly quiescent NFS server:
286 Chapter 12
18_599496 ch12.qxd 8/30/05 6:42 PM Page 286
$ /usr/sbin/rpcinfo -p
program vers proto port
100000 2 tcp 111 portmapper
100000 2 udp 111 portmapper
100011 1 udp 961 rquotad
100011 2 udp 961 rquotad
100011 1 tcp 964 rquotad
100011 2 tcp 964 rquotad
100003 2 udp 2049 nfs
100003 3 udp 2049 nfs
100003 4 udp 2049 nfs
100003 2 tcp 2049 nfs
100003 3 tcp 2049 nfs
100003 4 tcp 2049 nfs
100021 1 udp 32770 nlockmgr
100021 3 udp 32770 nlockmgr
100021 4 udp 32770 nlockmgr
100021 1 tcp 35605 nlockmgr
100021 3 tcp 35605 nlockmgr
100021 4 tcp 35605 nlockmgr
100005 1 udp 32772 mountd
100005 1 tcp 32825 mountd
100005 2 udp 32772 mountd
100005 2 tcp 32825 mountd
100005 3 udp 32772 mountd
100005 3 tcp 32825 mountd
rpcinfo’s output shows the RPC program’s ID number, version number, the
network protocol it is using, the port number it is using, and an alias name for
the program number. The program number and name (first and fifth columns)
are taken from the file /etc/rpc, which maps program numbers to program
names and also lists aliases for program names. At a bare minimum, to have a
functioning NFS server, rpcinfo should list entries for portmapper, nfs, and
mountd.
The exportfs command enables you to manipulate the list of available
exports, in some cases without editing /etc/exports. It also maintains the
list of currently exported file systems in /var/lib/nfs/etab and the ker-
nel’s internal table of exported file systems. In fact, the NFS initialization script
discussed earlier in this subsection uses exportfs extensively. For example,
the exportfs -a command initializes /var/lib/nfs/etab, synchronizing
it with the contents of /etc/exports. To add a new export to etab and to
the kernel’s internal table of NFS exports without editing /etc/exports, use
the following syntax:
exportfs -o opts host:dir
The Network File System 287
18_599496 ch12.qxd 8/30/05 6:42 PM Page 287
opts, host, and dir use the same syntax as that described for
/etc/exports earlier in the chapter. Consider the following command:
# exportfs -o async,rw 192.168.0.3:/var/spool/mail
This command exports /var/spool/mail with the async and rw options
to the host whose IP address is 192.168.0.3. This invocation is exactly equiva-
lent to the following entry in /etc/exports:
/var/spool/mail 192.168.0.3(async,rw)
A bare exportfs call lists all currently exported file systems; adding the -v
option lists currently exported file systems with their mount options.
# exportfs -v
/usr/local 192.168.0.4(ro,wdelay,root_squash)
/home 192.168.0.4(rw,wdelay,root_squash)
To remove an exported file system, use the -u option with exportfs. For
example, the following command unexports the /home file system shown in
the previous example.
# exportfs -v -u 192.168.0.4:/home
unexporting 192.168.0.4:/home
The showmount command queries the mount daemon, mountd, about the
status of the NFS server. Its syntax is:
showmount [-adehv] [host]
Invoked with no options, showmount displays a list of all clients that have
mounted file systems from the current host. Specify host to query the mount
daemon on that host, where host can be a resolvable DNS hostname or, as in
the following example, an IP address:
# showmount 192.168.0.1
Hosts on 192.168.0.1:
192.168.0.0/24
192.168.0.1
Table 12-3 describes the effects of showmount’s options.
288 Chapter 12
18_599496 ch12.qxd 8/30/05 6:42 PM Page 288
Table 12-3 Options for the showmount Command
OPTION DESCRIPTION
-a Displays client hostnames and mounted directories in
host:directory format
-d Displays only the directories clients have mounted
-e Displays the NFS server’s list of exported file systems
-h Displays a short usage summary
no-headers Disables displaying descriptive headings for showmount’s
output
-v Displays showmount’s version number
The following examples show the output of showmount executed on an
NFS server that has exported /media to the client named bubba.example
.com, which has an IP address of 192.168.0.2, using the following entry in
/etc/exports:
/media 192.168.0.0/24(rw)
The first command uses the -a option for the most comprehensive output,
the second uses the -d option to show only the mounted directories, and the
third example uses -e to show the server’s export list.
# showmount -a
All mount points on bubba.example.com:
192.168.0.0/24:/media
192.168.0.1:192.168.0.0/24
# showmount -d
Directories on bubba.example.com:
/media
# showmount -e
Export list for bubba.example.com:
/media 192.168.0.0/24
The showmount command is most useful on potential NFS clients because
they can identify the directories an NFS server is exporting. By the same token,
however, this poses a security risk because, in the absence of entries in
/etc/hosts.deny that forbid access to the portmapper, any host can obtain
this information from an NFS server.
The Network File System 289
18_599496 ch12.qxd 8/30/05 6:42 PM Page 289
Using Secure NFS
Although NFSv4 is installed, the default installation does not use NFSv4’s
security enhancements by default. You need to set this up manually. To do so,
use the following procedure:
1. Enable secure NFS by adding the following line to /etc/sysconfig
/nfs:
SECURE_NFS=no
/etc/sysconfig/nfs does not exist on Fedora Core 4 and RHEL 4
systems. To use Kerberos 5 or other strong encryption mechanism with
NFSv4, you should set this variable to yes.
2. Edit /etc/idmapd.conf and set the Domain option to your domain
and change the Nobody-User and Nobody-Group options to nobody:
Domain = example.com
[Mapping]
Nobody-User = nobody
Nobody-Group = nobody
You might not have to make this change because idmapd.conf is usu-
ally configured to use the nobody user and group by default.
3. Restart the portmapper and NFS using the service utility:
# service portmap restart
# service nfs condrestart
You do not need to start the GSS client and server daemons, rpcgssd
and rpcsvcgssd, respectively, unless you wish to use Kerberos 5 or
another strong encryption mechanism (in which case there is additional
setup to perform that this chapter does not address).
Once the daemons are running, you can configure your server as described
in the next section. You’ll learn how to mount the exports in the section titled
“Configuring an NFS Client.”
Example NFS Server
This section illustrates a simple but representative NFS server configuration. It
exports two file systems, /home and /media. Here are the corresponding
entries in /etc/exports:
/home 192.168.0.0/24(rw,async,no_subtree_check)
/media 192.168.0.0/24(ro)
290 Chapter 12
18_599496 ch12.qxd 8/30/05 6:42 PM Page 290
With the exports configured, start (or restart) the daemons (the portmapper
is already running) using the initialization scripts:
# service nfs start
Starting NFS services: [ OK ]
Starting NFS quotas: [ OK ]
Starting NFS mountd: [ OK ]
Starting NFS daemon: [ OK ]
# service nfslock start
Starting NFS file locking services:
Starting NFS statd: [ OK ]
Next, use rpcinfo -p to make sure the necessary daemons are running,
then finish up with showmount -a (or exportfs -v) to list the server’s NFS
exports:
# rpcinfo -p
program vers proto port
100000 2 tcp 111 portmapper
100000 2 udp 111 portmapper
100011 1 udp 958 rquotad
100011 2 udp 958 rquotad
100011 1 tcp 961 rquotad
100011 2 tcp 961 rquotad
100003 2 udp 2049 nfs
100003 3 udp 2049 nfs
100003 4 udp 2049 nfs
100003 2 tcp 2049 nfs
100003 3 tcp 2049 nfs
100003 4 tcp 2049 nfs
100021 1 udp 37737 nlockmgr
100021 3 udp 37737 nlockmgr
100021 4 udp 37737 nlockmgr
100021 1 tcp 35981 nlockmgr
100021 3 tcp 35981 nlockmgr
100021 4 tcp 35981 nlockmgr
100005 1 udp 974 mountd
100005 1 tcp 977 mountd
100005 2 udp 974 mountd
100005 2 tcp 977 mountd
100005 3 udp 974 mountd
100005 3 tcp 977 mountd
# showmount -e
Export list for bubba.example.com:
/home 192.168.0.0/24
/media 192.168.0.0/24
The Network File System 291
18_599496 ch12.qxd 8/30/05 6:42 PM Page 291
The final step in preparing an NFS server is to ensure that NFS services are
started at boot time. You can use the Services Configuration Tool (Red Hat ➪
System Settings ➪ Server Settings ➪ Services on Fedora Core and Applica-
tions ➪ System Settings ➪ Server Settings ➪ Services on RHEL); system-
config-services at the command line, or the chkconfig command-line
services administration tool. Using chkconfig, execute the following
commands:
# chkconfig level 0123456 nfs off
# chkconfig level 0123456 nfslock off
# chkconfig level 345 nfs on
# chkconfig level 345 nfslock on
The first two commands disable the nfs and nfslock initialization scripts
for all run levels. The second two commands reenable them for run levels 3, 4,
and 5. After you have confirmed that the NFS daemons are running and that
the exports are available, you are ready to configure one or more NFS clients.
First, however, for the graphically addicted (or the command-line-challenged),
we’ll show you how to use Red Hat Linux’s graphical tool for administering
NFS exports, the NFS Server Configuration Tool.
Using the NFS Server Configuration Tool
If you prefer to use graphical tools for system administration, Red Hat Linux
includes the NFS Server Configuration tool. It edits the /etc/exports file
directly, so you can use the graphical tool and edit the configuration file directly
using a text editor interchangeably. To start the NFS Server Configuration tool,
select Red Hat ➪ System Settings ➪ Server Settings ➪ NFS on Fedora Core or
Applications ➪ System Settings ➪ Server Settings ➪ NFS on RHEL. You can
also start the tool by executing the command system-config-nfs (as root) in
a terminal window. Figure 12-2 shows the NFS Server Configuration tool.
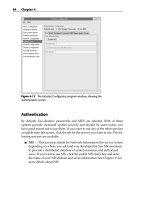
To add a new export, click the Add button, which opens the Add NFS Share
dialog box (see Figure 12-3). On the Basic tab, type the name of the directory
you want to export in the Directory text box or use the Browse button to locate
the directory to export. Use the Host(s) text box to indicate which hosts are
allowed to mount this directory. Click the Read-only radio button (selected by
default) or the Read/Write radio button to indicate the basic access permis-
sions for this export.
Figure 12-3, for example, shows that /home will be exported read-write to
all hosts with an IP address in the range 192.168.0.0/24. Notice that you can
use the same syntax for specifying IP addresses in this NFS Server Configura-
tion tool that you can if you edit /etc/exports directly.
292 Chapter 12
18_599496 ch12.qxd 8/30/05 6:42 PM Page 292
Figure 12-2 The NFS Server Configuration dialog box.
Figure 12-3 The Add NFS Share dialog box.
To modify the mount options for your new NFS export, click the General
Options tab. On this tab, click the check boxes to enable the corresponding
mount option. The possible mount options include:
■■ Allow connections from ports 1024 and higher — This option corre-
sponds to the insecure option listed in Table 12-1.
■■ Allow insecure file locking — This option corresponds to the
insecure_locks option listed in Table 12-1.
■■ Disable subtree checking — This option corresponds to the
no_subtree_check option listed in Table 12-1.
■■ Sync write operations on request — This option (enabled by default)
corresponds to the sync option listed in Table 12-1.
■■ Force sync of write operations immediately — This option is only
available if Sync write operations on request is enabled and corre-
sponds to the no_wdelay option listed in Table 12-1.
The Network File System 293
18_599496 ch12.qxd 8/30/05 6:42 PM Page 293
■■ Hide filesystems beneath — This option corresponds to the hide
option listed in Table 12-1.
■■ Export only if mounted — This option corresponds to the mp[=path]
option listed in Table 12-1. Selecting this option is equivalent to specify
the mp mount option with out the optional path mount point.
■■ Optional mount point — This option corresponds to the path portion
of the mp[=path] option listed in Table 12-1. You can type the mount
point, if you want to specify on, the text box or use the Browse button
to select the mount point graphically.
■■ Set explicit Filesystem ID — This option corresponds to the fsid=n
option listed in Table 12-1. Enter the actual FSID value in the text box.
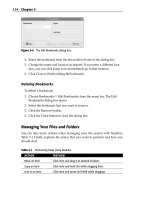
Figure 12-4 shows the General Options tab. We have disabled subtree check-
ing for /home and left the required sync option (Sync write operations on
request) enabled.
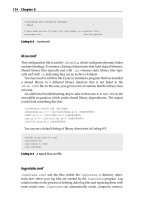
The User Access tab, shown in Figure 12-5, implements the UID/GID
remapping and root-squashing options described earlier in this chapter. Select
the Treat remote root user as local root user check box if you want the equiva-
lent of no_root_squash. To remap all UIDs and GIDs to the UID and GID of
the anonymous user (the all_squash option from Table 12-1), select the Treat
all client users as anonymous users check box. As you might guess, if you want
to specify the anonymous UID or GID, click the corresponding check boxes to
enable these options and then type the desired value in the matching text
boxes. In Figure 12-5, all clients will be remapped to the anonymous user.
Figure 12-5 shows the User Access Tab as it appears in Fedora Core; it looks
slightly different in RHEL.
Figure 12-4 The General Options tab.
294 Chapter 12
18_599496 ch12.qxd 8/30/05 6:42 PM Page 294
Figure 12-5 The User Access tab.
When you have finished configuring your new NFS export, click the OK
button to close the Add NFS Share dialog box. After a short pause, the new
NFS share appears in this list of NFS exports, as shown in Figure 12-6. If you
want to change the characteristics of an NFS share, select the share you want
to modify and click the Properties button on the toolbar. This will open the
Edit NFS Share dialog box, which has the same interface as the Add NFS Share
dialog box.
Similarly, if you want to remove an NFS share, select the export you want to
cancel and click the Delete button. To close the NFS Server Configuration tool,
type Ctrl+Q or click File ➪ Quit on the menu bar.
Figure 12-6 Adding an NFS share.
The Network File System 295
18_599496 ch12.qxd 8/30/05 6:42 PM Page 295
Configuring an NFS Client
Configuring client systems to mount NFS exports is simpler than configuring
the NFS server itself. This section of the chapter provides a brief overview of
client configuration, identifies the key files and commands involved in config-
uring and mounting NFS exported file systems, and shows you how to con-
figure a client to access the NFS exports configured in the previous section.
Configuring a client system to use NFS involves making sure that the
portmapper and the NFS file locking daemons statd and lockd are avail-
able, adding entries to the client’s /etc/fstab for the NFS exports, and
mounting the exports using the mount command.
As explained at the beginning of the chapter, a mounted NFS exported file
system is functionally equivalent to a local file system. Thus, as you might
expect, you can use the mount command at the command line to mount NFS
exports manually, just as you might mount a local file system. Similarly, to
mount NFS exports at boot time, you just add entries to the file system mount
table, /etc/fstab. As you will see in the section titled “Using Automount
Services” at the end of this chapter, you can even mount NFS file systems auto-
matically when they are first used, without having to mount them manually.
The service that provides this feature is called, yup, you guessed it, the auto-
mounter. More on the automounter in a moment.
As a networked file system, NFS is sensitive to network conditions, so the
NFS client daemons accept a few options, passed via the mount command,
address NFS’s sensitivities and peculiarities. Table 12-4 lists the major NFS-
specific options that mount accepts. For a complete list and discussion of all
NFS-specific options, see the NFS manual page (man nfs).
Table 12-4 NFS-Specific Mount Options
OPTION DESCRIPTION
bg Enables mount attempts to run in the background if the first
mount attempt times out (disable with nobg).
fg Causes mount attempts to run in the foreground if the first
mount attempt times out, the default behavior (disable with
nofg).
hard Enables failed NFS file operations to continue retrying after
reporting “server not responding” on the system, the default
behavior (disable with nohard).
intr Allow signals (such as Ctrl+C) to interrupt a failed NFS file
operation if the file system is mounted with the hard option
(disable with nointr). Has no effect unless the hard
option is also specified or if soft or nohard is specified.
296 Chapter 12
18_599496 ch12.qxd 8/30/05 6:42 PM Page 296
Table 12-4 (continued)
OPTION DESCRIPTION
lock Enables NFS locking and starts the statd and lockd
daemons (disable with nolock).
mounthost=name Sets the name of the server running mountd to name.
mountport=n Sets the mountd server port to connect to n (no default).
nfsvers=n Specify the NFS protocol version to use, where n is 1, 2, 3,
or 4.
port=n Sets the NFS server port to which to connect to n (the
default is 2049).
posix Mount the export using POSIX semantics so that the POSIX
pathconf command will work properly.
retry=n Sets the time to retry a mount operation before giving up to
n minutes (the default is 10,000).
rsize=n Sets the NFS read buffer size to n bytes (the default is
1024); for NFSv4, the default value is 8192.
soft Allows an NFS file operation to fail and terminate (disable
with nosoft).
tcp Mount the NFS file system using the TCP protocol (disable
with notcp).
timeo=n Sets the RPC transmission timeout to n tenths of a second
(the default is 7). Especially useful with the soft mount
option.
udp Mount the NFS file system using the UDP protocol, the
default behavior (disable with noupd).
wsize=n Sets the NFS write buffer size to n bytes (the default is
1024); for NFSv4, the default value is 8192.
The options you are most likely to use are rsize, wsize, hard, intr, and
nolock. Increasing the default size of the NFS read and write buffers
improves NFS’s performance. The suggested value is 8192 bytes, that is,
rsize=8192 and wsize=8192, but you might find that you get better per-
formance with larger or smaller values. The nolock option can also improve
performance because it eliminates the overhead of file locking calls, but not all
servers support file locking over NFS. If an NFS file operation fails, you can
use a keyboard interrupt, usually Ctrl+C, to interrupt the operation if the
exported file system was mounted with both the intr and hard options. This
prevents NFS clients from hanging.
The Network File System 297
18_599496 ch12.qxd 8/30/05 6:42 PM Page 297