Red Hat Linux Networking and System Administration Third Edition phần 6 ppt
Bạn đang xem bản rút gọn của tài liệu. Xem và tải ngay bản đầy đủ của tài liệu tại đây (1.99 MB, 103 trang )
Using the Postfix Mail Server
After you read this section, you might decide that Sendmail is far too complex
and baffling, or at least more complicated than Postfix. While Sendmail might
surpass Postfix in terms of configurability and features, this is only true of cor-
ner cases, that is, of extremely obtuse or unusual mail system configurations.
Postfix is used every day at sites that handle thousands and tens of thousands
of messages per day, so Postfix probably provides all of the functionality you’ll
need with a fraction of the frustration and aggravation that accompanies
learning arcane configuration hieroglyphics.
The best part is that Postfix is fully compatible with Sendmail at the com-
mand level. For example, the command to regenerate the Postfix alias data-
base is newaliases, the same name that Sendmail uses; the primary Postfix
daemon is named sendmail, just like Sendmail. The similarity is deliberate,
for Postfix was designed to be a high-performance, easier-to-use replacement
for Sendmail. A single example might illustrate why it is easier to configure
and use. As you learned in the previous section, the (unintuitive) Sendmail
syntax for defining a mail relay host is:
DSrelay.example.com
Postfix’s syntax is eminently clearer:
relayhost = relay.example.com
If this admittedly simple example doesn’t convince you that Postfix is easier
to configure and use, consider this: it is Sendmail, not Postfix, that needs a
meta-configuration-language (the m4 macros described earlier) to generate or
modify configuration files.
Switching to Postfix
By default, Fedora Core and RHEL use Sendmail. Switching to Postfix is sim-
ple, but before doing so, stop Sendmail:
# service sendmail stop
You want to stop Sendmail before changing anything so that no incoming
mail gets stuck in Sendmail’s queues before it is delivered. Of course, you
should make sure that Postfix is installed:
$ rpmquery postfix
postfix-2.2.2-2
Configuring Mail Services 479
28_599496 ch21.qxd 8/30/05 7:29 PM Page 479
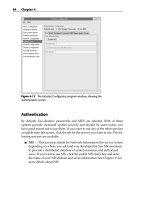
Install Postfix before proceeding. Otherwise, to make Postfix your MTA,
click Main Menu ➪ Preferences ➪ More Preferences ➪ Mail Transport Agent
Switcher or execute the command system-switch-mail at a command
prompt. Either way, you should see the dialog box shown in Figure 21-1.
Click the Postfix radio button and then click OK to save your change and
close the dialog box. After the change is applied, you will see the confirmation
message shown in Figure 21-2.
Click OK to proceed. The Mail Transport Agent Switcher does most of the
heavy lifting for you, so most of what you need to do is tweak and fine-tune
the Postfix configuration, as described in the next section.
Configuring Postfix
Postfix’s primary configuration file is /etc/postfix/main.cf. You will
need to check or edit at least the following variables:
■■ The mydomain variable specifies your domain name:
mydomain = example.com
■■ The myhostname variable identifies the local machine’s fully qualified
domain name:
myhostname = coondog.example.com
■■ The myorigin variable identifies the domain name appended to
unqualified addresses (that is, usernames without the @example.com
goober attached):
myorigin = $mydomain
This causes all mail going out to have your domain name appended.
Thus, if the value of mydomain is possum_holler.com and your
username is bubba, then your outgoing mail will appear to come from
bubba@possum_holler.com.
■■ The mydestination variable tells Postfix what addresses it should
deliver locally. For a standalone workstation, which is a system that is
connected directly to the Internet and that has some sort of domain
name resolution running, you want mail to that machine and to
localhost (and/or localhost.$mydomain and/or localhost
.locadomain) delivered locally, so the following entry should suffice:
mydestination = $myhostname, localhost, localhost.$mydomain
Postfix supports a larger number of configuration variables than the four
just listed, but these are the mandatory changes you have to make.
480 Chapter 21
28_599496 ch21.qxd 8/30/05 7:29 PM Page 480
Figure 21-1 The Mail Transport Agent Switcher.
Figure 21-2 Successfully changing the MTA.
Create or modify /etc/aliases. At the very least, you need aliases for
Postfix, postmaster, and root in order for mail sent to those addresses to get to
a real person. Here are the contents of my initial /etc/aliases file:
postfix: root
postmaster: root
root: bubba
After creating or modifying the aliases file, regenerate the alias database
using Postfix’s newaliases command:
# /usr/sbin/newaliases
You are finally ready to start Postfix:
# service postfix start
Starting postfix: [ OK ]
Make sure that Postfix will start when you boot the system. This should be
taken care of by the MTA switching tool, but it never hurts to double-check.
You can use the chkconfig commands shown in the following example:
# chkconfig levels 0123456 sendmail off
# chkconfig levels 0123456 postfix off
# chkconfig levels 2345 postfix on
Configuring Mail Services 481
28_599496 ch21.qxd 8/30/05 7:29 PM Page 481
Finally, modify your syslog configuration to handle Postfix log messages
appropriately. Many system administrators, including the authors, prefer that
mail log messages go to their own files to avoid cluttering up the primary sys-
tem log. So, we use the following entries in /etc/syslog.conf, which con-
trols the system log:
*.info;*.!warn;authpriv.none;cron.none;mail.none; -/var/log/messages
*.warn;authpriv.none;cron.none;mail.none; -/var/log/syslog
mail.*;mail.!err -/var/log/mail.log
mail.err -/var/log/mail.err
The first two lines keep any mail-related messages from being logged to
/var/log/messages and /var/log/syslog. The third line logs every-
thing but errors to /var/log/mail.log. The last line drops all error mes-
sages from Postfix into /var/log/mail.err. The - character before each
filename tells the system logging daemon, syslogd, to use asynchronous
writes, which means that the logging daemon does not force log messages out
to the specified file before returning control to the system. This measure helps
Postfix run somewhat faster, especially on a heavily loaded system but can
lead to data loss if the machine crashes before buffered data is flushed to disk.
Naturally, you have to restart syslogd syslogd to cause these changes to
take effect:
# service syslog restart
At this point, you have a basic, functional Postfix installation. There is a
great deal more customization that you can do and might want to do, but what
has been covered here should get you started and offer some insight into the
simplicity of Postfix installation and configuration.
Running Postfix behind a Firewall or Gateway
If the system on which you run Postfix is behind a firewall, uses a mail host, or
otherwise lacks a direct or constant Internet connection, you probably want to
define a relay host that handles your system’s outbound email. In this case,
Postfix will simply hand off locally generated email to the relay host, which
must be configured to relay for you. For a system that sits on an internal net-
work and that doesn’t have a direct connection to the Internet, add the follow-
ing entries to /etc/postfix/main.cf:
relayhost = mailhost.$mydomain
disable_dns_lookups = yes
482 Chapter 21
28_599496 ch21.qxd 8/30/05 7:29 PM Page 482
mailhost.$mydomain (replace mailhost with the actual name of the
relay host) handles actual mail delivery. If you don’t run DNS on your internal
network, the second line prevents Postfix’s SMTP client from performing DNS
lookups and instead causes Postfix to retrieve the IP address for the relay host
from /etc/hosts, so make sure that /etc/hosts contains the fully quali-
fied domain name, IP address, and alias (if one exists) for the relay host you
specify.
TIP You can also specify the relay host’s IP address in /etc/postfix/main.cf
using the syntax:
relayhost = [192.168.0.1]
Notice that the IP address is enclosed in square brackets. The square brackets
implicitly disable DNS lookups. That is, the square brackets imply
disable_dnl_lookups = yes.
If you make these (or other) changes to the Postfix configuration file, you
have to tell Postfix about them. Use the following command to do so:
# service postfix reload
Reloading postfix: [ OK ]
The next section, “Running Postfix on a Mail Host,” shows you how to cre-
ate a mail host that handles incoming mail for the systems on your network.
Running Postfix on a Mail Host
At the end of the previous section, you configured Postfix to use a mail host,
sometimes called a smart host, mail hub, or mail relay, for delivering outbound
mail. In this section, you configure the mail host to process outbound mail for
such client systems. This configuration assumes that the relay host, named
mailbeast (just an example), is the sole point of entry and exit for all
email traffic entering the network from the Internet and exiting the network
from client systems.
As you did on the client systems, you need to set the following configura-
tion variables on mailbeast:
■■ $myhostname
■■ $mydomain
■■ $myorigin
■■ $mydestination
Configuring Mail Services 483
28_599496 ch21.qxd 8/30/05 7:29 PM Page 483
In addition, mailbeast needs to be told for which systems it can relay
mail. Doing so involves setting two additional configuration variables,
$mynetworks and $relay_domains. $mynetworks defines a list of trusted
SMTP clients, that is, the list of clients that Postfix will allow to relay mail.
$relay_domains defines the destinations to which Postfix will relay mail.
Define $mynetworks using an explicit list of network/netmask patterns.
Consider the following $mynetworks setting:
mynetworks = 192.168.0.0/24, 127.0.0.0/8
TIP If you have trouble deriving the appropriate netmask to use, remember
the ipcalc tool introduced Chapter 12.
This directive states that any system with an IP address in the range
192.168.0.1 to 192.168.0.254 or in the loopback network can relay mail through
the Postfix server. You need to use values that reflect your internal network, of
course.
Where $mynetworks defines who is permitted to relay using the
Postfix server, $relay_domains identifies to where email can be relayed.
By default, Postfix relays mail to any address that matches $mynetworks
and $mydestination (the default value of $relay_domains is
$mydestination). To add relay destinations, specify a comma- or space-
delimited list of hostnames or domains. For example, the following directive
allows relays to $mydestination, the domain example.com (and any sub-
domain of example.com), and the host mailbeast.otherexample.com:
relay_domains = $mydestination, example.com,
mailbeast.otherexample.com
Notice how the long line is continued using white space at the beginning of
the next line. After making these changes, use the reload command shown
earlier (service postfix reload).
Serving Email with POP3 and IMAP
The mail system configurations discussed so far assumed that all systems on
your network run some sort of MTA. Obviously, this is an unwarranted
assumption. For example, Windows systems used as desktop network clients
ordinarily do not have an MTA of their own. Such systems require email access
484 Chapter 21
28_599496 ch21.qxd 8/30/05 7:29 PM Page 484
using IMAP or POP3 (or Web-based mail, discussed in Chapter 24). This sec-
tion shows you how to configure IMAP and POP3 servers. Worth noting is that
you can provide both IMAP and POP3 services, but that clients usually need
to use one or the other or chaos will ensue. Bear in mind also that IMAP, while
more feature-rich than POP3, imposes a significantly higher disk space
penalty on the server, especially if users decide to store all of their email on the
server. POP3 is slimmer than IMAP, but heavy POP3 usage can dramatically
bog down a mail server due to the overhead involved in clients polling the
server for new mail.
Setting up an IMAP Server
The IMAP implementation configured in this section is the Dovecot IMAP
server. As an extra bonus, the Dovecot IMAP server also speaks POP3. We’ve
selected Dovecot for several reasons. First, it supports POP3 and IMAP, sim-
plifying initial setup and ongoing maintenance. So, if you configure the IMAP
server using the procedures described in this section, you get a POP3 server
for free unless you specifically disable POP3 services. Second, Dovecot also
supports POP3S and IMAPS (Secure POP3 and Secure IMAP, respectively),
which wrap the authentication and data exchange processes in SSL-based
encryption (using OpenSSL). Finally, Dovecot is also ready to run after the nec-
essary packages have been installed, modulo the steps described in the fol-
lowing paragraphs.
First, make sure that the dovecot package is installed. The following
rpmquery command shows you whether this package is installed. If not,
install the dovecot package before proceeding:
# rpmquery dovecot
dovecot-0.99.14-4.fc4
The version number you see might be slightly different.
Configuring Dovecot
If the necessary packages are installed, configure the dovecot service to start
when the system boots. If you don’t intend to provide an IMAP server, you can
disable the IMAP services as described shortly. Use the following commands
to start dovecot at boot time:
# chkconfig levels 0123456 dovecot off
# chkconfig levels 345 dovecot on
Configuring Mail Services 485
28_599496 ch21.qxd 8/30/05 7:29 PM Page 485
Testing Cyrus
To test the server, connect to the POP3 server as a mortal user using telnet:
$ telnet localhost pop3
Trying 127.0.0.1
Connected to localhost.localdomain (127.0.0.1).
Escape character is ‘^]’.
+OK dovecot ready.
quit
+OK Logging out
Connection closed by foreign host.
To close the connection, type quit (or QUIT) and press Enter. This example
used telnet to connect to the POP3 port (port 110). If you see anything other
than +OK mumble displayed, check your configuration. If you can connect to
the POP3 server, you will be able to retrieve messages using the POP3 protocol.
Next up, connect to the IMAP server, again using telnet:
$ telnet localhost imap
Trying 127.0.0.1
Connected to localhost.localdomain (127.0.0.1).
Escape character is ‘^]’.
* OK dovecot ready.
. logout
* BYE Logging out
. OK Logout completed.
Connection closed by foreign host.
To close the connection, type . logout (or . LOGOUT) and press Enter. This
example used telnet to connect to the IMAP port (port 143). If you see any-
thing other than * OK mumble displayed, check your configuration. At this
point, your IMAP and POP servers are up and running and ready to service
IMAP and POP clients.
Maintaining Email Security
Do you think you have nothing to hide? Maybe you don’t, but email security is
always a privacy issue even if you aren’t mailing credit card numbers or cor-
porate secrets. Using S/MIME (secure MIME) for security is only one of many
steps to take to protect the integrity of your own and your users’ email.
486 Chapter 21
28_599496 ch21.qxd 8/30/05 7:29 PM Page 486
NOTE This section briefly covers some of the most common vulnerabilities
that affect email security. For more information about email security, see the
Sendmail Web site at and the Postfix Web site at
/>Protecting against Eavesdropping
Your mail message goes through more computers than just yours and your
recipient’s because of store-and-forward techniques. All a cracker has to do to
snoop through your mail is use a packet sniffer program to intercept passing
mail messages. A packet sniffer is intended to be a tool that a network adminis-
trator uses to record and analyze network traffic, but the bad guys use them
too. Dozens of free packet sniffing programs are available on the Internet.
Using Encryption
Cryptography isn’t just for secret agents. Many email products enable your
messages to be encrypted (coded in a secret pattern) so that only you and your
recipient can read them. Lotus Notes provides email encryption, for example.
One common method it to sign your messages using digital signatures, which
makes it possible for people to confirm that a message purporting to come
from you did in fact come from you. Another typical approach, which can be
used with digital signatures, is to encrypt email itself. Combining digital sig-
natures with encryption protects both the confidentiality of your email and its
authenticity. Fedora Core and RHEL ship with GNU Privacy Guard, or GPG,
which provides a full suite of digital signature and encryption services.
Using a Firewall
If you receive mail from people outside your network, you should set up a fire-
wall to protect your network. The firewall is a computer that prevents unautho-
rized data from reaching your network. For example, if you don’t want
anything from ispy.com to penetrate your net, put your net behind a firewall.
The firewall blocks out all ispy.com messages. If you work on one computer
dialed in to an ISP, you can still install a firewall. Several vendors provide per-
sonal firewalls, and some of them are free if you don’t want a lot of bells and
whistles.
Configuring Mail Services 487
28_599496 ch21.qxd 8/30/05 7:29 PM Page 487
Don’t Get Bombed, Spammed, or Spoofed
Bombing happens when someone continually sends the same message to an
email address either accidentally or maliciously. If you reside in the United
States and you receive 200 or more copies of the same message from the same
person, you can report the bomber to the FBI. The U.S. Federal Bureau of
Investigation has a National Computer Crimes Squad in Washington, DC, tele-
phone +1-202-325-9164.
Spamming is a variation of bombing. A spammer sends unsolicited email to
many users (hundreds, thousands, and even tens of thousands). You easily can
be an accidental spammer. If you choose your email’s Reply All function, and
you send a reply to a worldwide distribution list, you might be perceived by
some of the recipients as a spammer.
Spoofing happens when someone sends you email from a fake address. If
spoofing doesn’t seem like it could be a major problem for you, consider this:
you get email from a system administrator telling you to use a specific password
for security reasons. Many people comply because the system administrator
knows best. Imagine the consequences if a spoofer sends an email faking the sys-
tem administrator’s email address to all the users on a computer. All of a sud-
den, the spoofer knows everyone’s passwords and has access to private and
possibly sensitive or secret data. Spoofing is possible because plain SMTP does
not have authentication capabilities. Without authentication features, SMTP
can’t be sure that incoming mail is really from the address it says it is. If your
mail server enables connections to the SMTP port, anyone with a little knowl-
edge of the internal workings of SMTP can connect to that port and send you
email from a spoofed address. Besides connecting to the SMTP port of a site, a
user can send spoofed email by modifying his or her Web browser interfaces.
TIP You can protect your data and configure your mail system to make mail
fraud more difficult. If someone invades your mail system, you should report
the intrusion to the Computer Emergency Response Team (CERT). You can
find the reporting form on the Internet at />/incident_reporting_form.
Be Careful with SMTP
Use dedicated mail servers. First of all, keep the number of computers vulner-
able to SMTP-based attacks to a minimum. Have only one or a few centralized
email servers, depending on the size of your organization.
Allow only SMTP connections that come from outside your firewall to go to
those few central email servers. This policy protects the other computers on
488 Chapter 21
28_599496 ch21.qxd 8/30/05 7:29 PM Page 488
your network. If your site gets spammed, you have to clean up the central
email servers, but the rest of your networked computers are okay.
If you use packet filtering, you need only configure your email servers.
Packet filtering analyzes packets based on the source and destination
addresses. The analysis decides whether to accept the packets and pass them
through to your networks or to reject them as being unsafe. Firewalls often
use packet-filtering techniques. The latest stable kernel, 2.6, has powerful
built-in packet filtering capabilities.
Summary
This chapter explained the steps a message takes through MUAs, MTAs
(Sendmail and Postfix), TCP/IP protocols, LDAs, mail-notification programs,
mail queues, and mailboxes. Along the way you learned how to configure both
the client and server sides of an email system.
Configuring Mail Services 489
28_599496 ch21.qxd 8/30/05 7:29 PM Page 489
28_599496 ch21.qxd 8/30/05 7:29 PM Page 490
491
In today’s pecking order of Internet services, FTP, the File Transfer Protocol,
arguably places third behind email’s enormous popularity and the Web’s
visual appeal. Despite its second-class status, FTP is a fundamental Internet
service, one that almost every Internet user has used at one time or another.
This chapter shows you how to install, configure, and maintain the Very
Secure FTP daemon, vsftpd, the FTP server package that comes with Fedora
Core and RHEL.
FTP itself is relatively straightforward and uncomplicated to install, config-
ure, maintain, and monitor. For the lion’s share of FTP installations, vsftpd
works with few modifications. Minimal tweaks are necessary to customize the
FTP server for your site. When problems arise, though, they are usually the
result of unexpected interactions between the FTP server and various security
measures. After you’ve read this chapter, you should be able to configure an
FTP server with your eyes closed.
NOTE A complete Fedora Core or RHEL installation also installs in.tftp, an
FTP server implementing the Trivial File Transfer Protocol (TFTP). However, TFTP
is used almost exclusively for PXE boot services and for booting diskless
workstations, such as X terminals and slave nodes in clusters, or transferring
files to other diskless devices, such as network routers and bridges, so it is not
mentioned again in this chapter.
Configuring
FTP Services
IN THIS CHAPTER
■■ Introducing vsftp
■■ Configuring vsftp
■■ Advanced FTP Server Configuration
CHAPTER
22
29_599496 ch22.qxd 8/30/05 7:23 PM Page 491
Introducing vsftpd
The default FTP server daemon on Fedora Core and RHEL systems is vsftpd,
the Very Secure FTP Daemon, which has a project Web site at
Red Hat Software feels confident enough
about vsftpd, in fact, to use it to power their own FTP site. So does the
OpenBSD FTP site. So do a lot of other sites. vsftpd is extremely lightweight in
that it makes sparing use of system resources and does not rely on system
binaries for parts of its functionality. It can be tuned, to some degree, to use
even fewer resources if need be. For more information about vsftpd, see the
vsftpd Web site at />TIP In this chapter, the text vsftpd refers to the name of the product. When
vsftpd is used to refer to the actual daemon binary, it appears in monospaced
text, for example, vsftpd.
To the standard FTP services defined in RFC 959, the core RFC (Request for
Comment) that defines the FTP protocol, vsftpd offers the additional security
features and usability enhancements listed here:
■■ Support for virtual IP configurations
■■ Support for so-called virtual users
■■ Can run as a standalone daemon or from inetd or xinetd
■■ Configurable on a per-user or per-IP basis
■■ Bandwidth throttling
■■ IPv6-ready
Unlike older versions of products formerly known as Red Hat Linux, you no
longer have to install a special RPM to provide anonymous FTP services. Acou-
ple of tweaks to the vsftpd configuration file and you are set to go. One of the
reasons a special RPM is no longer required is that vsftpd is self-contained —
that is, it doesn’t need access to system binaries, such as a statically linked
/bin/ls, to operate. Rather, vsftpd provides internal implementations of com-
mands other FTP daemons (such as the venerable wu-ftpd) expect the host
operating system to provide.
Although Fedora Core and RHEL prefer and install vsftpd, ProFTPD and
NcFTPd deserve mention because they are widely used at busy FTP sites.
ProFTPD (www.proftpd.org) is a free FTP server licensed under the GPL.
Roughly modeled on the Apache Web server, ProFTPD was designed to be
more configurable and more secure than vsftpd. ProFTPD was written from
492 Chapter 22
29_599496 ch22.qxd 8/30/05 7:23 PM Page 492
scratch. Other Linux FTP servers, including vsftpd, evolved from the original
BSD ftpd server. The following key features distinguish ProFTPD:
■■ Per-directory access configuration using .ftpaccess files, much like
Apache’s .htaccess file
■■ An anonymous FTP root directory unencumbered by required directory
structures and system binaries
■■ Support for hidden files and directories
■■ Self-contained and does not need to use system binaries or libraries,
reducing the likelihood of exploits that take advantage of external
programs
■■ Runs as an unprivileged user in standalone mode, decreasing exposure
to security attacks that attempt to exploit its root privileges
NcFTPd () is a commercial FTP server that, like
ProFTPD, was written from scratch, optimized for anonymous FTP service,
and designed for high performance. Its primary architectural features are its
self-described “no-forks” design — not spawning child processes to handle
incoming connections and individual directory listings — and its indepen-
dence from inetd and xinetd. It runs as a standalone server. It is not free soft-
ware, but its features, security, and performance make it a popular FTP server.
Configuring vsftpd
Depending on the type of installation you selected, the installer, might or
might not have installed vsftpd. To find out, execute the command rpmquery
vsftpd. If the output resembles the following, vsftpd is installed:
# rpmquery vsftpd
vsftpd-2.0.1-5
If, on the other hand, you see this message, you must at least install the
binary RPM before continuing with this chapter:
# rpmquery vsftpd
package vsftpd is not installed
If vsftpd is installed, configure it to start at boot time using the chkconfig
command:
# chkconfig levels 0123456 vsftpd off
# chkconfig levels 345 vsftpd on
Configuring FTP Services 493
29_599496 ch22.qxd 8/30/05 7:23 PM Page 493
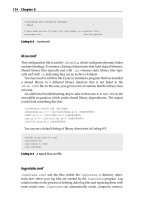
Alternatively, you can use the graphical Service Configuration tool. To do
so, type system-config-services at a command prompt or select Main
Menu ➪ System Settings ➪ Server Setting ➪ Services. When you see the screen
shown in Figure 22-1, scroll down to the vsftpd entry near the bottom of the
services scroll box.
Click the check box next to vsftpd to enable it and then click Save to save
your changes. Select File ➪ Exit to close the Service Configuration Tool after
saving your changes.
The stock vsftpd installation creates a basic functioning FTP server that works
for users with their own login accounts on the system and for anonymous FTP,
using either the anonymous or ftp login names. Just to be sure that everything
is working, however, do a quick smoke test. If not already present (it should be),
add the following line to the bottom of /etc/vsftpd/vsftpd.conf, the
vsftpd configuration file:
listen=YES
This entry configures vsftpd to run as a standalone daemon. The case is
important, so add the line as shown.
Start vsftpd:
# service vsftpd start
Figure 22-1 The Service Configuration tool.
494 Chapter 22
29_599496 ch22.qxd 8/30/05 7:23 PM Page 494
Finally, try to log in as an anonymous user. You can use a login name of ftp
or anonymous:
$ ftp localhost
Connected to localhost (127.0.0.1).
220 (vsFTPd 2.0.1)
Name (localhost:bubba): ftp
331 Please specify the password.
Password:
230 Login successful.
Remote system type is UNIX.
Using binary mode to transfer files.
ftp> ls -a
227 Entering Passive Mode (127,0,0,1,100,97)
150 Here comes the directory listing.
drwxr-xr-x 3 0 0 16 Jan 22 14:17 .
drwxr-xr-x 3 0 0 16 Jan 22 14:17
drwxr-xr-x 2 0 0 6 Oct 04 06:36 pub
226 Directory send OK.
ftp> close
221 Goodbye.
ftp> bye
If all has gone well, and it should have, you will be able to log in as the
anonymous user, as shown in the preceding example. Of course, you haven’t
populated the FTP directories yet, so there’s not much to see. In its default con-
figuration, vsftpd uses /var/ftp/pub as the download directory, so if you
want to add content to your FTP server with no server reconfiguration, popu-
late /var/ftp/pub.
The default configuration is only a start, a base you should customize to
enhance security and to fit your needs. In this section, you learn how to fine-
tune the default FTP server configuration.
The first step in FTP server configuration is to become familiar with the con-
figuration files that control the server’s behavior. Table 22-1 lists and briefly
describes vsftpd’s configuration files.
Table 22-1 vsftpd Configuration Files
FILE NAME DESCRIPTION
/etc/vsftpd/vsftpd.conf Controls the operation of FTP daemon, vsftpd
/etc/vsftpd/ftpusers Lists the users not allowed to login via FTP
/etc/vsftp/user_list By default, defines user permitted access via FTP
Configuring FTP Services 495
29_599496 ch22.qxd 8/30/05 7:23 PM Page 495
Configuring User Level FTP Access
The /etc/vsftpd/ftpusers file is the simplest to understand. It contains a
list of user or account names, one per line, that are not allowed to log in using
FTP. This file is used to increase security. For example, if a cracker somehow
obtains the root password but (stupidly) tries to log in as root using FTP, the
login attempt will fail. Notice that the filename is annoyingly counterintuitive:
user accounts listed in this file are not permitted to log in to the system via FTP.
In general, /etc/vsftpd/ftpusers is used to prevent privileged user
accounts, such as root, from using FTP to obtain access to the system. The fol-
lowing code shows the default /etc/vsftpd/ftpusers file:
root
bin
daemon
adm
lp
sync
shutdown
halt
news
uucp
operator
games
nobody
So, to prevent a user named bubba from using FTP to log in, or, rather, to
prevent bubba from logging in to the system via FTP, add bubba to the end of
/etc/vsftpd/ftpusers. In most cases, these default entries should be suf-
ficient, but if you install a software package, such as a database package, that
requires one or more special user accounts, consider adding such special
accounts to /etc/vsftpd/ftpusers in order to maintain strict limits on
how the FTP server can be accessed.
TIP The default vsftpd configuration as installed by Fedora Core and RHEL
allows anonymous FTP access. If you choose not to enable anonymous FTP
access, add the user ftp to /etc/vsftpd/ftpusers and set
anonymous_enable=NO in /etc/vsftpd/vsftpd.conf.
The /etc/vsftpd/user_list file serves a purpose similar to /etc
/vsftpd/ftpusers, limiting FTP access, but it is more flexible. If you com-
pare the two files, though, you see that the users listed in /etc/vsftpd
/user_list are the same ones listed in /etc/vsftpd/ftpusers. So, what
496 Chapter 22
29_599496 ch22.qxd 8/30/05 7:23 PM Page 496
is the difference between the two files? /etc/vsftp/ftpusers uncondi-
tionally denies access to the system via FTP; /etc/vsftpd/user_list can
be used to deny or permit access, depending on the value of the userlist_
deny directive in /etv/vsftpd/vsftpd.conf. If userlist_deny is set to
NO (that is, userlist_deny=NO), then vsftpd allows FTP access only to the
users listed in /etc/vsftpd.user_list. If userlist_deny is set to YES
(that is, userlist_deny=YES), no user listed in /etc/vsftpd/user_list
will not be permitted to login via FTP. Such users will not even be prompted
for a password.
Configuring vsftpd Features
By far, the most important (and potentially the longest) vsftpd configuration
file is /etc/vsftpd/vsftpd.conf. The configuration directives in this file
enable you to exercise finely grained control over vsftpd’s behavior. The con-
figuration file itself has a pleasantly simple format. Each line is either a
comment, which begins with #, or a directive. Directives have the form
option=value. Most of the configuration options are Boolean, so they are
either on or off, or, rather, YES or NO. A second group of configuration options
take numeric values, and a third, considerably smaller set of configuration
options accept string values.
To organize the discussion of /etc/vsftpd/vsftpd.conf, we start with
the default configuration file provided in Fedora Core and RHEL. It is shown
in the following listing, with most of the comments removed to preserve space
and to make it easier to read. Like many configuration files, lines that begin
with the hash sign (#) denote comments that the program ignores.
anonymous_enable=YES
local_enable=YES
write_enable=YES
local_umask=022
#anon_upload_enable=YES
#anon_mkdir_write_enable=YES
dirmessage_enable=YES
xferlog_enable=YES
connect_from_port_20=YES
#chown_uploads=YES
#chown_username=whoever
#xferlog_file=/var/log/vsftpd.log
xferlog_std_format=YES
#idle_session_timeout=600
#data_connection_timeout=120
#nopriv_user=ftpsecure
#async_abor_enable=YES
Configuring FTP Services 497
29_599496 ch22.qxd 8/30/05 7:23 PM Page 497
#ascii_upload_enable=YES
#ascii_download_enable=YES
#ftpd_banner=Welcome to blah FTP service.
#deny_email_enable=YES
#banned_email_file=/etc/vsftpd.banned_emails
#chroot_list_enable=YES
#chroot_list_file=/etc/vsftpd.chroot_list
#ls_recurse_enable=YES
pam_service_name=vsftpd
userlist_enable=YES
listen=YES
tcp_wrappers=YES
The first configuration option, anonymous_enable=YES, allows anony-
mous FTP access. You can set this to NO if you do not want to enable anony-
mous FTP. The directive local_enable=YES allows local users (users with
accounts on the system on which vsftpd is running) to access the system via
FTP. Similarly, write_enable=YES enables all variations of the FTP com-
mands that allow FTP users to modify the file system, such as STOR (the FTP
put and mput commands for uploading files) and DELE (the FTP del com-
mand for deleting files). As a rule, it is unwise to permit FTP users to modify
the file system, so if security is a concern, you might consider disabling write
commands by setting write_enable to NO.
At first glance, it might seem reasonable to grant local users write access, or
at least to be able to log in. However, the reason local users should not be
allowed to log in is that FTP is a clear-text protocol; usernames and, more
importantly, passwords, are transmitted in clear text. Anyone with a packet
sniffer monitoring IP traffic to and from your FTP server’s IP address can grab
the authentication information and use it to compromise your system. Where
FTP is concerned, one can argue that anonymous access is actually less of a
security risk than normal, authenticated access because anonymous FTP does
not require transmitting sensitive passwords over the wire. In fact, for local
users, sftp sftp, part of the OpenSSH suite of programs, is vastly superior to
plain vanilla FTP because it encapsulates FTP inside a secure, encrypted com-
munication session (see “Using SFTP” at the end of this chapter).
The directives anon_upload_enable=YES and anon_mkdir_write_
enable=YES control whether or not anonymous FTP users can upload files
and create directories, respectively. These two directives are commented out,
so anonymous uploads are disabled. Hopefully, it is obvious that allowing
anonymous uploads is potentially dangerous. That said, should you decide to
permit anonymous uploads, you will want to investigate additional vsftpd
configuration directives that restrict this type of access. In particular, use the
chown_uploads=YES directive to change the ownership of uploaded files to
498 Chapter 22
29_599496 ch22.qxd 8/30/05 7:23 PM Page 498
the username specified by the chown_username directive. See the section
titled “Enabling Anonymous Uploads” for more information about creating a
more secure anonymous upload environment using vsftpd.
TIP For more secure FTP-like behavior, consider using the sftp (secure FTP)
command or the very nice lftp FTP client. sftp is part of the OpenSSH suite of
commands and implements a secure version of FTP. lftp, similarly, uses SSH
over fish (that is, SSL using blowfish encryption), a very handy feature.
In the configuration file shown, the chown_username is whoever. We rec-
ommend changing this to nobody (that is, chown_username=nobody)
because the user named nobody has special security semantics associ-
ated with it that reduce security risks. One of these semantic features is that
the nobody user is not allowed to login via FTP. Another feature of the
nobody user is that it usually does not have a login shell; in the default
/etc/password file on Fedora Core and RHEL systems, nobody’s login
shell is /sbin/nologin.
The various xferlog directives xferlog_enable, xferlog_file, and
xferlog_std_format, control the location of the transfer log and the format
of entries in this log file. If xferlog_enable is set to YES, file uploads (if per-
mitted) and downloads are recorded in a log file, widely referred to using the
shorthand expression xferlog. The xferlog_file directive specifies the name
of the xferlog file. The default log file is /var/log/vsftpd.log, which
should be suitable for most purposes. If you want to capture file transfers in a
more mnemonically named file, you might use xferlog_file=/var/log
/xfer.log, but this is only a suggestion.
If you want to change the log entry format from the standard format, set
xferlog_std_format=NO and add the directive log_ftp_protocol=YES,
which will cause all FTP protocol requests to be dumped into the log file. Again,
the standard format should be fine. Logging FTP at the protocol level is mostly
valuable when trying to isolate server or network problems or debugging
vsftpd itself.
If you have ever wondered how FTP servers show you special messages
when you cd into certain directories, the dirmessage_enabled=YES direc-
tive is how vsftpd, at least, accomplishes it. If this directive is set to YES, the first
time a user enters a new directory, vsftpd displays the contents of a file named
.message, if it exists. You can change the message file using the message_
file directive. For example, message_file=readme sets the message file to
readme. You can use the message file to display special notices specific to cer-
tain directories.
Configuring FTP Services 499
29_599496 ch22.qxd 8/30/05 7:23 PM Page 499
The ftpd_banner directive allows you to display a site-specific banner
message when users connect to the server. For example, the directive ftpd_
banner=* * * * Welcome to the Possum Holler FTP Server * * * * looks
like the following when users first log in:
220 * * * * Welcome the Possum Holler FTP Server * * * *
User (192.168.0.1:(none)): ftp
331 Please specify the password.
Password:
230 Login successful. Have fun.
ftp>
Notice that the ftpd_banner directive is not embedded between double
quotes (“”). This is because vsftpd would display the quotes as part of the
banner.
If you want to deny access to your server based on the email address provided
as part of an anonymous login, uncomment the deny_email_enable=YES
and put the email addresses you want to deny access into a file named
/etc/vsftpd.banned_emails. If you want to store the banned addresses in a
different file, uncomment the banned_email_file=/etc/vsftpd.banned_
emails directive and change the filename. Although this measure can be used as
a security feature, it is extremely weak because it is trivial to change an email
address and even more trivial to issue a bogus email address to an FTP server.
Moreover, vsftpd, and Fedora Core and RHEL in general, offer much stronger
and more secure methods for limiting or denying access.
The two chroot entries, chroot_list_enable=YES and chroot_
list_file=/etc/vsftpd.chroot_list, affect the behavior of the vsftpd
server when it runs in chroot mode. The first directive, if uncommented,
causes vsftpd to execute a chroot to the home directory of local users when
they log in. For this to work, however, the file /etc/vsftpd.chroot_list
must contain a list of the users to whom this measure will be applied.
/etc/vsftpd.chroot_list is the default. If you want to change it, uncom-
ment chroot_list_file=/etc/vsftpd.chroot_list and change the
filename appropriately. If you want to list users who should not be chrooted,
set chroot_local_user=YES in /etc/vsftpd/vsftpd.conf. In this
case, users listed in chroot_list_file will not be chrooted to their home
directory.
Oh, what does chroot mean? chroot is short for change root and refers to
changing a process’s or a user’s root directory so that it only sees a limited sub-
set of the entire file system. For example, chrooting to /home/bubba turns
/home/bubba into a process’s root file system. Thereafter, /home/bubba is
effectively the same as /, and the process or user can navigate no higher in the
file system than /home/bubba. The only files and directories accessible are
500 Chapter 22
29_599496 ch22.qxd 8/30/05 7:23 PM Page 500
those in /home/bubba and its subdirectories. More practically, chrooting a
user or process is an access restriction technique and a way to limit damage to
a prescribed area should the user or process go awry.
As explained earlier, vsftpd runs in standalone mode rather than from
xinetd because the listen directive is set to YES. The default vsftpd configu-
ration provided with in Fedora Core and RHEL does not provide an xinetd
configuration file in /etc/xinetd.d, so you need to make sure that listen
=YES is set and that vsftpd starts at boot time (provided, of course, you intend
to provide FTP services). To enable vsftpd at boot time, execute the following
commands (as root):
# /usr/sbin/chkconfig levels 0123456 vsftpd off
# /usr/sbin/chkconfig levels 345 vsftpd on
The first command disables the vsftpd service in all run levels. The second
command reenables vsftpd in run levels 3, 4, and 5.
The ls_recurse directive enables the -R option to vsftpd’s built-in ls
command, so executing the command ls -R during an FTP session performs
a recursive ls of all files and subdirectories of the current directory. The direc-
tive pam_service_name=vsftpd defines the name that vsftpd uses to inter-
act with PAM. If you want to use TCP wrappers, finally, make sure that
tcp_wrapper=YES is enabled, which causes vsftpd to use the access control
features available with TCP wrappers and to check /etc/hosts.allow and
/etc/hosts.deny to evaluate which remote systems to allow access to.
Disabling Anonymous FTP
On the off chance you decided to disable anonymous FTP entirely, this is
easily accomplished. The easiest way is to remove the ftp user from /etc
/passwd and /etc/group:
# cp -p /etc/passwd /etc/passwd.ftp
# cp -p /etc/group /etc/group.ftp
# userdel -r ftp
userdel: /var/ftp not owned by ftp, not removing
# find / -user 50 | xargs rm -r
Ordinarily, userdel’s -r option removes files in ftp’s home directory
(/var/ftp), but it doesn’t work in this case because the ftp user doesn’t own
/var/ftp, root does. userdel also removes the ftp user from /etc/group,
so you needn’t execute the groupdel command. The find command locates
all the files owned by the ftp user and deletes them. You have to use the
numeric UID (50) instead of the username (ftp) because the username no
Configuring FTP Services 501
29_599496 ch22.qxd 8/30/05 7:23 PM Page 501
longer exists. You might not want to execute the command if you have popu-
lated the FTP server with files that you can’t easily replace.
The problem with this method is that if you later decide to permit anony-
mous FTP, you have to recreate the ftp user and group because, as config-
ured, vsftpd doesn’t allow any FTP login if the user ftp is not present in the
password file. That’s why we made backup copies of /etc/passwd and
/etc/group before executing userdel.
A more flexible approach is to add ftp to /etc/vsftpd/user_list and
set userlist_deny=YES and anonymous_enable=NO in /etc/vsftpd
/vsftpd.conf. It is not sufficient to comment out anonymous_enable=YES,
because that will default to permitting anonymous FTP. This approach dis-
ables anonymous FTP while permitting regular FTP. However, if you use this
method, remove any other users from /etc/vsftpd/user_list that you
do want to be able to log in via FTP.
Advanced FTP Server Configuration
The information in the previous sections should enable you to get a basic, fully
functioning FTP server up and running in 15 minutes, if you type really slowly.
To be sure, there’s nothing wrong with a plain vanilla FTP server. It will do
what it is supposed to do, provide FTP access to designated files, reliably,
quickly, and efficiently. Unfortunately, you will not be taking advantage of
some of vsftpd’s best features. For example, perhaps you do not want to run
vsftpd as a standalone daemon but prefer to run it via xinetd; maybe, despite
the recommendation not to do so, you want to permit anonymous uploads;
perchance you want or need to provide FTP services for guest users; mayhap
you have decided to run vsftpd over SSL. This section describes how to enable
each of these options.
Running vsftpd from xinetd
As remarked earlier in the chapter, the standard vsftpd installation does not
install a configuration file for xinetd. However, all is not lost. vsftpd’s author
provides a sample xinetd configuration file. Listing 22-1 shows this sample
file, modified for Fedora Core and RHEL.
NOTE The preferred method for starting vsftpd is as a service, using the
command service vsftpd start. It also works “out of the box” on any
Fedora Core or RHEL system.
502 Chapter 22
29_599496 ch22.qxd 8/30/05 7:23 PM Page 502
# default: on
# description:
# The vsftpd FTP server serves FTP connections. It uses
# normal, unencrypted usernames and passwords for authentication.
# vsftpd is designed to be secure.
service ftp
{
socket_type = stream
wait = no
user = root
server = /usr/sbin/vsftpd
server_args = /etc/vsftpd/vsftpd.conf
log_on_success += DURATION USERID
log_on_failure += USERID
nice = 10
disable = no
}
Listing 22-1 An xinetd configuration file for vsftpd.
The modified file is available in this chapter’s directory on the accompany-
ing CD-ROM as vsftpd.xinetd. You can copy the file from the CD-ROM
into /etc/xinetd.d/vsftpd, or you can create the file yourself. One last
time, however, we do not recommend starting vsftpd from xinetd because
the performance will be crummy. To express it more prosaically, starting
vsftpd from xinetd is like teaching a pig to sing: it annoys the pig and you
won’t like the results.
Enabling Anonymous Uploads
Enabling anonymous uploads is also like teaching a pig to sing, but we’re not
going to beat that simile into the ground (but we will mangle a metaphor if we
can get away with it). Seriously, anonymous uploads pose all sorts of security
risks. The two that come to mind are someone uploading a virus or trojan to
your server and having your FTP server become a warez server, that is, a transfer
point for illegal or cracked copies of software, music, and/or movies. Becoming
a warez server isn’t so much a security risk as it is a freedom risk, as in, the
authorities might put you in jail if they discover you’re running a warez server.
You get the point.
The obligatory security lecture notwithstanding, how do you enable anony-
mous uploads?
Configuring FTP Services 503
29_599496 ch22.qxd 8/30/05 7:23 PM Page 503