Red Hat Linux Networking and System Administration Third Edition phần 9 pptx
Bạn đang xem bản rút gọn của tài liệu. Xem và tải ngay bản đầy đủ của tài liệu tại đây (1.8 MB, 103 trang )
The output of the cdrecord command follows. The line that shows the CD
drive type and manufacturer is the one you are interested in. At the beginning
of the line is the SCSI ID information shown as 1,0,0, which is the SCSI device
number (1), the logical unit number (0), and the device ID (0).
cdrecord-Clone 2.01-dvd (i686-pc-linux-gnu) Copyright (C) 1995-2004 Jörg
Schilling
Note: This version is an unofficial (modified) version with DVD support
Note: and therefore may have bugs that are not present in the original.
Note: Please send bug reports or support requests to
/>Note: The author of cdrecord should not be bothered with problems in this
version.
scsidev: ‘ATA’
devname: ‘ATA’
scsibus: -2 target: -2 lun: -2
Linux sg driver version: 3.5.27
Using libscg version ‘schily-0.8’.
cdrecord: Warning: using inofficial libscg transport code version (schily - Red
Hat-scsi-linux-sg.c-1.83-RH ‘@(#)scsi-linux-sg.c 1.83 04/05/20 Copyright
1997 J. Schilling’).
scsibus1:
1,0,0 100) ‘HL-DT-ST’ ‘RW/DVD GCC-4243N’ ‘1.07’ Removable CD-ROM
1,1,0 101) *
1,2,0 102) *
1,3,0 103) *
1,4,0 104) *
1,5,0 105) *
1,6,0 106) *
1,7,0 107) *
You supply the SCSI device number, the device ID, and the logical unit num-
ber to the cdrecord command, in that order, as part of the dev option. Asam-
ple cdrecord command is as follows:
cdrecord -v dev=1,0,0 -data /tmp/cd.image
This command does not generally produce a bootable CD. For a CD to be
bootable, the image file being recorded onto the CD needs to follow a specific
format. Also, your BIOS must support booting from your particular CD-ROM.
To produce a bootable image file, you need to follow several steps. First, you
need to obtain a boot image. If you have a bootable CD-ROM in the disk drive,
the boot image can be written to a file with the following command:
dd if=/dev/fd0 of=boot.img bs=10k count=144
TIP One handy boot image is the diskboot.img, which is on disk one of the
Fedora Core and Red Hat Enterprise installation disks.
788 Chapter 31
39_599496 ch31.qxd 8/30/05 7:13 PM Page 788
This command puts the boot image in the file boot.img. You must put this
somewhere in the directory that you are going to put on the CD. In the exam-
ple provided, you could create a directory /home/terry/boot and place the
file there. You also need to give mkisofs some extra parameters to have it cre-
ate a bootable image.
mkisofs -r -b /home/terry/boot/boot.img -c
/home/terry/boot/boot.catalog -o /tmp/cd.image /home/terry
The boot.catalog file need not already exist. It is generated by mkisofs.
The command line option just tells mkisofs where in the image to store the
generated file.
Using dump
The dump package consists of several commands for backing up and restoring
the file system. The dump command is used to do backups of either entire par-
titions or individual directories of ext2 and ext3 file systems. The restore
command is used to restore an entire partition, individual directories, or indi-
vidual files.
Syntax of the dump Command
The first argument to the dump command is a list of options. Following that are
all arguments required by the various options in the same order as the options
were specified. The last argument is the file system to back up. Table 31-2 lists
the available dump options.
Table 31-2 Dump Options
OPTION MEANING TYPE
B The number of records per volume Number
b The number of kilobytes per dump record Number
h The dump level at which to use nodump flags Number
f Name of file or device to write to Filename
d Tape density Number
n Tell dump to send a message when done None
s Length of dump tape Number in feet
u Record the date of this dump in /etc/dumpdates None
T Add only files older than the given time Time (ctime)
(continued)
Backing Up and Restoring the File System 789
39_599496 ch31.qxd 8/30/05 7:13 PM Page 789
Table 31-2 (continued)
OPTION MEANING TYPE
W List the file systems that need to be backed up None
w List individual files that need to be backed up None
0–9 Specify a dump level of 0 through 9 None
CAUTION Using dump on a live file system can be dangerous and unreliable.
For more information on this topic, see redhat.com/archives/ext3-users
/2003-January/msg00034.html.
Sample dump Command
If you want to see a sample of the output from the dump command, try enter-
ing the command shown here:
dump 0uf /dev/nst0 /dev/hda3
This command specifies that the file system on /dev/hda3should be backed
up on the magnetic tape on device /dev/nst0. It specifies that the backup
should use backup level 0 (full backup) and write the time of the backup to the
/etc/dumpdates file. The /etc/dumpdates file is used to keep track of the
dates when your information was backed up.
Using restore
The restore command is used to retrieve files from the backups created with
dump. You can use restore to restore an entire file system or you can use it
to interactively select which files you want to restore.
The syntax for the restore command is the same as that for the dump com-
mand, although it has different options. Table 31-3 lists the options.
Table 31-3 Restore Options
OPTION MEANING TYPE
r Restores the entire dump archive None
C Compares the files on the file system to those None
in the dump archive
R Starts the restore from a particular tape in a None
multivolume sequence
790 Chapter 31
39_599496 ch31.qxd 8/30/05 7:13 PM Page 790
Table 31-3 (continued)
OPTION MEANING TYPE
x Extracts only specified files List of files
t Lists the contents of the dump archive List of files
I Restores files in interactive mode None
b Blocks size of the dump in kilobytes Number
D Names the file system to be compared against File system
f Names dump archive to restore from Filename
h Recreates directories but does not restore None
their contents
m Extracts files by inode number instead of name None
N Prints filenames rather than extracting them None
s Specifies the tape number to start on when Number
using the R option
T Specifies where to write temporary files Directory
v Specifies verbose mode None
y Does not prompt when bad blocks are encountered None
Restoring the File System
To restore a damaged or erased file system, you must first recreate the direc-
tory or partition that has been lost. If, for instance, you want to recreate the
/home directory, which existed by itself on the /dev/hdb1 partition, you
could use the following commands:
mkfs /dev/hdb1
mount /dev/hdb1 /home
Note that this command erases all of the data on the /dev/hdb1 partition.
This method of restoration is useful only for restoring all of the files previously
archived with dump. If any files have been added, modified, or deleted since
the last backup, those changes are lost. Restoring individual files is covered in
the section “Using Restore Interactively.” Also, if mkfs is accidentally run on a
different partition than the one meant to be restored, all of the data on the par-
tition on which it is mistakenly run is irrevocably erased.
The restore command must be run inside the directory that is going to be
restored. So, restore can restore the /home directory with the following
commands:
Backing Up and Restoring the File System 791
39_599496 ch31.qxd 8/30/05 7:13 PM Page 791
cd /home
restore rf /dev/nst0
The r flag tells restore to restore the entire archive rather than just some
files. The f flag tells restore that the archive is located on the device
/dev/rft0.
Using restore Interactively
The restore command, in addition to being used to restore an entire file sys-
tem, can also be used in an interactive mode, which enables you to restore
individual files. The interactive mode is invoked as follows:
restore if /dev/nst0
This command runs restore in interactive mode and specifies that it
should restore from the archive on the device /dev/rft0. The interactive
mode enables you to type options to restore and lets you control restore’s
behavior. It includes the options shown in Table 31-4.
Table 31-4 Restore Commands
COMMAND MEANING
add Adds a file or directory to the list of files to be extracted. If a
directory is specified, all contained files, subdirectories, and files
contained in subdirectories are extracted. File paths are relative
to the current directory being viewed in the dump archive.
cd Changes which directory within the dump archive is being
viewed.
delete Removes a file or directory from the list of files to be extracted.
If a directory is specified, all files in that directory, subdirectories,
and files in subdirectories are removed from the list as well.
Note that this does not affect what is stored in the dump
archive, but rather which files are extracted during the restore.
extract Extracts all files and directories currently in the list of files to
extract and restores them in the file system.
help Lists available commands.
ls Lists the contents of the directory currently being viewed in the
dump archive. If a directory is specified, the contents of the
specified directory are listed rather than the contents of the
current directory. Files and directories marked with * in the file
listing are currently marked for extraction.
pwd Prints the path within the dump archive of the directory
currently being viewed.
792 Chapter 31
39_599496 ch31.qxd 8/30/05 7:13 PM Page 792
Table 31-4 (continued)
COMMAND MEANING
quit Exits the restore program. No other actions are taken by restore.
setmodes Rather than extracting the files, this sets the permissions on the
files in the file system so that they match the permissions of the
files in the dump archive that are marked for extraction.
verbose Switches verbose mode on or off.
Using tar
Fedora Core and Red Hat Enterprise Linux include the GNU version of tar. It
includes some extensions to the older standard versions of tar, including multi-
volume archiving, an automated process in which tar prompts for new media to
be inserted whenever it runs out of space. The tar program is a utility originally
designed for making magnetic tape backups, but is useful for any kind of
archiving purpose. When making archives, it is important to specify a leading
./ for files. That creates a relative path, which will be necessary when restoring
the files later.
The tar command requires one command option followed by any number
of optional options. Table 31-5 lists the command options.
Table 31-5 tar Options
COMMAND EXPLANATION
A Appends the contents of the given tar files to the specified tar
archive.
d Finds differences between what’s in the tar archive and what’s in
the file system.
j Filters the archive through the bzip filter. Used to compress or
decompress files ending with bz2 extension.
r Appends the given files to the specified tar archive.
t Lists the contents of the specified tar archive.
u Appends the given files to the specified tar archive, but only if
they are newer than the files in the tar archive.
x Extracts the given files from the specified tar archive.
z Filters the archive through the gzip filter. Used to compress or
decompress files ending with gz extension.
Backing Up and Restoring the File System 793
39_599496 ch31.qxd 8/30/05 7:13 PM Page 793
In addition to specifying a command, you must specify a device or file to act
as the destination of the tar archive.
Creating a tar Archive
The tar command was originally designed to create tape archives; in fact tar
is a contraction of tape archive. But, you can create tar archives and save them
anywhere on your system, not just to a tape drive. To create a tar file use the
following command syntax.
tar cvf (name of tar file to create) (list of files to add)
If you wanted to create a tar file of the files testing1.txt, test-
ing2.txt, and testing3.txt and place them into a tar archive called
testing.tar, you would issue this command:
tar cvf testing.tar testing1.txt testing2.txt testing3.txt
In this example, you could use wildcards to make your job easier by using
testing*.txt instead of typing the filenames individually.
You can also use tar to back up entire directories by issuing the directory
name you want to tar instead of filenames. For example, if you wanted to tar
a directory called ch4 to the tape drive, you would issue this command:
tar cvf /dev/st0 ch4
This command would create a tar file called ch4.tar that would contain
the contents of ch4, including all files as well as any subdirectories and rewind
the tape to the beginning.
Extracting a Tar Archive
To extract a tar archive, use the following syntax:
tar x (name of tar file)
To extract the tar file created in the previous section, issue this command:
tar x testing.tar
This would extract the files from the tar file and place them in the current
directory. If you extract a tar file containing a directory and subdirectories, if
any, the directory and its subdirectories will be extracted into their original
directory structure at the location from where the tar command was issued.
For example, to extract the sample directory you created previously, you
would type the following:
tar xvf /dev/st0
794 Chapter 31
39_599496 ch31.qxd 8/30/05 7:13 PM Page 794
This command would extract the sample directory, and any files or subdi-
rectories it contained, from the tape and place it at the location from where the
tar command was run.
Advanced Tools
This section discusses a number of advanced backup tools, including
AMANDA, the amdump test, and pax.
Using AMANDA
The Advanced Maryland Automatic Network Disk Archiver (AMANDA)
package is a set of tools for doing backups of multiple machines over the net-
work. Using AMANDA, you can configure your Red Hat Linux machine to be
a centralized backup server for the other machines in the network, including
Windows systems. AMANDA is included with Fedora Core and Red Hat
Enterprise Linux. To use AMANDA, install the following packages:
■■ amanda
■■ amanda-client
■■ amanda-server
■■ Gnuplot
You need to install the amanda-server and gnuplot packages only on the
machine that is going to be the backup server. However, you must install
amanda-client on any machine that you want to back up using AMANDA. You
must install the base amanda package on both the client and server machines.
The amanda package contains several commands, shown in Table 31-6.
Table 31-6 AMANDA Commands
COMMAND USE
amdump Normally executed periodically by a cron job, this utility is run
on the AMANDA server. It requests backups from the various
AMANDA clients.
amflush If amdump has trouble writing backups to tape, they are kept in
temporary storage space on disk until the problem is
corrected. After the problem is fixed, this command is run to
write the data in the temporary storage space to the tapes.
amcleanup If the AMANDA server crashes during the running of amdump,
this utility should be run to clean up after the interrupted
amdump.
(continued)
Backing Up and Restoring the File System 795
39_599496 ch31.qxd 8/30/05 7:13 PM Page 795
Table 31-6 (continued)
COMMAND USE
amrecover This utility provides a way to select which tapes should be
used to recover files.
amrestore This utility is used to restore individual files or directories or
entire partitions from AMANDA backups.
amlabel This utility is used to write an AMANDA label onto a tape. You
must use this command to label tapes before they can be
written to with amdump.
amcheck This utility should be run before amdump to verify that the
correct tape is in the drive.
amadmin This utility does various administrative tasks.
amtape This utility is used for low-level tape control, such as loading
and ejecting disks.
amverify This utility checks AMANDA tapes for errors.
amrmtape This utility deletes a tape with a particular label from the
AMANDA tape database.
amstatus This utility reports on the current status of a running amdump
program.
Installing AMANDA
After installing the necessary RPMs, some additional installation is required to
get AMANDA running. You must create subdirectories in the /etc/amanda
and /usr/admn/amanda directories for each backup schedule you are going
to run. For instance, if you plan to run a backup schedule called test, you
must execute the following commands:
mkdir -p /etc/amanda/test
mkdir -p /usr/admn/amanda/normal
You also need to create some temporary space for AMANDA to keep files,
which it is in the process of backing up. So if, for instance, you want to create
this space as a directory on your root partition, you can use the following com-
mand to make an amanda directory:
mkdir /amanda
796 Chapter 31
39_599496 ch31.qxd 8/30/05 7:13 PM Page 796
Configuring AMANDA
To configure AMANDA, you must make changes to the amanda.conf file
and put it in the subdirectory in /etc/amanda that you created. A sample
amanda.conf file is created during AMANDAinstallation. So in the example,
for instance, it would be called /etc/amanda/test/amanda.conf. The
amanda.conf file has many options, shown in Table 31-7, but has defaults for
most of them.
Table 31-7 amanda.conf Options
OPTION EXAMPLE MEANING
org “name” org This option specifies the name
“Tristero” used in reports generated by AMANDA.
mailto mailto “root This option specifies account names that
“accounts” example” Amanda should put in charge of the
backup process.
dumpuser dumpuser This option specifies the user account that
“account” “Amanda” the AMANDA dump process should run as.
inparallel inparallel 5 This entry specifies the number of amdump
number processes that can run simultaneously.
netusage netusage This entry indicates the bandwidth that
num unit 1000 Kpbs AMANDA is allowed to consume while
doing backups. It should be set such that
even if all of the allocated bandwidth is
consumed there is still enough bandwidth
for other tasks that might operate at the
same time as the AMANDA backup process.
dumpcycle dumpcycle This option specifies the length of the
num unit 1 week backup cycle.
runspercycle runspercycle 7 This option specifies the number of
num backups that should be done during a
single dump cycle. So, with a dump cycle
of 1 week and seven runs per cycle,
AMANDA makes one full backup and six
incremental backups every week.
tapespercycle tapespercycle This option specifies how many tapes are
num unit 7 tapes available for use in a single backup cycle.
runtapes num runtapes 1 This option specifies how many tapes are
available for use in each backup.
tapedev tapedev This option specifies the device name of
“device” “/dev/rft0” the tape device.
Backing Up and Restoring the File System 797
39_599496 ch31.qxd 8/30/05 7:13 PM Page 797
The amanda.conf file also has some complex options, which consist of
blocks with multiple subfields. The holdingdisk block defines a temporary
storage space for holding data that is being backed up. You can define multi-
ple holdingdisk blocks in a single file. The definition has the following format:
Holdingdisk name
{
directory “name”
use num unit
}
Example holdingdisk block:
Holdingdisk example
{
directory “/example”
use 4 Gb
}
The tapetype block defines a particular kind of magnetic tape that might be
used in backups. It defines properties about the tape such as length and speed.
The tapetype definition has the following format:
Define tapetype name
{
comment “freeform string”
length num unit
filemark num unit
speed num unit
}
Example tapetype definition:
Define tapetype EXAMPLE
{
comment “These are fictional numbers.”
Length 5000 mbytes
Filemark 100 kbytes
Speed 500 kbytes
}
The interface block defines a particular network interface that can be used
for communication between an Amanda server and client. The interface defi-
nition specifies how much bandwidth can be used on that particular network
interface. The syntax of the definition is as follows:
798 Chapter 31
39_599496 ch31.qxd 8/30/05 7:13 PM Page 798
Define interface name
{
comment “Freeform string”
use num unit
}
Example interface definition:
Define interface eth0
{
comment “This sets the bandwidth usage of the Ethernet network
interface”
use 500 kbps
}
The dumptype block defines a particular kind of dump. The entries in the
disklist file refer to these definitions. A corresponding dumptype block must
exist in the amanda.conf file for it to be referenced in the disklist file. The
dumptype block specifies certain properties of the kind of dump, such as
which program to use for dumping, whether to compress backups, and which
files should not be backed up.
The dumptype block has many options, shown in Table 31-8, which define
how the dump works.
Table 31-8 dumptype Options
OPTION EXPLANATION
auth This option specifies which authorization method should be used
between the client and the server. This option can be set to either
bsd or krb4 and defaults to bsd.
comment This option is a freeform string and is ignored.
comprate This option specifies the compression rates for backed up files in
terms of how the size of the compressed file should compare to
the size of the uncompressed file. This option can either be a
single value or two values separated by a comma. The first value
specifies the compression rate for full backups. The second value
specifies the compression rate for incremental backups and is
assumed to be the same as the first value if omitted.
compress This option specifies the method to be used for compressing the
data. The options are presented in the Table 31-9. The default
compression type is “client fast.”
dumpcycle This option specifies the number of days in the backup cycle. A full
backup is performed at the beginning of each backup cycle.
(continued)
Backing Up and Restoring the File System 799
39_599496 ch31.qxd 8/30/05 7:13 PM Page 799
Table 31-8 (continued)
OPTION EXPLANATION
exclude This option specifies which files should not be included in the
backup. This option works only when the backup program being
used is tar. When used with dump or samba it is ignored. The
possible values for exclude are a quote wildcard pattern or the list
keyword followed by a quoted filename. If the list keyword is
used, the filename should refer to a file on the client machine,
which contains a list of wildcard patterns to match. Wildcard
patterns are listed one per line. Any files matched by either the
quoted patterns or any of the patterns in the specified file are
excluded from the AMANDA backups.
holdingdisk This option specifies whether the holdingdisk should be used for
temporarily storing files that are going to be dumped. The default
is yes.
ignore This option specifies that this dump type should not actually be
backed up even if the disklist file specifies that it should.
index This option specifies whether to keep an index of files that have
been backed up. The default is no.
kencrypt This option specifies whether the connection between the client
and the server should be encrypted. The default is no.
maxdumps This option specifies how many simultaneous instances of the
amdump process can be run. The default is 1.
priority This option specifies the priority of the dump. When AMANDA runs
out of tape or is otherwise unable to write backups for some
reason, all the data that can be kept on the holdingdisk is put
there in order of highest priority dump type to lowest priority. The
possible values for the priority of a dump are high, medium, and
low. The default is medium.
program This option specifies which program should be used for making
the backup dump. The possible values are DUMP and GNUTAR. The
default is DUMP. You must change this to GNUTAR if you wish to
use the exclude option.
record This option specifies whether the date of the dump should be
written to the /etc/dumpdates file. The default is yes.
skip-full This option specifies that when Amanda is scheduled to do a full
backup it should refrain from doing so. This option is useful if you
want to use AMANDA for incremental backups or to use some
other method for full backups.
800 Chapter 31
39_599496 ch31.qxd 8/30/05 7:13 PM Page 800
Table 31-8 (continued)
OPTION EXPLANATION
skip-incr This option specifies that when AMANDA is scheduled to do an
incremental backup it should refrain from doing so. This option is
useful if you want to use AMANDA for full backups but to use
some other method for incremental backups or if you do not want
to do incremental backups at all.
starttime This option specifies that the starting time of the dump should be
delayed.
strategy This option specifies the dumping strategy that should be used for
this kind of dump. The various available dump strategies are listed
in Table 31-10. The default strategy is Standard.
Table 31-9 AMANDA Compression Types
TYPE EXPLANATION
none This option specifies that no compression should be used on
AMANDA backups.
client best This option specifies that the client should use the compression
algorithm that results in the highest compression levels.
client fast This option specifies that the client should use the fastest
compression algorithm.
server best This option specifies that the server should use the compression
algorithm that results in the highest compression levels.
server fast This option specifies that the server should use the fastest
compression algorithm.
Table 31-10 AMANDA Dumping Strategies
STRATEGY EXPLANATION
standard This option specifies that AMANDA should use the standard
dumping strategy, which includes both full and incremental
backups.
nofull This option specifies that AMANDA should use level 1 incremental
backups always and never do full backups. This is useful when a
set of machines all have the same base installation and setup with
only minor differences that do not change rapidly. Amanda then
saves space by backing up only the changes that occur over time.
(continued)
Backing Up and Restoring the File System 801
39_599496 ch31.qxd 8/30/05 7:13 PM Page 801
Table 31-10 (continued)
STRATEGY EXPLANATION
noinc This option specifies that incremental backups should never occur
and that AMANDA should always do full backups. This is useful if
it is important to make the restoration of a machine as swift and
easy as possible. However, it makes backups much slower and
requires much more storage space for the backups.
skip This option specifies that the dump type should never be backed
up either with full backups or incremental backups. The dump
type is ignored even if it occurs in the disklist file.
You need to adapt the amanda.conf file to your system. Most important,
you need to correctly specify the paths to where you will be backing up the
data, such as a disk archive or a tape drive devices, the type of tape drives, and
the path to the directory that AMANDA can use as temporary space.
You must also create a disklist file that specifies which partitions to back up. In
the example setup this file would be stored as /etc/amanda/test/disklist.
The format of the disklist file is a series of entries, one per line, in the fol-
lowing format:
Hostname device dumptype
The disklist file has the arguments shown in Table 31-11.
The following is an example disklist file:
Blanu.net /home/blanu/public_html normal
Tristero.sourceforge.net /cvsroot/tristero incremental
Baldwinpage.com /var/www/htdocs/bruno/ normal
Table 31-11 disklist Arguments
ARGUMENT EXPLANATION
hostname This argument specifies the hostname of the AMANDA client to be
backed up. For the AMANDA client to enable a connection from
the AMANDA server, the hostname of the AMANDA server must
be in that client’s .amandahosts file.
device This argument specifies the name of the directory to be backed up.
dumptype This argument specifies the name of the dumptype definition in
the amanda.conf file, which defines the properties associated
with this type of dump.
802 Chapter 31
39_599496 ch31.qxd 8/30/05 7:13 PM Page 802
AMANDA Client Configuration
To enable the AMANDA backup servers to connect to the clients to request
backups, you must create on each client an .amandahosts file in the /root
directory of the machine. The file consists simply of the names of the server
machines that are allowed to connect to the client to request backups.
Here is an example .amandahosts file:
Blanu.net
Thalassocracy.org
Tristero.sourceforge.net
Baldwinpage.com
You are wise to set the permissions of this file to 600 using chmod. That
ensures that only root can modify the file and other users cannot add hosts to
the file, thus bypassing the permission system and gaining access to the full
file system.
Performing Backups with AMANDA
To perform a backup, you simply run amdump with the name of the backup
that you want to run. The configuration information and list of partitions to
back up are read from the configuration files in the particular subdirectory in
/etc/amanda that you created for this particular backup type. In the exam-
ples in this section the test directory was created, so you run the command
amdump TEST
The amdump commands then go through the list of the partitions specified in
amdump and back up each of them, in order, to the tape drives specified in the
associated amanda.conf file. The partitions in the disklist file should be
specified in order of importance so that in case of problems the most important
files are more likely to have already been backed up. The results of the amdump
operation, including any errors, are written to the /usr/adm/Amanda/test
directory.
The amdump command is typically run as a cron job, so it can run as an auto-
mated process. If you wanted your backup to run every night at 1 a.m. you
would need the following crontab entry.
0 1 * * 1-5 /usr/sbin/amdump test
Backing Up and Restoring the File System 803
39_599496 ch31.qxd 8/30/05 7:13 PM Page 803
Summary
In this chapter, you learned how to back up and restore your file system. You
learned how to choose which files are important to back up and to choose a
backup medium, a backup method, and a tape rotation schedule appropriate
for the needs of your situation. You also learned how to use low-level archiv-
ing tools such as tar and dump to produce archives and file system data and
to restore corrupted file system data from archives. In addition, you learned
how to configure and use AMANDA, an advanced archiving tool.
804 Chapter 31
39_599496 ch31.qxd 8/30/05 7:13 PM Page 804
805
Performance
Monitoring
IN THIS CHAPTER
■■ System Performance Monitoring Tools
■■ Measuring Memory Usage
■■ Viewing Running Tasks
■■ Monitoring I/O Activity
■■ Using sar
This chapter describes some of the tools you can use to monitor the status and
performance of your Fedora Core or RHEL system. Utilities like free, top,
and ps provide basic information about the status of the system at given
points in time. For ongoing monitoring, you would use tools like iostat,
vmstat, and sar.
System-Performance-Monitoring Tools
The first group of tools this chapter discusses enables you to take snapshots of
system performance at a given point in time. You can use this data to create
baseline metrics of your system’s performance. This historical data serves as a
guide against which you measure the impact of changes you make. You can
use a variety of tools, many more, in fact, than this chapter covers. The six
you’ll look at are listed here in alphabetical order:
■■ free — Reports the amount of free and used memory in the system
■■ iostat — Provides detailed CPU and I/O usage information
■■ sar — Collects, saves, or reports on a comprehensive list of system
activity data
CHAPTER
32
40_599496 ch32.qxd 8/30/05 7:14 PM Page 805
■■ slabtop — Reports kernel memory usage
■■ top — Displays a real-time list of running processes
■■ vmstat — Shows virtual memory and I/O system usage
One of the things you will notice is that each utility has some overlap with
other utilities. For example, free and vmstat both report on virtual memory
usage, although vmstat provides considerably more detail than does free.
Likewise, vmstat and iostat can both provide I/O (input/output) usage
data; again, iostat’s I/O analysis is more complete than vmstat’s is. The
following sections disregard these areas of overlap and focus on what each
utility does best. For instance, you won’t see any discussion of vmstat’s disk
I/O-specific features, nor will you read much about iostat’s ability to report
on running processes (an area in which it overlaps with top).
Measuring Memory Usage
Even on systems that seem to have ample physical RAM, it is still a good idea
to know how much memory is in use and how much is available. Excessive
memory consumption, perhaps due to a memory leak in a running program,
can slow a system down and eventually force a reboot to reclaim the “lost”
memory. At the highest level, you can use free command to show a quick
report of how much memory is in use and how much is free. vmstat shows
more detail about memory usage, especially swap usage. The slabtop com-
mand shows you how the kernel itself is allocating memory.
Memory Usage as Seen by Users and Processes
You can use two commands to obtain summary information about the system’s
memory usage. The free command shows information about the amount of
memory that is used and unused, including both physical RAM and swap
space. vmstat shows the same information in greater detail.
Free’s syntax is:
free [-b|-k|-m] [-o] [-s secs] [-t]
Invoked without command line arguments, free’s output looks like the
following:
$ free
total used free shared buffers cached
Mem: 515800 500652 15148 0 0 255356
-/+ buffers/cache: 245296 270504
Swap: 1052248 536 1051712
806 Chapter 32
40_599496 ch32.qxd 8/30/05 7:14 PM Page 806
If you want the output to be displayed in bytes, rather than kilobytes, use
the -b option; use -m to display the output in megabytes; -k displays the out-
put in kilobytes, the default. If you’re math challenged, the -t option adds a
line to the bottom of the output showing totals values.
The -o option disables the -/+ buffers/cached: line, which shows adjust-
ments made to the used and free physical RAM. These adjustments are neces-
sary if you want to know how much RAM is actually in use and how much
RAM the kernel has set aside for its own use. The kernel keeps a certain
amount of RAM available for I/O and memory buffers to facilitate I/O. The
amount of buffer memory varies over time as it is used and released. From the
point of view of the system as a whole, RAM used as buffer memory is always
“in use,” even if the kernel has not allocated it at a given point in time. From
the kernel’s point of view, however, unused buffer memory is just that, unused
(or free). Without the -o option, you see memory usage from the kernel’s point
of view. With the -o option, you can visualize memory consumption from the
view of the system as a whole. In the free example just shown, just over 263
Mb (270,504 Kb) is “free” from the kernel’s point of view. If you use the -o
option, you won’t see the amount of amount of RAM allocated as kernel buffer
memory.
The other columns of output show the amount of memory allocated as
shared memory (System V IPC shared memory, to be precise), additional non-
specific buffer memory, and the amount of cached data in memory. The shared
memory column should be disregarded because it is no longer used.
The final option that might prove useful is the -s secs option, which
causes free to redisplay its report every secs seconds. The following exam-
ple shows free’s output immediately before and during a kernel compilation:
$ free -s5 -m -o
total used free shared buffers cached
Mem: 503 496 7 0 0 253
Swap: 1027 0 1027
total used free shared buffers cached
Mem: 503 495 8 0 0 253
Swap: 1027 0 1027
total used free shared buffers cached
Mem: 503 494 8 0 0 243
Swap: 1027 0 1027
total used free shared buffers cached
Mem: 503 489 14 0 0 244
Swap: 1027 0 1027
This example used the -m option to display the output in megabytes, the -o
option to turn off the buffer adjustment, and the -s5 option to refresh the display
Performance Monitoring 807
40_599496 ch32.qxd 8/30/05 7:14 PM Page 807
every five seconds. The kernel compilation started between the first and second
updates. One of the features you’ll notice in the bold-faced section is that the
amount of cached data fell when the kernel build process started.
Presumably, this occurred because data the kernel needed had to be read from
disk, forcing a certain amount of cached data to be flushed.
vmstat digs deeper into memory usage than free and pays particular
attention to virtual memory (swap) usage. If your system is constantly swap-
ping, disk I/O will slow to a crawl and the system will seem slow to respond
to user input. vmstat makes it possible for you to detect the problem. You can
then use top or one of the other utilities discussed in this chapter to identify
what is causing the excessive swapping. First, however, vmstat’s syntax,
bearing in mind that this discussion ignores options not related to virtual
memory:
vmstat [-S k|K|m|M] [-a] [-n] [secs [cnt]]
vmstat [-S k|K|m|M] -m
vmstat [-S k|K|m|M] -s
To change the display unit, which defaults to bytes, use -S k for units of
1000 bytes, -S K for true kilobytes (1024 bytes), -S m for units of 1,000,000
bytes, or -S M for true megabytes (1,048,576 bytes). The examples in the text
use -S K. Certain vmstat reports can be refreshed every secs seconds and, if
cnt is specified, will refresh cnt times every secs seconds before vmstat
terminates. In its simplest usage, vmstat’s output looks like the following:
$ vmstat -S K
procs memory swap io system cpu
r b swpd free buff cache si so bi bo in cs us sy id wa
2 0 852 16132 0 249232 0 0 33 26 10 82 94 2 4 0
This information shows only the average usage since the system was
booted. To get information about current usage, you must request a refreshing
display using secs and, if you multiple reports, cnt, as shown in the follow-
ing example:
$ vmstat -S K 5 5
procs memory swap io system cpu
r b swpd free buff cache si so bi bo in cs us sy id wa
3 0 852 4880 0 250120 0 0 33 26 15 135 93 3 4 0
2 0 852 14628 0 250308 0 0 0 30 1132 405 94 6 0 0
3 0 852 14168 0 250444 0 0 0 31 1131 418 93 7 0 0
4 0 852 6780 0 250528 0 0 0 35 1130 375 94 6 0 0
4 0 852 11856 0 247484 0 0 0 156 1149 422 93 7 0 0
808 Chapter 32
40_599496 ch32.qxd 8/30/05 7:14 PM Page 808
What information is shown? In the procs section, the r column shows the
number of processes that are ready to run and waiting for their turn to run on
the CPU and the b column shows the number of processes that are blocked, or
sleeping, and thus not ready to run. In the first example, therefore, two processes
are ready to run and waiting for CPU time and no processes are blocked.
The four columns under the memory heading, show the following information:
■■ swpd — The amount of virtual memory in use
■■ free — The amount of physical RAM not in use
■■ buff — The amount of physical RAM used as buffers
■■ cache — The amount of physical RAM used as cache
As you can see in the second example, created during a kernel compile, the
amount of free and cache memory fluctuates constantly; the more active the
system, the greater the fluctuation.
If you specify -a, inact and active replace the buff and cache columns
under the memory heading. inact displays the amount of inactive memory
and active displays the amount of active memory. Inactive memory is the
buffer memory the free command shows as free (unused) when buffer
adjustments are enabled; active memory is memory that is both allocated and in
use and maps to the used buffer memory reported by the free command. The
following vmstat example shows the effect of the -a option:
$ vmstat -S K -a 5 5
procs memory swap io system cpu
r b swpd free inact active si so bi bo in cs us sy id wa
4 0 1500 13132 114240 346908 0 0 33 26 17 143 93 3 4 0
3 0 1500 14412 114308 345512 0 0 71 116 1172 486 91 9 0 0
4 0 1500 10704 114400 349152 0 0 22 36 1220 849 92 8 0 0
4 0 1500 20944 114416 338936 0 0 10 82 1145 521 94 6 0 0
3 0 1500 12240 114484 347584 0 0 13 49 1342 1437 92 8 0 0
Under the swap heading, si shows the amount of memory that has been
read in from the swap device (or devices, if there are multiple swap files or
partitions) and so the amount of memory that has been written out to a swap
device. As you can see in the example just shown, swap usage on this system,
even during a kernel compile, is negligible.
In the io section, the columns bi and bo show the number of disk blocks (in
units of 1024 bytes) read from and written to, respectively, the system’s block
devices. Under the system heading, in lists the number of interrupts received
per second and cs shows the number of context switches per second. Values
under the cpu heading, finally, show the disposition of CPU usage, with each
column expressed as a percentage of total CPU time (due to rounding, the val-
ues might not add to 100 percent). The specific columns are:
Performance Monitoring 809
40_599496 ch32.qxd 8/30/05 7:14 PM Page 809
■■ us — The percentage of CPU time spent running user, or nonkernel, code
■■ sy — The percentage of time spent executing system, or kernel, code
■■ id — The percentage of CPU time that the CPU is idle
■■ wa — The percentage of CPU time spent waiting for I/O to complete
Examining Kernel Memory Usage
The memory usage information discussed so far examined memory from the
point of view of the user or running processes. You haven’t seen with any
amount of detail how the kernel itself is using memory. The last vmstat option,
-m, gives you a window into the kernel’s internal memory usage. The -m option
causes vmstat to display kernel slab usage. Slabs are caches of frequently used
kernel memory objects, such as inodes, directory entries, file pointers, and ran-
dom blocks of memory of specific sizes, such as 8192 bytes, 4096 bytes, and so
on. Rather than use vmstat to view slab usage, however, you should use
slabtop, which does for slabs what the top command does for processes,
namely, show slab usage in a real-time updated format. Slabtop’s syntax is:
slabtop [-d secs] [-s sort] [-o]
-d secs specifies the number of seconds to pause between updates. -o tells
slabtop to display its output once and then exit. The -s sort option sets the
sort order, which defaults to the number of slab objects descending order, for
the displayed slabs to sort. sort can be one of the values listed in Table 32-1.
Table 32-1 slabtop Sorting Criteria
CRITERIA ORDER DESCRIPTION
a Ascending Sort by the number of active objects
b Ascending Sort by the number of objects per slab
c Descending Sort by cache size
l Descending Sort by the number of slabs
v Descending Sort by the number of active slabs
n Ascending Sort by the slab name
o Descending Sort by the number of objects (this the default sort
order)
p Descending Sort by the number of pages per slab
s Descending Sort by the object size
u Descending Sort by cache utilization
810 Chapter 32
40_599496 ch32.qxd 8/30/05 7:14 PM Page 810
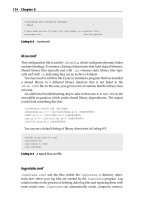
Figure 32-1 Viewing slabtop’s default output.
Invoked with no options, slabtop’s output resembles Figure 32-1.
The slab cache listing, updated every three seconds by default, shows
detailed slab cache information. The top five lines show summary information
for the number of individual objects, the total number of slabs containing
objects, the number of slab caches, and slab size statistics. The bottom portion
of the display shows the specifics for each type of slab cache sorted in descend-
ing order by the object type. You can change the sort order at runtime by press-
ing the key associated with the sort criteria that interests you (see Table 32-1).
TIP The p sort option for sorting slabtop’s output by the number of pages
per slab does not appear to function in slabtop version 3.2.3. However, you
can view this information using the following sort invocation:
$ sort -k6,6 -nr < /proc/slabinfo | cut -f1 -d:
size-131072(DMA) 0 0 131072 1 32
size-131072 0 0 131072 1 32
size-65536(DMA) 0 0 65536 1 16
size-65536 4 4 65536 1 16
size-32768(DMA) 0 0 32768 1 8
size-32768 49 49 32768 1 8
size-16384(DMA) 0 0 16384 1 4
size-16384 3 3 16384 1 4
tcpv6_sock 1 5 1376 5 2
task_struct 120 120 1392 5 2
The sixth column shows the number of pages per slab. To view the output
sorted in ascending order, omit -r:
$ sort -k6,6 -n < /proc/slabinfo | cut -f 1 -d:
# name <active_objs> <num_objs> <objsize> <objperslab>
Performance Monitoring 811
40_599496 ch32.qxd 8/30/05 7:14 PM Page 811
<pagesperslab>
slabinfo - version
anon_vma 3069 3213 32 119 1
arp_cache 2 20 192 20 1
as_arq 0 0 64 61 1
avc_node 12 600 52 75 1
bdev_cache 14 18 608 6 1
bio 287 287 96 41 1
biovec-1 293 452 16 226 1
biovec-16 260 260 192 20 1
Again, the sixth column shows the number of pages per slab.
If you run slabtop on a kernel that was compiled with the configuration
option CONFIG_DEBUG_SLAB enabled, you will see additional slab cache statis-
tics. The first line of the output will include (statistics) and the real-time display
will show five additional columns:
■■ The maximum number of active objects in the slab
■■ The number of times objects have been allocated
■■ The number of times new pages have added to the cache (cache growth)
■■ The number of times unused pages have been removed from the cache
(cache reaping)
■■ The number of errors allocating new pages to the cache
Unless you run a debugging kernel and are actively working on the kernel,
you won’t need this additional information. Nevertheless, you will at least
know how to produce this information if someone asks for it.
Viewing Running Tasks
In many cases, you will be less concerned about how much memory a process
is using and more concerned about what processes are running, or perhaps
more likely, what processes are running out of control. The canonical tools for
viewing running processes are ps and top. ps gives you a snapshot view of
the currently active processes, and top gives you a real-time updated display
of running processes.
812 Chapter 32
40_599496 ch32.qxd 8/30/05 7:14 PM Page 812