html xhtml and css for dummies 7th edition phần 4 pdf
Bạn đang xem bản rút gọn của tài liệu. Xem và tải ngay bản đầy đủ của tài liệu tại đây (2.33 MB, 41 trang )
103
Chapter 6: Linking to Online Resources
You can make download markup more user-friendly by adding supporting
text and links, like this:
<h1>
Download our new software
</h1>
<p> <a href=”software.zip”>
Software
</a> <\p>
<p><b>
Note:
</b>
You need a zip utility such as
<a href=””>
7Zip
</a>
(Windows) or
<a href=””>
ZipIt
</a>
(Macintosh)
to open this file.
</p>
<p><a href=”doc.pdf”>
Documentation
</a> <\p>
<p><b>
Note:
</b>
You need the free
<a href=” />Adobe Reader
</a>
to view this file.
</p>
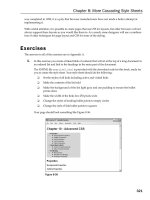
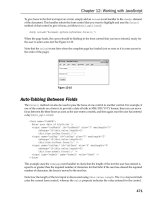
Figure 6-4 shows how a browser renders this HTML — and the dialog box it
displays when you click the Software link.
Figure 6-4: This browser prompts you to save or view the Zip file.
E-mail addresses
A link to an e-mail address can automatically open a new e-mail addressed to
exactly the right person.
This is a great way to help users send you e-mail with comments and
requests.
12_9780470916599-ch06.indd 10312_9780470916599-ch06.indd 103 11/30/10 12:24 AM11/30/10 12:24 AM
104
Part II: Formatting Web Pages with (X)HTML
An e-mail link uses the standard anchor element and an href attribute. The
value of the href attribute is the receiving e-mail address, prefaced with
mailto:.
<p>
Send us your
<a href=”mailto:”>
comments
</a>.</p>
The user’s browser configuration controls how the browser handles an e-mail
link. Most browsers follow these two basic steps automatically:
1. Open a new message window in the default e-mail program.
2. Insert the address from the href attribute into the To field of the
message.
Unfortunately, Web page mailto: links are a prime source of e-mail
addresses for spammers. Creating a form to receive feedback is often a better
idea; better still, use JavaScript encryption on the e-mail address. (For more
info, see Steven Chapman’s great article, “Hiding Your Email Address,” at
We gener-
ally tend to provide our e-mail addresses in the form: jeff at conquest
media dot com, knowing that people are smart enough to substitute @ for
at and . for dot, but that address-harvesters usually aren’t that canny. If
you do elect to use a form instead, be aware that this too can present secu-
rity issues — always be sure to check your input, or take steps to avoid
so-called SQL injection attacks. For more info, see Colin Mackay’s article,
“SQL Injection Attacks and Some Tips on How to Prevent Them,” at www.
codeproject.com/KB/database/SQLInjectionAttacks.aspx.
12_9780470916599-ch06.indd 10412_9780470916599-ch06.indd 104 11/30/10 12:24 AM11/30/10 12:24 AM
Chapter 7
Finding and Using Images
In This Chapter
▶ Determining the right format for your images
▶ Adding images to Web pages
▶ Creating images and image maps that trigger links
W
eb-page designers use images to deliver important information, direct
site navigation, and contribute to the overall look and feel of a Web
page. However, you have to use images properly, or you risk reducing their
effectiveness.
When used well, images are a key element of page design. When used poorly,
though, they can make a page unreadable, unintelligible, or inaccessible.
This chapter is a crash course in using images on Web pages. You find out
which image formats are Web-friendly and how to use (X)HTML elements to
add images to your Web pages. You also discover how to attach links to an
image and how to create image maps for a Web page.
The Role of Images in a Web Page
Images in Web sites may be logos or clickable navigation aids, or they may
display content; they can also make a page look prettier or serve to unify
or illustrate a page’s theme. A perfect example of the many different ways
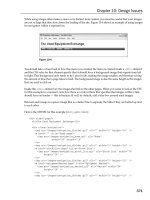
images can enhance and contribute to Web pages is the White House home
page at www.whitehouse.gov, shown in Figure 7-1, where the White House
logo, photos, and even the Great Seal of the United States are used to good
effect.
13_9780470916599-ch07.indd 10513_9780470916599-ch07.indd 105 11/30/10 12:24 AM11/30/10 12:24 AM
106
Part II: Formatting Web Pages with (X)HTML
Figure 7-1: The White House Web page uses images in a variety of ways.
Creating Web-Friendly Images
You can create and save graphics in many ways, but only a few formats are
actually appropriate for images you intend to use on the Web. As you create
Web-friendly images, you must pay attention to file formats and sizes.
Often, graphics file formats are specific to operating systems or software
applications. Because you can’t predict what a visitor’s computer and soft-
ware will be (other than he or she will use some sort of Web browser), you
need images that anyone can view with any browser. This means you need
to use cross-platform file formats that users can view with any version of
Microsoft Windows, the Mac OS, or Linux.
These three compressed graphics formats are best for general use on the Web:
✓ Graphics Interchange Format (GIF): Images saved as GIFs often are
smaller than those saved in other file formats. GIF supports up to 256
colors only, so if you try to save an image created with millions of colors
as a GIF, you lose image quality. GIF is the best format for less-complex,
nonphotographic images, such as line art and clip art.
13_9780470916599-ch07.indd 10613_9780470916599-ch07.indd 106 11/30/10 12:24 AM11/30/10 12:24 AM
107
Chapter 7: Finding and Using Images
✓ Joint Photographic Experts Group (JPEG): The JPEG file format sup-
ports 24-bit color (millions of colors) and complex images, such as pho-
tographs. JPEG is cross-platform and application-independent. A good
image editing tool can help you tweak the compression so you can strike
an optimum balance between the image’s quality and its file size.
✓ Portable Network Graphics (PNG): PNG is the latest cross-platform and
application-independent image file format. It was developed to bring
together the best aspects of GIF and JPEG. PNG has the same compres-
sion as GIF but supports 24-bit color (and even 32-bit color) like JPEG.
Any good graphics editing tool, such as those mentioned in Chapter 23, allows
you to save images in any of these formats. Experiment with them to see how
converting a graphic from one format to another changes its appearance and
file size, and then choose whichever format produces the best results.
Table 7-1 shows guidelines for choosing a file format for images by type.
Table 7-1 Choosing the Right File Format for an Image
File
Format
Best Used For Watch Out
GIF Line art and other images with
few colors and less detail
Don’t use this format if you have a
complex image or photo.
JPEG Photos and other images with
millions of colors and lots of
detail
Don’t use with line art. This format
compromises too much quality when
you compress the file.
PNG Photos and other images with
millions of colors and lots of
detail
Don’t use with line art. PNG offers
the best balance between quality
and file size.
Optimizing images
As you build graphics for your Web page, maintain a healthy balance between file quality and file
size. If you poke around with your favorite search engine, you can find good tutorials on trimming
image file sizes and optimizing entire sites for fast download. For tips and tricks to help you build
pages that download quickly, review these handy resources:
✓ Optimizing images: www.yourhtmlsource.com/optimisation/image
optimisation.html
✓ Optimizing Web graphics: www.websiteoptimization.com/speed/12
13_9780470916599-ch07.indd 10713_9780470916599-ch07.indd 107 11/30/10 12:24 AM11/30/10 12:24 AM
108
Part II: Formatting Web Pages with (X)HTML
For a complete overview of graphics formats, visit
✓ W3C’s “Graphics on the Web” article at www.w3.org/Graphics
✓ Quackit.com’s Web Graphics Tutorial at www.quackit.com/web_
graphics/tutorial
Adding an Image to a Web Page
When an image is ready for the Web, you need to use the correct markup to
add it to your page, but you need to know where to store your image as well.
Image location
You can store images for your Web site in several places. Image storage
works best if it uses relative URLs — stored somewhere on the Web site with
your other (X)HTML files. You can store images in the same root as your
(X)HTML files, which gets confusing if you have a lot of files, or you can
create a graphics or images directory in the root file for your Web site.
Relative links connect resources from the same Web site. You use absolute
links between resources on two different Web sites. Turn to Chapter 6 for a
complete discussion of the differences between relative and absolute links.
Here are three compelling reasons to store images on your own site:
✓ Control: When images are stored on your site, you keep complete
control over them. You know your images aren’t going to disappear or
change, and you can work to optimize them.
✓ Speed: If you link to images on someone else’s site, you never know
when that site may go down or respond unbelievably slowly. Linking to
images on someone else’s site also causes the other site’s owner to pay
for bandwidth required to display it on your pages — on another site!
✓ Copyright: If you link to images on another site to display them on your
pages, you may violate copyright laws. If you must do this, obtain per-
mission from the copyright holder to store and display images on your
Web site.
Using the <img /> element
The image (<img />) element is an empty element (sometimes called a sin-
gleton tag) that you place on the page where you want your image to go.
An empty element uses only one tag, with neither a distinct opening nor a
distinct closing tag.
13_9780470916599-ch07.indd 10813_9780470916599-ch07.indd 108 11/30/10 12:24 AM11/30/10 12:24 AM
109
Chapter 7: Finding and Using Images
The following markup places an image named 07fg02-cd.jpg, which is
saved in the same directory as the (X)HTML file, between two paragraphs:
<!DOCTYPE html PUBLIC “-//W3C//DTD XHTML 1.0 Transitional//EN”
“ /><html
xmlns=” lang=”en” xml:lang=”en”>
<head>
<meta http-equiv=”Content-Type” content=”text/html; charset=ISO-8859-1” />
<title>
Optical Disks at Work
</title>
</head>
<body>
<h1>
CD/DVD as a Storage Medium
</h1>
<p>
CD-ROMs and DVDs have become a standard storage option in today’s computing
world because they are inexpensive and easy to use.
</p>
<img src=”07fg02-cd.jpg” alt=”line drawing of optical disk”/>
<p>
To read from a CD or DVD, you only need a standard CD-ROM drive, but to
create CDs or DVDs, you need a DVD burner (all DVD burners can read
and write CDs as well).
</p>
</body>
</html>
A Web browser replaces the <img /> element with the image file provided
as the value for the src attribute, as shown in Figure 7-2.
Figure 7-2: Use the <img /> element to place graphics in
a Web page.
13_9780470916599-ch07.indd 10913_9780470916599-ch07.indd 109 11/30/10 12:24 AM11/30/10 12:24 AM
110
Part II: Formatting Web Pages with (X)HTML
The src attribute is like the href attribute that you use with an anchor
(<a>) element. The src attribute specifies the location for the image you
want to display on your page. The preceding example points to an image file
in the same folder as the HTML file referencing it.
Adding alternative and title text
Alternative text describes an image so those who can’t see the images for
some reason can access that text to learn more about the image. Adding
alternative text (often referred to by HTMLers as “alt text”) is a good practice
because it accounts for
✓ Visually impaired users who may not be able to see images and must
rely on alternative text for a text-to-speech reader to read to them
✓ Users who access the Web site from a phone browser with limited
graphics capabilities
✓ Users with slow modem connections who don’t display images
Some search engines and cataloguing tools use alternative text to index
images.
Most of your users will see your images, but be prepared for those who won’t.
The (X)HTML specifications require that you provide alternative text to
describe each image on a Web page. Use the alt attribute with the <img />
element to add this information to your markup, like this:
<!DOCTYPE html PUBLIC “-//W3C//DTD XHTML 1.0 Transitional//EN”
“ /><html
xmlns=” lang=”en” xml:lang=”en”>
<head>
<meta http-equiv=”Content-Type” content=”text/html; charset=ISO-8859-1” />
<title>
Inside the Orchestra
</title>
</head>
<body>
<p>
Among the different sections of the orchestra you will find:
</p>
<p><img src=”07fg03-violin.jpg” alt=”violin” title=”violin” />
Strings
</p>
<p><img src=”07fg03-trumpet.jpg” alt=”trumpet” title=”trumpet” />
Brass
</p>
<p><img src=”07fg03-woodwinds.jpg” alt=”clarinet and saxophone”
title=“clarinet and saxophone”/>
Woodwinds
</p>
</body>
</html>
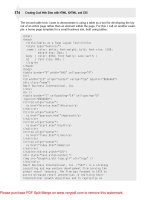
When browsers don’t display an image (or can’t, as in text-only browsers such
as Lynx), they display the alternative text instead, as shown in Figure 7-3. (We
turned images off in Internet Explorer to produce the screenshot.)
13_9780470916599-ch07.indd 11013_9780470916599-ch07.indd 110 11/30/10 12:24 AM11/30/10 12:24 AM
111
Chapter 7: Finding and Using Images
Figure 7-3: When a browser doesn’t show an image, it shows
alternative text.
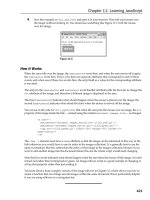
When browsers show an image, browsers — including Internet Explorer,
Firefox, Chrome, Safari, and Opera — show title text as pop-up tips when
you hover your mouse pointer over an image for a few seconds, as shown in
Figure 7-4. This requires adding a title attribute to each <img /> element,
which is why it’s also included in the preceding markup. Note: alt text is
required for a page to validate, but title text is not required.
Figure 7-4: A browser displays title text as a
pop-up tip.
13_9780470916599-ch07.indd 11113_9780470916599-ch07.indd 111 11/30/10 12:24 AM11/30/10 12:24 AM
112
Part II: Formatting Web Pages with (X)HTML
This means you can use alternative text to describe the image to those who
can’t see it and/or title text to provide useful (or amusing) information about
the same image.
The W3C’s Web Accessibility Initiative (WAI) includes helpful tips for creat-
ing useful and usable alternatives to visual content at www.w3.org/TR/
WCAG10-TECHS/#gl-provide-equivalents.
Specifying image size
You can use the height and width attributes with the <img /> element to
let the browser know just how tall and wide an image is (in pixels; px):
<p><img src=”07fg03-trumpet.jpg”
width=”50” height=”70” alt=”trumpet” />
Brass
</p>
Most browsers download the HTML and text associated with a page before
they download the page graphics. Instead of making users wait for the whole
page to download, browsers typically display the text first and then fill in
graphics as they become available. If you tell the browser how big a graphic
is, the browser can reserve a spot for it in the page display. This speeds the
process of adding graphics to the Web page.
You can check the width and height of an image in pixels in any image editing
program, or in the image viewers built into Windows and the Mac OS. (You
might be able simply to view the properties of the image in either Windows
or the Mac OS to see its height and width.)
Another good use of the height and width attributes is to create colored
lines on a page by using just a small colored square. For example, this
markup adds a 10-x-10-px blue box to a Web page:
<img src=”07fg05-blue-box.gif” alt=”blue box” height=”10” width=”10” />
Use the <img /> element height and width attributes to set image height
and width. Thus we use these values to create a 10-x-10-px blue box in a
browser window (shown at the top of Figure 7-5) even though the original
image is 600 x 600 px. In general, it’s safe to reduce image dimensions using
these attributes although you’ll always want to check the results carefully
during testing. With any kind of aspect sensitive image, you want to maintain
its aspect ratio by dividing the original dimensions by some common value.
13_9780470916599-ch07.indd 11213_9780470916599-ch07.indd 112 11/30/10 12:24 AM11/30/10 12:24 AM
113
Chapter 7: Finding and Using Images
Figure 7-5: A series of small blue boxes.
Figure 7-5 also shows boxes with dimensions of 20 x 20 and 50 x 50 px. Here
are the changes to the values for height and width in the markup to pro-
duce the other two boxes:
<img src=”07fg05-blue-box.gif” alt=”blue box” height=”20” width=”20” />
<img src=”07fg05-blue-box.gif” alt=”blue box” height=”50” width=”50” />
Using this technique, you can turn a single image like the blue box (only
2.39K in size) into a variety of lines — and even boxes:
✓ This can ensure that all dividers and other border elements on your
page use the same color because they’re all based on the same graphic.
✓ If you decide you want to change all your blue lines to green, you just
change the image. Every line you created changes colors.
When you specify an image’s height and width that are different from the
image’s actual height and width, you rely on the browser to scale the image
display. This works great for single-color images (such as the blue box), but
it doesn’t work well for images with multiple colors or images that contain
actual photos. The browser doesn’t size images well, and you wind up with a
distorted picture. Figure 7-6 shows how badly a browser handles enlarging a
trumpet image when the markup multiplies the image height by four and its
width by two (note the resemblance to a flugelhorn!):
<p><img src=”07fg03-trumpet.jpg” width=”200” height=”124” alt=”trumpet”
Title =
“
trumpet
”
/>
Brass
</p>
13_9780470916599-ch07.indd 11313_9780470916599-ch07.indd 113 11/30/10 12:24 AM11/30/10 12:24 AM
114
Part II: Formatting Web Pages with (X)HTML
Figure 7-6: Don’t use a browser to resize complex
images; use a graphics editor.
If you need several sizes for the same image — as for a logo or navigation
button — use a large image as the master for that graphic, and make smaller
versions; doing so gives you better control over the final look and feel of each
image.
Image borders and alignment
The image element supports a border attribute, and numerous options for
aligning images are supported in (X)HTML markup, but they are deprecated
in favor of working with CSS. Although you can use these controls if you
must, we cover them only in passing in our discussion of deprecated markup
in Chapter 8, and explain how to use CSS to control image borders, position-
ing, alignment, spacing, text flow, and more in Chapter 10. In case we haven’t
made this sufficiently clear already, we strongly urge you to use CSS for bor-
ders, positioning, and alignment for both text and images, and let (X)HTML
do the job it does best: represent and point to actual content.
13_9780470916599-ch07.indd 11413_9780470916599-ch07.indd 114 11/30/10 12:24 AM11/30/10 12:24 AM
115
Chapter 7: Finding and Using Images
Images That Link
Web pages often use images for navigation. They’re prettier than plain-text
links, and you can add both form and function on your page with one element.
Triggering links
To create an image that triggers a link, you substitute an <img /> element in
place of text to which you would anchor your link. This markup links text:
<p><a href=””>
Visit the W3C
</a></p>
This markup replaces the text Visit the W3C with an appropriate icon:
<p><a href=””><img src=”w3.jpg”
alt=”Visit the W3C Web Site” title =
“
Visit the W3C Web Site
”
height=”75” width=”131” border=”2” /></a>
</p>
The preceding markup creates a linked image to . In
the preceding example, the alternative text now reads Visit the W3C Web
Site so users who can’t see the image know where the link goes. When a
user moves the mouse pointer over the image, the cursor changes from an
arrow into a pointing hand (or any icon the browser uses for a link).
We include a 2px border around this image as a visual cue to let users know
it also serves as a link. The border appears as a light blue outline (as shown
in Figure 7-7) until the link is followed. After that, the blue outline turns
purple to let users know this link has been visited.
Figure 7-7: Combine image and anchor elements
to create a linked image.
13_9780470916599-ch07.indd 11513_9780470916599-ch07.indd 115 11/30/10 12:24 AM11/30/10 12:24 AM
116
Part II: Formatting Web Pages with (X)HTML
A quick click of the image launches the W3C Web site. It’s as simple as that.
As shown earlier in the chapter, you should set the border of any image you
use in a link to 0 if you want to keep the browser from surrounding your
image with a blue line. Without the line, however, users need other visual
(or alternative text) clues so they know that an image is a link. Be sure
images that serve as links scream to the user (tastefully of course) “I’m a
link!” In all cases, if the automatic outline is eliminated, you should build an
outline into the graphic itself or add a caption that indicates that the image
serves as a link.
Building image maps
When you use an <img /> element with an anchor element to create a link-
ing image, you can attach only one link to that image. To create a larger
image that connects links to different regions on the page, you need an
image map.
To create an image map, you need two things:
✓ An image with distinct areas obvious to users
For example, an image of a park might show a playground, a picnic area,
and a pond area.
✓ Markup to map the different regions on the map to different URLs
Elements and attributes
Use the <img /> element to add the map image into your page, just as you
would any other image. In addition, include the usemap attribute to let the
browser know that image map information should go with that image. The
value of the usemap attribute is the name of your map.
You use two elements and a collection of attributes to define the image map:
✓ <map> holds the map information. The <map> element uses the name
attribute to identify the map. The value of name should match the value
of usemap in the <img /> element that goes with the map.
✓ <area /> links specific parts of the map to URLs. The <area />
element takes these attributes to define the specifics for each section
of the map:
• shape
: Specifies the shape of the region (a clickable hot spot that
makes the image map work). You can choose from rect
(rectangle),
circle, and poly (a triangle or polygon).
13_9780470916599-ch07.indd 11613_9780470916599-ch07.indd 116 11/30/10 12:24 AM11/30/10 12:24 AM
Downloa d f r o m W o w ! e B o o k < w w w.woweb o o k . c o m >
117
Chapter 7: Finding and Using Images
• coords: Defines the region’s coordinates.
A rectangle’s coordinates include the left, right, top, and bottom
points.
A circle’s coordinates include the x and y coordinates for the
center of the circle as well as the circle’s radius.
A polygon’s coordinates are a collection of x and y coordinates for
every vertex in the polygon.
You can use an image map editor like Mapedit from www.
boutell.com/mapedit, or a graphics editor such as PaintShop
Photo Pro from www.corel.com, to determine image coordinates;
Mapedit also records them for you.
• href: Specifies the URL to which the region links (can be absolute
or relative).
• alt: Provides alternative text for the image region.
Markup
The following defines a three-region map called NavMap linked to the graph-
ics file named 07fg07-navmap.gif:
<img src=”07fg09-navmap.gif” width=”302” height=”30” usemap=”#NavMap” border=”0”
/>
<map name=”NavMap” />
<area shape=”rect” coords=”0,0,99,30” href=”home.html” alt=”Home”
title=
”
Home
”
/>
<area shape=”rect” coords=”102,0,202,30” href=”about.html” alt=”About”
title=
”
About
”
/>
<area shape=”rect” coords=”202,0,301,30” href=”products.html”
alt=”Products” title=
”
Products
”
/>
</map>
Figure 7-8 shows how a browser displays this markup.
When the mouse sits over a region in the map, the cursor turns into a point-
ing hand (just as it changes over any other hyperlink). So take advantage of
the title text to include useful information about the link and to make the map
more accessible to the visually impaired, too.
A common use for image maps is to turn maps of places (states, countries,
cities, and such) into linkable maps. About.com’s image map tutorial at
provides more details on building image maps by hand. HTML Goodies has a
13_9780470916599-ch07.indd 11713_9780470916599-ch07.indd 117 11/30/10 12:24 AM11/30/10 12:24 AM
118
Part II: Formatting Web Pages with (X)HTML
great collection of image map tutorials and information at www.htmlgoodies.
com/tutorials/image_maps/index.php. For a more fully fleshed HTML
file that implements the preceding image map example, see this book’s Web
site at www.dummieshtml.com/examples/ch07/07fg09-validx.html.
Figure 7-8: Image maps turn different areas of an image into
linking regions.
Creating image maps by hand can be tricky. Use an image editor to identify
each point in your map, and then create the proper markup for it. Most
(X)HTML tools include utilities to help you make image maps. If you take
advantage of such a tool, you can create image maps quickly and with few
errors. Find out more about (X)HTML tools in Chapter 23.
Exercise caution when using image maps. If you’re creating a visual aid
(something like a map with links to different countries shown therein, for
example), using an image map makes perfect sense. On the other hand, you
should never use a graphic with image maps for your main navigation. (Well,
you could, but you wouldn’t like the results!) Always use (X)HTML and CSS
for your main Web site navigation, or if you must use a graphical image map,
include a text-based alternative along with that map so that visually impaired
visitors to your site can also navigate successfully by using the alternate con-
trols instead.
In general, the best thing for navigation is to use text for button labels, and to
let CSS handle the work involved in making buttons look good. This comes in
for further discussion in Chapter 20 on CSS3, but you could simply use CSS
2.1 to make some pretty good looking buttons as well.
13_9780470916599-ch07.indd 11813_9780470916599-ch07.indd 118 11/30/10 12:24 AM11/30/10 12:24 AM
Part III
Taking Precise
Control over Web
Pages and Styles
14_9780470916599-pp03.indd 11914_9780470916599-pp03.indd 119 11/30/10 12:25 AM11/30/10 12:25 AM
In this part . . .
H
ere, we introduce and describe Cascading Style
Sheets (CSS), a powerful markup language designed
to supplement (X)HTML and to manage the way pages
look inside a Web browser. (X)HTML can reference CSS
by including either an external style sheet or inline CSS
markup within an (X)HTML document.
You start by familiarizing yourself with the many and vari-
ous capabilities of CSS, by looking at different kinds of
style sheets, and by getting acquainted with the rules for
handling multiple style sheets when they’re applied to a
single Web page (that’s where the Cascading in CSS comes
from). Of course, you also find out how to build and use
CSS for such things as creating visual layouts, position-
ing individual items, and handling fonts. Because CSS
also provides controls for modifying how color and text
appears on the page, we show you how to deal with these
capabilities, too.
14_9780470916599-pp03.indd 12014_9780470916599-pp03.indd 120 11/30/10 12:25 AM11/30/10 12:25 AM
Chapter 8
Deprecated (X)HTML Markup
In This Chapter
▶ Understanding deprecation
▶ Finding deprecated markup
▶ Running down the deprecated elements
▶ Listing the deprecated attributes
▶ Cleaning up after deprecated markup
B
y definition, to deprecate means either “to express disapproval of, to
deplore” or “to declare something obsolete or superseded.” When
(X)HTML talk turns to deprecated markup — and you’ll find this term applied
to both markup elements and attributes — however deplorable such markup
may be, rest assured that the term is used in the second sense! That is,
using deprecated markup is not recommended because the World Wide Web
Consortium (W3C) is convinced that it won’t be around forever, and because
using deprecated markup leads to all kinds of unsavory coding habits, bad
behavior, and possible jail time (just kidding on the last bit).
To understand why markup is deprecated, you need to think about the funda-
mental role of (X)HTML and how CSS plays into a thoroughly modern view of
the Web. First and foremost, (X)HTML’s job is to capture and deliver content
including both graphical and textual information, plus pointers galore (hyper-
links put the “hyper” in hypertext, after all).
Early implementations of HTML included plenty of presentation controls as
well as content elements and linking mechanisms. Over time, Web designers
came to understand that separating content from presentation was highly
desirable. CSS has come to take over the presentation role much more capa-
bly and effectively than HTML ever could. As you look at the deprecated
markup elements and attributes covered in this chapter, you’ll see that the
vast majority deal with presentation controls best turned over to CSS, along
with historical remnants of now-obsolete tools, technologies, and page
design approaches.
15_9780470916599-ch08.indd 12115_9780470916599-ch08.indd 121 11/30/10 12:25 AM11/30/10 12:25 AM
122
Part III: Taking Precise Control Over Web Pages and Styles
Sure, you can find plenty of sites that use deprecated markup, and you may
even find some deprecated markup in your own work here and there. Use
this markup at your own risk, though, and do yourself a favor: As old pages
give way to new, take the time and expend the effort to get that nasty old
deprecated markup out of your pages!
And Now, A Word from Our Sponsor
If you look at the current HTML 4 specification at the W3C Website (available
at www.w3.org/TR/REC-html40/conform.html), you’ll find the following
language used to explain deprecated and obsolete markup:
Deprecated
A deprecated element or attribute is one that has been outdated by newer
constructs. Deprecated elements are defined in the reference manual in
appropriate locations, but are clearly marked as deprecated. Deprecated
elements may become obsolete in future versions of HTML.
User agents should continue to support deprecated elements for reasons of
backward compatibility.
Definitions of elements and attributes clearly indicate which are
deprecated.
This specification includes examples that illustrate how to avoid using
deprecated elements. In most cases these depend on user agent support
for style sheets. In general, authors should use style sheets to achieve
stylistic and formatting effects rather than HTML presentational attributes.
HTML presentational attributes have been deprecated when style sheet
alternatives exist. . . .
Obsolete
An obsolete element or attribute is one for which there is no guarantee of
support by a user agent. Obsolete elements are no longer defined in the
specification, but are listed for historical purposes in the changes section of
the reference manual.
As you read through this language, the term “user agent” is a technical term
for any program that reads and interprets (X)HTML markup. Primarily, this
means a Web browser of some kind, although lots of other programs read
markup, too (think search engine, validator, editor, and so forth). Note that
most programs will support deprecated markup, but its use is best avoided
through — you guessed it — style sheets, or CSS.
15_9780470916599-ch08.indd 12215_9780470916599-ch08.indd 122 11/30/10 12:25 AM11/30/10 12:25 AM
123
Chapter 8: Deprecated (X)HTML Markup
Obsolete markup may still hang around on certain old and moldy Web pages,
but that markup doesn’t work in newer Web browsers. We don’t even cover
it in this book. If your curiosity about such markup must be satiated, please
read the older HTML specifications!
On the other hand, if you want to dig deeper into markup details, check
out the latest HTML 4.01 specification at www.w3.org/TR/html4/cover.
html#minitoc.
If you want to jump right to deprecation, it’s covered in Appendix A of the
HTML 4.01 specification. The real action, however, is in the sections named
“Index of Elements” and “Index of Attributes.” In fact, extract the items
marked D for deprecated in those two indices, and that’s the basic skeleton
for the next two sections that follow.
Deprecated Elements
We present these deprecated elements in alphabetical order in Table 8-1.
Where replacement markup or alternate techniques (can you say “CSS”?)
exist, we point that out, too. If the type is pair, that means you need opening
and closing tags for the element (for example, <center>this</center>);
if the type is empty, that means there’s only one tag for the element (for
example, <isindex … />).
Table 8-1 Deprecated HTML Markup Elements
Name Type Description Alternative
applet pair
Invoke Java applets
Object
basefont pair
Base font size CSS font controls
center pair Shorthand for <div
align=”center”>
CSS text alignment controls
dir pair
Directory list type
<ul> with CSS formatting
font pair
Local font assignment
CSS font-family
isindex empty
Single line input
prompt
HTML forms markup
menu pair
List type for menu
options
<ul> with CSS formatting
s pair
Strikethrough text
CSS text-decoration
strike pair
Strikethrough text
CSS text-decoration
u pair
Underline text
CSS text-decoration
15_9780470916599-ch08.indd 12315_9780470916599-ch08.indd 123 11/30/10 12:25 AM11/30/10 12:25 AM
124
Part III: Taking Precise Control Over Web Pages and Styles
As you look over Table 8-1, only two markup elements are nonpresentational:
✓ applet: The applet tag hearkens back to an era when the Java pro-
gramming language represented the primary means for adding code ele-
ments directly into Web pages. Today, the object element allows page
developers to work with all kinds of programming languages, including
Java, through a single uniform (X)HTML element.
✓ isindex: The isindex element was designed to enable quick-and-dirty
access to a single line of input text from users. Today, the various ele-
ments that go into HTML forms (covered in Chapter 14 of this book) are
used instead.
Deprecated Attributes
Whereas only 10 elements are deprecated in (X)HTML, a great many more
attributes are deprecated — 44 of them are shown in Table 8-2, in fact (of
which 32 are unique, and the rest repeats). Indeed, some attributes appear
more than once in this table because they have different meanings when
associated with specific (X)HTML elements. We use the W3C shorthand for
values that attributes take, and explain those type entries in a list that fol-
lows the table. Here, we don’t discuss alternatives or replacements because
CSS supersedes the vast majority of deprecated elements.
Table 8-2 Deprecated HTML Attributes
Name Related
Elements
Type Description
Align Caption %CAlign
Table caption alignment
Align applet,
iframe,
img, input,
object
%IAlign
Vertical or horizontal
alignment
Align Legend %LAlign
Form fieldset control
Align Table %TAlign
Table position relative to
window
Align Hr LCR
Horizontal rule alignment
Align div,h1
h6,p
LCRJ
Text block alignment
15_9780470916599-ch08.indd 12415_9780470916599-ch08.indd 124 11/30/10 12:25 AM11/30/10 12:25 AM
125
Chapter 8: Deprecated (X)HTML Markup
Name Related
Elements
Type Description
Align col,
colgroup,
tbody, td,
tfoot, th,
thead, tr
LCRJ
Table alignment
Alink Body %Color
Color for selected (high-
lighted) links
Alt Applet %Text
Short description for
applet function
Archive Applet CDATA
Comma separated java
archive (.jar) list
background Body %URI
Image file for document
background
Bgcolor table, tr,
td, th
%Color
Table element back-
ground color
Bgcolor Body %Color
General document back-
ground color
Border img, object %Pixels
Width for link border
Clear Br LRAN
Control of text flow after
line break
Code Applet CDATA
Applet Java class file
codebase Applet %URI
Base location for classid,
data, and archive files
Color basefont,
font
%Color
Text color
Compact dir, dl,
menu, ol, ul
*self
Reduced interword
spacing
Face basefont,
font
CDATA
Comma-separated list of
font names
Height td, th %Length
Table cell height
Height Applet %Length
Initial height for applet
window
Hspace applet,
img, object
%Pixels
Horizontal gutter around
box
Language Script CDATA
Predefined script lan-
guage name
(continued)
15_9780470916599-ch08.indd 12515_9780470916599-ch08.indd 125 11/30/10 12:25 AM11/30/10 12:25 AM
126
Part III: Taking Precise Control Over Web Pages and Styles
Table 8-2 (continued)
Name Related
Elements
Type Description
Link Body %Color
Color for links in docu-
ment body
Name Applet CDATA
Provides id so applets
can find each other
Noshade Hr *self
Turn off dropshadow on
horizontal rule
Nowrap td, th *self
Suppress word wrap in
table cells
Object Applet CDATA
Serialized applet file
(read in pieces)
Prompt Isindex %text
Prompt message to
solicit input
Size Hr %Pixels
Size of horizontal rule
Size Font CDATA
Various positive integer
values for font size
Size Basefont CDATA
Base font size for all font
elements
Start Ol Number
Starting value for num-
bered list
Text Body %Color
Document text color
Type li, ol, ul ListStyle
List item, numbering, and
bullet styles
Value Li Number
Reset list sequence
number
Version Html CDATA
HTML version number for
DTD in use
Vlink Body %Color
Color for visited links
Vspace applet,
img, object
%Pixels
Vertical gutter around
box
Width Hr %Length
Horizontal rule width
Width td,th %Length
Table cell width
Width Applet %Length
Initial width of applet
window/box
Width Pre Number
Width of preformatted
text area in characters
15_9780470916599-ch08.indd 12615_9780470916599-ch08.indd 126 11/30/10 12:25 AM11/30/10 12:25 AM
127
Chapter 8: Deprecated (X)HTML Markup
The following list describes the attribute type abbreviations and values in
Table 8-2:
✓ %CAlign: Column alignment in table
✓ CDATA: SGML (Standard Generalized Markup Language) data type for
general character data
✓ %Color: Color name or hexcode
✓ %IAlign: Alignment for iframes: top, middle, bottom, left, right
✓ %LAlign: Alignment for legends: top, bottom, left, right
✓ LCR: Left, Center, Right
✓ LCRJ: Left, Center, Right, Justified
✓ %Length: Length in pixels or percentages, or relative length
✓ ListStyle: List item styles, list bullet styles, list numbering styles
✓ LRAN: Left, All, Right, None
✓ Number: A string of one or more digits (values from 0 to 9)
✓ %Pixel: Integer representing length in pixels
✓ *self: Attribute name repeated as value (compact=”compact”)
✓ %TAlign: Alignment for table cells: left, center, right, justify, char
✓ %Text: Character data
✓ %URI: Uniform Resource Identifier, usually a URL
Iframe is an HTML construct that functions like a window frame within a
Web page but is used to insert one HTML document inside another, where
the iFrame occupies only a specified area and scrolls like any other static
page element. Content in an iFrame scrolls only within the specified display
area if it is larger than the iFrame window itself. Unlike typical HTML frames
used to divide the browser window into multiple display areas, an iFrame
serves to insert an external element — often, an advertisement or an external
text block — into a specific area on a Web page.
How to Handle Deprecated Markup
The short, sweet admonition of how to handle deprecated markup in your
code is, “Get rid of it!” In practice, though, replacing the vast majority of dep-
recated elements and attributes will come quite naturally upon developing
familiarity — and hopefully, even comfort — with Cascading Style Sheets (CSS).
After you learn how to position items on a page, and to work with margins and
padding, you can dispense entirely with most of the items in Table 8-2, and
many of those in Table 8-1 as well.
15_9780470916599-ch08.indd 12715_9780470916599-ch08.indd 127 11/30/10 12:25 AM11/30/10 12:25 AM