html xhtml and css for dummies 7th edition phần 8 ppsx
Bạn đang xem bản rút gọn của tài liệu. Xem và tải ngay bản đầy đủ của tài liệu tại đây (3.17 MB, 41 trang )
267
Chapter 16: Fun with Client-Side Scripts
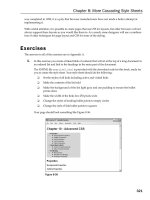
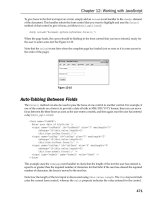
Figure 16-2: Moving the cursor over the link text
changes the text and background colors.
The link text still shows up onscreen regardless of whether you visited the
linked page. Figure 16-3 shows how the page appears after you visit this site’s
home page. Although that text is grayed out, it’s still a link, so rolling over it
still produces the same effect shown in Figure 16-2.
Listing 16-1: A Text Rollover with CSS
<!DOCTYPE html PUBLIC “-//W3C//DTD XHTML 1.0 Transitional//EN”
“ /><html xmlns=” /><head>
<title>CSS Text Rollover</title>
<meta http-equiv=”Content-Type” content=”text/html; charset=ISO-8859-1” />
<style type=”text/css”>
h4 {font: 18pt geneva, sans-serif; margin: 0; color: teal;
background: white;}
a {text-decoration: none;}
div#navbar {width: 200px;}
div#navbar a {display: block; margin: 0; padding: 0.3em;}
div#navbar a:link {color: #008080; background-color: transparent;}
div#navbar a:visited {color: #C0C0C0; background-color: transparent;}
div#navbar a:hover {background: black; color: white;}
</style>
</head>
<body>
<div id=”navbar”>
<h4><a href=”index.html”>
Home
</a></h4>
<h4><a href=”aboutMe.html”>
About Me
</a></h4>
</div>
</body>
</html>
In this example, we change the text from teal-on-white to white-on-black when
the cursor hovers over the link; that way, it’s easy for you to see what’s going
on in the screenshots. You may want to use a different approach on your site
(or a different color scheme). The link goes gray after being visited.
24_9780470916599-ch16.indd 26724_9780470916599-ch16.indd 267 11/30/10 12:26 AM11/30/10 12:26 AM
268
Part IV: Scripting and (X)HTML
Figure 16-3: After you visit a page, the link text
color shows that the page was visited.
Adding this type of navigation to your site couldn’t be simpler:
1. Within the <head> tags, add the preceding code (from Listing 16-1)
inside and including the <style> and </style> tags.
2. Add links inside individual <h4> tags.
3. Make sure that the entire menu is inside a <div> tag with an id attri-
bute of navbar.
If you add the CSS to your site via a link to a site-wide external style sheet
(see Chapters 9 and 10 for more information on style sheets), you can add,
change, or delete menu-bar links on your site at any time without having to
touch a single line of CSS or JavaScript. You simply add or modify your <a
href> tags. Slick, huh?
Image rollovers with CSS
With text rollovers under your belt, kick things up a notch and move on
to image rollovers. Say you have a basic image that you want to change to
some different image when a visitor to your Web site rolls over its display
frame. In the past, you needed JavaScript to handle the mechanics for
image rollovers. Lucky for you, this can all easily be done with CSS now.
Check out this sample page where you can mess with Jeff’s head (literally)
www.dummieshtml.com/examples/ch16/image%20rollover.
Here, we use some CSS trickery to apparently take one image and replace it
with another. Actually, it’s really a single image that was created by stacking
two separate images together, one next to the other. We use some format
tricks to handle the rollover behavior using CSS by shifting our frame of refer-
ence to the right as we hover over that image.
Figure 16-4 shows the sample image (notice how it’s really two images).
Figure 16-5 shows the Web page of the formatted image with part of the
image hidden from view. Hovering the cursor over the black-and-white part
of the image, as shown in Figure 16-6, causes the rolled-over version of the
24_9780470916599-ch16.indd 26824_9780470916599-ch16.indd 268 11/30/10 12:26 AM11/30/10 12:26 AM
269
Chapter 16: Fun with Client-Side Scripts
image to display (it’s in color). Listing 16-2 displays the HTML and CSS that
we use to produce this rollover effect.
Figure 16-4: One image composed of two pictures
of intrepid author, Jeff Noble.
Figure 16-5: The page showing the base (black-
and-white) image of Jeff.
24_9780470916599-ch16.indd 26924_9780470916599-ch16.indd 269 11/30/10 12:26 AM11/30/10 12:26 AM
270
Part IV: Scripting and (X)HTML
Figure 16-6: Hovering over Jeff’s head calls up
the color image of Jeff as a rollover.
Listing 16-2: HTML and CSS Creating a Rollover Effect
<!DOCTYPE html PUBLIC “-//W3C//DTD XHTML 1.0 Transitional//EN”
“ /><html xmlns=” /><head>
<meta http-equiv=”Content-Type” content=”text/html; charset=UTF-8” />
<title>
Image Roll Over
</title>
<style type=”text/css”>
body{margin: 0px; padding: 0px;
background-image:url(images/background-page.gif);}
#top{width: 580px; height: 351px; background-image:url(images/header.gif)}
#container{margin: 0px auto; width: 580px}
#content{ background-color:#001021; margin-left: 6px; margin-right: 5px;}
.jeffPhoto {width: 251px; height: 376px;
background-image:url(images/jeff.jpg);margin: 0px auto;}
.jeffPhoto:hover{ background-position: -251px 0px}
.caption{color:#FFF; width: 251px; margin: 0px auto; text-align:center;
font-family:Verdana, Geneva, sans-serif}
</style>
</head>
24_9780470916599-ch16.indd 27024_9780470916599-ch16.indd 270 11/30/10 12:26 AM11/30/10 12:26 AM
271
Chapter 16: Fun with Client-Side Scripts
<body>
<div id=”container”>
<div id=”top”></div>
<div id=”content”>
<div class=”jeffPhoto”></div>
<div class=”caption”>
Roll over my head!
</div>
</div>
</div>
</body>
</html>
It’s the trick with the background position on the hover that switches the
image over from the black-and-white part on the left to the color part on the
right. By changing the first value to –251px, the image shifts all the way to
the right edge, which shows us the right-hand “half” (in color).
Custom button rollovers with CSS
When you’re familiar with text and image rollovers, you can really ramp up
your Web site by combining aspects of both to create your own custom
buttons.
In the old days, people often created buttons using images with text on them.
This method worked, but it also required creating a bunch of individual
graphics with rollovers. This not only takes a long time to build and maintain,
but images also take time to load when visitors come to your site.
No more! You can create standard buttons using CSS to change their pre-
sentation, as we show in Chapter 12. While this works, it doesn’t provide
the push that takes your site’s power level up to “11” (as the special ampli-
fiers did for that famous but fictional rock band, Spinal Tap). A snazzier way
to create buttons is to use a CSS “Sliding Doors” technique, which involves
using multiple images that scale with the width of your HTML text.
We challenge you to take your new-found skills and attempt this technique
on your own. We defer to Janko Jovanovic, a true master of fancy buttons for
the sliding doors technique. Be sure to check out his tutorial and try it your-
self. You may even be able to improve it using your new skills! Visit “Janko At
Warp Speed” at www.jankoatwarpspeed.com/post/2008/04/30/make-
fancy-buttons-using-css-sliding-doors-technique.aspx.
24_9780470916599-ch16.indd 27124_9780470916599-ch16.indd 271 11/30/10 12:26 AM11/30/10 12:26 AM
272
Part IV: Scripting and (X)HTML
Working with Cookies
Every time we start talking about cookies, we’re tempted to grab a glass of
milk and get ready for dipping. Then we remind ourselves that Web cookies,
as useful as they can be, are actually tasteless. (We imagine they’d taste more
like chicken than cookies made from the Toll House recipe.) Although they
may not be tasty, you may find cookies helpful as you create your Web site.
A cookie allows you to store information on visitors’ computers that you can
revisit later. Cookies offer a powerful way to maintain “state” within Web
pages. The code in Listing 16-3 reads and writes two cookies as a visitor
loads the page:
✓ pageHit contains a count of the number of times the visitor has loaded
the page.
✓ pageVisit contains the last date and time the visitor visited.
Figure 16-7 shows how the page appears on the initial visit, and Figure 16-8
shows how it looks on subsequent visits.
Figure 16-7: This cookie knows you’ve never
been to this page before.
Figure 16-8: These cookies know not only that
you’ve been here before, but when.
24_9780470916599-ch16.indd 27224_9780470916599-ch16.indd 272 11/30/10 12:26 AM11/30/10 12:26 AM
273
Chapter 16: Fun with Client-Side Scripts
Listing 16-3: Cookie-handling Script
<!DOCTYPE html PUBLIC “-//W3C//DTD XHTML 1.0 Transitional//EN”
“ /><html xmlns=” /><head>
<title>
Cookie Demo
</title>
<meta http-equiv=”Content-Type” content=”text/html; charset=ISO-8859-1” />
<script type=”text/javascript” language=”javascript”>
<!
now = new Date
expireDate = new Date
expireDate.setMonth(expireDate.getMonth()+6)
hitCt = parseInt(cookieVal(“pageHit”))
hitCt++
lastVisit = cookieVal(“pageVisit”)
if (lastVisit == 0) {
lastVisit = “”
}
document.cookie = “pageHit=”+hitCt+”;expires=” + expireDate.toGMTString()
document.cookie = “pageVisit=”+now+”;expires=” + expireDate.toGMTString()
function cookieVal(cookieName) {
thisCookie = document.cookie.split(“; “)
for (i=0; i<thisCookie.length; i++) {
if (cookieName == thisCookie[i].split(“=”)[0]) {
return thisCookie[i].split(“=”)[1]
}
}
return 0
}
>
</script>
</head>
<body>
<h2>
<script type=”text/javascript” language=”javascript”>
<!
document.write(“You have visited this page “ + hitCt + “ times.”)
if (lastVisit != “”) {
document.write(“<br />Your last visit was “ + lastVisit)
}
>
</script>
</h2>
</body>
</html>
24_9780470916599-ch16.indd 27324_9780470916599-ch16.indd 273 11/30/10 12:26 AM11/30/10 12:26 AM
274
Part IV: Scripting and (X)HTML
Unlike preceding examples, Listing 16-3 has a <script> section in both the
head and the body:
✓ Cookies are read and written in the header script when the page loads.
✓ The body script dynamically writes out the contents of the page itself.
Follow these steps to add the cookie-handling script to your page:
1.
Copy both <script> sections and put them into the appropriate parts
of your page.
2. Change the <body> section to contain the text that you want the page
to display.
The lines inside the document.write() statements write the text out
to the document on the fly.
A cookie has an expiration date, after which it’s no longer available. This
example creates cookies that expire in six months. If you want your cookies
to live longer (or not so long), adjust the JavaScript code near the top that
sets a value for expireDate. Thus, the following example increases the cur-
rent expiration date by six months:
expireDate.setMonth(expireDate.getMonth()+6)
Working with jQuery and FancyBox Lightbox
In days of yore, it was commonplace to use browser pop-ups to present addi-
tional information about your Web site. In fact, we even used this technique
in the last edition of this book. Owing to overuse at some unscrupulous
Web sites, plus their annoying in-your-face nature, pop-ups are now mostly
blocked by major browsers . . . and that’s probably a good thing!
Instead of pop-ups, we now recommend using lightboxes. This may sound
like a weapon out of Star Wars or a tool used by photographers (that last
guess is close). In this case, however, a lightbox is a tool that displays images,
HTML content, and multimedia atop of a Web page.
Dozens of different lightboxes are available on the Internet. Please use your
favorite search engine to check those out if you want to know more. Here, we
only discuss jQuery and FancyBox.
If you’re unfamiliar with jQuery, think of it as a popular JavaScript library
that you can reference without writing much real code yourself. (We don’t
dig much into jQuery in this book, but you need only do a Web search on this
24_9780470916599-ch16.indd 27424_9780470916599-ch16.indd 274 11/30/10 12:26 AM11/30/10 12:26 AM
275
Chapter 16: Fun with Client-Side Scripts
term to find more information than you can read in an entire Sunday after-
noon.) jQuery can be extended for many different uses — say for example, a
lightbox — by no coincidence whatsover!
To create a lightbox, such as the one at www.dummieshtml.com/examples/
ch16/lightbox, follow these steps:
1. Download FancyBox at />jquery.fancybox-1.3.1.zip.
The FancyBox home page is shown in Figure 16-9.
Figure 16-9: The FancyBox home page.
2. Unzip its files into your Web site folder.
3. Create a blank HTML page, and then add the necessary JavaScript
files along with the Fancy Box CSS File (see Figure 16-10).
4. Include the following code in that document (inside the head part):
<script type=”text/javascript”
src=” /></script>
<script type=”text/javascript”
src=”fancybox/jquery.fancybox-1.3.1.pack.js”></script>
<link rel=”stylesheet” href=”fancybox/jquery.fancybox-1.3.1.css”
type=”text/css” media=”screen” />
24_9780470916599-ch16.indd 27524_9780470916599-ch16.indd 275 11/30/10 12:26 AM11/30/10 12:26 AM
276
Part IV: Scripting and (X)HTML
Figure 16-10: HTML source code for our lightbox example.
5. Create a link to launch the lightbox.
In this example (see Figure 16-11), we use a small image to launch a
larger one.
<a id=”example” href=”images/oldCoverLarge.jpg”>
<img src=”images/oldCoverSmall.jpg” alt=”Our Old Book Cover”
border=”0” /></a>
Figure 16-11 shows how the lightbox looks on the Web page when
completed. You can also view it online at www.dummieshtml.com/
examples/ch16/lightbox.
Here’s the magic part: We add some JavaScript to enable the lightbox to
work with jQuery.
6. Enter the following code into the head section of your document:
<script type=”text/javascript”>
$(document).ready(function() {
$(“a#example”).fancybox({
‘titleShow’: true
});
});
</script>
24_9780470916599-ch16.indd 27624_9780470916599-ch16.indd 276 11/30/10 12:26 AM11/30/10 12:26 AM
277
Chapter 16: Fun with Client-Side Scripts
Figure 16-11: The lightbox example from the HTML For Dummies Web site.
This example is intended to showcase what’s possible using these tools.
Check out the sample code on our site and give it a shot! (You can also visit
www.dummieshtml.com/examples/ch16/lightbox, and then choose
View➪Source in Internet Explorer or View➪Page Source in Firefox.)
For additional resources for this example, visit the following sites:
✓ jQuery: /> ✓ FancyBox: />To find alternative lightbox plugins, check the following sites:
✓ 6 Lightbox Plugins for WordPress: />lightbox-plugins-for-wordpress
✓ jQuery lightBox: />lightbox
You can find more about JavaScript libraries at the following sites:
✓ jQuery: www.jquery.com
✓ script.aculo.us:
✓ MooTools:
24_9780470916599-ch16.indd 27724_9780470916599-ch16.indd 277 11/30/10 12:26 AM11/30/10 12:26 AM
278
Part IV: Scripting and (X)HTML
If you try to follow along with the various techniques we illustrate in these
chapters, you’ll realize that we didn’t describe every single step in complete
detail. You will need to load image files into the various environments (Flickr,
for example), and in general, you must make sure that file paths and other
resource references are absolutely correct (or images and objects won’t
show up where they should). Our skeleton approach is designed to help you
understand what you must do in general. If you need more help in completing
the steps, drop us an e-mail (, jeff@conquestmedia.
com) or send us a tweet (@dummieshtml), and we’ll add a step-by-step tuto-
rial to the Web site.
24_9780470916599-ch16.indd 27824_9780470916599-ch16.indd 278 11/30/10 12:26 AM11/30/10 12:26 AM
Chapter 17
Content Management Systems
In This Chapter
▶ Understanding the differences between content management systems and HTML
▶ Introducing WordPress, Drupal, and Joomla!
▶ Customizing CSS using content management systems
A
content management system (CMS) is a Web application designed to
make life easy for nontechnical users to add, edit, and (wait for it . . .)
manage a Web site. A CMS is like a Web site on steroids: bigger, stronger, and
with more abilities. However, a CMS might be overkill for what many folks
need — and there are side effects.
Well, that’s it for us: You can now put this book down and just use a CMS
instead of HTML. Cue the music and thanks very much: The End. Alas, if only
that were true. Many people start with HTML, XHTML, and CSS, and eventu-
ally graduate to their very own CMS Web site, whereas others jump directly
into CMS and move ahead from there. It really just depends on what makes
you comfortable and happy. Regardless of whether you start out with or
graduate to a CMS, learning HTML, XHTML, and CSS will help (not hurt) as
you prepare for life with a CMS (if you choose that option).
Comparing CMS Sites to HTML Sites
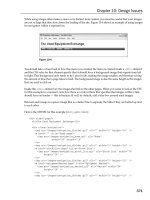
Table 17-1 describes a few ways in which a CMS-based site compares with a
basic HTML Web site.
25_9780470916599-ch17.indd 27925_9780470916599-ch17.indd 279 11/30/10 12:26 AM11/30/10 12:26 AM
280
Part IV: Scripting and (X)HTML
Table 17-1 HTML-Only and CMS-Based Web Sites Compared
CMS-Based Site HTML-Only Site
Edit anywhere using a Web browser
and an Internet link
Edit local files and upload to a Web
server
HTML, XHTML, and CSS knowledge not
required, but helpful for customization
HTML, XHTML, and CSS required
unless using a WYSIWYG editing tool
(such as Dreamweaver)
Access can be restricted on a per-user
basis
Anyone with write access to the right
server folder can add, change, or delete
HTML files
Hard to set up unless assisted by Web
host
Easy to set up
Easy to update, lots of automation
support
Easy to update, little or no automation
support
Requires a database to store
information
A database is possible but not required
Popular CMS Sites and Programs
There are probably more CMS options available than pages in this book.
Supporters of any particular CMS are a lot like most of the mixed martial
arts fans that we know — all of them think whoever or whatever they sup-
port is the absolute best and no amount of arguing can change that — until
one party takes the other party out! We don’t cover any particular CMS in
depth in this chapter. Rather, we identify three of the most popular CMS
choices available — WordPress, Drupal, and Joomla! — and introduce them
with some high-level exploration. For those who might want to find out
more about any or all of these systems, whole books are dedicated to each.
We recommend checking them out so you can pick one to explore further
on your own, without any threat of someone putting you into the infamous
“kimura hold.”
If it looks like we’re avoiding in-depth coverage of these CMS options, this is
a case where looks do not deceive. There’s no way we can cover everything
about CMS systems and capabilities in a single chapter, nor can we provide
much useful information or detail about any single CMS in the same space.
However, we can tell you what makes them useful, interesting, and popular,
so that’s what we do instead.
25_9780470916599-ch17.indd 28025_9780470916599-ch17.indd 280 11/30/10 12:26 AM11/30/10 12:26 AM
Downloa d f r o m W o w ! e B o o k < w w w.woweb o o k . c o m >
281
Chapter 17: Content Management Systems
Lots of Web hosts offer the CMS systems we cover briefly here — namely,
WordPress, Drupal, and Joomla! — to their customers (often for free; some-
times, for a slightly higher monthly fee). For the companion site for this book,
we were able to set up the sample sites we use as examples in the following
sections using all three of these CMS options for no extra cost. Hmmm . . .
something else you might want to think about using when selecting a Web
hosting provider, especially if you find one or more of these CMS offerings
appealing.
WordPress
WordPress is widely known as a blogging system but has evolved into a full-
blown CMS. It’s offered as a multi-platform CMS in a hosted solution from
its developers (www.wordpress.com) and in a self-hosted solution (www.
wordpress.org). The differences between these two varieties of WordPress
are minor, and your choice will depend on your intentions and the amount of
control you will need over your site.
For the most part, the hosted solution involves an easier setup and requires
neither a download nor an installation to some specific Web server. On the
other hand, the self-hosted solution offers many more customization options
and confers complete control to its operators. Either way, a basic setup
is free (and the self-hosted version is open source, so you can download,
install, modify, and share the WordPress code for free). With a user commu-
nity in the millions, thousands of optional features are available with plugins
and themes that you can use to extend WordPress and add to its already
formidable list of features and functions. (Most plugins and themes are free,
though some commercial products also play on this field.)
WordPress distinguishes itself from other CMS because it is
✓ Extremely easy to use
✓ Highly extensible
✓ Home to strong and passionate user and developer communities
Our companion site for this book (www.dummieshtml.com) is built atop a
WordPress self-hosted solution for which we’ve done a fair amount of custom
CSS development.
Drupal
Drupal is an open source CMS. According to the Drupal Web site (www.
drupal.org), Drupal is a “free software package that allows an individual or
community of users to easily publish, manage, and organize a wide variety of
25_9780470916599-ch17.indd 28125_9780470916599-ch17.indd 281 11/30/10 12:26 AM11/30/10 12:26 AM
282
Part IV: Scripting and (X)HTML
content on a Web site.” Drupal is known to most as a solid and well-thought-
out CMS, but it is hampered with a somewhat difficult installation, and its
management interface can also be a bit confusing. Like WordPress, Drupal
offers additional modules that you can add to a Web site to extend its func-
tionality. Also like WordPress, thousands of these modules are available for
you to download and install.
Drupal’s strengths include the following:
✓ It’s free
✓ It supports highly flexible layout and page creation capabilities
✓ It’s also highly extensible
There is no hosted version of Drupal available at a single centralized site, but
you can download Drupal from www.drupal.org and install it anywhere you
might like!
Joomla!
In discussing this CMS, we drop the exclamation point from its proper name,
Joomla!, following the same convention in other books. We think this makes
the name more readable, if less emphatic.
Joomla is an open source CMS that gives its users total control over the Web
sites under its management. Joomla is extremely powerful and offers “out of
the box” features that include user (account) management, multi-language
support, template management, and an integrated help and support system.
As with WordPress and Drupal, Joomla supports a plethora of add-on fea-
tures (called extensions) that you can download and install.
Joomla is known for the following characteristics:
✓ It’s free
✓ It’s easy for site designers and operators to use to set up individual Web
sites
✓ It’s highly extensible, and it offers a comprehensive set of management
and support tools
You can download Joomla from www.joomla.org. However, Joomla’s great
power also puts the burden of great responsibility on its operators (who run
the servers on which Joomla is used to set up and manage individual Web
sites), if not also on its operators (who build and manage those individual
sites).
25_9780470916599-ch17.indd 28225_9780470916599-ch17.indd 282 11/30/10 12:26 AM11/30/10 12:26 AM
283
Chapter 17: Content Management Systems
Customizing CSS on a CMS
Sure, reading about CMS is nice and all that, but this is an HTML (plus
XHTML and CSS) book, so we have to dive in a little deeper. Here again, we
won’t swim all the way down to the bottom of this pool — we just cover some
areas within the individual CMS packages introduced in the previous section
and explain how you might go about updating the HTML/CSS in each one.
Each of the three systems — namely, WordPress, Drupal, and Joomla — uses
different methods to edit CSS. However, for all the systems, changing the
“theme” is the key to accessing and managing page presentation for the sites
under their control.
WordPress and CSS
Installing and managing themes in WordPress is easy. With the CSS skills we
provide you in this book, you should find it even easier to update and tweak
the look and feel for any predefined theme you might like. In fact, you can use
what you know to create your own themes, using a predefined WordPress
theme as your point of departure.
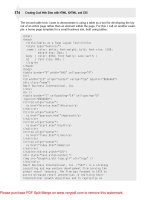
First, log in to your site’s WordPress administration view. Then, from the
main dashboard, click the Appearance link in the panel to the left (the one
with a small icon that looks like some sections on a page). This screen shows
your current theme and how to activate other themes, and lets you install
new ones, as shown in Figure 17-1.
Figure 17-1: Basic theme management in WordPress.
25_9780470916599-ch17.indd 28325_9780470916599-ch17.indd 283 11/30/10 12:26 AM11/30/10 12:26 AM
284
Part IV: Scripting and (X)HTML
To edit the current theme, click the Editor link in the Appearance panel.
The main stylesheet contents open in a text input area in the main screen.
Alternatively, you can select the style you want to work on under the Styles
category on the right side of the page.
After you handle these preliminaries, all you must do to update the CSS is
to choose some element in the current stylesheet, modify it, and then click
the Update File button (under the input area). This saves your changes and
makes them part of the theme, so be prepared to spend some time tweaking
and tuning to get things just right.
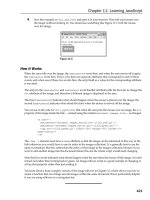
In our simple example, we want to increase the font size for the body text
in our Web site (this actually requires changing a stylesheet entry named
#content, so be sure to make your changes for that element in particular).
To do this, we scroll to the #content element, then bump the font size up
from .76em to 1em, and then click the Update File button. See Figure 17-2 for
the before (top) and after (bottom) results of changing the font size.
When you’re working on style sheets from any of these CMSs, you may find
it easier to grab them and import them to your local machine, where you can
use a CSS-savvy editor (or at least a text editor with search-and-replace func-
tionality) instead of the waaaay-too-basic text editing any of these systems
gives you.
You can also update the CSS in WordPress using an entirely different method.
Here’s how:
1. Log in to your Web site with an FTP client.
(See Chapter 23 for information on FTP clients.)
2. Navigate to the CSS folder (usually found in /www/wp-content/
themes).
3. Select your current theme folder.
4. Download the main stylesheet.
Be careful — there may be multiple styles with a .css file extension.
5. Modify the file using a Web site editor.
(For recommendations, see Chapter 23.)
6. Upload the main stylesheet file back to the location from which you
downloaded it.
For more information about updating CSS and tons of other features about
WordPress, we suggest latching on to a copy of WordPress For Dummies, 3rd
Edition, by Lisa Sabin-Wilson.
25_9780470916599-ch17.indd 28425_9780470916599-ch17.indd 284 11/30/10 12:26 AM11/30/10 12:26 AM
285
Chapter 17: Content Management Systems
Figure 17-2: Before (top) and after (bottom) changing the font size on
the WordPress site.
Drupal and CSS
Themes in Drupal are a bit more involved and require more effort to update
than in WordPress. Even so, we think the process is pretty fascinating!
First, you must know which theme is designated as the default Drupal theme.
To make this determination, follow these steps:
1. Log in to your Drupal administration page.
2. In the Administrator panel, choose Site Building➪Themes.
3. On the Themes page, scroll down to find the name of the theme that’s
currently enabled. (Look for the selected check box in the Enabled
column, as shown in Figure 17-3.)
Remember this name.
25_9780470916599-ch17.indd 28525_9780470916599-ch17.indd 285 11/30/10 12:26 AM11/30/10 12:26 AM
286
Part IV: Scripting and (X)HTML
Figure 17-3: The Themes page in Drupal shows that the Garland theme
is selected.
4. Log in to your Web site with an FTP client and navigate to the CSS
folder.
This folder is usually found in the /httpdocs/themes folder; for our
site, the directory specification is …/cms/drupal/themes/garland,
where Garland is the name for our default theme.
5. Select your current theme folder and download the main stylesheet (it
lives in a file named style.css).
In this example, we want to make the body text in our Web site bigger,
so we open up the main stylesheet. (Be careful — you’ll find many files
that end in .css in any theme directory.)
6. Modify that file in a Web editor.
We opened the style.css file with a Web site editor, and then found
the <body> tag and changed the font-size from 12px to 16px.
7. Upload the edited file back to the same location.
Figure 17-4 shows the original page (top) and the edited page (bottom).
For more information about Drupal, we suggest checking out Drupal For
Dummies by Lynn Beighley.
25_9780470916599-ch17.indd 28625_9780470916599-ch17.indd 286 11/30/10 12:26 AM11/30/10 12:26 AM
287
Chapter 17: Content Management Systems
Figure 17-4: Before (top) and after (bottom) with Drupal and a font size
enlargement.
Joomla and CSS
While not as quite as user friendly as WordPress, editing themes in Joomla is
much easier than in Drupal — but at least, it’s not FTP based!
To edit a theme using CSS in Joomla, follow these steps:
1. Log in to Joomla.
2. On the Administration page, choose Extensions➪Template Manager.
The template manager is where you select your (drum roll please)
template — which is a lot like selecting a theme in WordPress or Drupal.
You see a list of installed templates, and the default template in effect
for your Web site is tagged with a yellow star in the Default column, as
shown in Figure 17-5.
25_9780470916599-ch17.indd 28725_9780470916599-ch17.indd 287 11/30/10 12:26 AM11/30/10 12:26 AM
288
Part IV: Scripting and (X)HTML
Figure 17-5: The Joomla Template Manager marks the current template
with a yellow star.
3. Click the template name that’s designated with the star (that is, you’ll
want to click the left-most column in the table of entries) for an over-
view of that template.
4. Click the Edit CSS icon at the upper right.
A list of CSS files appears.
5. To edit any of these files, click the radio button on the left to select
a particular file, and then click the Edit icon above the table on the
right.
In this example, we want to make the body text in our Web site bigger,
so we click the radio button to the left of the main CSS template called
template.css. Then we click the Edit icon above the table. The CSS for
the selected template file opens in a text input box.
6. Edit the CSS code in the text input box.
For example, we scrolled to the <body> tag and changed font-size
from 12px to 16px.
7. Click the Save icon above the text input box to commit your changes
to the template file.
That’s it! See Figure 17-6 to view the site before (top) and after (bottom)
changing the font size.
For more information about Joomla, we suggest checking out Joomla! For
Dummies by Steven Holzner and Nancy Conner.
25_9780470916599-ch17.indd 28825_9780470916599-ch17.indd 288 11/30/10 12:26 AM11/30/10 12:26 AM
289
Chapter 17: Content Management Systems
Figure 17-6: Before (top) and after (bottom) changing the default Joomla
body font size.
Pssst! Hey Buddy! Wanna See Some CMS?
As exciting as this section heading may seem, the reality actually both
exceeds its floridity and promise. We built three sample sites for each of the
CMS options we cover in this chapter (WordPress, Drupal, and Joomla), so
you can drop by the companion site for this book (in the CMS section, if you
must know) to visit any or all of them.
Don’t get your hopes up too high, though — we’re permitting you read-only
access to these offerings, so you can look but you can’t touch. As the pro-
tagonist himself said to Robin Hood in Shrek 1: “Hey, that’s my princess. Go
find your own!”
Here are the URLs for the various CMS versions:
✓ /> ✓ /> ✓ />25_9780470916599-ch17.indd 28925_9780470916599-ch17.indd 289 11/30/10 12:26 AM11/30/10 12:26 AM
290
Part IV: Scripting and (X)HTML
25_9780470916599-ch17.indd 29025_9780470916599-ch17.indd 290 11/30/10 12:26 AM11/30/10 12:26 AM
Part V
The Future of
(X)HTML
26_9780470916599-pp05.indd 29126_9780470916599-pp05.indd 291 11/30/10 12:26 AM11/30/10 12:26 AM