CompTIA A+ Complete Study Guide phần 3 pptx
Bạn đang xem bản rút gọn của tài liệu. Xem và tải ngay bản đầy đủ của tài liệu tại đây (2.88 MB, 99 trang )
Performing Preventative Maintenance on Personal Computers
129
air from time to time can prevent damage to the components. While you’re cleaning the com-
ponents, be sure to clean any cooling fans in the power supply or on the heat sink.
To clean the power supply fan, blow the air from the inside of the case. When
you do this, the fan will blow the contaminants out the cooling vents. If you
spray from the vents toward the inside of the box, you’ll be blowing the dust
and grime inside the case or back into the fan motor.
One way to ensure that the environment has the least possible effect on your computer is
to always leave the blanks in the empty slots on the back of your box. These pieces of metal
are designed to keep dirt, dust, and other foreign matter from the inside of the computer. They
also maintain proper airflow within the case to ensure that the computer doesn’t overheat.
Performing Preventative Maintenance
on Personal Computers
This section outlines some preventative maintenance products and procedures. Preventative main-
tenance is one of the most overlooked ways to reduce the cost of ownership in any environment.
Cleaning a computer system is the most important part of maintaining it. Computer com-
ponents get dirty. Dirt reduces their operating efficiency and, ultimately, their life. Cleaning
them is definitely important. But cleaning them with the right cleaning compounds is equally
important. Using the wrong compounds can leave residue behind that is more harmful than
the dirt you’re trying to remove!
Most computer cases and monitor cases can be cleaned using mild soap and water on a
clean, lint-free cloth. Make sure the power is off before you put anything wet near a computer.
Dampen (don’t soak) a cloth with a mild soap solution, and wipe the dirt and dust from the
case. Then wipe the moisture from the case with a dry, lint-free cloth. Anything with a plastic
or metal case can be cleaned in this manner.
Don't drip liquid into any vent holes on equipment. CRTs in particular have
vent holes in the top.
To clean a monitor screen, use glass cleaner designed specifically for monitors and a soft
cloth. Don’t use commercial window cleaner, because the chemicals in it can ruin the antiglare
coating on some monitors.
To clean a keyboard, use canned air to blow debris out from under keys, and use towelettes
designed for use with computers to keep the key tops clean. If you spill anything on a keyboard,
you can clean it by soaking it in distilled, demineralized water. The minerals and impurities have
been removed from this type of water, so it won’t leave any traces of residue that might interfere
with the proper operation of the keyboard after cleaning. Make sure you let the keyboard dry
for at least 48 hours before using it.
4831x.book Page 129 Tuesday, September 12, 2006 11:59 AM
130
Chapter 2
Effectively Working with Personal Computer Components
The electronic connectors of computer equipment, on the other hand, should never touch
water. Instead, use a swab moistened in distilled, denatured isopropyl alcohol (also known as
electronics cleaner and found in electronics stores) to clean contacts. Doing so will take the
oxidation off the copper contacts.
A good way to remove dust and dirt from the inside of the computer is to use compressed
air. Blow the dust from inside the computer using a stream of compressed air. However, be
sure you do this outdoors, so you don’t blow dust all over your work area or yourself. You
can also use a vacuum, but it must be designed specifically for electronics—such models don’t
generate ESD and have a finer filter than normal.
To prevent a computer from becoming dirty in the first place, control its environment.
Make sure there is adequate ventilation in the work area and that the dust level isn’t excessive.
To avoid ESD, you should maintain 50 to 80 percent humidity in the room where the com-
puter is operating.
You should visually inspect the computer for signs of distress within it. Discolored areas on
the board are often caused by overheating. The overheating can be caused by power surges or
overclocking and is an indication that all is not right.
One unique challenge when cleaning printers is spilled toner. It sticks to everything and
should not be inhaled. Use a vacuum designed specifically for electronics. A normal vacuum’s
filter isn’t fine enough to catch all the particles, so the toner may be circulated into the air.
If you get toner on your clothes, use a magnet to get it out (toner is half iron).
Removable media devices such as floppy and CD drives don’t usually need to be cleaned
during preventative maintenance. Clean one only if you’re experiencing problems with it.
Cleaning kits sold in computer stores provide the needed supplies. Usually, cleaning a floppy
drive involves using a dummy floppy disk made of semi-abrasive material. When you insert
the disk in the drive, the drive spins it, and the abrasive action on the read-write head
removes any debris.
An uninterruptible power supply (UPS) should be checked periodically as part of the pre-
ventative maintenance routine to make sure that its battery is operational. Most UPSs have a
Test button you can press to simulate a power outage. You will find that batteries wear out
over time, and you should replace the battery in the UPS every couple of years in order to keep
the UPS dependable.
The motherboard contains a battery, as well, which is used to maintain internal settings
when power is not provided to the unit. Resembling large watch batteries, these entities tend
to have a considerable life, on average, but can lose their charge over time. If you boot a system
and find that the date and time and other variables have not been maintained, you will want
to change the internal battery.
Remember, preventative maintenance is more than just manipulating hardware; it also
encompasses running software utilities on a regular basis to keep the file system fit. These
utilities can include Disk Defragmenter, ScanDisk, Check Disk, and Disk Cleanup.
4831x.book Page 130 Tuesday, September 12, 2006 11:59 AM
Summary
131
Summary
In this chapter, you finished learning about personal computer components, specifically storage
devices, display devices, and input and multimedia devices.
In addition, we discussed identifying various problems that can occur, as well as various
solutions or approaches to finding a solution. Finally, we walked through troubleshooting the-
ory and techniques and concluded by examining some preventative maintenance recommen-
dations and issues.
Exam Essentials
Know how many pins an IDE/PATA/ATA-5/ATA-6 cable has. A cable for use with these
technologies has 40 pins. You’re likely to be asked to choose a cable in a scenario question
simply by knowing how many pins the drive requires.
Know how a controller works in a master/slave environment. When you have a master and a
slave, only one of the two controllers controls data transfers. You’re likely to be asked a scenario
question that relates to this environment.
Know what other devices besides hard drives use IDE interfaces. With the popularity of
IDE technology, manufacturers have introduced tape drives and CD-ROMs that use IDE
interfaces.
Know what can be used to clean computer components. Many types of cleaning solutions
can be used to perform these procedures. Be familiar with which option is best for each com-
ponent. Which ones can be cleaned with water? Which ones require alcohol? Which ones need
canned air?
Know why the proper cleaning solutions should be used. Using the wrong cleaning solution
can damage components. Along with choosing the right cleaning solution, understand why the
improper solutions are inappropriate for a particular component.
4831x.book Page 131 Tuesday, September 12, 2006 11:59 AM
132
Chapter 2
Effectively Working with Personal Computer Components
Review Questions
1. Which of the following steps is not necessary when replacing a floppy drive?
A. Turn off the PC.
B. Disconnect the power supply from the drive.
C. Disconnect the ribbon cable from the drive.
D. Disconnect the audio cable from the drive.
2. When attaching a ribbon cable to a drive, if there is no marking for pin 1, which way should
you orient the red stripe?
A. Closest to the power supply connector
B. Farthest away from the power supply connector
C. Facing the top of the drive
D. Facing the bottom of the drive
3. To fix a bad power supply in a desktop PC, you should ____________.
A. Remove and replace the entire power supply box.
B. Disassemble the power supply and replace the coils.
C. Disassemble the power supply and replace the capacitors.
D. Disassemble the power supply and replace the resistors.
4. How many bits of data does a high-speed serial cable carry simultaneously in a single direction?
A. 1
B. 8
C. 32
D. Depends on the cable
5. Which of the following could not be connected to an IDE interface on a typical motherboard?
A. ATA-2
B. EIDE
C. ATAPI
D. All of these could be connected.
6. What do UltraDMA/66 and higher require?
A. Cable Select configuration
B. An 80-wire cable
C. Operating system support
D. All of the above
4831x.book Page 132 Tuesday, September 12, 2006 11:59 AM
Review Questions
133
7. On the primary IDE channel, if a single hard disk is attached, its jumper should be
set to ________.
A. Slave
B. Single if available; otherwise Master
C. Master
D. Boot
8. Which type of SCSI termination uses voltage regulators inside the terminator?
A. Active
B. Passive
C. High-byte
D. All of the above
9. You install a new UltraATA/100 hard disk in an old PC, connecting it directly to the primary
IDE on the motherboard. You use the 80-wire ribbon cable that came with it. Performance
testing indicates that the new drive is not performing up to UltraATA/100 standards. What
could you try next?
A. Reformat the hard disk using NTFS 5.0.
B. Add an ATA/100-compatible expansion board and connect the drive to it.
C. Partition the disk into smaller logical drives.
D. Set up the drive in BIOS Setup to use PIO mode 4.
10. Which AT command resets the modem?
A. ATH0
B. ATM0
C. ATZ
D. ATDT
11. While inspecting a motherboard, you notice a discolored area. What is usually a cause of this?
A. Spilled liquid
B. Improper manufacture
C. Power surge
D. Underclocking
12. What does the red stripe on a ribbon cable indicate?
A. Pin 16
B. Pin 1
C. The manufacturer’s trademark
D. Parity
4831x.book Page 133 Tuesday, September 12, 2006 11:59 AM
134
Chapter 2
Effectively Working with Personal Computer Components
13. Display devices can be connected to a PC using DB-15 connectors or ________.
A. HDT
B. DVI
C. VBA
D. VBP
14. What utility can be used with Windows XP to format drives?
A. Disk Design
B. Disk Plan
C. Disk Management
D. Disk Prep
15. Which ATA standard supports UltraDMA/133?
A. ATA-7
B. ATA-8
C. ATA-9
D. ATA-10
16. What type of female DB-style connector does SCSI-2 use? (Choose all that apply.)
A. 25-pin
B. 50-pin
C. 68-pin
D. 72-pin
17. Internally, what type of wire ribbon cable does SCSI use?
A. 25-pin
B. 50-pin
C. 68-pin
D. 72-pin
18. When changing display devices or upgrading to a newer one, what is one of the most crucial
components to have?
A. Manufacturer’s resolution recommendations
B. Antistatic mat
C. Ribbon cable
D. Correct driver
4831x.book Page 134 Tuesday, September 12, 2006 11:59 AM
Review Questions
135
19. Every computer has a diagnostic program built into its BIOS called the ________.
A. CMOS
B. BIOS
C. POST
D. DNS
20. What two devices are commonly used to cool components within a PC? (Choose two.)
A. Fans
B. Compressed air
C. Freon
D. Heat sinks
4831x.book Page 135 Tuesday, September 12, 2006 11:59 AM
136
Chapter 2
Effectively Working with Personal Computer Components
Answers to Review Questions
1. D. There is no audio cable associated with a floppy drive; that’s only for CD drives. All the
other listed actions are necessary when replacing a floppy drive.
2. A. Closest to the power supply connector is a general rule for stripe orientation. Because the
cable attaches horizontally to the drive, there is no “facing the top” or “facing the bottom”
orientation.
3. A. You should never attempt to disassemble a power supply, because of the risk of electrocu-
tion and the relatively low cost of a new power supply.
4. A. By definition, a serial cable carries only one bit of data at a time.
5. D. All of these are types of IDE. ATA-2 and EIDE are the same thing—a rather dated but still
useful version of the ATA standard. ATAPI is a non-hard-disk type of IDE device.
6. B. UltraDMA/66 requires a special ribbon cable with extra wires to cut down on crosstalk.
It does not require Cable Select to be in use, and it does not require specific operating system
support because it operates at a lower level than the OS.
7. B. If there is a Single setting, it should be used. Otherwise use Master. Slave is never appropri-
ate for a single drive. There is no such jumper setting as Boot.
8. A. Active termination uses voltage regulators. Passive termination uses resistors. High-byte
termination is a specialty type that terminates only half of the bytes; it’s used to transition
between a wide and a narrow device on the same chain.
9. B. Because it is an older PC, its IDE interface probably does not support UltraATA/100, so add-
ing an expansion board would be the next step. Repartitioning or reformatting would make no
difference. Using a PIO mode in BIOS could actually impede the drive’s performance.
10. C. ATZ is a reset command. ATH0 hangs up. ATM0 turns off the speaker. ATDT dials whatever
number follows it.
11. C. Discolored areas on the board are often caused by overheating. This can be the result of
power surges or overclocking.
12. B. The red stripe on the cable indicates pin 1.
13. B. Digital Visual Interface (DVI) connectors can be used to connect display devices to PCs.
14. C. The Disk Management utility can be used in Windows XP to format drives.
15. A. ATA-7 supports UltraDMA/133.
16. A, B, C. SCSI-2 uses a 25-, 50-, or 68-pin female DB-style connector.
17. B. SCSI internal cabling uses a 50-wire ribbon cable with several keyed connectors.
4831x.book Page 136 Tuesday, September 12, 2006 11:59 AM
Answers to Review Questions
137
18. D. The correct driver is needed in order to assure the new display device works as
it should.
19. B. Every computer has a diagnostic program built into its BIOS called the power-on self-test
(POST).
20. A, D. Heat sinks and fans are commonly used to cool components within a PC.
4831x.book Page 137 Tuesday, September 12, 2006 11:59 AM
4831x.book Page 138 Tuesday, September 12, 2006 11:59 AM
Chapter
3
Understanding
Laptops and
Portable Devices
THE FOLLOWING COMPTIA A+ ESSENTIALS
EXAM OBJECTIVES ARE COVERED IN THIS
CHAPTER:
2.1 Identify the fundamental principles of using laptops and
portable devices
Identify names, purposes and characteristics of
laptop-specific:
Form factors such as memory and hard drives
Peripherals (e.g. docking station, port replicator and
media / accessory bay)
Expansion slots (e.g. PCMCIA I, II and III, card and
express bus)
Ports (e.g. mini PCI slot)
Communication connections (e.g. Bluetooth, infrared,
cellular WAN, Ethernet)
Power and electrical input devices (e.g. auto-switching
and fixed-input power supplies, batteries)
LCD technologies (e.g. active and passive matrix,
resolution such as XGA, SXGA+, UXGA, WUXGA,
contrast radio, native resolution)
Input devices (e.g. stylus / digitizer, function (Fn)
keys and pointing devices such as touch pad, point
stick / track point)
Identify and distinguish between mobile and desktop
motherboards and processors including throttling,
power management and WiFi
4831xc03.fm Page 139 Thursday, September 14, 2006 3:11 PM
2.2 Install, configure, optimize and upgrade laptops and
portable devices
Configure power management
Identify the features of BIOS-ACPI
Identify the difference between suspend, hibernate
and standby
Demonstrate safe removal of laptop-specific hardware
such as peripherals, hot-swappable devices and non-
hot-swappable devices
2.3 Identify tools, basic diagnostic procedures and
troubleshooting techniques for laptops and portable
devices
Use procedures and techniques to diagnose power
conditions, video, keyboard, pointer and wireless card
issues, for example:
Verify AC power (e.g. LEDs, swap AC adapter)
Verify DC power
Remove unneeded peripherals
Plug in external monitor
Toggle Fn keys
Check LCD cutoff switch
Verify backlight functionality and pixilation
Stylus issues (e.g. digitizer problems)
Unique laptop keypad issues
Antenna wires
2.4 Perform preventative maintenance on laptops and
portable devices
Identify and apply common preventative maintenance
techniques for laptops and portable devices, for example:
cooling devices, hardware and video cleaning materials,
operating environments including temperature and air
quality, storage, transportation and shipping
4831xc03.fm Page 140 Thursday, September 14, 2006 3:11 PM
Just 10 to 15 years ago, portable computers were luxuries that
were affordable to only the wealthy or to the select few business-
people who traveled extensively. As with all other technologies,
though, portable systems have gotten smaller, lighter (more portable), more powerful, and less
expensive. Because the technology and price disparity between the two platforms has
decreased significantly, more laptops than desktops are now sold every year.
Every indication is that the movement toward mobile computing will continue, so you definitely
need to be well versed in portable technologies, which contain both nifty features and frustrating
quirks. For this discussion, assume that a
portable computer
is any computer that contains all the
functionality of a desktop computer system but is portable. Most people define
portable
in terms
of weight and size. So we can discuss things on the same level, let’s define
portable
as less than 20
pounds and smaller than an average desktop computer.
Most portable computers fall into one of three categories: luggable, laptop, or PDA.
The original portable computers were hardly portable, hence the unofficial term “luggable.”
They were the size of a small suitcase and could weigh 50 pounds. Not only were they greatly infe-
rior to desktops in technology, they were also outrageously expensive. It’s no wonder few people
purchased them. Compaq, Kaypro, and Osborne made some of the first luggable computers.
Laptops were the next type of portable computer. They contain a built-in keyboard, pointing
device, and LCD screen in a clamshell design. They are also called
notebook
computers because
they resemble large notebooks. Most portable computers in use today are laptop computers.
The final type of portable computer, which has really taken off in the last 10 years, is the
palmtop computer, also known as a personal digital assistant (PDA). These computers are
designed to keep the information you need close by so you can access it whenever you need it.
There are two different approaches to the PDA. Pen-based assistants are basically small digital
notepads that use a stylus and handwriting-interpretation software to perform operations.
The Palm series of PDAs and HP iPAQ are two examples of this type of PDA.
The other type of PDA is known as a
handheld PC (HPC).
These are basically shrunken lap-
tops. HPCs run an operating system known as Windows Mobile (the most popular previous
mobile version was Windows CE). Windows Mobile is basically Windows XP, shrunk to fit
into the limited RAM of the HPC. Instead of using a mouse to point to the icons and menus
in Windows Mobile, you use a stylus on the HPC’s touch-sensitive screen or a thumbwheel on
the side of the device. The RIM BlackBerry is the most common handheld PC.
Many portable computers now also incorporate cell phone features as well. The line
between mobile computing and mobile communication has definitely blurred, and we’ll likely
see a continuation of this technology consolidation for years to come.
In this chapter, you will learn about laptop computer architecture and how it differs from
desktops, as well as installing and configuring laptop hardware, troubleshooting laptops, and
performing preventative maintenance on laptop computers.
4831xc03.fm Page 141 Thursday, September 14, 2006 3:11 PM
142
Chapter 3
Understanding Laptops and Portable Devices
Understanding Laptop Architecture
Laptops are similar to desktop computers in architecture in that they contain many parts that
perform similar functions. However, the parts that make up a laptop are completely different
from those in desktop computers. The obvious major difference is size; laptops are space-chal-
lenged. Another primary concern is heat. Restricted space means less airflow, meaning parts
can heat up and overheat faster.
To overcome space limitations, laptop parts are physically much smaller and lighter, and
they must fit into the compact space of a laptop’s case. (It might not sound like much, but there
really is a major difference between a 4.5 pound laptop and a 5.5 pound laptop if you’re car-
rying it around in its case with a shoulder strap all day.) Also, laptop parts are designed to con-
sume less power and to shut themselves off when not being used (although many desktops
have components that go into a low-power state when not active, such as video circuitry).
Finally, most laptop components, especially the motherboard, are proprietary—the LCD
screen from one laptop will not necessarily fit on another.
In this section, you will learn about the various components that make up laptops and how
they differ from desktop computer components. If you don’t remember exactly what each com-
ponent does, it may help you to refer back to Chapter 1 occasionally as you read this chapter.
Laptops vs. Desktops
If you’ve ever shopped for a laptop, you have no doubt noticed that the prices of desktop PCs
are often quite a bit lower than for notebook computers, yet they are faster and more power-
ful. If you’ve ever wondered what makes a laptop so much different than a PC, here are the
primary differences between laptops and desktops:
Portability
This is probably the most obvious difference. Laptops are designed to be porta-
ble. They run on batteries, so you aren’t tied to one spot at home or at the office. Networking
options are available that allow you to connect to a network wirelessly and do work from just
about anywhere, including malls, airports, Starbucks, and so on. As anyone who’s tried to
bring their full-tower PC to a LAN party can tell you, desktops just aren’t that portable.
Cost
Laptops cost more—sometimes as much as 60 to 80 percent more—than desktop com-
puters with similar features. The primary reason is that portability requires small components
and unique proprietary designs for those components so they fit into the small size necessary.
Miniature versions of components cost more money than standard-size (desktop) versions.
Performance
By and large, laptops are always going to lose out somewhere in the perfor-
mance department. Compromises must often be made between performance and portability,
and considering that portability is the major feature of a laptop, performance is what usually
suffers. While it is possible to have a laptop with comparable performance to a desktop, the
amount of money one would have to spend for a “desktop replacement” laptop is consider-
able. This is not to say that a laptop can’t outperform a desktop, it’s just that the “bang for
the buck” factor is higher in a desktop.
4831xc03.fm Page 142 Thursday, September 14, 2006 3:11 PM
Understanding Laptop Architecture
143
Expandability
Because desktop computers were designed to be modular, their capabilities
can be upgraded quite easily. It is next to impossible to upgrade the processor or motherboard
on most laptops. Other than memory and hard drives, most laptop upgrades consist of adding
an external device though one of the laptop’s ports, such as a USB port.
Quality of Construction
Considering how much abuse laptops get, it is much more impor-
tant that the materials used to construct the laptop case and other components be extremely
durable. Not that it isn’t important in a desktop—but it’s more important in a laptop.
Now that we’ve illustrated the primary differences between laptops and desktops, let’s
examine the parts of the laptop and what they do.
Laptop Case
A typical laptop case is made up of three main parts: the
display
(usually an LCD display), the
case frame
(the metal reinforcing structure inside the laptop that provides rigidity and strength
and that most components mount to), and the laptop’s
case
itself (the plastic cover that sur-
rounds the components and provides protection from the elements). The cases are typically
made of some type of plastic (usually ABS plastic or ABS composite) to provide for light weight
as well as strength.
A few notebooks have cases made of a strong, lightweight metal, such as alu-
minum or titanium. However, the majority of laptop cases are made of plastic.
Laptop cases are made in what is known as a
clamshell design
. In a clamshell design, the
laptop has two halves, hinged together at the back. Usually, the display is the top half and
everything else is in the bottom half.
Occasionally, part of the laptop’s case will crack and need to be replaced. However, you
usually can’t just replace the cracked section. Most often, you must remove every component
from inside the laptop’s case and swap the components over to the new case. This is a labor-
intensive process, because the screws in laptops are often very small and hard to reach. Often,
Building Your Own
You can’t build your own laptop. Because laptop components are designed to fit exacting
specifications to fit properly inside the notebook, there generally are no universal mother-
boards, video boards, and so on for laptops. Memory and hard drives are the exception. You
can get different brands of memory and hard drives for laptops, but you can’t buy a mother-
board from one company and the video circuitry from another. Even things as mundane as
floppy drives are designed to work only with a specific model.
4831xc03.fm Page 143 Thursday, September 14, 2006 3:11 PM
144
Chapter 3
Understanding Laptops and Portable Devices
repairing a cracked case may cost several hundred dollars in labor alone. Most times, people
who have cracked laptop cases wait until something else needs to be repaired before having the
case fixed. I have a crack on my laptop that I haven’t bothered to fix for this very reason.
Motherboards and Processors
As with desktop computers, the motherboard of a laptop is the backbone structure to which
all internal components connect. However, with a laptop, almost all components are inte-
grated onto the motherboard, including onboard circuitry for the serial, parallel, USB, IEEE
1394, video, expansion, and network ports of the laptop.
Laptop Motherboards
The primary differences between a laptop motherboard and a desktop motherboard are the
lack of standards and the much smaller form factor. As mentioned earlier, most motherboards
are designed along with the laptop case so that all the components will fit inside. Therefore,
the motherboard is mostly proprietary. Figure 3.1 shows an example of a laptop motherboard.
FIGURE 3.1
A laptop motherboard
To save space, components of the video circuitry (and possibly other circuits as well) are
placed on a thin circuit board that connects directly to the motherboard. This circuit board is
often known as a
daughterboard
.
Having components performing different functions (such as video, audio, and networking)
integrated on the same board is a mixed bag. On one hand, it saves a lot of space. On the other
hand, if one part goes bad, you have to replace the entire board, which is more expensive than
just replacing one expansion card.
Laptop Processors
Just like in desktop computers, the processor is the brain of the computer. And just like every-
thing else, compared to desktop hardware laptop hardware means a smaller device that isn’t
quite as powerful. At the time of this writing, the fastest laptop processor readily available is
2.26 GHz, whereas you can get desktop processors at nearly 4 GHz.
4831xc03.fm Page 144 Thursday, September 14, 2006 3:11 PM
Understanding Laptop Architecture
145
As mentioned earlier (and will be mentioned over and over until you’re sick of hearing it),
laptops have less space and heat is a major concern. Add to that the fact that processors are
the hottest-running component, and you can see where cooling is a major concern. To help
combat this heat problem, laptop processors are engineered with the following features:
Laptop processors mount to the motherboard differently than desktop processors.
Nearly
all desktop processors mount using pin connectors, while a few others use card edge connec-
tors. Pins and sockets are big and bulky, meaning they’re not our friends. Laptop processors
are generally either soldered directly to the motherboard or attached using the Micro-FCBGA
(Flip Chip Ball Grid Array) standard, which uses balls instead of pins. In most cases, this
means that the processor cannot be removed, meaning no processor upgrades are possible.
Laptop processors run at lower voltages and clock speeds than desktop processors.
Two
ways to combat heat are to slow the processor down (run it at a lower speed) or give it less juice
(run it at a lower voltage). Again, performance will suffer vs. a desktop processor, but lowering
heat is the goal here. In addition, most laptops will run in a lower power state when on battery
power instead of plugged into an AC outlet, in an effort to extend the life of the battery.
Laptop processors have active sleep and slow-down modes.
This is also known as proces-
sor
throttling
. The motherboard works closely with the operating system to determine if the
processor really needs to run at full speed. If it doesn’t, it’s slowed down to save energy and
heat. When more processing power is needed, the CPU is throttled back up.
One of the best features of many laptop processors is that they include built-in wireless net-
working. By far the most common laptop processor is the
Pentium M
chip made by Intel. The
Pentium M comprises three separate components:
The Mobile Intel Express chipset (such as the Mobile Intel 915GM Express or the Mobile
Intel 910GML), which is the graphics memory controller hub
The Intel/PRO Wireless Network Connection, providing an integrated wireless LAN
connection
The Intel Centrino chipset, which is the “brain” of the chipset, designed to run on lower
power than the desktop processor
Some portable computers will simply use stripped-down versions of desktop processors
such as the Pentium 4. While there’s nothing wrong with this, my feeling is that if there’s some-
thing specifically designed for notebooks, I would rather use that than something that’s been
retrofitted for notebook use.
Memory
Notebooks don’t use standard desktop computer memory chips, because they’re too big. In
fact, for most of the history of laptops there were no standard types of memory chips. If you
wanted to add memory to your laptop, you had to order it from the laptop manufacturer. Of
course, because you could get memory from only one supplier, you got the privilege of paying
a premium over and above a similar-sized desktop memory chip.
4831xc03.fm Page 145 Thursday, September 14, 2006 3:11 PM
146
Chapter 3
Understanding Laptops and Portable Devices
However, there are now two common types of laptop memory package: SoDIMM and the
MicroDIMM. To see what kind of memory your laptop uses, check either the manual or the
manufacturer’s website. You can also check third-party memory producers’ websites (such as
www.crucial.com
).
Interestingly, the Apple iMac desktop uses SoDIMMs.
SoDIMM
The most common memory form factor for laptops is called a
Small Outline DIMM (SoDIMM)
.
They’re much smaller than standard DIMMs, measuring about 67 millimeters (2.6 inches) long
and 32 millimeters (1.25 inches) tall. SoDIMMs are available in a variety of configurations,
including 32-bit (72-pin) and 64-bit (144-pin EDO, 144-pin SDRAM, 200-pin DDR, and
200-pin DDR2) options. Figure 3.2 shows an example of the 144-pin variety.
Just like with desktop computers, make sure the SoDIMM you want to put into the laptop
is compatible with the motherboard. The same standards that apply to desktop memory com-
patibility apply to laptops, such as PC2700, PC3200, DDR2, and so forth. Current DDR and
DDR2 technologies allow you to get SoDIMMS up to 2GB in size.
FIGURE 3.2
144-pin SoDIMM
4831xc03.fm Page 146 Thursday, September 14, 2006 3:11 PM
Understanding Laptop Architecture
147
MicroDIMM
The newest and smallest RAM form factor is the
MicroDIMM
. The MicroDIMM is an
extremely small RAM form factor. In fact, it is over 50 percent smaller than a SoDIMM—only
about 45.5 millimeters (about 1.75 inches) long and 30 millimeters (about 1.2 inches, a bit big-
ger than a quarter) wide. Another major difference is that the MicroDIMM does not have any
notches on the bottom. Figure 3.3 shows a 172-pin MicroDIMM.
It was designed for the ultralight and portable subnotebook style of computer. MicroDIMMs
have either 144 pins or 172 pins and are similar to DIMMs in that they are 64-bit memory mod-
ules. They also have less capacity (currently topping out at 1GB) and cost a bit more than
SoDIMMs.
FIGURE 3.3
172-pin MicroDIMM
Storage
Nearly all laptops have a hard drive, but not all laptops have both a floppy drive and a CD-
ROM drive. Many times there just isn’t room for both, and considering floppy drives are prac-
tically obsolete, why have one anyway? Often there is a
drive bay that can be used to hold
either drive. If this drive bay exists, users generally keep the CD-ROM drive installed most of
the time and leave out the floppy drive. In some cases, the floppy drive is an external device
that you connect with a special cable to a proprietary connector. Figure 3.4 shows an example
of one of these connectors, and Figure 3.5 shows an example of a laptop floppy drive. Notice
how thin the floppy drive is and how compact the electronics are.
FIGURE 3.4 A proprietary floppy connector
4831xc03.fm Page 147 Thursday, September 14, 2006 3:11 PM
148
Chapter 3
Understanding Laptops and Portable Devices
FIGURE 3.5 A laptop floppy drive
Laptops don’t have the room for the full-size 3
1
/
2
-inch hard drives that desktop computers
use. Instead, they use a small-form-factor hard drive that’s only 2
1
/
2
inches wide and less than
1
/
2
inch thick! These drives share the same interface technologies (usually ATA and UDMA) as
desktop computers; however, they use smaller connectors. Figure 3.6 shows an example of a
standard hard drive compared to a laptop hard drive.
FIGURE 3.6 A desktop hard drive compared to a laptop hard drive
Laptop CD-ROM drives come in many different kinds, just like desktop CD-ROM drives.
You can get standard CD-ROM, CD-R, CD-RW, DVD, DVD-RAM, and (probably the most
popular option) CD-RW/DVD-ROM drives that can both burn CDs and play DVD movies.
It is also possible to get CD-ROM drives that manage to cram a floppy drive into the same
drive bay along with the CD-ROM.
Often, these drives are very small in form factor (usually less than
1
/
2
inch high). Figure 3.7
shows an example of a desktop CD-ROM drive compared to a laptop CD-ROM drive. Note
that the laptop drive is very small, but it has all the functionality of a desktop unit. The drive
mechanism and circuits have all been miniaturized to save space. The functionality is basically
the same, but the cost is higher. Any time a component’s functionality remains the same while
its size decreases, you will notice an increase in price over the standard-size item.
4831xc03.fm Page 148 Thursday, September 14, 2006 3:11 PM
Understanding Laptop Architecture
149
FIGURE 3.7 A desktop CD-ROM drive compared to a laptop CD-ROM drive
CD or DVD burners are great to have on laptops as backup devices. Simply
copy the contents of the hard drive (or just important files) to the CD or DVD,
and store the disc in a safe location.
Displays
Portable computers were originally designed to be compact versions of their bigger brothers. They
crammed all the components of the big desktop computers into a small, suitcase-like box called
(laughably) a portable computer. No matter what the designers did to reduce the size of the com-
puter, the display remained as large as the desktop version’s. That is, until an inventor found that
when he passed an electric current through a semicrystalline liquid, the crystals aligned themselves
with the current. It was found that by combining transistors with these liquid crystals, patterns
could be formed. These patterns could represent numbers or letters. The first application of these
liquid crystal displays (LCDs) was the LCD watch. It was rather bulky, but it was cool.
As LCD elements got smaller, the detail of the patterns became greater, until one day some-
one thought to make a computer screen out of several of these elements. This screen was very
light compared to computer monitors of the day, and it consumed little power. It could easily
be added to a portable computer to reduce the weight by as much as 30 pounds. As the com-
ponents got smaller, so did the computer, and the laptop computer was born.
LCDs are not just limited to laptops; desktop versions of LCD displays are available as well.
They use the same technologies as their laptop counterparts but on a much larger scale. Plus,
these LCDs are available in either analog or digital interfaces for the desktop computer. The
analog interface is exactly the same as the interface used for most monitors. All digital signals
from the computer are converted into analog signals by the video card, which are then sent
along the same 15-pin connector as a monitor. Digital LCDs, on the other hand, are directly
driven by the video card’s internal circuitry. They require the video card to be able to support
digital output (through the use of a Digital Visual Interface, or DVI, connector). The advan-
tage is that since the video signal never goes from digital to analog, there is no conversion-
related quality loss. Digital displays are generally sharper than their analog counterparts.
4831xc03.fm Page 149 Thursday, September 14, 2006 3:11 PM
150
Chapter 3
Understanding Laptops and Portable Devices
LCD Technologies
Two major types of LCD displays are used today: active-matrix screen and passive-matrix
screen. The main differences lie in the quality of the image. However, both types use lighting
behind the LCD panel to make the screen easier to view:
Active matrix An active-matrix screen works in a similar manner to the LCD watch. The
screen is made up of several individual LCD pixels. A transistor behind each pixel, when
switched on, activates two electrodes that align the crystals and turn the pixel dark. This type
of display is very crisp and easy to look at. The major disadvantage of an active-matrix screen
is that it requires large amounts of power to operate all the transistors. Even with the backlight
turned off, the screen can still consume battery power at an alarming rate. Most laptops with
active-matrix screens can’t operate on a battery for more than two hours.
Passive matrix Within the passive-matrix screen are two rows of transistors: one at the top,
another at the side. When the computer’s video circuit wants to turn on a particular pixel (turn
it black), it sends a signal to the x- and y-coordinate transistors for that pixel, thus turning
them on. This then causes voltage lines from each axis to intersect at the desired coordinates,
turning the desired pixel black. Figure 3.8 illustrates this concept.
The main difference between active matrix and passive matrix is image quality. Because the
computer takes a millisecond or two to light the coordinates for a pixel in passive matrix dis-
plays, the response of the screen to rapid changes is poor, causing, for example, an effect
known as submarining: On a computer with a passive-matrix display, if you move the mouse
pointer rapidly from one location to another, it will disappear from the first location and reap-
pear in the new location without appearing anywhere in between.
FIGURE 3.8 A passive-matrix display
To light
this pixel . . .
we send current on these wires.
4831xc03.fm Page 150 Thursday, September 14, 2006 3:11 PM
Understanding Laptop Architecture
151
LCD Resolutions
The concept of resolution on an LCD screen is similar to the concept on a standard CRT mon-
itor. Resolution is measured by the number of pixels used to draw the screen. If you use more
pixels, you can display a higher the level of detail. Typically, you will see resolution noted like
this: 1024 × 768 or 1280 × 1024. At 1024 × 768, the screen will display 1024 rows of pixels 768
columns wide, for a total of 786,432 pixels. At 1280 × 1024, the number of pixels increases to
1,310,720—nearly double the pixels for what doesn’t sound like much of a difference! As you
might expect, it requires better technology and more video memory to display higher resolutions.
One of the best features about LCD technology is the flexibility to play with the aspect ratio
of the screen. The aspect ratio gives a proportion of how wide the screen is versus how tall it
is (specifically, it’s the image width divided by image height). Basically, it’s another way of
looking at resolution. Standard desktop monitors and televisions have a 4:3 ratio. High-
definition televisions (and many new monitors) use 16:9, and widescreen televisions and
monitors are often 16:10.
There are over 20 different video standards that various LCD monitors support, including
XGA, SXGA+, UXGA, and WUXGA.
XGA
The Extended Graphics Array (XGA) was introduced in 1990 by IBM. It’s often thought of as
a synonym for the 1024 × 768 standard, but it can really support more than just that resolution.
XGA was rather limited in that it could support only 65,536 colors in 800 × 600 resolution, and
256 colors in 1024 × 768 resolution. The XGA-2 upgrade provided true color (16 million)
options for both resolutions, as well as better refresh rates for monitors.
SXGA+
Common on 14- and 15-inch LCD laptop displays, the Super eXtended Graphics Array plus
(SXGA+) standard has a resolution of 1400 × 1050 pixels. It’s a version of SXGA, which is used
in many 17-inch to 19-inch desktop LCD monitors. SXGA+ became popular starting in 2004.
UXGA and WUXGA
Ultra eXtended Graphics Array (UXGA) was the next step in technology after the SXGA stan-
dard. It has a resolution of 1600 × 1200. For Dell computers, the standard is called UGA.
If you take a digital video standard and make it widescreen, you need to call it something
else. Hence, Widescreen UXGA (WUXGA). It’s the same technology as UXGA, with a reso-
lution of 1920 × 1200 and a 16:10 aspect ratio.
Some of the newest standards take digital video to an extremely high level. They include
Quad eXtended Graphics Array (QXGA) and its derivatives, which have four times as many
pixels as XGA, and Hex eXtended Graphics Array (HXGA) and its derivatives, which has 16
times as many pixels as XGA. One of the newest flavors, Wide Hex Ultra eXtended Graphics
Array (WHUXGA), can support resolutions up to 7680 × 4800 pixels (37 million total) at
a16:10 aspect ratio.
4831xc03.fm Page 151 Thursday, September 14, 2006 3:11 PM
152
Chapter 3
Understanding Laptops and Portable Devices
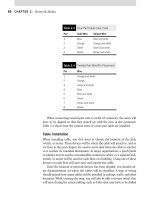
Table 3.1 highlights the some LCD video standards, their standard resolutions, and their
aspect ratio:
Keeping track of all the new developments in digital video can be a tedious and mind-
blowing task unless you’re immersed in the technology every day. Most of the time, knowing
the specifics of the standards does you good only if you’re being tested on it. For the “real
world” times, just know that there are different standards. Also, be able to find differences if
you need to on the Web when you’re laptop shopping.
Native Resolution
One of the peculiarities of LCD displays is that they have a single fixed resolution, known as
the native resolution. As opposed to CRT monitors, which can change resolution to match the
frequency emitted by the video signal, LCD monitors are fixed.
What this means in practical terms is that if you have an LCD monitor that isn’t totally
compatible with your video card, you could see some distortion of the image on the screen.
This is because the LCD monitor might be forced to try to scale the image (called interpola-
tion) to fit it on the screen. Depending on how bad the fit is, you might see distortion. This is
particularly noticeable when dealing with disparate aspect ratios, like 4:3 (which would be
16:12) versus 16:10. The monitor will try to adjust the picture accordingly, but there isn’t a
true, even mapping of pixels, and you will probably have distortion.
Normally this isn’t much of an issue with laptops, because the displays are usually propri-
etary to one manufacturer or line of laptops. If you replace one LCD panel with another, it’s
likely to have the same aspect ratio. It tends to be more of a problem with desktops, where the
monitor is easily exchangeable.
Contrast Ratio
The contrast ratio is the measure of the ratio between the lightest color and the darkest color
the screen is capable of producing. One of the original problems with LCD displays, and a con-
tinuing problem with cheaper versions, is that they have low ratios. A display with a low ratio
TABLE 3.1 LCD Video Standards
Name Resolution Ratio
Extended Graphics Array (XGA) 800 × 600
1024 × 768
4:3
4:3
Super eXtended Graphics Array plus (SXGA+) 1400 × 1050 4.3
Ultra eXtended Graphics Array (UXGA) 1600 × 1200 4.3
Widescreen Ultra eXtended Graphics Array (WUXGA) 1920 × 1200 16:10
4831xc03.fm Page 152 Thursday, September 14, 2006 3:11 PM
Understanding Laptop Architecture
153
won’t show a “true black” very well, and the other colors will look washed out when you have
a light source nearby. Try to use the device in full sunshine, and you’re not going to see much
of anything. Also, lower contrast ratios mean that you’ll have a harder time viewing images
from the side as opposed to being directly in front of the display.
A common myth is that too much contrast is a bad thing. Not true. You might
pay more for higher contrast ratios, but depending on where you use your
laptop, the investment might be worth it.
Ratios for LCD monitors typically start out around 500:1 or 600:1, and 800:1 is common
as well. Higher-end displays claim ratios of 1200:1 or higher.
One caveat to contrast ratios is that a manufacturer can boost the ratio simply by increasing
how bright the monitor can go. This doesn’t do anything to help the display of darker colors,
though. All it will do is wash out the lighter colors and make white seem like it’s glowing,
which is hardly useful to you, the monitor viewer. So while the contrast ratio can be a good
thing to consider, don’t just take it at face value. Always compare displays to see which one
works better for the situation in which you use it.
LCD Maintenance
To keep the quality of the image on an LCD the best, the screen must be cleaned often. Liquid crystal
displays are typically coated with a clear plastic covering. This covering commonly gets dirtied by
fingerprints as well as a generous coating of dust. The best way to clean the LCD lens coating is to
wipe it off occasionally with a damp cloth. Doing so will ensure that the images stay crisp and clear.
A laptop’s display takes the most power to run. It is also the device that drains the battery
the fastest when the laptop is running on batteries only.
Because the technology behind LCD displays is complex, there are almost no service pro-
cedures for the display in a laptop. Most often, when the display is broken, it can be removed
by a service technician (usually the display is held in with only a few screws and a plastic bezel)
and exchanged with the manufacturer for a new one. This procedure may be under warranty
(depending on the length of the manufacturer’s warranty).
One particular sore spot with laptop owners and manufacturers is the phenomenon known
as bad pixels. Most higher-end laptops use active-matrix displays (they have a transistor for
each pixel on the screen). With these types of displays, small defects sometimes occur during
the manufacturing process, causing a few transistors in the display to not function. The cor-
responding pixels on the screen are completely black. To put this in perspective, a 15-inch lap-
top display (at a resolution of 1028 × 768 pixels) has 789,504 pixels. If one of them is black,
you may not notice it (unless it’s right in the center of your field of vision).
Manufacturers have warranty stipulations that indicate they will replace the display only
if a certain number of pixels go bad. Manufacturers usually consider a display to be fully oper-
ational if 99.999 percent of its pixels are operating. On the previously mentioned 1028 × 768
display, that would mean the manufacturer would replace the screen only if eight of the pixels
were bad. This figure is actually pretty good—some manufacturers indicate in their warranties
that 99.99 percent is good enough (meaning approximately 79 pixels would have to be bad
before they would replace the display).
4831xc03.fm Page 153 Thursday, September 14, 2006 3:11 PM