Adobe photoshop for intermediate users
Bạn đang xem bản rút gọn của tài liệu. Xem và tải ngay bản đầy đủ của tài liệu tại đây (10.31 MB, 89 trang )
Steve Bark
Adobe Photoshop for Intermediate Users
Download free ebooks at bookboon.com
2
Adobe Photoshop for Intermediate Users
© 2012 Steve Bark & Ventus Publishing ApS
ISBN 978-87-403-0089-5
Download free ebooks at bookboon.com
3
Adobe Photoshop for Intermediate Users
Contents
Contents
About the Author
6
Introduction
7
1
Adobe Bridge and Mini Bridge
8
2
Camera Raw
18
3
Transformations
25
4
Smart Objects
34
5
Layer Styles
38
6
Vector Tools and the Paths Panel
45
7
he Brush Tool & Brush Panel
54
8
Layer Masks and Clipping Masks
60
9
he Cloning and Healing Tools
70
10
Selections
74
Download free ebooks at bookboon.com
4
Adobe Photoshop for Intermediate Users
Contents
11
Image & Canvas Resizing
80
12
he Filter Gallery
84
13
More on Layers
87
Download free ebooks at bookboon.com
5
Adobe Photoshop for Intermediate Users
About the Author
About the Author
Ater leaving school in Sheield, UK, Steve worked in the print industry for 10 years before being made redundant. He
decided to return to education and completed courses in many subjects including Information Technology, Business and
Finance, Sound Engineering and Music Production, Science and a BSc. in Biomedical Science.
Ater graduating, Steve had several jobs in various scientiic ields including immunology and developmental genetics,
during which time he developed a keen interest in digital imaging which progressed into an interest in creative Photography.
Ater his current contract had expired, he undertook a course in Photoshop Artistry at the University of Sheield. He
soon realised that he had already amassed a great deal of knowledge in this ield and knew more about image editing
and processing than the lecturer. he lecturer asked if Steve would take over in teaching the course as he was leaving
for another position. He contacted the University and was given a position as an associate lecturer teaching Photoshop
Artistry, Computer Graphics and Advanced Digital Imaging.
Steve taught at the University of Sheield for three years and then decided to pursue a career in providing bespoke training
and consultancy in Photoshop and Digital Photography. He has continued in this role for the past seven years.
Steve remains an avid consumer of knowledge and education and has completed over thirty online courses and has become
an Adobe Certiied Expert in Photoshop and a respected Photographer in his own right.
Download free ebooks at bookboon.com
6
Adobe Photoshop for Intermediate Users
Introduction
Introduction
his is the second book in this series, written to help develop essential skills in using Adobe Photoshop. his book is for
people who have an understanding of Photoshop’s basic functions and would like to build on that knowledge.
We will build on the basic skills covered in the previous book and we will also be taking a look at several new tools,
adjustments, editing methodology and worklow options. We will also cover two ancillary programs that ship as part of
the Photoshop package – Adobe Bridge and Adobe Camera Raw.
Photoshop is a large and complex program, and as such, requires practice and patience to develop the skills required to be
an efective user. I encourage you to use these three books as a starting point and go on to develop your own worklows
and techniques.
Download free ebooks at bookboon.com
7
Adobe Photoshop for Intermediate Users
Adobe Bridge and Mini Bridge
1 Adobe Bridge and Mini Bridge
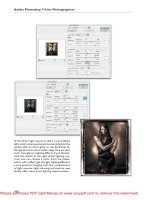
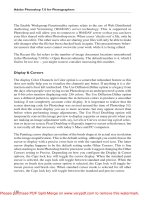
Before we get to Photoshop, it is important to take a minute to explore the image editing worklow, ig1.1. When you
install Photoshop, a second program called Adobe Bridge is also installed automatically, along with an editing plugin
called Adobe Camera Raw (ACR). Adobe Bridge acts as a digital light-table and allows you to organise, categorize, ilter
and edit all of the media on your computer. From Adobe Bridge it is possible to choose to open a document with any
of the Adobe suite of programs that support that ile type. If the image is a raw, jpg or tif (lattened) ile, it can also be
opened in Adobe Camera Raw.
Fig. 1.1 recommended image editing worklow
In many cases all of the editing for a particular image can be performed in the Camera Raw plugin (see the section on
Camera Raw). If further editing is needed, or you wish to print an image, you may then choose to open the image in
Photoshop.
Adobe Bridge can be opened from the same program folder as Photoshop. If you already have Photoshop open, you can
access Bridge or Mini Bridge by clicking on one of the following icons
located in the top let corner.
Download free ebooks at bookboon.com
8
Adobe Photoshop for Intermediate Users
Adobe Bridge and Mini Bridge
Fig. 1.2 a full screen shot of the Adobe Bridge
Download free ebooks at bookboon.com
9
Adobe Photoshop for Intermediate Users
Adobe Bridge and Mini Bridge
Bridge Panels and Workspaces
As you can see in ig 1.2, the Adobe Bridge contains many tabbed panels. hese panels may be opened or closed from the
Window menu. As with Photoshop, you can drag the panel tabs into new locations or groupings and save the new layout
as a custom workspace. To save a Workspace, go to the Window menu > Workspace and choose the New Workspace
option, ig 1.3.
Fig 1.3 save your Workspace in the Window menu
Adobe Bridge comes with many preset Workspaces, each one designed with a particular operation in mind, as you can
see from their names, ig 1.4.
Fig 1.4 you can switch between several preset Workspaces by clicking on its name in the options panel.
Download free ebooks at bookboon.com
10
Adobe Photoshop for Intermediate Users
Adobe Bridge and Mini Bridge
Useful panels include:
v;ミWノ"d;マW"
E; ラ キ W "
v;ミWノ"E ミI キラミ"
}; W" エW"ノラI; キラミ "ラa";ノノ" ラ " ラ ニ"aキノW "; "E; ラ キ W "aラ "
キIニ";ミS"W; ";IIW く"
エキ " ;ミWノ"キ " WS" ラ"ミ; キェ; W"aラノSW "ラミ" ラ "
Iラマ W "
エキ "キ ";" W " ラ W a ノ"aW; W";ミS"Wミ;HノW " ラ " ラ"テ "
エラ " ; キI ノ; "キマ;ェW く""Eラ "W ;マ ノW" ラ "マ; " キ エ" ラ"
aキノ W " ラ "SラI マWミ "H "S; Wが"I;マW ;" WSが" エ W "
WWSが"aキノW" Wが"ラ キWミ ; キラミ";ミS"マ;ミ "ラ エW "I キ W キ;""
ラ "I;ミ"I W; W"1ラノノWI キラミ " ラ"ェ ラ "IW ;キミ" W "ラa"
SラI マWミ " ラェW エW く""Eラ "W ;マ ノWが"I;マW ;" WSが"aキノW"
ミ;マWが" W; " エラ が" キSWラ";ミS";ミ エキミェ" エ; " ラ " キ エく"
ラ "I;ミ";ノ ラ"I W; W"}マ; "1ラノノWI キラミ く""7ラI マWミ " キノノ"
HW";SSWS"}マ; "1ラノノWI キラミ "H; WS"ラミ" WSWaキミWS"
I キ W キ;く"""
⁄ WS" ラ" ; W";ミS"H;Iニ "SラI マWミ く""
7キ ノ; " エW"1ラミ Wミ "ラa";"aラノSW "
v ラ キSW ";"v W キW "ラa" エW"SラI マWミ く"""
キW ";ノノ"ラa" エW"キミaラ マ; キラミ"; ラIキ; WS" キ エ";"
SラI マWミ "キミ" エキ " ;ミWノ"キミIノ Sキミェ"I;マW ;"ふ"; キaぶ"S; ;く"
# キェミ"[W ラ S " ラ"SラI マWミ " ラ"エWノ "aキノ W ";ミS"
ラ ェ;ミキ W" エWマく"
EラノSW "
Eキノ W "
"
1ラノノWI キラミ "
; ラ "
1ラミ Wミ "
v W キW "
cW ;S; ;"
[W
"
ラS "
"
Please click the advert
Fast-track
your career
Masters in Management
Stand out from the crowd
Designed for graduates with less than one year of full-time postgraduate work
experience, London Business School’s Masters in Management will expand your
thinking and provide you with the foundations for a successful career in business.
The programme is developed in consultation with recruiters to provide you with
the key skills that top employers demand. Through 11 months of full-time study,
you will gain the business knowledge and capabilities to increase your career
choices and stand out from the crowd.
London Business School
Regent’s Park
London NW1 4SA
United Kingdom
Tel +44 (0)20 7000 7573
Applications are now open for entry in September 2011.
For more information visit www.london.edu/mim/
email or call +44 (0)20 7000 7573
www.london.edu/mim/
Download free ebooks at bookboon.com
11
Adobe Photoshop for Intermediate Users
Adobe Bridge and Mini Bridge
Preferences
he Bridge Preferences can be found in the Edit Menu and are grouped according to function, ig 1.5.
Fig 1.5 the Adobe Bridge Preferences dialogue box.
Download free ebooks at bookboon.com
12
Adobe Photoshop for Intermediate Users
v WaW WミIW"F ラ
FWミW ;ノ"
Adobe Bridge and Mini Bridge
"
E ミI キラミ"
⁄ W "Nミ W a;IW"; W; ;ミIWが"1ノキIニ"0Wエ; キラ ";ミS"
E; ラ キ W "
}W "マ; "aキノW" キ Wく""7WaキミW"マW ;S; ;" ラ"HW" エラ ミ" キ エ"
エ マHミ;キノ "
キSWラ";ミS"# Sキラ" W キミェ "
1エララ W" エW" W"ラa"cW ;S; ;" エ; "マ; "HW" キW WS"キミ"
エW"cW ;S; ;" ;ミWノく"
[W ラ Sキミェ"ラ キラミ く"
7WaキミW"I ラマ"ミ;マW "aラ "Iラノラ "ノ;HWノ く"
# キェミ"SWa; ノ " ラェ ;マ " ラ" WIキaキI"aキノW" W "
エW"1;IエW"Iラミ ;キミ "SラI マWミ " W キW く""}W " エW"
1;IエW"ラ キラミ "ラ " ェW" エW"1;IエW" ラ"a WW" "エ; S"S キ W"
;IWく"
}W "}I キ " ラ" ミ"; ラマ; キI;ノノ " エWミ"IW ;キミ"1 W; キ W"
} キ W" ラS I "; W"ノ; ミIエWSく"
cキ IWノノ;ミWラ " W キミェ ";ミS"];ミェ ;ェW"ラ キラミ ""
#S ;ミIWS"ラ
"ラ キラミ く"
エ マHミ;キノ "
vノ; H;Iニ"
cW ;S; ;"
[W ラ S "
];HWノ "
EキノW"
W"# ラIキ; キラミ "
1;IエW"
};
"}I キ
"
#S ;ミIWS"
j
"
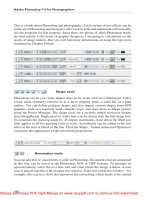
Labelling and Ranking Images
If you have a folder containing a large number of images, you can go through them and quickly assign a label or star
rating (ig 1.6) to the image so that you can use the iltering options to just select certain images. To assign a star rating,
click on the dots beneath the image or right click on the image in the Preview panel. You can also assign a star rating by
using the keyboard shortcut Cmd/Ctrl (Mac/PC) + 1-5. To assign a coloured label you may either right click on the image
in the Preview or Content panels (in the Labels submenu) and select the appropriate label, or use the keyboard shortcut
Cmd/Ctrl (Mac/PC) + 6-9. Both ratings and labels may also be assigned from the Label menu.
Fig 1.6 this image has been assigned 5 stars and red label.
Download free ebooks at bookboon.com
13
Adobe Photoshop for Intermediate Users
Adobe Bridge and Mini Bridge
Keywords and Filtering
Keywords are added to a document (or multiple documents) in the Keyword panel. You can add new keywords to the
list by clicking on the + icon at the bottom of the Keyword panel, ig 1.7. To apply a keyword to a document, select a
document or documents and then simply click in the box next to the keyword in the Keyword panel to associate that
word with your document, ig 1.7.
Keywords are embedded in the documents metadata and show up as tags in many utilities and programs. For example, if you
keyword and image and then post it to Flickr, the keywords will appear as tags and are a searchable feature of that image.
Fig 1.7 the Keyword panel
I have mentioned previously that you can use the Filter panel to ind speciic document based on labels. You can also
ilter your documents based on Keywords. If you select a group of documents or folders, any keywords assigned to those
documents will appear in the Keywords section of the Filter panel, ig 1.8. If you click on a keyword in the Filter panel
only the documents that have that keyword will appear in the contents window, all of the other documents will be hidden.
To remove the ilter, click on the keyword once again in the Filter panel.
Fig 1.8 the Keywords section of the Filter panel
Download free ebooks at bookboon.com
14
Adobe Photoshop for Intermediate Users
Adobe Bridge and Mini Bridge
The Collections Panel
Once you have iltered your documents and found the one you want, you may wish to save them as a Collection. A
Collection is created in the Collections panel by clicking on the
icon at the bottom of the panel. If you have document
selected, you will be asked if you wish to include them in the Collection. You can also create an Empty Collection folder
and simply drag the documents into it.
At the bottom of the Collections panel there is also an icon that allows you to create a Smart Collection. If you click on
the Smart Collection icon a dialogue box will appear that allows you to set certain criteria for documents that are to be
included in the Smart Collection, ig 1.9.
""
Please click the advert
You’re full of energy
and ideas. And that’s
just what we are looking for.
© UBS 2010. All rights reserved.
Fig 1.9 the Smart Collection dialogue box.
Looking for a career where your ideas could really make a difference? UBS’s
Graduate Programme and internships are a chance for you to experience
for yourself what it’s like to be part of a global team that rewards your input
and believes in succeeding together.
Wherever you are in your academic career, make your future a part of ours
by visiting www.ubs.com/graduates.
www.ubs.com/graduates
Download free ebooks at bookboon.com
15
Adobe Photoshop for Intermediate Users
Adobe Bridge and Mini Bridge
In ig 1.9 you can see that the Criteria for this smart Collection is to included documents that have “Charlotte” in the
ilename. Once a Smart Collection is set up, any subsequent documents that are added to the Source folder will be
automatically added to the Smart Collection. his is an extremely useful function, because you can use Smart Collections
for keeping all documents from a certain client together, or documents created with in a speciic time period, or any
other purpose that you require.
Mini Bridge
he Mini Bridge is a tabbed panel in Photoshop CS5 and later, ig 1.10. It is a quick ile browsing tool that ofers some
basic features of the full version of Bridge. To browse iles in Mini Bridge requires the full version of Bridge to be running
in the background. If you do not have Bridge already running the Mini Bridge will launch the program automatically if
you choose to “Browse Files”.
"
Fig 1.10 the Mini Bridge panel
Download free ebooks at bookboon.com
16
Adobe Photoshop for Intermediate Users
Adobe Bridge and Mini Bridge
here are four icons that run across the top let of the Content area. From let to right they are:
1. Select – Ofers a few selection features
2. Filter – Basic iltering functions mostly based on Star Ratings.
3. Sort – Sorting options.
4. Tools – Allows you to place iles in Photoshop or other Adobe products such as InDesign. You can also access
Please click the advert
useful Photoshop features such as “Merge to HDR” and “Photomerge”.
Download free ebooks at bookboon.com
17
Adobe Photoshop for Intermediate Users
Camera Raw
2 Camera Raw
It may oten be the case that you only need to make basic adjustments to your images. If so, you can perform nondestructive edits to your images in Camera Raw without even opening Photoshop.
Camera Raw was designed to make initial adjustments to Raw images before taking them into Photoshop, but it has grown
into a fairly comprehensive editing solution in its own right. If you are not a Photographer you may not have come across
Raw images before. In addition to capturing JPG and TIFF images, many high end compacts and all dSLR’s are able to
save images in the Raw format. his means that the image is saved at the maximum bit depth and is not processed. he
resulting ile contains the maximum amount of information the camera is able to capture.
Note: Every camera manufacturer has its own proprietary Raw format. Adobe Camera Raw can read Raw data hundreds
of diferent cameras. However, if you by a brand new camera its Raw format may not be supported by the program until
the next update. Check the Adobe website for the latest version of Camera Raw. If there is no update available and you
want to use Camera Raw you can download the Adobe DNG Converter from the Adobe website. he utility will convert
Raw iles into Adobes own format, the Digital Negative (DNG).
In the last few versions of Photoshop it has also been possible to open JPG and TIFF formats in Camera Raw. However, in
versions prior to CS5 you need to set the behaviours for JPG and TIFF iles in the General Preferences if you want them to
automatically open in Camera Raw. In Bridge CS5 the Camera Raw preferences are available from the Edit menu, ig 2.1.
Fig 2.1 the Camera Raw Preferences in Bridge CS5.
Download free ebooks at bookboon.com
18
Adobe Photoshop for Intermediate Users
Camera Raw
Whenever you edit a ile in Camera Raw your original image remains unchanged. Instead of saving an altered version of
the image, Camera Raw saves a small “sidecar” ile which will appear in the same folder as the image and have a XMP ile
extension. It is important that the XMP ile remains with the image, because it records all of the edits that you have made
in Camera Raw. If you use the Adobe DNG format, it has the beneit of being able to store the Camera Raw edits in the
original ile and so a sidecar ile will not be created. You can also choose to have the edit data saved to the Camera Raw
Database in the Camera Raw Preferences, ig 2.1. If you go down this route, please note that if you transfer the image to
another machine, the edit information will not be transferred unless it is in the DNG format.
The Camera Raw Interface
Fig 2.2 the Adobe Camera Raw interface version 6.6
Across the top let of the interface are a series of tools, for editing your image. From let to right, they are:
1. he Zoom Tool – Click and drag to magnify part the image. Double click on the icon to go to a 100% view.
2. he Hand Tool – Navigate when zoomed into an image by using the hand tool to move the image around.
Double click on the hand tool to it the image to the work area.
3. he White Balance Tool – Click on a neutral colour in the image to set the white balance and remove any
colour cast.
Download free ebooks at bookboon.com
19
Adobe Photoshop for Intermediate Users
Camera Raw
4. he Colour Sampler Tool – Use this tool to see the RGB values of speciic pixel values. he values are given in
the RGB section located below the Histogram in the top right.
5. he Targeted Adjustment Tool – Select a parameter from the drop down list (ig 2.3) and click and drag in the
image to change the values. Dragging to the right increases the value and dragging to the let decreases the
value. You can also choose to drag up and down.Fig 2.3 the Targeted Adjustment Tool drop down menu options.
"
6. he Crop Tool – Crop your image non-destructively with this tool. Use the drop down menu (ig 2.4) to select
a speciic aspect ratio or clear a previous crop.
your chance
Please click the advert
to change
the world
Here at Ericsson we have a deep rooted belief that
the innovations we make on a daily basis can have a
profound effect on making the world a better place
for people, business and society. Join us.
In Germany we are especially looking for graduates
as Integration Engineers for
• Radio Access and IP Networks
• IMS and IPTV
We are looking forward to getting your application!
To apply and for all current job openings please visit
our web page: www.ericsson.com/careers
Download free ebooks at bookboon.com
20
Adobe Photoshop for Intermediate Users
Camera Raw
"
Fig 2.4 the Crop Tool drop down menu options.
7. he Straighten Tool – Click and drag along an edge in your image that should be vertical or horizontal. When
you select another tool the image is automatically straightened and cropped.
8. he Spot Removal Tool – Use this tool to remove sensor dust spot from your image. Click and drag over the
dust spot and Camera Raw will automatically select a clear area to ill your selection. You can adjust these areas
by clicking inside one of the circles and dragging.
9. he Redeye Removal Tool – Click and drag over the eye area and the redeye will automatically be ixed. Use
the panel on the right to adjust the pupil size and darken values if necessary.
10. he Adjustment Brush – Apply basic adjustments to localized areas of the image by painting them onto the
image using this tool. he adjustments that can be applied with this tool will appear in the panel on the right
once the tool has been selected, ig 2.5.
he Auto Mask checked box at the bottom of the panel (ig 2.5), restricts the area in which you can paint to
a similar range of pixel values. his can be very useful if you need to paint up to an edge but not go over it.
Fig 2.5 the Adjustment Brush panel.
""
Download free ebooks at bookboon.com
21
Adobe Photoshop for Intermediate Users
Camera Raw
11. he Gradient Filter – his tool works in a similar fashion to the Adjustment Brush, but instead of painting,
you click and drag to create a gradient which applies the adjustment values you have chosen. At the start of the
gradient the adjustment is applied at 100%, gradually reducing to 0% at the end point of the gradient.
12. he Open Preferences Dialogue – Opens the same Dialogue box that is available from the Bridge menu, ig 2.1.
13. Rotate Anti-Clockwise – Rotates the image 90 degrees anti-clockwise
14. Rotate Clockwise – Rotates the image 90 degrees clockwise
Basic Adjustments
On the right of the Camera Raw interface are a series of 10 tabbed panels. We are going to take a look at the irst of these
panels, the Basic panel. It is oten the case, that 80-100% of the image adjustments that you need to make can be achieved
using only this panel, ig 2.6.
"
Figure 2.6 the Basic Adjustment tabbed panel.
It is recommended that you edit your image in the Basic panel by starting at the top and working your way down to the
bottom.
White Balance – his consists of a drop down menu and two sliders. he drop down menu contains a number of white
balance presets similar to the one found in most cameras, ig 2.7 (let). However, this list is only available when working
with Raw ile formats.
Download free ebooks at bookboon.com
22
Adobe Photoshop for Intermediate Users
Camera Raw
"""
"
Fig 2.7 White Balance presets for Raw (left) and JPG/TIFF (right)
You can adjust the White Balance manually using the Temperature and Tint sliders, regardless of which image format
you are using.
• Exposure – Lightens or darkens the entire image in standard f-stop increments.
• Recovery – Moving this slider to the right will darken the very brightest values in your image to recover detail
in the highlights.
• Fill Light - Moving this slider to the right will lighten the darkest areas of the image in an attempt to recover
detail in the shadows.
• Blacks – Set the black point in the image. Moving the slider to the right will send more pixel values to pure black.
• Brightness – Makes the light areas lighter whilst leaving the darkest areas alone.
• Contrast – Increase the contrast of the image by making the dark areas darker and the light areas lighter.
• Clarity – Moving this slider to the right makes the image look sharper and clearer by adding micro contrast
adjustment to edges. Moving the slider to the let will soten the image which can be nice when used on portraits.
e Graduate Programme
for Engineers and Geoscientists
I joined MITAS because
I wanted real responsibili
Please click the advert
Maersk.com/Mitas
Real work
Internationa
al opportunities
International
ree work
wo
or placements
Month 16
I was a construction
supervisor in
the North Sea
advising and
he
helping foremen
ssolve problems
Download free ebooks at bookboon.com
23
Adobe Photoshop for Intermediate Users
Camera Raw
• Vibrance – Alters the saturation of colours in the image, but has less efect on colours that are already saturated
or contain lesh tones.
• Saturation – Afects the saturation all of the colours in the image equally.
Camera Raw Worklow Options
An oten overlooked setting in Camera Raw is the Worklow Options. hese settings are accessed by clicking on the blue
hyperlink (ig 2.8) at the bottom of the Camera Raw work area. In the Worklow options dialogue box we have the option to:
• Set the colour space for the image
• he Depth option allows you to set the number of bits per RGB channel.
• Set the image size. You can increase or decrease the image size in set increments.
• Set the image resolution.
• Add a preset amount of sharpening. You can choose to add sharpening for the screen or matte/glossy prints.
• Select to always open the image in Photoshop as a Smart Object (see the section on Smart Objects).
"
Fig 2.8 the Camera Raw Worklow Options, accessed from the hyperlink at the bottom of the work area.
Saving Images from within Camera Raw
In the bottom let corner of the Camera Raw work area there is an option to “Save” your image. his means that you
can edit an image in Camera Raw and save out a inished version as a JPG, TIFF, DNG or PSD without ever opening
Photoshop. he Worklow Options can be very helpful at this point because you can change the settings according to suit
the purpose of the ile. For example, you may wish to create a small, low resolution ile to attach to an Email. However,
it is important that you change the Worklow Options back to their original settings, otherwise all of your subsequent
documents will be formatted as small, low resolution images.
Download free ebooks at bookboon.com
24
Adobe Photoshop for Intermediate Users
Transformations
3 Transformations
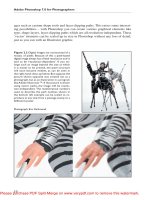
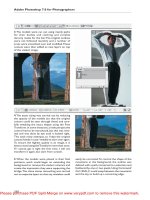
One of Photoshop most powerful features is the ability to resize, distort and warp an object within an image. For example,
in ig 3.1 we have a landscape image that features the moon. If we make a selection of the moon using any of the selection
tools, it can then be copied to a new layer by going to the Layer menu and choosing New > Layer via Copy. A copy of
the selected area will then appear in a new layer in the Layers panel, ig 3.2.
Fig 3.1 the Moon is selected.
"
Fig 3.2 the Moon in a new layer.
Download free ebooks at bookboon.com
25