Setting VraySky and VraySun
Bạn đang xem bản rút gọn của tài liệu. Xem và tải ngay bản đầy đủ của tài liệu tại đây (606.17 KB, 14 trang )
1. VraySky and VraySun
In Vray 1.5 you can find new map "vraysky" and new light "vraysun". This two things will make
your rendering much easier. With this feature you will be able to set up reality exterior lighting. It
also can be used in interior lighting.
I will explain how it works on one of building from archmodels vol.17.
Settig up of sky and sun is very easy. You just need to get new material - Vraysky in your
material editor. (Just select one of the slots in material editor, use Material->Get material and
select Vraysky).
Now create vraysun (you can find it in vray lights section), and put in the scene one vrayplane,
so it will be our ground.
In this step you must go to options of vraysky map, and turn on "manual sun node". And now
you can select your sun node, just click on "None" button and point vraysun.
Now go to rendering -> environment. Turn on Use Map in Background section and select map by
clicking on button below. Now in Material/Map Browser select on the left Browse From: -> Scene,
and there you can see created few whiles ago vraysky. So select it and in new popup window
choose instance.
Next thing we need to do is to create vraycamera, this is very important, becouse without this
type of camera we wouldn't get options like ISO, shutter speed, f-number.
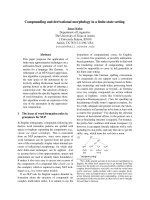
This is how the building looks from camera angle:
Now turn on GI, I wouldn't describe settings now, becouse it will be in other section, but in
shortcut i used QMC + LC, and HSV exponential as color mapping type. Just look how it looks for
now.
As you can see this image is overbrighted. All you need to correct it is to change camera settings.
Set f-number on 7,0, shutter speed on 45, and film speed(ISO) on 50. And here we got.
But look at it, its don't realy this what we want. Now we need to do some adjustments. Change
VRayPlane material to a bit darker. Now in vraysky, and vraysun change sun turbidity to 6, and
sun ozone to 0,25. This is almost everything. Now we need to use an vray frame buffer for color
and levels correction (it is described in vray frame buffer section).
And final results