Hội Tim mạch học Việt Nam PCI support short
Bạn đang xem bản rút gọn của tài liệu. Xem và tải ngay bản đầy đủ của tài liệu tại đây (16.55 MB, 48 trang )
PCI for calcified and
tortuous vessels
Nguyen Ngoc Quang, MD, FASCC
Dept. of Cardiology, Hanoi Medical University
Vietnam National Heart Institute
Key Points in DES era
✓ The simpler procedure the better outcome
✓
Debulking device plays a small role except calcified or
some special kinds of lesion (bifurcation, ostial, ISR…)
✓
Longer DES is frequently used (33, 38 mm…) - “from
shoulder to shoulder” principle
✓ Safe DES implantation is important for long term outcome
➠The deliverability of long stent is not good especially in the
calcified or tortuous lesion
Strong guiding catheter with supportive wire
Enough pre-dilatation or debulking
Buddy wire or support wire
Deeply engage or
“amplatz” guiding
Mother-child (5F)
catheter technique
Anchor technique
Supports from guiding catheter
In complicated lesion we should initially use support catheter
instead of Judkins catheter.
For RCA: AR, AL, Hockey, Champ, RCB
Supports from guiding catheter
In complicated lesion we should initially use support catheter
instead of Judkins catheter.
For LCA: XB, EBU
Supports from guiding catheter
Influencing factor of Back up support
Friction & slipping
Shape of catheter
Stiffness
Pushing & pulling
of shaft,
Torque control
Supports from guiding catheter
ØThus,
Maximun
backup
force
(Fmax) is:
Ø If Fcosθ ≤ λ (static friction),
the guiding catheter works.
Ø If Fcosθ > λ, system collapses.
λ
Fmax = ――――
cosθ
λ = static friction within the aorta wall
F = back-up force
Supports from guiding catheter
JL-4.0
Trans-femoral
JL-3.5
Voda-3.0
Active
point
F1
Supporting
point
F2
E0
F3
F0
ac
b
g
n
o rt
r
t
S po
sup
p
u
k
A
n
o
i
t
c
e
r
&
n
o
i
t
ac
Supports from guiding catheter
JL-4.0
Trans-radial
JL-3.5
BL-3.0
F1
Supporting
point
Active
point
F2
E0
F3
F0
c
a
b
g
n t
o
r
St por
p
u
s
p
u
k
A
n
o
i
ct
Re
n
o
i
t
ac
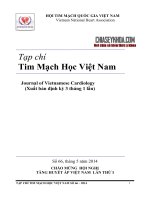
Supports from guiding catheter
λ
Fmax = ――――
cosθ
Judkins Left TRI vs TFI
resistance (gram force)
70.0
θr
θf
P<0.05
52.5
35.0
17.5
0
TRI
TFI
Judkins L can generate greater backup force in TFI than in TRI
Supports from guiding catheter
JL-4.0
JL-3.5
BL-3.0
JR-4.0 or 3.5
F1
Re
E0
F2
tio
n
Supporting
point
act
F1
ion
Active
point
Ac
F3
c
a
b
g
n t
o
r
r
t
o
S pp
su
p
u
k
F0
LCA
Supporting point
Active
point
E0
Action R
eaction
RCA
c
a
B
F0
p
u
k
p
u
s
rt
o
p
Trans-radial Superior high take off
Supports from guiding catheter
λ
Fmax = ――――
cosθ
Judkins Left JL 4 vs JL 3.5
45.0
resistance (gram force)
P<0.05
θ4
θ 3.5
33.8
22.5
11.3
0
JL 4
JL 3.5
Judkins L 3.5 can generate greater backup force in TRI than JL4.
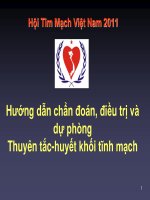
Supports from guiding catheter
λ
Fmax = ――――
cosθ
Ikari vs Judkins Left
90.0
resistance (gram force)
P<0.001
θj
θi
67.5
45.0
22.5
0
JL 4
IL 4
Ikari L can generate greater backup force than Judkins L in TRI
Supports from guiding catheter
Considerations about the static friction
15mm
Static friction
35mm
λ
Fmax = ――――
cosθ
P<0.05
45mm
25mm
IL 3.5
Supports from guiding catheter
2
Co-axial position
θ
1
2
Supporting point
F2
E sinθ
F1
Supporting point
E
θ
Action Reaction
F2
Poor back up support when GC engages eccentrically to coronary artery ostium
Supports from guiding catheter
Engaging & power position
● Make the supporting point at lateral position of action & reaction
● Maintain the same direction with coronary artery ostium,
toward supporting point.
Active
point Ea
Active
point Eb
GCa
GCb
Fa
Power Position
Fb
Power Position
Supports from guiding catheter
λ
Fmax = ――――
cosθ
Judkins Left vs JL Deep engage
50.0
resistance (gram force)
P<0.05
θ4
θ4deep
37.5
25.0
12.5
0
JL 4
JL 4 Deep
Deep engagement increases backup force of Judkins Left.
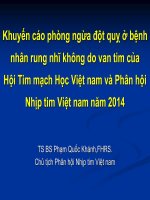
Supports from guiding catheter
λ
Fmax = ――――
cosθ
Power position Of Ikari Left
90.0
resistance (gram force)
P<0.05
θi
θ4
θi power
67.5
45.0
22.5
0
IL 3.5
IL 3.5 Power Position
Power Position of Ikari L generates the greatest backup force
Pre-dilatation & pre-debulking
✓ Enough pre-dilatation
✓ Step by step dilatation
✓ Using higher pressure, larger, longer balloon
✓ Cutting balloon or balloon with buddy wire
✓ Rotablator (calcified lesion
✓ DCA
Pre-dilatation & pre-debulking
Acting mechanisms of Regular and Cutting balloons
✓Entire balloon surface contact the
vessel wall – arterial wall damage
✓Multiple rips and tears in media
✓Endothelium is completely
disrupted, large hematoma has
formed due to trauma
✓Injury localized to the scoring
sites - reduced trauma
✓Media with no visible disruption
✓Endothelial layer remains intact
Buddy wire or support wire
Deep engage - “amplatz” guiding
Deep engage - “amplatz” guiding