Wiley microsoft office excel 2007 top 100 simplified tips and tricks jul 2007 ISBN 0470126744 pdf
Bạn đang xem bản rút gọn của tài liệu. Xem và tải ngay bản đầy đủ của tài liệu tại đây (42.13 MB, 259 trang )
01_126745 ffirs.qxp
6/5/07
6:58 PM
Page i
by Denise Etheridge
02_126745 ftoc.qxp
6/5/07
6:59 PM
Page 1
01_126745 ffirs.qxp
6/5/07
6:58 PM
Page i
by Denise Etheridge
01_126745 ffirs.qxp
6/5/07
6:58 PM
Page ii
Excel® 2007: Top 100
Simplified® Tips & Tricks
Published by
Wiley Publishing, Inc.
111 River Street
Hoboken, NJ 07030-5774
Published simultaneously in Canada
Copyright © 2007 by Wiley Publishing, Inc., Indianapolis,
Indiana
Library of Congress Control Number: 2007926010
ISBN: 978-0-470-12674-5
Manufactured in the United States of America
10 9 8 7 6 5 4 3 2 1
No part of this publication may be reproduced, stored in a
retrieval system or transmitted in any form or by any means,
electronic, mechanical, photocopying, recording, scanning or
otherwise, except as permitted under Sections 107 or 108 of
the 1976 United States Copyright Act, without either the prior
written permission of the Publisher, or authorization through
payment of the appropriate per-copy fee to the Copyright
Clearance Center, 222 Rosewood Drive, Danvers, MA 01923,
978-750-8400, fax 978-646-8600. Requests to the Publisher
for permission should be addressed to the Legal Department,
Wiley Publishing, Inc., 10475 Crosspoint Blvd., Indianapolis,
IN 46256, 317-572-3447, fax 317-572-4355, online:
www.wiley.com/go/permissions.
Trademark Acknowledgments
Wiley, the Wiley Publishing logo, Visual, the Visual logo,
Simplified, Read Less - Learn More, and related trade dress are
trademarks or registered trademarks of John Wiley & Sons, Inc.
and/or its affiliates. Microsoft and Excel are registered trademarks
of Microsoft Corporation in the U.S. and/or other countries. All
other trademarks are the property of their respective owners.
Wiley Publishing, Inc. is not associated with any product or
vendor mentioned in this book.
LIMIT OF LIABILITY/DISCLAIMER OF WARRANTY: THE
PUBLISHER AND THE AUTHOR MAKE NO REPRESENTATIONS
OR WARRANTIES WITH RESPECT TO THE ACCURACY OR
COMPLETENESS OF THE CONTENTS OF THIS WORK AND
SPECIFICALLY DISCLAIM ALL WARRANTIES, INCLUDING
WITHOUT LIMITATION WARRANTIES OF FITNESS FOR A
PARTICULAR PURPOSE. NO WARRANTY MAY BE CREATED
OR EXTENDED BY SALES OR PROMOTIONAL MATERIALS. THE
ADVICE AND STRATEGIES CONTAINED HEREIN MAY NOT BE
SUITABLE FOR EVERY SITUATION. THIS WORK IS SOLD WITH
THE UNDERSTANDING THAT THE PUBLISHER IS NOT
ENGAGED IN RENDERING LEGAL, ACCOUNTING, OR OTHER
PROFESSIONAL SERVICES. IF PROFESSIONAL ASSISTANCE IS
REQUIRED, THE SERVICES OF A COMPETENT PROFESSIONAL
PERSON SHOULD BE SOUGHT. NEITHER THE PUBLISHER NOR
THE AUTHOR SHALL BE LIABLE FOR DAMAGES ARISING
HEREFROM. THE FACT THAT AN ORGANIZATION OR
WEBSITE IS REFERRED TO IN THIS WORK AS A CITATION
AND/OR A POTENTIAL SOURCE OF FURTHER INFORMATION
DOES NOT MEAN THAT THE AUTHOR OR THE PUBLISHER
ENDORSES THE INFORMATION THE ORGANIZATION OR
WEBSITE MAY PROVIDE OR RECOMMENDATIONS IT MAY
MAKE. FURTHER, READERS SHOULD BE AWARE THAT
INTERNET WEBSITES LISTED IN THIS WORK MAY HAVE
CHANGED OR DISAPPEARED BETWEEN WHEN THIS WORK
WAS WRITTEN AND WHEN IT IS READ.
FOR PURPOSES OF ILLUSTRATING THE CONCEPTS AND
TECHNIQUES DESCRIBED IN THIS BOOK, THE AUTHOR HAS
CREATED VARIOUS NAMES, COMPANY NAMES, MAILING,
E-MAIL AND INTERNET ADDRESSES, PHONE AND FAX
NUMBERS AND SIMILAR INFORMATION, ALL OF WHICH
ARE FICTITIOUS. ANY RESEMBLANCE OF THESE FICTITIOUS
NAMES, ADDRESSES, PHONE AND FAX NUMBERS AND
SIMILAR INFORMATION TO ANY ACTUAL PERSON, COMPANY
AND/OR ORGANIZATION IS UNINTENTIONAL AND PURELY
COINCIDENTAL.
Contact Us
For general information on our other products and services
contact our Customer Care Department within the U.S. at
800-762-2974, outside the U.S. at 317-572-3993, or fax
317-572-4002.
For technical support please visit www.wiley.com/techsupport.
U.S. Sales
Contact Wiley at
(800) 762-2974 or
fax (317) 572-4002.
01_126745 ffirs.qxp
6/5/07
6:58 PM
Page iii
PRAISE
FOR
“I have to praise you and your company on the
fine products you turn out. I have twelve Visual
books in my house. They were instrumental in
helping me pass a difficult computer course.
Thank you for creating books that are easy to
follow. Keep turning out those quality books.”
Gordon Justin (Brielle, NJ)
“What fantastic teaching books you have
produced! Congratulations to you and your staff.
You deserve the Nobel prize in Education. Thanks
for helping me understand computers.”
Bruno Tonon (Melbourne, Australia)
“A Picture Is Worth A Thousand Words! If your
learning method is by observing or hands-on
training, this is the book for you!”
Lorri Pegan-Durastante (Wickliffe, OH)
“Over time, I have bought a number of your
‘Read Less - Learn More’ books. For me, they are
THE way to learn anything easily. I learn easiest
using your method of teaching.”
José A. Mazón (Cuba, NY)
“You’ve got a fan for life!! Thanks so much!!”
Kevin P. Quinn (Oakland, CA)
“I have several books from the Visual series and
have always found them to be valuable
resources.”
Stephen P. Miller (Ballston Spa, NY)
“I have several of your Visual books and they are
the best I have ever used.”
Stanley Clark (Crawfordville, FL)
VISUAL BOOKS
“Like a lot of other people, I understand things
best when I see them visually. Your books really
make learning easy and life more fun.”
John T. Frey (Cadillac, MI)
“I have quite a few of your Visual books and have
been very pleased with all of them. I love the way
the lessons are presented!”
Mary Jane Newman (Yorba Linda, CA)
“Thank you, thank you, thank you...for making it
so easy for me to break into this high-tech world.”
Gay O’Donnell (Calgary, Alberta,Canada)
“I write to extend my thanks and appreciation for
your books. They are clear, easy to follow, and
straight to the point. Keep up the good work! I
bought several of your books and they are just
right! No regrets! I will always buy your books
because they are the best.”
Seward Kollie (Dakar, Senegal)
“I would like to take this time to thank you and
your company for producing great and easy-tolearn products. I bought two of your books from a
local bookstore, and it was the best investment
I’ve ever made! Thank you for thinking of us
ordinary people.”
Jeff Eastman (West Des Moines, IA)
“Compliments to the chef!! Your books are
extraordinary! Or, simply put, extra-ordinary,
meaning way above the rest! THANKYOU
THANKYOU THANKYOU! I buy them for friends,
family, and colleagues.”
Christine J. Manfrin (Castle Rock, CO)
01_126745 ffirs.qxp
6/5/07
6:58 PM
Page iv
CREDITS
Project Editor
Sarah Hellert
Acquisitions Editor
Jody Lefevere
Layout
Carrie A. Foster
Jennifer Mayberry
Heather Pope
Amanda Spagnuolo
Copy Editor
Kim Heusel
Screen Artist
Jill A. Proll
Technical Editor
Suzanne Borys, PhD
James Floyd Kelly
Proofreader
Broccoli Information Management
Quality Control
Cynthia Fields
Jessica Kramer
Charles Spencer
Editorial Manager
Robyn Siesky
Business Manager
Amy Knies
Indexer
Infodex Indexing Services, Inc.
Editorial Assistant
Laura Sinise
Wiley Bicentennial Logo
Richard J. Pacifico
Manufacturing
Allan Conley
Linda Cook
Paul Gilchrist
Jennifer Guynn
Special Help
Malinda McCain
Barbara Moore
Christine Williams
Vice President and Executive
Group Publisher
Richard Swadley
Book Design
Kathie Rickard
Production Coordinator
Erin Smith
Vice President and Publisher
Barry Pruett
Composition Director
Debbie Stailey
ABOUT
THE
AUTHOR
Denise Etheridge is a certified public accountant as well as
the president and founder of Baycon Group, Inc. She publishes
Web sites, provides consulting services on accounting-related
software, and authors computer-related books. You can visit
www.baycongroup.com to view her online tutorials.
This book is dedicated to my mother, Catherine Austin Etheridge
01_126745 ffirs.qxp
6/5/07
6:58 PM
Page v
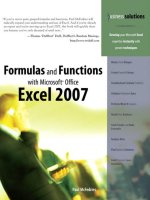
HOW TO USE THIS BOOK
Excel 2007: Top 100 Simplified® Tips & Tricks includes 100 tasks that reveal cool secrets, teach timesaving tricks, and
explain great tips guaranteed to make you more productive with Excel. The easy-to-use layout lets you work
through all the tasks from beginning to end or jump in at random.
Who is this book for?
You already know Excel basics. Now you’d like to go beyond, with shortcuts, tricks, and tips that let you work
smarter and faster. And because you learn more easily when someone shows you how, this is the book for you.
Conventions Used In This Book
1
Steps
This book uses step-by-step
instructions to guide you easily
through each task. Numbered
callouts on every screen shot show
you exactly how to perform each
task, step by step.
2
Tips
Practical tips provide insights to
save you time and trouble, caution
you about hazards to avoid, and
reveal how to do things in Excel
2007 that you never thought
possible!
3
4
1
2
3
Task Numbers
Task numbers from 1 to 100
indicate which lesson you are
working on.
4
Difficulty Levels
For quick reference, the symbols
below mark the difficulty level of
each task.
Demonstrates a new spin on a
common task
Introduces a new skill or a new
task
Combines multiple skills requiring
in-depth knowledge
Requires extensive skill and may
involve other technologies
02_126745 ftoc.qxp
6/5/07
6:59 PM
Page vi
Table of Contents
1
Boost Your Efficiency
#1
#2
#3
#4
#5
#6
#7
#8
#9
2
vi
Validate with a Validation List
4
Validate with Data Entry Rules
6
Extend a Series with AutoFill
8
Insert Symbols or Special Characters
10
Hide Rows by Grouping and Outlining
12
Find and Replace Formats
14
Add Comments to Your Worksheet
16
Let Excel Read Back Your Data
18
Create Your Own Sort or AutoFill
20
Work with Formulas and Functions
#10
#11
#12
#13
#14
#15
#16
#17
#18
#19
#20
#21
#22
#23
Enter Formulas Using a Variety of Methods
24
Name Cells and Ranges
26
Define a Constant
28
Create Formulas That Include Names
30
Calculate with the Function Wizard
32
Figure Out Loan Terms
34
Determine the Internal Rate of Return
36
Determine the Nth Largest Value
38
Create a Conditional Formula
40
Calculate a Conditional Sum
42
Add a Calculator
44
Find Products and Square Roots
46
Perform Time Calculations
48
Perform Date Calculations
50
02_126745 ftoc.qxp
3
6:59 PM
Page vii
Copy, Format, and More
#24
#25
#26
#27
#28
#29
#30
#31
#32
#33
#34
#35
4
6/5/07
Check Your Formulas for Errors
54
Trace Precedents and Dependents
56
Change Text to Numbers
58
Convert a Row to a Column
60
Copy with the Office Clipboard
62
Adjust Column Widths with Paste Special
64
Specify How to Paste with Paste Special
66
Create Your Own Style
68
Copy Styles to Another Workbook
70
Conditionally Format Your Worksheet
72
Track Changes While Editing
76
Consolidate Worksheets
78
Manipulate Records
#36
#37
#38
#39
#40
#41
#42
#43
#44
#45
#46
#47
#48
Enter Data with a Form
82
Filter Duplicate Records
84
Perform Simple Sorts and Filters
86
Perform Complex Sorts
88
Sort by Cell Color, Font Color, or Icon
90
Perform Complex Filters
92
Filter by Multiple Criteria
94
Subtotal Sorted Data
96
Chart Filtered Data Easily
98
Count Filtered Records
100
Look Up Information in Your Worksheet
102
Define Data as a Table
104
Modify a Table Style
106
vii
02_126745 ftoc.qxp
6/5/07
6:59 PM
Page viii
Table of Contents
5
Explore the Patterns in Your Data
#49
#50
#51
#52
#53
#54
#55
#56
#57
#58
#59
6
110
Modify PivotTable Data and Layout
114
Compute PivotTable Sub and Grand Totals
116
Create a PivotTable Calculated Field
118
Hide Rows or Columns in a PivotTable
120
Sort a PivotTable
121
Create a PivotChart
122
Describe Data with Statistics
124
Find the Correlation between Variables
126
Explore Outcomes with What-If Analysis
128
Optimize a Result with Goal Seek
130
Create Charts
#60
#61
#62
#63
#64
#65
#66
#67
viii
Create a PivotTable
Create a Chart That Has Visual Appeal
134
Add Chart Details
136
Change the Chart Type
140
Add a Trendline
142
Add and Remove Chart Data
144
Add Error Bars
146
Create a Histogram
148
Create a Combination Chart
150
02_126745 ftoc.qxp
7
8
6/5/07
6:59 PM
Page ix
Present Worksheets
#68
#69
#70
#71
#72
#73
#74
#75
#76
#77
Format Numbers, Dates, and Times
154
Apply Formats to Cells
158
Fill with a Gradient
162
Format Quickly with Format Painter
164
Insert Shapes into Your Worksheet
166
Insert Text Boxes into Your Worksheet
168
Insert Photographs into Your Worksheet
170
Arrange the Graphics in Your Worksheet
172
Insert a Background Image
174
Take a Picture of Your Worksheet
176
Protect, Save, and Print
#78
#79
#80
#81
#82
Protect Your Worksheet
180
Save a Workbook as a Template
182
Choose a Format When Saving a Workbook
184
Print Multiple Areas of a Workbook
186
Print Multiple Worksheets from a Workbook
188
ix
02_126745 ftoc.qxp
6/5/07
6:59 PM
Page x
Table of Contents
9
10
Extend Excel
#83
#84
#85
#86
#87
#88
#89
#90
#91
#92
#93
192
Embed a Worksheet
194
Create a Link from an Excel Workbook
196
Query a Web Site
198
Copy a Word Table into Excel
200
Import a Text File into Excel
202
Import an Access Database into Excel
206
Query an Access Database
208
Reuse a Saved Query
212
Import an Excel Worksheet into Access
214
Using Excel with Mail Merge
218
Customize Excel
#94
#95
#96
#97
#98
#99
#100
x
Paste Link into Word or PowerPoint
Add Features by Installing Add-Ins
222
Customize the Quick Access Toolbar
224
Work with Multiple Windows
226
Save Time by Creating a Custom View
227
Create a Custom Number Format
228
Automate Your Worksheet with Macros
230
Add a Button to Run a Macro
232
02_126745 ftoc.qxp
6/5/07
6:59 PM
Page 1
03_126745 ch01.qxp
6/5/07
7:00 PM
Page 2
Boost Your Efficiency
You can use Microsoft Excel 2007 to work
with numbers. In fact, wherever you use
numbers — doing taxes, running a small
business, maintaining a budget, or anything
else — Excel can help make your work easier,
quicker, and more accurate.
Excel 2007 provides you with many ways to
enter, present, explore, and analyze data. This
chapter focuses on ways in which you can
boost your efficiency when using Excel. You
learn how to use the Excel AutoFill feature, to
group and outline, to check the accuracy of
your data and more.
The AutoFill feature enables you to fill a row or
column quickly with a series of values,
numbers, dates, or times generated from one
or more values you have entered. This chapter
will show you how to use the AutoFills that
come standard with Excel and how to create
your own AutoFills.
You can use grouping and outlining to hide
parts of your worksheet, enabling you to focus
in on the data in which you are interested,
thereby making data analysis easier. This
chapter steps you through the process of
grouping and outlining.
Sometimes you may want to double-check the
accuracy of your data. One of the final tasks in
this chapter teaches you how you can increase
the accuracy of your data entry by letting
Excel read back your data to you.
03_126745 ch01.qxp
6/5/07
7:00 PM
Page 3
Validate with a Validation List . . . . . . . . . . . . . . . . . . . . . . . 4
Validate with Data Entry Rules . . . . . . . . . . . . . . . . . . . . . . 6
Extend a Series with AutoFill . . . . . . . . . . . . . . . . . . . . . . . . 8
Insert Symbols or Special Characters . . . . . . . . . . . . . . . . 10
Hide Rows by Grouping and Outlining . . . . . . . . . . . . . . . 12
Find and Replace Formats . . . . . . . . . . . . . . . . . . . . . . . . . 14
Add Comments to Your Worksheet . . . . . . . . . . . . . . . . . . 16
Let Excel Read Back Your Data . . . . . . . . . . . . . . . . . . . . . 18
Create Your Own Sort or AutoFill . . . . . . . . . . . . . . . . . . . 20
03_126745 ch01.qxp
6/5/07
7:00 PM
Page 4
Validate with a
VALIDATION LIST
Excel enables you to restrict the values a user can
enter in a cell. By restricting values, you ensure that
your worksheet entries are valid and that calculations
based on them thereby are valid as well. During
data entry, a validation list forces anyone using your
worksheet to select a value from a drop-down menu
rather than typing it and potentially typing the wrong
information. In this way, validation lists save time
and reduce errors.
may want to name the range. See Task #11 to learn
how to name ranges. After you type your values, use
the Data Validation dialog box to assign values to your
validation list. Then copy and paste your validation list
into the appropriate cells by using the Paste Special
Validation option.
You may want to place your validation list in an outof-the-way place on your worksheet or on a separate
worksheet.
To create a validation list, type the values you want
to include into adjacent cells in a column or row. You
2
3
1 Click in the cell in which you
want to create a validation list.
2 Click the Data tab.
3 Click Data Validation in the Data
6
Tools group.
4
5
1
6
7
l The Data Validation dialog box
appears.
4 Click the Settings tab.
5 Click here and then select List.
6 Click and drag to select the valid
entries, or type = followed by
the range name.
7 Click OK.
l Excel creates a validation list in
the cell you selected.
4
03_126745 ch01.qxp
2
5
6
6/5/07
7:00 PM
Page 5
PASTE YOUR VALIDATION LIST
1 Click in the cell that
3
contains your validation
list.
2 Click the Home tab.
3 Click the Copy button in
1
the Clipboard group.
7
4
4 Select the cells in which
8
you want to place the
validation list.
5 Click Paste in the
Clipboard group.
A menu appears.
6 Click Paste Special.
l The Paste Special dialog box appears.
7 Click Validation (
8 Click OK.
changes to
).
Excel places the validation list in the cells
you selected.
l When users make an entry into the cell,
they must pick from the list.
Did You Know?
Remove It!
Validation lists can consist of numbers,
names of regions, employees, products,
and so on.
To remove a validation list, click in any cell that contains the
validation list you want to remove, click the Home tab, and
then click Find and Select in the Editing group. A menu appears.
Click Go To Special. The Go To Special dialog box appears. Click
Data validation, click Same, and then click OK. The Go To
Special dialog box closes. Click the Data tab and then click
Data Validation in the Data Tools group. A menu appears. Click
Data Validation. The Data Validation dialog box appears. Click
Clear All and then click OK.
Chapter 1: Boost Your Efficiency
5
03_126745 ch01.qxp
6/5/07
7:00 PM
Page 6
Validate with
DATA ENTRY RULES
You can use data entry rules to ensure that data
entered has the correct format, and you can restrict
the data entered to whole numbers, decimals, dates,
times, or a specific text length. You can also specify
whether the values need to be between, not
between, equal to, not equal to, greater than, less
than, greater than or equal to, or less than or equal
to the values you specify.
as well as an error alert that displays if the user
makes an incorrect entry. Error alerts can stop the
user, provide a warning, or just provide information.
After you create your data entry rule, copy and paste
it into the appropriate cells by using the Paste Special
Validation option. See Task #1 under Paste Your
Validation List to learn how to copy and paste
your data entry rule.
As with all data validation, you can create an input
message that appears when the user enters the cell,
2
3
1 Click in the cell in which you
want to create a data entry rule.
2 Click the Data tab.
3 Click Data Validation in the Data
1
Tools group.
l The Data Validation Dialog box
appears.
4
5
6
7
4 Click the Settings tab.
5 Click here and select a validation
criterion.
6 Click here and select a validation
criterion.
7 Type the criteria or click and
drag to select the cells with the
criteria you want to use.
8 Click the Input Message tab.
9 Type a title for your message.
0 Type an input message.
8
9
0
6
03_126745 ch01.qxp
6/5/07
7:00 PM
Page 7
! Click the Error Alert tab.
@ Click here and select a
style.
Choose Stop if you want
to stop the entry of
invalid data.
!
#
$
Choose Warning if you
want to display a
warning to the user, but
not prevent entry.
Choose Information
to provide information
to the user.
@
# Type a title.
$ Type an error message.
% Click OK.
%
Excel creates the data entry rule.
l When you click in the cell, Excel displays
your input message.
l When you enter invalid data, Excel
displays your error alert.
Important!
Did You Know?
Did You Know?
After you create your data entry
rules, use the steps outlined in
Task #1 under Paste Your
Validation List to place your data
entry rules in the cells in which
you want them.
If you use cells to specify your
validation criteria in Step 7,
you can change the criteria as
needed without changing the
validation rule.
When you make an incorrect entry,
the Stop Error Alert style displays
the error message you entered
and prevents you from making an
entry that does not meet your
criteria. The Warning Alert style
and the Information Alert style
allow you to enter data that does
not meet your criteria.
Chapter 1: Boost Your Efficiency
7
03_126745 ch01.qxp
6/5/07
7:00 PM
Page 8
Extend a series with
AUTOFILL
AutoFill gives you a way to ensure accurate data
entry when a particular data series has an intrinsic
order: days of the week, months of the year, numeric
increments of two, and so on.
To use AutoFill, start by typing one or more values
from which you will generate other values. Select the
cell or cells you want to extend. Selecting two or
more cells determines the step size, or increment, by
which you want to jump in each cell. With the cells
selected, click the Fill handle in the lower-right corner
and drag. When you release the mouse button, Excel
fills the cells with values.
After filling the cells, Excel provides a menu button.
Click the button to open a menu that enables you to
change the fill. You can copy the initial value; fill the
series one day at a time; or extend it by weekdays,
months, or years, depending on the type of fill you
create.
1 Type the initial value for the
series you want to create.
2 Select the cell or cells.
3 Click the Fill handle.
1
2
3
4 Drag the desired number of cells
and release the mouse.
l Excel fills the cells with a series.
l The AutoFill Options button
appears.
5 Click the button.
A menu appears.
4
8
6
5
6 Click Copy Cells (
to
).
changes
03_126745 ch01.qxp
6/5/07
7:00 PM
Page 9
l Excel changes the series
to a copy of the original
cell.
7 Type a pattern of
7
entries.
8 Repeat Steps 2 to 4.
l Excel fills the cell with the pattern.
Did You Know?
When you release the mouse button after creating a series, the AutoFill Options
button (
) appears. Click the button to view a menu of options. If you want to
fill with the days of the week, you can click Fill Days or Fill Weekdays to fill with
Monday through Friday (
changes to
). You can also click the Fill Formatting
Only option (
changes to
) to change the formatting of the cell without
changing the contents. Click the Fill Without Formatting option (
changes to
)
to change the contents of the filled cells without changing the formatting. You can
extend a series in any direction: up, down, left, or right.
Chapter 1: Boost Your Efficiency
9
03_126745 ch01.qxp
6/5/07
7:00 PM
Page 10
Insert
SYMBOLS OR SPECIAL
CHARACTERS
In Excel, you are not restricted to the standard
numerals, letters, and punctuation marks on your
keyboard. You can also select from hundreds of special
characters, such as foreign letters and currency
characters such as the Euro (€). Each font has a
different set of special characters. A smaller set of
standard characters, called symbols, is always
available as well; they include dashes, hyphens, and
quotation marks.
Symbols and special characters serve many uses in
Excel. Many financial applications, for example, call
2
3
for currency symbols. Symbols and special characters
are useful in column and row heads as part of the
text describing column and row content, for example,
Net sales in €.
Using symbols and special characters in the same cell
with a value such as a number, date, or time usually
prevents the value from being used in a formula. If
you need to use a symbol in a cell used in a formula,
use a number format. If you need to create a custom
number format, see Task #98.
ADD A SYMBOL
1 Click in the cell in which you
want to insert a symbol.
2 Click the Insert tab.
3 Click Symbol in the Text group.
1
l The Symbol dialog box appears.
4 Click here and then select a font.
5 Click the Symbol you want.
6 Click Insert.
4
l The character appears in the cell.
7 Click Close.
5
The Symbol dialog box closes.
6
10
7
03_126745 ch01.qxp
6/5/07
7:00 PM
Page 11
2
ADD A SPECIAL CHARACTER
1 Click in the cell in which
3
you want to insert a
special character.
1
2 Click the Insert tab.
3 Click Symbol in the Text
group.
l The Symbol dialog box appears.
4 Click the Special Characters tab.
5 Locate the character you want and click it.
6 Click Insert.
4
l The character appears in the cell.
7 Click Close.
5
The Symbol dialog box closes.
6
7
Did You Know?
Did You Know?
In Excel, entries are numbers, dates, times, letters,
or special characters. You can only use numbers,
dates, and times in numeric calculations. Excel
treats letters and special characters as blanks or
zeroes in calculations. To have a currency symbol
appear with a value, as in $400, and use the cell
value in a calculation, you must apply a currency,
accounting, or custom format.
Excel fonts are based on Unicode, a set of 40,000
characters enabling the display of characters from
approximately 80 languages, including right-to-left
alphabets such as Hebrew. To use a language other
than English, attach an appropriate keyboard and
use the Control Panel to set the Regional and
Language options.
Chapter 1: Boost Your Efficiency
11
03_126745 ch01.qxp
6/5/07
7:00 PM
Page 12
Hide rows by
GROUPING AND OUTLINING
You can use the Excel grouping and outlining feature
to hide sets of columns and/or rows. For example,
you can hide the details relating to weekly sales
so you can compare monthly sales. Your outlines
can include up to eight levels of detail.
Outlining a set of rows or columns creates a clickable
button on the far left or top of your worksheet. The
button displays either a minus sign or a plus sign,
depending on what is displayed in the worksheet.
Click the minus sign to hide rows or columns, and
2
the plus sign to display them again. Adjacent to the
button is a solid line that indicates, by its length, the
approximate number of rows or columns Excel has
hidden.
Outlining was designed for use with structured
information such as lists but can be used with
any worksheet. When you outline a PivotTable,
outlining has the same effect as it does in any other
worksheet.
ADD A GROUP
1 Click and drag to select the rows
3
or columns to hide.
2 Click the Data tab.
3 Click Group in the Outline group.
1
You can also select the rows or
columns and then press
Shift+Alt+Right Arrow.
l The Group dialog box appears.
4 Click to select either the Rows or
the Columns option (
to ).
4
Click Rows if you want to group
rows.
5
Click Columns if you want to
group columns.
5 Click OK.
12
changes