Pro SQL Server 2008 Policy-Based Management- P2
Bạn đang xem bản rút gọn của tài liệu. Xem và tải ngay bản đầy đủ của tài liệu tại đây (1.27 MB, 50 trang )
CHAPTER 2 CREATING POLICIES
</data>
</document>
<document>
<docinfo>
<aliases>
<alias>/PolicyStore/ObjectSet/Full Database Rec
overy
Model__ObjectSet/TargetSet/Server_/Database/TargetSetLevel/Server_/Database</alias>
</aliases
>
<sfc:version DomainVersion="3"/>
</docinfo>
<data>
<DMF:TargetSetLevel>
<DMF:Parent>
<sfc:Referen
ce sml:ref="true">
<sml:Uri>/PolicyStore/ObjectSet/Full Database Recovery
Model__ObjectSet/TargetSe
t/Server_/Database</sml:Uri>
</sfc:Reference>
</DMF:Parent>
<DMF:TargetTypeSkeleton type="string">
Server/Database</DMF:TargetTypeSkeleton>
<DMF:LevelName type="string">Database</DMF:LevelName>
<DMF
:Condition type="string"/>
</DMF:TargetSetLevel>
</data>
</document>
</instances>
</model>
As you can see by Listing 2-2, a policy is not something you want to create by hand. But for all of you
curious types, interrogating an XML file for a policy is a great way to see what is going on behind the
scenes. You may also notice many tags begin with
DMF, which stands for Declarative Management
Framework. DMF was the original name of Policy-Based Management, but Microsoft changed the name
prior to the final release of SQL Server 2008.
Exporting Current State As Policy
Many policies can be exported based on the current state of a facet. Once you have configured the
properties of the facet for a given object, you can export the current state of the facet as a policy.
If you are familiar with SQL Server 2005, you may have noticed that the Surface Area Configuration
tool is not available when you install SQL Server 2008. The configuration of the Database Engine features
is now managed using the Surface Area Configuration facet in Policy-Based Management. This section
will walk you through exporting a Surface Area Configuration policy using the current state.
In SQL Server Management Studio, right-click the server instance you would like to configure and
select Facets from the context menu.
You can now select and manage any of the server-level facets, including the following:
x Server
x Server Audit
x Server Configuration
33
Please purchase PDF Split-Merge on www.verypdf.com to remove this watermark.
CHAPTER 2 CREATING POLICIES
x Server Installation Settings
x Server Performance
x Server Security
x Server Settings
x Surface Area Configuration
For this example, change the Facet option to Surface Area Configuration, as shown in Figure 2-15.
Note: You can right-click other objects, such as databases and tables, to manage facets directly related to
those objects. For example, if you right-click a database and select Facets from the context menu, you will be able
to manage the following facets from the View Facets dialog box: Database, Database Maintenance, Database
Options, Database Performance, and Database Security.
Figure 2-15. The View Facets dialog box displays available facets for an object.
34
Please purchase PDF Split-Merge on www.verypdf.com to remove this watermark.
CHAPTER 2 CREATING POLICIES
From the View Facets dialog box, you can configure the values for the facet. If you had previously
configured the options using
sp_configure, they would show up as the current state.
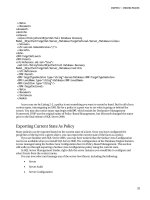
You can also export the current configurations as a policy to the local server or to a file that you can
import and apply to multiple servers across the organization. Click the Export Current State as Policy
button to bring up the Export as Policy dialog box, as shown in Figure 2-16.
Figure 2-16. Export as Policy dialog box
The Export as Policy dialog box allows you to name the policy and condition that will be created. By
default, the policy and condition name will be FacetName_YYYYMMDD. For this demonstration, save
the policy to the local server and click OK. Click OK again to close the View Facets dialog box.
You should now be able to see your new policy and condition in the Policy Management node in
SQL Server Management Studio. You can manage the policy using the same methods as if you created it
manually.
Creating Policies with T-SQL
Another way to create policies is by using use T-SQL. This makes policies extremely portable. You can
script custom policies and share them with other DBAs or even create a postinstallation script that will
apply all the standard policies for your organization within seconds.
One of the advantages of using T-SQL to create policies over using XML files is the ability to place all
the policies in a single script file. This way, there are fewer steps needed to deploy the policies
throughout your environment. You can also take advantage of a Central Management Server (you will
learn more about Central Management Servers in Chapter 3) to deploy all of your policies to a group of
servers with a single click.
35
Please purchase PDF Split-Merge on www.verypdf.com to remove this watermark.
CHAPTER 2 CREATING POLICIES
To generate the T-SQL for the Full Database Recovery Model policy we created earlier in this
chapter, right-click the policy and select Script Policy as o Create to o New Query Editor Window.
Listing 2-3 shows the T-SQL script that is generated.
Listing 2-3. T-SQL script to create the Full Database Recovery Model policy
Declare @object_set_id int
EXEC msdb.dbo.sp_syspolicy_add_object_set
@object_set_name=N'Full Da
tabase Recovery Model_ObjectSet',
@facet=N'IDatabaseMaintenanceFacet',
@object_set_id=@ob
ject_set_id OUTPUT
Select @object_set_id
Declare @target_set_id int
EXEC msdb.dbo.sp_syspolicy_add_ta
rget_set
@object_set_name=N'Full Database Recovery Model_ObjectSet',
@type_skeleton=N'Serv
er/Database',
@type=N'DATABASE',
@enabled=True,
@target_set_id=@target_set_id OUTPU
T
Select @target_set_id
EXEC msdb.dbo.sp_syspolicy_add_target_set_level
@target_set_id=@target
_set_id,
@type_skeleton=N'Server/Database',
@level_name=N'Database',
@condition_nam
e=N'',
@target_set_level_id=0
GO
Declare @policy_id int
EXEC msdb.dbo.sp_syspolicy_add_policy
@name=N'Full Database Recovery Model',
@condition_name=N'Full Recovery Model',
@po
licy_category=N'',
@description=N'Policy to make sure a database recovery model is set to Full'
,
@help_text=N'Choosing a Recovery Model',
@help_link=N' />ibrary/ms175987.aspx',
@schedule_uid=N'00000000-0000-0000-0000-000000000000',
@execution_
mode=0,
@is_enabled=False,
@policy_id=@policy_id OUTPUT,
@root_condition_name=N'',
@object_set=N'Full Database Recovery Model_ObjectSet'
Select @policy_id
GO
The script in Listing 2-3 executes a few stored procedures in the msdb database, which ultimately
insert the policy definition into the internal policy tables also located in the msdb database. These stored
36
Please purchase PDF Split-Merge on www.verypdf.com to remove this watermark.
CHAPTER 2 CREATING POLICIES
procedures are not documented, so it would not be a good idea to try to use them to create a policy from
scratch. We will discuss the internals of Policy-Based Management in detail in Chapter 6, including
internal tables and procedures.
Managing Policy Categories
Policy categories help you group like policies in order to ease policy administration. For example, you
can sort by category in order to help you quickly identify a set of policies you would like to evaluate. You
can also create custom categories that mandate target subscriptions to the policies within the category
or just allow targets to subscribe to each category on an as-needed basis.
Creating Policy Categories
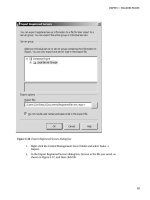
To create policy categories, right-click Policy Management in SQL Server Management Studio Object
Explorer and select Manage Categories from the context menu. This will display the Manage Policy
Categories dialog box, shown in Figure 2-17.
Figure 2-17. Manage Policy Categories dialog box
To add a new category, just type the name of a new category on the empty line, choose whether to
mandate subscriptions, and click OK. If a category is mandated, it will be evaluated against all targets. If
you do not choose to mandate subscriptions, you will need to specifically designate the targets that will
be evaluated. This allows individual database owner to determine if the policy is relevant to their
database and subscribe as necessary.
37
Please purchase PDF Split-Merge on www.verypdf.com to remove this watermark.
CHAPTER 2 CREATING POLICIES
All policies must be assigned to a category, and if no category is specifically chosen, the policy will
be assigned to the Default category. Note that for the Default category, you cannot remove the Mandate
Database check box. All policies that remain in the Default category will be mandated against all targets.
You can also add a new category from the Description page of the Open Policy dialog box by
selecting the New button next to the Category drop-down list, as shown in Figure 2-18.
Figure 2-18. Choosing New next to the the Category drop-down list in the Open Policy dialog box displays
the Create New Category dialog box.
Notice that in the Create New Category dialog box, you can specify only the category name; you
cannot select to mandate database subscriptions. In this case, a new category will be created with the
default option to mandate subscriptions. This is somewhat of a shortcut if you want to mandate
subscriptions to the policies in the new category. If you do not want to mandate subscriptions, you will
need to go to the Manage Policy Category dialog box to change the setting, so you may as well create the
new category from there, rather than taking the Open Policy dialog box route.
38
Please purchase PDF Split-Merge on www.verypdf.com to remove this watermark.
CHAPTER 2 CREATING POLICIES
Once you have created your categories, you can start assigning policies to them by selecting the
Category drop-down list on the Description page of the Open Policy dialog box (see Figure 2-18). You
can tell which policies are assigned to each category by running the query in Listing 2-4.
Listing 2-4. Query used to view policies by category
SELECT B.name AS 'CategoryName',
A.name AS 'PolicyName',
B.mandate_database_subscrip
tions,
A.is_enabled
FROM msdb.dbo.syspolicy_policies_internal A INNER JOIN
msdb.dbo.syspolicy_policy_categories_internal B ON
A.policy_category_id = B.policy
_category_id
ORDER BY B.name,
A.name
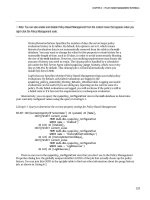
Figure 2-19 shows a sample result set returned by running the query in Listing 2-4. As you can see,
this query will come in handy as you start incorporating more policies into your environment.
Figure 2-19. Results returned from running the query in Listing 2-4
Subscribing to Categories
We mentioned earlier that a target could choose to subscribe to a category if the category is not
mandated. You can subscribe a database to a category, and all the policies within that category that
apply to the database, or any object within the database, will be checked when you evaluate a policy
within the category. However, you must be the database owner (dbo) or system administrator (sa) in
39
Please purchase PDF Split-Merge on www.verypdf.com to remove this watermark.
CHAPTER 2 CREATING POLICIES
order to subscribe a database to a category. If you allow each database to subscribe to a category, the
policy administrators do not necessarily need to know which policies are relevant for each database.
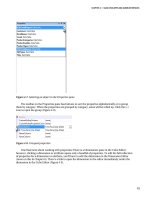
To subscribe to a category, right-click a database and select Policies o Categories from the context
menu to display the Categories dialog box, as shown in Figure 2-20. Select the Subscribed check box
beside each category name that you wish to enforce, and then click OK.
Figure 2-20. Categories dialog box
In the example in Figure 2-20, notice that the only category you can control is Microsoft Best
Practices: Maintenance; all of the check boxes for the other categories are disabled. If you look at Figure
2-17, you will see that the Microsoft Best Practices: Maintenance category is the only one that does not
have the Mandate Database option selected. It is important to remember that you cannot remove the
Mandate Database option from the Default category, and all policies are placed in the Default category if
you do not explicitly specify a different one. Therefore, if you want to allow database owners to manage
their own categories, you need to make sure to put a little extra thought into creating categories and
adding policies.
Creating Advanced Conditions
Thus far, we have showed you how to create policies and conditions based on predefined attributes of a
given facet. However, you can create advanced conditions that extend the realm of Policy-Based
Management far beyond the predefined attributes. The following is a list of available functions you can
use to create advanced conditions:
Add() Enum() Multiply()
Array() ExecuteSql() Power()
Avg() ExecuteWql() Round()
BitwiseAnd() False()
String()
40
Please purchase PDF Split-Merge on www.verypdf.com to remove this watermark.
CHAPTER 2 CREATING POLICIES
BitwiseOr() GetDate() Subtract()
Count() Guid() Sum()
DateAdd() IsNull() True()
DatePart() Len() Uppe
r()
DateTime() Lower()
Divide() Mod()
Not only can you use these functions in your conditions, but you can also access the properties that
apply to the facet you are using to create the condition.
Two very powerful functions in the preceding list are
ExecuteSql() and ExecuteWql(). Windows
Management Instrumentation (WMI) allows you access information about the operating system, such as
disk and processor information. By taking advantage of WMI Query Language (WQL), you can use the
ExecuteWql() function to create policies using logic based on the state of the operating system. You can
use the
ExecuteSql() function to run any valid SQL statement that you can think of to help you enforce
rules in your environment. You can use a property, function, or constant on either side of the operator.
The basic syntax for an advanced condition is as follows:
{property | function | constant}
{operator}
{property | function | constant}
The biggest limiting factor for using advanced conditions is figuring out when and how you can use
them, because it is up to you to think of usage scenarios for your environment.
Let’s look at a situation where you can use an advanced operator. Let’s say you have servers in your
development environment and you want to create a policy to know if developers are creating an
excessive number of databases. You can create a policy using an advanced condition that compares the
number of databases on the server to a given value. If the number of databases exceeds that value, the
policy will fail when evaluated against that server. Follow these steps to create the policy:
1. Right-click the Policies folder in SQL Server Management Studio and select
New Policy from the context menu. Give the policy a descriptive name, such as
Check Number of Databases.
2. Click the Conditions drop-down list and select New Condition to display the
Create New Condition dialog box. Give the condition a descriptive name, such
as Check Number of Databases.
3. Click the Facet drop-down list and select the Server facet, since we will be
checking this policy at the server level.
4. Click the ellipsis button next to the Field column in the Expression grid to
display the Advanced Edit dialog box.
5. When you highlight a function in the Advanced Dialog box, you get a lot of
useful information in the Details section on the right side of the dialog box,
including an example of how to execute each function. We want to get a count
of all the databases on the server. Enter the following command in the Cell
Value text box, as shown in Figure 2-21:
ExecuteSql('Numeric', 'SELECT COUNT(*) FROM sys.databases')
41
Please purchase PDF Split-Merge on www.verypdf.com to remove this watermark.
CHAPTER 2 CREATING POLICIES
Note If you have any single quotes in your SQL statement, they need to be escaped by another single quote,
just as in dynamic SQL. For example, notice there are two single quotes around
master
in the following statement
instead of just one:
ExecuteSql('Numeric', 'SELECT COUNT(*) FROM sys.databases WHERE name <>
''master''')
.
Figure 2-21. Advanced Edit dialog box
42
Please purchase PDF Split-Merge on www.verypdf.com to remove this watermark.
CHAPTER 2 CREATING POLICIES
6. Click OK in the Advanced Edit dialog box to return to the Create New
Condition dialog box.
7. For this example, we want the policy to fail if there are more than ten
databases. Change the Operator to <= and type 10 in the Value field. Figure 2-
22 shows the completed condition.
Figure 2-22. The condition for the Check Number of Databases policy in the Create New Condition dialog
box
8. Click OK to return to the Create Policy dialog box.
9. Enter any remaining information you would like for the policy, such as a brief
description and category.
10. Click OK to create the new policy.
Figure 2-23 shows a sample result of the policy once it has been evaluated. We will explain how to
evaluate policies in Chapter 3.
43
Please purchase PDF Split-Merge on www.verypdf.com to remove this watermark.
CHAPTER 2 CREATING POLICIES
Figure 2-23. Results Detailed View dialog box
As you can see in Figure 2-23, the expected value was <= 10 (which we hard-coded in our condition),
and the actual value is 13 (which was derived by executing the query we defined using the Advanced Edit
dialog box). Obviously, since 13 is greater than 10, the policy results in a failure. You should also be
aware that ExecuteSql() evaluates only the first column from the first row of a result set.
As you can see, by creating advanced conditions, you can greatly expand the capabilities of Policy-
Based Management based on the needs of your environment.
Defining Conditions for System Databases
When you create a new policy, you will notice that the target is set to Every Database, which is
misleading, because it applies the policy against every user database. This means if you want to ensure
AUTOSHRINK is not enabled on your system databases (master, msdb, model, and tempdb), for example,
applying a policy with this default target setting will not work.
So, how can you create a new condition that allows you to run a policy against both user and system
databases? You can create a new custom condition by using the following procedure, which allows you
to look at both system and user database targets.
1. Right-click the Conditions folder under the Policy Management node in SQL
Server Management Studio and select New Condition from the context menu.
44
Please purchase PDF Split-Merge on www.verypdf.com to remove this watermark.
CHAPTER 2 CREATING POLICIES
2. Give the condition a meaningful name, such as Every Database – User and
System.
3. Choose the appropriate facet. For this particular condition, you want to use
the Database facet.
4. Click the Field column and select the
@IsSystemObject property from the drop-
down list.
5. Make sure the Operator column is set to =.
6. Click the Value column and select True from the drop-down list.
7. Select the next line in the Expression grid that reads “Click here to add a
clause,” and change the AndOr operator to OR.
8. Click the Field column and select the
@IsSystemObject property from the drop-
down list.
9. Make sure the Operator column is set to =.
10. Click the Value column and select False from the drop-down list.
11. Select the Description page and enter a meaningful description, such as
Condition that allows you to evaluate both user and system databases.
12. Click OK to create the new condition.
After following the preceding steps, your new condition should look like the condition shown in
Figure 2-24.
Figure 2-24. Condition to evaluate both user and system databases
45
Please purchase PDF Split-Merge on www.verypdf.com to remove this watermark.
CHAPTER 2 CREATING POLICIES
Alternatively, you can execute the T-SQL script in Listing 2-5 to easily create the condition on your
servers.
Listing 2-5. Script to create a condition to evaluate both user and system databases
DECLARE @condition_id int
EXEC msdb.dbo.sp_syspolicy_add_condition
@name=N'Every database – Use
r and System',
@description=N'Condition that allows you to evaluate both user and system databa
ses.',
@facet=N'Database',
@expression=N'<Operator>
<TypeClass>Bool</TypeClass>
<OpTy
pe>OR</OpType>
<Count>2</Count>
<Operator>
<TypeClass>Bool</TypeClass>
<OpType>EQ</OpType
>
<Count>2</Count>
<Attribute>
<TypeClass>Bool</TypeClass>
<Name>IsSystemObject</
Name>
</Attribute>
<Function>
<TypeClass>Bool</TypeClass>
<FunctionType>True</Fun
ctionType>
<ReturnType>Bool</ReturnType>
<Count>0</Count>
</Function>
</Operator>
<Operator>
<TypeClass>Bool</TypeClass>
<OpType>EQ</OpType>
<Count>2</Count>
<Attribu
te>
<TypeClass>Bool</TypeClass>
<Name>IsSystemObject</Name>
</Attribute>
<Functio
n>
<TypeClass>Bool</TypeClass>
<FunctionType>False</FunctionType>
<ReturnType>Bool<
/ReturnType>
<Count>0</Count>
</Function>
</Operator>
</Operator>', @is_name_condition=0,
@obj_name=N'', @condition_id=@condition_id OUTPUT
SELECT @condition_id
GO
46
Please purchase PDF Split-Merge on www.verypdf.com to remove this watermark.
CHAPTER 2 CREATING POLICIES
47
Once you have created the new condition, you can use it when creating your policies by selecting it
from the drop-down list in the Against Targets section.
Caution: Be cautious when applying policies to your system databases. Some policies may make sense to apply
to system databases; others may not. For example, you may not care if the data and log files of the
model
database reside on the same drive. On the other hand, you wouldn’t want
AUTOSHRINK
enabled for your
msdb
database.
With the appropriate policies in place, you can make sure to manage your entire environment, not
just your user databases.
Summary
In this chapter, we discussed many aspects of creating and managing policies. Working with the
SQL Server Management Studio GUI, you can create a condition, create a policy, and even view the
policies that are dependent on each condition.
We covered the various ways of importing and exporting policies, including exporting existing
policies and exporting the current state of a facet to create a policy. We also showed you how to manage
policies using T-SQL, along with some advantages of doing so. We talked about the importance of
managing categories, including how to create new categories and how to subscribe to categories that are
not mandated. We demonstrated how powerful Policy-Based Management can be by using advanced
conditions. Finally, you saw how to create conditions that will include your system databases as well as
your user databases.
In the next chapter, you will see the many ways you can evaluate and enforce these policies to
maintain consistency and control in your environment.
Please purchase PDF Split-Merge on www.verypdf.com to remove this watermark.
Please purchase PDF Split-Merge on www.verypdf.com to remove this watermark.
C H A P T E R 3
Evaluating Policies
Evaluating a policy is the process of executing a policy and reviewing the results against the desired
configuration on the target instance. Policy-Based Management provides several options and
configurations for evaluating policies:
x You can evaluate policies against a single registered SQL Server instance or a
group of instances.
x You can configure policy evaluation to check on change, on schedule, or on
demand.
x You can configure Policy-Based Management to allow and log the noncompliant
changes, or to prevent and roll back changes.
x You can schedule evaluation of single or multiple policies against a given SQL
Server instance.
All of these techniques will be covered in this chapter.
Evaluation Modes
As discussed in the previous chapters, you have up to four choices on how you would like the policy to
be evaluated. Note that not all evaluation modes will be available for all the policies, due to the
characteristics of the facets used by the policy. Table 3-1 summarizes how the modes work and their
availability. We’ll look at using each of these modes in the following sections.
Table 3-1. Summary of Evaluation Modes
Evaluation Mode Description Availability
On Demand Evaluate the policy only when the user
has requested.
Always available
On Schedule Evaluate the policy on a schedule for a
job using the SQL Server Agent. This is an
automated evaluation mode.
Always available
On Change: Log
Only
Allow a change to be made that does not
conform to the policy defined, and then
log the change to the event log. This is an
automated evaluation mode.
Available only if the change of the state of
the facet can be captured by an event
49
Please purchase PDF Split-Merge on www.verypdf.com to remove this watermark.
CHAPTER 3 EVALUATING POLICIES
Table 3-1. Continued
On Change:
Prevent
Disallow a change if it does not conform
to the policy defined. This is an
automated evaluation mode. It uses DDL
triggers.
Available only if there is transactional
support for the DDL statements that
change the state of the facet
Evaluation on Demand
When evaluating a policy on demand, you can either evaluate a single policy or evaluate multiple
policies at once. Let’s start with the evaluation of a single policy on demand.
Evaluating a Single Policy on Demand
Evaluating a single policy on demand is a quick way to give the target instance a once-over if you think
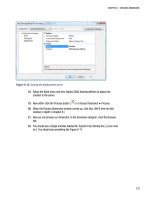
something may be awry. As an example, we’ll walk through the procedure for making sure that
autoshrink is disabled for all of your databases.
Begin by expanding the Policies folder. Right-click the policy that you want to evaluate and select
Evaluate from the context menu, as shown in Figure 3-1. In our scenario, we are choosing the Database
Auto Shrink policy. If you do not have the Database Auto Shrink policy, you can import it from the
predefined policies location that is part of the SQL Server installation, as described in Chapter 2.
(Actually, any policy you choose will be fine.)
Figure 3-1. Choosing to evaluate a single policy
50
Please purchase PDF Split-Merge on www.verypdf.com to remove this watermark.
CHAPTER 3 EVALUATING POLICIES
Since you selected only one policy, that policy is immediately executed, and you are taken to the
Evaluation Results page of the Evaluate Policies dialog box, as shown in Figure 3-2. The Evaluation
Results page has two sections: Results and Target Details.
Figure 3-2. The Evaluation Results page of the Evaluate Policies dialog box
In the Target Details section in Figure 3-2, you can see that the policy ran against all of the user
databases (as defined by the Database Auto Shrink policy), and the database named DB1 failed to
evaluate successfully against the policy.
To determine the problem, click the View link in the Details column. In the Results Detailed View
dialog box, you will see the expected value that the policy is checking for and the actual value at the time
of evaluation, as shown in Figure 3-3. If the policy creator added a policy description and a help link, you
will find that information here as well.
51
Please purchase PDF Split-Merge on www.verypdf.com to remove this watermark.
CHAPTER 3 EVALUATING POLICIES
Figure 3-3. Results Detailed View dialog box
Close the Results Detailed View dialog box and return to the Evaluate Policies dialog box. Select the
check box to the left of the failed evaluation of the policy. Now the Apply button that was previously
disabled is enabled, as shown in Figure 3-4. Clicking the Apply button will change the facet’s current
configuration value to the expected value of the policy.
52
Please purchase PDF Split-Merge on www.verypdf.com to remove this watermark.