Setting Up a PHP-MySQL Development Environment
Bạn đang xem bản rút gọn của tài liệu. Xem và tải ngay bản đầy đủ của tài liệu tại đây (1.82 MB, 25 trang )
34
How to Do Everything with
PHP & MySQL
HowTo8 (8) / How to Do Everything with PHP & MySQL/Vaswani/225795-4/Chapter 2HowTo8 (8) / How to Do Everything with PHP & MySQL/Vaswani/225795-4/Chapter 2
The PHP configuration process is extremely sophisticated, enabling you
to control many aspects of PHP’s behavior. To see a complete list of
available options, use the command ./configure --help, and visit
for detailed explanations
of what each option does.
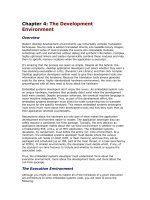
7.
Next, compile and install PHP using make and make install:
[root@host]# make
[root@host]# make install
Figure 2-7 illustrates what you might see during the compilation process.
PHP should now be installed to /usr/local/php5/.
8.
The next step in the installation process consists of configuring Apache
to correctly recognize requests for PHP pages. This is accomplished by
opening the Apache configuration file, httpd.conf (which is found in the
conf/ subdirectory of the Apache installation directory), in a text editor
and adding the following line to it.
AddType application/x-httpd-php .php
FIGURE 2-6
Configuring the PHP source tree
ch02.indd 34 2/2/05 3:06:32 PM
TEAM LinG
HowTo8 (8)
CHAPTER 2: Setting Up a PHP-MySQL Development Environment
35
HowTo8 (8)
9.
Save the changes to the file. Also, check to make sure this line appears
somewhere in the file:
LoadModule php5_module libexec/libphp5.so
The PHP installation process should automatically add this line to the file,
but it has been known to fail. If you don’t see it, add it yourself.
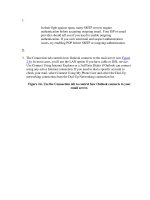
10.
Start the Apache server by manually running the apachectl script.
[root@host]# /usr/local/apache/bin/apachectl start
Apache should start up normally. Figure 2-8 demonstrates what you will see as
the server starts up.
Once installation is successfully completed and the server has started, move down
to the section entitled “Testing Apache and PHP” to verify that all is functioning as
it should.
Installing on Windows
Compiling applications on Windows is a challenging process, especially for novice
developers. With this in mind, it is advisable for Windows users to focus instead
on installing and configuring prebuilt binary releases of MySQL, PHP, and Apache,
FIGURE 2-7
Compiling PHP
2
ch02.indd 35 2/2/05 3:06:32 PM
TEAM LinG
36
How to Do Everything with
PHP & MySQL
/ How to Do Everything with PHP & MySQL/Vaswani/225795-4/Chapter 2 / How to Do Everything with PHP & MySQL/Vaswani/225795-4/Chapter 2
instead of attempting to compile them from source code. These releases can be
downloaded from the web sites listed in the previous section. They are to be
installed one after another, as outlined in the following subsections.
Installing MySQL
The binary distribution of MySQL for Windows comes with an automated
installer, which enables you to get MySQL up and running on your Windows
system in just a few minutes.
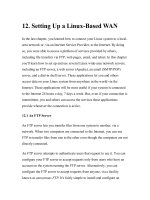
1.
Log in as an administrator (if you’re using Windows NT or Windows 2000)
and unzip the distribution archive to a temporary directory on your system.
After extraction, your directory should look something like Figure 2-9.
2.
Double-click the setup.exe file to begin the installation process. You should
see a welcome screen (Figure 2-10).
3.
Select the directory in which MySQL is to be installed, for example,
c:\program files\mysql\ (Figure 2-11).
FIGURE 2-8
Apache server startup messages
ch02.indd 36 2/2/05 3:06:32 PM
TEAM LinG
HowTo8 (8)
CHAPTER 2: Setting Up a PHP-MySQL Development Environment
37
HowTo8 (8)
FIGURE 2-9
The directory structure created on unpackaging a MySQL binary distribution
for Windows
FIGURE 2-10
Beginning MySQL installation on Windows
2
ch02.indd 37 2/2/05 3:06:32 PM
TEAM LinG
38
How to Do Everything with
PHP & MySQL
HowTo8 (8) / How to Do Everything with PHP & MySQL/Vaswani/225795-4/Chapter 2HowTo8 (8) / How to Do Everything with PHP & MySQL/Vaswani/225795-4/Chapter 2
FIGURE 2-11
Selecting the MySQL installation directory
4.
Select the type of installation required (Figure 2-12).
Most often, a Typical Installation will do. If you’re the kind who likes
tweaking default settings, however, or if you’re short of disk space, select
the Custom Installation option, and decide which components of the
package should be installed (Figure 2-13).
5.
MySQL should now begin installing to your system (Figure 2-14).
6.
Once installation is complete, you should see a screen like Figure 2-15.
You should now be able to start the MySQL server by diving into the bin\
subdirectory of your MySQL installation and launching the WinMySQLadmin
tool (winmysqladmin.exe). This tool provides a graphical user interface to MySQL
configuration, and is by far the simplest way to configure MySQL on Windows
systems.
The first time you start WinMySQLadmin, you will be asked for the name and
password of the user the server should run as (Figure 2-16).
Once this information is entered, WinMySQLadmin will automatically create
the MySQL configuration file (named my.ini) and populate it with appropriate
values for your system. You can edit these values at any time using the my.ini
Setup section of the WinMySQLadmin application (see Figure 2-17).
ch02.indd 38 2/2/05 3:06:33 PM
TEAM LinG
HowTo8 (8)
CHAPTER 2: Setting Up a PHP-MySQL Development Environment
39
HowTo8 (8)
FIGURE 2-12
Selecting the MySQL installation type
FIGURE 2-13
Selecting components for a custom MySQL installation
2
ch02.indd 39 2/2/05 3:06:33 PM
TEAM LinG
40
How to Do Everything with
PHP & MySQL
HowTo8 (8) / How to Do Everything with PHP & MySQL/Vaswani/225795-4/Chapter 2HowTo8 (8) / How to Do Everything with PHP & MySQL/Vaswani/225795-4/Chapter 2
You can also start the MySQL server by directly launching the mysqld.
exe or mysqld-nt.exe binaries from the bin\ subdirectory of your MySQL
installation.
FIGURE 2-14
MySQL installation in progress
FIGURE 2-15
MySQL installation successfully completed
ch02.indd 40 2/2/05 3:06:33 PM
TEAM LinG
HowTo8 (8)
CHAPTER 2: Setting Up a PHP-MySQL Development Environment
41
HowTo8 (8)
FIGURE 2-16
Setting the WinMySQLadmin username and password
FIGURE 2-17
Editing MySQL configuration on Windows via WinMySQLadmin
2
ch02.indd 41 2/2/05 3:06:34 PM
TEAM LinG
42
How to Do Everything with
PHP & MySQL
HowTo8 (8) / How to Do Everything with PHP & MySQL/Vaswani/225795-4/Chapter 2HowTo8 (8) / How to Do Everything with PHP & MySQL/Vaswani/225795-4/Chapter 2
Once the server has started, WinMySQLadmin will minimize to a green icon in
your Windows taskbar notification area. You can now proceed to test the server, as
described in the section “Testing MySQL,” to ensure that everything is working as
it should.
You can bring the WinMySQLadmin application back to the foreground
at any time by right-clicking its taskbar icon and selecting the Show Me
option from the menu that pops up (see Figure 2-18).
Installing Apache
Once MySQL is installed, the next step is to install the Apache Web server. On
Windows, this is a point-and-click process, similar to that used when installing
MySQL.
1.
Begin by double-clicking the Apache installer to begin the installation
process. You should see a welcome screen (Figure 2-19).
2.
Read the license agreement and accept the terms to proceed (Figure 2-20).
3.
Read the descriptive information and proceed to enter basic server information
and the e-mail address to be displayed on error pages (Figure 2-21).
4.
Select the type of installation required (Figure 2-22).
If you like, select the Custom Installation option to decide which
components of the package should be installed (Figure 2-23).
5.
Select the location to which Apache should be installed, for example,
c:\program files\apache group\ (Figure 2-24).
FIGURE 2-18
Using the WinMySQLadmin system tray icon
ch02.indd 42 2/2/05 3:06:34 PM
TEAM LinG
HowTo8 (8)
CHAPTER 2: Setting Up a PHP-MySQL Development Environment
43
HowTo8 (8)
FIGURE 2-19
Beginning Apache installation on Windows
FIGURE 2-20
Apache licensing terms
2
ch02.indd 43 2/2/05 3:06:34 PM
TEAM LinG