Pro SQL Server 2008 Analysis Services- P4
Bạn đang xem bản rút gọn của tài liệu. Xem và tải ngay bản đầy đủ của tài liệu tại đây (1.43 MB, 50 trang )
CHAPTER 6 CREATING DIMENSIONS
131
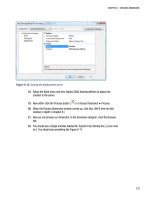
Figure 6-16. Setting the deployment server
18. Select the Build menu and then Deploy SSAS AdventureWorks to deploy the
solution to the server.
19. Now either click the Process button (
) or choose Dimension
➤
Process.
20. When the Process Dimension window comes up, click Run. (We’ll dive into this
window in depth in Chapter 8.)
21. Now we can browse our dimension. In the dimension designer, click the Browser
tab.
22. You should see a single member labeled All. Expand it by clicking the [+] icon next
to it. You should see something like Figure 6-17.
Please purchase PDF Split-Merge on www.verypdf.com to remove this watermark.
CHAPTER 6 CREATING DIMENSIONS
132
Figure 6-17. Our new dimension?
23. That’s odd. Hold on—look at the Hierarchy selection. These are the available
Discount Percentages. Change the selection to Promotion Key and open the tree
again (Figure 6-18).
Please purchase PDF Split-Merge on www.verypdf.com to remove this watermark.
CHAPTER 6 CREATING DIMENSIONS
133
Figure 6-18. The promotions in the dimension
24. This looks more like a list of dimensions. So how do we make them come up first?
We’ll use a little trickery. Let’s also clean up the dimension a bit. Click the
Dimension Structure tab again.
25. Right-click English Promotion Category, select Rename, and rename it Category.
26. Similarly, rename English Promotion Type to Type, and Promotion Key to
Promotion.
27. Now we’re going to create a hierarchy. Drag Category to the Hierarchies section in
the middle of the designer. This will create a Hierarchy container. Drag Type to the
<new level> area under Category.
28. Finally, drag Promotion under Type.
29. Right-click Hierarchy and select Rename. Rename the hierarchy Promotions. It
should look like Figure 6-19.
Please purchase PDF Split-Merge on www.verypdf.com to remove this watermark.
CHAPTER 6 CREATING DIMENSIONS
134
Figure 6-19. The Promotions hierarchy
30. Note that little blue squiggle under Promotions in the hierarchy. See the upcoming
section, “Analysis Management Objects (AMO) Warnings,” for more about that. For
now don’t worry about it.
31. Save the dimension and process it again.
32. Click the Browser tab. (You will likely have to click on the Reconnect link in the
yellow bar at the bottom to refresh the connection.)
33. In the Hierarchy tab, select Promotions.
Note that now the promotions are all structured in an easy-to-browse tree (see
Figure 6-20).
Figure 6-20. The finished Promotions hierarchy
Please purchase PDF Split-Merge on www.verypdf.com to remove this watermark.
CHAPTER 6 CREATING DIMENSIONS
135
In this exercise, we talked a lot about attributes and hierarchies. Let’s take a deeper look at what
they are and how they factor into cube design.
Analysis Management Objects (AMO) Warnings
In Exercise 6-2, we see a little blue squiggle in a hierarchy. When we mouse over it, we see a warning
(Figure 6-21). This is an Analysis Management Objects (AMO) warning, a new feature in BIDS 2008. AMO
warnings are best-practice recommendations to aid in design of Analysis Services cubes. In this case, the
warning is pointing out that there is no relationship defined between the Type and Promotion attributes
(more on this in the “Attributes” section later in this chapter).
Figure 6-21. An AMO warning in BIDS
BIDS has dozens of design warning rules that it runs against OLAP designs as you work. The
warnings will show up as you work. AMO warnings won’t keep you from saving or processing cubes or
dimensions. You can choose to ignore warnings, either on a case-by-case basis, or you can dismiss a
warning globally.
To dismiss a warning, open the Error List pane (View menu
➤
Error List). Find the error and then
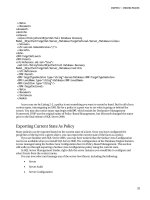
right-click on it. Click Dismiss, and the Dismiss Warning dialog box will open (Figure 6-22). Note that
you can enter comments. These comments will be stored with the database for future reference. For
example, this same warning was dismissed in the AdventureWorks database. Let’s take a look at why.
Figure 6-22. Dismissing an AMO warning
Please purchase PDF Split-Merge on www.verypdf.com to remove this watermark.
CHAPTER 6 CREATING DIMENSIONS
136
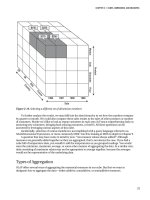
To view the status of warnings in a database, right-click the database name (the project in the
Solution Explorer) and select Edit Database. In the designer that opens, click the Warnings tab (Figure
6-23).
Figure 6-23. Reviewing AMO warnings
The top section lists the design warning rules available. They’re grouped by type of object (Cube,
Data Source, and so on), and ranked by importance. You can come in and deselect rules that you don’t
want enforced. In the lower window are the warnings you’ve dismissed for the current database
(including comments you made when you dismissed them). You can highlight a dismissed warning and
click the Re-enable button to put the warning back in place.
Dimension Properties
Now that you’ve built a dimension, let’s dig into the features and properties. These are accessible by
right-clicking on the dimension name in the attributes pane on the left, in Visual Studio, and selecting
Properties. The following subsections describe each of the properties that you see.
Please purchase PDF Split-Merge on www.verypdf.com to remove this watermark.
CHAPTER 6 CREATING DIMENSIONS
137
Dimension Type
You can flag a dimension with a type—the default is Regular. For the most part, the dimension type is an
indicator for client applications on how to treat a dimension. For example, if a dimension is the
Customer type, a client application may provide a way to map the dimension to contact cards or a
personnel selector-type control. Note that Account, Currency, and Time dimension types do have
special handling built into SSAS—we’ll look at them separately.
The dimension types are as follows:
Account: This dimension represents a chart of accounts (revenues, losses, profits, expenses, and so
forth). An Account dimension type can be managed such that specific account types are positive or
negative solely based on the account definition.
Bill of Materials: A Bill of Materials type will contain manufacturing or inventory information (unit
of measure, cost, packaging).
Channel: Used in retail sales, a Channel dimension will indicate the sales channel used (wholesale,
retail, partners).
Currency: The Currency dimension is designed to reflect the financial requirements of dealing with
international transactions. SSAS has a currency-conversion feature to manage these transactions.
Customer: A Customer dimension will have standard attributes for customers and contact
information.
Geography: If you want to designate attributes as addresses, cities, and zip codes, then set the
dimension type as Geography. You can also have spatial data types in a Geography dimension type.
Organization: Employee names, positions, offices, and branches can all be defined in an
Organization dimension.
Product: A Product dimension will have attribute types for brands, SKUs, and product categories.
You can also add attributes for product start and end dates.
Promotion: If you need to group facts by the type of deal the buyer got, you can use a Promotion
dimension type, including minimum and maximum quantities, start and end dates, percentage
discounts, and so on.
Quantitative: Quantitative is more a general description than an actual dimension type, and more
of a collection of measurement-oriented attributes (volume, weight, color, maximum, minimum,
and so forth) than anything else.
Rates: Generally a dimension for measuring exchange rates.
Scenario: Scenarios are a fascinating capability of an OLAP solution. Because any dimension can
“slice” the fact data into exclusive collections (sales in Europe, North America, or Asia), we can
create a dimension solely for creating scenarios. For example, a scenario may have members for
“5 percent growth,” “No growth,” and “5 percent decline.” Selecting each member then groups
the data for that scenario. You’ll revisit the concept of scenarios when you look at writeback in
Chapter 7.
Time: A Time dimension represents a calendar—days, weeks, months, quarters, years. The Time
dimension is very special, as we’ve seen previously, and we’ll cover time dimension types
specifically later in the chapter.
Please purchase PDF Split-Merge on www.verypdf.com to remove this watermark.
CHAPTER 6 CREATING DIMENSIONS
138
Utility: A Utility dimension is basically a catchall for some aspect of the data that may not be
reflected in the business rules.
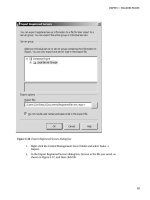
Each of these dimension types has a host of matching attribute types (Figure 6-24). In general, you
can “mix and match” attribute types with dimension types, though some of the special types can be used
only in their matching dimension type. If you mismatch types, you’ll get an AMO warning on the
dimension.
Figure 6-24. Selecting attribute types
After you’ve set a dimension type and assigned attribute types, OLAP client applications can
leverage known dimension types in business logic. For example, a sales and marketing analysis tool
could pull promotion and channel dimensions from your cubes and align them with the analysis system.
I mentioned that Account, Currency, and Time dimension types are special. In addition to being
able to be leveraged by client applications, each of these dimensions can be specified within SSAS to
work in special ways. Let’s open AdventureWorks and look at the Account dimension (Figure 6-25). Note
that the table in the data source view is self-referential. It has a field that is a foreign key for the table’s
primary key, to indicate the parent account. This creates the recursive hierarchy of accounts in the
dimension.
Please purchase PDF Split-Merge on www.verypdf.com to remove this watermark.
CHAPTER 6 CREATING DIMENSIONS
139
Figure 6-25. The Account dimension in AdventureWorks
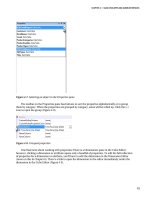
Now let’s look at the dimension browser (Figure 6-26). You might not notice at first, but various
accounts have plus or minus signs on their icons in the browser. That’s because the DBA set up account
business intelligence on the dimension. When you run the Add Business Intelligence Wizard (Dimension
menu), it walks you through mapping an accounts table to built-in logic for standard accounts. In
addition, the UnaryOperatorColumn was set to the Operator column of the Account table. In a parent-
child hierarchy dimension, setting the Unary Operator on the parent attribute indicates to Analysis
Services to use that column to determine how to aggregate that member.
Figure 6-26. Browsing the Account dimension
Please purchase PDF Split-Merge on www.verypdf.com to remove this watermark.
CHAPTER 6 CREATING DIMENSIONS
140
Currency dimensions have similar logic that can be added via the business intelligence wizard. The
wizard is pretty straightforward. You will want a table of exchange rates by time period to handle the
automatic currency conversion. One aspect you will have to know is your preferred method of handling
local currencies. SSAS will want one of the following three scenarios:
Many-to-many: All transactions are recorded in the local currency. Currency conversion is applied
at the cube level and can target many currencies.
Many-to-one: All transactions are recorded in the local currency. Conversions are applied at the
cube level to the corporate standard currency.
One-to-many: All transactions are recorded in a single currency. The conversion is applied at the
cube level with multiple target currencies.
So if all your sales are reported in the local currency, you can set up a currency dimension and
conversion rate table, apply the business intelligence wizard, and you can roll up aggregated sales
figures with conversions automatically applied.
ErrorConfiguration
This section of properties refers to how Analysis Services should handle errors that crop up while
processing the dimension. Think of a dimension as a lookup table—one thing that’s necessary is a
primary key value to link the dimension and subordinate attributes to records in the cube. So when
processing the dimension (reading in the data, parsing it for attributes and relationships, and then
caching the dimension data), if multiple records have the same key value, SSAS will throw an error.
You can indicate how to handle the error here. The default action is to ignore the error and continue
processing. You can see how this may cause problems, so you might want to change this to either
ReportAndContinue or ReportAndStop if you have a data source where you expect you may get
duplicates. Both IgnoreError and ReportAndContinue will leverage the KeyErrorAction setting—either
converting the key to an Unknown catchall value or discarding the record.
MdxMissingMemberMode
This setting indicates how Analysis Services should handle queries or calculations that reference a
member that doesn’t exist in the dimension. The default setting is Default, which means the error will be
handled in accordance with the settings in Analysis Services and the cube. You can also specifically set
this to error out or ignore the error.
Processing
These options govern how the dimension is processed. You should generally leave the setting for
ProcessingGroup at the default value of ByAttribute. ByTable is used for a small subset of cases generally
involving very large dimensions (millions of rows). Setting ProcessingMode to LazyAggregations will
make the dimension available for use while it’s still being processed, but as a result, processing will take
longer.
ProcessingPriority allows you to prioritize the order in which dimensions are processed. You might
want certain dimensions (such as Time) available sooner, for example, while other less-used dimensions
are processed afterward.
Please purchase PDF Split-Merge on www.verypdf.com to remove this watermark.
CHAPTER 6 CREATING DIMENSIONS
141
Storage
There are two major sections here: StorageMode and ProactiveCaching. Recall the discussion about
MOLAP and ROLAP; in Analysis Services you can specify the storage setting for each dimension and
measure partition. The two settings here are MOLAP and ROLAP, reflecting the two major options for
where dimensions are stored—either in the multidimensional repository or in the relational database.
Where is HOLAP? Well the “hybrid” part of the equation is where the proactive caching comes in.
Remember that MOLAP stores the dimension data in the Analysis Services cube, while ROLAP stores the
data in the relational store. However, with MOLAP we can also specify proactive caching. With proactive
caching, SSAS rebuilds the dimension either when the source data changes, when signaled by a client
application, or on scheduled intervals.
If you click the builder button […] next to the ProactiveCaching setting, you’ll open the Dimension
Storage Settings dialog box (Figure 6-27). Here you can choose either one of the standard settings or a
custom setting. The custom options give you some granular control over the cache, and then allow you
to control how SSAS should be notified of changes in the underlying data.
Figure 6-27. Setting dimension storage settings
The options for notification are as follows:
SQL Server: SSAS simply sets a trace on the necessary tables in SQL Server and tracks for data
changes. You can select the Specify Tracking Tables check box and explicitly list the tables SSAS
should track for changes (remember, all that will happen is that SSAS will rebuild the dimension if
any changes to the data in the indicated tables are detected). If you don’t specify the tables, Analysis
Services will try to determine from the dimension structure which tables to track.
Please purchase PDF Split-Merge on www.verypdf.com to remove this watermark.
CHAPTER 6 CREATING DIMENSIONS
142
Note If you select the SQL Server option, the account that connects to the data sources tables must have ALTER
TRACE permissions on the database.
Client Initiated: This is pretty close to regular MOLAP—a client calls for the processing to occur.
Scheduled Polling: Specify a polling interval, and SSAS will query the data source for changes; if the
data has changed, SSAS will rebuild the dimension. You can also specify incremental updates if you
need to process only part of a dimension based on data changes.
Let’s take a look at how dimension storage works in Exercise 6-3.
Exercise 6-3. Specify Dimension Storage Modes
Follow the steps in this exercise to work through a detailed example showing how to specify dimension
storage.
1. Open the SSAS AdventureWorks project. Double-click on the Promotions
dimension to open that.
2. First let’s check out the dimension as it currently works. Click the Browser tab.
3. Select the Promotion hierarchy, and then open the tree by clicking the [+] symbol
next to the All member (Figure 6-28).
Figure 6-28. Viewing the promotion members in the dimension
Please purchase PDF Split-Merge on www.verypdf.com to remove this watermark.
CHAPTER 6 CREATING DIMENSIONS
143
4. We want to rename the Mountain Tire Sale to Mountain Tire Sale 2009, so let’s
go change the data in the underlying data table.
5. Open SQL Server Management Studio.
6. Connect to the server where the Adventure Works DW2008 database is located
(Database Engine connection).
7. Open the AdventureWorks DW2008 database and then the Tables folder.
8. Right-click on the dbo.DimPromotion table and select Edit 250 Rows.
9. Find the promotion where the EnglishPromotionName is Mountain Tire Sale.
Change the name to Mountain Tire Sale 2009 (Figure 6-29).
Figure 6-29. Editing the Promotion
10. Click the down arrow to leave the row and write the record change to the
database.
11. Now that we’ve changed the record, let’s look at the dimension. Go back to BIDS.
(Leave the edit table window open in SSMS—we’ll come back to it.)
12. Refresh the dimension browser (Dimension menu
➤
Refresh). Note that the
Mountain Tire Sale promotion hasn’t changed.
13. Process the dimension (Dimension
➤
Process). Now refresh the browser view, and
you should see the new promotion name.
14. Let’s change the storage. Go back to the Dimension Structure tab.
15. In the left pane (Attributes), right-click on the Promotions at the top of the tree and
select Properties (Figure 6-30).
Please purchase PDF Split-Merge on www.verypdf.com to remove this watermark.
CHAPTER 6 CREATING DIMENSIONS
144
Figure 6-30. Opening the Properties pane for the dimension
16. In the Properties pane, under Storage, click the Off option next to
ProactiveCaching.
17. Click the Builder button […].
18. In the Dimension Storage Settings dialog box, select Custom Setting and then click
the Options button.
19. At the top, under the Storage mode drop-down, select the check box for Enable
Proactive Caching.
20. Select the check box labeled Update the Cache When Data Changes. Note the
warning at the bottom (Figure 6-31).
Please purchase PDF Split-Merge on www.verypdf.com to remove this watermark.
CHAPTER 6 CREATING DIMENSIONS
145
Figure 6-31. Setting proactive caching
21. Click the Notifications tab. Note that SQL Server is selected and Specify Tracking
Tables is not selected. Click the OK button to return to the Dimension Storage
Settings dialog box, and click the OK button there. Now we’re going to go check
our permissions.
What we need is for the account that connects to the SQL Server database to have
ALTER TRACE permissions. First let’s look at the data source.
22. In BIDS, double-click on the
Adventure Works DW2008.ds
data source to open
the designer.
23. Click the Impersonation Information tab.
24. The default option is Use the Service Account. This means SSAS will use the
service account it’s running under to connect to the data source. Click OK to close
this dialog.
Please purchase PDF Split-Merge on www.verypdf.com to remove this watermark.
CHAPTER 6 CREATING DIMENSIONS
146
25. On the server running Analysis Services, open the Services applet:
o Windows Server 2003: Right-click on My Computer, click Manage. In the
Computer Management applet, open Services and Applications and click
Services.
o Windows Server 2008: Right-click on Computer and click Manage. In the
Server Manager applet, open Configuration and then click Services.
26. Scroll down to find the SQL Server Analysis Services service. Right-click on it and
select Properties.
27. Click the Log On tab (Figure 6-32).
Figure 6-32. The Log On properties for the SSAS service
28. Note the account named; because the data source is using this account to access
the data source, this is the account we have to provide for.
29. Close the dialog box and management applets.
30. Go back to SQL Server Management Studio.
31. Right-click on the server in the Object Explorer and select Properties.
32. In the Properties dialog box, select the Permissions page.
33. If you scroll down in the Logins or Roles pane, you should see NT
AUTHORITY\NETWORK SERVICE (Figure 6-33).
Please purchase PDF Split-Merge on www.verypdf.com to remove this watermark.
CHAPTER 6 CREATING DIMENSIONS
147
Figure 6-33. Setting properties on the database server
34. Select NT AUTHORITY\NETWORK SERVICE and then scroll down in the Permissions
pane and select the Alter Trace check box.
35. Click the OK button.
36. Return to BIDS and process the dimension (with the new Automatic MOLAP
storage setting). Click Yes to “Would you like to build and deploy the project first?”
37. Click Run when the Process Dimension dialog box shows up. After processing,
click Close and then click Close again.
38. Click the Dimension Structure tab and then the Browser tab. You should get the
warning at the bottom of the browser. Click Reconnect.
39. Let’s edit the promotion again—back to SQL Server Management Studio.
40. Change LL Road Frame Sale to All Road Frame Sale. Remember to click the
down arrow to write the change!
41. Back to BIDS.
42. In the Dimension menu, click Refresh.
Please purchase PDF Split-Merge on www.verypdf.com to remove this watermark.
CHAPTER 6 CREATING DIMENSIONS
148
43. Note that the promotion now indicates All Road Frame Sale and the members are
re-sorted!
Our dimension will now automatically update with changes to the database.
UnknownMember
The UnknownMember is effectively a catchall where any measures that don’t match members in this
dimension will be assigned. You have the option as to whether to have an unknown member and
whether it’s visible. You can also give the member a specific name (for example, Unassigned Sales or
Respondents Didn’t Answer).
WriteEnabled
While most of the time OLAP cubes are used for read-only analysis, Analysis Services does have the
ability to edit cubes and dimensions directly. However, only parent-child dimensions can be write-
enabled.
We talked a lot about attributes earlier. Let’s take a closer look at them.
Attributes
If dimension members are nouns, attributes are adjectives. Let’s look back at our Promotion dimension
(Figure 6-34). The dimension has attributes for the percentage discount, start and end date, maximum
and minimum quantities, promotion category, type, and name. Each of these is amplifying information
for each promotion in the dimension.
Figure 6-34. Attributes on the Promotion dimension
Attributes are often called containers for dimension members. I find the adjective concept easier to
grasp. However, you can see how that approach works—take all the Promotion categories, and each one
is something of a “bucket” for the promotions that have that category. However, not every attribute is
really a “container”—for example, a Product dimension might have a Price attribute, but grouping by
price ($12.95, $13.15, $14.75) wouldn’t be that productive.
Please purchase PDF Split-Merge on www.verypdf.com to remove this watermark.
CHAPTER 6 CREATING DIMENSIONS
149
In addition to enabling drill-down or reporting, attributes are also useful for querying. For example,
you can select for all blue bicycles, or use an MDX query like the following, to show sales by product for
all products with a list price over $1,000.00. We’ll dive into MDX in Chapter 9.
WITH
MEMBER Measures.[List Price] AS [Product].[List Price].CurrentMember.MemberValue
SELECT
{[Date].[Fiscal].[Fiscal Quarter].Members}
ON COLUMNS,
Filter([Product].[Product].Members, (Measures.[List Price]>1000))
ON ROWS
FROM [Adventure Works]
WHERE ([Measures].[Internet Sales Amount])
In the dimension structure, attributes are generally defined by dragging a field from the data source
view over to the dimension (Figure 6-35).
Figure 6-35. Creating an attribute from the dimension data source view
For the most part, a dimension consisting of members and attributes is similar to a database table
with rows and columns. In fact, you can view the dimension with its attributes as a table: in the browser,
Please purchase PDF Split-Merge on www.verypdf.com to remove this watermark.
CHAPTER 6 CREATING DIMENSIONS
150
selecting Member Properties from the Dimension menu will show all the attributes for the dimension in
a table (Figure 6-36).
Figure 6-36. Showing all attribute values for a dimension
To really get value out of the collection of attributes in a dimension, we want to build hierarchies
and set attribute relationships. Because our users will generally use various attributes in different ways,
defining attribute relationships aids the user in seeing relationships in the dimension structure, as well
as optimizing performance by defining how attributes are related within the data and by business rule.
Let’s dig into attribute relationships.
Attribute Relationships
Every attribute in a dimension is related to the key attribute of the dimension, either directly or
indirectly (via a relationship with another attribute). By default, when you create a dimension in BIDS,
each attribute in the table with the key attribute (in a star schema this would be the only table in the
dimension; in a snowflake schema it’s the main dimension table) is directly related to the key attribute.
The attribute in foreign-key tables bound to the foreign key is also directly related to the key attribute.
Finally, attributes based on fields in the foreign-key tables are directly related to the foreign-key attribute
(Figure 6-37).
Please purchase PDF Split-Merge on www.verypdf.com to remove this watermark.