Foundation Flash CS5 For Designers- P3
Bạn đang xem bản rút gọn của tài liệu. Xem và tải ngay bản đầy đủ của tài liệu tại đây (1.63 MB, 50 trang )
GRAPHICS IN FLASH CS5
79
Figure 2-11. The tip or “pour” point of the Paint Bucket’s icon is its hot spot.
8.
Click the object on the stage. When you do, it will be surrounded by circle, a line will bisect the
selection, and three handles will appear, as shown in Figure 2-12. The circle represents the area
of the gradient fill.
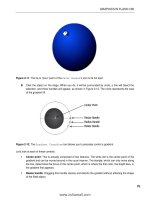
Figure 2-12. The Gradient Transform tool allows you to precisely control a gradient.
Let’s look at each of these controls:
Center point: This is actually composed of two features. The white dot is the center point of the
gradient and can be moved around in the usual manner. The triangle, which can only move along
the line, determines the focus of the center point, which is where the first color, the bright blue, in
the gradient first appears.
Resize handle: Dragging this handle resizes and distorts the gradient without affecting the shape
of the filled object.
www.zshareall.com
Please purchase PDF Split-Merge on www.verypdf.com to remove this watermark.
CHAPTER 2
80
Radius handle: Moving this one inward or outward resizes the gradient proportionally.
Rotate handle: Drag this handle, and the gradient rotates around the center point. The effect can
be quite subtle with a radial gradient, but you’ll see a difference if you squeeze the gradient into a
lozenge shape with the resize handle.
Now that you know how to use the tool on a radial gradient, give it a try on a linear gradient. Here’s how:
1.
Select one of the linear gradients from the Fill color chip in the Tools panel.
2.
Select the Rectangle tool, and draw a square. Click the square with the Gradient
Transform tool.
3.
As you can see in Figure 2-13, the same controls are in place. This time two lines, which indicate
the range of the gradient, appear. If you click the resize handle and drag it downward toward the
top of the box, the colors in the gradient become more compressed. The rotate and center point
handles work in the same manner as their radial gradient counterparts.
Figure 2-13. The Gradient Transform tool can be used on linear gradients as well.
Object Drawing mode
Introduced in Flash 8, the addition of the Object Drawing mode feature was greeted with wild cheering and
dancing in the streets. Well, it didn’t exactly happen that way, but a lot designers became seriously “happy
campers” when they discovered this feature.
Prior to the release of Flash 8, shapes that overlapped each other on the stage were, for many, a
frustrating experience. If one shape was over another—in the same layer—and you selected and moved it,
it would cut a chunk out of the shape below it. This is not to say it was flaw in the application. This behavior
is quite common with painting applications. In Flash, once you understand the “one piece eats the other”
This book was purchased by
www.zshareall.com
Please purchase PDF Split-Merge on www.verypdf.com to remove this watermark.
GRAPHICS IN FLASH CS5
81
phenomenon, it becomes a great construction tool. It can be much simpler to throw down a base shape
and purposefully “take bites” out of it to achieve a complex figure than to draw the same figure from
scratch. Object Drawing mode uses the opposite concept. You get the best of both worlds, and the choice
is yours.
When you select a drawing tool, the Object Drawing icon, shown in Figure 2-14, appears in the Tools
panel. Click it, and the oval you are about to draw will be drawn as a separate object on the stage and will
not automatically merge with any object under it, even on the same layer. Let’s see how it works.
Figure 2-14. Click the Object Drawing icon to turn on this feature.
www.zshareall.com
Please purchase PDF Split-Merge on www.verypdf.com to remove this watermark.
CHAPTER 2
82
1.
Open the ObjectDrawing.fla file in your Chapter 2 Exercise folder.
2.
Select the Oval tool, turn off the stroke in the Tools panel, and draw a circle over the shape on
the stage.
3.
Select the circle, and drag it off of the shape. When you release the mouse, you will see that your
circle has bitten off a chunk of the shape.
4.
Select the Oval tool, click the Object Drawing mode button in the Tools panel, and draw
another circle over the shape. Drag it away and nothing happens, as shown in Figure 2-15.
Hooray for Object Drawing mode!
When you drew that second circle, Flash offered you a visual clue that you were in Object Drawing mode.
When you selected the shape, it was surrounded by a bounding box.
Figure 2-15. The effects of having Object Drawing mode turned on or turned off
Here’s a little trick you can use to edit a single object in Object Drawing mode: double-
click the second circle you just drew. Everything but the object you just double-clicked
fades, and the words Drawing Object appear beside the Scene 1 link. This allows
you to edit the object in place without disturbing anything else on the stage. To return to
the stage, click the Scene 1 link or double-click outside the shape to go back a layer.
www.zshareall.com
Please purchase PDF Split-Merge on www.verypdf.com to remove this watermark.
GRAPHICS IN FLASH CS5
83
Drawing in Flash CS5
In this section, you will review the four primary drawing tools:
Pencil: Use this tool to draw free-form lines and shapes. It is also draws strokes.
Brush: Use this tool to paint in fill colors. A variant of this tool will appeal to the inner delinquent
in all of us: the Spray Brush.
Eraser: The opposite of the Brush tool. It erases and removes rather than fills.
Pen: Use this one to draw Bezier curves.
The Pencil tool
Think of the Pencil tool as being a mechanical pencil with a huge number of leads and colors, all of
which are available with a simple click. Select the Pencil tool, and the Properties panel changes
(Figure 2-16) to allow you to set properties for the lines you will draw such as line thickness, style, and
color.
Figure 2-16. The Pencil tool and its properties
This tool also has a modifier that appears at the bottom of the Tools panel. Click it, and a drop-down
menu, as shown in Figure 2-17, gives you three modes to choose from. These modes are important
because they control how the line behaves when you draw. Also, when you select this tool, you can
choose to use the Object Drawing mode.
www.zshareall.com
Please purchase PDF Split-Merge on www.verypdf.com to remove this watermark.
CHAPTER 2
84
Figure 2-17. The Pencil tool has three drawing modes.
Let’s try the modes:
1.
Open a new Flash document, and select the Pencil tool or press the Y key.
2.
Using the Pencil tool, draw three squiggly lines. Use one of the following three modes for each
line. The results, as shown in Figure 2-18, will be slightly different for each. Here’s what the
modes do:
Straighten: Use this if you want curves to flatten.
Smooth: Use this mode to round out kinks or otherwise smooth awkward curves.
Ink: This is the mode that gives you exactly what you draw. If you use this mode, make sure
that Hinting in the Properties panel is selected. This will ensure crisp, nonblurry lines.
Figure 2-18. The Smooth and Straighten modes can remove awkward angles.
3.
Switch to the Selection tool, and click the top line. Notice how you selected just a piece of it.
The lines you draw with the Pencil tool are vectors.
4.
Deselect the line segment, and this time roll the mouse over the line. When you see a small curve
appear under the mouse, click and drag. This tells you that you can change the shape of the lines
you draw by simply moving their segments.
www.zshareall.com
Please purchase PDF Split-Merge on www.verypdf.com to remove this watermark.
GRAPHICS IN FLASH CS5
85
5.
Double-click one of the lines, and change the thickness and line type from the drop-down menu in
the Properties panel. As shown in Figure 2-19, your choices are solid, dashed, dotted,
ragged, stippled, and hatched.
Figure 2-19. Choose a line style in the Properties panel.
6.
Draw a circle using the Pencil tool in Smooth mode. Select the shape with the Selection tool,
and in the Tools panel click the Smooth button. Notice how the awkward edges of your circle
become rounded. Now click the adjacent Straighten button a couple of times. Your awkward
circle actually becomes a round circle. Double-click one of your lines. The Pencil options
change to show you separate Straighten and Smooth buttons. Click the Smooth and
Straighten buttons to see how they work on nonclosed shapes. As you can see, these buttons
work independently of the Straighten and Smooth options available through the Pencil tool’s
drop-down menu.
Flash has preferences that will help you with your drawing chores. If you select Edit
➤
Preferences (Windows) or Flash
➤
Preferences (Mac), you will open the
Preferences panel. Click the Drawing category, and the panel will change to show
you how Flash handles the drawing tools, lines, and shapes. The Recognize shapes
drop-down list can be set to take your hand-drawn approximations of circles, squares,
triangles, and the like, and replace them with truer shapes, as if drawn by the Oval or
Rectangle tool.
The Brush tool
You have discovered that all objects drawn on the stage are separated into strokes and fills. The Pencil
and Brush tools follow that separation. The Brush tool feels quite similar to the Pencil tool in how it is
used. The difference between the two is that the Brush tool works with fills while the Pencil tool works
with strokes, which is a subtle but also quite profound difference.
When you select the Brush tool or press the B key to select the tool, a number of options will appear at
the bottom of the Tools panel, and the Properties panel will change, as shown in Figure 2-20.
www.zshareall.com
Please purchase PDF Split-Merge on www.verypdf.com to remove this watermark.
CHAPTER 2
86
Figure 2-20. The Brush tool options and properties
www.zshareall.com
Please purchase PDF Split-Merge on www.verypdf.com to remove this watermark.
GRAPHICS IN FLASH CS5
87
Object Drawing: You saw this earlier in the chapter. It’s the button that toggles Object Drawing
mode on and off.
Lock Fill: Select this to fill multiple objects with a single gradient or some other fill. This can be
useful in cases where the gradient implies a highlight, because the “lighting” will be applied
evenly across all selected objects.
Brush Mode: This controls how the strokes are painted, and the drop-down menu contains the
following five modifiers:
Paint Normal: Paints over anything on the screen providing they are on the same layer
and not in Object Drawing mode. These caveats apply to the other mode options as well. If
your content is a drawing object, use Modify
➤
Break Apart to turn it into a shape. When
you finish, you can put it all back together as a single object by selecting Modify
➤
Combine Objects.
Paint Fills: Paints the fills and leaves the stroke alone.
Paint Behind: Paints only on the empty areas of the layer.
Paint Selection: Paints only on the selected areas of the object.
Paint Inside: Paints only inside the area surrounded by a stroke. This mode works only if
the Brush tool starts inside the stroke; otherwise, it acts like Paint Behind.
Brush Size: Use this to change the width and spread of the brush strokes.
Brush Shape: This drop-down menu offers a number of brush shapes ranging from round to
square.
Use Pressure and Use Tilt: These two appear only if a tablet is attached to the computer.
They allow you to use the pressure and angle settings of a graphics tablet’s pen. This is a piece
of hardware with a special drawing surface and “pen” that translates your actual hand motions
into drawings on the screen.
The final control is the Smoothing option on the Properties panel. This option determines the amount
of smoothing and sharpness applied to an object drawn with the Brush tool. In many respects, it is the
same as the Smooth mode of the Pencil tool. Try it:
1.
Select the Brush tool, and select a fill color.
2.
Turn off Object Drawing mode, and make sure the Brush mode is set to Paint Normal.
3.
In the Properties panel, set the Smooth value to 0, and draw a squiggle on the screen.
4.
Set the Smooth value to 50, and draw another squiggle on the screen. Repeat this step with a
value of 100. As you can see in Figure 2-21, the edges move from rough to smooth and flowing.
If these strokes don’t look all that different from each other, take a look at Figure 2-22. The number of
vector points used to create the object reduces significantly as the Smoothing value increases. To see for
yourself, select the Subselection tool, and click the edge of each scribble. The vector points become
www.zshareall.com
Please purchase PDF Split-Merge on www.verypdf.com to remove this watermark.
CHAPTER 2
88
visible. Remember, vector points require processing power to draw on the screen at runtime. Which will
appear quicker: the squiggle on the left or the one on the right?
Figure 2-21. Smoothing brush strokes
Figure 2-22. Smoothing reduces a haze of points on the left to a manageable number toward the right.
The Deco tool
When it was first introduced in Flash CS4, Flash designers greeted the Deco tool with a resounding, “I
don’t get it.” This was quite understandable because all it seemed to do was draw vines, and their clients
weren’t exactly overwhelming them with requests for vines. If you think we are kidding, try it for yourself:
1.
Open a new Flash document, and select the Deco tool.
www.zshareall.com
Please purchase PDF Split-Merge on www.verypdf.com to remove this watermark.
GRAPHICS IN FLASH CS5
89
2.
Click anywhere in the upper-left corner of the stage to watch Flash draw a bunch of vines and
flowers, as shown in Figure 2-23.
Figure 2-23. The Deco tool’s default value is a tangle of vines and flowers.
If you need a stage full of vines, now you know where to go. Unfortunately, this is where many Flash
designers stop. This tool’s value isn’t in its default setting but in its purpose: it is a JavaScript-based
drawing tool that allows you to create new drawing tools. This tool, and its counterpart the Spray Brush
tool, were introduced in Flash CS4 as part of a new infrastructure called procedural modeling, which is
“techie talk” for using the computer code to draw.
For those of you just itching to see the code that drives these things, they can be found
in the following location from where you installed Flash:
Adobe Flash
CS5/Common/First Run/ ProcScripts
. The
.jsx
files you see drive the brushes, and
the visual assets used by those files can be found in the
svg
folder. If you do want to
make changes, we can’t stress strongly enough how important it is to make any changes
to a copy of the file. At the time this book was being written, there wasn’t any
documentation regarding the Deco scripting APIs. Adobe tells us it is in the process of
creating this documentation, but there is no date for its release.
So, how can you properly use this tool? Read on:
1.
Open the Deco.fla file in the Chapter 2 Exercise folder. When it opens, you will see a blank
stage, and in the Library there is a movie clip named Box.
www.zshareall.com
Please purchase PDF Split-Merge on www.verypdf.com to remove this watermark.
CHAPTER 2
90
2.
Reselect the Deco tool, and take a look at the Drawing Effect area in the Properties
panel. There is a drop-down menu. That’s your ticket to fun and a chance for you to explore a
major change to this tool in Flash CS5. Change the drop-down from Vine Fill to Grid Fill.
At this point, you could play around with the Deco tool, but it really becomes interesting when it has
something to play with. When you selected Grid Fill, the Properties panel changed to show four tile
strips with Edit buttons and a color fill, as shown in Figure 2-24.
Figure 2-24. The Deco tool’s Grid Fill properties
3.
Change the Tile 2 color to yellow, and click the stage once. The stage fills with a bunch of
black and yellow boxes spaced according to the Horizontal and Vertical spacing values
in the Advanced Options. Double-click the Eraser tool to clear the stage.
4.
Deselect Tiles 2, 3, and 4. Click the Edit button in Tile 1 strip to open the Select
Symbol dialog box. Click the Box symbol once, and click the OK button to close the dialog box.
5.
Twirl down the Advanced Options, and set the Horizontal and Vertical spacing values to
0. This will tighten up the spacing between the repeated Box symbols you are about to see.
This book was purchased by
www.zshareall.com
Please purchase PDF Split-Merge on www.verypdf.com to remove this watermark.
GRAPHICS IN FLASH CS5
91
6.
Click once near the upper-left corner of the stage, and you will get the pattern shown in Figure 2-25.
If you switch to the Selection tool and click the pattern, you will discover the pattern is a single
object, which means it can be moved around the stage. This tool doesn’t just cover the stage with a
pattern; it can be used as a fill brush.
Figure 2-25. The Deco tool’s Grid Fill options can be used to create grids.
7.
Double-click the Eraser tool to clear the stage. Select the Rectangle tool, and set its fill to
none. Draw a rectangle on the stage.
8.
Click the Deco tool once, and in the Advanced Options, select Floor Pattern from the new
Pattern drop-down menu. Click once inside the rectangle, and, as shown in Figure 2-26, the
object looks like it is filled with floor tiles.
Keep in mind the important aspect of this section is not the tool. It is the fact you can use
a movie clip to create the drawing. One of the authors demonstrated this in a seminar.
Rather than use squares, he used a movie clip of a cow that was scaled and rotated. If
you open the
DecoCow.fla
or
DecoCow.swf
file in the
Completed
folder, you can see
the example used in the presentation.
www.zshareall.com
Please purchase PDF Split-Merge on www.verypdf.com to remove this watermark.
CHAPTER 2
92
Figure 2-26. Deco tool patterns can be used to fill objects you draw in Flash.
As you can see, you can use the tool to create interesting backgrounds, flags, quilts, or whatever else you
may create that requires a grid layout. Using the Deco tool is a lot less work than placing these elements
by hand.
Ready for a truly versatile Deco tool option?
1.
Open the Deco02.fla file in you Chapter 2 Exercise folder. You will see, in the Library, a
movie clip containing an image of a lake in northern Ontario.
2.
Click the Deco tool, and select Symmetry Brush from the drop-down list in the Drawing
Effect area of the Properties panel.
3.
Using the Edit button, make sure that Lake is the selected symbol.
4.
In the Advanced Options, select Reflect Across Line in the drop-down list.
5.
Start clicking the stage with the Deco tool. When you click, don’t immediately release the mouse.
Instead, click and hold and drag around a bit to see how that affects the Lake symbol. Being in
Reflect Across Line mode means you see a mirror image, as shown in Figure 2-27, on the
other side of the line of where you placed the Lake movie clip.
www.zshareall.com
Please purchase PDF Split-Merge on www.verypdf.com to remove this watermark.
GRAPHICS IN FLASH CS5
93
Figure 2-27. The Reflect Across Line option lets you create mirrored artwork.
6.
Place the mouse pointer over the pivot handle (it is the one with curved double-headed arrow),
and drag it in an arc. As you drag, two things happen: the pattern rotates, and each movie clip
rotates. Drag the handle back to the start position.
7.
In the Properties panel, switch the Advanced Option to Reflect Across Point. One of
the arms will disappear because the mirroring is now up and down as well as left and right.
8.
In the Properties panel, switch to Rotate Around. This time, the content looks like a
kaleidoscope because of the mirroring increase.
9.
If you move the double-curved arrow, the artwork rotates, and the circle in the center lets you
move the whole shebang around the stage. The handle with the + sign lets you change the
number of arms in the “pinwheel.” Click and drag that handle clockwise or counterclockwise, and
you can, as shown in Figure 2-28, have quite a few copies of the movie clip appear on the stage.
10.
Let’s finish this part up with a look at the Grid Translation option. Double-click the Eraser
tool to clear the stage, and select the Deco tool. Make sure the Symmetry Brush is chosen
from the Drawing Effect drop-down menu, and select Grid Translation from the
Advanced Options drop-down menu.
11.
Click once in the graph area and a couple of copies of the movie clip will appear on the stage.
Drag the handles with the + sign up and out to add more copies of the movie clip and to fill the
stage with a pattern, as shown in Figure 2-29.
www.zshareall.com
Please purchase PDF Split-Merge on www.verypdf.com to remove this watermark.
CHAPTER 2
94
Figure 2-28. The Rotate Around option lets you create kaleidoscopic artwork.
Figure 2-29. The Grid Translation option gives you dynamically modifiable grids.
www.zshareall.com
Please purchase PDF Split-Merge on www.verypdf.com to remove this watermark.
GRAPHICS IN FLASH CS5
95
The major difference between this and the Grid Fill option is the fact that, with Grid Translation,
you can actually modify the grid’s characteristics dynamically. By this we mean you can drag and rotate
the handles to change the look of the grid.
We are going to finish our exploration of the Deco tool by trying a couple of the new brushes in the
Drawing Effect drop-down. Before we start, it is important for you to understand that these brushes
demonstrate the concept of procedural modeling; they aren’t professional-grade drawing brushes, but they
are fun to use. Here’s how:
1.
Open the Deco03.fla file from your Chapter 2 Exercise folder, and select the Deco tool.
2.
In the Drawing Effect drop-down, select the 3D brush. Click the Edit button in the Object 1
strip, and select the Lake movie clip. This tool works best if you use a movie clip with the brush.
3.
Twirl down the Advanced Options, and use these settings:
Max objects: 1000
Spray area: 50 px
Perspective: Selected
Distance scale: 10%
Random scale range : 50%
Random rotation range: 45 deg
4.
Click and drag the brush around stage. When you stop, you will see, as shown in Figure 2-30,
that quite a few copies of the movie clip are on the stage and that they recede, thanks to the
Perspective selection, into the distance as you drag away from your starting point.
www.zshareall.com
Please purchase PDF Split-Merge on www.verypdf.com to remove this watermark.
CHAPTER 2
96
Figure 2-30. The 3D brush uses perspective to give the effect of distance.
What is not commonly known is that the “official” name for the group of tools comprising the Deco and
Spray Brush tools is Decorative drawing tools. Their description in the Adobe Flash CS5
documentation is quite succinct: “The Decorative drawing tools let you turn graphic shapes that you create
into complex, geometric patterns. The Decorative drawing tools use algorithmic calculations—known as
procedural drawing. These calculations are applied to a movie clip or graphic symbol in the Library that
you create. In this way, you can create a complex pattern using any graphic shape or object.” Follow these
steps to use the Deco tool to create a cityscape.
1.
Open a new Flash document.
2.
Select the Deco tool, and click the Properties panel. In the Drawing Effect drop-down,
select the Building Brush, and in the Advanced Options, select Random Building and
set Building Size to 5.
3.
Don’t simply click the mouse to draw a building. Click where you want the building to start and
drag upward. When you release the mouse, a building will appear. Draw a few more buildings, as
shown in Figure 2-31. If you want a bit more variety, change the Building Size value before
drawing a building.
www.zshareall.com
Please purchase PDF Split-Merge on www.verypdf.com to remove this watermark.
GRAPHICS IN FLASH CS5
97
Figure 2-31. Using procedural drawing to create a block of skyscrapers
Let’s add some trees. Here’s how:
4.
Add a new layer to the document.
5.
Select the Deco tool, and select Tree Brush from the Drawing Effect drop-down. In the
Advanced Options, select Poplar Tree from the drop-down.
6.
Place the brush where you want the tree to grow, and click and drag upward. As you “draw,” the
trunk will appear and then the foliage. If you want a “bushier” tree, hold the mouse button down
for a second before releasing it. Branches, as shown in Figure 2-32, will be added.
www.zshareall.com
Please purchase PDF Split-Merge on www.verypdf.com to remove this watermark.
CHAPTER 2
98
Figure 2-32. Pick a tree…any tree.
The Spray Brush tool
There is a tool in the CS5 lineup that is seriously fun to use. The tool? Introduced in Flash CS4, it is called
the Spray Brush tool, and, like the Deco tool, it is part of the procedural modeling framework. Here’s
how to use it:
1.
Open the SprayBrush.fla file in the Exercise folder. When it opens, you will notice there is a
movie clip symbol named Figurine in the Library.
2.
Click the drop-down menu for the Brush tool, and you will see the Spray Brush tool. Select it.
The tool’s icon looks like a can of spray paint. This should tell you that you are about to become a
graffiti artist.
www.zshareall.com
Please purchase PDF Split-Merge on www.verypdf.com to remove this watermark.

