Working with Selections
Bạn đang xem bản rút gọn của tài liệu. Xem và tải ngay bản đầy đủ của tài liệu tại đây (484.6 KB, 14 trang )
Tutorial
ADOBE PHOTOSHOP 5.0
B
ack to Contents
Working with Selections
Learning how to select areas of an
image is of primary importance when
working with Adobe® Photoshop® —
you must first select what you want to
affect. Once you’ve made a selection,
only the area within a selection can be
edited; areas outside the selection are
protected from change.
WORKING WITH SELECTIONS
PAGE 2 OF 14
In this lesson, you’ll learn how to do the following:
•
Use the marquee, lasso, and magic wand tools to select parts of an image in various ways.
•
Reposition a selection marquee.
•
Deselect a selection.
•
Move and duplicate a selection.
•
Constrain the movement of a selection.
•
Adjust a selection with the arrow keys.
•
Add to and subtract from selections.
•
Rotate, scale, and transform a selection.
•
Combine selection tools.
•
Crop an image.
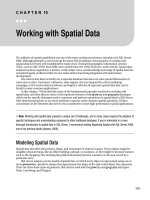
Tool overview
In Adobe Photoshop, you can make selections based on size, shape, and color using four basic sets
of tools—the marquee, lasso, magic wand, and pen tools. In addition, you can use a fifth tool, the
move tool, to reposition the selections you create.
Note:
In this lesson, you will use just the marquee, lasso, magic wand, and move tools; for more infor-
mation on the pen tools, see Chapter 7, “Selecting,” in the
Adobe Photoshop User Guide
.
A.
Marquee Tool
B.
Move Tool
C.
Lasso Tool
D.
Magic Wand Tool
The marquee and lasso tool icons contain hidden tools, which you can select by holding down the
mouse button on the toolbox icon and dragging to the desired tool in the pop-up menu.
The
rectangular marquee
tool
( ) lets you select a rectangular area in an image. The
elliptical
marquee tool
( ) lets you select elliptical areas. The
single row and single column marquee tools
()
( ) let you select a 1-pixel-high row and 1-pixel-wide column. You can also use the
crop tool
() to
crop an image.
The
lasso
tool
( ) lets you make a freehand selection around an area. The
polygon lasso
tool
( ) lets
you make a straight-line selection around an area. The
magnetic lasso tool
( ) lets you draw a
freehand border that snaps to the edges of an area.
The
magic wand tool
( ) lets you select parts of an image based on the similarity in color of adjacent
pixels. This tool is useful for selecting odd-shaped areas without having to trace a complex outline
using the lasso tool.
B
D
A
C
WORKING WITH SELECTIONS
PAGE 3 OF 14
Getting started
Before beginning this lesson, delete the Adobe Photoshop Preferences file to restore the program’s
default settings. To delete the Preferences file in Windows®, exit Photoshop, and then delete the
Adobe Photoshop 5 Prefs file in the Adobe Photoshop Settings subdirectory inside the Photoshop5
directory. To delete the Preferences file in Mac® OS, quit Photoshop, locate the Adobe Photoshop 5
Prefs file in the Adobe Photoshop Settings folder inside the Adobe Photoshop 5.0 folder, drag the
file to the Trash, and choose Special > Empty Trash.
After you have deleted the Preferences file, restart the Photoshop program. Then open the finished
art file for this lesson to see what you’ll be creating.
1
Choose File > Open. Locate and open the Training\Lesson01 folder in the Adobe Photoshop 5.0
application folder or on the tutorial CD. Then select End01.psd and click Open. An image of a face,
constructed using various types of fruits and vegetables, is displayed.
2
If you like, choose View > Zoom Out to make the image smaller and leave it on your screen as you
work. If you don’t want to leave the image open, choose File > Close.
Now open the start file to begin the lesson.
3
Choose File > Open. Locate and open the Lesson01 folder, select Start01.psd, and click Open.
4
Choose File > Save As, type the name
Work01
.psd, and click Save.
Selecting with the rectangular marquee tool
You’ll start by practicing selection techniques using the rectangular marquee tool.
1
Click the rectangle marquee tool ( ) in the toolbox.
2
Drag it diagonally from the top left to the bottom right corner of the melon to create a rectangular
selection.
Initial selection Marquee tool placed Selection border
within selection repositioned
You can move a selection border after you’ve created it by positioning the tool within the selection
and dragging. Notice this technique changes the location of just the selection border; it does not
affect the size or shape of the selection.
3
Place the marquee tool anywhere inside the selection surrounding the melon. The pointer
becomes an arrow with a small selection icon next to it.
WORKING WITH SELECTIONS
PAGE 4 OF 14
4
Drag to reposition the border around the melon.
Note:
Repositioning techniques for selection borders work with any of the marquee, lasso, and magic
wand tools.
If you are still not happy with the selection after repositioning it, you can deselect it and redraw it.
5
Deselect the selection by using either of these methods:
•
Choose Select > Deselect.
•
Click anywhere in the window outside the selection border.
6
Reselect the melon using the rectangle marquee tool.
To back up one action at any point in the lesson, choose Edit > Undo.
Selecting with the elliptical marquee tool
Next you’ll use the elliptical marquee tool to select eyes for the face. Note that in most cases, making a
new selection replaces the existing selection.
1
Select the zoom tool ( ), and click twice on the blueberry to zoom in to a 300% view.
2
Hold down the mouse button on the rectangular marquee tool, and drag to the elliptical marquee
tool ( ).
3
Move the pointer over the blueberry, and drag it diagonally from the top left to the bottom right
edge of the blueberry to create a selection. Do not release the mouse button.
Repositioning a selection border while creating it
If a selection border isn’t placed exactly where you want it, you can adjust its position and size while
creating it.
1
Still holding down the mouse button, hold down the spacebar and drag the selection. The border
moves as you drag.
2
Release the spacebar (but not the mouse button), and drag again. Notice that when you drag
without the spacebar, the size and shape of the selection changes, but its point of origin does not.
Incorrect point of origin Corrected point of origin Adjusted border
(Click and drag) (Spacebar depressed) (Spacebar released)
3
When the selection border is positioned and sized correctly, release the mouse button.
WORKING WITH SELECTIONS
PAGE 5 OF 14
Selecting from a center point
Sometimes it’s easier to make elliptical or rectangular selections by drawing a selection from the
center point of the object to the outside edge. Using this method, you’ll reselect the blueberry.
1
Choose Select > Deselect.
2
Position the marquee tool at the approximate center of the blueberry.
3
Click and begin dragging. Then without releasing the mouse button, hold down Alt (Windows)
or Option (Mac OS), and continue dragging the selection to the blueberry’s outer edge. Notice that
the selection is centered over its starting point.
4
When you have the entire blueberry selected, release first the mouse button and then the
Alt/Option key.
If necessary, adjust the selection border using one of the methods you learned earlier.
Moving a selection
Now you’ll use the move tool to move the blueberry onto the carrot slice to create an eye for the face.
Then you’ll duplicate and move the selection to make a second eye.
1
Make sure that the blueberry is selected. Then click the move tool ( ), and position the pointer
within the blueberry’s selection. The pointer becomes an arrow with a pair of scissors to indicate
that dragging the selection will cut it from its present location and move it to the new location.
2
Drag the blueberry onto the carrot slice.
Move tool placed Blueberry moved onto
within blueberry carrot slice
selection
3
Choose Select > Deselect.
4
Choose File > Save.
Moving and duplicating simultaneously
Next you’ll move and duplicate a selection simultaneously.
1
Choose View > Fit on Screen to resize the document to fit on your screen.
2
Select the elliptical marquee tool.
3
Drag a selection around the carrot slice containing the blueberry. If necessary, adjust the selection
border using one of the methods you learned earlier.