HTML, XHTML and CSS quicksteps
Bạn đang xem bản rút gọn của tài liệu. Xem và tải ngay bản đầy đủ của tài liệu tại đây (9.1 MB, 225 trang )
<span class='text_page_counter'>(1)</span><div class='page_container' data-page=1></div>
<span class='text_page_counter'>(2)</span><div class='page_container' data-page=2></div>
<span class='text_page_counter'>(3)</span><div class='page_container' data-page=3>
<b>Guy Hart-Davis </b>is the author of more than 50 computer books, including
</div>
<span class='text_page_counter'>(4)</span><div class='page_container' data-page=4>
<b>QuickSteps</b>
New York Chicago San Francisco
Lisbon London Madrid Mexico City
Milan New Delhi San Juan
Seoul Singapore Sydney Toronto
</div>
<span class='text_page_counter'>(5)</span><div class='page_container' data-page=5>
ISBN: 978-0-07-163318-5
MHID: 0-07-163318-9
The material in this eBook also appears in the print version of this title: ISBN: 978-0-07-163317-8, MHID: 0-07-163317-0.
All trademarks are trademarks of their respective owners. Rather than put a trademark symbol after every occurrence of a trademarked name, we use names in an editorial fashion only, and to the
bene-fit of the trademark owner, with no intention of infringement of the trademark. Where such designations appear in this book, they have been printed with initial caps.
McGraw-Hill eBooks are available at special quantity discounts to use as premiums and sales promotions, or for use in corporate training programs. To contact a representative please e-mail us at
Information has been obtained by McGraw-Hill from sources believed to be reliable. However, because of the possibility of human or mechanical error by our sources, McGraw-Hill, or others,
McGraw-Hill does not guarantee the accuracy, adequacy, or completeness of any information and is not responsible for any errors or omissions or the results obtained from the use of such information.
TERMS OF USE
This is a copyrighted work and The McGraw-Hill Companies, Inc. (“McGraw-Hill”) and its licensors reserve all rights in and to the work. Use of this work is subject to these terms. Except as permitted
under the Copyright Act of 1976 and the right to store and retrieve one copy of the work, you may not decompile, disassemble, reverse engineer, reproduce, modify, create derivative works based upon,
transmit, distribute, disseminate, sell, publish or sublicense the work or any part of it without McGraw-Hill’s prior consent. You may use the work for your own noncommercial and personal use; any other
use of the work is strictly prohibited. Your right to use the work may be terminated if you fail to comply with these terms.
</div>
<span class='text_page_counter'>(6)</span><div class='page_container' data-page=6></div>
<span class='text_page_counter'>(7)</span><div class='page_container' data-page=7></div>
<span class='text_page_counter'>(8)</span><div class='page_container' data-page=8>
<b>8</b>
<b>7</b>
<b>6</b>
<b>5</b>
<b>4</b>
<b>3</b>
<b>2</b>
<b>1</b>
Chapter 1
<b>Creating Your First Web Pages with HTML and XHTML</b>
....1
Begin and organize your website, choose HTML tools, create web
pages, and describe and check your web pages.
Chapter 2
<b>Choosing a Web Host and Getting Your Own Website</b>
... 27
Understand the basics of the Web; choose a web host or ISP; plan,
design, and create your site; and transfer it to the Web.
Chapter 3
<b>Structuring Web Pages and </b>
<b>Applying Manual Formatting</b>
... 45
Apply manual formatting, create lists, apply indents and alignment,
use inline styles, and work with the style attribute.
Chapter 4
<b>Adding Graphics to Your Web Pages... 67</b>
Create or acquire graphics files, add and format inline graphics,
place background graphics, and create an HTML signature file.
Chapter 5
<b>Adding Links</b>
... 81
Link to another web page or the same page, create links that download
files or send e-mail, create imagemaps, and add audio and video.
Chapter 6
<b>Creating Tables</b>
... 97
Create a table, add rows and columns, format table borders, format
and group cells, and create nested tables.
Chapter 7
<b>Creating Frames</b>
... 119
Create frameset documents and component documents, lay out the
frames, add alternative text, and create inline frames.
Chapter 8
<b>Applying Formatting </b>
<b>Using Cascading Style Sheets</b>
... 135
Create style rules; create embedded and external style sheets; set
alignment, indents, margins, and line height; and create floating
two-column and three-column layouts.
Chapter 9
<b>Creating Web Pages </b>
<b>Using the Microsoft Office Applications ... 159</b>
Configure web options, insert hyperlinks, and create web pages
using Word or from your spreadsheets and presentations.
Chapter 10
<b>Using Forms and Scripts</b>
... 183
Create forms to collect information, create a login form, and use
scripts in your web pages.
Index ... 201
<b>10</b>
</div>
<span class='text_page_counter'>(9)</span><div class='page_container' data-page=9></div>
<span class='text_page_counter'>(10)</span><div class='page_container' data-page=10>
Acknowledgments.. ...xv
Introduction ... xvii
Chapter 1
<b>Creating Your First Web Pages with </b>
<b>HTML and XHTML</b>
...1
Understanding Tools for Creating HTML ...2
Understand HTML, XML, XHTML, and HTML 5 ...2
HTML ...2
XML ...3
XHTML ...3
HTML 5 ...3
Organizing Your Site ...4
Which Version of HTML Should You Use? ...4
Get Started with Your Website ...4
Create a Folder for Your Website ...4
Open Notepad ...5
Understanding the DOCTYPE Declaration ...6
Create a Web Page and Adding Content to It ...6
Create the Page’s Structure ...6
Understanding the Header and the Body ...8
Add Header and Body Tags ...8
Add Content to the Page ...9
Apply Formatting ...14
Add a Picture ...14
Add Hyperlinks and Tags, and Reloading Pages ...16
Add a Hyperlink ...16
Create Linked Files ...18
Describe Your Pages with Meta Tags ...20
Reload a Page Automatically ...20
Understanding How Search Engines Work ...21
Redirect the Browser to Another Page ...21
Validate Your HTML and Checking Your Pages ...22
Validate Your HTML with the W3C Markup Validation Service ...22
Check Your Pages with Other Browsers ...23
Chapter 2
<b>Choosing a Web Host and </b>
<b>Getting Your Own Website</b>
... 27
Understand Web Basics ...27
Understanding IPv4 and IPv6 ...28
Understand Web Clients and Servers ...28
Access a Web Page ...29
Understanding URLs ...30
Choose a Web Host ...30
Assess Your Requirements ...30
<b>2</b>
</div>
<span class='text_page_counter'>(11)</span><div class='page_container' data-page=11>
Understanding Domains ...34
Evaluate an ISP ...34
Evaluate a Web-Hosting Service ...34
Register a Domain Name ...34
Plan, Design, and Create Your Site ...36
Plan Your Site’s Contents ...36
Make Your Site Effective ...37
Keep Your Web Pages Small Enough to Download Quickly ...39
Check Your Website ...40
Update and Maintain Your Website ...40
Transfer Your Site to the Web ...41
Get the Information Required for FTP ...41
Transfer a Site Using an FTP Client ...42
Chapter 3
<b>Structuring Web Pages and </b>
<b>Applying Manual Formatting</b>
... 45
Using Proportional and Monospaced Fonts ...46
Understand Considerations for Web Formatting ...46
Use Paragraphs, Divisions, Breaks, and Hyphens ...47
Create Paragraphs ...47
Group Paragraphs into Divisions ...48
Control Breaks ...48
Inserting Special Characters ...49
Keep Text Together with Nonbreaking Spaces ...49
Control Hyphenation with Optional Hyphens ...49
Create Headings, Lists, and Indents ...49
Create Headings ...49
Create Numbered, Bulleted, and Definition Lists ...50
Apply an Indent ...55
Align Elements ...56
Use Preformatted Text ...57
Apply Formatting Tags and Attributes ...57
“Physical” and “Logical” Style Tags ...58
Apply Boldface ...58
Apply Italics ...58
Apply Underline ...58
Apply Strikethrough ...59
Apply Monospaced Font ...59
Apply Subscript and Superscript ...59
Control Font Formatting and Styles ...60
Understanding Other Format ting ...60
Control Font Formatting ...60
Working with Fonts ...62
Change Style Using Inline Styles ...62
Catch the Eye with Moving Text ...65
</div>
<span class='text_page_counter'>(12)</span><div class='page_container' data-page=12>
<b>6</b>
Add an Inline Graphic ...68
Insert a Graphic ...68
Use Suitable Alternative Text ...68
Choose Where to Locate the Graphics File ...69
Add a Long Description URL ...70
Align a Graphic ...70
Change the Size of a Graphic ...70
Using Graphics to Control How Text Appears ...72
Apply Borders to a Graphic ...72
Add a Title to a Graphic ...72
Position a Graphic with Spacers ...73
Understanding GIF, JPEG, and PNG ...74
Add a Background Graphic ...74
Add a Horizontal Rule ...75
Create an E-mail Signature Containing a Graphic ...76
Laying Out Your Web Pages ...77
Create an HTML Signature File ...77
Use an HTML Signature File in Windows Mail ...78
Keeping Down Graphic Size to Make Pages Load Faster ...79
Chapter 5
<b>Adding Links ... 81</b>
Create Links ...81
Understanding Absolute and Relative Links ...82
Link to Another Web Page ...82
Link Within a Web Page ...84
Link to a Particular Point on a Web Page ...85
Making Your Site Navigable ...86
Open a Link in a New Window ...86
Create a Link to Download a File ...86
Display a ScreenTip for a Link ...87
Create Links to Send E-mail ...88
Making Your Imagemaps Useful and Intelligible ...91
Create Two or More Links in a Graphic ...91
Add Audio and Video to Your Web Pages ...93
Understand Audio and Video Formats ...94
Understand Audio and Video Delivery Methods ...94
Create a Link for Downloading an Audio or Video File ...95
Create a Link to Play an Audio or Video File ...95
Embedding a Video File in a Web Page ...96
Chapter 6
<b>Creating Tables</b>
... 97
Understand How Tables Work and When to Use Them ...97
Plan a Table ...98
Create the Table’s Structure ...98
Add Rows and Columns to a Table ...103
Add Table Borders ...103
Group Cells by Rows and Columns ...105
Set Table and Cell Width ...108
</div>
<span class='text_page_counter'>(13)</span><div class='page_container' data-page=13>
Apply a Background Color or Picture ...115
Create a Nested Table ...115
Create a Vertical Line ...117
Chapter 7
<b>Creating Frames</b>
... 119
Understanding Frames and Their Alternatives ...120
Understand How Frames Work ...120
Plan a Web Page That Uses Frames ...121
Define Frame Height and Width ...121
Create the Component Documents ...123
Create the Frameset Document ...123
Lay Out the Frames ...124
Add the Component Documents to the Frameset ...126
Adding Alternative Text to a Frame Page ...127
Change a Frame’s Borders and Margins ...127
Control Whether a Frame Scrolls ...129
Prevent Visitors from Resizing the Frame ...129
Nest One Frameset Inside Another ...130
Create Inline Frames ...130
Create a Link That Changes the Contents of a Frame ...133
Chapter 8
<b>Applying Formatting Using </b>
<b>Cascading Style Sheets ... 135</b>
Understand CSS Essentials ...136
Understanding the Style Cascade ...137
Create a Style Rule ...138
Understanding Other Ways of Creating Style Rules ...139
Create an Embedded Style Sheet ...139
Understanding CSS Versions ...140
Create and Apply an External Style Sheet ...140
Use Special Selectors ...142
Apply a Style to Part of an Element ...145
Override Style Sheets ...146
Control Font Formatting ...146
Set Alignment, Indents, Margins, and Line Height ...148
Prevent a Background Graphic from Being Tiled or Scrolling ...150
Create a Floating Layout with CSS ...151
Creating a Three-Column Floating Layout ...154
Overriding Style Sheets in Your Browser ...155
Chapter 9
<b>Creating Web Pages Using </b>
<b>the Microsoft Office Applications</b>
... 159
Get Ready to Create Web Pages in the Office Applications ...159
Configure Web Options in the Office Applications ...160
Understanding How the Office Applications Use HTML ...161
Adding the New Web Page and Web Page Preview Commands
to the Office Applications ...166
<b>8</b>
<b>9</b>
</div>
<span class='text_page_counter'>(14)</span><div class='page_container' data-page=14>
Remove Sensitive Information from the Document ...173
Save Word Documents as Web Pages ...175
Choosing Suitable Web File Formats ...176
Remove Office-Specific Tags from a Word Document ...177
Using Word to Create HTML Elements ...178
Create Web Pages from Excel and PowerPoint ...178
Create Web Pages from Excel Workbooks ...178
Create Web Pages from PowerPoint Presentations ...181
Chapter 10
<b>Using Forms and Scripts</b>
... 183
Create Forms ...183
Understand the Basics of Forms ...184
Define the Form Structure ...184
Understanding the method Attribute ...186
Add Fields to the Form ...186
Complete a Form ...192
Letting Visitors Upload Files ...193
Create a Form That E-mails Its Contents to You ...194
Use Scripts in Your Web Pages ...195
Understand the Different Categories of User Events ...195
Dealing with Script Threats ...197
Show When a Page Was Last Updated ...197
Redirect the Browser to Another Page ...198
Verify That a Form Is Filled In ...198
Index ...201
</div>
<span class='text_page_counter'>(15)</span><div class='page_container' data-page=15></div>
<span class='text_page_counter'>(16)</span><div class='page_container' data-page=16>
My thanks go to the following people, who put in a huge amount of work on
this book:
<b>Marty Matthews</b>, series editor, developed, shaped, and improved the fi rst
edition of the book.
<b>Joya Anthony</b>, acquisitions coordinator, organized the acquisitions end of the
project.
<b>Jenn Kettell</b>, technical editor, reviewed the book for technical accuracy and
made many helpful suggestions.
<b>Lisa McCoy</b>, editor, edited the book skillfully and with good humor.
<b>Glyph International</b> laid out the book with great skill, turning the raw
manuscript and graphics into a highly polished book.
<b>Carol Shields</b>, proofreader, caught widely varied inconsistencies throughout
the text.
</div>
<span class='text_page_counter'>(17)</span><div class='page_container' data-page=17></div>
<span class='text_page_counter'>(18)</span><div class='page_container' data-page=18>
<i><b>QuickSteps</b></i>books are recipe books for computer users. They answer the
question “how do I…” by providing a quick set of steps to accomplish the most
common tasks with a particular operating system or application.
The sets of steps are the central focus of the book. QuickSteps sidebars show
how to quickly perform many small functions or tasks that support the primary
functions. QuickFacts sidebars supply information that you need to know about
a subject. Notes, Tips, and Cautions augment the steps, presented in a separate
column so as to not interrupt the fl ow of the steps. The introductions are
minimal rather than narrative, and numerous illustrations and fi gures, many
with callouts, support the steps.
<i><b>QuickSteps</b></i> books are organized by function and the tasks needed to perform
that function. Each function is a chapter. Each task, or “How To,” contains
the steps needed for accomplishing the function along with the relevant
Notes, Tips, Cautions, and screenshots. You can easily fi nd the tasks you need
through:
<b>•</b> The Table of Contents, which lists the functional areas (chapters) and
tasks in the order they are presented
<b>•</b> A How To list of tasks on the opening page of each chapter
<b>•</b> The index, which provides an alphabetical list of the terms that are used
to describe the functions and tasks
<b>•</b> Color-coded tabs for each chapter or functional area with an index to the
</div>
<span class='text_page_counter'>(19)</span><div class='page_container' data-page=19>
<i>HTML, XHTML & CSS QuickSteps </i>uses several conventions designed to make the
book easier for you to follow. Among these are:
<b>•</b> A in the Table of Contents and in the How To list in each chapter
references a QuickSteps sidebar in a chapter, and a references
a QuickFacts sidebar.
<b>•</b> <b>Bold type</b> is used for words or objects on the screen that you are to do
something with—for example, “Click the <b>Start</b> menu, and then click
<b>Computer</b>.”
<b>•</b> <i>Italic type</i> is used for a word or phrase that is being defined or otherwise
deserves special emphasis.
<b>•</b> Underlined type is used for text that you are to type from the keyboard.
<b>•</b> SMALL CAPITAL LETTERS are used for keys on the keyboard such as
<b>ENTER</b> and <b>SHIFT</b>.
<b>•</b> When you are expected to enter a command, you are told to “press” the
key(s). If you are to enter text or numbers, you are told to “type” them.
<b>•</b> Red font (for example, “the opening <title> tag”) distinguishes HTML
code terms that appear within body text.
<b>•</b> Code lines show examples of HTML code—for example:
<html>
<head>
<title>Acme Virtual Industries: Solving Your Problems
in Moments
</div>
<span class='text_page_counter'>(20)</span><div class='page_container' data-page=20>
<b>10</b>
<b>9</b>
<b>8</b>
<b>7</b>
<b>6</b>
<b>5</b>
<b>4</b>
<b>3</b>
<b>2</b>
<b>How to…</b>
<i><b> Understanding Tools for </b></i>
<i><b>Creating HTML</b></i>
<i><b>• Understand HTML, XML, </b></i>
<i><b>XHTML, and HTML 5</b></i>
<i><b> Organizing Your Site</b></i>
<i><b>• Create a Folder for Your Website</b></i>
<i><b>• Open </b><b>Notepad</b></i>
<i><b> Understanding the DOCTYPE </b></i>
<i><b>Declaration</b></i>
<i><b>• Create the Page’s Structure</b></i>
<i><b> Understanding the Header and </b></i>
<i><b>the Body</b></i>
<i><b>• Add Content to the Page</b></i>
<i><b>• Apply </b><b>Formatting</b></i>
<i><b>• Add a Picture</b></i>
<i><b>• Add a Hyperlink</b></i>
<i><b>• Create </b><b>Linked </b><b>Files</b></i>
<i><b>• Describe Your Pages with </b></i>
<i><b>Meta Tags</b></i>
<i><b>• Reload a Page Automatically</b></i>
<i><b> Understanding How Search </b></i>
<i><b>Engines Work</b></i>
<i><b>• Redirect the Browser to </b></i>
<i><b>Another Page</b></i>
<i><b>• Validate Your HTML with the W3 </b></i>
<i><b>Markup Validation Service</b></i>
<i><b>• Check Your Pages with </b></i>
<i><b>Other Browsers</b></i>
Chapter 1
<b>Creating Your First </b>
<b>Web Pages with </b>
<b>HTML and XHTML</b>
Hypertext Markup Language, or HTML, is the formatting
language in which most web pages are built. It lets you
specify the contents of a web page and control how it looks in
a web browser. All modern computer operating systems have
browsers, so pages created using HTML can be displayed on
almost any computer.
</div>
<span class='text_page_counter'>(21)</span><div class='page_container' data-page=21>
<b>2</b>
<b>3</b>
<b>4</b>
<b>5</b>
<b>6</b>
<b>7</b>
<b>8</b>
<b>9</b>
<b>2</b>
<b>3</b>
<b>4</b>
<b>5</b>
<b>6</b>
<b>7</b>
<b>8</b>
<b>9</b>
<b>2</b>
<b>3</b>
<b>4</b>
<b>5</b>
<b>6</b>
<b>7</b>
<b>8</b>
<b>9</b>
This book assumes that you are using Windows, because
Windows has the bulk of the computer market. The examples
use Windows Vista with Service Pack 1, the latest version
of Windows at this writing. If you use a different operating
system, such as Mac OS X or Linux, you will be able to follow
along easily using similar tools on that operating system.
<b>Understand HTML, XML, </b>
<b>XHTML, and HTML 5</b>
Part of what makes creating web pages confusing is the number of technologies
you can use. HTML is the general, overarching technology—but then there are
XML, XHTML, and HTML 5.
Here are some key definitions to get things straight from the start.
<b>HTML</b>
HTML (Hypertext Markup Language) is the formatting language in which web
pages have been written from the start of the Web. HTML tags describe how
a web page should look, but they don’t describe what kind of contents it has.
(More on this in a moment.)
HTML is flexible and “forgiving”: Many web pages contain coding errors, and
most browsers have been built to tolerate the errors and display a malformed
web page as best they can rather than stopping with an error. Generally,
it’s better to see the web page, even if it doesn’t appear exactly the way it’s
supposed to, than to quibble over technicalities such as a missing tag (or a
missing character from a tag).
The definition of HTML is an ongoing process involving various standards.
Most current HTML uses the HTML 4 standard, but is gradually moving
(“transitioning”) toward XHTML and the HTML 5 standard that is in development.
QUICK
<b>FACTS</b>
<b>UNDERSTANDING TOOLS FOR </b>
<b>CREATING HTML</b>
You can create effective HTML using just a text editor, as
described in this chapter, and it’s a great way not only to
keep total control of your code but also to learn exactly
what you’re doing. That said, you will probably be able to
create pages faster by using more capable tools much
of the time. This sidebar explains the two main options.
You can also use programs such as the Microsoft Office
programs, as discussed in Chapter 9.
<b>HTML EDITOR</b>
An HTML editor is an editing application that’s customized
for creating HTML manually. An HTML editor typically
includes options for creating and editing HTML tags
quickly (for example, creating tags via drag-and-drop or
by using property sheets), powerful search-and-replace
functionality, and HTML templates that you can use
to create particular types of documents quickly. HTML
editors usually show tags and attributes in different colors
so that you can easily distinguish them from text.
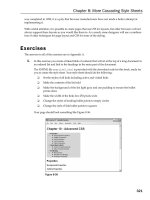
Figure 1-6 shows Komodo Edit (freeware; available
from various download sites on the Web), a powerful
Windows HTML editor. Another freeware HTML editor
well worth trying is Arachnophilia (www.arachnoid.com/
arachnophilia), which is written in Java and so runs on
other operating systems (including Mac OS X and Linux).
<b>WEB-AUTHORING APPLICATION</b>
A web-authoring application is an application designed for
creating web pages (as opposed to creating another kind
of document) using a graphical interface. Instead of typing
the HTML codes your pages need, you can apply codes
using formatting commands, toolbars, and menu options
in much the same way that you would apply formatting or
styles in a word processor or in a page layout program.
</div>
<span class='text_page_counter'>(22)</span><div class='page_container' data-page=22>
<b>10</b>
<b>9</b>
<b>8</b>
<b>7</b>
<b>6</b>
<b>5</b>
<b>4</b>
<b>3</b>
<b>2</b>
<b>XML</b>
XML (Extensible Markup Language) is a language that lets you create
structured data, data that describes its own content as well as how that content
should appear.
For example, if you need to transfer details about different components of a car,
you can create custom XML elements that describe the different components.
For instance, you can create an element called "brakepad" that contains the
information about a brake pad: its part number, the vehicles with which it’s
compatible, its dimensions, its cost, its documentation, and so on. A program
can then read your XML document, recognize the information as describing a
brake pad, and pull it into a database or manipulate it in another way.
<b>XHTML</b>
XHTML (Extensible Hypertext Markup Language) is HTML that is written in
XML syntax.
At this point, you may feel like holding your head in your hands or banging
it against your desk. But the benefit of writing HTML in XML syntax is
straightforward: XHTML lets you check quickly that a web page is correctly
formed and doesn’t contain any coding errors. This helps you to ensure that the
web page will appear correctly in any browser that conforms to these standards.
<b>HTML 5</b>
HTML 5, the fifth revision of HTML, is currently in draft form and is expected
to remain so for several years while the final details are worked out. This means
that there won’t be a sudden move to HTML 5. Instead, what’s likely to happen
is that some browsers will implement some parts of the HTML 5 draft standard,
and then others, leading gradually to a migration to the standard when it is
finished.
HTML 5 has a “classic” variant called (confusingly) HTML 5 and an
XHTML-based variant called XHTML 5.
QUICK
<b>FACTS</b>
<b>UNDERSTANDING TOOLS FOR </b>
<b>CREATING HTML </b>
<i>(Continued)</i>The advantage of a web-authoring application is that
you can see the layout of the page you’re creating. This
is sometimes called What You See Is What You Get,
or WYSIWYG (pronounced <i>whizzy-wig</i>). Most
web-authoring applications also let you dig into the code
manually when you want to do so.
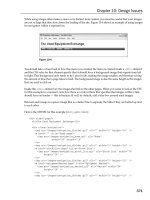
Widely used web-authoring applications include
Microsoft Expression Web (Windows only) and Adobe
Dreamweaver (Windows and Mac OS X). Figure 1-7
shows Expression Web. If you’re looking for a freeware
web-authoring application, try KompoZer (http://
kompozer.net), which runs on Windows, Mac OS X, and
Linux.
<b>•</b>
<b>Microsoft Expression Web (shown in Figure 1-7) </b>runs only on Windows.
</div>
<span class='text_page_counter'>(23)</span><div class='page_container' data-page=23>
<b>2</b>
<b>3</b>
<b>4</b>
<b>5</b>
<b>6</b>
<b>7</b>
<b>8</b>
<b>9</b>
<b>2</b>
<b>3</b>
<b>4</b>
<b>5</b>
<b>6</b>
<b>7</b>
<b>8</b>
<b>9</b>
<b>2</b>
<b>3</b>
<b>4</b>
<b>5</b>
<b>6</b>
<b>7</b>
<b>8</b>
<b>9</b>
<b>Which Version of HTML Should You Use?</b>
At this writing, the most sensible approach is to create your web pages using
the “transitional” version of XHTML. This allows you some flexibility in
creating your HTML code while keeping it more or less within a straitjacket of
proper form that will let you move it easily to the HTML 5 standard when it is
finally approved.
<b>Get Started with Your Website</b>
To get started with your website, you’ll need to create a folder to contain in, and
then open Notepad or another text editor to create files.
<b>Create a Folder for Your Website</b>
You will typically store your website on your local computer while you create
it and then transfer it to a web server when it is ready for public consumption.
Many HTML tools let you create and edit web pages directly on a web server,
but creating the site locally has three advantages.
<b>•</b>
You can create the site more quickly if it is stored locally. You can work on your sitewithout an Internet connection if necessary.
<b>•</b>
You can keep each page on your final website (on the Web) in a finished state ratherthan in an intermediate state. You can upload a new copy of any page as soon as
you’ve updated it.
<b>•</b>
Your local copy safeguards your site even if your Internet service provider (ISP) or webhost has a server disaster; once the server is back up, you can simply upload your site
again.
Start by creating a folder (if you do not already have one) on your computer for
your website (if you do not already have one) and such subfolders within that
folder as you need for the content. See the “Organizing Your Site” QuickFacts
for suggestions on how to organize your website.
<b> 1. </b>
Click the <b>Start</b> button, and then click <b>Documents</b>. The My Documents windowopens.
QUICK
<b>FACTS</b>
<b>ORGANIZING YOUR SITE</b>
Even the smallest site quickly grows far beyond the size
and complexity originally intended—so even if you’re
planning a “small” site, organize it carefully. Careful
organization is yet more important if you know from the
outset that you’ll be creating a larger site.
Use these three techniques to organize your site.
<b>•</b>
<b>Separate content by folder Create a separate </b>folder for each different type or category of
content: graphics, different text topics, scripts, and
so on. For example, for a family site, you might
create folders such as html, pictures, music, and
recipes. Keep the folder names short for ease of
use. Create subfolders as necessary within the
main folders.
<b>•</b>
<b>Use naming conventions Develop </b>namingconventions for the files that make up your site’s
content so that you can figure out easily what a
file would be called and where to locate it if you’ve
forgotten its name or location. Short, descriptive
names using lowercase letters are usually best.
When you need to use multiple words in a name,
separate the words with underscores rather than
with spaces. This is because Internet programs
have to substitute codes for spaces, which makes
for confusing-looking addresses.
</div>
<span class='text_page_counter'>(24)</span><div class='page_container' data-page=24>
<b>10</b>
<b>9</b>
<b>8</b>
<b>7</b>
<b>6</b>
<b>5</b>
<b>4</b>
<b>3</b>
<b>2</b>
<b> 2. </b>
Click the<b> Organize</b> menu button, and then click <b>New Folder</b>. You can also right-clickin the document area (the main part) of the Windows Explorer window and choose
<b>New | Folder</b> from the shortcut menu. Windows creates a new folder with the default
name “New Folder” and displays an edit box around the name so that you can change it.
<b> 3. </b>
Type the name for the folder (for example, Website), and press <b>ENTER</b> to applythe name.
<b> 4. </b>
Double-click the new folder to display its contents.<b> 5. </b>
Repeat steps 2 and 3 to create as many new folders as needed within the main folder.<b> 6. </b>
Click the <b>File</b> menu, and click <b>Close</b> to close the Windows Explorer window.<b>Open Notepad</b>
To open Notepad, click the <b>Start</b> button, click <b>All Programs</b>, click <b>Accessories</b>,
and then click <b>Notepad</b>. A Notepad window opens, containing a new, blank text
document.
<b>TIP</b>
Your computer may already have a suitable folder for
your website. For example, if you’ve installed Microsoft
Expression Web on your PC, your Documents folder will
contain a folder named My Web Sites. You can put your
websites in this folder, or use another folder—whichever
you prefer.
<b>NOTE</b>
This book shows HTML tags in red text where they
appear in regular text (rather than code listings) in order
to help you pick them out easily. HTML tags aren’t
case-sensitive, so you can write them in uppercase, lowercase,
or even mixed case. You’ll often see uppercase tags
because they make the tags easier to locate by eye on a
busy page; mixed case is seldom used because it has no
advantage beyond idiosyncrasy; but modern practice is to
use lowercase for tags because some markup languages
</div>
<span class='text_page_counter'>(25)</span><div class='page_container' data-page=25>
<b>2</b>
<b>3</b>
<b>4</b>
<b>5</b>
<b>6</b>
<b>7</b>
<b>8</b>
<b>9</b>
<b>2</b>
<b>3</b>
<b>4</b>
<b>5</b>
<b>6</b>
<b>7</b>
<b>8</b>
<b>9</b>
<b>2</b>
<b>3</b>
<b>4</b>
<b>5</b>
<b>6</b>
<b>7</b>
<b>8</b>
<b>9</b>
<b>Create a Web Page </b>
<b>and Adding Content to It</b>
To create a web page, you first set up the HTML structure for the web page. You
can then add content to the page and apply formatting to it.
<b>Create the Page’s Structure</b>
HTML is a set of tags that identify the elements of your web pages. A <i>tag</i> (or
<i>markup tag</i>) is a name contained within angle brackets (<>) and usually comes
in pairs (an opening and a closing tag). The tags may enclose a page element,
such as text or a graphic, that you want to format. The closing tag has a slash
preceding the tag name to identify it as the closing tag. Tags may also have
<i>attributes</i> that further define the formatting or function of the tag.
The following sections show you how to create the structure of the web page.
<b>ADD THE DOCTYPE</b>
To start your web page, insert the appropriate DOCTYPE definition from
Table 1-1. This example uses the XHTML 1.0 Transitional DOCTYPE.
<b>TIP</b>
If you plan to use Notepad frequently, pin it to the
upper-left section of the Start menu by right-clicking its entry on
the Start menu and then clicking Pin To Start Menu on
the shortcut menu.
QUICK
<b>FACTS</b>
<b>UNDERSTANDING THE DOCTYPE </b>
<b>DECLARATION</b>
Normally, each XHTML document begins with a
Document Type Declaration, or DOCTYPE for short.
The DOCTYPE tells the browser which Document Type
Definition (DTD) the web page uses so the browser
knows how to interpret the web page’s tags.
To make your documents comply with HTML and XHTML
standards, you’ll normally want to add a DOCTYPE at
the beginning. Table 1-1 explains the most widely used
types of DOCTYPE as of this writing. Each DOCTYPE
consists of two parts.
<b>•</b>
<b>Public identifier The </b><i>public identifier</i> is the textthat appears in double quotation marks after the
PUBLIC keyword—for example, PUBLIC "-//W3C//
DTD XHTML 1.0 Transitional//EN" is the public
identifier for the XHTML 1.0 Transitional DTD. This
identifier gives the name of the public version of
the DTD and always uses exactly the same text
shown in the table.
</div>
<span class='text_page_counter'>(26)</span><div class='page_container' data-page=26>
<b>10</b>
<b>9</b>
<b>8</b>
<b>7</b>
<b>6</b>
<b>5</b>
<b>4</b>
<b>3</b>
<b>2</b>
<b>ADD THE <HTML> TAGS</b>
All web pages have a basic set of tags that identify the page as an HTML
document, with all the major sections defined. These tags state the page is
written in HTML so that the browser knows that it should use HTML rules
for displaying the page. (Other markup languages have different rules from
HTML.) The tags may also give the version of HTML used, the language (for
example, “en” for English or “es” for Spanish), or other information.
<b> 1. </b>
In Notepad, on the next line of your text document after the end of the DOCTYPEstatement, type the opening HTML tag. Because we’re using the XHTML 1.0 Transitional
DOCTYPE, we also need to include details of the XML namespace, the area of XML to
which the tag applies. So type <html xmlns=" and then
press<b>ENTER</b>. This tag indicates the beginning of the HTML section of the document.
<b>DOCTYPE</b> <b>DOCUMENT TYPE DECLARATION</b> <b>COMMENTS</b>
XHTML 1.0 Transitional <!DOCTYPE html PUBLIC "-//W3C//DTD XHTML 1.0 Transitional//EN"
" />
Widely used by web-authoring tools. Allows
some flexibility in coding.
XHTML 1.0 Strict <!DOCTYPE html PUBLIC "-//W3C//DTD XHTML 1.0 Strict//EN"
" />
Ensures strict adherence to the XHTML 1.0
standard.
XHTML 1.1 <!DOCTYPE html PUBLIC "-//W3C//DTD XHTML 1.1//EN"
" />
Ensures strict adherence to the XHTML 1.1
standard.
XHTML 1.0 Frameset <!DOCTYPE html PUBLIC "-//W3C//DTD XHTML 1.0 Frameset//EN"
" />
Used for web pages laid out in different
areas (frames) rather than a single area.
XHTML 2.0 <!DOCTYPE html PUBLIC "-//W3C//DTD XHTML 2.0//EN"
" />
This is a draft DOCTYPE and is best avoided
as of this writing.
HTML 5 <!DOCTYPE html> Used for the HTML variant of the HTML 5
specification (still in draft as of this writing).
<i><b>Table 1-1:</b><b> Document Type Declarations and When to Use Them</b></i>
<b>TIP</b>
</div>
<span class='text_page_counter'>(27)</span><div class='page_container' data-page=27>
<b>2</b>
<b>3</b>
<b>4</b>
<b>5</b>
<b>6</b>
<b>7</b>
<b>8</b>
<b>9</b>
<b>2</b>
<b>3</b>
<b>4</b>
<b>5</b>
<b>6</b>
<b>7</b>
<b>8</b>
<b>9</b>
<b>2</b>
<b>3</b>
<b>4</b>
<b>5</b>
<b>6</b>
<b>7</b>
<b>8</b>
<b>9</b>
<b> 2. </b>
On the next line, type the closing tag, </html>. This tag indicates the end of theHTML document. The remainder of the HTML document goes between the
<html xmlns=" tag and the </html> tag.
<b>Add Header and Body Tags</b>
The header of an HTML web page starts with a <head> tag and ends with a
</head> tag. Similarly, the body starts with a <body> tag and ends with a
</body> tag. Type these into your web page between the existing <html> and
</html> tags:
<head>
</head>
<body>
</body>
The elements that make up the header go between the <head> and </head>
tags, and the elements that make up the body go between the <body> and
</body> tags.
QUICK
<b>FACTS</b>
<b>UNDERSTANDING THE HEADER </b>
<b>AND THE BODY</b>
Each HTML web page consists of a header and a body.
<b>•</b>
The<i>header</i> (also called the <i>document head</i>)typically contains the title for the web page and
information about the document, including terms
for search engines, information on links, and
information about the style and scripts used.
<b>•</b>
The<i>body</i> is the rest of the HTML web page. Thebody contains the text that appears when you
display the web page as well as instructions for
other objects (for example, pictures) to be included
in the web page.
<b>NOTE</b>
</div>
<span class='text_page_counter'>(28)</span><div class='page_container' data-page=28>
<b>10</b>
<b>9</b>
<b>8</b>
<b>7</b>
<b>6</b>
<b>5</b>
<b>4</b>
<b>3</b>
<b>2</b>
<b>Add Content to the Page</b>
After creating the structure for the web page, add content to it, as described in
this section.
<b>ADD THE TITLE FOR THE PAGE</b>
Most web pages begin with a title—the text that appears in the browser’s
title bar when the web page is loaded, and that is used as the default text for
a Favorite or bookmark created for the page. Create your title by placing an
opening<title> tag, the title text, and the closing </title> tag between the
<head> tag and the </head> tag, as shown:
<head>
<title>Acme Virtual Industries - Home Page</title>
</head>
<b>SAVE THE PAGE</b>
Save the page so that you can view it in your web browser.
<b> 1. </b>
Click the <b>File</b> menu, and then click <b>Save</b>. The Save As dialog box appears.<b> 2. </b>
Navigate to the folder for your website. (Note which folder it is, because you’ll need toaccess it again in a minute.)
<b> 3. </b>
Open the <b>Save As Type</b> drop-down list and choose <b>All Files</b> instead of TextDocuments.
<b> 4. </b>
Select the contents of the File Name text box, and type index.html over the selection,replacing it.
<b> 5. </b>
Click <b>Save</b>.<b>VIEW THE PAGE</b>
Open the web page you’re creating in Internet Explorer so that you can see the
effects of the HTML tags you enter.
<b> 1. </b>
Click the <b>Start</b> button, and then click <b>Documents</b> (Windows Vista) or <b>My Documents</b>(Windows XP) to open your Documents or My Documents folder, respectively.
<b>TIP</b>
Always give each web page a descriptive title so that
anyone viewing it can grasp immediately which page
it is. It’s best to include the name of the site and a
brief description of the contents of the page. Keep the
description brief so that it fits in the title bar in a small
window, on a tab in a tabbed browser window, or on the
Favorites menu or a Bookmarks menu. If a web page
doesn’t contain a title, the browser displays the file name
instead. Even if the file name is long and descriptive, it is
unlikely to be as easy to grasp as a title.
<b>TIP</b>
Instead of choosing All Files in the Save As Type
drop-down list, you can put double quotation marks (" ")
around the file name. This prevents Notepad from adding
its default .txt file extension to the filename (which would
give a name such as <i>index.html.txt</i>).
<b>CAUTION</b>
</div>
<span class='text_page_counter'>(29)</span><div class='page_container' data-page=29>
<b>2</b>
<b>3</b>
<b>4</b>
<b>5</b>
<b>6</b>
<b>7</b>
<b>8</b>
<b>9</b>
<b>2</b>
<b>3</b>
<b>4</b>
<b>5</b>
<b>6</b>
<b>7</b>
<b>8</b>
<b>9</b>
<b>2</b>
<b>3</b>
<b>4</b>
<b>5</b>
<b>6</b>
<b>7</b>
<b>8</b>
<b>9</b>
<b>2. </b>
Double-click the folder in which you stored yourwebsite.
<b>3. </b>
Right-click the <b>index.html</b> file, click <b>Open With</b>, andthen click <b>Internet Explorer</b>.
Figure 1-1 shows the page open in Internet
Explorer. All you see is the title in the title bar
because the body of the web page is blank.
<b>ADD A HEADING</b>
Add a level-1 (top-level) heading to your web
page by entering the heading text inside <h1> and
</h1> tags within the body section (between the
<body> and </body> tags). For example:
<body>
<h1>Welcome to Acme Virtual Industries!</h1>
</body>
Save the web page (click the <b>File</b> menu and then click <b>Save</b>), then switch to
Internet Explorer, and click the <b>Refresh</b> button to force Internet Explorer to read
the web page again. Figure 1-2 shows the page.
<i><b>Figure 1-1:</b><b> Use your browser to see the progress in the page you create. At first, only the title </b></i>
<i><b>is visible.</b></i>
<b>NOTE</b>
</div>
<span class='text_page_counter'>(30)</span><div class='page_container' data-page=30>
<b>10</b>
<b>9</b>
<b>8</b>
<b>7</b>
<b>6</b>
<b>5</b>
<b>4</b>
<b>3</b>
<b>2</b>
<b>ADD TEXT PARAGRAPHS</b>
To add a text paragraph to the body of the web page, enter the paragraph’s text
between an opening <p> tag and a closing </p> tag.
<b> 1. </b>
Immediately below the heading, add two or more text paragraphs to the page, puttingeach paragraph within <p> and </p> tags. For example:
<p>Acme Virtual Industries is the premier provider of
virtualized office space in the United States and Canada.</p>
<p>Contact us to learn how we can help you by providing virtual
staff and premises that allow your business to grow at the
touch of a button.</p>
<b> 2. </b>
Save the page, switch to your browser, and then refresh the display so that you cansee the change. Figure 1-3 shows the example page with the text added.
<i><b>Figure 1-2:</b><b> To see the effect of the changes you make, click the Refresh button to update the </b></i>
<i><b>display after each change you save to the page.</b></i>
<i><b>Refresh button</b></i>
<b>TIP</b>
Make your headings and titles as descriptive as possible.
Many search engines use the headings and titles to
determine the contents of your pages. Using quirky
or humorous headings and titles may amuse viewers,
but they can cause search engines to rank your pages
lower than for straightforward headings and titles.
Easy-to-grasp titles are also important when users create
bookmarks or favorites for your pages, as the browser
suggests the page’s title as the default name. You can
also use meta tags (discussed in “Describe Your Pages
with Meta Tags,” later in this chapter) to help search
engines index your pages.
<b>TIP</b>
For speed, you may want to use keyboard shortcuts to
save the web page, switch to your browser, and refresh
or reload the page. Press <b>CTRL+S</b> to save, <b>ALT+TAB</b>
</div>
<span class='text_page_counter'>(31)</span><div class='page_container' data-page=31>
<b>2</b>
<b>3</b>
<b>4</b>
<b>5</b>
<b>6</b>
<b>7</b>
<b>8</b>
<b>9</b>
<b>2</b>
<b>3</b>
<b>4</b>
<b>5</b>
<b>6</b>
<b>7</b>
<b>8</b>
<b>9</b>
<b>2</b>
<b>3</b>
<b>4</b>
<b>5</b>
<b>6</b>
<b>7</b>
<b>8</b>
<b>9</b>
<b>ADD A LINE BREAK</b>
Most browsers accept only one paragraph tag at a time, figuring that multiple
<p> tags in sequence are an error. To put space between paragraphs, use a
line-break tag, <br />, instead of multiple <p> tags.
<b> 1. </b>
Add a <br /> tag before “virtualized” in the first paragraph:<p>Acme Virtual Industries is the premier provider of <br />
virtualized office space in the United States and Canada.</p>
<b> 2. </b>
Add a <br /> tag between the two text paragraphs:<br />
<b> 3. </b>
Save the page, switch to your browser, and then refresh the display so that you cansee the change. Figure 1-4 shows the example page with the breaks added, making
the words “virtualized office space” appear at the start of the second line of the first
paragraph and adding extra space between the first and second paragraphs.
<i><b>Figure 1-3:</b><b> Paragraphs without specific attributes appear in the browser’s default font.</b></i>
<b>NOTE</b>
The<br/> tag is <i>self-closing</i>—it doesn’t need a closing
tag. The forward slash before the closing angle-bracket
indicates that a tag is self-closing.
<b>NOTE</b>
</div>
<span class='text_page_counter'>(32)</span><div class='page_container' data-page=32>
<b>10</b>
<b>9</b>
<b>8</b>
<b>7</b>
<b>6</b>
<b>5</b>
<b>4</b>
<b>3</b>
<b>2</b>
<b>ADD A COMMENT</b>
<i>Comments</i> are text that the browser is instructed
not to display. You can add comments to a web
page to note a change you need to make, explain
an effect you’re trying to achieve, or add other
information for yourself or others helping you to
create and manage your site.
To add a comment, use the <!-- --> tag, placing
the comment between the two pairs of dashes.
Put a space between each pair of dashes and the
comment.
<b>1. </b>
Add a comment to the line after the line break youjust inserted, together with a new text paragraph
below it:
<br />
<!-- Insert the picture here -->
<p>Virtualized office space is an
exciting and fast-moving market
sector.</p>
<b> 2. </b>
Save the page, switch to your browser, and then refresh the display so you can seethat the comment is not displayed, while the new paragraph is displayed.
<b>VIEW THE SOURCE CODE</b>
Although browsers don’t display comments when they display the web page,
anyone who can view your pages can view the comments by examining the
source code for the pages. Most browsers include a View Source or View Source
Code command (often on the View menu) for displaying the source code.
To view the source code for the page currently displayed in Internet Explorer:
<b> 1. </b>
Click the <b>Page</b> drop-down menu, and then click <b>View Source</b>. Windows opens thepage in Notepad (or your default text editor).
<b> 2. </b>
When you’ve finished examining the source code, click the <b>Close</b> button (the Xbutton) to close the Notepad window.
<i><b>Figure 1-4:</b><b> Use a </b><b><br/></b><b> (line-break) tag to add extra space </b></i>
<i><b>between paragraphs.</b></i>
<i><b>Line break providing extra </b></i>
<i><b>space between paragraphs </b></i>
<i><b>Line break breaking </b></i>
<i><b>a text paragraph</b></i>
<b>TIP</b>
</div>
<span class='text_page_counter'>(33)</span><div class='page_container' data-page=33>
<b>2</b>
<b>3</b>
<b>4</b>
<b>5</b>
<b>6</b>
<b>7</b>
<b>8</b>
<b>9</b>
<b>2</b>
<b>3</b>
<b>4</b>
<b>5</b>
<b>6</b>
<b>7</b>
<b>8</b>
<b>9</b>
<b>2</b>
<b>3</b>
<b>4</b>
<b>5</b>
<b>6</b>
<b>7</b>
<b>8</b>
<b>9</b>
<b>Apply Formatting</b>
HTML lets you apply formatting in several ways. The most basic way is
by applying direct formatting to the text that needs it. This is an old-style
formatting technique that is “deprecated” in both current HTML standards and
the forthcoming HTML 5 standard. (“Deprecated” here means the
standards-setting body wishes it would go away—but it won’t.) But direct formatting still
works, and you’ll see it used widely, so it’s a good idea to understand how it
works even if you use CSS—the preferred formatting method—for your web
pages.
To apply direct formatting using HTML, you use tags. In
this example, you’ll quickly apply centering to a paragraph
by adding the align attribute to the paragraph tags that
contain it.
<b>1. </b>
Click before the closing angle bracket of the <p> tag at thebeginning of the paragraph you want to center. In the example,
the paragraph is “Virtualized office space is an exciting and
fast-moving market sector.”
<b>2. </b>
Press<b>SPACEBAR</b> and then type align="center" before theclosing angle bracket, as in this example:
<p align="center"> Virtualized office space is
an exciting and fast-moving market sector.</p>
<b>3. </b>
Save the page, switch to your browser, and then refresh thedisplay so that you can see the change.
<b>Add a Picture</b>
Add a picture to the page by using an <img> tag. The <img> tag uses an src
attribute that specifies the source file used for the image and an alt attribute that
specifies alternative text to display if it is missing.
<b> 1. </b>
Choose the picture you want to display.<b> 2. </b>
Copy it to your site’s folder.<b>NOTE</b>
</div>
<span class='text_page_counter'>(34)</span><div class='page_container' data-page=34>
<b>10</b>
<b>9</b>
<b>8</b>
<b>7</b>
<b>6</b>
<b>5</b>
<b>4</b>
<b>3</b>
<b>2</b>
<b> 3. </b>
Type the tag on the line below the line break (<br/>) tag, substituting your picture’sname for “open_plan_office.jpg” and a description for the alt text.
<img src="open_plan_office.jpg" width="500" alt="Open-plan
office" />
<b> 4. </b>
Save the page, switch to your browser, and then refresh the display so that you cansee the change. Figure 1-5 shows an example of a page with an image added.
<b> 5. </b>
If the picture appears at an unsuitable size for the page, adjust the width value to makeit wider or narrower, save the file, and then reload the page in your browser.
<b>NOTE</b>
Thealt attribute makes the browser display text if the
image file isn’t available or if the browser is set not to
display images (which helps speed up browsing over
slow connections). This attribute is also used by assistive
technologies for sight-impaired users. alt is required for
theimg tag, as is src. For an illustrative picture, type a
short description so that visitors will know what they’re
missing. For a decorative picture, use alt=" " (a space).
For a bullet picture, use alt="*" so that the visitor sees an
asterisk. For a horizontal-line picture, use alt="---" so
that the visitor sees a horizontal line of dashes.
</div>
<span class='text_page_counter'>(35)</span><div class='page_container' data-page=35>
<b>2</b>
<b>3</b>
<b>4</b>
<b>5</b>
<b>6</b>
<b>7</b>
<b>8</b>
<b>9</b>
<b>2</b>
<b>3</b>
<b>4</b>
<b>5</b>
<b>6</b>
<b>7</b>
<b>8</b>
<b>9</b>
<b>2</b>
<b>3</b>
<b>4</b>
<b>5</b>
<b>6</b>
<b>7</b>
<b>8</b>
<b>9</b>
<b>Add Hyperlinks and Tags, </b>
<b>and Reloading Pages</b>
With your page’s content in place, you can add hyperlinks to other web pages
and web sites, and add tags to describe the page’s contents to search engines.
You may also want to reload a web page automatically to keep it fresh, or
redirect the browser to another web page.
<b>Add a Hyperlink</b>
A<i>hyperlink</i> is a link in a web page that leads to another page or to another point
on the same page. You click the hyperlink to switch the browser to the hyperlink’s
target or destination. Hyperlinks are usually implemented as text or graphics.
<i><b>Figure 1-6:</b><b> HTML editors, such as Komodo Edit, make the process of inserting and checking </b></i>
<i><b>codes easier. Some include an integrated browser for viewing pages as you work.</b></i>
<b>NOTE</b>
</div>
<span class='text_page_counter'>(36)</span><div class='page_container' data-page=36>
<b>10</b>
<b>9</b>
<b>8</b>
<b>7</b>
<b>6</b>
<b>5</b>
<b>4</b>
<b>3</b>
<b>2</b>
Add hyperlinks from this page to another page by using a pair of anchor tags,
<a> and </a>, with the href (hypertext reference) attribute and the path and
name of the linked file.
<b> 1. </b>
Position the insertion point where you want the hyperlink—for example after the last</p> tag in the file—and press <b>ENTER</b> to create a new line.
<b> 2. </b>
Create any heading or other text that you want to immediately precede the hyperlink.For example, type a new level-2 heading using <h2> and </h2> tags, as shown:
<h2>Acme Virtual Industries Locations</h2>
<b> 3. </b>
Type the actual hyperlink. This example creates a link to a page named west_coast.html that uses the words West Coast as the object the user clicks to use the hyperlink:
<a href="west_coast.html">West Coast</a>
<i><b>Figure 1-7:</b><b> Web-authoring applications, such as Microsoft Expression Web, let you apply </b></i>
<i><b>formatting graphically rather than by entering the HTML codes manually.</b></i>
<b>TIP</b>
</div>
<span class='text_page_counter'>(37)</span><div class='page_container' data-page=37>
<b>2</b>
<b>3</b>
<b>4</b>
<b>5</b>
<b>6</b>
<b>7</b>
<b>8</b>
<b>9</b>
<b>2</b>
<b>3</b>
<b>4</b>
<b>5</b>
<b>6</b>
<b>7</b>
<b>8</b>
<b>9</b>
<b>2</b>
<b>3</b>
<b>4</b>
<b>5</b>
<b>6</b>
<b>7</b>
<b>8</b>
<b>9</b>
<b>4. </b>
Type additional hyperlinks as needed—for example:<a href="midwest.html">Midwest</a>
<a href="east_coast.html">East Coast</a>
<b>5. </b>
Save the page, switch to your browser, and then refresh the displayso that you can see the change. Don’t click any of the links, however,
because there are no linked files yet.
Figure 1-8 shows the bottom of the page with the hyperlinks
added. Notice that even though the hyperlinks appear on
separate lines in the text editor, they appear on one line in the
browser because there are no paragraph tags or line-break tags
between them. If you want the hyperlinks to appear one above
the other, put paragraph tags around each like this:
<p><a href="west_coast.html">West Coast</a></p>
<p><a href="midwest.html">Midwest</a></p>
<p><a href="east_coast.html">East Coast</a></p>
<b>Create Linked Files</b>
Create the files that are referred to by the hyperlinks you just created.
<b> 1. </b>
Create a new text file by clicking the <b>File</b> menu and then clicking <b>New</b>. Notepadautomatically closes the index.html file because it can work with only one file at a time.
<b> 2. </b>
Type the structure of the new file and any contents that can be common to each of thehyperlinked pages, such as a hyperlink back to the index.html page. For example:
<!DOCTYPE html PUBLIC "-//W3C//DTD XHTML 1.0 Transitional//EN"
" /><html xmlns=" />
<head>
<title></title>
</head>
<body>
<h1></h1>
<a href="index.html">Back to Acme Virtual Industries home
page</a>
</body>
</html>
<b> 3. </b>
Click the <b>Edit</b> menu, and then click <b>Select All</b> to select all the contents of the file.<i><b>Figure 1-8:</b><b> Text hyperlinks provide an easy way of letting visitors access other </b></i>
</div>
<span class='text_page_counter'>(38)</span><div class='page_container' data-page=38>
<b>10</b>
<b>9</b>
<b>8</b>
<b>7</b>
<b>6</b>
<b>5</b>
<b>4</b>
<b>3</b>
<b>2</b>
<b> 4. </b>
Click the <b>Edit</b> menu, and then click <b>Copy</b> to copy the structure of the file to the Clipboard.<b> 5. </b>
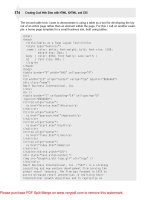
Enter the unique contents of the page using the techniques discussed earlier in thischapter to add a title, a heading, some text, and perhaps a picture. This example
shows the HTML for a short page (shown in Figure 1-9) that contains those items:
<!DOCTYPE html PUBLIC "-//W3C//DTD XHTML 1.0 Transitional//EN"
" /><html xmlns=" />
<head>
<title>Acme Virtual Industries - West Coast Locations</title>
</head>
<body>
<h1>West Coast Locations</h1>
<p>Please click your nearest city:</p>
<p><a href="redding.html">Redding</a></p>
<p><a href="berkeley.html">Berkeley</a></p>
<p><a href="los_angeles.html">Los Angeles</a></p>
<p><a href="san_diego.html">San Diego</a></p>
<br />
<p><a href="index.html">Back to Acme Virtual Industries Home
Page</a></p>
</body>
</html>
<b>6. </b>
Save the file under the filename you assigned to the first hyperlink youcreated in your site’s folder. Remember to use double quotation marks to
force Notepad to use the .html extension rather than the .txt extension.
<b>7. </b>
Switch to your browser and then click the first link at the bottom of thepage. Your browser displays the page you just created. Click the link on
the page to return to the home page.
<b>8. </b>
If you have additional hyperlinks, create a new text document for each,paste in the document structure and common elements that you copied,
and then add the unique elements desired. Save each file under the
name used for the hyperlink, and test the links from the index.html page
to each file and back to the index.html page.
<i><b>Figure 1-9:</b><b> Use the techniques discussed earlier in this </b></i>
<i><b>chapter to create a short page that includes a hyperlink </b></i>
<i><b>back to the index.html page.</b></i>
<b>NOTE</b>
</div>
<span class='text_page_counter'>(39)</span><div class='page_container' data-page=39>
<b>2</b>
<b>3</b>
<b>4</b>
<b>5</b>
<b>6</b>
<b>7</b>
<b>8</b>
<b>9</b>
<b>2</b>
<b>3</b>
<b>4</b>
<b>5</b>
<b>6</b>
<b>7</b>
<b>8</b>
<b>9</b>
<b>2</b>
<b>3</b>
<b>4</b>
<b>5</b>
<b>6</b>
<b>7</b>
<b>8</b>
<b>9</b>
<b>Describe Your Pages with Meta Tags</b>
To enable search engines to determine the contents of your web pages and
catalog them correctly, you can use meta tags with the appropriate information.
You place these tags inside the head of a web page, where they’re read by search
engines, but not displayed in the browser.
The main attributes for the meta tag are the name attribute and the content
attribute.
<b>•</b>
name specifies the name of the meta tag you want to create. HTML supports awide variety of names for recording details such as the author, editor, purpose and
rating of the page, and more. When describing your pages, you’ll typically want to
use the description name and the keywords name because search engines typically
concentrate on these tags.
<b>•</b>
content specifies the content of the meta tag.To add meta tags to a page:
<b> 1. </b>
Position the insertion point within the header of the web page you want to affect.<b> 2. </b>
Type the first meta tag, making it a description tag and assigning it a brief descriptionof the page—for example:
<meta name="description" content="virtualized office space"/>
<b> 3. </b>
Type the next meta tag, making it a keywords tag and assigning it the keywords youwant to use for the page, separated by commas—for example:
<meta name="keywords" content="virtual, office, services"/>
<b> 4. </b>
Type further meta tags as required—for example:<meta name="author" content="Acme Virtual Industries"/>
<b> 5. </b>
Save the page.Unlike most of the tags discussed in this chapter, meta tags don’t have a closing
tag.
<b>Reload a Page Automatically</b>
Sometimes you may need to create a web page that automatically reloads itself
without the user’s intervention so that it can display the latest information
<b>NOTE</b>
You can place the meta tags anywhere in the header, but
you’ll probably find it best to choose a standard location
for all your pages. For example, you might decide always
to put the meta tags after the page’s title.
<b>TIP</b>
Often, you may want to use meta tags to describe your
site (or an area of your site) rather than simply the
content of the page to which you’re adding the tag. This
will help increase your site’s presence in search engines,
but you will need to ensure that users can easily navigate
to the other areas of your site to find the contents that
have drawn them to it.
<b>TIP</b>
There’s a special meta tag called robots that you can
use to request search engines <i>not</i> to scan a page or
follow links on it. You might do this if you want to avoid
having a page appear in search engines—for example,
if it’s private or if you’re still testing your site. It’s not 100
percent effective, as search engines can disregard it,
but it’s still worth doing. Add this tag to the header area:
</div>
<span class='text_page_counter'>(40)</span><div class='page_container' data-page=40>
<b>10</b>
<b>9</b>
<b>8</b>
<b>7</b>
<b>6</b>
<b>5</b>
<b>4</b>
<b>3</b>
<b>2</b>
available. For example, you might need to update a page of sports events with
the latest statistics.
To update a page automatically, use a meta tag with the http-equiv attribute set
torefresh.
<b> 1. </b>
Position the insertion point within the header of the web page you want to affect.<b> 2. </b>
Type the meta tag in the following format, assigning to content the number of secondsafter which you want the page to be refreshed:
<meta http-equiv="refresh" content="60"/>
<b> 3. </b>
Save the page, switch to your browser, and refresh the display.<b> 4. </b>
Wait the specified number of seconds, and the page will automatically reload itself.<b>Redirect the Browser to Another Page</b>
If you’ve used the Web much, you’ll be familiar with being redirected from
one page to another. You’ll often need to use redirection in your pages as well.
For example, you might need to redirect browsers from your old website to
your new one or from an alternate domain (such as .org or .net) to your main
domain.
To redirect the browser, use an http-equiv meta tag with the url attribute set to
the destination URL.
<b> 1. </b>
Position the insertion point within the header of the web page you want to affect.<b> 2. </b>
Type the <meta> tag and specify the http-equiv attribute with the refresh value:<meta http-equiv="refresh"
<b> 3. </b>
Add the content attribute with the number of seconds to wait, followed by a semicolon(;), and then the URL that you want to use—for example:
content="2;URL="/>
The entire tag should look like this:
<meta http-equiv="refresh" content="2;url=http://www
.acmevirtualindustries.com"/>
Save the page, reload it in Internet Explorer, and you will be whisked to the
specified site after the delay you set.
<b>CAUTION</b>
Don’t set too short a refresh interval on a page, no matter
how frequently the information is updated or how eagerly
viewers will want to get the latest information; even when
you use a meta tag to update the page automatically,
users can reload it manually as frequently as they wish.
In particular, don’t set content to 0, as this will cause the
page to reload constantly.
QUICK
<b>FACTS</b>
<b>UNDERSTANDING HOW SEARCH </b>
<b>ENGINES WORK</b>
To find specific content on the Web, you’re probably used
to using a search engine, such as Google (www.google.
com), Yahoo! (www.yahoo.com), Microsoft’s Bing (www.
bing.com), or another search engine. You type your
search criteria, click the Search button or the Go button,
and receive the results within seconds.
</div>
<span class='text_page_counter'>(41)</span><div class='page_container' data-page=41>
<b>2</b>
<b>3</b>
<b>4</b>
<b>5</b>
<b>6</b>
<b>7</b>
<b>8</b>
<b>9</b>
<b>2</b>
<b>3</b>
<b>4</b>
<b>5</b>
<b>6</b>
<b>7</b>
<b>8</b>
<b>9</b>
<b>2</b>
<b>3</b>
<b>4</b>
<b>5</b>
<b>6</b>
<b>7</b>
<b>8</b>
<b>9</b>
<b>Validate Your HTML </b>
<b>and Checking Your Pages</b>
Before you put a page on the Web, you should validate it to make sure the
HTML code is correct. You should also view the page in various browsers to
make sure it looks as you intend.
<b>Validate Your HTML with the W3C Markup </b>
<b>Validation Service</b>
You’ve now written a couple of web pages in HTML, and they work okay
in Internet Explorer. But are they technically valid so that they will display
properly in all browsers? The easiest way to check is to use the Markup
Validation Service at the World Wide Web Consortium (W3C) website.
<b> 1. </b>
Open your index.html page in Notepad.<b> 2. </b>
Select all the code and copy it to the Clipboard. The easiest way is to press <b>CTRL+A</b>and then <b>CTRL+C</b>. Alternatively, right-click in the code and choose <b>Select All</b>, then
right-click again and choose <b>Copy</b>.
<b> 3. </b>
Open Internet Explorer and go to . You may want to bookmarkthis site so that you can access it quickly in the future.
<b> 4. </b>
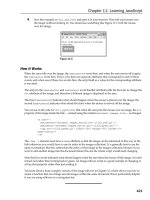
Click the <b>Validate By Direct Input </b>tab to display its contents.<b> 5. </b>
Right-click in the <b>Enter The Markup To Validate box</b>, and choose <b>Paste</b> from theshortcut menu to paste in your code (see Figure 1-10).
<b> 6. </b>
Click the <b>Check</b> button. The Markup Validation Service chews through your codeand lets you know how it tasted. Figure 1-11 shows the result of a successful
check.
If you get a red “Errors found while checking this document” message, scroll
down the page and read the details. You can then fix the errors one by one and
click the <b>Revalidate</b> button to try your code again.
<b>NOTE</b>
If your redirect sends Internet Explorer from a web page
on your computer to a web page on the Internet, Internet
Explorer opens the redirected page in a new browser
window rather than in the same browser window. This is
because the pages are in different security zones. But
if you redirect from one website to another, as you will
normally do, Internet Explorer uses the same window.
The same is true if you redirect from one page on your
computer to another page on it.
<b>NOTE</b>
You can also redirect the browser to another web page
using JavaScript. Chapter 10 shows you how to do this.
<b>NOTE</b>
</div>
<span class='text_page_counter'>(42)</span><div class='page_container' data-page=42>
<b>10</b>
<b>9</b>
<b>8</b>
<b>7</b>
<b>6</b>
<b>5</b>
<b>4</b>
<b>3</b>
<b>2</b>
<b>Check Your Pages with Other Browsers</b>
As of this writing (June 2009), Internet Explorer still has the lion’s share of the
browser market, with an estimated 60–70 percent share, depending on which
market-research organization you believe. After Internet Explorer come Firefox
(www.mozilla.com), with market share in the 20–25 percent range, and Safari
(www.apple.com/safari), in the 7–10 percent range.
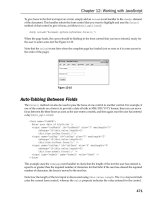
<i><b>Figure 1-10:</b><b> The W3C Markup Validation Service lets you quickly check that your </b></i>
<i><b>code is correct.</b></i>
<b>TIP</b>
</div>
<span class='text_page_counter'>(43)</span><div class='page_container' data-page=43>
<b>2</b>
<b>3</b>
<b>4</b>
<b>5</b>
<b>6</b>
<b>7</b>
<b>8</b>
<b>9</b>
<b>2</b>
<b>3</b>
<b>4</b>
<b>5</b>
<b>6</b>
<b>7</b>
<b>8</b>
<b>9</b>
<b>2</b>
<b>3</b>
<b>4</b>
<b>5</b>
<b>6</b>
<b>7</b>
<b>8</b>
<b>9</b>
<i><b>Figure 1-11:</b><b>A green bar indicates that the code checked out successfully. A red bar indicates there are errors; you’ll find the </b></i>
</div>
<span class='text_page_counter'>(44)</span><div class='page_container' data-page=44>
<b>10</b>
<b>9</b>
<b>8</b>
<b>7</b>
<b>6</b>
<b>5</b>
<b>4</b>
<b>3</b>
<b>2</b>
After these come other browsers with 1 percent of the market or less. Table 1-2
summarizes current Web browsers, the operating systems they run on, and
where to get them. All these Web browsers are free.
This means it’s vital to use Internet Explorer as your primary browser for
testing your web pages, because you want the majority of visitors to see the site
exactly as you intend it to look. It’s also a good idea to check your web pages
with Firefox and Safari, because most of the visitors who aren’t using Internet
Explorer will be using one or other of these browsers.
Beyond this, you may want to check your web pages with other browsers for
the sake of completeness. But unless you know that a significant part of your
website’s audience uses a particular browser other than Internet Explorer,
Firefox, or Safari, it is not normally worth checking your pages with every
browser just in case minor discrepancies occur.
Figure 1-12 shows Mozilla Firefox, the second most widely used Web browser
as of this writing.
When you’ve installed a browser, you can run it from the Start menu in
Windows or from the Applications folder in Mac OS X. If you need to use this
browser often, pin it to the Start menu or add it to the Quick Launch toolbar in
<b>BROWSER</b> <b>OPERATING SYSTEMS</b> <b>SOURCE</b>
Internet Explorer Windows Included with Windows
Safari Mac OS X, Windows Included with Mac OS X;
www.apple.com/safari
Opera Windows, Mac OS X, Linux www.opera.com
Mozilla Firefox Windows, Mac OS X, Linux www.mozilla.com
Camino Mac OS X www.caminobrowser.org
Konqueror Linux www.konqueror.org
Google Chrome Windows, Mac OS X, Linux www.google.com/chrome
<i><b>Table 1-2:</b><b> Web Browsers, Their Operating Systems, and Where to Get Them</b></i>
<b>NOTE</b>
Internet Explorer runs only on Windows. Microsoft used
to provide versions for Mac OS X, but stopped with
version 5 in 1999. Apart from being severely short of
competitive features, this version is not safe to use for
security reasons.
<b>TIP</b>
</div>
<span class='text_page_counter'>(45)</span><div class='page_container' data-page=45>
<b>2</b>
<b>3</b>
<b>4</b>
<b>5</b>
<b>6</b>
<b>7</b>
<b>8</b>
<b>9</b>
<b>2</b>
<b>3</b>
<b>4</b>
<b>5</b>
<b>6</b>
<b>7</b>
<b>8</b>
<b>9</b>
<b>2</b>
<b>3</b>
<b>4</b>
<b>5</b>
<b>6</b>
<b>7</b>
<b>8</b>
<b>9</b>
Windows; in Mac OS X, launch it, <b>CTRL</b>+click or right-click
the<b>Dock</b> icon, and then choose <b>Keep In Dock</b>.
You’re almost certainly familiar with the basic way of
accessing a web page.
<b> 1. </b>
Start the browser, if it’s not already running. For example,click the <b>Start</b> button, click <b>All Programs</b>, and then click the
browser’s entry on the Start menu.
<b> 2. </b>
Select the address in the browser’s address bar by draggingacross it or by pressing a keyboard shortcut. For example,
press<b>ALT+D</b> for Internet Explorer or Firefox on Windows, or
press<b>COMMAND+L</b> for Safari, Firefox, or Camino on Mac OS X.
<b> 3. </b>
Type the URL of a web page on the Internet or the pathand filename of the web page on a local drive, and then
press<b>ENTER</b>.
<i><b>Figure 1-12:</b><b> Most browsers, such as Mozilla Firefox, have </b></i>
</div>
<span class='text_page_counter'>(46)</span><div class='page_container' data-page=46>
<b>10</b>
<b>9</b>
<b>8</b>
<b>7</b>
<b>6</b>
<b>5</b>
<b>4</b>
<b>3</b>
<b>2</b>
<b>How to…</b>
<i><b> Understanding IPv4 and IPv6</b></i>
<i><b>• Understand Web Clients </b></i>
<i><b>and Servers</b></i>
<i><b>• Access a Web Page</b></i>
<i><b> Understanding URLs</b></i>
<i><b>• Assess </b><b>Your </b><b>Requirements</b></i>
<i><b> Understanding Intranets and </b></i>
<i><b>Extranets</b></i>
<i><b>• Choose an ISP or Web Hosting </b></i>
<i><b>Service</b></i>
<i><b>• Decide on Web Hosting Features</b></i>
<i><b> Running Your Own Web Server</b></i>
<i><b> Understanding Domains</b></i>
<i><b>• Evaluate </b><b>an </b><b>ISP</b></i>
<i><b>• Evaluate a Web Hosting Service</b></i>
<i><b>• Register a Domain Name</b></i>
<i><b>• Plan Your Site’s Contents</b></i>
<i><b>• Make Your Site Effective</b></i>
<i><b>• Keep Your Web Pages Small </b></i>
<i><b>Enough to Download Quickly</b></i>
<i><b>• Check </b><b>Your </b><b>Website</b></i>
<i><b>• Update and Maintain Your </b></i>
<i><b>Website</b></i>
<i><b>• Get the Information Required </b></i>
<i><b>for FTP</b></i>
<i><b>• Transfer a Site Using an </b></i>
<i><b>FTP Client</b></i>
Chapter 2
<b>Choosing a Web Host and </b>
<b>Getting Your Own Website</b>
To make the web pages you create available to your potential
audience, you put them in a folder on a web server; the web
pages make up the website. This chapter discusses how to
assess what type of website you need, how to choose a web
host, how to design and create a site, and how to transfer
your website from your local computer to the web server.
<b>Understand Web Basics</b>
The<i>Internet</i> is the umbrella term for the worldwide network of computers that
are connected together and use the Transmission Control Protocol/Internet
Protocol (TCP/IP) protocol suite of controlling standards. The Internet uses
several different forms of communication, including e-mail, file transfer, and the
Hypertext Transfer Protocol, or HTTP. The World Wide Web (hereafter, simply
<i>the Web</i>) is that part of the Internet that uses HTTP to transfer information.
</div>
<span class='text_page_counter'>(47)</span><div class='page_container' data-page=47>
<b>2</b>
<b>3</b>
<b>4</b>
<b>5</b>
<b>6</b>
<b>7</b>
<b>8</b>
<b>9</b>
<b>2</b>
<b>3</b>
<b>4</b>
<b>5</b>
<b>6</b>
<b>7</b>
<b>8</b>
<b>9</b>
<b>2</b>
<b>3</b>
<b>4</b>
<b>5</b>
<b>6</b>
<b>7</b>
<b>8</b>
<b>9</b>
<b>Understand Web Clients and Servers</b>
If you have an Internet connection, you’re probably already familiar with
the Web from the consumer’s end—using a web browser, such as Microsoft’s
Internet Explorer, to view the contents of a website and navigating from one
web page to another by following hypertext links. The mesh of links among
pages gives the Web its name. (Another name considered for the Web was
“the Mesh.”)
Websites (a <i>site</i> is a collection of linked web pages) are stored on <i>servers,</i>
computers that provide data to other computers (<i>clients</i>) on request. Web
servers can run almost any TCP/IP-capable operating system, such as UNIX,
Linux, Solaris, Windows, or Mac OS X. Likewise, Web clients can run almost
any operating system, although most run client operating systems rather than
server operating systems.
Figure 2-1 shows a web client requesting a web page from a web server across
the Internet.
Internet
Web server
Web client sends a request for a web page
Web client
Web server sends the web page to the client
<i><b>Figure 2-1: A web client (using a browser) typically connects to a web server </b></i>
<i><b>across the Internet. You can also use a browser to open an HTML document </b></i>
<i><b>on your local hard drive or network.</b></i>
QUICK
<b>FACTS</b>
<b>UNDERSTANDING IPV4 AND IPV6 </b>
There are two main versions of the Internet Protocol:
Version 4 (usually called IPv4) and version 6 (usually
called IPv6).
<b>IPV4</b>
IPv4 is the older version of the Internet Protocol. IPv4
uses a 32-bit address space, which gives around four
billion possible addresses. This seemed plenty of
addresses when the standard was approved in 1980,
but now, IPv4 is rapidly running out of different addresses
for computers.
IPv4 is still used most widely in much of the world, so
this book uses IPv4 for most of its examples that show
IP addresses.
An IPv4 address consists of four groups, called
<i>octets,</i> written in “dot-decimal notation”—for example,
192.168.1.212 or 216.54.31.255.
<b>IPV6</b>
IPv6 is the newer version of the Internet Protocol. IPv6
uses a 128-bit address space, which gives around
3.4 × 1038<sub> addresses—340 undecillion, if you like to </sub>
brandish the terms for absurdly large numbers. This
seemed like plenty of addresses when the standard was
approved in 1998, and it still does today.
IPv6 is increasingly used in China and other rapidly
developing economies, and will eventually take over from
IPv4. Apart from the extra addresses, IPv6 provides other
improvements over IPv4, but few businesses and even
fewer customers are yet prepared to move from IPv4 to
IPv6 unless forced to do so. This is because moving to
IPv6 involves both expense and technical upheaval.
<i>Continued . . .</i>
</div>
<span class='text_page_counter'>(48)</span><div class='page_container' data-page=48>
<b>10</b>
<b>9</b>
<b>8</b>
<b>7</b>
<b>6</b>
<b>5</b>
<b>4</b>
<b>3</b>
<b>2</b>
<b>Access a Web Page</b>
Every computer directly connected to the Internet has a unique address called
its<i>Internet Protocol address, </i>or<i>IP address, </i>that enables the computer to be
identified. If you enter that address in a browser, you will access the public web
page on that computer (provided that it has one).
Since an IPv4 address is a complex series of up to 12 digits, most web servers
have a domain name associated with that address that is simpler to remember
and use. For example, the IP address 198.45.22.173 is registered to the
computer associated with the domain host name
“mhprofessional.com,” home of McGraw-Hill
Professional, publishers of this book. To access
their website, you can also enter their domain
name using their URL, or Uniform Resource
Locator, , in
your browser (see Figure 2-2). Your browser
consults a Domain Name Service (DNS) server
(usually at your ISP) to resolve the URL to the
appropriate IP address. See the QuickSteps
“Understanding URLs,” in this chapter.
Long URLs tend to be hard to remember, so most
companies try to keep them as short as possible.
For example, on the back of this book, you’ll
see the URL www.mhprofessional.com for the
McGraw-Hill Professional website. To access the
McGraw-Hill website:
<b> 1. </b>
Click the <b>Start</b> button, and then click <b>Internet</b>.<b> 2. </b>
Type www.mhprofessional.com into the address barof your browser, and then press <b>ENTER</b>.
<i><b>Figure 2-2: When you enter a host name, your browser resolves the IP address and displays the </b></i>
<i><b>appropriate website.</b></i>
QUICK
<b>FACTS</b>
<b>UNDERSTANDING IPV4 AND IPV6 </b>
<i>(Continued)</i>
An IPv6 address is usually written as four groups of
digits in hexadecimal (base-16) notation, with the groups
separated by colons—for example, 2024:0cb8:86a3:
0010:7400:8d2e:0512:7443. There are various rules
about omitting leading zeros or zero values, but usually
it’s easier to write the addresses out in full.
</div>
<span class='text_page_counter'>(49)</span><div class='page_container' data-page=49>
<b>2</b>
<b>3</b>
<b>4</b>
<b>5</b>
<b>6</b>
<b>7</b>
<b>8</b>
<b>9</b>
<b>2</b>
<b>3</b>
<b>4</b>
<b>5</b>
<b>6</b>
<b>7</b>
<b>8</b>
<b>9</b>
<b>2</b>
<b>3</b>
<b>4</b>
<b>5</b>
<b>6</b>
<b>7</b>
<b>8</b>
<b>9</b>
When you enter a URL like this, your browser automatically adds <i>http://</i> to the
beginning of the address, because most websites use HTTP rather than another
protocol. The request doesn’t include a filename, so the web server supplies the
default file for the website. The default file is usually named index.html, but
may also be named index.htm (without an L) or default.html, depending on the
server technology used. You may or may not see this filename after the URL in
the browser’s address box when you access the website.
<b>Choose a Web Host </b>
Before you can put up a website, you’ll probably need to choose a web host or
ISP. This section discusses how to assess your requirements, decide whether to
run your own web server, establish which features your need, and choose a
web host.
<b>Assess Your Requirements</b>
First, assess your requirements for an ISP or web host and a website.
<b>•</b>
If you’re planning to build your own website, you’ll need to find an Internet locationto host your site, unless you have a location already. Follow the instructions in this
chapter to choose an ISP or a web hosting service and create your own website.
<b>•</b>
If you’re creating pages for your school, organization, or company, however, that bodywill probably have set up a hosting arrangement for the site, so you’ll put the pages
either on an existing website or on an intranet site (an intranet is a web network
similar to the Internet but contained within and limited to a single organization; see the
“Understanding Intranets and Extranets” QuickFacts later in this chapter). In this case,
you can skip most of this chapter, provided that you learn the details of the server that
will contain your web site.
<b>•</b>
If you’re creating HTML content for pages on a special site (for example, eBayor Blogger.com), you won’t need to get a website, but the site may have specific
constraints on the tags you can use and where you can place them.
QUICK
<b>FACTS</b>
<b>UNDERSTANDING URLS</b>
A typical full URL looks like this: http://www
.acmevirtualindustries.com/services/phones.html.
The first part of a URL, http://, tells the client and
the server that the site uses HTTP as opposed to
another protocol. If the URL begins with https://, it uses
encryption to secure the data transmitted between the
client and the server. For example, if you connect to your
bank via the Web, the connection will almost certainly
use HTTPS rather than unsecured HTTP so that your
sensitive data is secured in transit.
The next part of the URL, www, indicates that the server
being contacted is a web server. This part appears in
most URLs, but is not always required. For example,
URLs such as do not use www.
The next part of the URL identifies the domain name
or IP address of the server to which to connect.
Typically, the URL uses the domain name—in the format
acmevirtualindustries.com—because domain names are
easier for people to remember and to type. Sometimes,
the URL uses the server’s IP address instead of the
domain name—for example, http://216.239.37.99.
The last part of the URL is the address of the file that’s
being opened—for example, /services/phones.html. The
address consists of the filename (phones.html) preceded
by the folder path (/services/). The folders are divided
using forward slashes (/) rather than backward slashes
(\) because much of the Internet is based on UNIX (which
uses forward slashes to denote directory divisions).
</div>
<span class='text_page_counter'>(50)</span><div class='page_container' data-page=50>
<b>10</b>
<b>9</b>
<b>8</b>
<b>7</b>
<b>6</b>
<b>5</b>
<b>4</b>
<b>3</b>
<b>2</b>
<b>Choose an ISP or Web Hosting Service</b>
If you’re looking for web space, your main choices are your ISP or a web
hosting service. You can research your options on the Web by visiting ISPs’
websites, web hosts’ sites, and host-finding sites, such as TopHosts.com (www
.tophosts.com) and HostSearch (www.hostsearch.com), but you should also
ask your friends and coworkers. In particular, if you’re part of a company or a
school, ask its system administrator or webmaster for suggestions, because they
should be able to steer you toward suitable ISPs or hosts.
<b>Decide on Web Hosting Features</b>
When choosing an ISP or web host for your site, decide which features you
will need.
<b>AMOUNT OF SPACE</b>
The web host rents you a certain amount of space on its web servers for your
site. One hundred megabytes (MB) is enough for a small site; as soon as you
add more than a handful of pages with graphics or post one or more of your
musical compositions (even in a compressed format, such as MP3), you’ll need
to get more space. To start with, look for 1 gigabyte (GB) or more; even if you
don’t use anything like that amount of space, it’s good to have room to expand
as needed.
<b>AMOUNT OF TRAFFIC</b>
The web host allows you a certain amount of <i>traffic,</i> or data transferred, usually
measured in gigabytes per month. (Avoid any web host that offers less than a
gigabyte.) If your site exceeds your allowance, the web host charges you extra
for each gigabyte.
How much traffic you need depends on how many people visit your site and
what they do when they’re there—for example, viewing pages consisting of
compact files generates far less traffic than downloading your audio or video
files. Even if your site fits comfortably within, say, 100MB, you may need many
<b>CAUTION</b>
Most browsers also let you omit the www designation and
the domain type suffix (such as .com or .org), so you can
often type just the keyword in the domain and let your
browser fill in the rest. For example, you might type ibm
and let your browser expand the address to http://www
.ibm.com. The danger is that sometimes the site you
want may not use the .com domain suffix—but another
site will. This can lead to some unpleasant surprises.
QUICK
<b>FACTS</b>
<b>UNDERSTANDING INTRANETS </b>
<b>AND EXTRANETS</b>
A website is a site on the World Wide Web that anyone
with an Internet connection and a web browser can
access. Most large companies, and many small ones,
have websites that provide information and support to
their customers. Companies also tend to have internal
websites for their staff that people outside the company
cannot access. These websites are called <i>intranets</i> and
are separated from the Web by firewalls.
Beyond intranets and websites, some companies
have sites that allow people outside the company
to access certain types of information that are kept
on the company’s internal network rather than on its
web server. For example, at websites such as FedEx
(www.fedex.com) and UPS (www.ups.com), you can
enter the tracking number for a package and learn
its current location, status, and routing information.
This information comes from the company’s internal
network but is accessible to customers. This type of
externally accessible web site is called an <i>extranet;</i> when
customers can access it, it’s sometimes referred to as a
<i>business-to-consumer </i>(<i>B2C</i>)<i> extranet.</i>
<i>Continued . . .</i>
</div>
<span class='text_page_counter'>(51)</span><div class='page_container' data-page=51>
<b>2</b>
<b>3</b>
<b>4</b>
<b>5</b>
<b>6</b>
<b>7</b>
<b>8</b>
<b>9</b>
<b>2</b>
<b>3</b>
<b>4</b>
<b>5</b>
<b>6</b>
<b>7</b>
<b>8</b>
<b>9</b>
<b>2</b>
<b>3</b>
<b>4</b>
<b>5</b>
<b>6</b>
<b>7</b>
<b>8</b>
<b>9</b>
gigabytes of traffic if your site is busy. To start with, look for around 25–50GB
per month; more is better, providing it doesn’t cost too much.
Some hosts have creative accounting policies for traffic, such as excluding the
heaviest-traffic day of the month from the total calculation, which allows your
site to ride out brief surges of visitor interest without incurring extra cost. Other
hosts are less generous and deduct all data transfer from your allowance.
<b>NUMBER OF E-MAIL ACCOUNTS</b>
Most web hosts include some e-mail accounts with the web space. Make sure
that your host offers enough e-mail accounts and that you can add accounts at
reasonable rates should you need them.
If you don’t already have an e-mail account, you’ll want one for yourself, of
course—and one for each family member who will use the Internet. But it’s
sensible to split your e-mail among a main account that you protect vigorously
against spam and other accounts that you use for more public purposes. This
means it’s good to have extra accounts that you can set up as needed and
dispose of if they become polluted. (You can also use web-based e-mail, such as
Microsoft’s Windows Live Hotmail or Google’s Gmail, for this purpose.)
You may also want to have a separate e-mail account for administering your
website, allowing visitors to write to the webmaster without exposing your
main e-mail address.
<b>YOUR OWN DOMAIN NAME </b>
For impact and ease of access, you’ll probably want your website to have its
own domain name (for example, www.acmevirtualindustries.com) rather than
a name that includes your ISP’s name or web host’s name (for example, www
.earthlink.net/~acmevirtual). All web hosts support domain names, but some
ISPs do not.
<b>INTERNET CONNECTION SPEED AND UPTIME</b>
Check that the web host has a fast connection to the Internet’s <i>backbone,</i>the
main lines of connection of the Internet, so that would-be visitors will be able
QUICK
<b>FACTS</b>
<b>UNDERSTANDING INTRANETS </b>
<b>AND EXTRANETS </b>
<i>(Continued)</i>Having a valid tracking number establishes you as a
bona fide customer; without the tracking number, you
can’t (for example) learn the delivery information about
hundreds of packages on the off-chance of finding one
that interests you. At other extranet sites, users must log
in using a password.
From the customer’s point of view, an extranet works in the
same way as a website except that it provides more useful
information and may require logging in. The difference lies
in how the extranet provides information to the customer
from inside the firewall instead of simply providing the set
of information available on the web server.
In addition to being used to make information available
to customers on the Web, as in the examples given
here, extranets can be used to provide information
securely to the employees of another company without
the information being available to users of the Web as
a whole. This type of extranet is sometimes called a
<i>business-to-business</i> (<i>B2B</i>)<i>extranet.</i>
<b>TIP</b>
The easiest way to get a domain registered and hosted
is to have the web host or ISP handle the registration
for you. If this is what you need, check whether your
intended host or ISP offers this service.
</div>
<span class='text_page_counter'>(52)</span><div class='page_container' data-page=52>
<b>10</b>
<b>9</b>
<b>8</b>
<b>7</b>
<b>6</b>
<b>5</b>
<b>4</b>
<b>3</b>
<b>2</b>
to access your website quickly. Most serious web hosts will have multiple
Gigabyte Ethernet (GigE) connections to the backbone, usually through separate
carriers, such as AT&T, Sprint, and Verizon.
A good web host will publish statistics for its <i>uptime</i>—the percentage of time
that its servers and network are typically available. Look for an uptime above
99.9 percent.
<b>SUPPORT FOR ANY WEB TOOLS</b>
Some ISPs and web hosting services limit you to using their custom tools for
building and maintaining your website. Some of these custom tools consist of
online templates and wizards that walk you through the process of creating
a site; others are executable programs that you download and install on your
computer.
Many of these custom tools enable you to put together a good-looking website
with minimal time and effort, but they do not provide the flexibility that you
will need to create a full-featured website that meets your needs. Make sure that
you can use your preferred tools as well as any tools that the host provides.
<b>AUDIO AND VIDEO STREAMING</b>
If you plan to place audio or video files on your website for streaming rather
than for download, make sure your host offers streaming. <i>Streaming</i> is a way
of splitting up an audio or video file so that it can be played as it is being
transferred. Streamed files are usually not permanently saved on the computer
that plays them. By contrast, downloaded files are permanently saved, unless
the user chooses to delete them.
Audio and video streaming involve transferring a lot of data. This is why even
apparently generous bandwidth allowances can vanish overnight.
<b>SHOPPING CARTS AND SECURE SERVERS</b>
If you plan to sell items from your website, look for a web host that offers
shopping carts and secure servers. A <i>secure server</i> is one to which the user
connects using encryption to make sure that nobody can snoop the data
exchanged by the browser and the server.
QUICK
<b>FACTS</b>
<b>RUNNING YOUR OWN WEB SERVER</b>
Instead of renting space from an ISP or from a web
hosting service, you may be tempted to run your own web
server, especially if you have both the main items needed.
The first thing you need is web server software, which
you may already have as part of your computer’s
operating system.
<b>•</b>
Windows Vista Business Edition and Windows VistaUltimate Edition include a stripped-down version of
the Internet Information Services (IIS) web server
that permits up to 10 connections at a time. (The
Home versions of Windows Vista don’t include IIS.)
<b>•</b>
Mac OS X includes Apache, a full-bore web server.<b>•</b>
Most Linux distributions also include Apache.The second thing you need is a reliable broadband
connection to the Internet.
If you’ve got both these things, you could run your own
web server. But in most cases, running your own web
server makes sense only for a medium- to large-size
company, because you must keep your web server
running all the time so that the site is always accessible
and provide enough bandwidth for however many users
choose to visit the site. Even minor outages, such as
those caused by having to restart your computer after
installing software, can cost you part of your audience.
Worse, most residential broadband Internet connections
are<i>asymmetrical,</i> delivering fast download speeds but
slower upload speeds, so your site will not respond
speedily to multiple visitors. In addition, many ISPs
specifically exclude running a server from residential and
small office/home office (SOHO) service agreements
and will notice—and object—if you try to run a popular
website on such a connection.
</div>
<span class='text_page_counter'>(53)</span><div class='page_container' data-page=53>
<b>2</b>
<b>3</b>
<b>4</b>
<b>5</b>
<b>6</b>
<b>7</b>
<b>8</b>
<b>9</b>
<b>2</b>
<b>3</b>
<b>4</b>
<b>5</b>
<b>6</b>
<b>7</b>
<b>8</b>
<b>9</b>
<b>2</b>
<b>3</b>
<b>4</b>
<b>5</b>
<b>6</b>
<b>7</b>
<b>8</b>
<b>9</b>
<b>Evaluate an ISP</b>
If you already have an Internet connection via an ISP rather than through a
school, company, or organization, investigate the web hosting services that
the ISP provides. Having your ISP host your website is a convenient solution,
provided that the ISP provides all the web features you need (see the previous
section, “Decide on Web Hosting Features,” for a discussion of the features you
should evaluate).
<b>Evaluate a Web-Hosting Service</b>
Unless your ISP specializes in hosting websites, you will find more options
and greater flexibility in a web hosting service—a service that hosts websites
but does not provide Internet access. Most web hosting services offer various
packages aimed at different levels of users, from basic packages (for example,
1GB disk space, 100 mailboxes, 25GB-a-month traffic, and basic scripting
capabilities) to developer packages (for example, 50GB disk space, 500
mailboxes, 200GB-a-month traffic, extra FTP logins for extra users with different
privileges, secure server facilities, and advanced scripting capabilities). By
choosing a suitable web hosting service and an appropriate package, you can
get almost exactly the space, traffic, and capabilities you need.
Evaluate the cost of paying separately for your Internet access and for your
web hosting. If your website requires only the features and amount of space
that your ISP includes with an Internet access account, paying for separate
web hosting will be more expensive. If your site needs a significant amount
of space and bandwidth, however, using a web hosting service is likely to be
less expensive than getting that same amount of space and bandwidth from
your ISP.
<b>Register a Domain Name</b>
To make your web presence not only felt but also easy to find, you’ll
probably want to register your own domain name. (See the “Understanding
Domains” QuickFacts for an overview of domain names and how they work.)
QUICK
<b>FACTS</b>
<b>UNDERSTANDING DOMAINS</b>
The<i>Domain Naming System</i> or <i>Domain Name Service</i>
(abbreviated to DNS in either case) is a system (or
service) that maps domain names to IP addresses. A
domain name is essentially a human-friendly shortcut to
a particular IP address. For example, as of this writing,
the domain name yahoo.com maps to the IP address
206.190.60.37.
Domains are divided into different organizational types
and geographical areas. The key organizational types
are .com (commercial organization), .org (organization),
.edu (educational institution), .gov (government agency),
.mil (U.S. military), and .net (networking organization);
there are many other types, such as .biz (business), .info
(information), and .name (personal name). All types are
widely available except for .gov and .mil.
The most widely used geographical areas are .us (United
States), .de (Germany or Deutschland), .cn (China), .jp
(Japan), .uk (United Kingdom), .es (Spain or España),
.in (India), .br (Brazil), and .it (Italy); there are others for
most major, and many minor, countries. Some countries
with memorable country codes, such as Tuvalu (.tv) and
Tonga (.to), have made a good business out of selling
domain names to anyone who wants them.
The .com designation is king of the domain world, which
is why almost all web browsers default to the .com
address when the domain type isn’t specified. So if you’re
planning to register a domain name, .com should be
your first choice—even though you may have a hard time
finding a suitable name that hasn’t already been taken.
</div>
<span class='text_page_counter'>(54)</span><div class='page_container' data-page=54>
<b>10</b>
<b>9</b>
<b>8</b>
<b>7</b>
<b>6</b>
<b>5</b>
<b>4</b>
<b>3</b>
<b>2</b>
Having a domain name (for example, www.acmevirtualindustries.com)
gives your website much more impact—and makes it easier to access—than
a name contained within another domain (for example, www.yourisp.com/
~yourname).
Draw up a short list of domain names that would be suitable for your site. Huge
numbers of domain names have already been registered, so you’ll need to be
creative to find a suitable name that’s still available. Most registration services
provide suggestions of available domain names that are similar to unavailable
domain names you request. Sometimes you may strike it lucky with these
automated suggestions, but usually you will do better to start with your own
list and work through it in order of preference.
Domain name registration used to be centrally controlled, but nowadays there
are many registration sites. You can either register a domain directly through
your web host—which is often the best option—or use a specialist domain
registrar. Four of the most popular domain registrars are:
<b>•</b>
Network Solutions (www.networksolutions.com; shown in Figure 2-3) was the firstdomain registration site and remains the largest.
<b>•</b>
eNom (www.enom.com) is a large domain registrar that specializes in businessservices and reselling domain registrations.
<b>•</b>
Go Daddy (www.godaddy.com) manages about 30 million domain names. Go Daddy isnotorious for innuendo-heavy advertising featuring celebrities such as Danica Patrick.
Go Daddy has also made the headlines through having customer service problems in
the past, so you may want to surf its support forums before signing on the dotted line.
<b>•</b>
Register.com (www.register.com) is another large registration site with a goodreputation.
Start your web browser and go to a domain name registration site. The
procedure for registering a domain name starts by searching to see if it’s
available. If it is, and if you decide to proceed, you will need to provide
payment (via credit card), billing information, and the name and address of an
administrative contact (usually you) and a technical contact (usually the web
host) for the domain name. Ideally, you will also provide the IP addresses of
<b>TIP</b>
Most people prefer to spend the time and effort coming
up with a unique domain name for which you can get the
.com extension rather than settle for one of the less usual
extensions (such as .ws or .cc). Even if you prefer an
extension other than .com for your site, register the .com
domain as well so that you can redirect it to your site and
prevent anyone else from buying it, either so they can
grab your traffic or so that they can resell the domain to
you at a hefty markup. For example, if your site is for a
nonprofit organization, the .org domain type would more
accurately reflect its nature. By securing the .com domain
name and redirecting it to the .org site, however, you
can avoid losing traffic to someone who subsequently
registers the .com domain name. Also, because most
browsers default to the .com domain type, visitors who
type only the basic name of your site rather than the full
address will be directed to the correct site.
<b>NOTE</b>
Some domain registrars will hide your personal information
from public view, which can be handy when you register a
personal domain and don’t want people tracking you down.
For example, DreamHost (www.dreamhost.com) provides
this service by default, while Go Daddy can provide it
through their Domains By Proxy service.
</div>
<span class='text_page_counter'>(55)</span><div class='page_container' data-page=55>
<b>2</b>
<b>3</b>
<b>4</b>
<b>5</b>
<b>6</b>
<b>7</b>
<b>8</b>
<b>9</b>
<b>2</b>
<b>3</b>
<b>4</b>
<b>5</b>
<b>6</b>
<b>7</b>
<b>8</b>
<b>9</b>
<b>2</b>
<b>3</b>
<b>4</b>
<b>5</b>
<b>6</b>
<b>7</b>
<b>8</b>
<b>9</b>
the web server that will host the domain
name. If you don’t know them yet, you can
leave the domain name with the registration
service until you find a web host, but you
may then have to pay extra to transfer the
domain name to the web host.
<b>Plan, Design, and </b>
<b>Create Your Site</b>
You can start a website by creating
individual web pages using a text editor (as
discussed in Chapter 1), an HTML editor, or
a web-authoring application and linking the
pages to each other using hyperlinks. Before
you start creating your site, however, you
should plan the site’s contents and decide its
basic design.
<b>Plan Your Site’s Contents</b>
A snappy URL may stick in a web surfer’s
mind, and a good design will please the eye
(assuming that the browser renders it correctly), but content is what makes or
breaks your website. To make people come to your site and to persuade them to
come back, you need strong—and preferably unique—content.
Focus on what your site’s purpose is—why you’re creating it in the first place.
This should be obvious: You’d think few people would create a website for no
reason, but a surprising number of people do start off with, at best, a hazy idea
of what they’re trying to achieve. While you <i>can</i> start creating pages without
a firm goal and then let it grow in whichever direction your enthusiasm takes
<i><b>Figure 2-3: You can register a domain name—or just find </b></i>
<i><b>out whether a name is available—at a registration site </b></i>
<i><b>such as Network Solutions.</b></i>
<b>CAUTION</b>
Make sure any domain name you register doesn’t infringe
on any trademark. If it does, the trademark holder may be
able to claim the domain name from you.
</div>
<span class='text_page_counter'>(56)</span><div class='page_container' data-page=56>
<b>10</b>
<b>9</b>
<b>8</b>
<b>7</b>
<b>6</b>
<b>5</b>
<b>4</b>
<b>3</b>
<b>2</b>
you, you’re unlikely to end up with a focused, unified site that will draw
interest. (If you do begin creating your website this way, be prepared to make
root-and-branch changes if you realize you should have chosen a different
direction.)
Establish what value you will provide to the people who visit your site. Will
you provide tips, resources, or evaluations of products? Will you link to other
sites? Will you sell, promote, or support products? All of the above?
Once you have decided the purpose of your website, focus on how you will
deliver that purpose. In particular, decide who is going to generate content, who
is going to edit it, who will create the web pages, and who will post them to the
site and maintain it. On a small site, such as a personal site, you may end up
doing all the tasks yourself.
<b>Make Your Site Effective</b>
You must design your website so that it can be viewed successfully by everyone
who accesses it. That’s not as easy as it might seem, for several reasons.
<b>•</b>
How a given page looks will depend on the browser, the screen resolution thecomputer is using, and the window size of the browser.
<b>•</b>
The browsers that your site’s visitors use may interpret HTML a little differently. You canminimize these problems by writing your web pages to standards and testing them in
the major browsers (Internet Explorer, Firefox, and Safari), as discussed in Chapter 1.
<b>•</b>
Even if the users are using the same browser, the operating system on their computersmay cause the pages to be displayed in slightly different ways. For example, font sizes
appear smaller on a Mac than on Windows, so your pages will typically look different
on a Mac.
<b>•</b>
Most browsers have highly configurable display settings that will affect how the pageslook. You can change the text size, text color, background color, and even the display
resolution of most browsers.
<b>NOTE</b>
If you have a web-authoring application (such as
Microsoft Expression Web or Adobe Dreamweaver), you
may be able to use its automated features to set up your
website. Similarly, if you use a blogging service such as
WordPress (), you can create not
only a blog, but also a site that goes beyond the blog.
</div>
<span class='text_page_counter'>(57)</span><div class='page_container' data-page=57>
<b>2</b>
<b>3</b>
<b>4</b>
<b>5</b>
<b>6</b>
<b>7</b>
<b>8</b>
<b>9</b>
<b>2</b>
<b>3</b>
<b>4</b>
<b>5</b>
<b>6</b>
<b>7</b>
<b>8</b>
<b>9</b>
<b>2</b>
<b>3</b>
<b>4</b>
<b>5</b>
<b>6</b>
<b>7</b>
<b>8</b>
<b>9</b>
<i><b>Figure 2-4: Even when they are not customized </b></i><i><b>using all their options, different browsers </b></i>
<i><b>can display the same page in different ways, </b></i>
<i><b>especially with different window dimensions.</b></i>
Figure 2-4 shows how even the simple page used as the example in Chapter 1
looks different using different browsers and browser settings.
Text is the key to communicating via web pages, so you must ensure that your
site is navigable even if only the text is displayed. Organize it so that the most
important text will catch the reader’s eye and draw him or her into the page.
Provide alternative text for all graphics used so that visitors using text-only
</div>
<span class='text_page_counter'>(58)</span><div class='page_container' data-page=58>
<b>10</b>
<b>9</b>
<b>8</b>
<b>7</b>
<b>6</b>
<b>5</b>
<b>4</b>
<b>3</b>
<b>2</b>
browsers (either on personal computers or on other devices, such as handheld
computers or cell phones) will be able to see all the important information
on any page. The text will also benefit visitors using a browser with the
graphics turned off to speed up browsing, because they’ll be able to tell which
placeholders they should click to navigate your site, which placeholders they
should click to display relevant graphics, and which placeholders are irrelevant
to their needs.
<b>Keep Your Web Pages Small Enough </b>
<b>to Download Quickly</b>
One day, the whole world will have screaming-fast broadband connections—
maybe—but for the time being, all too many people are stuck with either
grindingly slow dial-up connections or lesser broadband connections that
barely deserve the term. To allow for such slow Internet connections, keep the
file sizes of your pages as small as possible. HTML files themselves contain only
text, so their file sizes remain quite compact unless you add heroic numbers of
unnecessary tags and comments, but large graphics, audio files, and video files
quickly increase the time it takes to download a web page.
If your site is primarily providing information, use graphics with discretion
rather than as a rule, and keep their sizes small. (Chapter 4 discusses how to
use graphics and how to prepare them for the Web.) On the other hand, if your
site is demonstrating examples of design, you may need to use more graphics to
produce the effects you need.
Where possible, reuse the same small graphics, such as those for your logo
and navigation buttons. Most browsers cache graphics so that they can quickly
supply them the next time the user requests the same page or another page that
uses the same graphics.
Use audio and video only in moderation, as they can quickly chew through
your bandwidth allowance.
<b>TIP</b>
If possible, have several other people look at your
website while it is in development to make sure that they
find it navigable and workable. Ask these people to note
any difficulties that they have with the layout, navigation,
text, or graphics. Resolve any persistent difficulties that
surface. For example, you may need to add explanatory
text to your home page to help visitors find parts of the
site or add redundant links to simplify navigation.
</div>
<span class='text_page_counter'>(59)</span><div class='page_container' data-page=59>
<b>2</b>
<b>3</b>
<b>4</b>
<b>5</b>
<b>6</b>
<b>7</b>
<b>8</b>
<b>9</b>
<b>2</b>
<b>3</b>
<b>4</b>
<b>5</b>
<b>6</b>
<b>7</b>
<b>8</b>
<b>9</b>
<b>2</b>
<b>3</b>
<b>4</b>
<b>5</b>
<b>6</b>
<b>7</b>
<b>8</b>
<b>9</b>
<b>Check Your Website</b>
Once you’ve gotten your website to a stage at which you want to make it
available to your audience, check it using Internet Explorer before transferring
it to your web host. If possible, check your website using browsers other than
Internet Explorer, such as Firefox and Safari. (See Chapter 1 for a table of other
browsers for Windows, Mac OS X, and Linux.) Verify that the site functions
correctly and that all pages are readable. As discussed earlier in this chapter, it’s
quite normal for the pages to look different on different browsers and operating
systems even if the browsers are configured with default settings.
Be sure to use different sizes of browser window as you test and, if it’s practical
to do so, assorted screen resolutions as well. Most modern desktop and laptop
computers use at least 1024 × 768 pixel resolution, but it’s a good idea to check
your pages at lower resolutions, such as 800 × 600 pixels and 640 × 480 pixels,
given the increasing popularity of small-screened “netbook” computers,
handheld computers, and Web-capable mobile phones.
Try turning down the display to 256 colors and make sure that the pages are
viewable. Graphics that use more colors will be noticeably dithered, using a
mixture of colors to deliver roughly the colors you specified.
<b>Update and Maintain Your Website</b>
Few websites are static; almost all sites contain information that needs updating,
either every day (for example, a restaurant’s menu pages) or from time to time.
New content will help to bring visitors back to your site, provided that they
know it is there and can easily find it, so make sure your new content is easy to
access and that it is flagged from the home page.
Develop a schedule for creating and posting new content and for moving
previously new content to the longer-established areas of your site or to an
archive. Decide how frequently the different areas of your website will need to be
updated and, if you have a team, establish whose responsibility the updates are.
<b>NOTE</b>
<i>Dithering</i> is a means of producing colors that aren’t in
the display color palette by mixing colors in adjacent
pixels to produce a blended color that’s approximately the
color required. Dithering helps to make pictures that use
more colors than the palette provides look better than
they would if only the colors in the palette were used. For
example, if you reduce a graphic from millions of colors
to 256 colors to decrease its file size, the colors that
aren’t in the palette will have to be substituted by colors
in the palette. Dithering helps to reduce the detrimental
effects of this substitution.
</div>
<span class='text_page_counter'>(60)</span><div class='page_container' data-page=60>
<b>10</b>
<b>9</b>
<b>8</b>
<b>7</b>
<b>6</b>
<b>5</b>
<b>4</b>
<b>3</b>
<b>2</b>
Add this information to your site-description document (the document
explaining your site, its structure, and its contents, as discussed in Chapter 1) so
that it is recorded and available to those who need to know it.
<b>Transfer Your Site to the Web</b>
There are three main ways of transferring your site’s web pages and files to the
web host.
<b>•</b>
<b>Use an FTP client program</b> An FTP client program lets you connect to a web serverand transfer files to it, much as you would do using Explorer on Windows or the Finder
on the Mac. This is the usual way of transferring files.
<b>•</b>
<b>Use a web-authoring program with built-in FTP</b> Web-authoring programs suchas Expression Web and Dreamweaver include built-in FTP functionality, so you can
upload files directly from within the program.
<b>•</b>
<b>Use a custom upload mechanism</b> Web hosts that provide custom website-buildingsoftware often also give you a custom mechanism for uploading web pages and files.
For example, you go to an upload web page, click a button, use the resulting Browse
For Folder dialog box or Open dialog box to select the file, and then click a button to
upload it.
This section shows you how to use an FTP client program to upload files to
your web host.
<b>Get the Information Required for FTP</b>
To transfer files via FTP, you must get the following information from the
server’s administrator (at your ISP, at the hosting service, or on your company’s
or organization’s network):
<b>•</b>
The web server’s address (for example, ftp.acmevirtualindustries.com) and the folderin which you should put the files.
<b>•</b>
Your username and password for the web server.<b>TIP</b>
Windows Vista also includes a command-line FTP client
named ftp that you can run from a Command Prompt
window (click the Start button, click All Programs, click
<b>Accessories, and then click Command Prompt). Unless </b>
you’re comfortable with UNIX-style FTP commands,
however, chances are that Internet Explorer or a
third-party FTP client with a graphical interface will be faster
and easier to use.
<b>NOTE</b>
The File Transfer Protocol, FTP, is an old and reliable
protocol that’s responsible for much of the file transfer on
the Internet. A <i>protocol</i> is a specification or set of rules
for doing something—in this case, for communicating
between computers.
<b>NOTE</b>
Many web server administrators configure their servers
to direct you automatically to your folder when you log in
using your username and password, but you may also
need to navigate to a particular subfolder within your folder.
</div>
<span class='text_page_counter'>(61)</span><div class='page_container' data-page=61>
<b>2</b>
<b>3</b>
<b>4</b>
<b>5</b>
<b>6</b>
<b>7</b>
<b>8</b>
<b>9</b>
<b>2</b>
<b>3</b>
<b>4</b>
<b>5</b>
<b>6</b>
<b>7</b>
<b>8</b>
<b>9</b>
<b>2</b>
<b>3</b>
<b>4</b>
<b>5</b>
<b>6</b>
<b>7</b>
<b>8</b>
<b>9</b>
<b>Transfer a Site Using an FTP Client</b>
Many different FTP client programs are available for Windows, Mac OS X, and
other operating systems. For most of them, you have to pay—but here are two
good free FTP clients:
<b>•</b>
<b>FileZilla</b> FileZilla () is an FTP client program that runs onWindows, Mac, and Linux.
<b>•</b>
<b>Cyberduck</b> Cyberduck () is an FTP client program that runs onlyon Mac OS X.
With a typical FTP client program (such as FileZilla), you set up a shortcut for
accessing a site so that you can then connect to it quickly. For example, here’s
how you set up a shortcut in FileZilla and connect to the site:
<b> 1. </b>
Click the <b>File</b> menu, and then click <b>Site Manager</b>. FileZilla opens the Site Managerwindow (see Figure 2-5).
<b> 2. </b>
Click the <b>New Site</b> button. FileZilla adds a new site to the Select Entry box, calls itNew site, and displays an edit box around the name.
<b> 3. </b>
Type the name you want to give the FTP site, and then press <b>ENTER</b> to apply thename.
<b> 4. </b>
Click in the <b>Host</b> box and then type the address for the FTP site—for example,ftp.acmevirtualindustries.com.
<b> 5. </b>
If your web host has given you a port number, type it in the Port box. Otherwise, leavethis box blank to use the default port.
<b> 6. </b>
Make sure the Servertype drop-down list shows FTP – File Transfer Protocol, unlessyour web host has told you to use a different protocol (for example, SFTP – SSH File
Transfer Protocol).
<b> 7. </b>
Open the Logontype drop-down list, and choose <b>Normal</b>.<b> 8. </b>
Type your logon name for the FTP server in the User box.<b> 9. </b>
Type your password in the Password box.<b> 10. </b>
Type any comments about the FTP site in the Comments box. If you have many FTPsites, the comments can help you to distinguish them easily.
<b> 11. </b>
Click the <b>Connect</b> button. FileZilla connects to the FTP site.<i><b>Figure 2-5: Use the Site Manager window to set up a </b></i>
<i><b>shortcut to an FTP site in FileZilla.</b></i>
</div>
<span class='text_page_counter'>(62)</span><div class='page_container' data-page=62>
<b>10</b>
<b>9</b>
<b>8</b>
<b>7</b>
<b>6</b>
<b>5</b>
<b>4</b>
<b>3</b>
<b>2</b>
Once you’ve created a shortcut to an FTP site, you can connect to the site in
moments. Figure 2-6 shows FileZilla connected to an FTP site.
Once you’ve connected to the site, transfer files by dragging them from the pane
showing your local folders to the pane showing the folders on the FTP site, or
vice versa.
<i><b>Figure 2-6: FileZilla is a freeware FTP client that runs on Windows, Mac OS X, and Linux.</b></i>
</div>
<span class='text_page_counter'>(63)</span><div class='page_container' data-page=63></div>
<span class='text_page_counter'>(64)</span><div class='page_container' data-page=64>
<b>10</b>
<b>9</b>
<b>8</b>
<b>7</b>
<b>6</b>
<b>5</b>
<b>4</b>
<b>3</b>
<b>2</b>
<b>How to…</b>
<i><b> Using Proportional and </b></i>
<i><b>Monospaced Fonts</b></i>
<i><b>• Create </b><b>Paragraphs</b></i>
<i><b>• Group Paragraphs into Division</b></i>
<i><b>• Control </b><b>Breaks</b></i>
<i><b> Inserting Special Characters</b></i>
<i><b>• Keep Text Together with </b></i>
<i><b>Nonbreaking Spaces</b></i>
<i><b>• Control Hyphenation with </b></i>
<i><b>Optional Hyphens</b></i>
<i><b>• Create </b><b>Headings, </b><b>Lists, </b></i>
<i><b>and Indents</b></i>
<i><b> “Physical” and “Logical” </b></i>
<i><b>Style Tags</b></i>
<i><b>• Apply </b><b>Boldface</b></i>
<i><b>• Apply </b><b>Italics</b></i>
<i><b>• Apply </b><b>Underline</b></i>
<i><b>• Apply </b><b>Strikethrough</b></i>
<i><b>• Apply Monospaced Font</b></i>
<i><b>• Apply Subscript and Superscript</b></i>
<i><b> Understanding Other Formatting</b></i>
<i><b>• Control Font Formatting</b></i>
<i><b> Working with Fonts</b></i>
<i><b>• Change Style Using Inline Styles</b></i>
<i><b> Catch the Eye with Moving Text</b></i>
Chapter 3
<b>Structuring Web Pages and </b>
<b>Applying Manual Formatting</b>
Each web page you create needs a structure that shapes its
contents. For example, a typical web page needs one or more
levels of headings to present its contents in a coherent order.
Under each heading, you’ll normally break up the text into
body paragraphs, just as you would in a book or article. You
may also use lists to present information.
To make a web page appear the way you want it to, you can
format it in either of two ways. The old-style way is to apply
manual formatting to individual elements, as described in
this chapter. This type of formatting is not recommended any
more, because there’s a better type of formatting: Cascading
Style Sheets (CSS), described in detail in Chapter 8, let you
organize your formatting centrally, improving consistency and
</div>
<span class='text_page_counter'>(65)</span><div class='page_container' data-page=65>
<b>2</b>
<b>3</b>
<b>4</b>
<b>5</b>
<b>6</b>
<b>7</b>
<b>8</b>
<b>9</b>
<b>2</b>
<b>3</b>
<b>4</b>
<b>5</b>
<b>6</b>
<b>7</b>
<b>8</b>
<b>9</b>
<b>2</b>
<b>3</b>
<b>4</b>
<b>5</b>
<b>6</b>
<b>7</b>
<b>8</b>
<b>9</b>
saving time and effort. But because manual formatting is still
widely used, and you will almost certainly need to work with
pages that use it, it's important to understand how it works,
even if you use CSS to format your own web pages.
<b>Understand Considerations </b>
<b>for Web Formatting</b>
When you create a document with a word processor, such as Microsoft Word
or Corel WordPerfect, you can specify the exact formatting you want for each
character, paragraph, and page. For example, you can make a character bold,
underlined, 18-point Times New Roman font; apply one-inch indents and
1.5-line spacing for a paragraph; and set one-inch margins for the top, bottom,
and sides of a page. When you print out the page, you’ll get the formatting
you applied.
Similarly, you can apply formatting to elements in the web pages you create:
font formatting, line breaks, alignment, indentation, and more. But you can’t be
sure that this formatting will appear as you intended it to when your pages are
displayed in a browser, for several reasons.
<b>•</b>
Different browsers interpret even standard HTML tags differently.<b>•</b>
If the fonts you use in the page are installed on the browser’s computer, they willbe displayed; if not, the browser will substitute its default proportional font for any
proportional font you use and its default monospaced (fixed-width) font for any
monospaced font you use.
<b>•</b>
The viewer can change how the browser displays particular items. For example, theviewer can increase or decrease the text size to make a page readable, or change the
text color or the background color.
<b>•</b>
Unless you use CSS (discussed in Chapter 8), you can’t apply precise indents toparagraphs.
QUICK
<b>FACTS</b>
<b>USING PROPORTIONAL AND </b>
<b>MONOSPACED FONTS</b>
Each browser has a default proportional font and a
default monospaced font.
<b>•</b>
A<i>proportional</i> font is one in which the letters aredifferent widths, like the body fonts used in this
book. For example, an uppercase M is wider than
a lowercase i or l.
<b>•</b>
A<i>monospaced, constant-width,</i> or <i>fixed-width</i>font is one in which all the letters are all the same
width (in the same font size). Courier, the font
used on most typewriters, is the most widely used
monospaced font, but there are plenty of others.
Proportional fonts are easier on the eye than
monospaced fonts, and normal practice is to use
proportional fonts for most of the text that appears on
web pages, keeping monospaced font for when you need
to differentiate some text or display it in a clear format.
The<pre> tag and some other tags automatically use
the monospaced font. While you <i>can</i> use monospaced
font more widely, there’s usually little to be gained from
doing so.
When checking your web pages, try changing the
default proportional and monospaced fonts used by
your browsers. In most Windows browsers, you’ll find
the settings in the Options dialog box (click the Tools
menu and then click Internet Options or Options). For
example, to change the fonts on Internet Explorer:
<b> 1. </b>If Internet Explorer isn’t running, click the Start
button and then click Internet.
<b> 2. </b>Click the Tools menu and then click Internet
<b>Options. The Internet Options dialog box appears.</b>
<i>Continued . . .</i>
</div>
<span class='text_page_counter'>(66)</span><div class='page_container' data-page=66>
<b>10</b>
<b>9</b>
<b>8</b>
<b>7</b>
<b>6</b>
<b>5</b>
<b>4</b>
<b>3</b>
<b>2</b>
<b>Use Paragraphs, Divisions, </b>
<b>Breaks, and Hyphens</b>
As discussed in Chapter 1, each web page you create must include an HTML
statement, a header section, and a body section. Normally, each page has a
DOCTYPE declaration as well to tell the browser how to interpret the document
type. Each page should have a title that appears in the browser’s title bar (or on
a tab, if it is a tabbed browser) when the page is displayed.
The basic structure of a web page typically looks like this:
<!DOCTYPE html PUBLIC "-//W3C//DTD XHTML 1.0 Transitional//EN"
"
<html>
<head>
<title></title>
</head>
<body>
</body>
</html>
Within the body of the web page, you use <i>block elements,</i> such as headings,
paragraphs, and images, to form the major parts of the page.
<b>Create Paragraphs</b>
Use the <p> and </p> tags to create a body text paragraph in the default
proportional font. A body text paragraph includes extra vertical space afterward
to separate it from the next paragraph. For correctness, always use the opening
tag (<p>) and the closing tag (</p>), even though many browsers will display
pages correctly that use only the opening tag to indicate a paragraph.
You can apply formatting directly to paragraphs or to text within paragraphs.
QUICK
<b>FACTS</b>
<b>USING PROPORTIONAL AND </b>
<b>MONOSPACED FONTS </b>
<i>(Continued)</i><b> 3. </b>On the General tab, click the Fonts button. The
Fonts dialog box appears.
<b> 4. </b>Choose the proportional font you want in the
Webpage Font list box.
<b> 5. </b>Choose the monospaced font you want in the
Plain Text Font list box.
<b> 6. </b>Click OK to close the Fonts dialog box, click OK
again to close the Internet Options dialog box,
and, if desired, close Internet Explorer.
<b>TIP</b>
If you use a text editor to create all your web pages, save
the basic structure of one of your pages in a file as a
template so that you can reuse it quickly to save yourself
typing the common elements. Alternatively, keep a text
file containing boilerplate sections of web pages that you
can paste into new pages as needed.
</div>
<span class='text_page_counter'>(67)</span><div class='page_container' data-page=67>
<b>2</b>
<b>3</b>
<b>4</b>
<b>5</b>
<b>6</b>
<b>7</b>
<b>8</b>
<b>9</b>
<b>2</b>
<b>3</b>
<b>4</b>
<b>5</b>
<b>6</b>
<b>7</b>
<b>8</b>
<b>9</b>
<b>2</b>
<b>3</b>
<b>4</b>
<b>5</b>
<b>6</b>
<b>7</b>
<b>8</b>
<b>9</b>
<b>Group Paragraphs into Divisions</b>
If you need to apply formatting to two or more paragraphs, you can create a
<i>division,</i> or group of paragraphs, and apply the formatting to the division. By
doing so, you can cut down on the number of formatting codes. You can also
achieve different effects, such as applying a border around the division as a
whole instead of applying a separate border around each of the paragraphs.
To create a division:
<b> 1. </b>
Type the opening <div> tag before the first paragraph you want to include in thedivision.
<b> 2. </b>
Include in the opening <div>tag the division identifier or any formatting instructions forthe division as a whole—for example:
<div id="services">
<b> 3. </b>
Type the closing </div> tag after the last paragraph you want to include in the division.For example, here is a division that includes a heading, an image, and two
paragraphs:
<div id="services">
<h1>Acme Virtual Industries: Services</h1>
<p>Acme Virtual Industries offers a market-leading variety of
services.</p>
<p>We offer the ultimate in document security services.</p>
<img src="shred.jpg" alt="Shredded paper" height="200"/
</div>
<b>Control Breaks</b>
Web browsers automatically rebreak the lines within paragraphs as necessary to
display all the text within the current window size so viewers will see your web
page differently, depending on their screen resolution, browser window size,
and the default text size they’ve chosen.
To force browsers to break a line at a particular point or to insert extra space
between paragraphs, insert a <br/> tag.
<b>TIP</b>
You can indent text in your web pages to make their
structure easier to read in a text editor or HTML editor.
Browsers automatically remove extra spaces, so such
indentation will not appear in the pages when they are
displayed in a browser.
<b>CAUTION</b>
In HTML, the <div> tag has an align attribute that
you can use to set the alignment of the division’s
content: align="left",align="center",align="right", or
align="justify". This attribute is deprecated in XHTML
and doesn’t work consistently in browsers—so you’ll do
best to avoid it.
<b>TIP</b>
After you give an id to a division, you can apply a style
to the whole division by using CSS. You can also “float”
the division to control how it appears on the page, which
is great for creating sophisticated layouts. See Chapter 8
for details.
<b>TIP</b>
In HTML, you can prevent a line of text from being broken
by putting it within no-break tags, <nobr> and </nobr>.
Usually, this isn’t a good idea, because if the browser
can’t break a line that’s too long, the line will continue
to the right of the visible area, and the user will have to
scroll across to see the rest of the line. This technique
is not valid in XHTML; instead, you need to use the
whitespace attribute.
</div>
<span class='text_page_counter'>(68)</span><div class='page_container' data-page=68>
<b>10</b>
<b>9</b>
<b>8</b>
<b>7</b>
<b>6</b>
<b>5</b>
<b>4</b>
<b>3</b>
<b>2</b>
<b>Keep Text Together with Nonbreaking Spaces</b>
To prevent two words from being broken at the end of a line, use the
code to create a nonbreaking space. For example, you might want to prevent
your name or your company’s name from being broken:
<p>To contact us at Acme Virtual Industries, write
to:</p>
<b>Control Hyphenation with Optional Hyphens</b>
If a compound word always uses a hyphen, type a hyphen in it, just as you
would in any document. You can also instruct the browser to break a long word
when it is at the end of a line but not break it at other times. To do so, you place
one or more <i>soft hyphens,</i> or <i>optional hyphens,</i> by typing the ­ code at the
appropriate places in the word—for example:
<p>Our industry-leading methods of document destruction ensure
that all data is fully non­recoverable.</p>
<b>Create Headings, Lists, and Indents</b>
To lay your web pages out logically, you’ll usually need to break them up into
headings. You may also need to create lists—for example, numbered lists and
bulleted list—and indents.
<b>Create Headings</b>
HTML offers six levels of headings, using paired tags, from Heading 1 (opening
tag<h1>, closing tag </h1>) to Heading 6 (opening tag <h6>, closing tag
</h6>). Each browser displays the headings in boldface, using its default
proportional font and descending font sizes, from Heading 1 (the biggest) to
Heading 6 (the smallest). The actual font size used depends on the browser and
on the user’s display settings: If the user increases the text size to make a page
more readable, the font size of the headings increases as well.
UICK
<b>STEPS</b>
<b>INSERTING SPECIAL CHARACTERS</b>
If you can type a character on the keyboard, you can enter
it in a web page with minimal effort. To use a character that
you can’t type directly on a keyboard, such as a registered
trademark symbol, ®, or smart quotes (“ ”), you must enter
the code that HTML uses to represent that character. HTML
refers to these codes as “character entities.” You can enter
these characters by using either their name or their code.
Table 3-1 shows the names and codes for the character
entities you’re most likely to need in your web pages.
<b>CHARACTER</b> <b>NAME</b> <b>CODE</b>
đ ® ®
â © ©
™ ™
“ “
” ”
< < <
> > >
¡ ¡ ¡
¿ ¿ ¿
 ¢ ¢
± ±
ẳ ¼ ¼
ẵ ½ ½
ắ ¾ ¾
ì × ×
ữ ÷ ÷
ủ ñ ñ
← ←
↑ ↑
→ → →
↓ ↓ ↓
<i>€</i> € €
– (en dash) –
— (em dash) —
<i><b>Table 3-1:</b><b> Special Character Codes</b></i>
</div>
<span class='text_page_counter'>(69)</span><div class='page_container' data-page=69>
<b>2</b>
<b>3</b>
<b>4</b>
<b>5</b>
<b>6</b>
<b>7</b>
<b>8</b>
<b>9</b>
<b>2</b>
<b>3</b>
<b>4</b>
<b>5</b>
<b>6</b>
<b>7</b>
<b>8</b>
<b>9</b>
<b>2</b>
<b>3</b>
<b>4</b>
<b>5</b>
<b>6</b>
<b>7</b>
<b>8</b>
<b>9</b>
For example, to create a short section of headings and text on an existing
web page:
<b> 1. </b>
Position the insertion point within the body of the web page.<b> 2. </b>
Type the opening tag for a Heading 1, the text for the heading, and then the closingtag—for example:
<h1>Acme Virtual Industries Services</h1>
<b> 3. </b>
Type a text paragraph between <p> and </p> tags—for example:<p>Acme Virtual Industries helps you to get the best out of
your business by providing an easy way to grow.</p>
<b> 4. </b>
Type the opening <h2> tag for a Heading 2, the text for the heading, and then theclosing</h2> tag—for example:
<h2>Virtual Office Space</h2>
<b> 5. </b>
Type a text paragraph after the Heading 2—for example:<p>We provide virtual office space in prime locations in the US
and in Europe.</p>
<b> 6. </b>
Type the opening <h3> tag for a Heading 3, the text for the heading, and then theclosing</h3> tag—for example:
<h3>US Locations: West Coast</h3>
<b> 7. </b>
Enter further headings and paragraphs (or other items, such as links) as necessary.<b> 8. </b>
Save the file, switch to your browser, and update the display. Figure 3-1 shows anexample of three levels of headings.
<b>Create Numbered, Bulleted, and Definition Lists</b>
HTML lets you create three different types of lists.
<b>•</b>
<b>Unordered list</b> A bulleted list (like this one). The browser automatically displays thebullets and indents the list items.
<b>•</b>
<b>Ordered list</b> A numbered list, like those used for the steps in this book. The browserautomatically displays the numbers in the correct sequence.
<b>•</b>
<b>Definition list</b> A list that alternates paragraphs aligned with the left margin andindented paragraphs. The first of each pair of paragraphs is the term being defined,
and the second is the definition of the term. (You’ll see an example of this a little later
in this chapter.)
<b>CAUTION</b>
Avoid using nonbreaking spaces on more than three
consecutive words because doing so can create
awkward breaks in lines.
<b>TIP</b>
You can also use nonbreaking spaces at the beginning
of a paragraph to force indentation. Such usage is
discouraged, but is nonetheless effective.
<b>TIP</b>
When structuring your documents, use as few heading
levels as is practical. Start by breaking each topic into
major sections: These become your Heading 1s, and
typically you’ll have only one of them on a web page, as
this helps search engines index your pages correctly.
Under the Heading 1, break up the document’s content
into Heading 2 sections as necessary; if those sections
need subsections, use Heading 3s, and then Heading
4s if you need them. You’ll seldom need to use the lower
heading levels. For example, most of the chapters in this
book have a chapter heading (the equivalent of Heading
1) and then three levels of headings—and your web
pages should normally be much shorter than even the
shortest chapter in this book. If not, consider breaking up
your material into further separate pages.
</div>
<span class='text_page_counter'>(70)</span><div class='page_container' data-page=70>
<b>10</b>
<b>9</b>
<b>8</b>
<b>7</b>
<b>6</b>
<b>5</b>
<b>4</b>
<b>3</b>
<b>2</b>
<b>CREATE A BULLETED LIST</b>
A bulleted list is a block element that starts with a <ul> (unordered
list) tag and ends with a </ul> tag. Within the list, each item starts
with an <li> (list item) tag and ends with an </li> tag.
To create a bulleted list:
<b> 1. </b>
Type the opening and closing tags for the unordered list:<ul>
</ul>
<b> 2. </b>
Within the tags, type the list items, one to a line, marking each with<li> and </li>tags—for example:
<ul>
<li>San Diego</li>
<li>Los Angeles</li>
<li>San Francisco</li>
</ul>
<b> 3. </b>
Save the file, switch to your browser, and update the display. Your list willbe displayed with default black bullets, as in the example shown.
<b> 4. </b>
Try changing the bullets to squares by adding the type attribute to the <ul> tag andspecifying the square parameter:
<ul type="square">
<b> 5. </b>
Save the file, switch to your browser, and update the display. The bullets will haveturned to squares. Depending on your browser, the squares may be filled in (as in the
example shown) or empty.
<b> 6. </b>
Change the bullets to empty circles by changing the type attribute to circle:<ul type="circle">
<i><b>Figure 3-1:</b><b> Use two or three levels of headings to break </b></i>
<i><b>your documents into major sections.</b></i>
</div>
<span class='text_page_counter'>(71)</span><div class='page_container' data-page=71>
<b>2</b>
<b>3</b>
<b>4</b>
<b>5</b>
<b>6</b>
<b>7</b>
<b>8</b>
<b>9</b>
<b>2</b>
<b>3</b>
<b>4</b>
<b>5</b>
<b>6</b>
<b>7</b>
<b>8</b>
<b>9</b>
<b>2</b>
<b>3</b>
<b>4</b>
<b>5</b>
<b>6</b>
<b>7</b>
<b>8</b>
<b>9</b>
<b> 7. </b>
Save the file, switch to your browser, and update the display. The bullets will haveturned to circles.
<b> 8. </b>
Change the bullets back to regular bullets by either changing the type attribute to discor by removing the attribute altogether. disc is the default bullet type, so you don’t need
to specify it if you want a default bulleted list.
<b> 9. </b>
Save the file.<b>CREATE A NUMBERED LIST</b>
A numbered list is a block element that begins with an <ol> (ordered list)
tag and ends with an </ol> tag. Within the list, each item starts with an
<li> (list item) tag and ends with an </li> tag.
To create a numbered list:
<b> 1. </b>
Type the opening and closing tags for the ordered list:<ol>
</ol>
<b> 2. </b>
Within the tags, type the list items, one to a line—for example:<ol>
<li>Answering live telephone queries</li>
<li>Providing customer service via phone</li>
<li>Providing customer service via e-mail</li>
<li>Providing customer service via online chat</li>
<li>Telemarketing</li>
</ol>
<b> 3. </b>
Save the file, switch to your browser, and update the display. Your list will be numberedfrom 1 to 5, as in the example shown.
<b>CHANGE THE NUMBERING TYPE</b>
The default type of numbered list uses standard numbers, as in the previous
example. You can specify different types of numbering by adding the type
attribute to the <ol> tag, as described in Table 3-2.
<b> 1. </b>
Change the numbering on the numbered list to uppercase roman numerals bychanging the type attribute to I:
<ol type="I">
<b>NOTE</b>
Being able to manipulate the bullets like this can be handy,
but you can take greater control over your lists by using
CSS. For example, you can change the indentation of the
bullets and the text, and you can use images as bullets.
<b>TYPE</b> <b>EFFECT</b> <b>EXAMPLE</b>
1 Standard numbering 1, 2, 3
I Uppercase roman numerals I, II, III
i Lowercase roman numerals i, ii, iii
A Uppercase letters A, B, C
a Lowercase letters a, b, c
<i><b>Table 3-2:</b><b> Types of Numbered Lists</b></i>
</div>
<span class='text_page_counter'>(72)</span><div class='page_container' data-page=72>
<b>10</b>
<b>9</b>
<b>8</b>
<b>7</b>
<b>6</b>
<b>5</b>
<b>4</b>
<b>3</b>
<b>2</b>
<b> 2. </b>
Save the file, switch to your browser, and update the display. When changed, theexample list looks like this:
<b> 3. </b>
Change the numbering back to standard numbering by either changing the typeattribute to 1 (<ol type="1">) or removing the type attribute altogether. Standard
numbering is the default for numbered lists, so you don’t need to specify the type
attribute if you want a list with standard numbering.
<b> 4. </b>
Save your file again.<b>CHANGE THE STARTING NUMBER</b>
By default, HTML starts each numbered list with 1 or the equivalent in the
numbering scheme used: I, i, A, or a. Sometimes, you may need to use a
different starting number for a list. For example, if you break a numbered list
with a graphic or a paragraph, you will need to start the second part of the list
with the appropriate number rather than with 1.
To change the starting number, add the start attribute to the <ol> tag, and
specify the appropriate number—for example:
<ol type="1" start="5">
<b>CREATE A DEFINITION LIST</b>
A definition list is a block element that begins with a <dl> (definition list) tag
and ends with a </dl> tag. Each of the terms defined begins with a <dt> tag
and ends with a </dt> tag. Each of the definitions for those terms begins with a
<dd> tag and ends with a </dd> tag.
<b>TIP</b>
A definition list is a great tool for presenting terms and
their definitions, but if you need to make the terms
appear in the outline of your document, you’ll be better
off using headings for the terms and paragraphs for the
definitions.
</div>
<span class='text_page_counter'>(73)</span><div class='page_container' data-page=73>
<b>2</b>
<b>3</b>
<b>4</b>
<b>5</b>
<b>6</b>
<b>7</b>
<b>8</b>
<b>9</b>
<b>2</b>
<b>3</b>
<b>4</b>
<b>5</b>
<b>6</b>
<b>7</b>
<b>8</b>
<b>9</b>
<b>2</b>
<b>3</b>
<b>4</b>
<b>5</b>
<b>6</b>
<b>7</b>
<b>8</b>
<b>9</b>
To create a definition list:
<b> 1. </b>
Type the opening and closing tags for the definition list:<dl>
</dl>
<b> 2. </b>
Within the tags, type each of the definition terms within <dt> and </dt> tags, and typethe definitions for those terms within <dd> and </dd>tags:
<dl>
<dt>Telephone</dt>
<dd>Just call us—couldn’t be easier.</dd>
<dt>Online chat</dt>
<dd>Talk to a customer service representative via text. The
representative will help you immediately or will call back if
research is required.</dd>
<dt>E-mail</dt>
<dd>Send a query to one of our customer service representatives.
You will receive an answer within 24 hours.</dd>
</dl>
<b> 3. </b>
Save the file, switch to your browser, and update the display. The example list lookslike this:
<b>CREATE A NESTED LIST</b>
You can <i>nest,</i> or position, any list within another list—for example, a bulleted
list within a numbered list, a numbered list within a bulleted list, a definition
list within a bulleted list, or a list within the same type of list as itself.
To nest a list, place the tags for the nested list within the tags for the list that will
contain it. The browser then displays the nested list with more indent than the
list that contains it. You can nest another list within the nested list if necessary;
the second nested list receives even more indent than the first nested list.
</div>
<span class='text_page_counter'>(74)</span><div class='page_container' data-page=74>
<b>10</b>
<b>9</b>
<b>8</b>
<b>7</b>
<b>6</b>
<b>5</b>
<b>4</b>
<b>3</b>
<b>2</b>
To create a nested list:
<b> 1. </b>
Position the insertion point at the appropriate point within the existing list.<b> 2. </b>
Close and reopen the ordered list, and add the opening and closing tags for thesublist—for example, as shown in bold font here:
<ol type="1">
<li>Answering live telephone queries</li>
<b></ol></b>
<b><ul></b>
<b></ul></b>
<b><ol></b>
<li>Providing customer service via phone</li>
<li>Providing customer service via e-mail</li>
<li>Providing customer service via online chat</li>
<li>Telemarketing</li>
</ol>
<b> 3. </b>
Within the bulleted list tags (<ul>and </ul>), type the items for the sublist:<ul>
<li>Provide information</li>
<li>Redirect to customer service</li>
<li>Redirect to sales agents</li>
</ul>
<b> 4. </b>
Save the file, switch to your browser, and update the display. The example list lookslike this:
<b>Apply an Indent</b>
Indentation is a standard feature of word-processing applications, but HTML
doesn’t offer a direct means of creating an indent. CSS (discussed in Chapter 8)
makes it easy to indent paragraphs, but if you’re not using CSS, you have to use
a workaround.
<b>TIP</b>
Nest lists as needed, but try to avoid using more than
one level of nested list. Excessive nesting is not only
confusing to the eye, but can also push too much of the
text to the right edge of a small window, making for short
lines of text in the display.
<b>CAUTION</b>
If you’re using HTML, you can apply a quick-and-dirty left
indent by creating an unordered list, but not specifying
any list items—for example, <ul>Virtual office services
save you time and money.</ul>. This technique is
effective and is widely used, but it’s not valid in XHTML
because it’s missing the <li> tags that denote the list
items. You can increase the indent by adding empty
unordered lists—for example, <ul><ul>Virtual office
services save you time and money.</ul></ul>.
</div>
<span class='text_page_counter'>(75)</span><div class='page_container' data-page=75>
<b>2</b>
<b>3</b>
<b>4</b>
<b>5</b>
<b>6</b>
<b>7</b>
<b>8</b>
<b>9</b>
<b>2</b>
<b>3</b>
<b>4</b>
<b>5</b>
<b>6</b>
<b>7</b>
<b>8</b>
<b>9</b>
<b>2</b>
<b>3</b>
<b>4</b>
<b>5</b>
<b>6</b>
<b>7</b>
<b>8</b>
<b>9</b>
The workaround for indenting both margins is to use the block quote tags,
<blockquote> and </blockquote>. As its name suggests, the block quote tag
was originally intended for longer quotations that needed to be set off from
the rest of the page, but you can also use it for other types of text that need
indentation.
Here is an example of a block quote:
<h3>The Value of Gold</h3>
<p>Here's what “The Loan Ranger” has to say about gold
versus paper money:</p>
<blockquote>Paper money is the fiat currency of governments and
has no real value. If you hold paper money, you are at the mercy
of governmental attempts to manipulate money supply. But gold has
intrinsic value, even if its price in paper money rises and falls
like the tide.</blockquote>
<b>Align Elements</b>
As in a word-processing document, you can apply left, center, and right
alignment to an element such as a paragraph, heading, or image. The old way of
doing so, now deprecated, is to use the align attribute in the element’s tag and
specify the appropriate value: left,center, or right. Left is the default alignment,
so you don’t need to specify it. (The new way of applying alignment is to use
CSS, as discussed in Chapter 8.)
For example, the following code centers the heading, aligns the first paragraph
right, and aligns the second paragraph left (see Figure 3-2):
<h3 align="center">Mail Fulfillment</h3>
<p align="right"><em>Everything from daily correspondence to
massive mailshots!</em></p>
<p align="left">When you let Acme Virtual Services handle your
mailing needs, you save time and money—and you get
high-quality results.</p>
<b>NOTE</b>
Indenting text by using the <blockquote> tags is officially
frowned upon, but it’s widely used by manual coders and
web-authoring programs, so it seems to be here to stay.
The preferred way of indenting content is by using CSS.
See Chapter 8 for details.
<i><b>Figure 3-2:</b><b> You can align elements (such as paragraphs) left, </b></i>
<i><b>right, or center.</b></i>
</div>
<span class='text_page_counter'>(76)</span><div class='page_container' data-page=76>
<b>10</b>
<b>9</b>
<b>8</b>
<b>7</b>
<b>6</b>
<b>5</b>
<b>4</b>
<b>3</b>
<b>2</b>
<b>Use Preformatted Text</b>
If you need to lay out text precisely using spaces and carriage returns, use
preformatted text. To create preformatted text, which is monospaced or
fixed-width text, enter the text between the opening <pre> tag and the closing
</pre> tag.
The following is an example of preformatted text:
<h3>Prices</h3>
<pre>
Service ID Description Hours Price (US$)
---A3892 Mail administration 1 19.99
A3893 One-time mailshot (200) 3 36.99
A3894 Customer-service template 2 49.99
---</pre>
<b>Apply Formatting Tags </b>
<b>and Attributes</b>
After setting the basic formatting for the blocks of text in a page, you can apply
specific formatting to individual words, phrases, or elements using inline styles.
Inline styles are the HTML equivalent of direct formatting or character styles in
a word processor.
<b>NOTE</b>
Preformatted text is ideal for displaying programming
code, where precise layout is vital, but you can use it for
any element that needs the text to be displayed in exactly
the way you enter it. The disadvantage of preformatted
text is that it always appears in the browser’s default
monospaced font, which doesn’t suit all purposes. You
can achieve similar results by using CSS and formatting
such as ordered lists.
<b>CAUTION</b>
Browsers don’t rebreak lines tagged as preformatted
text, so long lines will go beyond the right edge of small
windows using average-size text. For best results, keep
your preformatted-text lines relatively short.
</div>
<span class='text_page_counter'>(77)</span><div class='page_container' data-page=77>
<b>2</b>
<b>3</b>
<b>4</b>
<b>5</b>
<b>6</b>
<b>7</b>
<b>8</b>
<b>9</b>
<b>2</b>
<b>3</b>
<b>4</b>
<b>5</b>
<b>6</b>
<b>7</b>
<b>8</b>
<b>9</b>
<b>2</b>
<b>3</b>
<b>4</b>
<b>5</b>
<b>6</b>
<b>7</b>
<b>8</b>
<b>9</b>
<b>Apply Boldface</b>
To apply boldface, enclose the text in either the bold-text tags (<b> and </b>)
or the strong-text tags (<strong> and </strong>). Both pairs of tags typically
have the same effect, although you can change the effect of the strong-text tags
by using CSS.
Here is an example of using both bold-text tags and strong-text tags:
<p>This is an example of <b>boldface</b> using <b> and
</b> tags.</p>
<p>This is an example of <strong>boldface</strong> using
<strong> and </strong> tags.</p>
<b>Apply Italics</b>
To apply italics, enclose the text in either the physical italic-text tags (<i> and </i>)
or the logical emphasis-text tags (<em> and </em>). Both pairs of tags typically
have the same effect, although you can change the effect of the emphasis-text tags
by using CSS.
Here is an example of using both italic-text tags and emphasis-text tags:
<p><i>Today Only</i>: 15% discount on telephone services!</p>
<p><em>Special offers</em> on <b>answering</b> and <b>marketing
calls</b>.</p>
<b>Apply Underline</b>
To apply a single underline, enclose the text in <u> and </u> tags, as in the
example shown (see Figure 3-3):
<p>By maintaining <a href="concentration.jpg">focus</a> and
minimizing <a href="office_busy.jpg">distractions</a>, you
can increase <u>productivity</u> and bring your project to a
successful <a href="consultant.jpg">conclusion</a> quickly and
efficiently.</p>
QUICK
<b>FACTS</b>
<b>“PHYSICAL” AND “LOGICAL” </b>
<b>STYLE TAGS</b>
The bold-text tags (<b> and </b>) and the italic-text
tags (<i> and </i>) are considered “physical” style tags,
because they change the font itself, and the strong-text
tags (<strong> and </strong>) and the emphasis-text
tags (<em> and </em>) are considered “logical” style
tags, because they change the meaning of the text.
Most people find physical style tags easier when
formatting text manually, because you know exactly what
effect they will produce. Depending on the browser’s
configuration, logical-style tags can produce a different
effect; you can also use CSS to make the logical tags
have a different effect.
Official practice is to discourage the use of physical style
tags and to recommend using CSS formatting instead.
See Chapter 8 for details on CSS.
<b>CAUTION</b>
Whereas most applications use a separate font for italic
text (for example, Times New Roman Italic instead of
Times New Roman), browsers simulate italic by slanting
the default font. The result is that the italic often doesn’t
look like real italics and is best used only for emphasis on
small amounts of text. It’s usually best not to apply
italic-text or emphasis-italic-text formatting to whole sentences or
paragraphs at a time.
<i><b>Figure 3-3:</b><b> You can apply underline manually, but because </b></i>
<i><b>most browsers use colored underline to indicate hyperlinks </b></i>
<i><b>on text, underline can be confusing. </b></i>
</div>
<span class='text_page_counter'>(78)</span><div class='page_container' data-page=78>
<b>10</b>
<b>9</b>
<b>8</b>
<b>7</b>
<b>6</b>
<b>5</b>
<b>4</b>
<b>3</b>
<b>2</b>
<b>Apply Strikethrough</b>
To apply strikethrough, enclose the text in either <strike> and </strike> tags or
<s> and </s> tags:
<p>Special Assistance Package <strike>$349.99</strike> NOW ONLY
$299.99!</p>
<b>Apply Monospaced Font</b>
As well as displaying whole paragraphs in monospaced font using the <pre>
and</pre> tags, you can format characters as monospaced font by using the
teletype inline style. To apply this style, enclose the text in the <tt> and </tt>
tags, as in the example shown, which also uses the <big> and </big> tags to
increase the size of the monospaced font displayed:
<h3>Contact Us</h3>
<p>You can contact us via e-mail at
<big><tt></tt></big>.</p>
<b>Apply Subscript and Superscript</b>
To apply subscript, enclose the text in <sub> and </sub> tags. To apply
superscript, enclose the text in <sup> and </sup> tags. This example uses
a superscript:
<p>Our one-hundred square meter (100m<sup>2</sup>) conference
room can easily accommodate full board meetings.</p>
<b>CAUTION</b>
Some voice output systems may speak strong-tagged
and emphasis-tagged text more loudly than regular text.
This means that you can use the <strong> and <em>
tags to communicate emphasis to users of screen
readers—but go easy on the tags, or you may wind up
shouting remotely at visitors to your website when all you
intend is to make your page look more interesting.
<b>NOTE</b>
The underline and strikethrough tags have been
deprecated, but they’re still widely used.
<b>TIP</b>
You can apply multiple types of formatting to the same
text by nesting one pair of tags inside another. For
example, <b><i>Special Offers</i></b> produces bold
italic text, and <big><b><i>Special Offers</i></b></big>
produces big bold italic text. Close each tag in the same
order as you opened them—for example, <b><i>Special
Offers</i></b>, not <b><i>Special Offers</b></i>—
otherwise, you’ll cause errors in strict interpretations of
HTML coding. (Most web browsers are very tolerant of
out-of-order tags, so your pages may actually look fine.)
</div>
<span class='text_page_counter'>(79)</span><div class='page_container' data-page=79>
<b>2</b>
<b>3</b>
<b>4</b>
<b>5</b>
<b>6</b>
<b>7</b>
<b>8</b>
<b>9</b>
<b>2</b>
<b>3</b>
<b>4</b>
<b>5</b>
<b>6</b>
<b>7</b>
<b>8</b>
<b>9</b>
<b>2</b>
<b>3</b>
<b>4</b>
<b>5</b>
<b>6</b>
<b>7</b>
<b>8</b>
<b>9</b>
<b>Control Font Formatting and Styles</b>
To make your pages look good, you may want to change the font formatting
directly. Another option is to use inline styles, as discussed later in this section.
<b>Control Font Formatting</b>
The<font> tag lets you control the typeface, type size, and type color displayed
in the browser.
<b>CONTROL THE TYPEFACE</b>
To specify the typeface the browser should use for some text, enter the opening
<font> tag with the face attribute and the name of the font or fonts you want
to use, then the text on which to use the font, and then the closing </font>
tag. The font name can be either a specific font name (for example, Times New
Roman) or one of the five generic font families (serif, sans-serif, monospace,
fantasy, and cursive) that all browsers recognize. For example, you can specify
the Times New Roman typeface like this:
<font face="Times New Roman">Terms and Conditions</font>
Unless you know that visitors to your website will have specific fonts installed
(as you might know if you are designing an internal website for a company), it’s
better provide a list of alternative fonts or families to ensure that the browser
doesn’t substitute its default proportional font or monospaced font if it doesn’t
have the exact font you specify; for example:
<font face="Times New Roman, Times, serif">Terms and Conditions</font>
<b>CONTROL THE TYPE SIZE</b>
To control the type size via HTML, you do not use the point size (as in most
word-processing applications), but rather the type size relative to the default
size set in the browser.
Browsers use the values 1 through 7 to measure type sizes, with 1 being the
smallest and 7 the largest. Each size is about 20 percent bigger than the size
preceding it: Size 2 is 20 percent bigger than size 1, size 3 is 20 percent bigger
QUICK
<b>FACTS</b>
<b>UNDERSTANDING OTHER </b>
<b>FORMAT TING</b>
HTML supports various other types of formatting beyond
those discussed in this section, including the following:
<b>•</b>
Smaller text (<small> and </small>) appears ina smaller size than the default size set in the
browser.
<b>•</b>
Bigger text (<big> and </big>) appears in a largersize than the default size set in the browser.
<b>•</b>
Sample text (<samp> and </samp>) appears inthe browser’s default monospaced font to indicate
that it is a program or script example. Sample text
usually looks the same as typewriter text (<tt> and
</tt>), but it is a logical tag that can be interpreted
by screen readers and accessibility tools.
<b>•</b>
Variable text (<var> and </var>) appears initalicized (slanted) font.
<b>•</b>
Keyboard text (<kbd> and </kbd>) appears in thebrowser’s default monospaced font. Keyboard text
also usually looks the same as typewriter text, but
it is a logical tag that can be interpreted by screen
readers and accessibility tools.
</div>
<span class='text_page_counter'>(80)</span><div class='page_container' data-page=80>
<b>10</b>
<b>9</b>
<b>8</b>
<b>7</b>
<b>6</b>
<b>5</b>
<b>4</b>
<b>3</b>
<b>2</b>
than size 2, and so on. Each browser assigns the value 3 to its default type size, no
matter how big or small that size is. You can then control the type size by using
thesize attribute with either an absolute value (1 through 7) or a relative value,
the amount to be added to or subtracted from the current type size. For example:
<b>•</b>
size="4" is an absolute value that makes the type size 4, about 20 percent bigger thanthe default size.
<b>•</b>
size="+2" is a relative value that makes the type size 5, about 40 percent (two 20percent increments) bigger than the default size 3.
<b>•</b>
size="–1" is a relative value that makes the type size 2, about 20 percent smaller thanthe default size 3.
<b>CONTROL THE TYPE COLOR</b>
To change the font color, use the <font> tag with the color attribute. You
can display many different colors by using either their names (for example,
color="blue" or color="red") or the hexadecimal (base 16) code for the color
(for example, color="#99FF00" for a lime-green shade). Most web-authoring
tools and HTML editors make it easy to find the exact color you want. If
you’re working in a text editor, consult a color-codes reference, such as that
found at (search for “color charts”) to learn the
hexadecimal codes you need.
The following example changes the formatting of the text to sans-serif (preferring
Arial or Trebuchet), navy (dark blue), and two sizes larger than the default:
<p><font face="Arial, Trebuchet, sans-serif" size="+2"
color="navy">Support Services</font></p>
The next example changes the formatting of the text to sans-serif (preferring
Comic Sans MS or Trebuchet) and one size smaller than the default:
<p><font face="Comic Sans MS, Trebuchet, sans-serif"
color="#990099" size="-1">Product Support</font> keeps your
customers satisfied with your goods they’ve purchased.</p>
<b>NOTE</b>
You can change the default text size by inserting the
<basefont> tag and specifying the size to use—for
example, <basefont size="5">. If you want to affect the
whole page, insert the <basefont> tag in the page’s
header; otherwise, place the tag immediately before the
text you want to affect. Changing the default text size
like this can be useful in a pinch, but it’s not usually a
good idea, because it changes the look of the web page
from the preferences that the user has set. Even if your
intention in setting the basefont is to make the page easier
to read, the result may, in fact, make it harder to read.
</div>
<span class='text_page_counter'>(81)</span><div class='page_container' data-page=81>
<b>2</b>
<b>3</b>
<b>4</b>
<b>5</b>
<b>6</b>
<b>7</b>
<b>8</b>
<b>9</b>
<b>2</b>
<b>3</b>
<b>4</b>
<b>5</b>
<b>6</b>
<b>7</b>
<b>8</b>
<b>9</b>
<b>2</b>
<b>3</b>
<b>4</b>
<b>5</b>
<b>6</b>
<b>7</b>
<b>8</b>
<b>9</b>
<b>Change Style Using Inline Styles</b>
You can change the style of an element (such as a paragraph or a heading)
by applying the style attribute to the element’s tag. The style attribute takes
the format style="<i>property1:value1; property2:value2"</i>, where <i>property1</i> and
<i>property2</i> are properties of the style attribute, and <i>value1</i> and <i>value2</i> are the
values assigned to those properties.
To change the style of an element, follow these general steps. See the rest of this
section for specific examples of using the style attribute.
<b> 1. </b>
Type the opening tag (except for its closing angle bracket) and enter the style attribute,an equal sign, and double quotation marks:
<p style="
<b> 2. </b>
Type the name of the first property that you want to set for the element, a colon, andthe value for that property:
<p style="line-height:3
<b> 3. </b>
If you want to set a second property for the element, type a semicolon, a space, thename of the property, a colon, and the value for that property:
<p style="line-height:3<b>;</b> text-align:center
<b> 4. </b>
If you want to set a third property for the element, repeat step 3.<b> 5. </b>
When you’ve set all the properties for the element, type the closing angle bracket, thetext for the element, and then the closing tag:
<p style="line-height:3;text-align:center">Choose from our
selection of powerful mailing lists—and customize the
list to suit your mailing’s needs.</p>
<b> 6. </b>
Save the page, switch to your browser, and view the effect.<b>CREATE A FIRST-LINE INDENT</b>
To apply a first-line indent to a paragraph, use the text-indent property and
specify the indent as a number of pixels or as a percentage. For example, to
apply a first-line indent of 10 percent to the paragraph:
<p style="text-indent:10%">This paragraph is indented 10
percent.</p>
QUICK
<b>FACTS</b>
<b>WORKING WITH FONTS</b>
While you <i>can</i> control font formatting using the <font>
tag, you should usually avoid doing so. Any font you
specify in a web page will be displayed correctly only if
it is installed on the computer that’s viewing the page.
If the font isn’t installed, the computer substitutes its
default proportional font (for a proportional font) or its
default monospaced font (for a monospaced font). This
substitution can wreck the effects you carefully create.
Cascading Style Sheets (CSS) are now the preferred
method for applying formatting such as font formatting;
because CSS let you instantly apply a font change to a
whole document, they can save you a great deal of time
and effort. Chapter 8 shows you how to use CSS.
To avoid font substitutions changing the look of your pages,
stick with widely used fonts as much as possible, and
design your pages so that fonts can be substituted without
the pages suffering. The most widely used serif fonts are
Times New Roman, Times, and Georgia. The most widely
used sans-serif fonts are Arial, Helvetica, Trebuchet, and
Verdana. The most widely used monospaced font is Courier.
If you simply <i>must</i> ensure that a particular font is
used, create a graphic containing the text, and insert
the graphic at the appropriate place in the web page.
Remember that anyone who has turned off the display of
pictures or who is using a text-only browser will not see
such graphics. See Chapter 4 for more information.
<b>NOTE</b>
Thestyle attribute is different from the <style> element,
which is used for defining internal style sheets and
importing style rules found in external style sheets.
Chapter 8 discusses how to use CSS.
</div>
<span class='text_page_counter'>(82)</span><div class='page_container' data-page=82>
<b>10</b>
<b>9</b>
<b>8</b>
<b>7</b>
<b>6</b>
<b>5</b>
<b>4</b>
<b>3</b>
<b>2</b>
<b>CHANGE LINE SPACING</b>
To change the line spacing of a paragraph, use the line-height property and
specify the spacing as 1 (single spacing), 1.5 (one-and-a-half line spacing), 2
(double spacing), or a higher number. For example, to apply double spacing to
the paragraph:
<p style="line-height:2">Our one-hundred square meter
(100m<sup>2</sup>) conference room can easily accommodate full
<font>board</font> meetings.</p>
<b>CHANGE THE CAPITALIZATION OF TEXT</b>
To change the capitalization of the text in an element, use the text-transform
property and specify the case you want.
<b>•</b>
uppercase capitalizes every letter in the text.<b>•</b>
lowercase lowercases every letter in the text.<b>•</b>
capitalize applies initial capitals to the text. HTML changes the first letter in every wordto a capital but doesn’t change the case of other letters in the words.
For example, to apply initial capitals to the text:
<h1 style="text-transform:uppercase">Return on Investment</h1>
<b>APPLY UNDERLINING, OVERLINING, OR STRIKETHROUGH</b>
As discussed earlier in this chapter, you can apply underlining to individual
words using the <u> and </u> tags, and you can apply strikethrough using
either the <strike> and </strike> or <s> and </s> tags. To affect an entire
paragraph, you can use the text-decoration property of the style attribute
with the underline value (for an underline) or the line-through value (for
strikethrough). You can also use the text-decoration property to apply
<i>overlining</i>—a line above the text—by using the overline value.
For example, to apply underline to the first paragraph, strikethrough to the
second paragraph, and overline to the third paragraph:
<p style="text-decoration: underline">Document Management</p>
<p style="text-decoration: line-through">Filing and Assessment</p>
<p style="text-decoration: overline">Scanning and Shredding</p>
<b>NOTE</b>
It’s possible to apply most of your formatting by using the
style attribute, but normally you’ll save time and effort by
using CSS instead. You can use the style attribute when
you need to override the formatting applied by CSS.
<b>TIP</b>
Thetext-transform property is most useful when
you need to control the appearance of text that is
automatically entered in your web pages. If you’re typing
the text yourself, it’s easier to type the letters with the
correct capitalization.
</div>
<span class='text_page_counter'>(83)</span><div class='page_container' data-page=83>
<b>2</b>
<b>3</b>
<b>4</b>
<b>5</b>
<b>6</b>
<b>7</b>
<b>8</b>
<b>9</b>
<b>2</b>
<b>3</b>
<b>4</b>
<b>5</b>
<b>6</b>
<b>7</b>
<b>8</b>
<b>9</b>
<b>2</b>
<b>3</b>
<b>4</b>
<b>5</b>
<b>6</b>
<b>7</b>
<b>8</b>
<b>9</b>
<b>MAKE TEXT BLINK ON BROWSERS OTHER THAN </b>
<b>INTERNET EXPLORER AND SAFARI</b>
To make a text element blink on and off, use the text-decoration property of the
style attribute with the blink value—for example:
<h2 style="text-decoration:blink">Don't Miss This Offer!</h2>
<b>CHANGE FONT FORMATTING</b>
To set font formatting on an element, you can use the styleattribute’s
properties shown in Table 3-3.
For example, to apply bold, blue, extra-large Comic Sans MS font to the text:
<p style="family:Comic Sans MS; size:x-large;
font-weight:bold; color:blue">Modular and Functional Services</p>
<b>APPLY A BACKGROUND COLOR TO AN ELEMENT</b>
To apply a background color to an element, use the background-color property
of the style attribute, and specify the color either by name or its hex code.
<b>TIP</b>
Blinking text irritates many viewers, so use it in
moderation, if at all. Some browsers also enable the user
to suppress blinking text. In this case, the text is simply
displayed without the blinking.
<b>PROPERTY</b> <b>CONTROLS</b> <b>VALUES</b>
font-family The font displayed A specific font name—for example, Arial
font-size The font size Either an absolute size (xx-small,
x-small,small,medium,large,x-large, or
xx-large) or a relative size (smaller or
larger)
font-style The font style—normal,
italic, or oblique
normal,italic, or oblique.oblique
works only if the font includes oblique
characters; otherwise, oblique produces
slanted text that gives an italic effect
font-variant Whether the font is
normal or small caps
normal or small-caps
font-weight How bold the font is normal,lighter,bold,bolder,100,200,
300,400,500,600,700,800, or 900
color The color of the font A specific color name or hex code
<i><b>Table 3-3:</b><b> Font Properties for the</b><b>style</b><b>Attribute</b></i>
<b>TIP</b>
The margin for borders is the space between the
previous element, or the edge of the page, and the start
of the border. The padding is the space between the
border and the element inside the border.
<b>CAUTION</b>
Borders may be displayed somewhat differently in some
browsers, so it’s a good idea to check your pages with
any browser for which you want to be sure that your web
pages work correctly.
<b>CAUTION</b>
Elements you hide are still visible in the source code for
the web page, which any visitor can view.
<b>CAUTION</b>
Theblink text decoration does not work on Internet
Explorer, the browser used by around two-thirds of the
people on the Internet, or on Safari (about 10 percent).
Unless you have a captive audience that is using Firefox,
Camino (on the Mac), or another browser in which blink
does work, don’t use blink.
</div>
<span class='text_page_counter'>(84)</span><div class='page_container' data-page=84>
<b>10</b>
<b>9</b>
<b>8</b>
<b>7</b>
<b>6</b>
<b>5</b>
<b>4</b>
<b>3</b>
<b>2</b>
For example, the following code applies a different background color to a
division to make the heading and paragraph text stand out (see Figure 3-4):
<div style="background-color:turquoise">
<br/>
<h1 style="color:blue" align="center">Save Time by Outsourcing
the Effort</h1>
<p align="center" style="color:navy; family:serif;
font-weight:bold; font-size:large">We provide a full set of services
to meet every business need.</p>
<br/>
</div>
<b>APPLY BORDERS</b>
To apply borders to an element, you can use the style properties shown in Table 3-4.
For example, to use most of the border settings and many of the other properties
of the style attribute discussed in this section to create the box shown in the
illustration:
<p style="border-style:solid; border-color:black; border-width:
thick; width:200px; height:100px; top:10px;
padding-left:10px; padding-right:10px; background-color:gray; color:
white; padding-left:30px; padding-right:20px; padding-top: 20px;
font-weight:bold">Use our personalized services to slash costs
and turbo-charge your business performance.</p>
<i><b>Figure 3-4:</b><b> To make text stand out, you can apply a background color </b></i>
<i><b>that contrasts with the text color.</b></i>
UICK
<b>STEPS</b>
<b>CATCH THE EYE WITH </b>
<b>MOVING TEXT</b>
Here’s a feature that’s popular even though it works only
on some browsers and is officially frowned upon: moving
text. Internet Explorer and Safari support this feature, but
Firefox does not.
To add moving text to a web page, use the <marquee>
tag. Moving text can help draw the viewer’s eye to
important information, such as an advertisement or the
latest headline. Quite apart from not working in every
browser, moving text can be distracting to viewers, so
use it with care.
The<marquee> tag uses the following attributes:
<b>•</b>
behavior can be scroll,alternate, or slide.scrollis the default and makes the text scroll in the
direction specified by direction.alternate makes
the text scroll in alternating directions. slide makes
the text appear from the direction specified by
direction and stop when it reaches the opposite
margin.
<b>•</b>
direction can be left (the default), right,up, ordown. Scrolling left is the most common usage.
Scrolling up or down can be effective but takes up
more space.
<b>•</b>
bgcolor specifies the background color for themarquee. bgcolor can be any valid color—either a
color name (such as red) or a hexadecimal code
(such as #FFFF00).
<b>•</b>
loop specifies how many times the marqueerepeats the scrolling. The default setting is to loop
endlessly, which you can also specify explicitly
using the value infinite.
<i>Continued . . .</i>
</div>
<span class='text_page_counter'>(85)</span><div class='page_container' data-page=85>
<b>2</b>
<b>3</b>
<b>4</b>
<b>5</b>
<b>6</b>
<b>7</b>
<b>8</b>
<b>9</b>
<b>2</b>
<b>3</b>
<b>4</b>
<b>5</b>
<b>6</b>
<b>7</b>
<b>8</b>
<b>9</b>
<b>2</b>
<b>3</b>
<b>4</b>
<b>5</b>
<b>6</b>
<b>7</b>
<b>8</b>
<b>9</b>
<b>HIDE AN ELEMENT</b>To hide an element, set the visibility property of the style attribute to hidden;
to display the element, set the visibility property to visible (or remove the
visibility property).
UICK
<b>STEPS</b>
<b>CATCH THE EYE WITH </b>
<b>MOVING TEXT </b>
<i>(Continued)</i>For example, to create a marquee with a cyan (light blue)
background:
<b> 1. </b>Type the opening <marquee> tag:
<marquee>
<b> 2. </b>Before the closing angle bracket, type the
behavior attribute and specify scroll,alternate, or
slide, as appropriate—for example:
<marquee behavior="scroll">
<b> 3. </b>Type the direction attribute and specify left,right,
up, or down, as appropriate—for example:
<marquee behavior="scroll"
direction="left">
<b> 4. </b>Type the bgcolor attribute and specify the color
you want to use—for example:
<marquee behavior="scroll"
direction="left" bgcolor="cyan">
<b> 5. </b>Type the loop attribute and specify either the
number of loops or the value infinite—for example:
<marquee behavior="scroll"
direction="left" bgcolor="cyan"
loop="2">
<b> 6. </b>On the next line, type the text you want the
marquee to display—for example:
April Special: Get an extra week of
service free!
<b> 7. </b>Type the closing </marquee> tag:
</marquee>
<b> 8. </b>Save the file, switch to your web browser, and
refresh the page to see the effect.
<b>PROPERTY</b> <b>CONTROLS</b> <b>VALUES</b>
border-style Whether the border is hidden or
appears as a single line or a double line
none (for no border), solid,
dotted,dashed, or double
border-color The border color A specific color name or
hex code
border-width The border width undefined, a number of
pixels (for example, 10px),
thin, or thick
border-top-width The width of the top border medium, a number of
pixels, thin, or thick
border-bottom-width The width of the bottom border medium, a number of
pixels, thin, or thick
border-left-width The width of the left border medium, a number of
pixels, thin, or thick
border-right-width The width of the right border medium, a number of
pixels, thin, or thick
margin-top The width of the top margin (from the
border to the element above it)
A number of pixels
margin-bottom The width of the bottom margin A number of pixels
margin-left The width of the left margin A number of pixels
margin-right The width of the right margin A number of pixels
padding-top The amount of padding from the top
edge to the top of the contents
A number of pixels
padding-bottom The amount of padding from the
bottom edge
A number of pixels
padding-left The amount of padding from the
left edge
A number of pixels
padding-right The amount of padding from the
right edge
A number of pixels
<i><b>Table 3-4:</b><b> Border Properties for the</b><b>style</b><b>Attribute</b></i>
</div>
<span class='text_page_counter'>(86)</span><div class='page_container' data-page=86>
<b>10</b>
<b>9</b>
<b>8</b>
<b>7</b>
<b>6</b>
<b>5</b>
<b>4</b>
<b>3</b>
<b>2</b>
<b>How to…</b>
<i><b> Creating or Acquiring </b></i>
<i><b>Graphics Files</b></i>
<i><b>• Insert a Graphic</b></i>
<i><b>• Use Suitable Alternative Text</b></i>
<i><b>• Choose Where to Locate the </b></i>
<i><b>Graphics File</b></i>
<i><b>• Add a Long Description URL</b></i>
<i><b>• Align a Graphic</b></i>
<i><b>• Change the Size of a Graphic</b></i>
<i><b> Using Graphics to Control How </b></i>
<i><b>Text Appears</b></i>
<i><b>• Apply Borders to a Graphic</b></i>
<i><b>• Add a Title to a Graphic</b></i>
<i><b>• Position a Graphic with Spacers</b></i>
<i><b> Understanding GIF, JPEG, </b></i>
<i><b>and PNG</b></i>
<i><b> Laying Out Your Web Pages</b></i>
<i><b>• Create an HTML Signature File</b></i>
<i><b>• Use an HTML Signature File in </b></i>
<i><b>Windows Mail </b></i>
<i><b> Keeping Down Graphic Size to </b></i>
<i><b>Make Pages Load Faster</b></i>
Chapter 4
<b>Adding Graphics to </b>
<b>Your Web Pages</b>
Much of the Web’s popularity is due to its ability to present
graphical content rather than only text, and even a few
well-placed graphics can make a huge difference in the look of a
web page. Graphics of any size increase the time it takes to
download a page, however, so you should use them with care
to avoid making your pages awkward to access.
This chapter shows you how to insert graphics in your web
pages and control how they appear. You can place graphics
either with the text and other elements in the foreground
of a web page or in the background behind the text and
other elements. You’ll also learn to add horizontal rules to
your pages, and how to create and use an e-mail signature
containing a graphic.
</div>
<span class='text_page_counter'>(87)</span><div class='page_container' data-page=87>
<b>2</b>
<b>3</b>
<b>4</b>
<b>5</b>
<b>6</b>
<b>7</b>
<b>8</b>
<b>9</b>
<b>2</b>
<b>3</b>
<b>4</b>
<b>5</b>
<b>6</b>
<b>7</b>
<b>8</b>
<b>9</b>
<b>2</b>
<b>3</b>
<b>4</b>
<b>5</b>
<b>6</b>
<b>7</b>
<b>8</b>
<b>9</b>
<b>Add an Inline Graphic</b>
An<i>inline</i> graphic is one that appears in the same layer of a web page as the
text—in other words, not in the background. You can control the size of
graphics, specify alignment and alternative text, and apply borders, as needed.
<b>Insert a Graphic</b>
To insert a graphic, you use an <img/> tag. This is a self-closing tag, so it
requires the forward slash (/) before the closing angle bracket.
You must always use the src attribute to specify the source of the graphic and
thealt attribute to specify alternative text—for example:
<img src="brainstorm.jpg" alt="Brainstorming session"/>
The alternative text explains what the graphic is for any browser that has
graphics turned off (as shown on the left in Figure 4-1), for a text-only browser,
or for someone using a screen reader. Under normal circumstances, the graphic
appears and the alternative text does not (as shown on the right in Figure 4-1).
<b>Use Suitable Alternative Text</b>
Because the alternative text is used not only by humans but also by screen
readers, it’s important to make it suitable. Follow these guidelines to try to
balance the needs of screen readers with the needs of humans who have turned
off the display of graphics:
<b>•</b>
<b>Illustrative picture</b> Type a short description so that visitors will know what they’remissing. There’s no hard-and-fast length limit, but if you need to use more than 150
characters to describe the picture, use the longdesc attribute to provide the URL of a
page that gives a detailed description.
<b>•</b>
<b>Decorative picture</b> Use alt="" (an empty string in double quotation marks). This tellsthe screen reader to ignore the picture. If you use text that describes the picture, the
screen reader will speak the text.
<b>•</b>
<b>Bullet picture</b> Use alt="*" so that the visitor sees an asterisk.<b>•</b>
<b>Horizontal-line picture</b> Use alt="---" so that the visitor sees a horizontal line of dashes.QUICK
<b>FACTS</b>
<b>CREATING OR ACQUIRING </b>
<b>GRAPHICS FILES</b>
Before you can add graphics to your web pages, you’ll
need to create or acquire the files. If you’re creating the
web pages for a company, the company may supply
suitable files. Otherwise, the following are the main ways
of creating and acquiring graphics:
<b>•</b>
<b>Create graphics from scratch on your </b><b>computer Windows includes the Paint applet </b>
(choose Start | All Programs | Accessories | Paint),
but it is painfully limited, and you will normally do
better with a more powerful tool. Start by looking at
The Gnu Image Manipulation Program, known as
GIMP, which you can download for free from www.
gimp.org. For a paid program, consider Paint Shop
Pro (Windows), Photoshop Elements (Windows
and Mac), or Photoshop (Windows and Mac).
<b>•</b>
<b>Create graphics from scratch online If </b>youneed to create only a few graphics, try an online
image editor such as pixlr (www.pixlr.com).
<b>•</b>
<b>Download pictures from your digital camera</b>A digital camera is great for getting photos of your
products or other items you’re selling. Connect your
digital camera or its memory card to your computer
via Universal Serial Bus (USB). On Windows,
import your digital photos into Windows Photo
Gallery; on Mac OS X, import them into iPhoto.
<b>•</b>
<b>Scan graphics from documents or pictures Use </b>a scanner to create graphics of hard-copy documents
or pictures of flat objects that are difficult to
photograph with a camera, such as slides or jewelry.
If your scanner did not include custom software,
use Windows Fax and Scan (on Windows Vista) or
Image Capture (on Mac OS X) to perform the scan.
<i>Continued . . .</i>
</div>
<span class='text_page_counter'>(88)</span><div class='page_container' data-page=88>
<b>10</b>
<b>9</b>
<b>8</b>
<b>7</b>
<b>6</b>
<b>5</b>
<b>4</b>
<b>3</b>
<b>2</b>
<b>Choose Where to Locate the Graphics File</b>
The graphics file you add can be located either on the same computer as the web page or on another
computer.
<b>•</b>
<b>Graphics file on the same computer</b> Use either an absolute path (one that showseach folder from the web root—for example, src="/site/images/thoughtshower.jpg") or a
relative path (one that shows only the folders needed to reach the file from the current
file—for example, src="webimages/brainstorm.jpg"). If the graphics file is in the same
folder as the web page, you need supply only the filename.
<b>•</b>
<b>Graphics file on another computer</b> Specify the full URL of the graphics file—forexample, Bear in mind
that the file will have to be transferred from the server you specify and that this server
may respond more slowly than the main server you’re using. If this happens, the visitor
won’t see the graphic on the web page at first, although they may see a placeholder.
QUICK
<b>FACTS</b>
<b>CREATING OR ACQUIRING </b>
<b>GRAPHICS FILES </b>
<i>(Continued)</i><b>•</b>
<b>Find clip-art graphics that are free to </b><b>use Office suites such as Microsoft Office </b>
include clip art graphics that you can use freely.
You can also find free clip art online. For specific
needs, you may be able to get permission to
reuse other people’s copyrighted graphics on
your website.
<b>•</b>
<b>Buy the rights to use professional stock </b><b>photos Stock photography agencies license </b>
photos for use, acting for the photographer. For
low-cost images, start your search at “microstock”
photography sites—sites that offer stock
photos for modest fees—such as Shutterstock
(www.shutterstock.com) or iStockphoto
(www.istockphoto.com).
<b>CAUTION</b>
Never use someone else’s copyrighted content—be it
text, image, audio, or video—without specific permission.
Unless an item is in the public domain, either because
its copyright term has expired or because the copyright
holder has specifically put the item in the public domain,
unauthorized reuse is a violation of copyright law. For
example, it’s seldom legal to scan a picture and use it on
your website, borrow a graphic from another website, or rip
a song from a CD and use it as background audio on your
website. Always verify that an item is in the public domain
or get permission (and pay if necessary) before using it.
<i><b>Figure 4-1:</b><b> Alternative text appears in placeholders when graphics are turned off.</b></i>
</div>
<span class='text_page_counter'>(89)</span><div class='page_container' data-page=89>
<b>2</b>
<b>3</b>
<b>4</b>
<b>5</b>
<b>6</b>
<b>7</b>
<b>8</b>
<b>9</b>
<b>2</b>
<b>3</b>
<b>4</b>
<b>5</b>
<b>6</b>
<b>7</b>
<b>8</b>
<b>9</b>
<b>2</b>
<b>3</b>
<b>4</b>
<b>5</b>
<b>6</b>
<b>7</b>
<b>8</b>
<b>9</b>
<b>Add a Long Description URL</b>
When you need to provide a detailed description of a graphic, put that
description on a separate web page (preferably with the picture there as well)
and add the longdesc attribute to the <img/> tag pointing to that page’s URL.
Here’s an example:
<img src="brainstorm.jpg" alt="Brainstorming session"
longdesc="photo_details.html"/>
<b>Align a Graphic</b>
By default, most browsers align a graphic vertically with the baseline of any
text or object on the same line. Figure 4-2 shows an example. The bottom of the
graphic is aligned with the base of the text.
The quick-and-dirty way to control horizontal and vertical alignment is by
using the align attribute (see Table 4-1). This approach still works as of this
writing, but it has been deprecated in favor of using CSS (see Chapter 8).
The following example aligns the graphic to the left of the text. To ensure that
this works, place the <img> tag before the text to whose left it should appear:
<img src="brainstorm.jpg" alt="Brainstorming session" align="left"/>
<b>Change the Size of a Graphic</b>
When you use an <img/> tag without specifying the height or width of the
graphic, the browser displays the graphic at its full size. This size might be too
large or too small in the browser window, depending on the window’s size and
the screen resolution.
To control the size at which the browser displays the graphic, use the height
attribute and the width attribute of the <img/> tag. Usually, you’ll want to
specify the exact number of pixels for these attributes, but you can also specify
the percentage of the browser window that the graphic should occupy. The
problem with specifying the percentage is that the graphic may be distorted,
depending on the proportions of the browser window—and if the user resizes
the window, the graphic’s proportions may change, too.
<b>NOTE</b>
If the graphics file is hosted not only on another
computer but also on someone else’s site, you should
get permission before using the graphics file in your
web pages. Apart from copyright issues, your use of the
graphics file will take up some of that site’s bandwidth.
<b>TIP</b>
Thelongdesc attribute isn’t visible unless the user views
the page’s source code or uses a screen reader. If you
uselongdesc, it’s a good idea to provide a conventional,
visible link to the web page that contains the long
description.
<i><b>Figure 4-2:</b><b> Use the </b><b>align</b><b> attribute to specify the horizontal </b></i>
<i><b>or vertical alignment of a graphic.</b></i>
<b>ALIGN VALUE</b> <b>ALIGNS THE GRAPHIC</b>
top With the top of the object
middle With the vertical middle of the object
bottom With the bottom of the object
left To the left of the object
right To the right of the object
<i><b>Table 4-1:</b><b> Values for the </b><b>align</b><b>Attribute</b></i>
</div>
<span class='text_page_counter'>(90)</span><div class='page_container' data-page=90>
<b>10</b>
<b>9</b>
<b>8</b>
<b>7</b>
<b>6</b>
<b>5</b>
<b>4</b>
<b>3</b>
<b>2</b>
The following example sets the height of the graphic to 220 pixels and its width
to 325 pixels:
<img src="brainstorm.jpg" alt="Brainstorming session"
height="220" width="325">
The next example displays the graphic at 40 percent of the height of the browser
window and 90 percent of its width. Figure 4-3 shows how the graphic becomes
distorted when the Safari window is resized: In the left image, the graphic’s
proportions are correct, while in the right image, it is stretched horizontally.
Some browsers (including Internet Explorer and Firefox) detect the problem and
resize the graphic proportionally, ignoring the measurement that is out of kilter.
<img src="brainstorm.jpg" alt="Brainstorming session"
height="40%" width="90%">
<b>TIP</b>
Use a graphics application to change your graphics to
approximately the right size before adding them to your
web pages. Even after doing this, tell the browser the size
at which to display the graphic.
<b>NOTE</b>
If you specify both dimensions for a graphic, most browsers
can use the size as a placeholder that enables them to
lay out the web page correctly before the graphic has fully
downloaded. If, however, you don’t specify the dimensions
of the graphic, browsers aren’t able to lay the page out
correctly until the graphic has fully downloaded because
they do not know how much space the graphic occupies.
<i><b>Figure 4-3:</b><b> Using percentages to specify the height and width of a graphic can cause it to become distorted. </b></i>
</div>
<span class='text_page_counter'>(91)</span><div class='page_container' data-page=91>
<b>2</b>
<b>3</b>
<b>4</b>
<b>5</b>
<b>6</b>
<b>7</b>
<b>8</b>
<b>9</b>
<b>2</b>
<b>3</b>
<b>4</b>
<b>5</b>
<b>6</b>
<b>7</b>
<b>8</b>
<b>9</b>
<b>2</b>
<b>3</b>
<b>4</b>
<b>5</b>
<b>6</b>
<b>7</b>
<b>8</b>
<b>9</b>
<b>Apply Borders to a Graphic</b>
To apply borders to a graphic, add the border attribute to the <img/> tag, and
specify the appropriate properties. (See Chapter 3 for a list of border properties.)
The following example uses an inline style to apply a thin black border to the
picture, as shown in Figure 4-4:
<img src="brainstorm.jpg" alt="Brainstorming session"
height="300px" style="border-style:solid; border-color:black;
border-width:thin"/>
<b>Add a Title to a Graphic</b>
In addition to alternative text (which you supply with the alt attribute), you can
add a title to a graphic by using the title attribute. The title is text that appears
as a ScreenTip when a visitor hovers the mouse pointer over the graphic for
a couple of seconds. Bear in mind that most visitors will not hover the mouse
pointer over a graphic like this unless you encourage them to do so, so they
may well not see the title.
Figure 4-5 shows an example of a title added to a graphic by the following HTML:
<img src="checklist.jpg" alt="Check list with one box checked"
title="Track your progress by making a list of commitments and
marking each one completed." width="400" style="border-style:
solid; border-color:black; border-width:thin"/>
<i><b>Figure 4-4:</b><b> Apply borders to your graphics when you </b></i>
<i><b>want to separate them further from the rest of the page.</b></i>
UICK
<b>STEPS</b>
<b>USING GRAPHICS TO CONTROL </b>
<b>HOW TEXT APPEARS</b>
If a web page requires text to be displayed using exactly the
font, size, and arrangement you specify rather than using
the available fonts and current settings on the computer a
viewer is using, use a graphic instead of text formatting.
<b> 1. </b>Use a graphics application, such as Paint or
GIMP, to create a graphic that contains the
necessary text in your desired arrangement. Save
the graphic in your site’s folder.
<b> 2. </b>Use the techniques described in this chapter to
position the graphic where you need the text to
appear in your web page.
<i><b>Figure 4-5:</b><b> You can use the </b><b>title</b></i>
<i><b>attribute to display a ScreenTip for </b></i>
<i><b>any visitor who hovers the mouse </b></i>
<i><b>pointer over a graphic.</b></i>
</div>
<span class='text_page_counter'>(92)</span><div class='page_container' data-page=92>
<b>10</b>
<b>9</b>
<b>8</b>
<b>7</b>
<b>6</b>
<b>5</b>
<b>4</b>
<b>3</b>
<b>2</b>
<b>Position a Graphic with Spacers</b>
As discussed in Chapter 3, HTML enables you to specify the relative alignment
of paragraphs and other items. If you need to align items precisely, however, you
must either use styles (as discussed in Chapter 8) or work around the problem. One
rough-and-ready but widely used solution is to use <i>spacer images</i>—images that take
up a certain amount of space, but that don’t display their physical presence on the
web page because they’re either transparent or the same color as the background.
To use a spacer image:
<b> 1. </b>
Use a graphics program such as Paint or GIMP to create a small graphic—just a fewpixels (or even one pixel) in each direction.
<b> 2. </b>
Type an <img src= /> tag that specifies the location of the graphic you want to use as aspacer and a blank alt attribute to tell screen readers to ignore it. Here’s an example:
<img src="images/spacer1.jpg" alt="" />
<b> 3. </b>
Use the width attribute and the height attribute to specify the size at which you wantthe spacer graphic to be displayed—for example:
width="50" height="80"
<b> 4. </b>
If the spacer graphic isn’t transparent, use the border attribute to set the border to azero width:
border="0"
<b> 5. </b>
Place the graphic you want to indent after the spacer graphic by using the <img> tagas usual—for example:
<img src="checklist.jpg" alt="Check list with one box checked"
width="400" style="border-style:solid; border-color:black;
border-width:thin"/>
<b> 6. </b>
Save the web page, switch to your browser, and refresh the display so that you cansee the effect of using the spacer graphic.
Figure 4-6 shows an indent produced by using the spacer graphic specified in
the following code:
<h2>Accentuate Your Progress Through Monitoring</h2>
<img src="spacer1.jpg" width="50" height="80" alt="" />
<img src="checklist.jpg" alt="Check list with one box checked"
width="400" style="style:solid; color:black;
border-width:thin"/>
<p>Marking down each completed task helps you focus on your remaining
tasks and gain confidence from what you have achieved.</p>
<b>NOTE</b>
The spacer graphic can be a much smaller size than the
amount of space that you need it to occupy because you
can use the width attribute and height attribute of the
<img> tag to make it occupy more space.
<i><b>Figure 4-6:</b><b> You can use an invisible graphic to indent an </b></i>
<i><b>element, such as a graphic, as in the example here.</b></i>
</div>
<span class='text_page_counter'>(93)</span><div class='page_container' data-page=93>
<b>2</b>
<b>3</b>
<b>4</b>
<b>5</b>
<b>6</b>
<b>7</b>
<b>8</b>
<b>9</b>
<b>2</b>
<b>3</b>
<b>4</b>
<b>5</b>
<b>6</b>
<b>7</b>
<b>8</b>
<b>9</b>
<b>2</b>
<b>3</b>
<b>4</b>
<b>5</b>
<b>6</b>
<b>7</b>
<b>8</b>
<b>9</b>
<b>Add a Background Graphic</b>
Instead of placing a graphic inline with the text, you may want to use it to form
the background of a web page. A background graphic can make your web pages
much more colorful and dramatic, but you must make sure that the graphic
neither obscures the text of the page nor clashes with any graphics you place
inline. In practice, this means that the background image should provide a
considerable contrast with the content of the page. For example, you might use
a subtle, light-toned image in your background that does not obscure black text.
To add a background image, add the background attribute to the <body> tag,
and specify the filename (and, if needed, the path) in double quotation marks.
The following example (shown in Figure 4-7) uses the file named fieldwork.jpg
in the images folder:
<body background="images/fieldwork.jpg">
<i><b>Figure 4-7:</b><b> You can use a JPEG, GIF, or </b></i>
<i><b>PNG file as a background graphic for </b></i>
<i><b>a web page. Choose a contrasting text </b></i>
<i><b>color to make sure that the text is legible.</b></i>
QUICK
<b>FACTS</b>
<b>UNDERSTANDING GIF, JPEG, </b>
<b>AND PNG</b>
Most images used in web pages are in one of the three
main graphics formats that the majority of browsers
support: PNG, JPEG, or GIF.
<b>LOSSY AND LOSSLESS COMPRESSION</b>
All three formats use compression to reduce the size of
the image file so that it will download faster. There are
two main types of compression.
<b>•</b>
<i>Lossless compression</i> doesn’t discard anyof the information required to display the
graphic, so graphics compressed with lossless
compression are as high in quality as the original,
uncompressed file.
<b>•</b>
Lossy<i>compression</i> discards some of theinformation required to display the graphic, so
graphics compressed with lossy compression are
lower in quality than the original file.
<b>PNG</b>
PNG (Portable Network Graphics) is a graphics format
developed for Internet usage. It uses lossless compression
to create a high-quality picture with as small a file size as
possible. PNG doesn’t offer different compression levels,
but it lets you make parts of the graphic transparent so
that the background shows through.
PNG is a good choice for web graphics and is supported
by all current browsers. Some older versions of browsers
don’t support PNG, but most people have now stopped
using these versions.
<i>Continued . . .</i>
</div>
<span class='text_page_counter'>(94)</span><div class='page_container' data-page=94>
<b>10</b>
<b>9</b>
<b>8</b>
<b>7</b>
<b>6</b>
<b>5</b>
<b>4</b>
<b>3</b>
<b>2</b>
<b>Add a Horizontal Rule</b>
To divide a web page into different horizontal areas, add one or more horizontal
rules by using the <hr /> tag. Used on its own, this tag creates a horizontal rule
of the default color (black) and default width that is left-aligned and that spans
the whole browser window.
The preferred way of formatting a horizontal rule is by using CSS (see
Chapter 8), but you can also format a horizontal rule by setting the four
attributes listed in Table 4-2.
The following example includes a plain horizontal rule (shown at the top of
Figure 4-8) and a thicker, centered horizontal rule with the noshade attribute
applied (shown at the bottom of the figure):
<p>Virtual office space can save you time, effort, and hard
cash.</p>
<hr/>
<h2>Industry-Leading Physical Office Space</h2>
<p>When you do need to meet your clients in person, take
advantage of our spacious meeting rooms.</p>
<img src="conference_room.jpg" alt="Berlin office" width="550" />
<p><em>Berlin, Germany</em></p>
<hr align="center" width="350" size="5px" noshade/>
<img src="office_view.jpg" alt="Paris office" width="550" />
QUICK
<b>FACTS</b>
<b>UNDERSTANDING GIF, JPEG, </b>
<b>AND PNG </b>
<i>(Continued)</i><b>JPEG</b>
JPEG (Joint Photographic Experts Group) is a graphics
format widely used on the Web. JPEG uses lossy
compression and is supported by all browsers. It offers
different levels of compression, allowing you to choose a
suitable quality of picture. JPEG does not let you make
parts of the graphic transparent.
Use JPEG when you want to make sure that all browsers
can view the graphics on your web pages. (If a visitor
has turned off the display of graphics in the browser,
however, he or she will not see the graphics.)
For best performance, use <i>progressive</i> JPEGs; JPEG
files created so that they can display a rough version
of the graphic while downloading the rest of it. When a
browser requests a progressive JPEG, the web server
first supplies every eighth line of the JPEG so that a
rough version can be displayed and then fills in the
missing lines gradually. The result is that the visitor can
get an idea of what the graphic looks like without waiting
for the whole graphic to download.
<b>GIF</b>
GIF (Graphics Interchange Format) is a standard
graphics format that has been widely used on the Web
for many years. GIF uses lossless compression and
maps the colors in a graphic to 256 colors and uses
dithering to represent colors not included in those 256.
It also lets you make parts of the graphic transparent.
<i>Interlaced GIFs</i> work in the same way as progressive
JPEGs, enabling the visitor to see a rough version of the
graphic while the rest is being downloaded.
For line art, GIF provides a good balance of picture
quality with file size. Avoid using GIF for photos, however,
because they’ll suffer.
<b>ATTRIBUTE</b> <b>VALUE</b>
align left,center,right
size The thickness of the rule in pixels
width The length of the rule in pixels; if you omit width, the rule runs all the
way across the window
noshade No value; if included, it prevents the rule from having a 3-D effect
<i><b>Table 4-2:</b><b> Attributes for the </b><b><hr></b><b> Tag</b></i>
</div>
<span class='text_page_counter'>(95)</span><div class='page_container' data-page=95>
<b>2</b>
<b>3</b>
<b>4</b>
<b>5</b>
<b>6</b>
<b>7</b>
<b>8</b>
<b>9</b>
<b>2</b>
<b>3</b>
<b>4</b>
<b>5</b>
<b>6</b>
<b>7</b>
<b>8</b>
<b>9</b>
<b>2</b>
<b>3</b>
<b>4</b>
<b>5</b>
<b>6</b>
<b>7</b>
<b>8</b>
<b>9</b>
<b>Create an E-mail Signature </b>
<b>Containing a Graphic </b>
A<i>signature</i> is an item that most e-mail applications can automatically insert
at the end of each outgoing message, if you choose to include it. A signature
normally consists of text that identifies the sender—for example, by supplying
the sender’s full name, position and company (if applicable), physical address,
phone numbers, and other relevant information, such as the URL of the
sender’s website. Many signatures also include a short quote for the recipient’s
enjoyment, edification, or annoyance.
<b>TIP</b>
Normally, when you put a background graphic in a web
page, that image moves when the user scrolls through
the web page. If you want the image to stay in place
when the user scrolls so that it is always in the same
position in the browser window and the text and other
content scrolls over it, add bgproperties="fixed" to the
<body> tag. This effect can be useful, but you must make
sure that the page’s content will be visible no matter
which part of the background image it is displayed over. <i><b><sub>Figure 4-8:</sub></b><b><sub> Use horizontal rules to break up a page into different </sub></b></i>
<i><b>areas. You can specify the alignment, length, and thickness of </b></i>
<i><b>the rule for effect. </b></i>
<b>TIP</b>
HTML doesn’t have a tag for a vertical line, but you can
apply vertical lines by using a table. See Chapter 6.
</div>
<span class='text_page_counter'>(96)</span><div class='page_container' data-page=96>
<b>10</b>
<b>9</b>
<b>8</b>
<b>7</b>
<b>6</b>
<b>5</b>
<b>4</b>
<b>3</b>
<b>2</b>
You can also add a graphic to your signature by creating a suitable page using
HTML. This example shows you how to create a graphical signature and then
apply it in Windows Mail, the e-mail application included with Windows Vista
and Windows 7. Windows Mail is the successor to Outlook Express, which came
with Windows XP and earlier versions, and works in much the same way—so
you can use this technique with Outlook Express as well.
<b>Create an HTML Signature File</b>
To create an HTML signature file:
<b> 1. </b>
In your text editor (for example, Notepad), create an HTML file that contains theinformation you want. An example including a graphic follows.
<?xml version="1.0" encoding="utf-8"?>
<!DOCTYPE html PUBLIC "-//W3C//DTD XHTML 1.0 Transitional//EN"
" />dtd">
<html xmlns=" xml:lang="en"
lang="en">
<head>
<meta http-equiv="content-type" content="text/html;
charset=utf-8" />
<title></title>
</head>
<body>
<p>Anna Connor<br/>Account Executive</p>
<br/>
<img src=" />png" alt="Acme logo" height="180" align="left"/>
<h3> Acme Virtual Industries</h3>
<p> Website: <a href="">
<tt></tt></a></p>
<p> E-mail: <a href="mailto:anna_connor@acmevirtualindustries.
com">
<tt></tt></a></p>
<p> Office: 510-555-1298<br/>
Mobile: 408-555-9823</p>
</body>
</html>
QUICK
<b>FACTS</b>
<b>LAYING OUT YOUR WEB PAGES</b>
As discussed in Chapter 2, people trying to view your
web pages may be using any of a variety of browsers
and operating systems, page sizes, and connections.
Keep your web pages small so that they can be viewed in
small windows if necessary. Even so, the only area of a
page that you can be certain will be visible is the
upper-left corner—so this is where you should put all the vital
information on the page. This crucial area is sometimes
called “above the fold,” a term taken from newspaper
publishing—when the newspaper is folded, the most
important information must be visible.
On most pages, the most important information is the
site’s name (and perhaps logo) and description, and
primary means of navigation (perhaps including a
Search tool), the page’s name or description, and contact
information. If your site carries advertising, above the
fold is prime screen real estate, and you should charge
accordingly.
You should probably also put a brief version of the site’s
name and the page’s content in the page’s title (using the
<title> tag).
</div>
<span class='text_page_counter'>(97)</span><div class='page_container' data-page=97>
<b>2</b>
<b>3</b>
<b>4</b>
<b>5</b>
<b>6</b>
<b>7</b>
<b>8</b>
<b>9</b>
<b>2</b>
<b>3</b>
<b>4</b>
<b>5</b>
<b>6</b>
<b>7</b>
<b>8</b>
<b>9</b>
<b>2</b>
<b>3</b>
<b>4</b>
<b>5</b>
<b>6</b>
<b>7</b>
<b>8</b>
<b>9</b>
<b> 2. </b>
Make sure the file is correctly formed, with the DOCTYPE, a starting <html> tag, aheader section, a body section, and a closing </html> tag.
<b> 3. </b>
Create an <img/> tag, add the src attribute, and specify the full path and filename ofthe graphics file. Add the alt attribute and alternative text. If necessary, use the height
andwidth attributes to size the graphic.
<b> 4. </b>
Save the file and view it in your browser to make sure it looks the way you want.Figure 4-9 shows the example signature. Make any necessary adjustments and save
the file again.
<b>Use an HTML Signature File in Windows Mail</b>
To use an HTML signature file in Windows Mail:
<b> 1. </b>
If Windows Mail isn’t already running, start it: Click the <b>Start</b> button, click <b>All Programs</b>,and then click <b>Windows Mail</b>.
<b> 2. </b>
Click the <b>Tools</b> menu and then click <b>Options</b>. The Options dialog box appears. Clickthe<b>Signatures</b> tab (shown in Figure 4-10 with a signature applied).
<b> 3. </b>
Click <b>New</b>, click the <b>File</b> option button, and then click <b>Browse</b>. The Open dialog boxappears. Select <b>HTML Files</b> in the Files Of Type drop-down list, select the signature
file, and then click <b>Open</b>. Windows Mail closes the Open dialog box and enters the
path and filename on the Signatures tab.
<i><b>Figure 4-9:</b><b> You can add graphics to an e-mail signature.</b></i>
<b>NOTE</b>
If the image is smaller than the browser window, the
browser automatically tiles the image so that it occupies
the whole of the browser window. Any visitor browsing
with a large window on a high-resolution monitor will see
more tiling than someone using a smaller window. So, if
possible, test your site at high resolution as well as lower
resolutions to see the effect.
</div>
<span class='text_page_counter'>(98)</span><div class='page_container' data-page=98>
<b>10</b>
<b>9</b>
<b>8</b>
<b>7</b>
<b>6</b>
<b>5</b>
<b>4</b>
<b>3</b>
<b>2</b>
<b> 4. </b>
Select the <b>Add Signatures To All Outgoing Messages</b> check box if you wantWindows Mail to add your signature automatically to all messages you send. Ensure
that the <b>Don’t Add Signatures To Replies And Forwards</b> check box is selected so
that replies and forwarded messages you send do not receive a signature.
<b> 5. </b>
Click <b>OK</b>.When you create a new message, Windows Mail automatically inserts the
signature if you selected the <b>Add Signatures To All Outgoing Messages</b> check
box. Otherwise, you can insert the signature manually when needed by clicking
the<b>Insert</b> menu and then clicking <b>Signature</b>.
<i><b>Figure 4-10:</b><b> Define a signature on the Signatures tab of the Options dialog </b></i>
<i><b>box in Windows Mail.</b></i>
QUICK
<b>FACTS</b>
<b>KEEPING DOWN GRAPHIC SIZE TO </b>
<b>MAKE PAGES LOAD FASTER</b>
Unless you know that all visitors to your website will
be accessing it across a high-speed connection (for
example, a corporate intranet), you should keep the
size of your web pages small so that they load quickly
across even a slow connection. In many cases, the key
factor determining how quickly a page loads is how many
graphics it contains and how large the file size of those
graphics is.
To make your pages load faster:
<b>•</b>
Reduce the number of graphics you use in yourpages. Look at the web pages you visit most
frequently, and analyze their use of graphics.
Some major sites, such as Google (www.google.
com), use very few graphics indeed—and so load
quickly even over dial-up connections.
<b>•</b>
Reduce each graphic to the size at which it will bedisplayed, rather than using a larger graphic and
displaying it at a smaller size.
<b>•</b>
Reduce the number of colors used in yourgraphics. (If you use GIFs, you’re automatically
reducing the number of colors to 256 or fewer.)
<b>•</b>
Compress each graphic by using a compressedfile format (GIF, JPEG, or PNG). If you use JPEG,
choose a degree of compression that provides
adequate image quality with as small a file size as
possible.
<b>•</b>
Reuse graphics where possible so that thebrowser needs to download them only once. For
example, use the same logo on each page rather
than using variations of the logo.
</div>
<span class='text_page_counter'>(99)</span><div class='page_container' data-page=99></div>
<span class='text_page_counter'>(100)</span><div class='page_container' data-page=100>
<b>10</b>
<b>9</b>
<b>8</b>
<b>7</b>
<b>6</b>
<b>5</b>
<b>4</b>
<b>3</b>
<b>2</b>
<b>How to…</b>
<i><b> Understanding Absolute and </b></i>
<i><b>Relative Links</b></i>
<i><b>• Link to Another Web Page</b></i>
<i><b>• Link Within a Web Page</b></i>
<i><b>• Link to a Particular Point on a </b></i>
<i><b>Web Page</b></i>
<i><b> Making Your Site Navigable</b></i>
<i><b>• Open a Link in a New Window</b></i>
<i><b>• Create a Link to Download a File</b></i>
<i><b>• Display a ScreenTip for a Link</b></i>
<i><b>• Create Links to Send E-mail</b></i>
<i><b> Making Your Imagemaps Useful </b></i>
<i><b>and Intelligible</b></i>
<i><b>• Create Two or More Links </b></i>
<i><b>in a Graphic</b></i>
<i><b>• Understand Audio and </b></i>
<i><b>Video Formats</b></i>
<i><b>• Understand Audio and Video </b></i>
<i><b>Delivery Methods</b></i>
<i><b>• Create a Link for Downloading </b></i>
<i><b>an Audio or Video File</b></i>
<i><b>• Create a Link to Play an Audio </b></i>
<i><b>or Video File</b></i>
<i><b> Embedding a Video File in </b></i>
<i><b>a Web Page</b></i>
Chapter 5
<b>Adding Links</b>
<i>Hyperlinks</i>
—links that connect one web page to other
pages—are the key to the Web. This chapter shows you
how to create links to other web pages and links to different
locations on the same web page. You’ll also learn how
to create links that start e-mail messages for a specified
address, links that use graphics rather than text, and links that
download or play audio or video files.
<b>Create Links</b>
Most links on the Web go to other web pages, but others go to a different point
on the same web page. You can also create links that take whoever clicks them
directly to a specific point on another web page.
</div>
<span class='text_page_counter'>(101)</span><div class='page_container' data-page=101>
<b>2</b>
<b>3</b>
<b>4</b>
<b>5</b>
<b>6</b>
<b>7</b>
<b>8</b>
<b>9</b>
<b>2</b>
<b>3</b>
<b>4</b>
<b>5</b>
<b>6</b>
<b>7</b>
<b>8</b>
<b>9</b>
<b>2</b>
<b>3</b>
<b>4</b>
<b>5</b>
<b>6</b>
<b>7</b>
<b>8</b>
<b>9</b>
<b>Link to Another Web Page</b>
A link consists of an anchor element that controls how the link appears on its
web page and the URL of the destination to which the link leads. The anchor
element can be text, a graphic, or a graphical element. For example, many links
appear as underlined text so that when the visitor clicks the text, the browser
displays the page specified by the URL in the link. Other links appear as
graphics that the visitor can click, or as buttons.
<b>CREATE A TEXT LINK</b>
To create a text link:
<b> 1. </b>
Position the insertion point in the element in which you want to create the link. Forexample, if you want to create the text link in a paragraph, create the paragraph and
type any preliminary text.
<b> 2. </b>
Type the beginning of the anchor tag for the link:<a
<b> 3. </b>
Type the href attribute, an equal sign, the destination URL (within double quotationmarks), and the closing angle bracket—for example:
href=" />
<b> 4. </b>
Type the text that you want to have displayed as the anchor for the hyperlink—forexample:
click here to contact us
<b> 5. </b>
Type the closing </a> tag for the anchor:</a>
The next example contains the entire link in a paragraph:
<p>If you have any questions about our services, <a href="http://
www.acmevirtualindustries.com/contact_us.html">click here to
contact us</a>.</p>
<b>CREATE A GRAPHIC LINK</b>
To create a graphic link:
<b> 1. </b>
Position the insertion point where you want to place the graphic between otherHTML elements.
QUICK
<b>FACTS</b>
<b>UNDERSTANDING ABSOLUTE AND </b>
<b>RELATIVE LINKS</b>
You can use either absolute links or relative links in your
web pages.
<b>ABSOLUTE LINKS</b>
An<i>absolute link</i> is a link that includes the full address
of the destination to which it links. The full address can
be either a complete URL (for example, http://www.
acmevirtualindustries.com/services/index.html) for a
page on the Web or a complete file path (for example,
\\acmeserver44\services\index.html) on a web server on
your local network.
Complete URLs to websites must always include
the appropriate prefix, which tells the browser which
protocol to use. When linking to a website, you’ll almost
always use http:// to designate the HTTP protocol. Most
browsers automatically supply this prefix if you omit
the prefix when browsing, but you must include it in
your absolute links. That way, the browser knows that it
shouldn’t try the HTTPS protocol (for secure sites) or the
FTP protocol (for file transfer) instead.
<b>RELATIVE LINKS</b>
A<i>relative link</i> is a link that supplies just that part of the
address needed to access the destination from the current
page. For example, if the destination page is in the same
folder as the current page, only the name of the destination
page is needed—for example, href="index.html" to access
the page named index.html in the current folder.
If the destination file is in a subfolder of the folder that
contains the current page, specify the folder name,
a forward slash, and the filename. For example,
href="products/index.html" refers to the page named
index.html in the subfolder named products contained in
the same folder as the current page.
<i>Continued . . .</i>
</div>
<span class='text_page_counter'>(102)</span><div class='page_container' data-page=102>
<b>10</b>
<b>9</b>
<b>8</b>
<b>7</b>
<b>6</b>
<b>5</b>
<b>4</b>
<b>3</b>
<b>2</b>
<b> 2. </b>
Type the opening anchor tag, including the href attribute and the target address—forexample:
<a href=" />meetings.html">
<b> 3. </b>
Type the <img/> tag, including the src attribute and the graphic name (and, if needed,the file path)—for example:
<img src="conference_room.jpg"/>
<b> 4. </b>
Type the closing anchor tag:</a>
The complete tag looks like this:
<p><a href=" />meetings.html"><img src="conference_room.jpg" alt="Conference
room" width="500"/></a></p>
When the user hovers the mouse pointer over the graphic, the pointer changes
to a hand with a pointing finger to indicate the hyperlink and the status bar
displays the destination of the link (see Figure 5-1).
QUICK
<b>FACTS</b>
<b>UNDERSTANDING ABSOLUTE AND </b>
<b>RELATIVE LINKS </b>
<i>(Continued)</i>If the destination file is in a different part of the folder
structure, enter two periods and a forward slash before
the filename to instruct the browser to move up one level
before traversing to the folder you specify. For example,
href="../webs/content/index.html" causes the browser
to move up one level, switch to the folder called webs,
switch to the subfolder called content, and then open the
file named index.html. To go up more than one level, use
../ as many times as necessary. For example, to go up
two levels, use ../../.
When creating the pages on your local computer, make
sure that you don’t include any drive letters (for example, C:
or D:) or any backslashes (\) in your relative links. Neither
will work after you transfer your website to the web host.
<b>WHEN TO USE ABSOLUTE AND RELATIVE LINKS</b>
Relative links continue to work even if you move your
entire website from one location to another. For example,
if you create your website on your local computer and
then transfer it to your web host, the links will continue to
work. By contrast, if you use absolute links on your local
computer, you will need to change all of the links to the
correct URLs when you transfer your site to your web host.
Typically, you’ll want to use relative links when linking
to pages within your own website. When linking to other
websites, use absolute URLs.
<i><b>Figure 5-1:</b><b> By default, HTML displays a blue border around a linked </b></i>
<i><b>graphic to indicate that it is a hyperlink. Specify a zero-width border </b></i>
<i><b>if you want to remove the blue border.</b></i>
<b>NOTE</b>
The anchor element (<a>) is an inline element that
should always appear within a block element such as a
paragraph. Many browsers can handle anchor elements
that appear outside block elements, but other browsers
have problems displaying them properly.
</div>
<span class='text_page_counter'>(103)</span><div class='page_container' data-page=103>
<b>2</b>
<b>3</b>
<b>4</b>
<b>5</b>
<b>6</b>
<b>7</b>
<b>8</b>
<b>9</b>
<b>2</b>
<b>3</b>
<b>4</b>
<b>5</b>
<b>6</b>
<b>7</b>
<b>8</b>
<b>9</b>
<b>2</b>
<b>3</b>
<b>4</b>
<b>5</b>
<b>6</b>
<b>7</b>
<b>8</b>
<b>9</b>
HTML displays a blue border around a linked graphic to draw the viewer’s
attention to the hyperlink. To prevent this border from being displayed, include
theborder attribute in the <img/> tag and set it to zero:
<p><a href=" />meetings.html"><img src="conference_room.jpg" alt="Conference
room" width="500" style="border: none"/></a></p>
<b>Link Within a Web Page</b>
Instead of linking to a different web page, you can link to a different place on
the same page by placing a named anchor at that point. This technique is useful
for long pages that might otherwise be awkward for visitors to navigate, such as
FAQ pages. By providing at the top of the page a table of contents whose entries
are linked to the relevant parts of the page, you can enable visitors to access
those parts quickly. By also providing links from all regions of the page back
to the top of the page, you can enable visitors to return to the table of contents
easily.
To create a link within a web page:
<b> 1. </b>
Insert an anchor at the point within the page to which you want to be able to link. Typean anchor tag (<a>) and use the name attribute to specify the name for the anchor—
for example:
<a name="Question_01"></a>
<b> 2. </b>
Create a link to the anchor you just inserted. Type an anchor tag (<a>) and use thehref attribute to refer to the anchor, putting a hash symbol (#) before the name—for
example:
<a href="#Question_01">What are the benefits of virtual office
space?</a>
<b> 3. </b>
Save the file, switch to your browser, and test the link.<b> 4. </b>
Add further anchors and links to the page as necessary. For example, insert an anchornamedTop at the top of the page, and then insert links farther down the page to this
anchor so that visitors can quickly return to the top of the page:
<p>Return to the <a href="#Top">top</a> of the page.</p>
<b>TIP</b>
From working on a computer, you’re used to having to
get filenames exactly right—if you get even one character
wrong, the computer doesn’t know which file you’re
referring to. URLs require even more precision: Not only
must you get the address exactly right, but you must
also use the right case, because some server operating
systems are case-sensitive. If in doubt about the case
you need for accessing a page on the Web (for example,
a page on a website affiliated with yours), open your
browser, browse to that page, copy the URL from the
address bar, and paste it into your code. This way, it will
be exactly right.
<b>NOTE</b>
A named anchor within a web page is similar to a
bookmark in a word-processing application, such as
Microsoft Word: It provides a point to which you can move
automatically, but its presence does not necessarily have
any visible manifestation on the page. It is often also
called a “bookmark” on web pages.
<b>NOTE</b>
The normal hyperlink attribute, href, refers to a website
and/or web page. The hash symbol (#) tells the browser
thathref is referring to an anchor point on a page.
</div>
<span class='text_page_counter'>(104)</span><div class='page_container' data-page=104>
<b>10</b>
<b>9</b>
<b>8</b>
<b>7</b>
<b>6</b>
<b>5</b>
<b>4</b>
<b>3</b>
<b>2</b>
The following code shows the beginning of a page that uses internal links for
navigation between a list of questions at the top and answers to the questions
farther down the page (see Figure 5-2). Note the anchor named Top in the
first-level heading at the top of the page and the links to the anchors (#Question_01
through Question_08) farther down the page.
<body>
<a href="index.html" target="_blank" accesskey="H">Home Page</a>
<h1><a name="Top"></a>Frequently Answered Questions (FAQ)</h1>
<p>Customers often ask us similar questions about how our
services meet their needs. Please read this list of questions
before contacting us to see if we've already answered your
question.</p>
<h2>List of Questions</h2>
<ol>
<li><a href="#Question_01" accesskey="b" tabindex="1">What are
the benefits of virtual office space?</a></li>
<li><a href="#Question_02" accesskey="s" tabindex="2">Which
services do you offer?</a></li>
<li><a href="#Question_03" accesskey="p" tabindex="3">What is
your pricing structure?</a></li>
<li><a href="#Question_04">Where are your offices?</a></li>
<li><a href="#Question_05">How many people can your meeting rooms
hold?</a></li>
<li><a href="#Question_06">How do you answer my virtual
telephone?</a></li>
<li><a href="#Question_07">How do I organize a mailshot?</a></li>
<li><a href="#Question_08">Do you provide real staff for
tradeshows?</a></li>
<b>Link to a Particular Point on a Web Page</b>
You can use the anchor technique to create a link to a particular anchor on
another web page. To do so:
<b> 1. </b>
Insert an anchor at the point on the destination page to which you want to be able tolink. Type an anchor tag (<a>) and use the name attribute to specify the name for the
anchor—for example:
<a name="mailshots"></a>
<b> 2. </b>
Save the destination page.<i><b>Figure 5-2:</b><b> Create links within long web pages to enable the </b></i>
<i><b>user to move easily about the page. Include links back to the </b></i>
<i><b>top of the page.</b></i>
</div>
<span class='text_page_counter'>(105)</span><div class='page_container' data-page=105>
<b>2</b>
<b>3</b>
<b>4</b>
<b>5</b>
<b>6</b>
<b>7</b>
<b>8</b>
<b>9</b>
<b>2</b>
<b>3</b>
<b>4</b>
<b>5</b>
<b>6</b>
<b>7</b>
<b>8</b>
<b>9</b>
<b>2</b>
<b>3</b>
<b>4</b>
<b>5</b>
<b>6</b>
<b>7</b>
<b>8</b>
<b>9</b>
<b> 3. </b>
Switch to the page that will contain the link. Type the start of an anchor tag (<a), typethehref attribute, an equal sign, the absolute or relative address, a hash symbol (#),
the anchor name, and the closing angle bracket—for example:
<a href=" />.html#mailshots">
<b> 4. </b>
Type the text (or insert the graphic) that you want to use as the visible manifestation ofthe anchor and then the closing </a> tag—for example:
Mailshots</a>
<b> 5. </b>
Save the file, switch to your browser, and click the link. Make sure it takes you to theright point on the other web page.
<b>Open a Link in a New Window</b>
When you click a link, most browsers open the linked page in the same tab or
window so that you can no longer see the page that contained the link. (You can
configure some browsers to open linked pages in a new window or on a new
tab.) To keep the previous page visible, you can create a link that opens in a new
window by default. This technique is especially useful when your pages contain
links to external websites (as opposed to other pages in your site)—you can
enable visitors to access other sites without entirely leaving your site.
To make a link open a new window, include the target attribute with the value
_blank in the link—for example:
<a href="
target="_blank">Services</a>
<b>Create a Link to Download a File</b>
Depending on the content of your site, you may choose to provide files that
visitors can download. For example, if you sell items, you might want to
provide product manuals in a downloadable format rather than putting all the
information on your web pages. If you sell computer hardware, you might need
to provide updated drivers for your products.
UICK
<b>STEPS</b>
<b>MAKING YOUR SITE NAVIGABLE</b>
To make your site easy for visitors to get around, you should
provide effective navigation. You may also need to assign
keyboard shortcuts to links so that they can be “clicked”
using the keyboard and change the tab order of links.
<b>PROVIDE EFFECTIVE NAVIGATION</b>
To provide effective navigation in your site:
<b>•</b>
Include plenty of links on each page, includingredundant links in different areas of long pages.
<b>•</b>
Explain in text, in title-attribute ScreenTips, or inboth where the visitor will be taken if he or she
clicks a link.
<b>•</b>
Consider implementing a standard means ofnavigation across your entire site. For example,
you might use a series of links across the top of
each page to allow visitors to access the main
areas of your site quickly.
<b>ASSIGN A KEYBOARD SHORTCUT TO A LINK</b>
To enable users without a mouse to click links, you
can assign a keyboard shortcut to a link by adding the
accesskey attribute and specifying the key. For example,
addaccesskey="h" to specify <i>h</i> as the access key for a
hyperlink.
Most browsers display no indication of the access key, so
you need to mark it to make it explicit. For example, you
might use bold font on the access key letter in the text to
indicate the access key.
<b>CHANGE THE TAB ORDER OF LINKS</b>
You can move from one hyperlink in a web page to the
next hyperlink by pressing <b>TAB</b>; to move to the previous
hyperlink, press <b>SHIFT+TAB</b>. Most browsers display a
selection box or a highlight around the current link. To
click the current link, press <b>ENTER</b>.
<i>Continued . . .</i>
</div>
<span class='text_page_counter'>(106)</span><div class='page_container' data-page=106>
<b>10</b>
<b>9</b>
<b>8</b>
<b>7</b>
<b>6</b>
<b>5</b>
<b>4</b>
<b>3</b>
<b>2</b>
To create a link that downloads a file, enter the absolute address or relative
address of the desired file for the href attribute. For example, this code contains
links to download two files (see Figure 5-3):
<h2>Files for Free Download</h2>
<p>We offer the following files for free download
(right-click and choose Save As):</p>
<dl>
<dt><a href="files/five_minute_virtual_office.pdf">
<i>Your Virtual Office in Five Minutese</i></a></dt>
<dd>A five-minute guide to planning a virtual office
to suit your business.
(PDF file; requires Acrobat or Acrobat Reader)</dd>
<dt><a href="files/seven_steps.zip">
<i>Starter Package</i></a></dt>
<dd>A starter package to help you set up your
virtual office. (Zip file; requires Zip capability, such
as that built into Windows or Mac OS X)</dd>
</dl>
<b>Display a ScreenTip for a Link</b>
For some of your links, you may want to display extra information in a
ScreenTip when the visitor hovers the mouse pointer over the link. To do so,
UICK
<b>STEPS</b>
<b>MAKING YOUR SITE NAVIGABLE </b>
<i>(Continued)</i>
The default order of the links is from the first to the
last, top to bottom, and left to right. If you need to
change this order, add the tabindex attribute to the
links, using numbering to specify the desired order:
Addtabindex="1" to the link you want to be first,
tabindex="2" to the second link, and so on.
For example, here are accesskey and tabindex
implemented with the list of questions described earlier
in this chapter:
<h2>List of Questions</h2>
<ol>
<li><a href="#Question_01" accesskey="b"
tabindex="1">What are the benefits of
virtual office space?</a></li>
<li><a href="#Question_02" accesskey="s"
tabindex="2">Which services do you
offer?</a></li>
<li><a href="#Question_03" accesskey="p"
tabindex="3">What is your pricing
structure?</a></li>
<b>CAUTION</b>
Even when you create a link that opens a page in a
separate window, a visitor can override the instruction.
For example, the visitor can right-click and select Open
from the shortcut menu to open the linked page in the
same browser window.
<i><b>Figure 5-3:</b><b> When you provide files for download, it’s a good idea to make sure the user </b></i>
<i><b>knows how to download them rather than open them in the browser.</b></i>
</div>
<span class='text_page_counter'>(107)</span><div class='page_container' data-page=107>
<b>2</b>
<b>3</b>
<b>4</b>
<b>5</b>
<b>6</b>
<b>7</b>
<b>8</b>
<b>9</b>
<b>2</b>
<b>3</b>
<b>4</b>
<b>5</b>
<b>6</b>
<b>7</b>
<b>8</b>
<b>9</b>
<b>2</b>
<b>3</b>
<b>4</b>
<b>5</b>
<b>6</b>
<b>7</b>
<b>8</b>
<b>9</b>
add the title attribute to the link and specify the text string that you want to
display, as in the example shown here and in Figure 5-4:
<dt><a href="files/five_minute_virtual_office.pdf"
title="Right-click here and choose Save As to save this file to your computer.
Click here to open this file in your browser (if your browser
supports PDFs).">
<i>Your Virtual Office in Five Minutes</i></a></dt>
<dd>A five-minute guide to planning a virtual office
to suit your business.
(PDF file; requires Acrobat or Acrobat Reader)</dd>
<b>Create Links to Send E-mail</b>
To get feedback from visitors to your website, you can simply list your e-mail
address on your site (for example, on the Contact Us page, if you have one) and
allow people to start messages manually using their e-mail clients as usual.
Often, however, you can get better results by adding a link that automatically
starts an e-mail message to the e-mail address you specify. This helps to ensure
that the visitor gets the e-mail address right, eliminating the risk that he or
she might mistype it. You can also include a subject line in the link. Provided
that the user doesn’t change the subject line in the e-mail client, you can then
implement e-mail filters to pick out mail related to your website.
<b>NOTE</b>
You can also use the target attribute with the _parent
name to open the linked document in the frameset
containing the link or with a named frame to open the
linked document in that frame. See Chapter 7 for a
discussion of frames and framesets.
<b>NOTE</b>
The exact name of the command for saving a file from
a download link varies from one browser to another. For
example, Internet Explorer calls the command “Save
Target As,” while Mozilla Firefox calls it “Save Link As.” To
cover both of these cases, and possibly others, tell the
reader to “Save As.”
<b>TIP</b>
Make sure the visitor knows that they should right-click
and choose Save to download the file. Otherwise, they
may simply click the link. Depending on the file type
of the linked file, the browser may try to open the file
in the browser or in another application rather than
downloading it.
<i><b>Figure 5-4:</b><b> Use the</b><b>title</b><b>attribute to display a ScreenTip of extra information </b></i>
<i><b>when the visitor hovers the mouse pointer over a link.</b></i>
<b>CAUTION</b>
Internet Explorer 8 does not display the title attribute as a
ScreenTip. Most other browsers do.
</div>
<span class='text_page_counter'>(108)</span><div class='page_container' data-page=108>
<b>10</b>
<b>9</b>
<b>8</b>
<b>7</b>
<b>6</b>
<b>5</b>
<b>4</b>
<b>3</b>
<b>2</b>
<b>USE TEXT OR A GRAPHIC TO SEND E-MAIL</b>
A text link, such as that shown in the previous section, is the most
straightforward means of enabling visitors to send you an e-mail. Another
widely used option is to use a miniature JavaScript and add the onClick
instruction to text or to a graphic. (See Chapter 10 for more information about
JavaScript and how to add it to your web pages.) This example creates both a
graphic e-mail link and a text link.
<b> 1. </b>
Enter some explanatory text for the graphic link so that the viewer knows he or sheshould click the link in order to start an e-mail message—for example:
<h3>Send Us a Customer Query</h3>
<p>Click the e-mail icon to send us a customer query.</p>
<b> 2. </b>
Type an <img/> tag that uses the src attribute to specify the graphic and the alt attribute tospecify alternative text as usual, and specify style="border:none" to prevent the browser
from displaying a blue border around the graphic to indicate the link—for example:
<img src="mail.png" alt="Contact Us icon" style="border:none"/>
<b> 3. </b>
Before the forward slash and closing angle bracket of the <img/> tag, add the onClickproperty with the details of the e-mail address and the subject (if desired)—for example:
onClick="location.href='mailto:customers@acmevirtualindustries
.com?subject=Customer Query'">
<b> 4. </b>
Add any explanatory text needed for the text link that will send e-mail, followed by thetext hyperlink—for example:
<p>If you can't see the envelope icon,
<a href="mailto:customers@acmevirtualindustries
.com?subject=Customer Query">click here</a></p>
The complete code used in the example is as follows:
<h3>Send Us a Customer Query</h3>
<p>Click the e-mail icon to send us a customer query.</p>
<img src="mail.png" alt="Contact Us icon" style="border:none"
onClick="location.href='mailto:?
subject=Customer Query'">/>
<p>If you can't see the envelope icon,
<a href="mailto:?subject=Customer
Query">click here</a></p>
Figure 5-5 shows the icon and link created by the code.
<b>TIP</b>
To simplify your e-mail life, don't use your main
e-mail account for collecting e-mail that comes to your
website—instead, keep a separate account solely for this
purpose. Doing this will enable you to keep your
website-related mail out of your personal e-mail and other
business-related e-mail.
<b>TIP</b>
You can put e-mail links on as many pages as you like,
but it’s best to keep the number to a minimum so that
you can easily change the links if you change your e-mail
address (or if someone else takes over the responsibility
for part of your site). Keeping all contact information
together on a single page is often the simplest solution.
Failing that, keep a list of pages that contain an e-mail
link so that you can update them all when necessary.
<i><b>Figure 5-5:</b><b> When you use a graphic as </b></i>
<i><b>a</b><b>mailto</b><b>hyperlink, it’s a good idea to </b></i>
<i><b>provide an alternate hyperlink in case </b></i>
<i><b>the visitor is unable to see the graphic.</b></i>
</div>
<span class='text_page_counter'>(109)</span><div class='page_container' data-page=109>
<b>2</b>
<b>3</b>
<b>4</b>
<b>5</b>
<b>6</b>
<b>7</b>
<b>8</b>
<b>9</b>
<b>2</b>
<b>3</b>
<b>4</b>
<b>5</b>
<b>6</b>
<b>7</b>
<b>8</b>
<b>9</b>
<b>2</b>
<b>3</b>
<b>4</b>
<b>5</b>
<b>6</b>
<b>7</b>
<b>8</b>
<b>9</b>
<b>CREATE AN E-MAIL BUTTON</b>
To create an e-mail button, use the <button> tag. You then set the onClick
attribute’slocation.href property to send e-mail to the appropriate address.
For example:
<b> 1. </b>
In the body of the web page, enter the opening tag for a button, but leave off theclosing angle bracket:
<button
<b> 2. </b>
With the insertion point still placed after <button, type the onClick attribute with thelocation.href property:
onClick="location.href=
<b> 3. </b>
Type a single quote, the mailto command, a colon, and the destination e-mail address:'mailto:
<b> 4. </b>
To add a subject line to the message, type a question mark, the word subject, an equalsign, and the text for the subject, as in the example here. (If you don’t want to add a
subject line to the message, skip this step—but a subject line helps prevent visitors
sending subjectless messages that look like spam.)
?subject=Address Change
<b> 5. </b>
Type a single quote, a double quotation mark, and the closing angle bracket:'">
<b> 6. </b>
Type the text you want to appear on the button—for example:Send an Address Change
<b> 7. </b>
Type the closing tag for the button:</button>
<b> 8. </b>
Save the page, switch to your browser, and refresh the displayso that the button appears. The example button looks like this:
<b> 9. </b>
Click the button to start a message in your default e-mail program (for example,Microsoft Outlook Express or Microsoft Outlook). Check that the address and subject
are correct, and then close the message without sending or saving it.
The full code for the sample button is as follows:
<button onClick="location.href='mailto:webs@acmevirtualindustries
.com?subject=Address Change'">Send an Address Change</button>
<b>NOTE</b>
When a visitor clicks a mailto link, Internet Explorer may
display an Internet Explorer Security dialog box, such
as the one shown here, to check that it’s the user who
has clicked the link and not an automated process. The
user must click the Allow button to proceed; if they don’t,
Internet Explorer denies the request.
<b>CAUTION</b>
E-mail addresses included in web pages, as in the
example here, can be harvested by spiders and other
robots that crawl through the web looking for addresses
to add to spammers’ lists. When you expose an e-mail
address publicly like this, be prepared for it to receive
junk mail or spam. For this reason, it’s usually a bad idea
to use your main e-mail address. An e-mail address at
your own domain that you can change if necessary, or a
free e-mail address, is usually a better idea.
</div>
<span class='text_page_counter'>(110)</span><div class='page_container' data-page=110>
<b>10</b>
<b>9</b>
<b>8</b>
<b>7</b>
<b>6</b>
<b>5</b>
<b>4</b>
<b>3</b>
<b>2</b>
When this code is used and someone clicks it in a browser, the e-mail program
will generate an e-mail message with the To and the Subject line (if appropriate)
filled in and the body blank.
<b>Create Two or More Links in a Graphic</b>
Instead of linking a graphic to a single destination (such as another page or a
mailto link), you can link different areas of the graphic to different destinations.
A graphic with two or more different links is called an <i>imagemap.</i>
To create an imagemap, you place an image using the <img/> tag as usual,
and then use the usemap attribute to specify which imagemap to use. You then
use<map> and </map> tags to define a map that consists of different areas,
each of which is linked to a different page or to a different anchor on the same
page. The areas are defined by their coordinates from the upper-left corner of
the image, which has coordinate 0,0. Each area can be a rectangle (rect), a circle
(circle), or a free-form polygon (poly).
This example uses the graphic shown in Figure 5-6, which is 640 pixels wide
by 480 pixels high. The graphic contains four distinct rectangular areas that are
roughly the same size.
To create the imagemap:
<b> 1. </b>
Open the graphic in your graphics program, and use the program’s selection tools towork out the coordinates of the areas you will need to define within the image. For
example, the coordinates "0,0,320,240" define the upper-left quarter of the sample
graphic.
<b> 2. </b>
Type the <img/> tag with the src attribute specifying the graphic file, the alt attributespecifying the alternative text, and the usemap attribute specifying the name of the
map you’ll create—for example:
<img src="map1.jpg"
alt="picture showing Acme Virtual Industries’ main service
areas"
usemap="#map1_map">
QUICK
<b>FACTS</b>
<b>MAKING YOUR IMAGEMAPS </b>
<b>USEFUL AND INTELLIGIBLE</b>
Should you need to, you can create highly complex
imagemaps—but you must make sure that visitors
to your site can immediately grasp the point of any
imagemaps you put on your pages and that they can use
them intuitively.
This depends both on the nature of the imagemaps and
how you use them. For example, if you needed visitors to
choose which part of the world they were visiting from,
you might use an image that showed the world and put
in place imagemap coordinates that divided the map
into the areas you required. Being familiar with maps,
most users would quickly grasp that they should click the
appropriate area.
If, however, you displayed an image that showed different
categories of merchandise, with an imagemap that linked
each picture of a product to that product’s page, visitors
might have a harder time grasping the linkage unless the
text made it explicit.
</div>
<span class='text_page_counter'>(111)</span><div class='page_container' data-page=111>
<b>2</b>
<b>3</b>
<b>4</b>
<b>5</b>
<b>6</b>
<b>7</b>
<b>8</b>
<b>9</b>
<b>2</b>
<b>3</b>
<b>4</b>
<b>5</b>
<b>6</b>
<b>7</b>
<b>8</b>
<b>9</b>
<b>2</b>
<b>3</b>
<b>4</b>
<b>5</b>
<b>6</b>
<b>7</b>
<b>8</b>
<b>9</b>
<b> 3. </b>
Type the opening <map> tag, and set the nameattribute to the name you used for the usemap attribute
of the <img/> tag—for example:
<map name="map1_map">
<b> 4. </b>
Type an <area> tag with the href attribute specifyingthe destination page for the hyperlink, the alt attribute
specifying the alternative text for the hyperlink (if
desired), the shape attribute specifying the type of
area (rect,circle, or poly), and the coords attribute
specifying the coordinates of the area. For example,
this code defines a rectangular area 320 pixels wide by
240 pixels high, starting at the upper-left corner of the
graphic:
<area href="finance.html"
alt="Financial Services"
shape="rect"
coords="0,0,320,240">
Enter<area> tags for the other areas in the graphic—
for example:
<area href="offices.html"
alt="Office Services"
shape="rect"
coords="0,240,320,240">
<area href="security.html"
alt="Security Services"
shape="rect"
coords="320,0,640,240">
<area href="computing.html"
alt="Computing Services"
shape="rect"
coords="320,240,640,480">
Type the closing </map> tag:
</map>
Save the page, switch to your browser, and then refresh the display so that you
can see the change.
<i><b>Figure 5-6:</b><b> You can use a graphic with two or more distinct areas to create an imagemap </b></i>
<i><b>with links to different pages from different parts of the graphic.</b></i>
</div>
<span class='text_page_counter'>(112)</span><div class='page_container' data-page=112>
<b>10</b>
<b>9</b>
<b>8</b>
<b>7</b>
<b>6</b>
<b>5</b>
<b>4</b>
<b>3</b>
<b>2</b>
Figure 5-7 shows the page and imagemap produced by
the sample code shown here:
<h1>Acme Virtual Industries Market Segments</h1>
<p>Click the market segment for which you'd like
to see information.</p>
<img src="map1.jpg"
alt="picture showing Acme Virtual
Industries’ main service areas"
usemap="#map1_map">
<map name="map1_map">
<area href=" />finance.html"
alt="Financial Services"
title="Financial Services"
shape="rect"
coords="0,0,320,240">
<area href="offices.html"
alt="Office Services"
title="Office Services"
shape="rect"
coords="0,240,320,480">
<area href="security.html"
alt="Security Services"
title="Security Services"
shape="rect"
coords="320,0,640,240">
<area href="computing.html"
alt="Computing Services"
title="Computing Services"
shape="rect"
coords="320,240,640,480">
</map>
<b>Add Audio and Video </b>
<b>to Your Web Pages</b>
Now that broadband is widely available, more and more people can enjoy
audio and video via the Web. If you have audio or video content to share, you
can put it on your website. You can create links that allow users to download
audio or video files, play audio or video files in a separate player, or play audio
or video files within your web page.
<i><b>Figure 5-7:</b><b> Using </b><b>title</b><b>text with your imagemaps gives visitors an idea of what they’ll </b></i>
<i><b>see if they click a particular part of the imagemap.</b></i>
<b>TIP</b>
Creating an imagemap manually takes some time
and patience, not to mention some accurate typing of
coordinates. Many graphics programs include tools for
creating imagemaps automatically, so check to see if
your graphics program has this feature. This automation
is particularly valuable for creating complex imagemaps,
such as those that use polygons.
</div>
<span class='text_page_counter'>(113)</span><div class='page_container' data-page=113>
<b>2</b>
<b>3</b>
<b>4</b>
<b>5</b>
<b>6</b>
<b>7</b>
<b>8</b>
<b>9</b>
<b>2</b>
<b>3</b>
<b>4</b>
<b>5</b>
<b>6</b>
<b>7</b>
<b>8</b>
<b>9</b>
<b>2</b>
<b>3</b>
<b>4</b>
<b>5</b>
<b>6</b>
<b>7</b>
<b>8</b>
<b>9</b>
<b>Understand Audio and Video Formats</b>
Computers use various audio and video formats, some of which are much more
widely used than others. To make sure that as many visitors to your website as
possible can enjoy its audio or video, you need to choose a suitable format. You
must also ensure that the file size of the audio or video is small enough that the
file can be downloaded over even a dial-up connection.
Use compressed audio formats for all but the shortest audio files. Most
computers can play MP3 files (which are compressed) and WAV files (which are
not compressed). Also, consider reducing the complexity of the audio file—for
example, by reducing it from a 16-bit sound to an 8-bit sound, or by using mono
instead of stereo. The file will not sound as good, but visitors to your website
will be able to get it that much more quickly.
Video contains far more data than audio, so always use compressed formats for
video—even for the shortest files. Most computers can play AVI (audio-video
interleave) files, which offer modest compression, and MPEG files, which offer
better compression. Most Windows computers can play Windows Media Video
(WMV) files, which also use a compressed format. Any PC or Mac with iTunes
installed can also play files in the QuickTime movie formats.
Most digital video camcorders export video at VGA resolution (640 × 480 pixels)
or a high-definition resolution. VGA gives good video quality, but produces large
files; high-definition gives great quality, but produces huge files. Reduce the
resolution for video files you put on the Web to 320 × 240 pixels for reasonable
quality, 240 × 160 pixels for acceptable quality, or 160 × 120 pixels for low quality.
<b>Understand Audio and Video Delivery Methods</b>
The easiest way to provide audio or video to visitors of your website is to allow
them to download entire files to their computers and play them when they want
to. This approach has two advantages.
<b>•</b>
People who download the files can listen to the audio or watch the video as manytimes as they like.
<b>TIP</b>
On most versions of Windows, you can use the
built-in Sound Recorder application to save a WAV file to a
compressed format that will take less time to download.
On Mac OS X, use GarageBand if you have the iLife
application suite. For more control on Windows, Mac OS X,
or Linux, try the free audio program Audacity (http://
audacity.sourceforge.net).
<b>TIP</b>
On the PC, you can use Windows Movie Maker, which is
included with most versions of Windows, to change video
resolution. On the Mac, use iMovie if you have the iLife
application suite.
</div>
<span class='text_page_counter'>(114)</span><div class='page_container' data-page=114>
<b>10</b>
<b>9</b>
<b>8</b>
<b>7</b>
<b>6</b>
<b>5</b>
<b>4</b>
<b>3</b>
<b>2</b>
<b>•</b>
Downloads work even over a slow or patchy connection (for example, a modemconnection or a congested broadband connection), provided the downloader has
enough time and patience to download the whole file. By contrast, streaming
high-quality audio or any high-quality of video usually requires a broadband connection that’s
working properly. (Some streaming technologies allow the client to download the entire
stream before attempting to play it, while other technologies do not.)
Allowing downloads works well if you have full distribution rights for the
audio or video files—for example, if they’re original works you’ve created. If,
however, you have only rights to play the files from your server or to stream
them, you will not be able to allow downloads.
<b>Create a Link for Downloading </b>
<b>an Audio or Video File</b>
If you have audio or video files that you can legally offer for download (for
example, music or movies that you have created yourself), create a link to
the file, and instruct visitors to right-click the link and choose Save As (or the
equivalent command, depending on the browser) from the shortcut menu to
download the file. (If a visitor simply clicks the link, the audio or video file will
probably play rather than be downloaded, although this depends on how the
computer is configured.)
This example tells visitors how to download an MP3 file:
<p>To download the interview on virtual offices,
right-click <a href="media/interview01.mp3"
title="Right-click this link and choose Save As to download
the file.">here</a>.</p>
<b>Create a Link to Play an Audio or Video File</b>
To enable visitors to play an audio or video file, create a link to the file. This
example links to the AVI video file named virtual_office_tour.avi in the media
folder:
<p>Click <a href="media/virtual_office_tour.avi">here</a> to
watch our Virtual Office Tour video (AVI format, 12.4MB).</p>
<b>CAUTION</b>
Playing an audio or video file in Windows Media Player
works seamlessly with Internet Explorer as the browser
and Windows Media Player installed and set up. If the
visitor is using another browser on Windows, such as
Firefox, the browser may prompt them to choose how
to open the file (see Figure 5-8); they can usually select
an option such as the Do This Automatically For Files
Like This From Now On check box in the figure to have
the browser play the files automatically. On Mac OS X or
another operating system, the visitor will normally have to
choose the program in which to play the file.
</div>
<span class='text_page_counter'>(115)</span><div class='page_container' data-page=115>
<b>2</b>
<b>3</b>
<b>4</b>
<b>5</b>
<b>6</b>
<b>7</b>
<b>8</b>
<b>9</b>
<b>2</b>
<b>3</b>
<b>4</b>
<b>5</b>
<b>6</b>
<b>7</b>
<b>8</b>
<b>9</b>
<b>2</b>
<b>3</b>
<b>4</b>
<b>5</b>
<b>6</b>
<b>7</b>
<b>8</b>
<b>9</b>
When a visitor clicks the link, the default media player on his or her computer
opens and plays the file. On a default configuration of Windows, the default
media player for audio and video files is Windows Media Player.
QUICK
<b>FACTS</b>
<b>EMBEDDING A VIDEO FILE IN A </b>
<b>WEB PAGE</b>
Instead of linking a video file, you can embed it in the
web page by using an <object> tag. The <object>
tag enables you to control precisely how the video file
appears and how the visitor can play it—for example,
whether the video starts playing automatically when the
web browser loads the page (seldom a good idea) and
whether the video player displays controls that allow the
visitor to control it (almost always a good idea).
The<object> tag is powerful but complex, as the
information you must use to make it work correctly
depends not only on the type of video file but also on
the browser the visitor is using. If you need to use the
<object> tag, consult a larger HTML reference work than
this book.
If you work with older web pages, you may also see the
<embed> tag used to embed a video player in a web
page. This is an older HTML technique that worked in
only some browsers, never became a standard, and has
now been superseded by the <object> tag—so don’t use
this tag unless it’s in pages that you’re maintaining and
that already work as they’re supposed to.
<i><b>Figure 5-8:</b><b> Firefox prompts the visitor to decide </b></i>
<i><b>how to handle a multimedia file.</b></i>
</div>
<span class='text_page_counter'>(116)</span><div class='page_container' data-page=116>
<b>10</b>
<b>9</b>
<b>8</b>
<b>7</b>
<b>6</b>
<b>5</b>
<b>4</b>
<b>3</b>
<b>2</b>
<b>How to…</b>
<i><b>• Plan a Table</b></i>
<i><b>• Create the Table’s Structure</b></i>
<i><b>• Add Rows and Columns </b></i>
<i><b>to a Table</b></i>
<i><b>• Add Table Borders</b></i>
<i><b>• Group Cells by Rows </b></i>
<i><b>and Columns</b></i>
<i><b>• Set Table and Cell Width</b></i>
<i><b> Setting Table and Cell Height</b></i>
<i><b>• Add Padding and Spacing</b></i>
<i><b>• Align a Table, Row, or Cell</b></i>
<i><b>• Make a Cell Span Two Columns </b></i>
<i><b>or Rows</b></i>
<i><b>• Apply a Background Color </b></i>
<i><b>or Picture</b></i>
<i><b>• Create a Nested Table</b></i>
<i><b>• Create a Vertical Line</b></i>
Chapter 6
<b>Creating Tables</b>
Many technical books (including this one) use tables to lay out
information in a clear and easily understandable format. You can
use tables in this way in your web pages as well, but you can
also use tables with invisible gridlines and borders for arranging
the layout of the elements that make up pages. This chapter
explains first how to create simple tables and then shows you
how to use tables to create more complex page layouts.
<b>Understand How Tables Work </b>
<b>and When to Use Them</b>
A table consists of cells made up of the intersections of rows and columns
(see Figure 6-1).
<b>•</b>
A<i>cell is the basic unit of a table. It is formed by the intersection of a row and a column.</i><b>•</b>
A<i>row is a line of cells running from left to right.</i><b>•</b>
A<i>column is a stack of cells running up and down.</i><b>•</b>
The<i>border is the rectangle that defines each cell and the outside of the table.</i></div>
<span class='text_page_counter'>(117)</span><div class='page_container' data-page=117>
<b>2</b>
<b>3</b>
<b>4</b>
<b>5</b>
<b>6</b>
<b>7</b>
<b>8</b>
<b>9</b>
<b>2</b>
<b>3</b>
<b>4</b>
<b>5</b>
<b>6</b>
<b>7</b>
<b>8</b>
<b>9</b>
<b>2</b>
<b>3</b>
<b>4</b>
<b>5</b>
<b>6</b>
<b>7</b>
<b>8</b>
<b>9</b>
In a standard table, each row contains the same number of
cells, and each column contains the same number of cells.
Figure 6-2 shows an example of a standard table.
You can, however, change the layout of a table by <i>spanning,</i>
or merging, cells together so that a single cell spans two
or more columns, two or more rows, or both. Figure 6-3
shows an example of using a table for layout. The screen on
the left, in which the table’s borders are hidden, is how the
page would normally be viewed. The screen on the right displays the borders so
that you can see how the table is divided into cells.
<b>Plan a Table</b>
If you want to experiment with tables, you can start by entering table tags
(discussed in the next section) in your HTML editor and placing content within
the cells. It’s better, however, to start by planning how you want your table to
look. Use any tool you find convenient—for example:
<b>•</b>
Draw a rough sketch of the table on a sheet of paper.<b>•</b>
Use a graphical tool, such as Microsoft Paint (click the <b>Start</b> button, click <b>All</b><b>Programs</b>, click <b>Accessories</b>, and then click <b>Paint</b>) or The GNU Image Manipulation
Program (GIMP), to create a mock-up of how the table will look.
<b>•</b>
Use an HTML-capable word processor, such as Microsoft Word or OpenOffice.org, tocreate a table; open the resulting file in a browser; and then copy the source code to
your HTML editor for fine-tuning.
<b>Create the Table’s Structure</b>
To create a table, you use the following tags:
<b>•</b>
The<table> tag marks the start of the table, and the </table> tagmarks the end of the table. All the table’s contents go between
these tags.
<i><b>Cell</b></i>
<i><b>Row</b></i>
<i><b>Column</b></i> <i><b>Border</b></i>
<i><b>Figure 6-1:</b><b> Each table has an outside border and rows and columns that </b></i>
<i><b>create cells.</b></i>
<b>Service Code</b>
AV101
AV102
AV103
AC104
<b>Service Description</b>
Virtual Phone
Virtual Assistant
Virtual Manager
Mailshot (one-off)
<b>Service Type</b>
Telecoms
Staffing
Staffing
Mailings
<b>Service Details</b>
1 day
1 day
1 day
50 pieces
<b>Service Cost</b>
$34.99
$49.99
$199.99
$99.99
<i><b>Figure 6-2:</b><b> You can use a table to lay out information in a grid for easy reference.</b></i>
<b>NOTE</b>
Technically, you should use only <i>data tables</i>—tables that
present tabular data. But many people also create <i>layout </i>
<i>tables</i>—tables used to lay out web pages as they want
them to appear. Because this practice is so widespread,
it’s important that you know how to work with layout
tables—even if you’re clear that usually CSS (discussed
in Chapter 8) is a better tool for creating such web pages.
</div>
<span class='text_page_counter'>(118)</span><div class='page_container' data-page=118>
<b>10</b>
<b>9</b>
<b>8</b>
<b>7</b>
<b>6</b>
<b>5</b>
<b>4</b>
<b>3</b>
<b>2</b>
<i><b>Figure 6-3:</b><b> Tables provide a way of controlling </b></i>
<i><b>the placement of elements in a web page. When </b></i>
<i><b>the table’s borders are not displayed (left), it’s </b></i>
<i><b>not easy to see the table’s structure (right).</b></i>
</div>
<span class='text_page_counter'>(119)</span><div class='page_container' data-page=119>
<b>2</b>
<b>3</b>
<b>4</b>
<b>5</b>
<b>6</b>
<b>7</b>
<b>8</b>
<b>9</b>
<b>2</b>
<b>3</b>
<b>4</b>
<b>5</b>
<b>6</b>
<b>7</b>
<b>8</b>
<b>9</b>
<b>2</b>
<b>3</b>
<b>4</b>
<b>5</b>
<b>6</b>
<b>7</b>
<b>8</b>
<b>9</b>
<b>•</b>
The<tr> (table row) tag marks the start of each row, and the </tr> tag marks the endof each row. The number of pairs of <tr> and </tr> tags you use controls the number of
rows in the table.
<b>•</b>
The<td> (table data) tag marks the start of each cell within a row, and then the </td>tag marks the end of each cell. The number of pairs of <td> and </td> tags controls the
number of cells in the row, and thus controls the number of columns.
To create a table, follow these general steps:
<b> 1. </b>
Open Notepad (or your HTML editor), and start a new web page. For example, if youhave created a template file containing the basic structure of a web page, open that
file and then click the <b>File</b> menu, click <b>Save As</b>, and use the Save As dialog box to
save the file under a different name. Otherwise, paste in or create the basic structure
of a web page manually:
<?xml version="1.0" encoding="utf-8"?>
<!DOCTYPE html PUBLIC "-//W3C//DTD XHTML 1.0 Transitional//EN"
" /><html xmlns=" xml:lang="en"
lang="en"><html>
<head>
<title></title>
</head>
<body>
</body>
</html>
<b> 2. </b>
Position the insertion point within the body section, and then type a starting <table>tag and a closing </table> tag:
<table>
</table>
<b> 3. </b>
Within the <table> and </table> tags, type the starting <tr> tag and a closing </tr> tagfor each row. For example, to create two rows:
<table>
<tr>
</tr>
<tr>
</tr>
</table>
<b>TIP</b>
Tables that contain more than a few rows and cells
quickly become difficult to read in a text editor. You
can make your tables easier to grasp—and to edit—by
indenting the contents of the table to different levels. For
example, you might indent each <tr> and </tr> tag pair
four spaces, indent each <td> and </td> pair a further
four spaces (eight spaces total), and indent the cell
contents even further.
</div>
<span class='text_page_counter'>(120)</span><div class='page_container' data-page=120>
<b>10</b>
<b>9</b>
<b>8</b>
<b>7</b>
<b>6</b>
<b>5</b>
<b>4</b>
<b>3</b>
<b>2</b>
<b> 4. </b>
To create a cell, place the insertion point between the appropriate <tr> and </tr> tags,and then type a starting <td> (table data) tag, the contents of the cell, and a closing
</td> tag. For example, to create three cells in the first row of the table:
<table>
<tr>
<td>Service Code</td>
<td>Service Description</td>
<td>Service Type</td>
</tr>
<tr>
</tr>
</table>
<b> 5. </b>
Save the page, switch to (or start) your browser, and display the page. So far, you willsee only the text of the table, as in this example.
<b> 6. </b>
Position the insertion point immediately before the closing angle bracket in the <table>tag, and then add the border attribute with the value 1 and the style attribute with the
value "border-color:blue":
<table border="1" style="border-color:blue">
<b> 7. </b>
Save the page, switch to your browser, and refresh the display. The cell borders aredisplayed, as shown in this example.
<b> 8. </b>
Using the technique described in step 3, create the cells in the remaining rows ofthe table. The following example shows the whole table with two further rows of cells
added:
<table border="1" style="border-color:blue" >
<tr>
<td>Service Code</td>
<td>Service Description</td>
<td>Service Type</td>
<td>Service Details</td>
<td>Service Cost</td>
</tr>
<tr>
<b>NOTE</b>
If you do not specify the width of the border for a table,
most browsers use a default width of 0, making the
border invisible. To ensure consistent display of your
pages, however, you should always specify the border
width you want. For example, to make sure that borders
are not displayed, use border="0".
<b>CAUTION</b>
Using the style attribute is not recommended as your
main means of formatting a table because it mixes the
table’s content with the table’s formatting; the new and
approved way of formatting the table is by using CSS (see
Chapter 8). But you may need to use the style attribute
in this way to override the style applied by CSS. This
example uses blue borders to make the table more visible.
<b>NOTE</b>
Empty rows and cells appear as only a minute amount of
white space in a table. Once you add content, the cells
increase in size so that they can display the content.
</div>
<span class='text_page_counter'>(121)</span><div class='page_container' data-page=121>
<b>2</b>
<b>3</b>
<b>4</b>
<b>5</b>
<b>6</b>
<b>7</b>
<b>8</b>
<b>9</b>
<b>2</b>
<b>3</b>
<b>4</b>
<b>5</b>
<b>6</b>
<b>7</b>
<b>8</b>
<b>9</b>
<b>2</b>
<b>3</b>
<b>4</b>
<b>5</b>
<b>6</b>
<b>7</b>
<b>8</b>
<b>9</b>
<td>AV101</td>
<td>Virtual Phone</td>
<td>Telecoms</td>
<td>1 day</td>
<td align="right">$34.99</td>
</tr>
<tr>
<td>AV102</td>
<td>Virtual Assistant</td>
<td>Staffing</td>
<td>1 day</td>
<td align="right">$49.99</td> </tr>
<tr>
<td>AV103</td>
<td>Virtual Manager</td>
<td>Staffing</td>
<td>1 day</td>
<td align="right">$199.99</td>
</tr>
<tr>
<td>AC104</td>
<td>Mailshot (one-off)</td>
<td>Mailings</td>
<td>50 pieces</td>
<td align="right">$99.99</td>
</tr>
</table>
<b> 9. </b>
Apply formatting to the cells, rows, and table, as discussed in the following sections, sothat it looks the way you want it to.
<b> 10. </b>
Optionally, add a table caption between an opening <caption> tag and a closing</caption> tag after the <table> tag. The caption appears above the table.
<table border="1" style="border-color:blue" >
<caption><b>Acme Virtual Industries: Service Codes and
Descriptions</b></caption>>
</div>
<span class='text_page_counter'>(122)</span><div class='page_container' data-page=122>
<b>10</b>
<b>9</b>
<b>8</b>
<b>7</b>
<b>6</b>
<b>5</b>
<b>4</b>
<b>3</b>
<b>2</b>
<b>Add Rows and Columns to a Table</b>
You can easily change the number of rows and columns in a table.
<b>•</b>
To add another row, position the insertion point at the appropriate place (before,between, or after existing rows), and type another pair of <tr> and </tr> tags. Within
these tags, type an opening <td> tag, the cell contents, and then the closing </td>tag
for each cell you want to create.
<b>•</b>
To add a column to a table, position the insertion point at the appropriate place(before, between, or after existing cells), and then type another pair of <td> and </td>
tags with any content for the cell between them.
By default, each table has a grid pattern of rows and columns so that each row
has the same number of cells. For example, if you create two cells in the first
row of a table, three cells in the second row, and one cell in the third row, as in
the following example, the table will have three columns:
<table border="1" style="border-color:blue">
<tr>
<td>Cell 1</td>
<td>Cell 2</td>
</tr>
<tr>
<td>Cell 1</td>
<td>Cell 2</td>
<td>Cell 3</td>
</tr>
<tr>
<td>Cell 1</td>
</tr>
</table>
To change the grid, you make cells span two or more columns or rows. See
“Make a Cell Span Two Columns or Rows,” later in this chapter, for details.
<b>Add Table Borders</b>
Each table has a border around its outside, and each cell has a border around
it. You can set the border color for the table as a whole, and then set a different
border color on particular rows or cells as necessary.
<b>TIP</b>
To provide more information than the caption can
accommodate, you can add the summaryattribute
to the table tag. For example, <table border="1"
summary="This table provides the codes, details, and
prices of services offered by Acme Virtual Industries." >.
</div>
<span class='text_page_counter'>(123)</span><div class='page_container' data-page=123>
<b>2</b>
<b>3</b>
<b>4</b>
<b>5</b>
<b>6</b>
<b>7</b>
<b>8</b>
<b>9</b>
<b>2</b>
<b>3</b>
<b>4</b>
<b>5</b>
<b>6</b>
<b>7</b>
<b>8</b>
<b>9</b>
<b>2</b>
<b>3</b>
<b>4</b>
<b>5</b>
<b>6</b>
<b>7</b>
<b>8</b>
<b>9</b>
<b>SET THE BORDER WIDTH</b>
To set the border width for the outside border of a table, add the border
attribute to the opening <table> tag, and specify the number of pixels for the
width of the border. For example, to create a border five pixels wide around the
table:
<table border="5px">
<b>SPECIFY THE BORDER COLOR VIA THE STYLE ATTRIBUTE</b>
Specifying a border width without a border color makes the browser display
the border in its default color, which is usually gray. The best way to set border
color is to use CSS, but you can also use the older, now deprecated method of
using the style attribute. For example, to create a black border:
<table border="5px" style="border-color:black">
<b>CONTROL WHICH OUTSIDE BORDERS OF THE TABLE ARE DISPLAYED</b>
To control which outside borders are displayed for a table, add the frame
attribute to the opening <table> tag, and specify one of the values explained in
Table 6-1.
For example, to display only the top and bottom borders of a table:
<table border="10px" frame="hsides" style="border-color:green">
To display only the outside border of a table:
<table border="10px" frame="box" style="border-color:green">
<b>CAUTION</b>
Useborder="0" inside the opening <table> tag if you
need to ensure that a table does not display a border—
for example, when you are using a table to implement a
precise layout in a web page. If you don’t specify a
zero-width border, some browsers may use an invisible
two-pixel border, which can spoil the layout of your pages.
<b>VALUE</b> <b>EFFECT</b>
box Displays the outside borders
(same as border)
border Displays the outside borders
(same as box)
void Hides all the outside borders
above Displays the top border
below Displays the bottom border
hsides Displays the top and bottom borders
lhs Displays the left border
rhs Displays the right border
vsides Displays both left and right borders
<i><b>Table 6-1:</b><b> Values for the</b><b>frame</b><b>Attribute</b></i>
</div>
<span class='text_page_counter'>(124)</span><div class='page_container' data-page=124>
<b>10</b>
<b>9</b>
<b>8</b>
<b>7</b>
<b>6</b>
<b>5</b>
<b>4</b>
<b>3</b>
<b>2</b>
<b>CONTROL WHICH INSIDE BORDERS ARE DISPLAYED</b>
To control which inside borders of a table are displayed, add the rules attribute
to the opening <table> tag, and specify one of the values explained in Table 6-2.
<i>Rules</i> are the lines or borders around the individual cells.
For example, to display only the horizontal borders within a table:
<table border="5px" frame="box" rules="rows" style="border-color:
blue">
To display all the inside borders of a table, but not the outside border:
<table border="0px" frame="void" rules="all" style="border-color:
black">
<b>Group Cells by Rows and Columns</b>
Theframe and rules attributes of the <table> tag enable you to create many
arrangements of borders in your tables. But if you need more flexibility, you
can use rules="groups" to put borders only on specific groups of rows and
columns.
<b>CREATE GROUPS OF ROWS</b>
To create groups of rows, you split your table into a section of header rows, a
body section, and a section of footer rows.
<b> 1. </b>
To create the header section, put an opening <thead> tag before the header rows andan ending </thead> tag after them.
<b>VALUE</b> <b>EFFECT</b>
all Displays rules around all cells
none Displays no rules
groups Displays rules around the horizontal or
vertical groups that are defined. See “Group
Cells by Rows and Columns” later in this
chapter for details
rows Displays all horizontal rules
cols Displays all vertical rules
<i><b>Table 6-2:</b><b> Values for the</b><b>rules</b><b>Attribute</b></i>
</div>
<span class='text_page_counter'>(125)</span><div class='page_container' data-page=125>
<b>2</b>
<b>3</b>
<b>4</b>
<b>5</b>
<b>6</b>
<b>7</b>
<b>8</b>
<b>9</b>
<b>2</b>
<b>3</b>
<b>4</b>
<b>5</b>
<b>6</b>
<b>7</b>
<b>8</b>
<b>9</b>
<b>2</b>
<b>3</b>
<b>4</b>
<b>5</b>
<b>6</b>
<b>7</b>
<b>8</b>
<b>9</b>
<b> 2. </b>
Within the header section, you can use either <th> and </th> tags to create a tableheader (which is boldface and centered) or <td> and </td> tags to create standard
table cells.
<b> 3. </b>
To create the footer section, put an opening <tfoot> tag before the footer rows and anending</tfoot> tag after them.
<b> 4. </b>
To create the body section, put an opening <tbody> tag before the body rows and anending</tbody> tag after them.
The next example shows a short table divided into header, body, and footer
sections:
<table rules="groups"
width="180"
border="4px"
style="border-color:blue">
<thead>
<tr>
<td>Member #</td>
<td align="right">First</td>
<td>Last</td>
</tr>
</thead>
<tfoot>
<tr>
<td align="right">Member</td>
<td>count:</td>
<td>2</td>
</tr>
</tfoot>
<tbody>
<tr>
<td>1007</td>
<td align="right">Jack</td>
<td>Hobbs</td>
</tr>
<tr>
<td>1008</td>
<td align="right">Katja</td>
<td>Reina</td>
</tr>
</tbody>
</table>
<b>CAUTION</b>
To make your web page correct, you must put the <tfoot>
section<i>before</i> the <tbody> section, not after it (as logic
and sense would suggest). The browser will display it
after the <tbody> section. One word of warning, though:
Not all browsers support the <tfoot> tag, so use it only if
you really need it, and test your pages with the browsers
you expect most visitors to use.
</div>
<span class='text_page_counter'>(126)</span><div class='page_container' data-page=126>
<b>10</b>
<b>9</b>
<b>8</b>
<b>7</b>
<b>6</b>
<b>5</b>
<b>4</b>
<b>3</b>
<b>2</b>
This HTML code produces the table shown here, with the rules="groups"
statement producing borders across the rows in the groups defined.
<b>CREATE GROUPS OF COLUMNS</b>
To create groups of columns, you split your table by using the <colgroup> tag
with the span attribute to specify which columns belong in each group. The
following example shows a short table divided into two column groups, each of
which contains two columns:
<table rules="groups"
width="240"
border="4px"
style="border-color:blue">
<colgroup span="2"></colgroup>
<colgroup span="2"></colgroup>
<tr>
<td>Employee</td>
<td>Item</td>
<td>Quantity</td>
<td>Total $</td>
</tr>
<tr>
<td>Johns</td>
<td>A384</td>
<td align="right">48</td>
<td align="right"> 480.00</td>
</tr>
<tr>
<td>Bills</td>
<td>C839</td>
<td align="right">11</td>
<td align="right">4492.00</td>
</tr>
<tr>
<td>Acinth</td>
<td>X420</td>
<td align="right">88</td>
<td align="right">6295.00</td>
</tr>
</table>
<b>CAUTION</b>
While you can still use the align attribute as shown in this
table in regular HTML, its use has been deprecated, and
it does not work in Strict XHTML. Use CSS instead to
control alignment.
</div>
<span class='text_page_counter'>(127)</span><div class='page_container' data-page=127>
<b>2</b>
<b>3</b>
<b>4</b>
<b>5</b>
<b>6</b>
<b>7</b>
<b>8</b>
<b>9</b>
<b>2</b>
<b>3</b>
<b>4</b>
<b>5</b>
<b>6</b>
<b>7</b>
<b>8</b>
<b>9</b>
<b>2</b>
<b>3</b>
<b>4</b>
<b>5</b>
<b>6</b>
<b>7</b>
<b>8</b>
<b>9</b>
This HTML code produces the table shown
here, with the rules="groups" statement
producing a vertical border between the
groups of columns and no border between
the columns that make up each group.
<b>Set Table and Cell Width</b>
If you don’t specify the width of a table or the width of the cells in the table,
browsers automatically fit the width of the cells to their contents (as in most of
the examples shown so far in this chapter). The result is economical on space,
but can produce crowded layouts, so it’s often better to specify the table width
or the width of particular cells within the table manually.
<b>SPECIFY TABLE WIDTH</b>
To specify the width of a table, add the width attribute to the opening <table>
tag, and specify either the number of pixels (without a designation for pixels) or
the percentage of the window width (with a percentage sign).
For example, to create a table 600 pixels wide:
<table width="600" border="1">
To create a table that is 90 percent of the width of the browser window and that
varies in width if the browser window’s width is changed:
<table width="90%" border="1">
<b>SPECIFY CELL WIDTH</b>
To specify the width of a cell, add the width attribute to the opening <td> tag,
and specify either the number of pixels (without a designation for pixels) or the
percentage of the window width (with a percentage sign).
The next example uses the width attribute of the <table> tag to set the width
of the entire table to 90 percent of the width of the browser window. It then
uses the width attribute of the <td> tags to set the width of the first cell to
200 pixels and the width of the second cell to 140 pixels. The width attribute is
<b>TIP</b>
You can also affect the size of the table by adding
padding and spacing to it. See “Add Padding and
Spacing,” later in this chapter, for more information.
<b>CAUTION</b>
You can use tables to fix the width of a page, but before
you do so, consider that some visitors to your site may be
using a screen resolution or window size that will prevent
them from seeing the entire page.
<b>CAUTION</b>
One method of preventing the text in a cell from wrapping
is to add the nowrap attribute to the <td> tag or the <th>
tag—for example, <td nowrap="nowrap">Don't wrap
this text!</td>. You should use nowrap with care for three
reasons: First, it doesn't work with all browsers (though it
does work with Internet Explorer and Firefox); second, it
may cause your tables to be too wide for narrow browser
windows; and third, CSS provides better alternatives.
<b>NOTE</b>
If the browser window isn’t wide enough to accommodate
the measurements specified, most browsers override
them so as to be able to display the table within the space
available. If the table becomes too squashed to display
usefully, the browser displays only part of it and adds a
horizontal scroll bar so that you can reach the rest.
</div>
<span class='text_page_counter'>(128)</span><div class='page_container' data-page=128>
<b>10</b>
<b>9</b>
<b>8</b>
<b>7</b>
<b>6</b>
<b>5</b>
<b>4</b>
<b>3</b>
<b>2</b>
not specified for the third <td> tag, so the browser sets the width of this cell
automatically to the remaining space (90 percent of the window width minus
the space allocated to the first and second cells).
<table width="90%" border="1" style="border-color:blue">
<tr>
<td width="200">This cell is 200 pixels wide.</td>
<td width="140">This cell is 140 pixels wide.</td>
<td>This cell's width is set automatically.</td>
</tr>
</table>
<b>Add Padding and Spacing</b>
Most of the example tables shown so far in this chapter have been tightly
packed. This is because they haven’t added any extra blank space between the
contents of each cell.
In HTML, you can add extra space between cells in two different ways.
<b>•</b>
You can use the cellpadding attribute to add padding between the walls of each celland the cell’s content. The default setting is 1 pixel. (You can also use a setting of 0 to
remove all cell padding.)
<b>•</b>
You can use the cellspacing attribute to change the width of the space between cells.Typically, you use cellspacing to increase the amount of space from its default setting,
which is 2 pixels; you can also reduce the amount of cell spacing to 1 pixel or 0 pixels
if you wish.
For example, to create a table that uses 10 pixels of cell spacing and 10 pixels of
cell padding:
<table border="1" cellspacing="10" cellpadding="10">
Figure 6-4 shows the effect of changing cell spacing and padding on a table.
<b>NOTE</b>
If you specify two width measurements for cells in the
same column, the browser uses the larger measurement.
UICK
<b>STEPS</b>
<b>SETTING TABLE AND CELL HEIGHT</b>
In addition to being able to set the width of a table or of
the cells that constitute it, you may be able to set the
height of the table or of its cells instead of letting the
browser set the height automatically to accommodate the
contents of the table or cells.
Most browsers (including Internet Explorer, Firefox,
and Safari) support setting the height of tables, but
table height is not a part of the HTML standard, so
you may find that some browsers do not support it. For
this reason, it is best not to set the height of a table
unless the design of a page absolutely requires a fixed
height. Cell height <i>is</i> a part of the HTML standard
and should work in all browsers, but setting it directly
instead of using Cascading Style Sheets (CSS) is not
recommended.
To set the height of a table, add the height attribute to
the opening <table> tag, and specify the number of
pixels. For example, to set the table height to 400 pixels:
<table width="300" height="400"
border="0">
To set the height of a cell, add the height attribute to the
opening<td> tag, and specify the number of pixels. For
example, to set the height to 100 pixels:
<td height="100">Tall cell</td>
You can also set the height of tables and cells by using
CSS, which are discussed in Chapter 8.
</div>
<span class='text_page_counter'>(129)</span><div class='page_container' data-page=129>
<b>2</b>
<b>3</b>
<b>4</b>
<b>5</b>
<b>6</b>
<b>7</b>
<b>8</b>
<b>9</b>
<b>2</b>
<b>3</b>
<b>4</b>
<b>5</b>
<b>6</b>
<b>7</b>
<b>8</b>
<b>9</b>
<b>2</b>
<b>3</b>
<b>4</b>
<b>5</b>
<b>6</b>
<b>7</b>
<b>8</b>
<b>9</b>
<b>Align a Table, Row, or Cell</b>
To achieve the placement you want, you can align a whole table, a whole row,
or the contents of individual cells.
<b>ALIGN A TABLE HORIZONTALLY</b>
You can align a table horizontally within a web page by adding the align
attribute to the opening <table> tag and specifying left,right, or center,
<i><b>Figure 6-4:</b><b> Cell spacing controls how far apart the cells are </b></i>
<i><b>from each other. Cell padding controls how much blank space </b></i>
<i><b>there is between the cell contents and the cell walls.</b></i>
<b>TIP</b>
Cell padding and cell spacing have visibly different
effects when used on a table with visible borders. When
used on a table with hidden borders, however, the
effects of cell padding and cell spacing can be hard to
distinguish from each other.
</div>
<span class='text_page_counter'>(130)</span><div class='page_container' data-page=130>
<b>10</b>
<b>9</b>
<b>8</b>
<b>7</b>
<b>6</b>
<b>5</b>
<b>4</b>
<b>3</b>
<b>2</b>
as needed. For example, to center a table on the web page that contains it
(see Figure 6-5):
<table align="center" border="2" cellspacing="5">
<b>ALIGN A ROW HORIZONTALLY</b>
You can align the contents of a row within their cells by adding the align
attribute to the opening <tr> tag and specifying left,right,center, or justify, as
needed. For example, to apply justified alignment (where both the left and right
edges of text are aligned) to a row:
<tr align="justify">
<b>ALIGN A CELL’S CONTENTS HORIZONTALLY</b>
You can align a cell’s contents horizontally by adding the align attribute to
the opening <td> tag and specifying left,right,center, or justify, as needed.
<i><b>Figure 6-5:</b><b> Instead of using the default left alignment, you can align a table horizontally on the page that contains it.</b></i>
<b>NOTE</b>
Horizontal alignment applied to a cell overrides horizontal
alignment applied to the row that contains the cell.
</div>
<span class='text_page_counter'>(131)</span><div class='page_container' data-page=131>
<b>2</b>
<b>3</b>
<b>4</b>
<b>5</b>
<b>6</b>
<b>7</b>
<b>8</b>
<b>9</b>
<b>2</b>
<b>3</b>
<b>4</b>
<b>5</b>
<b>6</b>
<b>7</b>
<b>8</b>
<b>9</b>
<b>2</b>
<b>3</b>
<b>4</b>
<b>5</b>
<b>6</b>
<b>7</b>
<b>8</b>
<b>9</b>
For example, the following code uses centered alignment in the third column
and right alignment in the first and fifth columns:
<table border="2" cellpadding="4" cellspacing="3"
style="border-color:blue" summary="This table provides the codes, details, and
prices of services offered by Acme Virtual Industries." >
<caption><b>Acme Virtual Industries: Service Codes and
Descriptions</b></caption>
<tr>
<th>Service Code</th>
<th>Service Description</th>
<th>Service Type</th>
<th>Service Details</th>
<th>Service Cost</th>
</tr>
<tr>
<td align="right">AV101</td>
<td>Virtual Phone</td>
<td align="center">Telecoms</td>
<td>1 day</td>
<td align="right">$34.99</td>
</tr>
<tr>
<td align="right">AV102</td>
<td>Virtual Assistant</td>
<td align="center">Staffing</td>
<td>1 day</td>
<td align="right">$49.99</td>
</tr>
<tr>
<td align="right">AV103</td>
<td>Virtual Manager</td>
<td align="center">Staffing</td>
<td>1 day</td>
<td align="right">$199.99</td>
</tr>
<tr>
<td align="right">AC104</td>
<td>Mailshot (one-off)</td>
<td align="center">Mailings</td>
<td>50 pieces</td>
<td align="right">$99.99</td>
</tr>
</table>
</div>
<span class='text_page_counter'>(132)</span><div class='page_container' data-page=132>
<b>10</b>
<b>9</b>
<b>8</b>
<b>7</b>
<b>6</b>
<b>5</b>
<b>4</b>
<b>3</b>
<b>2</b>
<b>ALIGN A ROW VERTICALLY</b>
You can align a row’s contents by adding the valign attribute to the opening
<tr> tag and specifying top,middle,bottom, or baseline, as needed. For
example, to apply top alignment to a row:
<tr align="top">
<b>ALIGN A CELL’S CONTENTS VERTICALLY</b>
Instead of applying the same vertical alignment to an entire row, you may need
to apply different vertical alignment to the individual cells in a row. To do so,
add the valign attribute to the opening <td> tag, and specify top,middle,
bottom, or baseline, as needed.
The following example produces the table shown in Figure 6-6:
<?xml version="1.0" encoding="utf-8"?>
<!DOCTYPE html PUBLIC "-//W3C//DTD XHTML 1.0 Transitional//EN"
" /><html xmlns=" xml:lang="en" lang="en">
<head>
<meta http-equiv="content-type" content="text/html;
charset=utf-8" />
<title>Baseline alignment</title>
</head>
<body>
<h2>Table Showing Vertical Alignment</h2>
<table border="6" style="border-color:purple" cellspacing="2"
cellpadding="2">
<tr>
<td height="100" valign="top">Top alignment.</td>
<td valign="middle">Middle alignment</td>
<td valign="bottom">Bottom alignment</td>
</tr>
<tr>
<td height="75" valign="bottom">Bottom alignment</td>
<td valign="baseline"><font size="+3">Baseline alignment</
font></td>
<td valign="baseline">Baseline alignment</td>
</tr>
</table>
</body>
</html>
<b>NOTE</b>
Thebaseline value aligns the contents of the cells along
the baseline, the imaginary line on which the bottom of a
letter that does not have a descender rests.
<b>NOTE</b>
Vertical alignment applied to a cell overrides vertical
alignment applied to the row that contains the cell.
<i><b>Figure 6-6:</b><b> Use vertical alignment to control the vertical </b></i>
<i><b>placement of text in a cell. Note how the two “Baseline </b></i>
<i><b>alignment” examples are aligned on the baseline of the </b></i>
<i><b>letters rather than on the bottom of the descender on the </b></i>
<i><b>letter g.</b></i>
</div>
<span class='text_page_counter'>(133)</span><div class='page_container' data-page=133>
<b>2</b>
<b>3</b>
<b>4</b>
<b>5</b>
<b>6</b>
<b>7</b>
<b>8</b>
<b>9</b>
<b>2</b>
<b>3</b>
<b>4</b>
<b>5</b>
<b>6</b>
<b>7</b>
<b>8</b>
<b>9</b>
<b>2</b>
<b>3</b>
<b>4</b>
<b>5</b>
<b>6</b>
<b>7</b>
<b>8</b>
<b>9</b>
<b>Make a Cell Span Two Columns or Rows</b>
Tables that use a regular grid are useful for presenting data in a tabular format,
but to lay out a page with tables, you’ll often need to remove some of the
borders between rows and columns. To do so, you make a cell <i>span</i> two or more
rows or columns—in other words, you merge the cells in two or more rows, or
in two or more columns, into a single larger cell.
<b>MAKE A CELL SPAN TWO COLUMNS</b>
To make a cell span two or more columns, add the colspan attribute to the
opening<td> tag of the cell in the leftmost of the columns involved, and specify
the number of columns to span. If there are cells in the columns that will be
spanned, delete them (if you don’t, they will create extra columns in the table).
For example, to make a cell span three columns:
<table border="1" style="border-color:purple" cellspacing="2"
cellpadding="4">
<tr>
<td colspan="3">This cell spans all three columns.</td>
</tr>
<tr>
<td>Column 1</td>
<td>Column 2</td>
<td>Column 3</td>
</tr>
</table>
<b>MAKE A CELL SPAN TWO ROWS</b>
To make a cell span two or more rows, add the rowspan attribute to the
opening<td> tag of the cell in the topmost of the rows involved, and specify
the number of rows to span. If there are cells in the rows that will be spanned,
delete them.
<b>TIP</b>
When building a nested table, start by creating the table
you’ll nest as a separate table. When you’ve laid it out
correctly and ensured that its size is right, cut it from its
current position and paste it into the cell that will contain
it. This approach is usually much easier than creating the
nested table in its nested position.
</div>
<span class='text_page_counter'>(134)</span><div class='page_container' data-page=134>
<b>10</b>
<b>9</b>
<b>8</b>
<b>7</b>
<b>6</b>
<b>5</b>
<b>4</b>
<b>3</b>
<b>2</b>
For example, to produce the cell containing the larger image
in Figure 6-7 (shown with borders displayed), spanning two
columns and two rows:
<td colspan="2" rowspan="2">
<img src="images/logo_03.jpg" width="420"
align="center">
</td>
<b>Apply a Background </b>
<b>Color or Picture</b>
To make a table more colorful or distinctive, you can apply a
background color or a background picture.
<b>APPLY A BACKGROUND COLOR </b>
<b>TO A TABLE, ROW, OR CELL</b>
To apply a background color to a table, add the bgcolor
attribute to the opening <table> tag, and specify the color
either by name or by hexadecimal code. For example, to
apply yellow as the background color:
<table bgcolor="yellow">
To apply a background color to all cells in a row, add the
bgcolor attribute to the opening <tr> tag. For example:
<tr bgcolor="black">
To apply a background color to an individual cell, add the
bgcolor attribute to the opening <td> tag. For example:
<td bgcolor="blue">
<b>Create a Nested Table</b>
Spanning columns, spanning rows, or spanning both
columns and rows gives you decent flexibility in laying out
your tables; however, if you must create a truly intricate table
design, you may need to nest one table within another.
<i><b>Figure 6-7:</b><b> You can span columns, rows, or both to create </b></i>
<i><b>larger cells in order to produce the layout effects your </b></i>
<i><b>web pages require.</b></i>
<i><b><td colspan="2" rowspan="2"></b></i>
<i><b><td colspan="3"></b></i>
</div>
<span class='text_page_counter'>(135)</span><div class='page_container' data-page=135>
<b>2</b>
<b>3</b>
<b>4</b>
<b>5</b>
<b>6</b>
<b>7</b>
<b>8</b>
<b>9</b>
<b>2</b>
<b>3</b>
<b>4</b>
<b>5</b>
<b>6</b>
<b>7</b>
<b>8</b>
<b>9</b>
<b>2</b>
<b>3</b>
<b>4</b>
<b>5</b>
<b>6</b>
<b>7</b>
<b>8</b>
<b>9</b>
To nest a table, enter the complete structure of the nested table within the <td>
and</td> tags for the cell in which you want the nested table to appear. The
next example creates the simple nested table shown here.
<?xml version="1.0" encoding="utf-8"?>
<!DOCTYPE html PUBLIC "-//W3C//DTD XHTML 1.0 Transitional//EN"
" /><html xmlns=" xml:lang="en" lang="en">
<head>
<meta http-equiv="content-type" content="text/html;
charset=utf-8" />
<title>Demo of Nesting a Table in a Cell</title>
</head>
<body>
<h1>Example Table Within a Table</h1>
<table border="1">
<tr>
<td>Column 1</td>
<td>Column 2</td>
<td>Column 3</td>
</tr>
<tr>
<td>Column 1</td>
<td>
<table border="1">
<tr>
<td>Table</td>
<td>nested</td>
</tr>
<tr>
<td>in a</td>
<td>cell</td>
</tr>
</table>
</td>
<td>Column 3</td>
</tr>
</table>
</body>
</html>
<b>TIP</b>
When using a background picture, keep the file size as
small as possible so that the page will transfer quickly
across even a dial-up Internet connection.
<b>NOTE</b>
Using the bgcolor attribute to apply a background color to
a table or table element is deprecated, but this technique
is still in widespread use. The approved, modern method
of applying a background color is to use CSS.
<b>NOTE</b>
Background color applied to a cell overrides any
background color applied to a row, which in turn overrides
any background color applied to the table as a whole.
</div>
<span class='text_page_counter'>(136)</span><div class='page_container' data-page=136>
<b>10</b>
<b>9</b>
<b>8</b>
<b>7</b>
<b>6</b>
<b>5</b>
<b>4</b>
<b>3</b>
<b>2</b>
<b>Create a Vertical Line</b>
The<hr> tag (discussed in Chapter 4) lets you easily insert a horizontal line
in a web page. To insert a vertical line, create a two-column table and specify
frame="void" and rules="cols", as shown in this example:
<table width="500" border="3"
style="border-color:black"
frame="void" rules="cols"
cellspacing="0"
cellpadding="10">
<tr>
<th valign="top" align="left">
Business Terminology</th>
<th valign="top" align="left">
Plain English</th>
</tr>
<tr>
<td><i>top-of-the-mind, back-of-the-envelope</i></td>
<td>seat-of-the-pants</td>
</tr>
<tr>
<td><i>leverage the paradigm</i></td>
<td>[untranslatable: this is gibberish]</td>
</tr>
<tr>
<td><i>target profile psychodemographics</i></td>
<td>our customers</td>
</tr>
</table>
<b>TIP</b>
You can see that creating HTML tables can be laborious,
especially when you nest tables within tables—but
you retain total control of what you’re creating. Many
programs, including Microsoft Web Expression and
Macromedia Dreamweaver, allow you to create web
tables directly in a What You See Is What You Get
(WYSIWYG) environment, which is much easier.
</div>
<span class='text_page_counter'>(137)</span><div class='page_container' data-page=137></div>
<span class='text_page_counter'>(138)</span><div class='page_container' data-page=138>
<b>10</b>
<b>9</b>
<b>8</b>
<b>7</b>
<b>6</b>
<b>5</b>
<b>4</b>
<b>3</b>
<b>2</b>
<b>How to…</b>
<i><b> Understanding Frames and </b></i>
<i><b>Their Alternatives</b></i>
<i><b>• Plan a Web Page That Uses </b></i>
<i><b>Frames</b></i>
<i><b>• Define Frame Height and Width</b></i>
<i><b>• Create </b><b>the </b><b>Component </b></i>
<i><b>Documents</b></i>
<i><b>• Create the Frameset Document</b></i>
<i><b>• Lay Out the Frames</b></i>
<i><b>• Add the Component Documents </b></i>
<i><b>to the Frameset</b></i>
<i><b> Adding Alternative Text for </b></i>
<i><b>a Frames Page</b></i>
<i><b>• Change a Frame’s Borders and </b></i>
<i><b>Margins</b></i>
<i><b>• Control Whether a Frame Scrolls</b></i>
<i><b>• Prevent Visitors from Resizing </b></i>
<i><b>the Frame</b></i>
<i><b>• Nest One Frameset Inside </b></i>
<i><b>Another</b></i>
<i><b>• Create </b><b>Inline </b><b>Frames</b></i>
<i><b>• Create a Link That Changes the </b></i>
<i><b>Contents of a Frame</b></i>
Chapter 7
<b>Creating Frames</b>
Frames are one of HTML’s ways of dividing the browser
window into two or more separate rectangular areas whose
contents you can supply separately. For example, you might
create a frame in the left third of the window that contains
navigation links, while the right two-thirds of the window
display the content associated with the navigation link that the
viewer clicks. By setting up the right frame’s content to scroll
independently of the left frame, you could enable the viewer
to keep the links available on the screen all the time, even
while scrolling down to the depths of the right frame.
Frames can make a powerful addition to your web tools,
but they’re not suitable for every page—or indeed for every
browser. In this chapter, you’ll learn when to use frames
(and when to avoid using them), how frames work, and how
to create and use them in your web pages.
</div>
<span class='text_page_counter'>(139)</span><div class='page_container' data-page=139>
<b>2</b>
<b>3</b>
<b>4</b>
<b>5</b>
<b>6</b>
<b>7</b>
<b>8</b>
<b>9</b>
<b>2</b>
<b>3</b>
<b>4</b>
<b>5</b>
<b>6</b>
<b>7</b>
<b>8</b>
<b>9</b>
<b>2</b>
<b>3</b>
<b>4</b>
<b>5</b>
<b>6</b>
<b>7</b>
<b>8</b>
<b>9</b>
<b>Understand How Frames Work</b>
In the web pages shown so far in this book, the browser window contains
a single rectangular frame, or area, that displays a single document. Frames
enable you to divide the browser window to display different content in
different areas of the browser window (see Figure 7-1), each of which displays
a different document. Each frame can be either fixed in place or able to scroll
independently of the other frames. Together, the frames used in a web page
make up a <i>frameset,</i> a set of frames that are laid out so that they fit together.
Web page consisting
of three frames
Normal web page, consisting
of a single frame
QUICK
<b>FACTS</b>
<b>UNDERSTANDING FRAMES AND </b>
<b>THEIR ALTERNATIVES</b>
As of this writing (Summer 2009), frames are still in
widespread use in web pages, so if you maintain or
update existing pages, you’ll need to know how frames
work and how to create them. Overall, though, frames
seem to be on their way out, so you may need to create
new frame documents only seldom.
Frames are especially useful when you need to keep a
particular element on a web page visible while the rest
of the web page scrolls. For example, you can keep
a navigation bar fixed to the left side of the web page
so that it’s always available even after the visitor has
scrolled way down on the text part of the page. You can
also use an inline frame to keep most of a page fixed, but
display one element in a scrolling container.
Instead of using frames to create separate areas of web
pages, you can use floating layouts in CSS, as discussed
in the next chapter.
Some devices that have smaller screens, such as mobile
phones and other handheld devices, may not be able to
display frames. To cover these cases, you can provide
alternative text to be displayed in any browser that
cannot handle the frames. See the QuickFacts “Adding
Alternative Text for a Frames Page,” later in this chapter,
for details.
Frames also have several other things going against
them.
<b>•</b>
In general, search engines have a hard timeranking frameset pages and typically give them
lower page rankings overall. This can make a
website appear less popular than it is.
<b>•</b>
Framed pages may not print correctly.<i><b>Figure 7-1:</b><b> You can use frames within the browser </b></i>
<i><b>window instead of displaying a single area.</b></i>
<i>Continued . . .</i>
</div>
<span class='text_page_counter'>(140)</span><div class='page_container' data-page=140>
<b>10</b>
<b>9</b>
<b>8</b>
<b>7</b>
<b>6</b>
<b>5</b>
<b>4</b>
<b>3</b>
<b>2</b>
<b>Plan a Web Page That Uses Frames</b>
A web page that uses frames consists of:
<b>•</b>
A<i>frameset document that specifies the frames involved in the frameset, how the </i>frames are laid out and how they behave, and which document to display in each
frame
<b>•</b>
An HTML document for each frame in the web pageBegin the process of creating a web page that uses frames by planning how you
will lay the page out.
<b>•</b>
Decide how many frames you will use (for example, two frames, three, or more).<b>•</b>
Decide how to position the frames relative to each other. For example, a two-framelayout might have a shallow row at the top of the window with a deeper row below it,
or a narrow column at the left side of the window and a wider column occupying the
remaining space. A three-frame layout might have a shallow row at the top, a narrow
column at one side, and a larger rectangle occupying the remaining space (look back
to Figure 7-1 for an example).
<b>•</b>
Make a rough diagram, either on your computer (for example, in a graphicsapplication, such as Paint or GIMP, or a word processor, such as Word) or on paper,
of your chosen layout. Include the dimensions that you will use for the frames (see the
following discussion).
<b>Define Frame Height and Width</b>
You can define the height of a row and the width of a column. For either height
or width, you can use either an <i>absolute</i> (fixed) dimension or a <i>relative</i> (variable)
dimension. You can specify a dimension in three ways.
<b>•</b>
Use an exact number of pixels—for example, create a column 200 pixels wide or a row100 pixels high.
<b>•</b>
Use a percentage of the width or height of the browser window.<b>•</b>
Use wildcards to allocate any remaining space left after you’ve specified an exactwidth or height.
QUICK
<b>FACTS</b>
<b>UNDERSTANDING FRAMES AND </b>
<b>THEIR ALTERNATIVES </b>
<i>(Continued)</i><b>•</b>
Framed pages may confuse visitors, especially ifthey attempt to load part of another site within the
frame rather than displaying it in a separate tab or
window.
<b>•</b>
Visitors may not be able to bookmark framedpages correctly.
All that being said, frames are still both used and
useful—but it’s best to approach them with your eyes
wide open.
<b>NOTE</b>
The frameset document isn’t displayed in the browser.
It simply tells the browser which pages to display and
how to lay them out. The title of the frameset document,
however, is displayed in the browser’s title bar, as usual.
</div>
<span class='text_page_counter'>(141)</span><div class='page_container' data-page=141>
<b>2</b>
<b>3</b>
<b>4</b>
<b>5</b>
<b>6</b>
<b>7</b>
<b>8</b>
<b>9</b>
<b>2</b>
<b>3</b>
<b>4</b>
<b>5</b>
<b>6</b>
<b>7</b>
<b>8</b>
<b>9</b>
<b>2</b>
<b>3</b>
<b>4</b>
<b>5</b>
<b>6</b>
<b>7</b>
<b>8</b>
<b>9</b>
<b>USE RELATIVE DIMENSIONS FOR MOST PAGES</b>
For most pages, your best choice is to use relative dimensions for your frames
by specifying the percentage of space you want to devote to each row or
column. For example, to create a two-column layout, you might allocate
25 percent of the space to the first column and the remaining 75 percent to the
second column. If a visitor resizes the browser window, the columns resize so
that they retain their proportions.
<b>ALLOCATE EXACT HEIGHT OR WIDTH TO ONE FRAME </b>
<b>AND SHARE THE REMAINING SPACE</b>
For some pages, you may want to allocate an exact amount of space to a
particular frame and tell the browser to share the rest of the available space
among the other frames. This technique is useful when you have content that
requires a certain amount of space and will suffer from being resized. For
example, if you put an image in a frame on the left of a page, set that frame’s
width. The other frames then get the remaining space and can be resized as
necessary.
To allocate exact height or width, specify the relevant dimension in pixels, and
then use the * wildcard to allocate the remaining space. Use the * wildcard on its
own to mean “one share of the remaining amount,” use 2* to mean two shares,
3* for three shares, and so on.
The following example makes the first column in the frameset 200 pixels wide
and then allocates all the remaining space to the second column:
<frameset cols="200,*">
The next example makes the first row 150 pixels high and then allocates
three-quarters of the remaining space to the second row and one-quarter to the third
row:
<frameset rows="150,3*,*">
Figure 7-2 shows three examples using pixel measurements, percentages, and
wildcards, respectively, to specify the width of columns.
<b>CAUTION</b>
Unless you know that all visitors to your web pages
will be using a particular screen resolution (as might
happen on a corporate intranet), avoid specifying exact
dimensions for all the frames in a page. The danger is
that visitors using different screen resolutions may have
a hard time viewing your pages.
200
(pixels)
25%
(of the
available
space)
200
(pixels)
*
(1 share of
the remaining
space)
2*
(2 shares of the
remaining space)
25%
(of the
available
space)
50%
(of the
available space)
200
(pixels)
Columns Using Fixed Widths in Pixels
Columns Using Variable Widths in Percentages
Columns Using Fixed Widths in Wildcards
400
(pixels)
<i><b>Figure 7-2:</b><b> Using percentages (as in the middle </b></i>
<i><b>example) or wildcards (as in the bottom example) </b></i>
<i><b>gives greater flexibility to your frames than using </b></i>
<i><b>absolute pixel dimensions (as in the top example).</b></i>
</div>
<span class='text_page_counter'>(142)</span><div class='page_container' data-page=142>
<b>10</b>
<b>9</b>
<b>8</b>
<b>7</b>
<b>6</b>
<b>5</b>
<b>4</b>
<b>3</b>
<b>2</b>
<b>Create the Component Documents</b>
Create the component documents of the web page by using the techniques
described in the other chapters of this book. Keep the following points in mind:
<b>•</b>
Each component document should be a complete HTML page, starting with aDOCTYPE declaration and <html> tag, ending with an </html> tag, and containing a
header section (within <head> and </head> tags) and a body section (within <body>
and</body>tags).
<b>•</b>
Design each component page to occupy the appropriate amount of space. Forexample, a column that will occupy only a narrow column in the window should not
contain any wide elements. Similarly, a row with a small height should not contain any
tall elements.
<b>•</b>
If the frame is resizable, specify the size of any graphic as a percentage of theavailable space rather than using a fixed pixel size that may cause part of the graphic
to be obscured when the size of the browser window changes.
<b>•</b>
Although the titles of the component documents will not be displayed, you may wantto add the <title> information anyway for the benefit of any search engines that visit
your site.
<b>Create the Frameset Document</b>
To create a frameset document:
<b> 1. </b>
Open Notepad (or your HTML editor), and start a new web page using the XHTML 1.0Frameset DOCTYPE:
<?xml version="1.0" encoding="utf-8"?>
<!DOCTYPE html PUBLIC "-//W3C//DTD XHTML 1.0 Frameset//EN"
" /><html xmlns=" xml:lang="en"
lang="en">
<head>
<title></title>
</head>
</html>
<b> 2. </b>
Position the insertion point between the opening <title> tag and the closing </title> tag,and then type the text you want to use as the title for the web page.
</div>
<span class='text_page_counter'>(143)</span><div class='page_container' data-page=143>
<b>2</b>
<b>3</b>
<b>4</b>
<b>5</b>
<b>6</b>
<b>7</b>
<b>8</b>
<b>9</b>
<b>2</b>
<b>3</b>
<b>4</b>
<b>5</b>
<b>6</b>
<b>7</b>
<b>8</b>
<b>9</b>
<b>2</b>
<b>3</b>
<b>4</b>
<b>5</b>
<b>6</b>
<b>7</b>
<b>8</b>
<b>9</b>
<b> 3. </b>
Instead of the opening <body> tag and closing </body> tag you would use for astandard web page, type an opening <frameset> tag right after the closing </head> tag
and a closing </frameset> tag before the closing </html> tag:
<?xml version="1.0" encoding="utf-8"?>
<!DOCTYPE html PUBLIC "-//W3C//DTD XHTML 1.0 Frameset//EN"
" /><html xmlns=" xml:lang="en"
lang="en">
<head>
<title></title>
</head>
<frameset>
</frameset>
</html>
<b> 4. </b>
Position the insertion point before the closing angle bracket of the opening <frameset>tag, and then type the details of the frameset. (See the next section for instructions on
specifying the frameset.)
<b> 5. </b>
Position the insertion point between the <frameset> and </frameset> tags, and typea<frame/> tag for each frame in the frameset, including the appropriate attributes for
each frame. See the next section for instructions on specifying the frames.
<b>Lay Out the Frames</b>
You can create frame layouts that use rows, columns, or both.
<b>CREATE FRAMES USING ROWS</b>
To create frames using rows:
<b> 1. </b>
Create the skeleton of the frameset document as described in the previous section.<b> 2. </b>
Position the insertion point before the closing angle bracket of the <frameset> tag.<b> 3. </b>
Type the rows attribute; an equal sign; double quotation marks; the height of each row,separated by commas; and another set of double quotation marks.
For example, to create two frames, the first with a height of 200 pixels and the
second occupying the remainder of the height of the browser window:
<frameset rows="200,*">
</div>
<span class='text_page_counter'>(144)</span><div class='page_container' data-page=144>
<b>10</b>
<b>9</b>
<b>8</b>
<b>7</b>
<b>6</b>
<b>5</b>
<b>4</b>
<b>3</b>
<b>2</b>
To create two frames, the first occupying one-quarter
of the height of the browser window and the second
occupying the remaining three-quarters:
<frameset rows="25%,75%">
To create three frames, the first with a height of 130
pixels, the third with a height of 100 pixels, and the
second occupying the remainder of the height of the
browser window (shown in Figure 7-3 with documents
in the frames):
<frameset rows="130,*,100">
<b>CREATE FRAMES USING COLUMNS</b>
To create frames using columns:
<b>1. </b>
Create the skeleton of the frameset document as describedin “Create the Frameset Document,” earlier in this chapter.
<b>2. </b>
Position the insertion point before the closing angle bracketof the <frameset> tag.
<b>3. </b>
Type the cols attribute; an equal sign; double quotationmarks; the width of each column, separated by commas; and
another set of double quotation marks.
For example, to create two frames, the first with a width
of 175 pixels and the second occupying the remainder of
the width of the browser window:
<frameset cols="175,*">
To create two frames, the first occupying approximately one-third of the width
of the browser window and the second occupying the remaining two-thirds:
<frameset cols="33%,67%">
To create three frames, the first and third with a width of 125 pixels each and the
second occupying the remainder of the width of the browser window (shown in
Figure 7-4 with easy-to-identify documents in the frames):
<frameset cols="125,*,125">
<i><b>Figure 7-3:</b><b> In a multirow frame layout, the component documents are arranged from </b></i>
<i><b>top to bottom.</b></i>
</div>
<span class='text_page_counter'>(145)</span><div class='page_container' data-page=145>
<b>2</b>
<b>3</b>
<b>4</b>
<b>5</b>
<b>6</b>
<b>7</b>
<b>8</b>
<b>9</b>
<b>2</b>
<b>3</b>
<b>4</b>
<b>5</b>
<b>6</b>
<b>7</b>
<b>8</b>
<b>9</b>
<b>2</b>
<b>3</b>
<b>4</b>
<b>5</b>
<b>6</b>
<b>7</b>
<b>8</b>
<b>9</b>
<b>CREATE FRAMES USING BOTH ROWS AND COLUMNS</b>
To create frames using both rows and columns, thus
producing four (2 × 2), six (3 × 2 or 2 × 3), eight (4 × 2 or
2 × 4), nine (3 × 3), or more frames:
<b> 1. </b>
Create the skeleton of the frameset document asdescribed in “Create the Frameset Document,” earlier
in this chapter.
<b> 2. </b>
Position the insertion point before the closing angle bracketof the <frameset> tag.
<b> 3. </b>
Type the rows attribute; an equal sign; double quotationmarks: the height of each row, separated by commas; and
another double quotation mark.
<b> 4. </b>
Type a space; the cols attribute; an equal sign; doublequotation marks; the width of each column, separated by
commas; and another set of double quotation marks.
For example, to create six frames in the arrangement
shown in Figure 7-5:
<frameset rows="200,*" cols="150,*,150">
<b>Add the Component Documents </b>
<b>to the Frameset</b>
To add the component documents to the frameset:
<b> 1. </b>
Position the insertion point after the end of the <frameset>tag, and press <b>ENTER</b> to start a new line. Type the beginning
of the opening <frame/> tag for the first frame:
<frame
<b> 2. </b>
Type a space, the name attribute, an equal sign, openingdouble quotation marks, the name for the frame, and closing
double quotation marks. For example:
<frame name="page1"
<i><b>Figure 7-4:</b><b> In a multicolumn frame layout, the component documents are arranged </b></i>
<i><b>from left to right.</b></i>
<i><b>Figure 7-5:</b><b> In a frame layout that uses multiple columns and multiple rows, the </b></i>
<i><b>component documents are arranged from left to right and from top to bottom.</b></i>
</div>
<span class='text_page_counter'>(146)</span><div class='page_container' data-page=146>
<b>10</b>
<b>9</b>
<b>8</b>
<b>7</b>
<b>6</b>
<b>5</b>
<b>4</b>
<b>3</b>
<b>2</b>
<b> 3. </b>
Type a space, the src attribute, an equal sign, opening double quotation marks, thepath (if necessary) and name of the web page to display in the frame, and closing
double quotation marks. For example, to display the web page named page_1.html:
<frame name="page1" src="page_1.html"
<b> 4. </b>
Type the slash and closing angle bracket to complete the <frame/> tag:<frame name="page1" src="page_1.html"/>
<b> 5. </b>
Press<b>ENTER</b> to start a new line, and then repeat steps 1 through 4 for each of theremaining frames.
<b>Change a Frame’s Borders and Margins</b>
To make frames appear exactly as you want them, you can control whether they
display borders and the width of their margins.
<b>CHANGE A FRAME’S BORDERS</b>
By default, a browser displays a border on each frame you create, as in Figure 7-5.
Borders are convenient for when you want users to be aware that a web page
consists of different frames—for example, when you use a frame to implement
a navigation area that remains static while the contents of the other parts of the
web page can move.
To remove borders from a frame, add the frameborder attribute to the
appropriate <frame/> tag, and set its value to 0. For example:
<frame name="mission" src="mission.html" frameborder="0"/>
Figure 7-6 shows the sample page with all its frame borders hidden.
To ensure that borders are displayed on a frame, add the frameborder
attribute to the appropriate <frame/> tag, and set its value to 1; however,
because this is the default setting, there is no benefit to adding this to your
code unless you want to make the code completely clear to anyone who needs
to review or edit it.
UICK
<b>STEPS</b>
<b>ADDING ALTERNATIVE TEXT TO </b>
<b>A FRAME PAGE</b>
Any visitor using a browser that does not support
frames won’t be able to see the content of any page that
contains a frameset. To let these visitors know what the
problem is, or to provide them with an alternative way of
accessing the content, you should add alternative text to
each frameset document.
To add alternative text, you place it between an
opening<noframes> tag and a closing </noframes>
tag between the <frameset> and </frameset> tags in
a frameset document. You put the <noframes> tags
and content in a <body> element, as it is essentially a
replacement body for the web page. The alternative text
appears as a regular web page, so any browser should
be able to display it correctly.
<frameset rows="275,*" cols="225,*">
<frame name="logo" src="avs_logo.html"/>
<frame name="intro" src="intro.html"/>
<frame name="services" src="services
.html"/>
<frame name="details" src="details1
.html"/>
<noframes>
<body>
<h1>Acme Virtual Services - Your
One-Stop Shop for Temporary
Office Solutions</h1>
<p>This page uses frames, which
either are not supported by
your browser or are turned
off in it.</p>
<p>Click <a href="no_fr_home.html">
here</a> to see a version of this
page that does not use frames.</p>
</body>
</noframes>
</frameset>
</div>
<span class='text_page_counter'>(147)</span><div class='page_container' data-page=147>
<b>2</b>
<b>3</b>
<b>4</b>
<b>5</b>
<b>6</b>
<b>7</b>
<b>8</b>
<b>9</b>
<b>2</b>
<b>3</b>
<b>4</b>
<b>5</b>
<b>6</b>
<b>7</b>
<b>8</b>
<b>9</b>
<b>2</b>
<b>3</b>
<b>4</b>
<b>5</b>
<b>6</b>
<b>7</b>
<b>8</b>
<b>9</b>
<b>NOTE</b>
Thename attribute enables you to link other web
pages directly to the frame rather than to the frameset
document that contains it. If you will not need to link
directly to the frame, you can omit the name attribute.
<i><b>Figure 7-6:</b><b> Hiding frame borders makes the layout of a frameset page less obvious. </b></i>
</div>
<span class='text_page_counter'>(148)</span><div class='page_container' data-page=148>
<b>10</b>
<b>9</b>
<b>8</b>
<b>7</b>
<b>6</b>
<b>5</b>
<b>4</b>
<b>3</b>
<b>2</b>
<b>CHANGE A FRAME’S MARGINS</b>
To control the amount of space between a frame’s contents and its margins, add
themarginheight attribute and the marginwidth attribute to the <frame/> tag,
and specify a value in pixels for each attribute. For example:
<b>•</b>
To set a margin of 10 pixels at the left and right sides of the frame:marginwidth="10"
<b>•</b>
To set a margin of 15 pixels at the top and bottom of the frame:marginheight="15"
The following is a complete tag using marginheight and marginwidth:
<frame name="mission" src="mission.html" frameborder="0"
marginheight="10" marginwidth="10"/>
<b>Control Whether a Frame Scrolls</b>
By default, each frame displays scroll bars if its contents are too large to fit in
the frame at its current size; if, however, the contents will fit in the frame, the
scroll bars are not displayed.
To control the scroll bars, add the scrolling attribute to the appropriate
<frame/> tag, and specify yes (to make the scroll bars always appear), no (to
prevent the scroll bars from appearing), or auto (to apply automatic scrolling
behavior). Given that there is little point in displaying scroll bars when they are
not needed, you’ll usually want to include the scrolling attribute only with a
value of no; otherwise, the default setting (auto) is preferable.
<b>Prevent Visitors from Resizing the Frame</b>
By default, visitors can resize the frames on your web pages by moving the
mouse pointer over the frame border. In most cases, leaving frames resizable
is a good idea because it enables visitors to adjust any frames whose contents
don’t fit in the frame because of the settings on the visitors’ web browsers. For
precise layouts, however, you may want to prevent visitors from resizing one
or more frames. To do so, add the noresize attribute to the <frame/> tag with
either the value "noresize"or the value "true" (either works)—for example:
<frame name="logo" src="logo.html" noresize="noresize"/>
<b>NOTE</b>
The alternative text does not appear when the web page
is displayed in a browser that can handle frames, but
a visitor can view the alternative text by displaying the
source code for the web page.
<b>NOTE</b>
A visitor can resize a frame, even if its border is hidden,
unless you specify the noresize attribute for the frame.
See the discussion of this attribute later in this chapter.
<b>TIP</b>
When you use a frame to display a graphic, you’ll often
want to remove all the white space around the graphic. To
do so, specify 0 for both the marginheight attribute and
themarginwidth attribute.
<b>CAUTION</b>
How much space a frame’s contents occupy will vary,
depending on the settings that visitors have chosen in
their browsers. If you prevent a frame from scrolling,
the visitor will be able to view more of its contents by
increasing the size of the frame—unless you prevent
resizing as well (as described next).
</div>
<span class='text_page_counter'>(149)</span><div class='page_container' data-page=149>
<b>2</b>
<b>3</b>
<b>4</b>
<b>5</b>
<b>6</b>
<b>7</b>
<b>8</b>
<b>9</b>
<b>2</b>
<b>3</b>
<b>4</b>
<b>5</b>
<b>6</b>
<b>7</b>
<b>8</b>
<b>9</b>
<b>2</b>
<b>3</b>
<b>4</b>
<b>5</b>
<b>6</b>
<b>7</b>
<b>8</b>
<b>9</b>
<b>Nest One Frameset </b>
<b>Inside Another</b>
To create more complex frame layouts, you can
nest one frameset inside another. Figure 7-7
shows a nested frameset used to produce a
three-row frameset in which only the second three-row is
divided into columns.
The following example shows the code for the
nested frameset that produces the layout shown
in Figure 7-7. For conciseness, this example
does not include the <noframes> information
included in the previous examples; however,
you would normally include <noframes>
information in a frameset page:
<frameset rows="15%,*,15%">
<frame name="contacts" src="offices
.html"/>
<frameset cols="150,*">
<frame name = "nav1"
src="navigation1.html"/>
<frame name="content"
src="european_offices.html"/>
</frameset>
<frame name="mission" src="mission
.html"/>
</frameset>
<b>Create Inline Frames</b>
If you need to display a single frame within another web page, you can use an
<i>inline frame</i>—one that appears as part of the page that contains it, without any
other frames being involved. The advantage of the inline frame is that it enables
you to place scrolling content within an otherwise static web page. For example,
you might place a scrollable description in an inline frame alongside a product
so that a visitor could scroll through the description without its occupying
<i><b>Figure 7-7:</b><b> Nesting one frameset inside another enables </b></i>
<i><b>you to produce frame layouts with varying numbers of </b></i>
<i><b>rows and columns.</b></i>
</div>
<span class='text_page_counter'>(150)</span><div class='page_container' data-page=150>
<b>10</b>
<b>9</b>
<b>8</b>
<b>7</b>
<b>6</b>
<b>5</b>
<b>4</b>
<b>3</b>
<b>2</b>
much space on the page. Similarly, you might place a series of graphics in an
inline frame so as to let each visitor choose the service area he or she wants, as
in Figure 7-8.
To create an inline frame:
<b> 1. </b>
Position the insertion point where you want to place the inline frame.<b> 2. </b>
Type the beginning of the <iframe> tag:<iframe
<i><b>Figure 7-8:</b><b> An inline frame lets you add a scrolling box of content within an otherwise static </b></i>
<i><b>web page.</b></i>
<b>CAUTION</b>
Inline frames are suitable only for some purposes. One
widespread use for which inline frames are <i>not</i> well
suited is displaying an end user license agreement for
software: Because the visitor can see only a small portion
of the entire text at a time, the agreement becomes even
harder to read than the smallest print of a tough contract.
</div>
<span class='text_page_counter'>(151)</span><div class='page_container' data-page=151>
<b>2</b>
<b>3</b>
<b>4</b>
<b>5</b>
<b>6</b>
<b>7</b>
<b>8</b>
<b>9</b>
<b>2</b>
<b>3</b>
<b>4</b>
<b>5</b>
<b>6</b>
<b>7</b>
<b>8</b>
<b>9</b>
<b>2</b>
<b>3</b>
<b>4</b>
<b>5</b>
<b>6</b>
<b>7</b>
<b>8</b>
<b>9</b>
<b> 3. </b>
Type the src attribute, an equal sign, double quotation marks, the URL of the web pagethat you want to display within the frame, and another pair of double quotation marks.
For example:
<iframe src="service_list.html"
<b> 4. </b>
To specify the position of the inline frame relative to the next element in the page, typea space, the align attribute, and the appropriate value (see Table 7-1). For example, to
align the inline frame to the left of the element in the page:
<iframe src="service_list.html" align="left"
<b> 5. </b>
To specify the height and width of the inline frame (rather than accepting default valueswhich may not suit your page), add the height attribute and a suitable value, and the
width attribute and a suitable value. Each value can be either a number of pixels or a
percentage of the browser window’s height or width. For example, to make the inline
frame 150 pixels wide by 450 pixels high:
<iframe src="service_list.html" align="left" width="150"
height="540"
<b> 6. </b>
To change the size of the inline frame’s internal margins instead of accepting thedefault settings, add the marginheight attribute and a suitable value in pixels for the
vertical margins and add the marginwidth attribute and a suitable value in pixels for the
horizontal margins. For example, to set horizontal and vertical margins of 5 pixels in
the inline frame:
<iframe src="service_list.html" align="left" width="175"
height="600" marginheight="5" marginwidth="5"
<b> 7. </b>
If you need to be able to refer to the inline frame using a hyperlink, add the nameattribute and specify the name within double quotation marks—for example:
<iframe src="service_list.html" align="left" width="175"
height="600" marginheight="5" marginwidth="5" name="selector"
<b>TIP</b>
If you want to center a frame horizontally and vertically
in the web page, use align="middle" in the <iframe>
tag, but also create the inline frame within a horizontally
centered block of text (for example, by creating a
center-aligned division using a <div align="center”> tag).
<b>NOTE</b>
To make sure that scroll bars are always displayed
on an inline frame, add the scrolling attribute with the
value yes (scrolling="yes"). The other possible setting
isscrolling="auto", which specifies automatic scroll bar
behavior; however, since this is the default setting, you
do not need to use it unless you want your HTML to be
completely unambiguous to human readers.
<b>VALUE</b> <b>ALIGNS THE INLINE FRAME</b>
left With the left margin, allowing subsequent elements to flow to its right
right With the right margin, allowing subsequent elements to flow to its left
top With the top of the surrounding content
middle With its center aligned vertically with the baseline of the surrounding content
bottom With the bottom of the surrounding content
<i><b>Table 7-1:</b><b> Values for the</b><b>align</b><b>Attribute</b></i>
</div>
<span class='text_page_counter'>(152)</span><div class='page_container' data-page=152>
<b>10</b>
<b>9</b>
<b>8</b>
<b>7</b>
<b>6</b>
<b>5</b>
<b>4</b>
<b>3</b>
<b>2</b>
<b> 8. </b>
By default, each inline frame automatically displays scroll bars if its contents aretoo large to fit in the frame. If you want to suppress the scroll bars, add the scrolling
attribute with the value no.
<b> 9. </b>
Type the closing angle bracket for the opening <iframe> tag and the closing </iframe>tag. The following example shows the complete code for the inline frame:
<iframe src="service_list.html" align="left" width="175"
height="600" marginheight="5" marginwidth="5"
name="selector"</iframe>
<b>Create a Link That Changes the </b>
<b>Contents of a Frame</b>
To create a link that changes the content of a frame:
<b> 1. </b>
Open the frameset document that defines the frame, and then verify that the <frame/>tag includes the name attribute. If it does not, add the name attribute—for example:
<frame name="mainframe" src="products.html">
<b> 2. </b>
If you made changes to the frameset document, save the changes. Then close theframeset document.
<b> 3. </b>
Open the component document that includes the link.<b> 4. </b>
Add the target attribute and the name of the target frame to each link that should beopened within that frame. For example:
<h3><a href="services.html"
target="mainframe">Services</a></h3>
<p>  <a href="offices.html"
target="mainframe">Offices</a></p>
<p>  <a href="staff.html"
target="mainframe">Staff</a></p>
<b> 5. </b>
Save the component document, switch to your browser, and test the links that youhave just created.
<b>CAUTION</b>
One use of inline frames is to display content from
other websites without visitors leaving your website.
Remember that you must either get permission from
the copyright holder of any content that is not yours or
establish that the content is in the public domain. Also be
aware that even if you have permission to use someone
else’s content (or do not require permission), you should
make it clear to visitors to your website that the content
comes from someone else.
<b>NOTE</b>
To create a link that opens in a separate window outside
the frameset, use the target="_blank" technique
discussed in Chapter 5.
</div>
<span class='text_page_counter'>(153)</span><div class='page_container' data-page=153></div>
<span class='text_page_counter'>(154)</span><div class='page_container' data-page=154>
<b>10</b>
<b>9</b>
<b>8</b>
<b>7</b>
<b>6</b>
<b>5</b>
<b>4</b>
<b>3</b>
<b>2</b>
<b>How to…</b>
<i><b> Understanding the </b></i>
<i><b>Style Cascade</b></i>
<i><b>• Create a Style Rule</b></i>
<i><b> Understanding Other Ways </b></i>
<i><b>of Creating Style Rules</b></i>
<i><b>• Create </b><b>an </b><b>Embedded </b></i>
<i><b>Style Sheet</b></i>
<i><b> Understanding CSS Versions</b></i>
<i><b>• Create and Apply an External </b></i>
<i><b>Style Sheet</b></i>
<i><b>• Use Special Selectors</b></i>
<i><b>• Apply a Style to Part of </b></i>
<i><b>an Element</b></i>
<i><b>• Override </b><b>Style </b><b>Sheets</b></i>
<i><b>• Control Font Formatting</b></i>
<i><b>• Set Alignment, Indents, </b></i>
<i><b>Margins, and Line Height</b></i>
<i><b>• Prevent a Background Graphic </b></i>
<i><b>from Being Tiled or Scrolling</b></i>
<i><b>• Create a Floating Layout </b></i>
<i><b>with CSS</b></i>
<i><b> Creating a Three-Column </b></i>
<i><b>Floating Layout</b></i>
<i><b> Overriding Style Sheets </b></i>
<i><b>in Your Browser</b></i>
Chapter 8
<b>Applying Formatting Using </b>
<b>Cascading Style Sheets</b>
Style sheets—known formally as Cascading Style Sheets,
or CSS—are the preferred means of applying formatting
consistently to your web pages. Unlike the HTML codes for
direct formatting discussed so far in this book, which can
be overridden by browser settings, CSS enable you to lay
out web pages exactly as you want them: You can specify
margins, indents, line spacing, font sizes, and more.
This chapter starts by discussing the basics of how CSS
work and how you apply them. You will then learn how to write
style rules, how to create style sheets, and how to use style
sheets to implement widely useful effects.
</div>
<span class='text_page_counter'>(155)</span><div class='page_container' data-page=155>
<b>2</b>
<b>3</b>
<b>4</b>
<b>5</b>
<b>6</b>
<b>7</b>
<b>8</b>
<b>9</b>
<b>2</b>
<b>3</b>
<b>4</b>
<b>5</b>
<b>6</b>
<b>7</b>
<b>8</b>
<b>9</b>
<b>2</b>
<b>3</b>
<b>4</b>
<b>5</b>
<b>6</b>
<b>7</b>
<b>8</b>
<b>9</b>
<b>Understand CSS Essentials</b>
As discussed earlier in this book, much of the formatting that you can apply directly
with HTML is either imprecise or can be overridden by the settings a visitor has
chosen in his or her browser. For example, you can specify that a word or phrase
be displayed in a font size two sizes larger than the default, but you do not usually
know which size is being used as the default on a visitor’s browser. Similarly, you
can specify that a particular font be used, but it may not be installed on the visitor’s
computer—in which case, the browser will substitute a default font.
Styles enable you to apply consistent formatting to elements in your web pages.
For example, by entering text between an opening <h1> tag and a closing
</h1> tag, you apply the h1 style (or first-level heading style) to it. The browser
displays all the instances of the h1 style using the same formatting. By defining
different formatting for the h1 style in the style sheet, you can change all the
instances of the h1 style in a web page.
Style sheets also enable you to apply some types of formatting—such as indents,
line spacing, and precise positioning—that are either difficult or impossible to
implement via direct formatting. Figure 8-1 shows a web page that uses a style
sheet to implement indents and line spacing.
Style sheets enable you to specify exact formatting that overrides a browser’s
setting, unless the visitor has turned off style sheets or applied a style sheet of
his or her own, as discussed at the end of this chapter.
You can create a style sheet either as a part of a web page or as an external file
that contains instructions.
<b>•</b>
<b>External style sheet</b> Using an external style sheet has the advantages of keepingthe layout instructions separate from the content and enabling you to quickly apply
style changes to all the web pages that use that style sheet. This is the best method to
use for most purposes.
<b>•</b>
<b>Internal style sheet</b> Using an internal (or embedded) style sheet enables you toimplement style effects only on that page, which can be useful in some circumstances.
You can also use an internal style sheet to override the styles in the external style sheet.
<b>NOTE</b>
If you’ve created documents in a word-processing
application, such as Microsoft Word, you’ve probably
used document styles—a one-click means of applying
a collection of formatting to a paragraph, a word, or a
selection. For example, a style for a paragraph such as
this might include 9-point sans-serif font with
one-and-a-half line spacing and a yellow-shaded background. HTML
styles work in much the same way.
<b>TIP</b>
As of this writing (Summer 2009), all current versions of
browsers should fully support style sheets—they’ve been
around for long enough. In some browsers, however,
support is patchy, so it’s a good idea to check your pages
in as many major browsers as possible to make sure they
look right. Use common screen resolutions (such as 800
× 600 pixels, 1024 × 768 pixels, and 1280 × 1024 pixels)
and a variety of window sizes to make sure that all styled
text is legible. No matter how attractive your site and
compelling your content, few visitors will choose to return
if they find the text too small, too faint, or the background
too overpowering for comfortable reading and viewing.
</div>
<span class='text_page_counter'>(156)</span><div class='page_container' data-page=156>
<b>10</b>
<b>9</b>
<b>8</b>
<b>7</b>
<b>6</b>
<b>5</b>
<b>4</b>
<b>3</b>
<b>2</b>
<i><b>Figure 8-1:</b><b> Style sheets not only simplify the layout and maintenance of your </b></i>
<i><b>pages, but also enable you to create effects you cannot create via direct </b></i>
<i><b>formatting.</b></i>
QUICK
<b>FACTS</b>
<b>UNDERSTANDING </b>
<b>THE STYLE CASCADE</b>
CSS are described as “cascading” because styles are
applied at up to four different levels, with the properties
flowing down from the top level and masking any
duplicate properties in the lower levels. At the bottom of
the cascade, the prevailing properties are applied to the
web page.
<b> 1. </b>The top level of the cascade is any style that is
applied using the style attribute for a tag (see
Chapter 3 for more information on the style
attribute).
<b> 2. </b>The second level is any style defined in a <style>
element within the web page itself (considered an
internal style sheet).
<b> 3. </b>The third level is any style defined in the external
style sheet (or style sheets) linked to the web page.
<b> 4. </b>The fourth level is the settings that the visitor
chooses in his or her browser.
These four levels give the following results:
<b>•</b>
Formatting in an external style sheet overrides thevisitor’s browser settings.
<b>•</b>
Formatting defined in an internal style sheet(a<style> element) overrides formatting in an
external style sheet. However, if the <link> tag
appears after the <style> element in the header,
the external style sheet overrides the internal style
sheet. (This breaks the cascade of style sheets.)
<b>•</b>
Formatting applied to an element using the styleattribute overrides formatting in both internal and
external style sheets.
<b>•</b>
Non-style attributes (such as the deprecated alignattribute) override style formatting.
</div>
<span class='text_page_counter'>(157)</span><div class='page_container' data-page=157>
<b>2</b>
<b>3</b>
<b>4</b>
<b>5</b>
<b>6</b>
<b>7</b>
<b>8</b>
<b>9</b>
<b>2</b>
<b>3</b>
<b>4</b>
<b>5</b>
<b>6</b>
<b>7</b>
<b>8</b>
<b>9</b>
<b>2</b>
<b>3</b>
<b>4</b>
<b>5</b>
<b>6</b>
<b>7</b>
<b>8</b>
<b>9</b>
Even when you use an embedded style sheet, you save time on formatting;
instead of needing to change every instance of a type of formatting throughout
the page, you need change only the definition of the style, which appears at the
beginning of the document.
<b>Create a Style Rule</b>
Each internal or external style sheet consists of <i>style rules,</i> items that specify
which markup element they affect and how that element should appear or
behave. For example, a style rule might specify that the h1 (heading 1) style
have the color blue and the font size 24 points.
To create a style rule:
<b> 1. </b>
Open the document in which you want to create the style rule.<b>•</b>
For an internal style sheet, open the web page that contains it. Position the insertionpoint in the header area but not within a tag (see “Create an Embedded Style
Sheet,” later in this chapter, for more information).
<b>•</b>
For an external style sheet, open the style sheet, or create a new style sheet. (See“Create and Apply an External Style Sheet,” later in this chapter.)
<b> 2. </b>
Type the selector:h1
<b> 3. </b>
Type a space, an opening brace, the name of the property you want to affect,and a colon:
h1 { size:
<b> 4. </b>
Type a space and the value you want to assign to the property. For example, to makethe font size 24 points:
h1 { size: 24pt
<b> 5. </b>
If you want to specify another property for the same selector, type a semicolon, aspace, the property, a colon, a space, and the value. For example, to make the font
color blue:
h1 { size: 24pt; color: blue
<b>TIP</b>
If you want an external style sheet to take effect and have
the controlling influence, you cannot have internal style
sheets (the <style> element) or use the style attribute in
tags that conflict with those in the external style sheet.
<b>NOTE</b>
The<i>selector</i> is the part of a style rule that declares which
markup element the style rule affects. For example,
in a style rule that specifies that the h1 style have the
color blue, h1 is the selector. The next part of the style
rule—in this case, the color—is the <i>property</i> affected.
The final part of the style rule is the <i>value</i> assigned to the
property—in this case, blue.
<b>NOTE</b>
If the value includes spaces, you must put double
quotation marks around it—for example, font-family:
"Arial Black”. If the value does not include spaces, you
do not need to put double quotation marks around it—for
example, font-family: Arial.
<b>TIP</b>
You can place a semicolon at the end of the final value
in a style declaration if you find doing so helpful for
consistency. For example, the declaration h2 { font-size:
20pt } can also be written h2 { font-size: 20pt; } (with the
final semicolon).
</div>
<span class='text_page_counter'>(158)</span><div class='page_container' data-page=158>
<b>10</b>
<b>9</b>
<b>8</b>
<b>7</b>
<b>6</b>
<b>5</b>
<b>4</b>
<b>3</b>
<b>2</b>
<b> 6. </b>
Repeat step 5 to add additional properties to the style rule. For example, to make thefont Garamond:
h1 { size: 24pt; color: blue; font-family: Garamond
<b> 7. </b>
End the style rule by typing a space and a closing brace:h1 { size: 24pt; color: blue; font-family: Garamond }
You can also break the style rule across multiple lines to make it easier to read—
for example:
h1 { size: 24pt;
color: blue;
font-family: Garamond }
<b>Create an Embedded Style Sheet</b>
To create an embedded style sheet, you place the style declarations in the header
of the web page.
<b> 1. </b>
In your text editor, open the web page to which you want to add the style.<b> 2. </b>
Place the insertion point in the header section. Anywhere in the header section isacceptable, provided that it is not within another element (such as the <title> and
</title> tags), but your pages will be easier to edit if you use a consistent location—for
example, on the line directly after the closing </title> tag or immediately before the
closing</head> tag.
<b> 3. </b>
Type the opening <style> tag. Include the type attribute and set its value to text/css:<style type="text/css">
<b> 4. </b>
Press<b>ENTER</b> to start a new line, and then type the definition for the style. For example:h1 { font-family: Garamond }
<b> 5. </b>
Repeat step 4 for each additional style rule you want to create. For example:<style type="text/css">
h1 { font-family: Garamond }
h2 { color: blue }
h3 { color: magenta }
<b> 6. </b>
Press<b>ENTER</b> to start a new line, and then type the closing </style> tag:</style>
QUICK
<b>FACTS</b>
<b>UNDERSTANDING OTHER WAYS OF </b>
<b>CREATING STYLE RULES</b>
The section “Create a Style Rule” shows you what’s
usually the easiest way to create a style rule: specifying
a single selector and then specifying each property you
want to set for that selector and the value for the property,
separating the property declarations with semicolons. But
you can also create style rules in two other ways.
<b>SET ONE PROPERTY AT A TIME</b>
If you choose, you can set a single property at a time. For
example, to set the paragraph font’s color to black and
10 points:
p { color: black }
p { font-size: 10pt }
The properties you set for a style are cumulative, so
the style ends up with all the properties defined. Setting
properties like this makes your code easier to read even
though it occupies more lines than if you had separated
the properties with semicolons.
<b>SET PROPERTIES FOR </b>
<b>MULTIPLE SELECTORS AT ONCE</b>
A technique you may sometimes want to use is to set
properties for multiple styles in a single statement. To
do so, separate each style from the previous one with
a comma and a space. For example:
h1, h2 { color: blue ; font-family: Arial }
This technique is most useful when you want to give two
or more styles several of the same properties, but you
can also use it to set a single property. Normally, you’ll
set only some of the properties for each selector this
way; you can then set other properties separately. For
example, if you make the h1 and h2 styles blue Arial like
this, you can then set different font sizes or font weights
separately to distinguish them.
</div>
<span class='text_page_counter'>(159)</span><div class='page_container' data-page=159>
<b>2</b>
<b>3</b>
<b>4</b>
<b>5</b>
<b>6</b>
<b>7</b>
<b>8</b>
<b>9</b>
<b>2</b>
<b>3</b>
<b>4</b>
<b>5</b>
<b>6</b>
<b>7</b>
<b>8</b>
<b>9</b>
<b>2</b>
<b>3</b>
<b>4</b>
<b>5</b>
<b>6</b>
<b>7</b>
<b>8</b>
<b>9</b>
<b>Create and Apply an External Style Sheet</b>
To use an external style sheet, you create it as a separate file in your text editor
or HTML editor, and then link to it each web page for which you want to use
the style sheet.
<b>CREATE AN EXTERNAL STYLE SHEET</b>
To create an external style sheet:
<b> 1. </b>
Open Notepad (or your HTML editor), and start a new document.<b> 2. </b>
Optionally, on the first line of the style sheet, type a comment explaining what the stylesheet is and what it is for. To create a comment in a style sheet, type a forward slash,
an asterisk, a space, the text of the comment, another space, another asterisk, and
another forward slash. For example:
/* Acme Virtual Industries standard style sheet, acme_standard
.css */
<b> 3. </b>
Type the definition for each style you want to include in the style sheet. For example:h1 { color: green; font-size: 24pt; font-weight: bold }
h2 { color: olive; font-size: 18pt; font-weight: bold }
h3 { color: #339900; font-size: 14pt; font-weight: bold }
p {font-size:14pt ; color: black }
<b> 4. </b>
Click the <b>File</b> menu, click <b>Save</b>, and then save the style sheet with the .css extension.(You can also use other extensions, but using .css is clearest.)
<b> 5. </b>
Click the <b>File</b> menu and then click <b>Exit</b> to exit Notepad.<b>LINK A WEB PAGE TO AN EXTERNAL STYLE SHEET</b>
After creating the external style sheet you want to use, link your web pages to it.
<b> 1. </b>
Open the web page that you want to link to the style sheet.<b> 2. </b>
Position the insertion point within the header section of the web page. Anywhere in theheader section will work, but your pages will be easier to edit if you use a consistent
location—for example, on the line immediately before the closing </head> tag.
<b> 3. </b>
Type the start of a <link> tag, specifying the rel attribute (which specifies therelationship of the link) with the value stylesheet and the type attribute with the
value text/css:
<link rel="stylesheet" type="text/css"
QUICK
<b>FACTS</b>
<b>UNDERSTANDING CSS VERSIONS</b>
As of this writing (Summer 2009), the current version
of the CSS specification is CSS 2.1. CSS 3 is under
development, but the due date keeps being pushed out.
Here is a brief summary of the differences in CSS versions:
<b>•</b>
CSS 1 enables you to control major elements,such as the font (size, color, and type), how lists
are displayed, margins and borders, alignment,
line spacing, and background graphics and
background colors.
<b>•</b>
CSS 2 improves font support, provides morecontrol over positioning objects, and enables you
to control tables. It also includes text-to-speech
capabilities.
<b>•</b>
CSS 3 is in development as of this writing.It consists of different modules that can be
implemented separately. For example, the
Template Layout module gives a new method of
positioning elements, while the Aural Style Sheets
module provides multimedia capabilities.
Current browsers—Internet Explorer 8, Firefox 3, and
Safari 4—implement CSS 2 with a high degree of
accuracy, though there are still some bugs.
You do not need to specify the CSS version that you are
using in your web pages, but you should be aware that
elements added more recently to CSS may not work
properly in all browsers.
The easiest way to identify problems is to test your web
pages in several browsers and make sure that they are
displayed correctly. At a minimum, test every page using
Internet Explorer, Firefox, and Safari, because these
three browsers between them have more than 90 percent
of the browser market.
</div>
<span class='text_page_counter'>(160)</span><div class='page_container' data-page=160>
<b>10</b>
<b>9</b>
<b>8</b>
<b>7</b>
<b>6</b>
<b>5</b>
<b>4</b>
<b>3</b>
<b>2</b>
<b> 4. </b>
Type the href attribute and assign to it the path (if required) and filename of theexternal style sheet. For example:
href="styles/acme_standard.css"
<b> 5. </b>
Finish the link by typing a space, a forward slash, and the closing angle bracket:href="styles/acme_standard.css" />
The following example shows the entire link in the header section of a web page:
<head>
<meta http-equiv="content-type" content="text/html;
charset=utf-8" />
<title>Acme Virtual Industries: Strategy Meeting</title>
<link rel="stylesheet" type="text/css" href="acme_standard
.css" />
</head>
Figure 8-2 provides a quick demonstration of the changes you can make in
moments by linking a style sheet to a web page.
<b>CAUTION</b>
If you use both an external style sheet and an internal
style sheet, put the <link> tag for the external style
sheet before the <style> tag for the internal style sheet.
Otherwise, you may break the style cascade and get
unexpected results.
<b>NOTE</b>
You can use two or more pairs of <style> and </style>
tags if you prefer, but in most cases, it’s easier and
clearer to use only a single pair.
<i><b>Figure 8-2:</b><b> By changing the style sheet attached to a web page, you can quickly change the look of every style defined </b></i>
<i><b>in the style sheet. The left screen uses default styles for h1, h2, and h3, while the right screen uses a style sheet that </b></i>
<i><b>defines custom styles for these headings.</b></i>
</div>
<span class='text_page_counter'>(161)</span><div class='page_container' data-page=161>
<b>2</b>
<b>3</b>
<b>4</b>
<b>5</b>
<b>6</b>
<b>7</b>
<b>8</b>
<b>9</b>
<b>2</b>
<b>3</b>
<b>4</b>
<b>5</b>
<b>6</b>
<b>7</b>
<b>8</b>
<b>9</b>
<b>2</b>
<b>3</b>
<b>4</b>
<b>5</b>
<b>6</b>
<b>7</b>
<b>8</b>
<b>9</b>
<b>LINK TWO OR MORE STYLE SHEETS TO A WEB PAGE</b>
Instead of linking a single style sheet to a web page, you can link two or more
style sheets to the same page. Two common reasons for doing this are:
<b>•</b>
The web page uses some styles that are contained in one of the style sheets andsome styles that are contained in the other style sheet. Instead of integrating all the
styles into a third comprehensive style sheet, you can apply both the style sheets to
achieve full coverage of the styles.
<b>•</b>
The second style sheet redefines some of the styles used in the first style sheet toproduce web pages with a similar yet slightly different appearance. For example, an
organization or company may use a global style sheet that produces the general look
for all web pages. Each office or department then may apply a second style sheet to
adapt the global style sheet to meet their needs, producing a different look for each
office’s or department’s pages.
The following example shows two style sheets applied to a document. The
second style sheet (acme_marketing.css) overrides the first style sheet (acme_
standard.css) because it is listed after the first style sheet.
<head>
<title>Acme Virtual Industries: About Us</title>
<link rel="stylesheet" type="text/css"
href="styles/acme_standard.css" />
<link rel="stylesheet" type="text/css"
href="styles/acme_marketing.css" />
</head>
<b>Use Special Selectors</b>
Up to this point, this chapter has used HTML tags as the selectors for style
rules—for example, to create a style rule that applies to h1 elements. For
flexibility, however, HTML also enables you to use other items—such as the id
attribute, the class attribute, and the <div> and <span> types—as the selectors
for style rules.
<b>USE THE ID ATTRIBUTE AS A SELECTOR</b>
If you need to pick out a single instance of an element from all the other
instances, add the id attribute to that element in the web page, and assign it
<b>NOTE</b>
This example assumes that the style sheet is on the
same web server as the web page that is being linked to
it. (The style sheet is in the /styles/ folder.) You can also
link to a style sheet on another server, if necessary; to
do so, assign the full URL of the style sheet to the href
attribute of the <link> tag. Bear in mind that keeping the
style sheet on the same server as your web pages may
help to avoid performance issues.
<b>NOTE</b>
When saving a file for the first time with Notepad,
remember to choose All Files in the Files Of Type
drop-down list to prevent Notepad from adding its default
.txt extension to the name. You can also enclose the
filename and extension within double quotation marks
(for example, "standard.css").
<b>NOTE</b>
When applying an external style sheet to a frameset
document, you must apply it to the component
documents that make up the frameset document, not to
the frameset document itself. If you want the component
documents to have different looks, you can use different
external style sheets for the component documents.
</div>
<span class='text_page_counter'>(162)</span><div class='page_container' data-page=162>
<b>10</b>
<b>9</b>
<b>8</b>
<b>7</b>
<b>6</b>
<b>5</b>
<b>4</b>
<b>3</b>
<b>2</b>
a unique identifying value that starts with a letter. This example assigns the
valuebreaking to the heading:
<h2 id="breaking">Breaking News</h2>
Once the item is marked with the id attribute, you can specify in the style sheet
how to format the item. To do so, type a hash mark (#) followed by the ID value,
a space, and the style information within braces. For example, to apply red
formatting and 28-point font size to the breaking item created previously:
#breaking { font-size: 28pt; color: red }
<b>USE THE CLASS ATTRIBUTE AS A SELECTOR</b>
Sometimes, it can be useful to distinguish different types of items that are
formatted as the same element. For example, your web pages may include
various types of content formatted as paragraphs (entered between <p> and
</p> tags) and various types of content formatted as second-level headings
(entered between <h2> and </h2> tags).
To distinguish between different types of content formatted as the same element,
you can use the class attribute to assign a particular description to the desired
instances of the element. For example, you might create a class named “new_
services” so that you could apply different formatting to only the items in that class.
To create the class, on a new line in your style sheet, type a period, the name
you want to assign to the class, and the style information for the class. For
example, to make the new_services class large and a purple font:
.new_services {color: #3333ff; font-size: large }
To apply the class to an element in a web page, add the class attribute to the
element’s opening tag, and specify the name of the class. For example:
<h2 class="new_services">Latest Services</h2>
<p class="new_services">Here are our latest services.</p>
<ol>
<li class="new_services">Virtual Manager</li>
<li class="new_services">Virtual Mailbox</li>
<li class="new_services">Reminder Hotline</li>
</ol>
<b>TIP</b>
You can <i>validate,</i> or check the correctness of, an external
style sheet by using the free W3C CSS Validation Service
at />
<b>TIP</b>
When you apply two or more style sheets to the same
page, you must understand how the style cascade
works so that you can achieve the style effects you want.
(See “Understanding the Style Cascade,” earlier in this
chapter, for details of the cascade.) When you’re starting
with style sheets, link only a single style sheet to a web
page to avoid these complexities.
<b>NOTE</b>
A class can apply either to a single element or to multiple
elements. By applying a class to multiple elements, you
can use it to format disparate elements in a similar way.
For example, you can display all the information related
to the new_services class in a different color to increase
its visibility.
<b>TIP</b>
You can apply a class to a particular element by adding
its name to the style name. For example, to apply the
.new_services class to the h2 style, you would use
h2.new_services.
</div>
<span class='text_page_counter'>(163)</span><div class='page_container' data-page=163>
<b>2</b>
<b>3</b>
<b>4</b>
<b>5</b>
<b>6</b>
<b>7</b>
<b>8</b>
<b>9</b>
<b>2</b>
<b>3</b>
<b>4</b>
<b>5</b>
<b>6</b>
<b>7</b>
<b>8</b>
<b>9</b>
<b>2</b>
<b>3</b>
<b>4</b>
<b>5</b>
<b>6</b>
<b>7</b>
<b>8</b>
<b>9</b>
<b>USE A SPAN AS A SELECTOR</b>
A<i>span</i> is a flexible unit that you can use to select text within an element so that
you can apply formatting to it. To create a span:
<b> 1. </b>
In your style sheet, create the class, if it does not already exist. For example:.new_services {color: #3333ff; font-size: large;
font-weight: bold }
<b> 2. </b>
In Notepad or your HTML editor, open the web page in which you want to createthe span.
<b> 3. </b>
Position the insertion point before the desired text.<b> 4. </b>
Type the opening <span> tag, including the class attribute and specifying the nameof the class you want to apply to the span. For example, to apply the class named
special_offers:
<span class="new_services">New Services
<b> 5. </b>
Position the insertion point at the end of the desired text, and then type the closing</span> tag:
</span>
The following example shows the complete paragraph containing the span:
<p>For information about more of our
<span class="new_services">New Services</span>,
click <a href="new_services.html">here</a>.</p>
<b>USE A DIVISION AS A SELECTOR</b>
As discussed in Chapter 3, you can use the <div> and </div> tags to group
paragraphs (or other elements) into a division so that you can manipulate them
all together. You can apply styles to a division directly (by adding the style
information to the opening <div> tag) or via either an internal style sheet or an
external style sheet. Using an external style sheet gives the greatest flexibility
because you can change the formatting of all the divisions in your web pages by
simply changing the relevant style rules in your style sheets.
<b>TIP</b>
You can use a span to apply font formatting to individual
words or phrases in your documents without using the
<font> tag. The advantage of using spans is that you can
change them all centrally from your style sheet instead of
having to change each instance of the formatting in the
individual web pages.
</div>
<span class='text_page_counter'>(164)</span><div class='page_container' data-page=164>
<b>10</b>
<b>9</b>
<b>8</b>
<b>7</b>
<b>6</b>
<b>5</b>
<b>4</b>
<b>3</b>
<b>2</b>
Instead of applying the class attribute to each of the elements to which you
want to apply the new_services formatting, you could create a division around
the elements and apply the class attribute to the division. The following
example shows how to do this:
<div class="new_services">
<h2>Latest Services</h2>
<p>Here are our latest services.</p>
<ol>
<li>Virtual Manager</li>
<li>Virtual Mailbox</li>
<li>Reminder Hotline</li>
</ol>
</div>
<b>Apply a Style to Part of an Element</b>
You can apply a style to only part of an element rather than to a full element by
using<i>pseudo-elements</i>: logically defined parts of elements. You don’t need to tag
the pseudo-element in your code—the browser identifies them on its own.
<b>FORMAT THE FIRST LETTER OF AN ELEMENT</b>
Sometimes you may find it useful to apply different formatting to the first letter
in an element. To do so, define a style rule for the first-letter pseudo-element of
the desired element.
<b> 1. </b>
In your style sheet, type the style name, a colon, and then first-letter. For example:h1:first-letter
<b> 2. </b>
Type a space and then the details of the style rule for the first letter. For example:h1:first-letter { font-weight: bold }
h1:first-letter { color: #990000 }
h1:first-letter { font-size: 24pt }
You can see how easy and effective this is—you don’t have to make any change
on the web page itself, only in your style sheet. The following illustration shows
an example of the effect produced.
<b>NOTE</b>
This example assumes that you have created the class
named new_services in the external style sheet attached
to the web page as described in “Use the Class Attribute
as a Selector,” earlier in this chapter.
</div>
<span class='text_page_counter'>(165)</span><div class='page_container' data-page=165>
<b>2</b>
<b>3</b>
<b>4</b>
<b>5</b>
<b>6</b>
<b>7</b>
<b>8</b>
<b>9</b>
<b>2</b>
<b>3</b>
<b>4</b>
<b>5</b>
<b>6</b>
<b>7</b>
<b>8</b>
<b>9</b>
<b>2</b>
<b>3</b>
<b>4</b>
<b>5</b>
<b>6</b>
<b>7</b>
<b>8</b>
<b>9</b>
<b>FORMAT THE FIRST LINE OF AN ELEMENT</b>
You can apply different formatting to the first line of an
element by adding the :first-line pseudo-element to a
style sheet. The following example, which you would
place in either an internal style sheet or an external style
sheet, makes the first line of each paragraph (p) bold.
Figure 8-3 shows the effect.
p {font-size:14pt ; color: black;}
p:first-line { font-weight: bold }
<b>Override Style Sheets</b>
If you’re creating a website and want to implement a
consistent look across it, use external style sheets rather
than internal style sheets. External style sheets will save
you considerable time and effort in keeping your web
pages up-to-date with your latest styles.
Sometimes, however, you may want to override an
external style sheet by using an internal style sheet to
apply one or more styles to a web page. You can use the
external style sheet to implement the general look of your
website, and then use an internal style sheet to change one or more specific
elements on a particular web page.
Beyond overriding the external style sheet by using an internal style sheet, you
may sometimes need to override the internal style sheet as well. As discussed
in Chapter 3, you can use the style attribute to apply formatting to an element.
Any formatting you apply this way overrides any formatting applied using an
internal style sheet, which in turn overrides any formatting applied using an
external style sheet.
<b>Control Font Formatting</b>
In style sheets, you can control font formatting by using either the individual
properties explained in Table 8-1 or the all-encompassing font property.
<i><b>Figure 8-3:</b><b>You can use the </b><b>:first-line</b><b> pseudo-element to make the first line of each </b></i>
<i><b>instance of an element pop out. The formatting applies to the first line no matter what size </b></i>
<i><b>of browser window the page is displayed in.</b></i>
<b>CAUTION</b>
Theblink value does not work in Internet Explorer and
can quickly become irritating to visitors using those
browsers that do support it. For this reason, it is best not
to use blink.
</div>
<span class='text_page_counter'>(166)</span><div class='page_container' data-page=166>
<b>10</b>
<b>9</b>
<b>8</b>
<b>7</b>
<b>6</b>
<b>5</b>
<b>4</b>
<b>3</b>
<b>2</b>
<b>PROPERTY</b> <b>EXPLANATION</b> <b>VALUES OR EXAMPLES</b>
background-color The background color to apply navy,magenta,#CCFFFF
color The font color to apply red,blue,#993333
font-family The name of the font family Georgia,"Times New Roman"
font-size A font size measured in points or another measurement unit (pixels, em,
centimeters) or specified by keyword (for example, x-large)
12pt,18pt, x-large
font-style The style: normal, italic, or oblique (slanted) normal,italic,oblique
font-variant Whether to use normal letters or small caps normal,small-caps
font-weight How bold the font is lighter,normal,bold,bolder
letter-spacing Whether the letters are normally spaced, closer together (a negative
value), or farther apart (a positive value)
-2px, 12px, 10%
text-decoration Whether to apply decoration to the text none,blink,underline,overline,line-through
text-transform Whether to apply consistent capitalization to the text none,capitalize (initial capitals), lowercase,
uppercase
word-spacing Whether the words are normally spaced, closer together (a negative
value), or farther apart (a positive value)
-3px, 10 px, 10%
<i><b>Table 8-1:</b><b> Individual Font Properties for Formatting Text</b></i>
For example, the following style, entered in a style sheet (internal or external),
produces Heading 3 paragraphs in 36-point boldface using small caps:
h3 { font-weight: bold}
h3 { font-variant: small-caps }
h3 { font-size: 36pt }
h3 { color: blue }
The following style, entered in a style sheet, makes ordered (numbered) lists
appear in maroon, italic uppercase:
ol { color: maroon; font-style: italic;
text-transform: uppercase }
Thefont property has a fixed syntax that enables you to specify each of the
values you want to set within a single property. The syntax, shown with vertical
bars indicating the divisions between values, is as follows (the vertical bars are
not used in the actual code):
font: style | weight | variant | size or line-height | font-family
<b>NOTE</b>
When using the font property, you must specify the
values in the correct order; however, you do not have
to use every value, as HTML figures out which values
you’ve omitted.
</div>
<span class='text_page_counter'>(167)</span><div class='page_container' data-page=167>
<b>2</b>
<b>3</b>
<b>4</b>
<b>5</b>
<b>6</b>
<b>7</b>
<b>8</b>
<b>9</b>
<b>2</b>
<b>3</b>
<b>4</b>
<b>5</b>
<b>6</b>
<b>7</b>
<b>8</b>
<b>9</b>
<b>2</b>
<b>3</b>
<b>4</b>
<b>5</b>
<b>6</b>
<b>7</b>
<b>8</b>
<b>9</b>
The following style rule, entered in a style sheet, makes h3 elements appear in
bold, italic, 24-point small capitals in the Times New Roman font:
h3 { font: italic bold small-caps 24pt "Times New Roman" }
<b>Set Alignment, Indents, Margins, </b>
<b>and Line Height</b>
As discussed in Chapter 3, you can apply basic alignment to individual items by
using the align attribute, but you have little control over indents, margins, and line
height via direct formatting. Style sheets offer far more control over these settings.
<b>ALIGN, CENTER, OR JUSTIFY TEXT</b>
Use the text-align property to left-align, right-align, center, or justify text.
(Justified text is aligned with both margins.) Table 8-2 lists the values for the
text-align property.
For example, to align an element with the right margin, you can create a class
with a name such as alignright in the style sheet:
.alignright {text-align: right }
Then apply the class to each item you want to align with the right margin:
<p class="alignright">This paragraph is aligned with the right
margin.</p>
<b>SET INDENTS</b>
Use the text-indent property to specify the indent you want to apply to the first
line of a paragraph. Normally, the best option is to specify a fixed indent using
a unit of measurement—for example, 0.5 inch. Your other option is to specify
that the indent be a percentage of the width of the element that contains the line
or paragraph. A percentage setting like this allows the indent to vary as the line
width changes when the browser window is resized.
The following example creates a CSS style that sets a half-inch indent on the
paragraph style (<p>):
p { text-indent: 0.5in }
<b>VALUE EXPLANATION</b>
left Aligns the text with the left margin
right Aligns the text with the right margin
center Centers the text between the margins
justify Aligns the text with both margins
<i><b>Table 8-2:</b><b> Values for the </b><b>text-align</b><b> Property</b></i>
</div>
<span class='text_page_counter'>(168)</span><div class='page_container' data-page=168>
<b>10</b>
<b>9</b>
<b>8</b>
<b>7</b>
<b>6</b>
<b>5</b>
<b>4</b>
<b>3</b>
<b>2</b>
<b>SET MARGINS</b>
To control where an element appears on a web page, you can adjust the
element’s margins—the amount of space that appears between the element and
the next element on the specified side.
To set a margin width, you use the margin-left property, the margin-right
property, the margin-top property, or the margin-bottom property. You can
specify the margin either as a percentage of the window size (which gives the
best flexibility for when the widow is resized) or as a number of pixels (px),
inches (in), millimeters (mm) or centimeters (cm), points (pt), or picas (pc). For
web pages, pixels are frequently used, although inches or centimeters may be
easier to think about.
The following example, which you would use in a style sheet, sets all four
margins for the p element:
p { margin-left: 0.5in; margin-right: 0.5in;
margin-top: 0.25in; margin-bottom: 0.15in }
If you need to specify all the margins for an element, you can also use the
margin property and specify the margins in a clockwise order starting from the
top: top, right, bottom, and then left. The following example sets a top margin
of 0.75 inches, a right margin of 0.5 inches, a bottom margin of 0.25 inches, and
a left margin of 0.5 inches for the h5 element. The result is more concise but
arguably harder to read:
h5 { margin: 0.75in 0.5in 0.25in 0.5in }
<b>SET LINE HEIGHT</b>
To control the amount of vertical space that an element occupies, you can
set the line height (also called “leading”) by using the line-height property
and specifying the measurement as a multiple of line spacing, a number
of measurement units (such as points, pixels, inches, or millimeters), or a
percentage of the space normally allotted to the font size or object.
<b>TIP</b>
If you need to prevent browsers from adding space
between elements, set the margin-bottom property of
the first element and the margin-top property of the
second element to 0. This technique is especially handy
when you need to make a heading and a paragraph
appear without extra space between them.
<b>TIP</b>
If an element needs one border measurement for
both the top and the bottom margins and one border
measurement for both the left and right margins, you
can specify only two values for the margin property.
The browser uses the first value for the top and bottom
borders and the second value for the left and right
borders. For example, { margin: 10px 20px } creates
10-pixel borders at the top and bottom and 20-10-pixel borders
at each side.
<b>NOTE</b>
If you don’t specify line height using the line-height
property, the browser automatically adjusts the line
height so that it is large enough for the font size or for the
object the element contains.
<b>NOTE</b>
You can also specify the line height as a percentage.
For example, a setting of 150% makes the line height
one-and-a-half times as large as usual; a setting of 25%
makes the line height one-quarter of the normal height.
</div>
<span class='text_page_counter'>(169)</span><div class='page_container' data-page=169>
<b>2</b>
<b>3</b>
<b>4</b>
<b>5</b>
<b>6</b>
<b>7</b>
<b>8</b>
<b>9</b>
<b>2</b>
<b>3</b>
<b>4</b>
<b>5</b>
<b>6</b>
<b>7</b>
<b>8</b>
<b>9</b>
<b>2</b>
<b>3</b>
<b>4</b>
<b>5</b>
<b>6</b>
<b>7</b>
<b>8</b>
<b>9</b>
Setting an exact line height in points is useful in precise
layouts. The following example sets the line height to
24 points:
.spaced { line-height: 24pt }
Figure 8-4 shows the effect of changing line height and
applying a first-line indent.
<b>Prevent a Background Graphic </b>
<b>from Being Tiled or Scrolling</b>
As discussed in Chapter 4, you can add a background graphic to an element
using the background attribute in the element’s tag. If the graphic isn’t large
enough to occupy the entire background, however, the browser will <i>tile,</i> or
repeat, the graphic automatically, so make it big enough. Tiling tends to spoil
the effect of a background graphic.
To prevent tiling, use the background-image property in the appropriate style
to place the graphic, and then specify the background-repeat property with the
valueno-repeat to prevent the graphic from repeating. The following example,
which uses an embedded style sheet, applies the graphic named avs.jpg in the
images folder as the background image and prevents it from being tiled:
<style>
body { background-image: url(images/avs.jpg);
background-repeat: no-repeat }
</style>
To fix a background graphic so that it remains in the same position in the
browser window even when the web page is scrolled, add the
background-attachment property and specify the value fixed. The following example
continues the previous example and fixes the background graphic in place:
<style>
body { background-image: url(images/sunset.jpg);
background-repeat: no-repeat;
background-attachment: fixed }
</style>
<i><b>Figure 8-4:</b><b> Applying a first-line indent and changing </b></i>
<i><b>the line height can greatly change the appearance of </b></i>
<i><b>an element.</b></i>
<b>TIP</b>
Note the syntax for specifying the background graphic:
url tells the browser that the parentheses contain the
location of the graphic file.
<b>NOTE</b>
If you do want to repeat a background graphic, set the
background-repeat property to repeat, repeat-x, or
repeat-y. The repeatvalue makes the graphic repeat as
many times as is necessary to fill the space, from left to
right and from top to bottom. The repeat-x value makes the
graphic repeat horizontally as many times as is necessary
to reach the other side of the space. The repeat-y value
makes the graphic repeat vertically as many times as is
necessary to reach the bottom of the space.
</div>
<span class='text_page_counter'>(170)</span><div class='page_container' data-page=170>
<b>10</b>
<b>9</b>
<b>8</b>
<b>7</b>
<b>6</b>
<b>5</b>
<b>4</b>
<b>3</b>
<b>2</b>
To control where the background graphic appears, set the background-position
property:
<b>•</b>
Horizontal placement. Choose left, center, or right.<b>•</b>
Vertical placement. Choose top, center, or bottom.For example, to position the background graphic in the center of the web page:
<style>
body { background-image: url(images/sunset.jpg);
background-repeat: no-repeat;
background-attachment: fixed;
background-position: center center }
</style>
<b>Create a Floating Layout with CSS</b>
Instead of using frames to display different information in different areas of a
web page (as discussed in Chapter 7), you can create a <i>floating layout</i> by using
CSS. To do so, you use the float property to set the appropriate part of the text
to float to the left or right, as needed. This enables you to position elements side
by side and create boxes and columns as needed.
Thefloat property has three settings.
<b>•</b>
left Moves the element to the left and makes content wrap around its right side.<b>•</b>
right Moves the element to the right and makes content wrap around its left side.<b>•</b>
none Turns off floating for the element so that it appears in its normal position.<b>UNDERSTAND HOW A FLOATING LAYOUT WORKS</b>
To set up a floating layout, you define the sections of the web page that you
want to float, and then apply the appropriate float setting to them.
You can float a graphic as it is, because it occupies a chunk of space, but for
text-based content, you need to divide it up into sections. Here’s how you do that:
<b>•</b>
Use the <div> tag to cordon off the content you want to put into one area of a page.<b>•</b>
Add a class or id to each <div> section so that you can refer to it easily.<b>•</b>
Set the float property for that class or id to position the <div> section.<b>TIP</b>
It’s often helpful to sketch out your web page before
you start creating it. Use either a piece of paper or the
online equivalent—for example, a drawing program (such
as Paint on Windows) or a word processor (such as
Microsoft Word). Give a simple but descriptive name to
each section—leftcolumn,header, and so on—so that
you can easily identify them in your HTML document and
your CSS document.
</div>
<span class='text_page_counter'>(171)</span><div class='page_container' data-page=171>
<b>2</b>
<b>3</b>
<b>4</b>
<b>5</b>
<b>6</b>
<b>7</b>
<b>8</b>
<b>9</b>
<b>2</b>
<b>3</b>
<b>4</b>
<b>5</b>
<b>6</b>
<b>7</b>
<b>8</b>
<b>9</b>
<b>2</b>
<b>3</b>
<b>4</b>
<b>5</b>
<b>6</b>
<b>7</b>
<b>8</b>
<b>9</b>
<b>CREATE A TWO-COLUMN FLOATING LAYOUT</b>
To create a simple two-column floating layout:
<b> 1. </b>
Create the HTML page as usual. This example uses a simple page,whose code is shown here and which appears in Figure 8-5:
<?xml version="1.0" encoding="utf-8"?>
<!DOCTYPE html PUBLIC "-//W3C//DTD XHTML 1.0
Transitional//EN"
" />
<html xmlns=" xml:
lang="en" lang="en">
<head>
<meta http-equiv="content-type" content="text/
html; charset=utf-8" />
<title>Acme Virtual Services: How We Can Help
You</title>
</head>
<body>
<h1>Acme Virtual Industries: How We Can Help
You</h1>
<img src="images/team_leaders.jpg" alt="Acme
Team Leaders" width="200px" />
<p><em>Our trained staff are standing ready to
help your business.</em></p>
<h2>The Easy Way to Get a Helping Hand... in
Moments</h2>
<p>If you've ever longed to be able to call
on extra assistance... at any time of the day or
night... without the need to hire, train, and
fire... without worry, hassle, or significant
expense—then our virtual services are
exactly what you need.</p>
<p>Our fully-trained, highly motivated staff
members can be up and running with your specific
business needs within hours... either onsite or
off.</p>
<p>Whether you need an assistant, a
supervisor, or a top-level manager, we can provide
an experienced staff member with the skills and
expertise you require.</p>
</body>
</html>
<i><b>Figure 8-5:</b><b> The sample page as a single-column layout.</b></i>
</div>
<span class='text_page_counter'>(172)</span><div class='page_container' data-page=172>
<b>10</b>
<b>9</b>
<b>8</b>
<b>7</b>
<b>6</b>
<b>5</b>
<b>4</b>
<b>3</b>
<b>2</b>
<b> 2. </b>
Use<div> tags to divide the <body> section into two divisions, one for the leftcolumn and one for the right column. Give each column a simple id: leftcolumn and
rightcolumn. The listing shows the <div> tags in bold.
<body>
<h1>Acme Virtual Industries: How We Can Help You</h1>
<b><div id="leftcolumn"></b>
<img src="images/team_leaders.jpg" alt="Acme Team Leaders"
width="200px" />
<p><em>Our trained staff are standing ready to help your
business.</em></p>
<b></div></b>
<b><div id="rightcolumn"></b>
<h2>The Easy Way to Get a Helping Hand... in Moments</h2>
<p>If you've ever longed to be able to call on extra
assistance... at any time of the day or night... without the
need to hire, train, and fire... without worry, hassle, or
significant expense—then our virtual services are exactly
what you need.</p>
<p>Our fully-trained, highly motivated staff members can
be up and running with your specific business needs within
hours... either onsite or off.</p>
<p>Whether you need an assistant, a supervisor, or a
top-level manager, we can provide an experienced staff member with
the skills and expertise you require.</p>
<b></div></b>
</body>
<b> 3. </b>
Change the width of the <img /> tag so that it occupies 100% of the column it’s inrather than using a fixed measurement. This will let the graphic resize with the browser
window.
<img src="images/team_leaders.jpg" alt="Acme Team Leaders"
width="100%" />
<b> 4. </b>
Add the style sheet reference to the header. <title>Acme Virtual Services: How We Can Help You</title>
<b><link rel="stylesheet" type="text/css" href="acme_two_cols</b>
<b>.css" /></b>
</head>
<b>NOTE</b>
Instead of floating rightcolumn to the left and making
it wrap to leftcolumn, you could float it to the right. This
would increase the amount of space between the columns.
</div>
<span class='text_page_counter'>(173)</span><div class='page_container' data-page=173>
<b>2</b>
<b>3</b>
<b>4</b>
<b>5</b>
<b>6</b>
<b>7</b>
<b>8</b>
<b>9</b>
<b>2</b>
<b>3</b>
<b>4</b>
<b>5</b>
<b>6</b>
<b>7</b>
<b>8</b>
<b>9</b>
<b>2</b>
<b>3</b>
<b>4</b>
<b>5</b>
<b>6</b>
<b>7</b>
<b>8</b>
<b>9</b>
<b> 5. </b>
Create a style sheet as described earlier in this chapter and add the CSS rules. Thefollowing listing shows all the style sheet needs to create the columns, but in practice,
your style sheet will normally include formatting for the text elements:
/* Acme Virtual Industries two-column style sheet,
acme_two_cols.css */
#leftcolumn { float: left;
width: 35% }
#rightcolumn { float: left;
width: 60% }
<b> 6. </b>
Save the changes to the style sheet, and then display the HTML page. The picture andits caption now appear on the left, with the main text on the right, as shown in Figure 8-6.
<i><b>Figure 8-6:</b><b> The sample page with a floating layout applied.</b></i>
<b>TIP</b>
If you’re having trouble getting your wrapped elements to
appear in the right places, add a different-colored border
to each rule so that you can see where its limits are.
UICK
<b>STEPS</b>
<b>CREATING A THREE-COLUMN </b>
<b>FLOATING LAYOUT</b>
To create a three-column floating layout, use a similar
technique to that for the two-column floating layout, but
create a center column as well (see Figure 8-7). Follow
these general steps:
<b> 1. </b>In the HTML file, create a separate <div> section
for each of the three columns.
<b> 2. </b>Assign each <div> section a unique id—for
example, leftcolumn,centercolumn, and
rightcolumn.
<b> 3. </b>Create a style sheet that defines three rules for
the columns. Here’s an example:
/* Acme Virtual Industries
three-column style sheet,
acme_three_cols.css */
#leftcolumn { float: left;
width: 18%;
padding: 2% }
#centercolumn { float: left;
width: 55% }
#rightcolumn { float: left;
width: 18%;
padding: 2% }
<b> 4. </b>Attach the style sheet to the HTML file. This
example uses a different style sheet name than
the two-column layout, so you’ll need to update
the<link> in the HTML file to point to the
three-column style sheet.
</div>
<span class='text_page_counter'>(174)</span><div class='page_container' data-page=174>
<b>10</b>
<b>9</b>
<b>8</b>
<b>7</b>
<b>6</b>
<b>5</b>
<b>4</b>
<b>3</b>
<b>2</b>
<b>PREVENT FLOATING WITH THE CLEAR PROPERTY</b>
To prevent an element from being floated, you can set the clear property of an
object. The clear property has four values, as explained in Table 8-3.
<b>CAUTION</b>
While What You See Is What You Get (WYSIWYG)
applications such as Dreamweaver enable you to create
floating layouts quickly, the layouts may not always be
perfect. Always test your layouts in a browser or three to
avoid awkward surprises.
<i><b>Figure 8-7:</b><b> You can create a three-column layout by adding a center column.</b></i>
<i><b>Table 8-3:</b><b> Values for the </b><b>clear</b><b> Property</b></i>
<b>VALUE</b> <b>MAKES THE ITEM</b>
left Move below left-floated objects but wrap around right-floated objects
right Move below right-floated objects but wrap around left-floated objects
both Move below both left- and right-floated objects
none Wrap around objects floated either left or right
UICK
<b>STEPS</b>
<b>OVERRIDING STYLE SHEETS IN </b>
<b>YOUR BROWSER</b>
Style sheets have many advantages, but with unsuitable
desktop or browser settings, they may produce pages
that are hard to read. Most browsers enable you to
override some aspects of style sheets. You may want to
use these techniques not only for easier viewing of some
web pages you visit, but also to check how your own web
pages look when your style sheets are not (or not fully)
in effect.
<b>APPLY YOUR OWN STYLE SHEET IN </b>
<b>INTERNET EXPLORER</b>
Internet Explorer lets you apply your own style sheet to
all web pages you visit; this style sheet overrides any
style sheet that each web page is using. You can also
choose to ignore the colors, font styles, and font sizes
specified on web pages.
<b> 1. </b>Start Internet Explorer or switch to it.
<b> 2. </b>Click the Tools menu button and then click
<b>Internet Options. The Internet Options dialog box </b>
appears.
<i>Continued . . .</i>
</div>
<span class='text_page_counter'>(175)</span><div class='page_container' data-page=175>
<b>2</b>
<b>3</b>
<b>4</b>
<b>5</b>
<b>6</b>
<b>7</b>
<b>8</b>
<b>9</b>
<b>2</b>
<b>3</b>
<b>4</b>
<b>5</b>
<b>6</b>
<b>7</b>
<b>8</b>
<b>9</b>
<b>2</b>
<b>3</b>
<b>4</b>
<b>5</b>
<b>6</b>
<b>7</b>
<b>8</b>
<b>9</b>
For example, you can add to the page a footer that runs all the way across the
page, as shown in Figure 8-8. To do so:
<b> 1. </b>
In the HTML document, create a division containing the footer’s content, and give ita unique id (the example uses pagefooter as the id).
<i><b>Figure 8-8:</b><b> You can use the </b><b>clear</b><b> property to create an area that runs across the whole </b></i>
<i><b>page.</b></i>
UICK
<b>STEPS</b>
<b>OVERRIDING STYLE SHEETS IN </b>
<b>YOUR BROWSER </b>
<i>(Continued)</i><b> 3. </b>On the General tab, click Accessibility. The
Accessibility dialog box appears.
<b> 4. </b>Select the Format Documents Using My Style
<b>Sheet check box, click Browse, select the style </b>
sheet in the Open dialog box, and click Open.
<b> 5. </b>If you want to ignore colors, font styles, or font
sizes, select the appropriate check boxes in the
Formatting area.
<b> 6. </b>Click OK and then click OK again.
<b>USE DEFAULT FONTS AND COLORS IN FIREFOX</b>
Firefox lets you choose your own default font or default
color instead of those specified in a web page’s style sheet.
<b> 1. </b>Start Firefox or switch to it.
<b> 2. </b>On Windows, click the Tools menu and then click
<b>Options. The Options dialog box appears. On </b>
the Mac, click the Firefox menu and then click
<b>Preferences. The Preferences window opens. </b>
<b> 3. </b>Click the Content button at the top of the window
to display the Content tab.
<i>Continued . . .</i>
</div>
<span class='text_page_counter'>(176)</span><div class='page_container' data-page=176>
<b>10</b>
<b>9</b>
<b>8</b>
<b>7</b>
<b>6</b>
<b>5</b>
<b>4</b>
<b>3</b>
<b>2</b>
<b> 2. </b>
In the style sheet, create a rule for thefooter that sets the floatproperty to left
and the clearproperty to both. Set the
widthproperty to 100% to make the
footer run all the way across the page.
Here’s an example that also puts a top
border on the footer so that you can
see the area it occupies:
#pagefooter { float: left;
border-top: 1px
blue solid;
clear: both;
width: 100% }
<b> 3. </b>
Save the style sheet, and then displaythe HTML page.
UICK
<b>STEPS</b>
<b>OVERRIDING STYLE SHEETS IN </b>
<b>YOUR BROWSER </b>
<i>(Continued)</i><b> 4. </b>In the Fonts & Colors area, click Advanced.
The Fonts dialog box appears.
<b> 5. </b>Choose the fonts you want to use.
<b> 6. </b>Clear the Allow Pages To Choose Their Own
<b>Fonts, Instead Of My Selections Above</b>
check box.
<b> 7. </b>Click OK to close the Fonts dialog box.
<b> 8. </b>Back on the Content tab of the Options
dialog box, click the Colors button. The
Colors dialog box appears.
<b> 9. </b>Choose the colors you want to use.
<b> 10. </b>Clear the Allow Pages To Choose Their
<b>Own Colors, Instead Of My Selections Above </b>
check box.
<b> 11. </b>Click OKto close the Colors dialog box.
<b> 12. </b>Click OK (Windows) or the Close button
(Mac OS X) to close the Options dialog box.
<b>APPLY YOUR OWN STYLE SHEET IN SAFARI</b>
Safari also lets you apply your own style sheet. Follow
these steps:
<b> 1. </b>In Windows, click the Edit menu and then click
<b>Preferences. The Preferences dialog box appears. </b>
On the Mac, click the Safari menu and then click
<b>Preferences. The Preferences window opens.</b>
<b> 2. </b>Click the Advanced button to display the
Advanced preferences.
<b> 3. </b>Click the Style Sheet drop-down menu, click
<b>Other, and use the resulting dialog box to choose </b>
the style sheet.
<b> 4. </b>Click the Close button to close the Preferences
dialog box or Preferences window.
</div>
<span class='text_page_counter'>(177)</span><div class='page_container' data-page=177></div>
<span class='text_page_counter'>(178)</span><div class='page_container' data-page=178>
<b>10</b>
<b>9</b>
<b>8</b>
<b>7</b>
<b>6</b>
<b>5</b>
<b>4</b>
<b>3</b>
<b>2</b>
<b>How to…</b>
<i><b>• Configure Web Options in the </b></i>
<i><b>Office Applications</b></i>
<i><b> Understanding How the Office </b></i>
<i><b>Applications Use HTML</b></i>
<i><b> Adding the New Web Page and </b></i>
<i><b>Web Page Preview Commands </b></i>
<i><b>to the Office Applications</b></i>
<i><b>• Start a New Web Page in Word</b></i>
<i><b>• Create </b><b>Hyperlinks</b></i>
<i><b>• Check How a Page Will Look</b></i>
<i><b>• Remove </b><b>Sensitive </b><b>Information </b></i>
<i><b>from the Document</b></i>
<i><b>• Save Word Documents </b></i>
<i><b>as Web Pages</b></i>
<i><b> Choosing Suitable Web </b></i>
<i><b>File Formats</b></i>
<i><b>• Remove </b><b>Office-Specific </b><b>Tags </b></i>
<i><b>from a Word Document</b></i>
<i><b> Using Word to Create </b></i>
<i><b>HTML Elements</b></i>
<i><b>• Create Web Pages from Excel </b></i>
<i><b>Workbooks</b></i>
<i><b>• Create Web Pages from </b></i>
<i><b>PowerPoint Presentations</b></i>
Chapter 9
<b>Creating Web Pages </b>
<b>Using the Microsoft </b>
<b>Office Applications</b>
If you have one of the versions of Microsoft Office 2007, you
can use the Office applications’ built-in features for saving
documents in web-page format. These features enable you
to put Word documents, Excel spreadsheets, and PowerPoint
presentations on to a website or an intranet site in a format in
which they can be viewed using a browser.
<b>Get Ready to Create Web Pages </b>
<b>in the Office Applications</b>
Before you start using the Office applications to create web pages, configure web
options in each of the applications that you plan to use. These options control
how the applications create web pages. Once you’ve specified the options you
</div>
<span class='text_page_counter'>(179)</span><div class='page_container' data-page=179>
<b>2</b>
<b>3</b>
<b>4</b>
<b>5</b>
<b>6</b>
<b>7</b>
<b>8</b>
<b>9</b>
<b>2</b>
<b>3</b>
<b>4</b>
<b>5</b>
<b>6</b>
<b>7</b>
<b>8</b>
<b>9</b>
<b>2</b>
<b>3</b>
<b>4</b>
<b>5</b>
<b>6</b>
<b>7</b>
<b>8</b>
<b>9</b>
want for web pages, you probably won’t need to change them. If you do need to
change them for a particular file, you can do so when you’re saving the file as a
web page.
You also need to know how the Office applications handle HTML. This section
explains that topic too.
<b>Configure Web Options in the </b>
<b>Office Applications</b>
The web options vary among the applications, but Word, Excel, and PowerPoint
have the same core set of options, which are discussed in this section. The
options that are substantially different for one or another of the applications are
discussed separately in the section for that particular application later in this
chapter.
<b>DISPLAY THE WEB OPTIONS DIALOG BOX</b>
To configure web options, first display the Web Options dialog box.
<b> 1. </b>
Open the application for which you want to configure web options. For example, if youwant to set options for Word, click the <b>Start</b> button, click <b>All Programs</b>, click <b>Microsoft </b>
<b>Office</b>, and then click <b>Microsoft Office Word 2007</b>.
<b> 2. </b>
Click the <b>Microsoft Office </b>button (the Office-logo button in the upper-left corner), andthen click the <b>Options</b>button. For example, click the <b>Word Options</b> button in Word or
the<b>Excel Options</b> button in Excel. The Options dialog box appears.
<b> 3. </b>
In the category list on the left, click <b>Advanced</b>, and then scroll down to the bottom ofthe dialog box.
<b> 4. </b>
Click the <b>Web Options</b> button. The Web Options dialog box for the applicationappears.
<b> 5. </b>
Choose options as discussed in the following subsections, click <b>OK</b> to close the WebOptions dialog box, and then click <b>OK</b> to close the Options dialog box.
<b>CHOOSE GENERAL TAB OPTIONS FOR EXCEL</b>
Choose options as follows on the General tab for Excel (see Figure 9-1):
<b> 1. </b>
Select the <b>Save Any Additional Hidden Data Necessary To Maintain Formulas</b>check box to make Excel save in the web page any hidden data that is required for
<b>TIP</b>
Microsoft Office 2003 for Windows, Microsoft Office 2008
for Mac, and Microsoft Office 2004 for Mac have similar
features. In Office 2003, choose Tools and then choose
<b>Options to open the Options dialog box. In Office for the </b>
Mac, press z<b>+COMMA</b> or choose Preferences from the
application’s menu (for example, choose Word and then
choose<b>Preferences) to open the Preferences dialog box </b>
(which contains the options).
<b>NOTE</b>
You must set the web options separately for each
of the Office applications. The changes you make in
one application don’t affect the settings in the other
applications.
<b>NOTE</b>
The General tab appears in the Web Options dialog box
for Excel and PowerPoint on Windows; it doesn’t appear
for Word. The Office for the Mac applications have fewer
options, which this chapter does not discuss in detail.
</div>
<span class='text_page_counter'>(180)</span><div class='page_container' data-page=180>
<b>10</b>
<b>9</b>
<b>8</b>
<b>7</b>
<b>6</b>
<b>5</b>
<b>4</b>
<b>3</b>
<b>2</b>
maintaining the formulas in the worksheets shown in the web page. Excluding any
relevant hidden data will prevent the formulas from working correctly.
<b> 2. </b>
Select the <b>Load Pictures From Web Pages Not Created In Excel</b> check box to makeExcel include graphics from non-Excel sources in the web pages you create from
Excel. Including such graphics helps to keep your worksheets complete. The usual
reason for clearing this check box and omitting graphics from other sources is that the
graphics will not be available in the web pages.
<b>CHOOSE GENERAL TAB OPTIONS FOR POWERPOINT</b>
Choose options as follows on the General tab of the Web Options dialog box for
PowerPoint (see Figure 9-2):
<b> 1. </b>
Select the <b>Add Slide Navigation Controls</b> check box if you want the presentation toinclude controls for navigating among slides. Usually, having the controls is beneficial,
but you may decide that your presentations don’t need them; if so, clear this check
box. If you include the controls, use the Colors drop-down list to choose the text color
and background color you want for the controls—for example, White Text On Black or
Browser Colors.
QUICK
<b>FACTS</b>
<b>UNDERSTANDING HOW THE OFFICE </b>
<b>APPLICATIONS USE HTML</b>
The Office applications use HTML for creating web
content, automatically applying all necessary tags when
you save a file in one of the web formats. The applications
use standard tags (such as those discussed in the rest of
this book) for creating standard HTML elements (such as
headings, paragraphs, and tables) that will be displayed by
a web browser, and custom, Office-specific tags for saving
Office application-specific data in a web-compatible format.
This combination of standard and custom tags enables
the Office applications to save an entire Word document,
Excel workbook, or PowerPoint presentation. Saving all
the information like this is called <i>round-tripping:</i> saving a
file with all its contents, formatting, and extra items (such
as customizations and Visual Basic for Applications
code) so that the application that created the file
can reopen it with exactly the same information and
formatting as when it saved the file.
Round-tripping enables you to create HTML documents
instead of documents that use the standard Office
file formats (for example, the Word Document format,
the Excel Spreadsheet format, or the PowerPoint
Presentation format). But always remember that the
Office-specific data is saved along with the HTML data.
Any visitor to your website can view the entire source
code for a web page, including any Office-specific data,
by using a View Source command.
Word enables you to remove the Office-specific tags
from a web page you save (see “Remove Office-Specific
Tags from a Word Document,” later in this chapter). You
may also choose to use Word to create specific HTML
elements that you then paste into your standard HTML
editor, where you can then integrate them with the code
you create manually. (See the “Using Word to Create
HTML Elements” QuickSteps, later in this chapter.)
<i><b>Figure 9-1: For most purposes, you should select both </b></i>
<i><b>the options on the General tab of the Web Options </b></i>
<i><b>dialog box for Excel.</b></i>
</div>
<span class='text_page_counter'>(181)</span><div class='page_container' data-page=181>
<b>2</b>
<b>3</b>
<b>4</b>
<b>5</b>
<b>6</b>
<b>7</b>
<b>8</b>
<b>9</b>
<b>2</b>
<b>3</b>
<b>4</b>
<b>5</b>
<b>6</b>
<b>7</b>
<b>8</b>
<b>9</b>
<b>2</b>
<b>3</b>
<b>4</b>
<b>5</b>
<b>6</b>
<b>7</b>
<b>8</b>
<b>9</b>
<b> 2. </b>
Clear the <b>Show Slide Animation While Browsing </b>check box unless you want thepresentation to include animations when the viewer is browsing from slide to slide.
<b> 3. </b>
Select the <b>Resize Graphics To Fit Browser Window</b> check box to make thepresentation automatically resize its graphics so that they fit within the browser
window. This makes the presentation easier to view and so is usually a good idea.
<b>CHOOSE BROWSERS TAB OPTIONS</b>
The Browsers tab lets you choose which features to use in your web pages based
on the browsers you’re expecting to view them. Figure 9-3 shows the Browsers
tab of the Web Options dialog box for Word, which offers one more option than
for Excel and PowerPoint. Table 9-1 explains the options and shows for which
browsers they’re turned on (with the check box selected) or off (with the check
box cleared).
The best way to select the options is to click the <b>People Who View This Web </b>
<b>Page Will Be Using</b> drop-down list and select the earliest browser version that
you want to support. The choice you make in this drop-down list automatically
selects the relevant check boxes in the Options group box. You can then select or
clear check boxes manually to fine-tune the choices you’ve made.
As of this writing, the most sensible option is to select <b>Microsoft Internet </b>
<b>Explorer 6 Or Later</b> in the People Who View This Web Page Will Be Using
drop-down list. Now that Internet Explorer has moved on to version 8 and the
other market-leading browsers—Firefox (25 percent), Safari (10 percent), Google
Chrome (around 1 percent), and Opera (around 1 percent)—support CSS, VML,
and PNG, there’s little point in choosing the earlier settings anymore.
<b>CHOOSE FILES TAB OPTIONS</b>
On the Files tab of the Web Options dialog box, choose options for controlling
how each Office application handles filenames and file locations in the web
pages you create, and specify whether to use Office as the default editor for web
pages created by the Office applications. Figure 9-4 shows the Files tab of the
Web Options dialog box for Word, which has the most extensive set of options
for files.
<i><b>Figure 9-2: The General tab of the Web Options dialog </b></i>
<i><b>box for PowerPoint enables you to add slide navigation </b></i>
<i><b>controls, display slide animations while the viewer is </b></i>
<i><b>browsing, and automatically resize graphics to fit the </b></i>
<i><b>browser window.</b></i>
<i><b>Figure 9-3: The Browsers tab of Word’s Web Options </b></i>
<i><b>dialog box lets you specify the types of browsers for </b></i>
<i><b>which you want your web pages to work correctly. </b></i>
</div>
<span class='text_page_counter'>(182)</span><div class='page_container' data-page=182>
<b>10</b>
<b>9</b>
<b>8</b>
<b>7</b>
<b>6</b>
<b>5</b>
<b>4</b>
<b>3</b>
<b>2</b>
Word, Excel, and PowerPoint for Windows all include the following options
(the Office applications for Mac have different options):
<b>•</b>
Select the <b>Organize Supporting Files In A Folder</b> check box if you want the applicationto save graphics and other separate elements in a folder that has the same name as the
web page plus “_files”—for example, the web page named “products.html” receives a
folder named “products_files” automatically. The application automatically creates a file
named “filelist.xml” that contains a list of the files required for the web page.
<b>•</b>
Clear the <b>Use Long File Names Whenever Possible</b> check box to prevent theapplication from creating long filenames that include spaces, which may not be
compatible with the web server you’re using. It’s best to keep filenames short and to
use underscores instead of spaces when you need to separate parts of the filename.
<b>•</b>
Select the <b>Update Links On Save</b> check box if you want the application toautomatically check each link and update any information that has changed each time
you save the file. In most cases, this automatic updating is helpful.
<b>OPTION</b> <b>EXPLANATION</b>
<b>IE 3, </b>
<b>NAVIGATOR 3</b>
<b>IE 4, </b>
<b>NAVIGATOR 4</b>
<b>IE 4 OR </b>
<b>LATER</b>
<b>IE 5 OR </b>
<b>LATER</b>
<b>IE 6 OR </b>
<b>LATER</b>
Allow PNG As A Graphics
Format
Enables web pages to contain graphics in
the PNG format. All current browsers can
display PNG graphics.
Off Off Off Off On
Rely On CSS For Font
Formatting
Uses Cascading Style Sheets for font
formatting.
Off On On On On
Rely On VML For Displaying
Graphics In Browsers
Uses Vector Markup Language for
displaying graphics.
Off Off Off On On
Save New Web Pages As
Single File Web Pages
Uses the Single File Web Page format for
saving new files.
Off Off On On On
Disable Features Not
Supported By These Browsers
(Word only.) Turns off HTML features the
browsers don’t support.
On On On On On
Save An Additional Version Of
The Presentation For Older
Browsers
(PowerPoint only.) Creates a version of
the presentation that’s viewable in Internet
Explorer 3, Internet Explorer 4, Netscape
Navigator 3, or Netscape Navigator 4.
On On Off Off Off
<i><b>Table 9-1: Options on the Browsers Tab of the Web Options Dialog Box</b></i>
<i><b>Figure 9-4: The Files tab of the Web Options dialog box </b></i>
<i><b>contains a different set of options for Word, Excel, and </b></i>
<i><b>PowerPoint. This is the Files tab for Word.</b></i>
</div>
<span class='text_page_counter'>(183)</span><div class='page_container' data-page=183>
<b>2</b>
<b>3</b>
<b>4</b>
<b>5</b>
<b>6</b>
<b>7</b>
<b>8</b>
<b>9</b>
<b>2</b>
<b>3</b>
<b>4</b>
<b>5</b>
<b>6</b>
<b>7</b>
<b>8</b>
<b>9</b>
<b>2</b>
<b>3</b>
<b>4</b>
<b>5</b>
<b>6</b>
<b>7</b>
<b>8</b>
<b>9</b>
<b>•</b>
Select the <b>Check If Office Is The Default Editor For Web Pages Created In Office</b>check box if you want Internet Explorer to check if the Office applications are your
default HTML editors for web pages created by the Office applications when you click
the Edit button in Internet Explorer. Clear this check box if you want to be able to use
another application to edit the web pages you’ve created with the Office applications.
The Files tab in the Web Options dialog box for Word also includes the Check If
Word Is The Default Editor For All Other Web Pages check box. Select this check
box if you want to use Word as your default HTML editor for web pages created
either using Word or using applications other than the other Office applications.
(Excel will still be the default editor for web pages created using Excel, and
PowerPoint for web pages created using PowerPoint.) Clear this check box if
you want to use another HTML editor as the default.
<b>CHOOSE PICTURES TAB OPTIONS</b>
On the Pictures tab of the Web Options dialog box (shown here), choose options
for the pictures you include in your web pages.
<b>•</b>
In the Screen Size drop-down list, select the minimum resolution that you expect mostvisitors to your website to be using. For most websites, the best choice is 800 × 600, a
resolution that most current computers support (including even the smallest netbooks).
<b>CAUTION</b>
Keeping the supporting files together in a folder is usually
helpful because you can move the web page and its
supporting files easily to another folder. If you clear the
<b>Organize Supporting Files In A Folder check box, the </b>
Office applications save the graphics and other separate
elements in the same folder as the web page. This
behavior tends to make your folders harder to manage,
as you cannot see at a glance which supporting files
belong to which web page. However, if you do not have
permission to create new folders in the folder in which
you are saving your web pages, you may need to clear
the<b>Organize Supporting Files In A Folder check box </b>
so that the Office application does not attempt to create
new folders for your web pages.
<b>NOTE</b>
Word documents, Excel worksheets, and PowerPoint
presentations keep all their text and embedded elements
(such as graphics) in the same file. Linked items, such as
graphics or automation objects from other applications,
are kept in separate files.
<b>TIP</b>
If you’re creating an intranet site whose visitors will all
use monitors with a higher resolution than 800 × 600,
you can choose a higher resolution. Similarly, if you’re
designing a website for small-screen computers (such as
handheld computers), choose a lower resolution, such as
640 × 480 or even 544 × 376.
</div>
<span class='text_page_counter'>(184)</span><div class='page_container' data-page=184>
<b>10</b>
<b>9</b>
<b>8</b>
<b>7</b>
<b>6</b>
<b>5</b>
<b>4</b>
<b>3</b>
<b>2</b>
<b>•</b>
In the Pixels Per Inch drop-down list, select the number of pixels per inch (ppi) to usefor pictures in your web pages. The default setting is 96 ppi, which works well for most
pages. You can also choose 72 ppi or 120 ppi. This drop-down list does not appear in
the Web Options dialog box for PowerPoint.
<b>CHOOSE ENCODING TAB OPTIONS</b>
The Encoding tab of the Web Options dialog box (shown here) lets you specify
which character-encoding scheme to use for the characters in your web pages.
The Office for Windows applications in North America and Western Europe
use the Western European (Windows) encoding by default. This works well
for most purposes, but you may prefer to choose Western European (ISO) for
compliance with the ISO-8859-1 standard or Unicode (UTF-8) for compliance
with the Unicode standard. Similarly, the Office for Mac applications use the
Western European (Macintosh) encoding as the default; as with Windows, you
may want to change to Western European (ISO).
Select the encoding you want in the Save This Document As drop-down list.
Then, if you always want to use this encoding, select the <b>Always Save Web </b>
<b>Pages In The Default Encoding</b> check box. Selecting this check box disables the
Save This Document As drop-down list.
The Reload The Current Document As drop-down list at the top of the Encoding
tab lets you reopen the current document using a different encoding. This can
be useful when you need to check how the document looks when encoded
differently.
<b>CHOOSE FONTS TAB OPTIONS</b>
The Fonts tab of the Web Options dialog box offers the following options:
<b>•</b>
Use the <b>Character Set</b> list box to specify the character set you want to use for yourpages. Use the <b>English/Western European/Other Latin Script</b> item unless you need
to create pages in another character set, such as Hebrew or Arabic. You need to make
sure that the character set you choose is available for the encoding you’re using, so
don’t make changes here unless you know what you’re doing.
<b>NOTE</b>
<i>Unicode</i> is a scheme for representing characters on
computers. For example, a capital A is represented
by 0041 in Unicode, and a capital B is represented by
0042. <i>UTF-8</i> is the abbreviation for Universal Character
Set Transformation Format 8-Bit. <i>ISO</i> is the short
term used to denote the International Organization for
Standardization.
</div>
<span class='text_page_counter'>(185)</span><div class='page_container' data-page=185>
<b>2</b>
<b>3</b>
<b>4</b>
<b>5</b>
<b>6</b>
<b>7</b>
<b>8</b>
<b>9</b>
<b>2</b>
<b>3</b>
<b>4</b>
<b>5</b>
<b>6</b>
<b>7</b>
<b>8</b>
<b>9</b>
<b>2</b>
<b>3</b>
<b>4</b>
<b>5</b>
<b>6</b>
<b>7</b>
<b>8</b>
<b>9</b>
<b>•</b>
Use the <b>Proportional Font</b> drop-down list and its <b>Size</b> drop-down list to specify theproportional font and font size to use for your pages.
<b>•</b>
Use the <b>Fixed-Width Font</b> and its <b>Size</b> drop-down list to specify the monospaced fontand font size.
After you finish choosing settings in the Web Options dialog box, click <b>OK</b> to
close the dialog box, and then click <b>OK</b> to close the Options dialog box.
<b>Create Web Pages in Word</b>
After choosing suitable web options, you’re ready to start creating web pages
in Word. The first step is to start a new web page. You can then add text and
hyperlinks and check how the page will look. If you’re creating a web page
from an existing document, you will need to remove any sensitive information
from it and then save it as a web page.
<b>Start a New Web Page in Word</b>
You can now create a new document in Word and add content to it like this:
<b> 1. </b>
Start Word, if it is not already running, or switch to Word.UICK
<b>STEPS</b>
<b>ADDING THE NEW WEB PAGE AND </b>
<b>WEB PAGE PREVIEW COMMANDS </b>
<b>TO THE OFFICE APPLICATIONS </b>
Word, Excel, and PowerPoint include a Web Page
Preview command that you can use to see how your
document will look as a web page. But this command
doesn’t appear in the Ribbon or on the Microsoft Office
button menu, so you need to add it to the Quick Access
toolbar before you can use it.
Similarly, both Word and Excel have a Save As Web
Page button for saving an unsaved document or
workbook as a web page, and Word has a New Web
Page command that you can use to start a new web
page. You have to add these buttons to the Quick Access
toolbar, too.
Follow these steps:
<b> 1. </b>Open the application you want to change.
<b> 2. </b>Click the Microsoft Office button, and then click
the<b>Options button to open the Options dialog </b>
box.
<b> 3. </b>In the left column, click the Customize item to
display the Customize screen. Figure 9-5 shows
the Customize screen for Word with customization
underway.
<b> 4. </b>Make sure the Customize Quick Access Toolbar
drop-down list shows For All Documents
<b>(Default).</b>
<b> 5. </b>In the Choose Commands From drop-down list,
choose<b>Commands Not In The Ribbon. The list </b>
of commands appears in the list box below the
drop-down list.
<b> 6. </b>Scroll down to the Web Page Preview command.
<i>Continued . . .</i>
</div>
<span class='text_page_counter'>(186)</span><div class='page_container' data-page=186>
<b>10</b>
<b>9</b>
<b>8</b>
<b>7</b>
<b>6</b>
<b>5</b>
<b>4</b>
<b>3</b>
<b>2</b>
<b> 2. </b>
Click the <b>New Web Page</b> button on the Quick Access toolbar. You will need to add thisbutton to the Quick Access toolbar, as described in the QuickSteps, “Adding the New
Web Page and Web Page Preview Commands to the Office Applications.”
<b> 3. </b>
Create content on the page by using standard Word techniques. For example:<b>•</b>
To enter text, type it as usual.<b>•</b>
To apply a style, click the <b>Style</b> drop-down list on the Formatting toolbar, and thenclick the desired style name.
<b>•</b>
To apply direct formatting (for example, bold or italic), select the text to which youwant to apply it, and then click the appropriate button on the Formatting toolbar.
<b> 4. </b>
Save the document as described in the section “Save Word Documents as WebPages,” later in this chapter.
<i><b>Figure 9-5: Put the Web Page Preview command on the Quick Access toolbar in the Office </b></i>
<i><b>applications so that you can preview your web pages.</b></i>
<b>NOTE</b>
Instead of starting a new web page from scratch in Word,
you can create a web page by opening an existing Word
document, Excel workbook, or PowerPoint presentation.
Click the Microsoft Office button menu, click Save As,
and then click Other Formats to save it in a web format.
See “Save Word Documents as Web Pages,” “Create
Web Pages from Excel Workbooks,” and “Create Web
Pages from PowerPoint Presentations,” all later in this
chapter, for details.
UICK
<b>STEPS</b>
<b>ADDING THE NEW WEB PAGE AND </b>
<b>WEB PAGE PREVIEW COMMANDS </b>
<b>TO THE OFFICE APPLICATIONS </b>
<i>(Continued)</i>
<b> 7. </b>Click the Web Page Preview command, and then
click the Add button to add it to the list box on
the right. You can then click it in that list box and
use the up-arrow button or down-arrow button to
reposition it on the Quick Access toolbar.
<b> 8. </b>For Word or Excel, scroll up to the Save As Web
<b>Page button, click it, and then click the Add button </b>
to add it to the list box on the right.
<b> 9. </b>For Word only, scroll the left list box up to the New
<b>Web Page button. Add this button to the Quick </b>
Access toolbar and reposition it if you want to.
<b> 10. </b>Click the OK button to close the Options dialog box.
</div>
<span class='text_page_counter'>(187)</span><div class='page_container' data-page=187>
<b>2</b>
<b>3</b>
<b>4</b>
<b>5</b>
<b>6</b>
<b>7</b>
<b>8</b>
<b>9</b>
<b>2</b>
<b>3</b>
<b>4</b>
<b>5</b>
<b>6</b>
<b>7</b>
<b>8</b>
<b>9</b>
<b>2</b>
<b>3</b>
<b>4</b>
<b>5</b>
<b>6</b>
<b>7</b>
<b>8</b>
<b>9</b>
<b>Create Hyperlinks</b>
The process of inserting a hyperlink is the same in each of the Office
applications, so it is discussed here. The example shown is from Word. To insert
a hyperlink, display the Insert Hyperlink dialog box by following these steps,
and then follow the steps in the subsection that discusses the type of hyperlink
you want to create:
<b> 1. </b>
Open the file in which you want to create the hyperlink. For example, start Word andthen open the document.
<b> 2. </b>
If you want the hyperlink to use existing text or a graphic as the object the user willclick, select that text or graphic. If not, position the insertion point where you want the
hyperlink to appear.
<b> 3. </b>
Click the <b>Insert</b> tab on the Ribbon, go to the <b>Links</b> group, and then click the <b>Hyperlink</b>button. The Insert Hyperlink dialog box appears (see Figure 9-6).
<b> 4. </b>
Complete the hyperlink with one of the following sections, depending on whetheryou want to create a hyperlink to an existing file or web page, a place in the current
document, a new document, or an e-mail address.
<i><b>Figure 9-6: The Insert Hyperlink dialog box enables you to create hyperlinks to web </b></i>
<i><b>pages, places within the same file, files, or e-mail addresses.</b></i>
<i><b>Browse For File</b></i>
<i><b>Browse The Web</b></i>
</div>
<span class='text_page_counter'>(188)</span><div class='page_container' data-page=188>
<b>10</b>
<b>9</b>
<b>8</b>
<b>7</b>
<b>6</b>
<b>5</b>
<b>4</b>
<b>3</b>
<b>2</b>
<b>CREATE A HYPERLINK TO AN EXISTING FILE OR WEB PAGE</b>
To create a hyperlink to an existing file or web page:
<b> 1. </b>
In the Link To column, click the <b>Existing File Or Web Page</b> button if it is not alreadyselected.
<b> 2. </b>
Navigate to the file or web page in one of these ways:<b>•</b>
Click the <b>Browse For File</b> button, use the resulting Link To File dialog box to selectthe file, and then click the <b>Open</b> button. The Office application automatically enters
the URL in the Address text box.
–Or–
<b>•</b>
Click the <b>Browse The Web</b> button to make Windows open or activate an InternetExplorer window, browse to the page to which you want to link, and then switch
back to the Insert Hyperlink dialog box. The Office application automatically enters
the URL in the Address text box.
–Or–
<b>•</b>
Click the <b>Current Folder</b> button to display the current folder. Click the <b>Browsed </b><b>Pages</b> button to display a list of web pages you’ve browsed recently. Click the
<b>Recent Files</b> button to display a list of local files you’ve worked with recently.
–Or–
<b>•</b>
Select the address from the Address drop-down list.<b> 3. </b>
Change the default text in the Text To Display text box to the text you want displayed forthe hyperlink. (This is the text that the user clicks to access the linked page. If you have
selected text on your web page, it will appear here.)
<b> 4. </b>
To add a ScreenTip to the hyperlink, click <b>ScreenTip</b>, type the text in the SetHyperlink ScreenTip dialog box, and then click <b>OK</b>. The ScreenTip gives the user extra
information about the link before they click it.
<b>CAUTION</b>
If Internet Explorer is not your default browser, the
Browse The Web button will not work correctly. Clicking
the button opens your default browser, but when you
return to the Insert Hyperlink dialog box, the Office
application tries to get the URL from Internet Explorer
rather than from your default browser. Instead, browse to
the web page in your default browser, copy the address
from the address bar, and then paste it into the Address
box in the Insert Hyperlink dialog box. In the Office for
Mac applications, you will need to use copy-and-paste in
any case.
</div>
<span class='text_page_counter'>(189)</span><div class='page_container' data-page=189>
<b>2</b>
<b>3</b>
<b>4</b>
<b>5</b>
<b>6</b>
<b>7</b>
<b>8</b>
<b>9</b>
<b>2</b>
<b>3</b>
<b>4</b>
<b>5</b>
<b>6</b>
<b>7</b>
<b>8</b>
<b>9</b>
<b>2</b>
<b>3</b>
<b>4</b>
<b>5</b>
<b>6</b>
<b>7</b>
<b>8</b>
<b>9</b>
<b> 5. </b>
To make the hyperlink connect to a particular anchor in the document rather thansimply to the beginning of the document, click <b>Bookmark</b>and choose the anchor
item in the Select Place In Document dialog box (see Figure 9-7). You’ll need to have
placed the bookmark or anchor in the document beforehand.
<b> 6. </b>
Click <b>OK</b>. The Office application inserts the hyperlink.<b>CREATE A HYPERLINK TO A PLACE IN THE CURRENT DOCUMENT</b>
To create a hyperlink to a place in the current document:
<b> 1. </b>
In the Link To column, click the <b>Place In This Document</b> button (see Figure 9-8).<b> 2. </b>
Change the default text in the Text To Display text box to the text you want displayed forthe hyperlink. (This is the text that the user clicks to access the linked page and is the
text you first selected, if you did so.)
<b> 3. </b>
To add a ScreenTip to the hyperlink, click <b>ScreenTip</b>, type the text in the Set HyperlinkScreenTip dialog box, and then click <b>OK</b>.
<b> 4. </b>
Click <b>OK</b>. The Office application inserts the hyperlink.<i><b>Figure 9-7: The Office applications enable you to link to a particular place in the destination document—for </b></i>
<i><b>example, to a bookmark in a Word document (left), a cell or range in an Excel worksheet (right), or a slide in a </b></i>
<i><b>PowerPoint presentation.</b></i>
</div>
<span class='text_page_counter'>(190)</span><div class='page_container' data-page=190>
<b>10</b>
<b>9</b>
<b>8</b>
<b>7</b>
<b>6</b>
<b>5</b>
<b>4</b>
<b>3</b>
<b>2</b>
<b>CREATE A HYPERLINK TO A NEW DOCUMENT</b>
To create a hyperlink to a new document:
<b> 1. </b>
<b>Create New Document</b> button (see Figure 9-9).<b> 2. </b>
Type the filename and extension in the Name Of NewDocument text box. Look at the path in the Full Path area
and make sure it shows the folder you want. If necessary,
click the <b>Change</b> button; use the Create New Document
dialog box to specify the folder, filename, and extension;
and then click <b>OK</b>.
<b> 3. </b>
Change the default text in the Text To Display text box tothe text you want displayed for the hyperlink. (This is the
text that the user clicks to access the linked page and is
the text you first selected, if you did so.)
<b> 4. </b>
To add a ScreenTip to the hyperlink, click the <b>ScreenTip</b>button, type the text in the Set Hyperlink ScreenTip dialog
box, and then click <b>OK</b>.
<i><b>Figure 9-8: The Place In This Document area of the Insert Hyperlink dialog box enables </b></i>
<i><b>you to quickly link to an anchor in the same document.</b></i>
<i><b>Figure 9-9: When you need to link to a new document, Office lets you create the new </b></i>
<i><b>document immediately. This helps ensure that the new document is saved with the </b></i>
</div>
<span class='text_page_counter'>(191)</span><div class='page_container' data-page=191>
<b>2</b>
<b>3</b>
<b>4</b>
<b>5</b>
<b>6</b>
<b>7</b>
<b>8</b>
<b>9</b>
<b>2</b>
<b>3</b>
<b>4</b>
<b>5</b>
<b>6</b>
<b>7</b>
<b>8</b>
<b>9</b>
<b>2</b>
<b>3</b>
<b>4</b>
<b>5</b>
<b>6</b>
<b>7</b>
<b>8</b>
<b>9</b>
<b> 5. </b>
By default, the Office application selects the Edit The New Document Now optionbutton. If you prefer not to open the new document for editing immediately, select the
<b>Edit The New Document Later</b> option button.
<b> 6. </b>
Click <b>OK</b>. The Office application inserts the hyperlink and creates the document.<b>CREATE A HYPERLINK TO AN E-MAIL ADDRESS</b>
To create a mailto hyperlink that starts a message to an e-mail address:
<b> 1. </b>
In the Link To column, click the <b>E-mail Address</b> button (see Figure 9-10).<b> 2. </b>
Type the e-mail address in the E-mail Address text box (or click it in the Recently UsedE-mail Addresses list box), and type the subject for the message in the Subject text
box.
<b> 3. </b>
Change the default text in the Text To Display text box to the text you want displayed forthe hyperlink. (This is the text that the user clicks to access the linked page and is the
text you first selected, if you did so.)
<b> 4. </b>
To add a ScreenTip to the hyperlink, click the <b>ScreenTip</b> button, type the text in theSet Hyperlink ScreenTip dialog box, and then click <b>OK</b>.
<b> 5. </b>
Click <b>OK</b>. The Office application inserts the hyperlink.<b>NOTE</b>
The Office applications automatically create a hyperlink
when you type a URL, e-mail address, or a network
path in a document and then press <b>SPACEBAR</b>,<b>TAB</b>,
<b>ENTER</b>, or a punctuation key. If you find this behavior
awkward, you can turn it off: Click the Microsoft Office
button, and then click the Options button. Click the
<b>Proofing category, and then click the AutoCorrect </b>
<b>Options button. In the AutoCorrect dialog box, click the </b>
<b>AutoFormat As You Type tab, clear the Internet And </b>
<b>Network Paths With Hyperlinks check box, and then </b>
click OK to close each dialog box.
<i><b>Figure 9-10: The Insert Hyperlink dialog box lets you quickly create a </b><b>mailto</b><b>hyperlink </b></i>
<i><b>to a recently used e-mail address.</b></i>
</div>
<span class='text_page_counter'>(192)</span><div class='page_container' data-page=192>
<b>10</b>
<b>9</b>
<b>8</b>
<b>7</b>
<b>6</b>
<b>5</b>
<b>4</b>
<b>3</b>
<b>2</b>
<b>Check How a Page Will Look</b>
Before you save an Office document as a web page, you may want to use Web
Page Preview to check how it looks.
<b> 1. </b>
If the document is not already open, open it in the appropriate application. Forexample, open a Word document in Word.
<b> 2. </b>
Click the <b>Web Page Preview</b> button on the Quick Access toolbar. (You will need to addthis button to the Quick Access toolbar, as described in the “Adding the New Web Page
and Web Page Preview Commands to the Office Applications” QuickSteps, earlier in this
chapter.) The application creates a temporary file containing the page in a web format
and then displays the page in Internet Explorer. Figure 9-11 shows an example.
<b> 3. </b>
After viewing the web page, click the <b>Close</b> button (the X button) to close the InternetExplorer tab or window.
<b>Remove Sensitive Information </b>
<b>from the Document</b>
When creating a web page that you will place on a website (as opposed to a
site on a local network), make sure you remove the personal information and
sensitive data that the Office applications automatically include by default in
documents. To remove this information:
<b> 1. </b>
Start the application and open the document that you will turn into a web page.<b> 2. </b>
Click the <b>Microsoft Office</b> button, highlight <b>Prepare</b>, and then click <b>Inspect</b><b>Document</b>. The Document Inspector dialog box appears. This dialog box contains
different options for the different applications, but the basic idea is the same: to let
you remove any potentially sensitive information. Figure 9-12 shows the Document
Inspector dialog box for Word.
<b> 3. </b>
Select the check box for each category of information you want to remove from thedocument.
<b> 4. </b>
Click the <b>Inspect</b> button. The application checks the document and updates the dialogbox to show which items it found (see Figure 9-13).
<b> 5. </b>
Click the <b>Remove All</b> button for each category of sensitive information you want toremove. If necessary, click the <b>Reinspect</b> button to inspect the document again to
make sure all the dangerous data has been stripped out.
</div>
<span class='text_page_counter'>(193)</span><div class='page_container' data-page=193>
<b>2</b>
<b>3</b>
<b>4</b>
<b>5</b>
<b>6</b>
<b>7</b>
<b>8</b>
<b>9</b>
<b>2</b>
<b>3</b>
<b>4</b>
<b>5</b>
<b>6</b>
<b>7</b>
<b>8</b>
<b>9</b>
<b>2</b>
<b>3</b>
<b>4</b>
<b>5</b>
<b>6</b>
<b>7</b>
<b>8</b>
<b>9</b>
<i><b>Figure 9-11: Web Page Preview enables you to identify problems with your web </b></i>
<i><b>pages (such as the squished image here) before you save them in an HTML format.</b></i>
</div>
<span class='text_page_counter'>(194)</span><div class='page_container' data-page=194>
<b>10</b>
<b>9</b>
<b>8</b>
<b>7</b>
<b>6</b>
<b>5</b>
<b>4</b>
<b>3</b>
<b>2</b>
<i><b>Figure 9-12: Use the Document Inspector dialog box to check a document </b></i>
<i><b>for sensitive information before you publish it as a web page.</b></i>
<i><b>Figure 9-13: Click the Remove All button for each category of document </b></i>
<i><b>information you want to remove.</b></i>
<b> 6. </b>
Click the <b>Close</b> button to close the Document Inspector.<b> 7. </b>
Click the <b>Save</b> button on the Quick Access toolbar to save the document.<b>Save Word Documents as Web Pages</b>
To save an existing Word document as a web page:
<b> 1. </b>
Start Word if it is not already running, or switch to it.<b> 2. </b>
Click the <b>Microsoft Office </b>button, click <b>Open</b>, select the existing document you wantto save as a web page, and then click <b>Open</b>. Alternatively, click the <b>Microsoft Office </b>
button, and then click the document on the Recent Documents menu. The document
opens.
</div>
<span class='text_page_counter'>(195)</span><div class='page_container' data-page=195>
<b>2</b>
<b>3</b>
<b>4</b>
<b>5</b>
<b>6</b>
<b>7</b>
<b>8</b>
<b>9</b>
<b>2</b>
<b>3</b>
<b>4</b>
<b>5</b>
<b>6</b>
<b>7</b>
<b>8</b>
<b>9</b>
<b>2</b>
<b>3</b>
<b>4</b>
<b>5</b>
<b>6</b>
<b>7</b>
<b>8</b>
<b>9</b>
<b> 3. </b>
Click the <b>Save As Web Page</b> button on the Quick Access toolbar. The Save As dialogbox appears.
<b> 4. </b>
In the Save As Type drop-down list, select the file format you want to use (see the“Choosing Suitable Web File Formats” QuickSteps in this chapter for a discussion
of the available formats). For example, choose Web Page. Word displays the web
page-related controls (see Figure 9-14).
<b> 5. </b>
Choose the folder in which to save the web page.<b> 6. </b>
In the File Name text box, type the filename. If you want to use the .html extensioninstead of the .htm extension (for a file in either the Web Page format or the Web Page,
Filtered format) or the .mhtml extension instead of the .mht extension (for a file in the
Single File Web Page Format), type the extension as well.
QUICK
<b>FACTS</b>
<b>CHOOSING SUITABLE WEB </b>
<b>FILE FORMATS</b>
Word, Excel, and PowerPoint each offer two or more HTML
formats to choose from; so before you save a file in HTML,
make sure you understand how the formats differ from
each other and which format is suitable for which purposes.
Word, Excel, and PowerPoint each offer the Single File
Web Page format and the Web Page format. Word also
offers the Web Page, Filtered format.
<b>WEB PAGE FORMAT</b>
The Web Page format creates an HTML file that contains
the text contents of the document along with a separate
folder that contains the graphics for the document. This
makes the web page’s HTML file itself smaller, but the
page as a whole is a little clumsy to distribute because
you must distribute the graphics folder as well. The folder
is created automatically and assigned the web page’s
name followed by _files. For example, a web page named
Products.html has a folder named Products_files.
Files in the Web Page format use the .htm and .html
file extensions. These files also use Office-specific tags
to preserve all of the information the file contains in an
HTML format.
<b>SINGLE FILE WEB PAGE FORMAT</b>
The Single File Web Page format creates a web archive
file that contains all the information required for the web
page—all the text contents and all the graphics. Use the
Single File Web Page format to create files that you can
easily distribute.
Files in the Single File Web Page format use the .mht
and .mhtml file extensions. These files use Office-specific
tags to preserve all of the information the file contains in
an HTML format.
<i>Continued . . .</i>
<i><b>Figure 9-14: Word’s Save As dialog box for saving web pages includes </b></i>
<i><b>the Page Title area and the Change Title button.</b></i>
</div>
<span class='text_page_counter'>(196)</span><div class='page_container' data-page=196>
<b>10</b>
<b>9</b>
<b>8</b>
<b>7</b>
<b>6</b>
<b>5</b>
<b>4</b>
<b>3</b>
<b>2</b>
<b> 7. </b>
Check the title displayed in the Page Title area. (You may see no title.) To change thetitle, click the <b>Change Title</b> button, type the new title in the Set Page Title dialog box,
and then click <b>OK</b>.
<b> 8. </b>
Click <b>Save</b>. Word saves the document as a web page.<b> 9. </b>
If you’ve finished working with the document, click the <b>Microsoft Office </b>button, andthen click <b>Close</b>. If you’ve finished working with Word, click the <b>Microsoft Office </b>
button, and then click <b>Exit</b><i><b>Application</b></i> (where Application is the application’s name).
<b>Remove Office-Specific Tags </b>
<b>from a Word Document</b>
As discussed earlier in this chapter, Word uses custom HTML tags to store the
Office-specific data required to save the entire Word document in an HTML
format. Saving this Office-specific data is good if you want to be able to edit
the document in Word with all the features present, but you don’t need this
extra data when you’re using Word on a one-time basis to create pages for your
website.
To remove the tags from a document, follow these steps:
<b> 1. </b>
Follow the steps in the previous section, but choose the <b>Web Page, Filtered</b> format inthe Save As Type drop-down list in the Save As dialog box.
<b> 2. </b>
When you click <b>Save</b>, the Microsoft Office Word dialog box shown here appears, tellingyou that Office-specific tags will be removed. Click <b>Yes</b>.
QUICK
<b>FACTS</b>
<b>CHOOSING SUITABLE WEB FILE </b>
<b>FORMATS </b>
<i>(Continued)</i><b>WEB PAGE, FILTERED FORMAT</b>
The Web Page, Filtered format is available only in Word.
Like the Web Page format, this format creates an HTML
file that contains the text contents of the document along
with a separate, automatically named folder that contains
the graphics for the document. However, this format
removes Office-specific tags from the document.
Removing these features reduces the size of the file,
which is a good idea when you just want HTML. This
is great when what you need is a web page without
Word-specific features or advanced formatting. The
disadvantage is that the file loses Word items such as
document properties, template links, and VBA code, so
this format is not useful for when you need to round-trip
complex documents—that is, save them in web-page
format and then bring them back into Word without losing
any data or meta data.
Files in the Web Page, Filtered format use the .htm and
.html file extensions.
</div>
<span class='text_page_counter'>(197)</span><div class='page_container' data-page=197>
<b>2</b>
<b>3</b>
<b>4</b>
<b>5</b>
<b>6</b>
<b>7</b>
<b>8</b>
<b>9</b>
<b>2</b>
<b>3</b>
<b>4</b>
<b>5</b>
<b>6</b>
<b>7</b>
<b>8</b>
<b>9</b>
<b>2</b>
<b>3</b>
<b>4</b>
<b>5</b>
<b>6</b>
<b>7</b>
<b>8</b>
<b>9</b>
<b> 3. </b>
Depending on the browser settings you have chosen in the Web Options dialogbox, you may also see warnings about features that will be removed from the Word
document. Click <b>Continue</b> if you want to proceed anyway; click <b>Cancel</b> if you want to
choose another format.
<b>Create Web Pages from </b>
<b>Excel and PowerPoint</b>
Word is great for creating web pages, but if the data you want to use on a web
page is part of a workbook, you’ll want to work from Excel instead. Similarly,
you can create web pages from presentations by using PowerPoint.
<b>Create Web Pages from Excel Workbooks</b>
Excel lets you save a selected part of the workbook, a worksheet, or the entire
workbook as a web page, with or without interactivity. Usually, however, what
you’ll want to do is “publish” a copy of part of the workbook, of a worksheet, or
of the entire workbook, because the Publish dialog box offers more features and
flexibility for web pages.
To save an Excel workbook, worksheet, or part of a worksheet as a web page:
<b> 1. </b>
Start Excel if it is not already running, or switch to Excel.<b> 2. </b>
Open the existing worksheet, or create a new worksheet, add content, and save it.<b> 3. </b>
If you want to save a worksheet rather than a workbook as a web page, select thatworksheet. If you want to save a range from a worksheet as a web page, select that
range.
<b> 4. </b>
Click the <b>Save As Web Page</b> button on the Quick Access toolbar. The Save As dialogbox appears (see Figure 9-15).
<b> 5. </b>
In the Save area, select the <b>Entire Workbook</b> option button if you want to save orpublish the entire workbook. Select the <b>Selection</b> option button if you want to publish
the active worksheet or the selected range. When a range is selected, the Selection
option button lists the range (for example, “Selection: $A$1:$H$15”); if no range is
selected, the Selection option button reads “Selection: Sheet.”
UICK
<b>STEPS</b>
<b>USING WORD TO CREATE </b>
<b>HTML ELEMENTS</b>
If you choose not to use Word as your main HTML editor,
you may still want to use Word to create some HTML
elements so that you can include them in your web pages.
<b> 1. </b>Start Word if it is not already running.
<b> 2. </b>Open an existing document or create a new
document that contains the desired content.
<b> 3. </b>Save the Word document in one of the HTML
formats.
<b> 4. </b>View the resulting page in your browser.
<b> 5. </b>View the source code of the web page. For
example, in Internet Explorer, click the Page menu
button and then click View Source.
<b> 6. </b>Select the code for the element you want to copy,
and then issue a Copy command (for example,
press<b>CTRL+C</b>).
<b> 7. </b>Switch to your HTML editor, position the insertion
point, and then issue a Paste command (for
example, press <b>CTRL+V</b>).
<b> 8. </b>Close Word and your browser if you have finished
working with them.
</div>
<span class='text_page_counter'>(198)</span><div class='page_container' data-page=198>
<b>10</b>
<b>9</b>
<b>8</b>
<b>7</b>
<b>6</b>
<b>5</b>
<b>4</b>
<b>3</b>
<b>2</b>
<b> 6. </b>
Use the Address box and the main list box to specify the folder in which to save theweb page.
<b> 7. </b>
In the Save As Type drop-down list, select the file format you want to use—forexample, Web Page (*.htm, *.html). See the “Choosing Suitable Web File Formats”
QuickSteps for a discussion of the available formats.
<b> 8. </b>
In the File Name text box, type the filename. If you want to use the .html extensioninstead of the .htm extension or the .mhtml extension instead of the .mht extension,
type the extension.
<b> 9. </b>
Click <b>Publish</b>. The Publish As Web Page dialog box appears (see Figure 9-16).<b>NOTE</b>
Files saved in the Web Page format can use the .htm
extension or the .html extension. Files saved in the Single
File Web Page format can use the .mht extension or the
.mhtml extension.
<i><b>Figure 9-15: Excel’s Save As dialog box for saving web pages includes </b></i>
<i><b>controls for publishing the workbook, worksheet, or selection.</b></i>
</div>
<span class='text_page_counter'>(199)</span><div class='page_container' data-page=199>
<b>2</b>
<b>3</b>
<b>4</b>
<b>5</b>
<b>6</b>
<b>7</b>
<b>8</b>
<b>9</b>
<b>2</b>
<b>3</b>
<b>4</b>
<b>5</b>
<b>6</b>
<b>7</b>
<b>8</b>
<b>9</b>
<b>2</b>
<b>3</b>
<b>4</b>
<b>5</b>
<b>6</b>
<b>7</b>
<b>8</b>
<b>9</b>
<b> 10. </b>
Use the Choose drop-down list and list box in the Item To Publish section to specifywhich item to publish. If necessary, change the item selected in the Choose
drop-down list. If you select the Range Of Cells item, Excel displays a Collapse Dialog
button. Click this button to collapse the dialog box to its title bar, select the range in the
worksheet, and then click the <b>Collapse Dialog</b> button again to restore the dialog box.
<b> 11. </b>
Check the title (if any) displayed in the Title text box. To change it, click the <b>Change</b>button, type the new title in the Set Title dialog box, and then click <b>OK</b>.
<b> 12. </b>
Check the path and filename in the File Name text box. If necessary, type a change,or click <b>Browse</b>, specify the folder and filename in the Publish As dialog box, and then
click <b>OK</b>.
<b> 13. </b>
Select the <b>AutoRepublish Every Time This Workbook Is Saved</b> check box if youwant Excel to automatically publish this web page again each time you save the file.
<b> 14. </b>
Select the <b>Open Published Web Page In Browser</b> check box if you want Excel todisplay the web page in Internet Explorer so that you can check it. This is usually a
good idea, because it helps you pick up any errors that occur when you publish the
web page.
<b> 15. </b>
Click <b>Publish</b>. Excel publishes the web page and (if you selected the Open PublishedWeb Page In Browser check box) displays it in Internet Explorer.
<i><b>Figure 9-16: In Excel’s Publish As Web Page dialog box, </b></i>
<i><b>choose whether to republish the web page automatically </b></i>
<i><b>each time you save the workbook.</b></i>
<b>NOTE</b>
The AutoRepublish Every Time This Workbook Is
Saved option is convenient for making sure the web
page is always up-to-date, but use it only if you have
a permanent and fast connection to the site on which
you’re publishing the web page.
<b>NOTE</b>
Internet Explorer may display the information bar,
telling you that it has restricted the file from showing
active content that could access your computer and
prevented the spreadsheet from being displayed. To view
the spreadsheet, click the information bar, click Allow
<b>Blocked Content, and then click Yes in the Security </b>
Warning dialog box.
</div>
<span class='text_page_counter'>(200)</span><div class='page_container' data-page=200>
<b>10</b>
<b>9</b>
<b>8</b>
<b>7</b>
<b>6</b>
<b>5</b>
<b>4</b>
<b>3</b>
<b>2</b>
<i><b>Figure 9-17: PowerPoint’s Save As dialog box for saving web pages includes a </b></i>
<i><b>Publish button and a Page Title text box.</b></i>
<b>Create Web Pages from </b>
<b>PowerPoint Presentations</b>
To save a PowerPoint presentation as a web page:
<b> 1. </b>
Start PowerPoint if it is not already running, or switch toPowerPoint.
<b> 2. </b>
Open the existing presentation, or create a new presentation,add content, and save it.
<b> 3. </b>
Click the <b>Microsoft Office </b>button, highlight <b>Save As</b>, and thenclick <b>Other Formats</b>. The Save As dialog box appears.
<b> 4. </b>
In the Save As Type drop-down list, choose the format youwant to use—Web Page (*.htm, *.html) or Single File Web Page
(*.mht, *.mhtml). The Save As dialog box displays controls for
saving the presentation as a web page (see Figure 9-17).
<b> 5. </b>
Click <b>Publish</b>. The Publish As Web Page dialog box appears(see Figure 9-18).
<i><b>Figure 9-18: The Publish As Web Page dialog box lets you </b></i>
<i><b>choose which parts of the PowerPoint presentation to </b></i>
<i><b>publish and which browsers to support.</b></i>
</div>
<!--links-->