Tài liệu Building Your Own Workflow phần 1 pdf
Bạn đang xem bản rút gọn của tài liệu. Xem và tải ngay bản đầy đủ của tài liệu tại đây (33.69 KB, 4 trang )
7.2. Building Your Own Workflow
You could spend all day playing with the workflows Apple gives you, making minor
tweaks and seeing how they affect the workflow's progress. You could even download
more preassembled workflows from www.automatorworld.com
, macscripter.net, or
Apple's own www.automator.us
, if you were so inclined.
Still, those options don't give you the kind of hands-on experience you need if you ever
want to automate your Mac on your own.
That's why the following pages walk you through building three different Automator
workflows from scratch. Along the way, you'll learn several tricks that you'll find handy
when you start building your own workflows.
Tip: If you're feeling lazy, you can download the completed workflow projects from this
book's "Missing CD" page atwww.missingmanuals.com
.
7.2.1. Emailing an iTunes Song
So you're listening to a song in iTunes, and you're seized by an overwhelming urge to
email it to someone. Maybe you think your mom would like to hear the new Britney
Spears hit (hey, she's your mom), or that your brother would be interested in your latest
GarageBand opus (he probably isn't).
The traditional process for emailing a song is a huge pain: locating the song in iTunes,
Control-clicking it, choosing Show in Finder from the shortcut menu, creating a new
message in Mail, addressing it, typing out a subject and short body message, dragging the
song file from the Finder into the email message, and, finally, clicking Send. Life's too
short.
Automator can greatly simplify this process. With a simple two-action workflow, you can
locate a song from your iTunes Library, set up all the email information you want in a
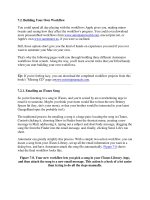
dialog box, and have Automator attach the song file automatically. Figure 7-8
shows
what the final workflow looks like.
Figure 7-8. Your new workflow lets you pick a song in your iTunes Library (top),
and then attach the song to a new email message. This action is a heck of a lot easier
than trying to do all the steps manually.
Note: Your recipient may not be able to play the song if it came from the iTunes music
store. Those songs are copy-protected, and play back on a maximum of five computers.
(MP3 files, GarageBand compositions, and songs you've ripped from your own CDs, of
course, have no such restrictions.)
Here's how to build the workflow:
1. Open a new Automator workflow window.
Either choose File New or press -N.
2. In the Starting Points menu, click Music & Audio. From the "Get content
from"pop-up menu, choose "my iTunes Library. "Then, from the second pop-up
menu, choose "Ask for songs and playlists when my workflow runs."
Since you're not looking for music files in the Finder or on the Web, you want
Automator to look specifically at your iTunes Library.
The second pop-up menu gives you a bunch of options for how and when you
want to specify which song(s) to use in the workflow. These options are pretty
self-explanatory: You can either select or search for songs, and you can either do
so right now or when you run the workflow. Since you'll probably want to use this
workflow more than once, and for different songs, you want the ability to select a
song every time the workflow runs.
When you click Choose, Automator creates a workflow and automatically adds the
Asks for Songs action, which matches the options you selected in the Starting
Points menu. It lets you pick out one song (or more, if "Allow multiple selection"
is on) from your iTunes Library (Figure 7-9
, top). Whichever songs you pick will
be attached to your new email.
Note: Whatever you type into the Prompt box will appear as a message in the
song-selection dialog box. You can make it say, for example, "Pick a song, any
song!"
3. In the Library list, click Mail.
(Make sure the Actions button is clicked above the list.) You've just narrowed
down the list of available actions to those that pertain to Apple's email program.
4. From the Actions list, drag the action called New Mail Message into the Workflow
pane.
This action lets you specify the recipient, subject, and content of your new email
message. (You can even add an email address straight from your Address Book.
Just click the address-card button in the upper-right corner.)
On the other hand, your workflow won't do you much good if you can only send
email to the same person every time. Therefore, to make the workflow more
general, you'd be wise to click the Options button and turn on "Show this action
when the workflow runs." That way, you can specify a different recipient—and
subject, and email account, and so on—each time you run the workflow (Figure 7-
9, middle).
If you look at the description for this action, you'll see that the Input accepts
"(Files/Folders, Text)." It explains that if a file is passed from the previous action,
it will automatically be attached to the email. Since the Ask for Songs action does
pass a file to the action under it—in this case, the song file you select—Automator
will conveniently attach it to the email, without needing another action.
Figure 7-9. Top: The dialog box of the Ask for Songs action. You can search
for songs using the field at the bottom, pick one of your playlists using the
menu at the top, and even sample a song by clicking the Play button
Middle: The dialog box of the New Mail Message action. If you have more
than one email account, you can select the one you'd like to send the message
from in the pop-up menu at the bottom of this window.
Bottom: The result: an email message with your text, subject, recipient, and
attachment. Just click Send and your message is on its way. (You could also
have used the Send Outgoing Messages action at the end of your workflow to
do this step automatically.)
5. Choose File Save ( -S), give your workflow a name, and save it
somewhere easy to find.
Tip: And if you really find this workflow useful, save it as a standard, double-
clickable application and stash it in your Dock. Details on Section 7.4
.
That's all there is to it. Click the Run button to test out your new workflow!
7.2.2. Burning an iPhoto Picture CD
iPhoto (Section 10.17.7
) is a fantastic program for organizing digital photos. It even has
its own photo-backup feature, which burns selected albums' photos to a blank CD or
DVD.
However, iPhoto's backup feature burns a disc that maintains iPhoto's complex and user-
hostile Library folder structure. That's great if you expect one day to restore the backup to
iPhoto, because the backup maintains all your keywords, ratings, albums, comments, and
other iPhoto data.
Figure 7-10. Top: The first action presents a dialog box telling you what this
workflow does.
Middle: The second action lets you select from your iPhoto Library the images you
want to back up.
Bottom: The last action, in a single step, burns those images onto a CD or DVD. It
works regardless of whether your Mac has an internal or external burner. Try that
simplicity on a PC!