Tài liệu Installing Mac OS X Programs ppt
Bạn đang xem bản rút gọn của tài liệu. Xem và tải ngay bản đầy đủ của tài liệu tại đây (33.12 KB, 6 trang )
5.12. Installing Mac OS X Programs
In general, new programs arrive on your Mac via one of two avenues: on a CD or DVD,
or via an Internet download. The CD method is slightly simpler; see "Performing the
Installation" later in this section.
For help installing downloaded programs, on the other hand, read on.
5.12.1. .sit, .zip, .tar, .gz, and .dmg
Programs you download from the Internet generally arrive in a specially encoded,
compressed form. (And unless you've changed the settings, they arrive in the Downloads
folder stack on your Dock.)
The downloaded file's name usually has one of these filename extensions:
•
.sit indicates a StuffIt file, the standard Macintosh file-compression format of
years gone by.
•
.zip is the standard Windows compression file format. And because Leopard has a
built-in Compress command right in the File menu (and doesn't come with Stuff It
Expander), .zip is the new standard Macintosh compression format. It certainly
makes life easier for people who have to exchange files with the Windows crowd.
•
.tar is short for tape archive, an ancient Unix utility that combines (but doesn't
compress) several files into a single icon, for simplicity in sending.
•
.gz is short for gzip, a standard Unix compression format.
•
.tar.gz or .tgz represents one compressed archive containing several files.
•
.dmg is a disk image, described below.
Fortunately, if you use Safari (Section 10.25
) as your Web browser, you don't have to
worry about all this, because it automatically unzips and unstuffs them.
If you use some other browser, StuffIt Expander can turn all of them back into usable
form when you download a file. (StuffIt Expander doesn't come with Mac OS X, but you
can download it for free from, for example, this book's "Missing CD" page at
www.missingmanuals.com
.)
5.12.2. Disk Images (.dmg files)
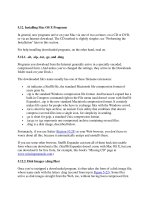
Once you've unzipped a downloaded program, it often takes the form of a disk image file,
whose name ends with the letters .dmg (second from top in Figure 5-22
). Some files
arrive as disk images straight from the Web, too, without having been compressed first.
Figure 5-22. Downloading a new program from the Internet may strew your
desktop or Downloads folder with icons. A: These are the original downloaded files.
Delete them after they're decompressed. B: The compressed file turns into this .dmg
file. Double-click it to "mount" the disk image (if it didn't appear automatically). C:
And now, the disk image itself. Double-click it to open the software installer
window. "Eject" it after the installation is complete. D: Here's the actual software
installer window. Drag the software's icon to your Applications folder, or double-
click the installer, if you see one here. After the installation is complete, you can
delete all of this stuff (except maybe the .dmg file, if you think you might want to
install the software again later).
Disk images are extremely common in Mac OS X. All you have to do is double-click the
.dmg icon. After a moment, it magically turns into a disk icon on your desktop, which
you can work with just as though it's a real disk (third from top in Figure 5-22
). For
example:
•
Double-click it to open it. The software you downloaded is inside.
•
Remove it from your desktop by dragging it to the Trash (whose icon turns into a
big silver Eject key as you drag), highlighting it and pressing -E (the shortcut
for File Eject), clicking its button in the Sidebar, or Control-clicking
(right-clicking) it, and then choosing Eject from the shortcut menu. (You've still
got the original .dmg file you downloaded, so you're not really saying goodbye to
the disk image forever.)
5.12.3. Cleaning Up after Decompression
When you've finished unzipping or unstuffing a downloaded file, you may have several
icons on your desktop or in the Downloads folder. Some are useful; some you're free to
trash:
•
The original compressed file. It's safe to throw away the .sit, .tar, .gz, or .tgz file
you originally downloaded (after it's decompressed, of course).
•
The .dmg file. Once you've turned it into an actual disk-drive icon, installed the
software from it, and "ejected" the disk-drive icon, you can delete the .dmg file.
Keep it only if you think you might need to reinstall the software someday.
FREQUENTLY ASKED QUESTION
Submit to Apple
What the—I was working along in Preview, and all of a sudden it just vanished!
Poof! And all I got was this lousy dialog box about "submitting to Apple."
What's going on?
Apple is trying to assimilate you.
Or, more accurately, it's trying to enlist your help in ferreting all the little
glitches that make modern computing so much fun. If you're willing to click the
Submit Report button and type a few comments ("I was just running Word,
minding my own business, and when I clicked the Print toolbar button, the
whole thing just crashed"), then Apple will add your report to the thousands
flowing in from everyone else.
The idea is that when its programmers get a moment, they'll study these reports,
track down the patterns ("Hmm, we've received 50,000 reports about that Print
button in Word"), and then chase down the software company responsible—and,
presumably, get a fix under way.
The report you submit is full of technical info that helps the programmers figure
out what was happening at the time of the crash, but no personal information
goes along for the ride. So if you feel like doing some good for your fellow Mac
fans, by all means submit the report (via the Internet) whenever you're offered
the chance.
•
•
•
Note: If you try to trash the .dmg file before removing the disk-drive icon from the
screen, you'll get a "file in use" error message when you try to empty the Trash.
•
•
The disk image itself. This final icon, the one that contains the actual software or
its installer (third from top in Figure 5-22
), doesn't exist as a file on your hard
drive. It's a phantom drive, held in memory, that will go away by itself when you
log out. So after installing its software, feel free to drag it to the Trash (or
highlight it and press -E to "eject" it).
5.12.4. Performing the Installation
Working with .tar, .gz, and .dmg files are all skills unique to downloading Mac OS X
programs from the Internet. Installing software from a CD or DVD is much more
straightforward.
In either case, once you've got a disk icon on your desktop (either a pseudo-disk from a
disk image or a CD or DVD you've inserted), you're ready to install the software. You
can install many Mac OS X programs just by dragging their icons or folders to your hard
drive (usually the Applications folder). Others offer a traditional installer program that
requires you to double-click, read and accept a license agreement, and so on.
In both cases, where you decide to install the new program is suddenly a big issue. You
have the following two alternatives:
•
In the Applications folder. Most programs, of course, sit in your Applications
folder. Most of the time, this is where you'll want to install new programs. Putting
them in the Applications folder makes them available to anyone who uses the
Mac.
Note: You can't put anything in your Applications folder unless you have an
Administrator account, as described on Section 12.2.1.1
.
•
In your Home folder. Suppose you share your Mac with other people, as described
in Chapter 12
. If that's your situation, you may occasionally want to install a
program privately, reserving it for your own use only. In that case, just install or
drag it into your Home folder, or a folder inside it. When other people log onto the
machine, they won't even know that you've installed that new program, since it
doesn't show up in the Applications folder.
If you don't have an Administrator account, in fact, this is your only option for
installing new programs.
5.12.5. Uninstalling Software
In Mac OS X, there's generally no Uninstall program, and no Add/Remove Programs
window. To uninstall a program, you just drag it (or its folder) from the Applications
folder (or wherever it is) to the Trash.
Some programs also leave harmless scraps of themselves behind; to check for them, look
for preference files or folders bearing the dearly departed program's name in your Library
folders (especially in Application Support) and your Home Library Preferences
folder.
UP TO SPEED
The Color Picker
Here and there—in System Preferences, iMovie, TextEdit, Microsoft Office,
and many other programs—Mac OS X offers you the opportunity to choose a
color for some element: for your desktop background, a window, and so on.
The dialog box that appears offers a miniature color lab that lets you dial in any
color in the Mac's rainbow. Several color labs, actually, arrayed across the top,
each designed to make color-choosing easier in certain circumstances:
Color Wheel. Drag the scroll bar vertically to adjust the brightness, and then
drag your cursor around the ball to pick the shade.
Color Sliders. From the pop-up menu, choose the color-mixing method you
prefer. CMYK stands for cyan, magenta, yellow, and black. People in the
printing industry will feel immediately at home, because these four colors are
the component inks for color printing. (These people may also be able to explain
why K stands for black.)
RGB is how a TV or computer monitor thinks of colors: as proportions of red,
green, and blue light. Gray Scale means shades of gray, like a black-and-white
TV. And HSB stands for Hue, Saturation, and Brightness—a favorite color-
specifying scheme in scientific circles.
In each case, just drag the sliders to mix up the color you want, or type in the
percentages of each component.
Color Palettes. This option presents canned sets of color swatches. They're
primarily for programmers who want quick access to the standard colors in Mac
OS X. The Web Safe Colors list is useful for Web designers, too; they can tell
whether a color will display properly on other computers.
Image Palettes. Here's the visible rainbow arrayed yet another way: in cloudy,
color-arranged streaks. (Cool tip: If you drag a graphics file directly into the
dialog box, it appears in the spectrum's place. That's a handy trick if you're
trying to identify the color of a certain spot of an image, for example. And don't
miss the pop-up button at the bottom of the dialog box, which offers a few other