Tài liệu 2D Artwork and 3D Modeling for Game Artists- P5 pdf
Bạn đang xem bản rút gọn của tài liệu. Xem và tải ngay bản đầy đủ của tài liệu tại đây (3.41 MB, 50 trang )
20. Relax the arm.
21. Repeat steps 18–20 for the other arm.
22. Stack these two arm pieces on top of each other (one side will have to be
flipped to match).
174
6.
U-V Mapping the Slogre with DeepUV
Figure 6.33 After
stacking the hand
parts, unwrap the
cuffs of the arm
using Interactive:
Cylinder mapping.
Figure 6.34
Unwrap the arms
using Interactive:
Cylinder mapping.
TEAMFLY
Team-Fly
®
Please purchase PDF Split-Merge on www.verypdf.com to remove this watermark.
That completes the arms. Just move the components away for now, and at the end
you’ll organize the map neatly. Before you continue, choose File, Export, Send UV
Update to transfer your work back to 3D Studio Max. It would also be a good idea
to switch back over to Max and save your file so you won’t lose your work. Now let’s
move on to the head portion of the slogre, which represents the most detail of the
model.
Step 3: Unwrap
the Head and Body
Normal human characters have fairly spherically shaped heads, and therefore an
Interactive: Sphere mapping would suffice. However, ‘tis not this case for this lovely
beast, which will require a combination of Interactive: Sphere mapping plus some
cutting and stitching to get it just right. I also want to get more of the neck in there
because, according to the sketches in earlier chapters, the underside has a very
snake-like appearance.
1. In a Top view, lasso one of the tusks as shown in Figure 6.35 and cut it away.
Be sure to deselect any points of the head that you may have accidentally
grabbed; if you cut the wrong points, however, you can always re-join them
with the rest of the head’s U-V mesh and try again.
175
Unwrap the Slogre’s U-V’s
Figure 6.35 Select
a tusk in the Top
view.
Please purchase PDF Split-Merge on www.verypdf.com to remove this watermark.
2. Once the tusk is cut away, apply Planar 2 mapping. Because the tusk won’t
get much detail other than a cloudy, off-white texture, you don’t have to
unwrap or relax it.
3. Repeat steps 1 and 2 the other tusk, stack them, and set them aside (see
Figure 6.36).
4. The remaining cluster of points at the top-left of the Material map represents
the entire head and body. Select that, and apply Planar 2 mapping (see
Figure 6.37). This will give you a nice profile of the character with which to
work.
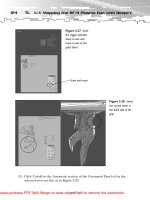
5. Use the Lasso tool to select the forward portion of the head, which will
require the most detail on your behalf. Zoom in to the neck region and
select the points that spill downward from the head as well (see Figure 6.38);
just be sure to uncheck the Back Faces option when doing this or you’ll grab
points through the mesh. Once it is selected, cut and move the head away.
6. Apply Interactive: Sphere mapping to the head, again centering it on the
selection. Align the mapping technique along the +z axis, and align the seam
along the −y axis. (Don’t do this manually; use the alignment control panel
in that mapping section!)
176
6.
U-V Mapping the Slogre with DeepUV
Figure 6.36
Apply Planar 2
mapping to the tusk.
Repeat steps 1 and
2 for the other tusk,
and stack them.
Please purchase PDF Split-Merge on www.verypdf.com to remove this watermark.
177
Unwrap the Slogre’s U-V’s
Figure 6.37 Select
the remaining points
on the Material map
and apply a Planar 2
mapping.
Figure 6.38 Select
the forward portion
of the head and cut
it away.
Please purchase PDF Split-Merge on www.verypdf.com to remove this watermark.
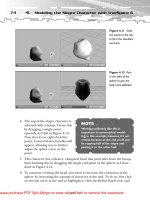
7. Relax the selection (see Figure 6.39).
8. The lower portion of the map has points that could be joined, so select them
and click the Join button. Then, reselect the entire head and relax it again
(see Figure 6.40).
9. The face in the center of the map may be a little scrunched, even after relax-
ing. This is due to the fact that there is a sharp transition between the face
points and the rest of the head, and DeepUV is doing its best to relax it all
proportionally. This is why I kept the top portion of my map unjoined, so
DeepUV didn’t have to wrestle with it. Zoom into the face area and select it,
and click the Relax button again to see it smooth out a bit (see Figure 6.41).
178
6.
U-V Mapping the Slogre with DeepUV
Figure 6.40 Join
the broken portion of
the neck area and
relax the head again.
Figure 6.39 Apply
an Interactive: Sphere
mapping to the head
and relax the selec-
tion.
Please purchase PDF Split-Merge on www.verypdf.com to remove this watermark.
10. You’re finished with the head and face; move that map out of the way for
now.
11. Select the rest of the body in the Left view, with Back Faces unchecked (this
allows you to select just one half of the body, as shown in Figure 6.42).
12. Cut the selection away from the other half of the body and relax it.
13. Select the other half, and relax it as well. Stack the two pieces together (see
Figure 6.43).
179
Unwrap the Slogre’s U-V’s
Figure 6.41 Select
the face portion of
the map and relax it.
Figure 6.42 In the
Left view, select one
half of the body with
Back Faces
unchecked.
Please purchase PDF Split-Merge on www.verypdf.com to remove this watermark.
Pack the Map
As I mentioned in the previous chapter, it’s best to pack these maps manually so
you can give preference to items that need more detail. The logic is thus: The
larger the scale of an individual map item on the Material map, the more texture
detail you’ll be able to apply to it. If you were to
scale the head portion of the map down to a
tiny little piece, how much texture detail
would show up once the texture skin was
reduced to 256×256 pixels? Not a lot, my
friend. So in this case, the pieces that need
the most detail are the head, followed by the
body, arms, legs, and so on. Figure 6.44 shows
my map, packed with preferences to those
pieces mentioned.
Update and View the
Results in Max
Once your map is packed, choose File, Export, Send UV Update to send your com-
pleted work back to 3D Studio Max. Then, switch back to Max and click on the
Modifier tab to see all the stacked updates you’ve sent. The topmost update is the
180
6.
U-V Mapping the Slogre with DeepUV
Figure 6.43 Cut, relax,
and stack the two body
halves together.
TIP
When you place and scale the
pieces on the map, use Edit,
Free Transform in conjunction
with the Shift key to scale the
pieces uniformly.
Please purchase PDF Split-Merge on www.verypdf.com to remove this watermark.
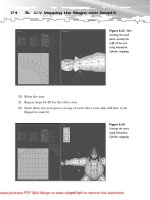
latest—to view it, add an Unwrap UVW modifier to the stack, and in its panel, click
the Edit button (see Figure 6.45). Now you’re ready to texture the slogre. To com-
mence this process, save your scene in Max, then skip to Chapter 12.
181
Update and View the Results in Max
Figure 6.44 The
completed slogre U-V
mapped, packed, and
ready to texture.
Figure 6.45
Export the final ver-
sion of the map back
to Max.View the
completed mapping
in Max using an
Unwrap UVW
modifier.
Please purchase PDF Split-Merge on www.verypdf.com to remove this watermark.
Summary
In this chapter, I showed you how to import your slogre mesh from Chapter 4 and
complete it using 3D Studio Max attaching, optimizing, and smoothing techniques.
The U-V coordinates, which represent the way the skin texture for the model will
be wrapped around it, were exported to DeepUV. This program allowed us to iso-
late and unwrap individual portions of the slogre’s U-V’s, thereby generating a two-
dimensional and easily texturable skin map. The combination of Max and DeepUV
rendered this entire operation painless and swift and prepared the model for its
texturing phase, which is covered in Chapter 12.
182
6.
U-V Mapping the Slogre with DeepUV
Please purchase PDF Split-Merge on www.verypdf.com to remove this watermark.
PART THREE
Texturing
the UV’s
with
DEEPUV
Please purchase PDF Split-Merge on www.verypdf.com to remove this watermark.
7 Game Texturing
8 Inorganic Texture Tutorials
with Photoshop
9Advanced Texturing Examples
10 Organic Texture Tutorials
with Photoshop
11 Skinning the RF-9 Plasma Gun
with Deep Paint 3D and Photoshop
12 Skinning the Slogre with
Deep Paint 3D and Photoshop
TEAMFLY
Team-Fly
®
Please purchase PDF Split-Merge on www.verypdf.com to remove this watermark.
CHAPTER 7
Game
Texturing
Please purchase PDF Split-Merge on www.verypdf.com to remove this watermark.
I
n this chapter I’ll introduce you to the vast world of game texturing. This will be
a primer, so to speak, for the chapters that follow. Specifically, this chapter covers
■
The game texturing arena
■
Different types of textures
■
Texturing techniques
■
Application of textures
Introduction to
Game Texturing
I think you’ll find that the art of designing textures for games has become a field in
itself. (In fact, my next book might be solely about game textures.) I wish I had
more room in this book to cover every gritty detail, but I’m going to do my best to
show you the median of what you should be familiar with in each of the texturing
categories. You see, a good game (especially a 3D one) has quite an amalgam of
different types of textures, from ones made from scratch, to “scripted” ones via fil-
ters, to photo-based . . . all to deliver some eye candy to the player.
Types of Textures
Even though we’re headed towards pure photorealism in games (hmmm, I’d say
around the year 2012), not every game that’s developed now or in the future will
require an environment that appears purely photorealistic. In fact, sometimes it’s
cool to create a game that appears cartoon-like or bizarrely unreal—so don’t panic
too much when trying to make things look perfectly real. I’ll be covering many dif-
ferent types of textures as this book progresses, many of which simulate the real
world, but also others that would fit nicely with Hanna-Barbera! That said, let’s dis-
cuss the various texture categories:
■
Hand-drawn textures
■
Seamless textures
■
Photo-based textures
■
Animated textures
■
Compositing textures
186
7.
Game Texturing
Please purchase PDF Split-Merge on www.verypdf.com to remove this watermark.
Hand-Drawn Textures
For the most part, I’ll show you how to create textures from scratch using either
Photoshop versions 6 or 7 (both are nearly identical in general functionality and
tool locations). Of course, it’s easier to get a picture of something real, clean it up,
and make a texture out of it; however, I want you to be able to make just about any-
thing by hand should the need arise.
Inorganic Versus Organic
Throughout this book, I tend to categorize models and textures as inorganic and
organic. By inorganic, I mean that, whatever it is, it’s most likely portraying some-
thing carved from steel, wood, or even rock—mostly inanimate objects. By organic,
I mean objects or other entities that have fluidity to their shape, or are in fact alive.
Organic, to me, are things that relate directly to living things. Rock-based textures I
like to contain within the inorganic category, despite their worldly origins, because
they represent materials used more for building things.
I believe inorganic textures (rocks, metals, walls, floors, and the like) to be the
easiest and most fun, as well as being the most realistic. For example, I made the
Mars rock texture shown in Figure 7.1 in under a minute using only a handful of
the default filters that come with Photoshop. I couldn’t believe how realistic it was;
I honestly didn’t expect it to look that good (I’ll show you how to make it in the
next chapter).
187
Types of Textures
Figure 7.1 A quick
Mars rock texture.
Please purchase PDF Split-Merge on www.verypdf.com to remove this watermark.
Organic textures—that is, any living (or once alive) carbon-based life form or part
of something living—can be either unbelievably easy or a total pain to create.
Animal and reptile skins are usually easy to make by hand because they take the
same path as rock-texture creation—usually you can achieve a great base texture
for them using only a handful of Photoshop’s filters. Textures for humans, insects,
or anything else with complex detail, however, can be a real challenge for someone
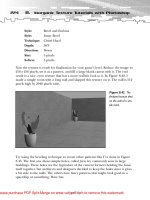
like me who has limited freehand artistic ability. Figure 7.2 shows a weak example
of a texture map I made for a butterfly . . . I’ll show you how to make skin textures
for the Slogre model later on in Part III.
Photo-Based Textures
No doubt you’ll encounter many occasions when using a photograph of a brick
wall, tree bark, a rusted pipe, or whatever to create your texture will be easier than
creating it from scratch. A good example would be if your game called for you to
create a texture for the side of an old train car. Just get a really good snapshot of
the car in broad daylight, clean it up a bit, and slap it on the side of a 3D model—
it’s much easier than spending a couple hours trying to make something real.
The most common case of photo-based texture usage probably is with brick walls.
Games sometimes have a gazillion of them, and you want the widest variety possi-
ble. So grab your digital camera, head into the big city, and go nuts. Figure 7.3
shows a seamlessly tiled brick wall texture I made from a picture I took of the side
of a building. I toned it down and cleaned it up a bit so it would be more appropri-
ate for a video game.
188
7.
Game Texturing
Figure 7.2 A free-
hand texture map
applied to the skin of
a butterfly model.
Please purchase PDF Split-Merge on www.verypdf.com to remove this watermark.
Compositing Textures
Compositing is simply mashing two or more textures together, but typically it’s the
careful combination of a photo and a hand-drawn image. I like to make compos-
ites, often because a flat-out photo can be too, well, dorky. Integrating a part of a
live picture with something you’ve created by hand or adding some layer effects to
a picture can make a texture work very well in a game. Check out Figure 7.4—I
took the brick texture from Figure 7.3 and, in Photoshop, applied a stucco look to
parts of it. Now it looks like someone tried to cement over the wall, and over time
it broke away.
189
Types of Textures
Figure 7.3 A brick
texture created from
a photograph.
Figure 7.4
Compositing a real
picture with a hand-
drawn image to
make a viable
texture.
Please purchase PDF Split-Merge on www.verypdf.com to remove this watermark.
Seamless Textures
Seamless textures are an art form in themselves. I don’t think there’s a 3D video
game out there that doesn’t have hundreds of seamless textures—that is, textures
that can be tiled side-by-side (and sometimes above and below) each other without
a noticeable seam. The basic technique for making a texture seamless is to first cre-
ate the texture, and then offset it evenly using the Offset filter in Photoshop. But
here’s the trick: A good seamless texture has little noticeable repetition in the over-
all pattern. That is, when the texture is tiled, nothing stands out to make you say,
“Oh, I see. It’s just a simple brick wall copied over and over again.”
Making a 256 × 256-pixel wall texture for a game is fairly easy—however, a good
artist will spend time weeding out the “sore thumbs” in the image. For instance, the
top seamless brick wall texture in Figure 7.5 has obvious shadows that stand out as
its tiled—every other row seems much darker and has a brick with stains where its
ends meet. After playing with it a bit, toning down some of the colors here and
there, I managed to make the wall look nice, smooth, and even.
190
7.
Game Texturing
Figure 7.5
A seamless brick
wall fixed for proper
continuity.
Please purchase PDF Split-Merge on www.verypdf.com to remove this watermark.
Animated Textures
Often in games you’ll see random belches of steam coming out of a pipe, or a flow
of water gushing down a drain. Both are cases of texture animation, but the first
might be considered a sprite, or a series of 2D textures (with transparency, meaning
that all areas surrounding the smoke are transparent in a game engine) chained
together to give the illusion of steam. The latter could simply be a flat-out AVI of
rushing water that’s overlaid onto a 3D object in the shape of water, then looped
ad infinitum. Animated textures can also be as simple as a blinking light on a con-
trol panel–two textures are created; one for the light being on, and one for off.
The game engine will handle alternating the two during game play (see Chapter 9,
“Advanced Texturing Examples,” where I show a simple on-off animation of two
textures that creates the illusion of a power switch being activated).
Summary
The texturing world is truly divided between two different categories: inorganic
and organic. Inorganic textures are those that represent man-made objects in this
world, such as metal, whereas organic textures are those that represent living or
natural things. As most artists paint images based on real life, textures are many
times the result of compositing photographs with filtering effects in Photoshop.
Whether your texture is seamlessly tileable for a large wall, or animated as a sprite
to simulate steam, the next few chapters will guide you through these detailed
processes so you can generate your own outstanding game textures.
191
Summary
Please purchase PDF Split-Merge on www.verypdf.com to remove this watermark.
This page intentionally left blank
Please purchase PDF Split-Merge on www.verypdf.com to remove this watermark.
CHAPTER 8
Inorganic
Texture
Tutorials
with
Photoshop
Please purchase PDF Split-Merge on www.verypdf.com to remove this watermark.