Tài liệu công nghệ thông tin, tin học, mạng, web, internet, quản trị mạng pptx
Bạn đang xem bản rút gọn của tài liệu. Xem và tải ngay bản đầy đủ của tài liệu tại đây (27.03 KB, 4 trang )
1 - 4 Semester 5: Advanced Routing v2.0 - Lab 1.5.1 Copyright 2001, Cisco Systems, Inc.
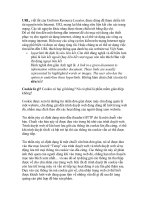
1.5.1 Equal-Cost Load Balancing with RIP
SanJose1
SanJose2
S0/0 192.168.1.1 /24 S0/1 192.168.2.1 /24
S0/0 192.168.1.2 /24 S0/1 192.168.2.2 /24
Fa0/0 10.0.0.1 /24
Fa0/0 10.0.0.2/ 24
Workstation
192.168.3.2 /24
Fa0/0 192.168.3.1/24
Vista
Objective
In this lab, you observe equal-cost load balancing on a per-packet and per-destination
basis by using advanced debug commands.
Scenario
Vista has two paths to network 10.0.0.0. You must use advanced debug features to verify
that both paths are being used to load-balance traffic to 10.0.0.0 and to test both per-
packet and per-destination load balancing.
Step 1
Build and configure the network according to the diagram just shown. Use RIPv1 and
enable updates on all active interfaces with network commands similar to these:
SanJose1(config)#router rip
SanJose1(config-router)#network 192.168.1.0
SanJose1(config-router)#network 10.0.0.0
Use the ping command to verify your work and test connectivity between all interfaces.
2 - 4 Semester 5: Advanced Routing v2.0 - Lab 1.5.1 Copyright 2001, Cisco Systems, Inc.
Step 2
Check the routing table on Vista using the show ip route command. Vista should
have two routes to network 10.0.0.0 in its table. Troubleshoot, if necessary.
RIP automatically performs load balancing using equal-cost routes. Note that both routes
have a metric (in this case, a hop count) of 1. RIP cannot perform unequal-cost load
balancing. You will see (in the next lab) that IGRP can.
Step 3
To configure Vista to load-balance on a per-packet basis, both S0/0 and S0/1 must use
process switching. Process switching forces the router to look in the routing table for the
destination network of each routed packet. In contrast, fast switching performs a table
lookup for the first packet only. The router then stores the result in a high-speed cache
and uses the cached information to forward all additional packets to the same
destination. Fast switching is the default setting.
Enable process switching on both of Vista’s serial interfaces with the following interface
configuration command:
Vista(config-if)#no ip route-cache
Verify that fast switching is disabled by using the show ip
interface command:
Vista#show ip interface s0/0
Serial0 is up, line protocol is up
Internet address is 192.168.1.1 255.255.255.0
Broadcast address is 255.255.255.255
Address determined by non-volatile memory
MTU is 1500 bytes
Helper address is not set
Directed broadcast forwarding is enabled
Outgoing access list is not set
Inbound access list is not set
Proxy ARP is enabled
Security level is default
Split horizon is enabled
ICMP redirects are always sent
ICMP unreachables are always sent
ICMP mask replies are never sent
IP fast switching is disabled
<output omitted>
Step 4
Because there are two routes to the destination network in the table, half the packets will
be sent along one path, and half will travel over the other. The path selection alternates
with each packet received. You can observe this process by using the debug ip
packet command, which outputs information about IP packets sent and received by the
router:
Vista#debug ip packet
With the debug running, send a few ping packets to 10.0.0.1 from your workstation at
192.168.3.2, and then return to Vista’s console. As the pings are sent, the router outputs
IP packet information. Stop the debug after a few successful pings using this command:
Vista#undebug all
Note: If you Telnetted to Vista, you probably will not see the debug output. To display the
debug results during a Telnet session, you need to issue the terminal monitor
command from privileged mode.
3 - 4 Semester 5: Advanced Routing v2.0 - Lab 1.5.1 Copyright 2001, Cisco Systems, Inc.
Examine the debug output. It can be a little confusing, because the ping requests and
replies are mixed together. Look for a line of output that includes d=10.0.0.1 (the
destination address). On those lines, look for the interface that the packet was sent out
on. The output interface should alternate between Serial0 and Serial1:
IP: s=192.168.3.2 (FastEthernet0), d=10.0.0.1 (Serial0/1),
g=192.168.2.1, len 84, forward
IP: s=192.168.3.2 (FastEthernet0), d=10.0.0.1 (Serial0/1),
g=192.168.1.1, len 84, forward
IP: s=192.168.3.2 (FastEthernet0), d=10.0.0.1 (Serial0/1),
g=192.168.2.1, len 84, forward
IP: s=192.168.3.2 (FastEthernet0), d=10.0.0.1 (Serial0/0),
g=192.168.1.1, len 84, forward
Step 5
You can also configure debug to output only the information you are interested in. To do
this, you will configure an access control list (ACL) that debug will use to match packets
against. Because you are interested in only the ping requests to the 10.0.0.0 network,
you can create a list that filters everything else:
Vista(config)#access-list 101 permit icmp any 10.0.0.0
0.255.255.255
Enable debug with the following command:
Vista#debug ip packet 101
IP packet debugging is on for access list 101
Repeat the ping to 10.0.0.1 from your workstation, and return to Vista’s console to view
the output.
Step 6
After verifying per-packet load balancing, configure Vista to use per-destination load
balancing. Both of Vista’s serial interfaces must be configured to use fast switching so
that the route cache can be used after the initial table lookup:
Vista(config-if)#ip route-cache
Use the show ip interface command to verify that fast switching is enabled.
Step 7
Because the routing table is consulted only once per destination, packets that are part of
a train to a specific host all follow the same path. Only when a second destination forces
another table lookup (or when the cached entry expires) is the alternate path used.
Use the debug ip packet 101 command, and ping 10.0.0.1 from your workstation.
1. Which serial interface was the packet sent out on?
Now ping 10.0.0.2.
2. Which serial interface was the packet sent out on?
4 - 4 Semester 5: Advanced Routing v2.0 - Lab 1.5.1 Copyright 2001, Cisco Systems, Inc.
Although you will not get a reply, you can send pings to the phantom addresses 10.0.0.3
and 10.0.0.4 to see what path the router selects.
Finally, you can issue the show ip cache command to view the contents of the route
cache. Note that mappings exist for 10.0.0.1 and 10.0.0.2, as well as for any other IP
addresses you have recently pinged on the 10.0.0.0 network.
Note: Save your configuration. It can be used with the next lab.