Tài liệu Microsoft Office 2010 Product Guide part 17 doc
Bạn đang xem bản rút gọn của tài liệu. Xem và tải ngay bản đầy đủ của tài liệu tại đây (322.8 KB, 10 trang )
Page 163 of 188
Features and Benefits Description Where to Find
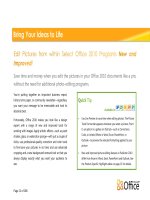
Improved!
Integrated print
experience
Adjust print settings while viewing a large print
preview of your publication—no need to
switch back and forth between multiple
screens to see the impact of your changes.
View page boundaries, page numbers, sheet
rulers and other key print information. You can
also use the new backlight feature to see
―through‖ the paper to preview the other side
of your publication, so that your page ―flips‖
exactly as you want it.
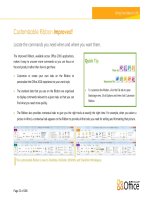
Click the File tab to open Backstage view
and then click Print.
Set your multipage publication to print
two-sided to enable the backlight slider
control at the upper-right of the preview
pane.
Improved!
Commercial and
digital printing support
Documents designed for printing in larger
quantities at higher-quality often have
different color needs. Publisher 2010 supports
a variety of color models including four-color
process and spot color printing, CMYK
composite postscript, save as PDF, support for
Pantone® colors - PMS and the NEW! Pantone
GOE color system.
Click the File tab to open Backstage view.
Click Info and then click Commercial
Print Settings to select a color model as
well as to manage embedded fonts and
other settings.
When you are ready to send your
presentation to print, in Backstage view,
click Save & Send and then click Save
for a Commercial Printer.
Page 164 of 188
Features and Benefits Description Where to Find
Improved!
Create PDF or XPS
Quickly create the perfect PDF or XPS version
of your publication. Expanded output
options—including the ability to password-
protect PDF files—make it easy to share for
commercial or desktop printing, e-mail, or
viewing online.
Click the File tab to open Backstage view.
Click Save & Send and then click Create
PDF/XPS Document.
Note: You can also save a copy of your publication
in any of several image formats, such as JPEG, for
easy printing and sharing. No add-ins are required.
To access available image formats, in Backstage
view, on the Save & Send tab, click Change File
Type.
Improved!
Language tools
Simplify and customize your multilingual
experience. Easily access a single dialog box in
Publisher 2010, where you can set preferences
for editing, display, ScreenTip, and Help
languages.
On the Review tab, in the Language
group, click Language and then click
Language Preferences.
Note: Changing these settings from any application
changes them for all applicable Office 2010
applications.
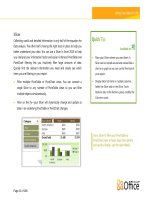
Create and manage
your customer list
The Mailings tab on the Ribbon makes it even
more efficient to create and manage a single
customer list in Publisher. Combine and edit
customer lists from multiple sources. Then
personalize your publications and marketing
materials for additional impact.
On the Mailings tab, in the Start group,
click Select Recipients.
Page 165 of 188
Features and Benefits Description Where to Find
Send e-mail
newsletters
Formatting and design stays intact when you
send e-mail newsletters to a variety of Web-
based and e-mail applications.
Open an e-mail newsletter.
Click the File tab to open Backstage view.
Click Save & Send and then click Send
Using E-mail for the options to send the
current page or all pages of your
newsletter.
Send files from within
Publisher
E-mail Publisher files, or PDF or XPS files
created in Publisher, as e-mail attachments.
Click the File tab to open Backstage view
and then click Save & Send. Click Send
Using E-mail for the options to send
your file as an e-mail attachment.
Page 166 of 188
SharePoint Workspace 2010
34
expands the boundaries of collaboration by allowing fast, anytime, anywhere access to your SharePoint
team sites. Synchronize Microsoft SharePoint Server 2010 content with SharePoint Workspace so you can access, view, and edit files
from your computer. Working across teams is also much easier when you can co-author documents simultaneously with other people
in SharePoint Workspace and automatically synchronize changes to SharePoint Server 2010 without additional steps. SharePoint
Workspace 2010 ushers in an entirely new way of working with your SharePoint team sites.
Features and Benefits Description Where to Find
New!
Direct folder access
Access your SharePoint and Groove
workspaces directly from Windows folders.
On the Windows taskbar, click the
Windows Start button and then click
your name (profile).
Double-click to open the Workspaces
folder. From here you can navigate to
your spaces where you can open, add or
remove files as you need.
34
SharePoint Workspace is the new name for Microsoft Office Groove.
Page 167 of 188
Features and Benefits Description Where to Find
New!
Search
When you choose to synchronize sites to your
PC, they are automatically indexed locally by
Windows Search.
On the Windows taskbar, click the
Windows Start button and then type
your keywords in the Search box.
New!
64-bit version
Maximize new and existing hardware
investments with the 64-bit version of Office
2010.
Note: This option can only be installed on 64-bit
systems. For installation instructions and more
information visit:
Groove Workspaces
Groove workspaces allow you to collaborate
with advanced security directly between team
members without SharePoint Server.
On the SharePoint Workspaces
Launchbar, on the Home tab of the
Ribbon, click New and then click Groove
Workspace.
Type a name for your workspace and
then click Create to open the workspace.
You can then add content and invite
others.
New!
Ribbon
The Ribbon replaces traditional menus and
toolbars with a fresh, highly visual layout of
commands, grouped logically in tabs, to help
you find the features you need fast. The new
Ribbon is also customizable to meet your
personal work style.
Appears at the top of your screen.
In Backstage view, click Options to
customize the Ribbon.
New!
Backstage view
The Backstage view replaces the File menu to
help you get to the tasks you need and
complete your work more efficiently.
Click the File tab to open Backstage view.