Tài liệu Pages Fromdigital Matte Painting - Phần 3 ppt
Bạn đang xem bản rút gọn của tài liệu. Xem và tải ngay bản đầy đủ của tài liệu tại đây (4.27 MB, 29 trang )
43
Digital Matte Painting Using Photoshop
In the past 4-5 years visual effects stopped being something extraordinary and became a part of almost any
production regardless of the scale. Would it be a 100 million dollar Hollywood feature, TV series or an independent
film project, ability to enhance visuals with computer generated imagery (CGI) have become accessible to almost
everyone. In today’s world of money and profit, producer thinks of a cheaper way to achieve something that used to
cost millions. Visual effects come in place when the world we live in cannot provide us with imagery we need or
the cost of recreating certain phenomena would jump over budged.
One of the most important parts in visual effects, and also one of the easiest and cheaper one to do is a matte
painting. Regardless of whether it is painted on a piece of glass or generated on computer it serves one purpose –
creating or extending the virtual space of the scene. As every art, this one has its secrets and cheats. Unlike
traditional art, where “cheating” is considered to be a bad manner, matte painting requires final product to be done
in the most efficient way possible. Don’t be afraid to make shortcuts if they are possible, because time always
works against you.
In this tutorial I will cover a process of enhancing footage to fulfill the needs of story. It all begins with the script
that calls for some change in original footage. After agreeing that the best way to specific shot is to enhance it
digitally, I start to create a concept of how to incorporate these enhancements in original footage. There are many
small details that have to be overlooked for the purpose of a smooth compositing. First I have to think of a camera
movements and composition. In my case, the idea to create a matte painting came before we started filming, so I
didn’t face any problems related with an unexpected change of plans during production.
The story called for a remote location covered with snow for all outside scenes. As the film has mainly interior shots,
we decided not to go to Colorado, but shoot background plates here in California and just paint the snow in. The
example I use here is a test that was done to prove that it would be financially better to make a painting. We shot
a background plate using still camera then replicated lighting conditions on a green screen stage in Ventura,
California for our foreground plates, which had actors and a car in it. We decided not to have any camera
movements to speed up production, because outside shots weren’t important on the bigger scale and had to be
simple.
44
I started with a picture I took in Santa Barbara, a very nice and worm city, were snow is something that people
don’t see very often.
First I had to clean the picture by eliminating all of the unnecessary objects and paint parts of the plate that were
obscured by the removed parts of the picture. This process requires a vision of the final product. Without
understanding what the final image is going to be it is very hard to make decisions on what has to be left. The main
rule I learned while doing matte paintings is that if you can leave specific parts of the picture intact or use a photo
to replace it – then do so. Nothing will look as realistic as a real life source. For the final touch up, I darkened the
color of the road to add wetness to it.
45
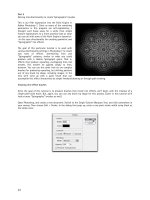
As an empty background color I always use the dominant color for specific painting. In this case it is the color of
the snow – white. The purpose of this is to being able to visualize your final product in the early stages. In this case
it is also the color of the sky, so I add a little gradient by darkening the horizon line.
Speaking of a horizon line, it is good to make one early on, so you won’t have and unexpected perspective artifacts.
This is done finding existing perspective lines (blue) and drawing the line through the point of their intersection
(red) which will be our horizon. After we have established all necessary elements it is time to start painting. The
next step would be to create a ground plane. I painted some free strokes using mainly three shades of snow from
light to dark gray. The idea behind the matte painting is the same as behind impressionistic painting. You just
create an impression, but on close-ups the reality breaks on strokes and colors.
46
As in real world, there can’t be any flat colors. Of course there are
exceptions, but the nature is full of texture that mixes colors in a very
organic way. I said before that if you can use photos the use them. I
applied a black and white photo of a grass field on top of the ground
plane to create imperfection in color. To do so, I placed a layer of grass
on top of ground layer in photoshop and overlayed top layer over the
bottom one.
This creates a more dynamic range of shades as well as adds a texture to
the ground plane.
Next step is actually painting snow on our plane. Before doing any matte painting it is always good to do research
on a subject of your painting. In this case it is snow. Snow might seam a very easy subject, but in fact it has a very
interesting nature. Under different weather conditions, snow has different color, shape and interaction with
environment. In my case it hasn’t snowed for couple days, as well as it is not windy, so the snow is not blowed off
the house.
47
If you look closer you can see the simplicity of technique I used. I projected the snow on every surface as if it was
falling down directly from the sky. I added little imperfections, but the underlying idea is very simple.
.
With a little help of imaginations you can predict which areas would be exposed to the snow in case if the snow
was falling in the straight vertical direction. The ground in front of the house has a little different technique then
the snow on the roof. Again, the method I use for specific areas of this painting is used on research I do. I can’t
stress enough how important to the your “homework”. In the case of the snow in front of the house, I chose areas
that would be physically blended with the underlying ground plane. I assumed that outside temperature is very
close to 0 Celsius. Hence, the areas where the snow is not thick are more “wet” and thus blended with the ground.
48
I used this blending technique on the areas where snow meets ground areas and sometimes on the snow itself to
create uneven texture. Besides snow I added small vegetation, like frozen grass and small bushes. This added more
realism to the flat areas of snow. Another reason for this was to create an atmosphere for this painting. I think that
trees and the way they branch can greatly affect the mood of the scene.
On this picture you can see a relatively simple tree behind the house. This is the first step in changing direction for
this painting. As with snow, I used plain color, after I finished the tree structure, I moved to adding snow with the
same technique I used for the house roof. Since we have a foggy atmosphere, this tree has to be a little lighter. If I
had a plain background with no intention of having something behind this tree I would change the opacity. Rather
then doing it I went to Image->Adjustments->Levels to reduce output black level.
If the background was something other then gray color, I also had to tweak its color palette.
49
Next I would fill out the background plane. I usually create 2-3 trees that I’d scale flip to randomize it a bit.
Depending on the type of a matte painting you have to put different amount of dedication. If the painting will be
slightly out of focus, or the camera will have some movement, I don’t spend much time on background objects, or
on something that doesn’t have viewer’s attention. As with the previous tree I changed output black level to match
the fog depth.
Then I paint the rest of the forest, recycling the trees I used before plus using some photos. I painted some snow on
the fir trees and then put several of those on the background. Final ouch is to make some foreground trees. It’s
good if you can get some photos. I finished them by painting snow and adjusting levels. For these fir trees I didn’t
worry much that they looked duplicated, as I painted snow on individual trees differently.
50
Now, when the painting is done, you can change it to whatever the shot requires you to use it with.
By using simple color correction techniques, I was being able to change the time of day or the mood of this
particular painting.
Here is what I ended up using for production purposes.
51
Matte Painting in Photoshop
Part 1: Maison
This tutorial is actually a "making of" where I explain how I proceeded to achieve this matte painting.
I use a Wacom Intuos² A4 board, if you don't have any graphic board this is going to be hard but not impossible.
At each step of the matte painting, useless to remind you to create a new layer so that the work will be easier and
mistakes avoided !
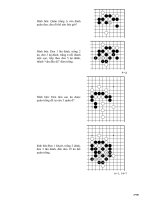
First of all, find a good res
picture. I chose to use a
picture of a house I found
on the web. You can find
very nice pics for free, just
look around !
The first step is to isolate
the house by putting it on
a separate layer and by
erasing the rest. In this
example I used the
polygonal lasso tool for
the house, and a soft
eraser for the bushes.
52
Now you need a new
background. You can
either find a good pic,
either paint one yourself.
I chose the former because
it is less time consuming,
and the result is far better
than what I would have
gotten had I painted a
background myself. I
found this image on the
web, unfortunately I do
not remember the site I
got it from.
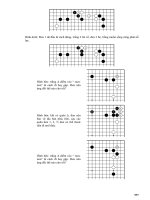
Put the sky behind the
house (by putting the sky
layer under the house
layer), and apply a little
perspective effect to give
more depth to the sky,
make it less flat.
Here the house picture
was taken from a low
angle, which makes our
work easier.
Now look at the edges of
the house. They still are
the color of the original
sky. We'll fix that.
53
Using the magic wand tool,
select the empty zone of
the house layer. Then,
Select > Modify > Expand,
to make your selection
wider. Pick a value that
includes the zone we need
to color correct.
In the menu : Image >
Adjust > Hue / Saturation
and color correct the
edges by matching them
with the color of the roof.
Still using Hue /
Saturation and also Color
Balance, adjust the colors
of the house and sky
layers so that they
perfectly blend together.
Now we want to get rid of
that palm tree that hides a
part of the house. That
tree has nothing to do
there since we want to
create a morbid mood.
This is probably the most
delicate step because we
have to hand paint the
missing part of the house.
For that I mostly used the
clone stamp tool, tool that
allows you to paint
something using another
part of the picture for
reference.
For instance, the tiles
located between the lower
and middle windows were
painted using similar tiles
of the house, using the
clone stamp tool.