Tài liệu Web Programming with HTML, XHTML, and CSS- P2 docx
Bạn đang xem bản rút gọn của tài liệu. Xem và tải ngay bản đầy đủ của tài liệu tại đây (1.11 MB, 50 trang )
The
align
attribute has been replaced with the
text-align
property in CSS and the ability to float block-
level elements (as you will see in Chapter 7). The
align
attribute is covered in more detail in
Appendix I.
Creating Paragraphs Using the <p> Element
The
<p>
element offers another way to structure your text. Each paragraph of text should go in between
an opening
<p>
and closing
</p>
tag, as in this example (
ch01_eg07.html
):
<p>Here is a paragraph of text.</p>
<p>Here is a second paragraph of text.</p>
<p>Here is a third paragraph of text.</p>
When a browser displays a paragraph, it usually inserts a new line before the next paragraph and adds a
little bit of extra vertical space, as in Figure 1-8.
Figure 1-8
The
<p>
element can carry all of the universal attributes and the deprecated
align
attribute:
align class id style title dir lang xml:lang
Creating Line Breaks Using the <br /> Element
Whenever you use the
<br />
element, anything following it starts on the next line. The
<br />
element
is an example of an empty element, where you do not need opening and closing tags, because there is nothing
to go in between them.
The
<br />
element has a space between the characters
br
and the forward slash. If you omit this
space, older browsers will have trouble rendering the line break, whereas if you miss the forward slash
character and just use
<br>
, it is not valid XHTML.
Most browsers allow you to use multiple
<br />
elements to push text down several lines, and many
designers use two line breaks between paragraphs of text rather than using the
<p>
element to structure
text, as follows:
Paragraph one<br /><br />
Paragraph two<br /><br />
Paragraph three<br /><br />
21
Chapter 1: Creating Structured Documents
59313c01.qxd:WroxPro 3/22/08 2:32 PM Page 21
Please purchase PDF Split-Merge on www.verypdf.com to remove this watermark.
While this creates a similar effect to using the paragraph element, if you do not use the
<p>
element itself for
each paragraph then the document is no longer describing where each paragraph starts and finishes. Further -
more, in Strict XHTML the
<br />
element can be used only within what are known as block-level elements.
These are elements such as the
<p>
element—elements that tend to naturally act as though they have a
line break before and after them. You learn more about block-level elements near the end of the chapter.
Avoid using
<br />
elements just to position text; such usage can produce unexpected results because
the amount of space created when you do so depends upon the size of the font. Instead, you should use
CSS, which you learn about in Chapter 7.
Here you can see an example of the
<br />
element in use within a paragraph (
ch01_eg08.html
):
<p>When you want to start a new line you can use the <br /> element.
So, the next<br />word will appear on a new line.</p>
Figure 1-9 shows you how the line breaks after the words “next” and “do” look.
Figure 1-9
The
<br />
element can carry the core attributes as well as an attribute called
clear
, which can be used
with images, and is covered in Appendix I.
clear class id style title
Creating Preformatted Text Using the <pre> Element
Sometimes you want your text to follow the exact format of how it is written in the XHTML document—
you don’t want the text to wrap onto a new line when it reaches the edge of the browser; you don’t want
it to ignore multiple spaces; and you want the line breaks where you put them.
22
Chapter 1: Creating Structured Documents
59313c01.qxd:WroxPro 3/22/08 2:32 PM Page 22
Please purchase PDF Split-Merge on www.verypdf.com to remove this watermark.
Any text between the opening
<pre>
tag and the closing
</pre>
tag will preserve the formatting of the
source document. You should be aware, however, that most browsers would display this text in a mono-
spaced font by default. (Courier is an example of a monospaced font, because each letter of the alphabet
takes up the same width. In non-monospaced fonts, an i is usually narrower than an m.)
Two of the most common uses of the
<pre>
element are to display tabular data without the use of a
table (in which case you must use the monospaced font or columns will not align correctly) and to repre-
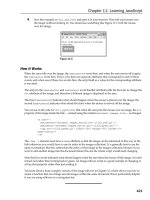
sent computer source code. For example, the following shows some JavaScript inside a
<pre>
element
(
ch01_eg09.html
):
<pre>
function testFunction(strText){
alert (strText)
}
</pre>
You can see in Figure 1-10 how the content of the
<pre>
element is displayed in the monospaced font;
more important, you can see how it follows the formatting shown inside the
<pre>
element—the white
space is preserved.
Figure 1-10
While tab characters can have an effect inside a
<pre>
element, and a tab is supposed to represent eight
spaces, the implementation of tabs varies across browsers, so it is advisable to use spaces instead.
You will come across more elements that can be used to represent code later in this chapter in the section
“Phrase Elements,” which covers the
<code>
,
<kbd>
, and
<var>
elements.
Firefox, IE, and Safari support an extension to the XHTML recommendation that prevents line breaks:
the
<nobr>
element. (This retains the normal style of its containing element and does not result in the
text being displayed in a monospaced font.) Because it is an extension, it is not valid XHTML. The
<nobr>
element is covered in Appendix I.
Try It Out Basic Text Formatting
Now that you’ve seen the basic elements that you will be using to format your text—headings and
paragraphs—it’s time to try putting that information to work.
23
Chapter 1: Creating Structured Documents
59313c01.qxd:WroxPro 3/22/08 2:32 PM Page 23
Please purchase PDF Split-Merge on www.verypdf.com to remove this watermark.
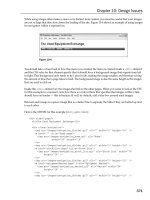
In this example, you create a new page for a site about jazz legends, and this page tells people about Miles
Davis. So, start up your text editor or web page authoring tool and follow these steps:
1.
You will be creating a Strict XHTML document, so add the XML declaration and a
DOCTYPE
dec
laration to indicate that you will be writing Strict XHTML:
<?xml version=”1.0” encoding=”UTF-8”?>
<!DOCTYPE html PUBLIC “-//W3C//DTD XHTML 1.0 Strict//EN”
“ />2.
Add the skeleton of the document: the
<html>
,
<head>
,
<title>
, and
<body>
elements. The root
<html>
element carries the
xmlns
attribute to indicate that the markup belongs to the XHTML
namespace.
<?xml version=”1.0” encoding=”UTF-8”?>
<!DOCTYPE html PUBLIC “-//W3C//DTD XHTML 1.0 Strict//EN”
“ /><html xmlns=” lang=”en”>
<head>
<title>Jazz Legends - Miles Davis</title>
</head>
<body>
</body>
</html>
3.
Your page will have a main heading and some level 2 headings, which show the general structure
of the page people will see:
<body>
<h1>Jazz Legends - Miles Davis</h1>
<h2>Styles of Miles</h2>
<h2>Davis the Painter</h2>
</body>
4.
You can now fill out the page with some paragraphs that follow the headings:
<body>
<h1>Jazz Legends - Miles Davis</h1>
<p>Miles Davis is known to many as one of the world’s finest jazz musicians
and an outstanding trumpet player. He also earned great respect in the
world of music as an innovative bandleader and composer.</p>
<h2>Styles of Miles</h2>
<p>Miles Davis played and wrote in a variety of styles throughout his
career, from tunes that have become jazz standards to his more
experimental improvisational work. </p>
<p>In the 1950s Miles was known for a warm, rich, wispy sound and was able
to vary the color of his sound, pitch. He was also adept in using a Harmon
mute. In the 1960s Miles began to play more in the upper register. In 1969
he even incorporated the use of electronic instruments in his music.</p>
<h2>Davis the Painter</h2>
<p>Miles’ love was not only for music; he is also considered a fine
painter. Inspired by a Milan-based design movement known as Memphis,
Miles painted a series of abstract paintings in 1988.</p>
</body>
</html>
24
Chapter 1: Creating Structured Documents
59313c01.qxd:WroxPro 3/22/08 2:32 PM Page 24
Please purchase PDF Split-Merge on www.verypdf.com to remove this watermark.
5.
Save the file as
miles.html
and then open it in a web browser. The result should look something
like Figure 1-11.
Figure 1-11
How It Works
The opening line of this page is the optional XML declaration. Because this is a Strict XHTML document
(and therefore is an XML document), it has been included here. The next line is the
DOCTYPE
declaration,
which is required in Strict XHTML documents. The
DOCTYPE
declaration indicates which version of
XHTML the document conforms to.
<?xml version=”1.0” encoding=”UTF-8”?>
<!DOCTYPE html PUBLIC “-//W3C//DTD XHTML 1.0 Strict//EN”
“ />The entire page is then contained in the root
<html>
element. The opening
<html>
tag carries the name-
space identifier, which is just another way of indicating that the markup your document contains is XHTML.
The
<html>
element also carries the
lang
attribute, which indicates the language that the document is
written in. Our web page is written in English, so it uses the two-letter ISO code for English (the full list
of country codes can be found in Appendix G). While the
lang
attribute has little practical use at the
moment, it will help future-proof your documents.
<html xmlns=” lang=”en” xml:lang=”en”>
The
<html>
element can contain only two child elements: the
<head>
element and
<body>
element. The
<head>
element contains the title for the page, and you should be able to tell from the title of the page
the type of information the page will contain.
<head>
<title>Jazz Legends: Miles Davis</title>
</head>
25
Chapter 1: Creating Structured Documents
59313c01.qxd:WroxPro 3/22/08 2:32 PM Page 25
Please purchase PDF Split-Merge on www.verypdf.com to remove this watermark.
Meanwhile, the
<body>
element contains the main part of the web page—the part that viewers will actu-
ally see in the main part of the web browser. Note how this page contains headings to structure the
information on the page just as you would find in a word-processed document.
There are different levels of headings to help enforce structure. In this example, there is a main heading
introducing Miles Davis—the main topic for this page—and then subheadings, each containing specific
information about his music and other interests.
Don’t forget the closing
</html>
tag at the end—after all, you must close every element correctly.
Presentational Elements
If you use a word processor, you are familiar with the ability to make text bold, italic, or underlined; these
are just three of the ten options available to indicate how text can appear in HTML and XHTML. The full
list is bold, italic, monospaced, underlined, strikethrough, teletype, larger, smaller, superscripted, and
subscripted text.
Technically speaking, these elements affect only the presentation of a document, and the markup is of no
other use, but they remain in both Transitional and Strict XHTML 1.0. As you will see later in the chapter,
there are dedicated elements for indicating things like emphasis within a piece of text, and these will result
in a similar presentation of the information.
All of the following presentational elements can carry the universal attributes and the UI event attributes
you met earlier in the chapter.
You should also be aware that you can use CSS to get similar results, as you will see in Chapter 7.
The <b> Element
Anything that appears in a
<b>
element is displayed in bold, like the word bold here:
The following word uses a <b>bold</b> typeface.
This does not necessarily mean the browser will use a boldface version of a font. Some browsers use an
algorithm to take a font and make the lines thicker (giving it the appearance of being bold), while others
(if they cannot find a boldface version of the font) may highlight or underline the text.
This
<b>
element has the same effect as the
<strong>
element, which you will meet later, and is used
to indicate that its contents have strong emphasis.
The <i> Element
The content of an
<i>
element is displayed in italicized text, like the word italic here:
The following word uses an <i>italic</i> typeface.
26
Chapter 1: Creating Structured Documents
59313c01.qxd:WroxPro 3/22/08 2:32 PM Page 26
Please purchase PDF Split-Merge on www.verypdf.com to remove this watermark.
This does not necessarily mean the browser will look for an oblique or italicized version of the font. Most
browsers use an algorithm to put the lines on a slant to simulate an italic font.
The
<i>
element has the same effect as the
<em>
element, which you will meet later, and which is used
to indicate that its contents have emphasis.
The <u> Element (deprecated)
The content of a
<u>
element is underlined with a simple line:
The following word would be <u>underlined</u>
The
<u>
element is deprecated in HTML 4 and XHTML 1.0, although it is still supported by current
browsers. The preferred method is to use CSS to achieve this effect, which you’ll learn about in
Chapter 7.
The <s> and <strike> Elements (deprecated)
The content of an
<s>
or
<strike>
element is displayed with a strikethrough, which is a thin line through
the text (
<s>
is just the abbreviated form of
<strike>
).
The following word would have a <s>strikethrough</s>.
Both the
<s>
and
<strike>
elements are deprecated in HTML 4.1 and Transitional XHTML 1.0, and were
removed from Strict XHTML 1.0, although they are still supported by current browsers. The preferred
method is to use CSS to achieve this effect, which you learn about in Chapter 7.
The <tt> Element
The content of a
<tt>
element is written in monospaced font.
The following word will appear in a <tt>monospaced</tt> font.
Figure 1-12 shows the use of the
<b>
,
<i>
,
<u>
,
<s>
, and
<tt>
elements (
ch01_eg10.html
).
Figure 1-12
27
Chapter 1: Creating Structured Documents
59313c01.qxd:WroxPro 3/22/08 2:32 PM Page 27
Please purchase PDF Split-Merge on www.verypdf.com to remove this watermark.
The <sup> Element
The content of a
<sup>
element is written in superscript; the font size used is the same size as the characters
surrounding it but is displayed half a character’s height above the other characters.
Written on the 31<sup>st</sup> February.
The
<sup>
element is especially helpful in adding exponential values to equations, and adding the st, nd,
rd, and th suffixes to numbers such as dates. However, in some browsers, you should be aware that it can
create a taller gap between the line with the superscript text and the line above it.
The <sub> Element
The content of a
<sub>
element is written in subscript; the font size used is the same as the characters
surrounding it, but is displayed half a character’s height beneath the other characters.
The EPR paradox<sub>2</sub> was devised by Einstein, Podolsky, and Rosen.
The
<sub>
element is particularly helpful when combined with the
<a>
element (which you meet in the
next chapter) to create footnotes.
The <big> Element
The content of the
<big>
element is displayed one font size larger than the rest of the text surrounding
it. If the font is already the largest size, it has no effect. You can nest several
<big>
elements inside one
another, and the content of each will get one size larger for each element.
The following word should be <big>bigger</big> than those around it.
In general, you should use CSS rather than the
<big>
element for formatting purposes.
The <small> Element
The content of the
<small>
element is displayed one font size smaller than the rest of the text surrounding
it. If the font is already the smallest, it has no effect. You can nest several
<small>
elements inside one
another, and the content of each gets one size smaller for each element.
The following word should be <small>smaller</small> than those around it.
In general, you should use CSS rather than the
<small>
element for formatting purposes.
The <hr /> Element
The
<hr />
element creates a horizontal rule across the page. It is an empty element, rather like the
<br />
element.
<hr />
This is frequently used to separate distinct sections of a page where a new heading is not appropriate.
28
Chapter 1: Creating Structured Documents
59313c01.qxd:WroxPro 3/22/08 2:32 PM Page 28
Please purchase PDF Split-Merge on www.verypdf.com to remove this watermark.
Figure 1-13 shows the use of the
<sup>
,
<sub>
,
<big>
,
<small>
, and
<hr />
elements (
ch01_eg11.html
).
Figure 1-13
Phrase Elements
The following elements are not used as widely as the elements you have met so far. As the element names
indicate, they are designed to describe their content:
❑
<em>
and
<strong>
for emphasis
❑
<blockquote>
,
<cite>
, and
<q>
for quotations and citations
❑
<abbr>
,
<acronym>
, and
<dfn>
for abbreviations, acronyms, and key terms
❑
<code>
,
<kbd>
,
<var>
, and
<samp>
for computer code and information
❑
<address>
for addresses
While some of these phrase elements are displayed in a manner similar to the
<b>
,
<i>
,
<pre>
, and
<tt>
elements you have already seen, they are designed for specific purposes. For example, the
<em>
and
<strong>
elements give text emphasis and strong emphasis respectively and there are several elements
for marking up quotes.
It is tempting to ignore these elements and just use the presentational elements you just met to create the
same visual effect, but you should be aware of them and preferably get into the habit of using them where
appropriate. For example, where you want to add emphasis to a word within a sentence you should use
the
<em>
and
<strong>
elements rather than the presentational elements you just met; there are several
good reasons for this, such as:
❑ Applications such as screen readers (which can read pages to web users with visual impairments)
could add suitable intonation to the reading voice so that users with visual impairments could
hear where the emphasis should be placed.
❑ Automated programs could be written to find the words with emphasis and pull them out as
keywords within a document, or specifically index those words so that a user could find impor-
tant terms in a document.
29
Chapter 1: Creating Structured Documents
59313c01.qxd:WroxPro 3/22/08 2:32 PM Page 29
Please purchase PDF Split-Merge on www.verypdf.com to remove this watermark.
As you can see, appropriate use of these elements adds more information to a document (such as which
words should have emphasis, which are parts of programming code, which parts are addresses, and so
on) rather than just saying how it should be presented visually.
All of the following phrase elements can carry the universal attributes and the UI event attributes you met
earlier in the chapter.
The <em> Element Adds Emphasis
The content of an
<em>
element is intended to be a point of emphasis in your document, and it is usually
displayed in italicized text. The kind of emphasis intended is on words such as “must” in the following
sentence:
<p>You <em>must</em> remember to close elements in XHTML.</p>
You should use this element only when you are trying to add emphasis to a word, not just because you
want to make the text appear italicized. If you just want italic text for stylistic reasons—without adding
emphasis—you can use either the
<i>
element or CSS.
The <strong> Element Adds Strong Emphasis
The
<strong>
element is intended to show strong emphasis for its content—stronger emphasis than the
<em>
element. As with the
<em>
element, the
<strong>
element should be used only when you want to
add strong emphasis to part of a document. Rather than being rendered in an italic font, most visual
browsers display the strong emphasis in a bold font.
<p><em>Always</em> look at burning magnesium through protective colored
glass as it <strong>can cause blindness</strong>.</p>
Figure 1-14 shows how the
<em>
and
<strong>
elements are rendered in Firefox (
ch01_eg12.html
).
You need to remember that how the elements are presented (italics or bold) is largely irrelevant. You
should use these elements to add emphasis to phrases, and therefore give your documents greater mean-
ing, rather than to control how they appear visually. As you will see in Chapter 7, it is quite simple with
CSS to change the visual presentation of these elements—for example to highlight any words inside an
<em>
element with a yellow background and make them bold rather than italic.
Figure 1-14
30
Chapter 1: Creating Structured Documents
59313c01.qxd:WroxPro 3/22/08 2:32 PM Page 30
Please purchase PDF Split-Merge on www.verypdf.com to remove this watermark.
The <abbr> Element Is for Abbreviations
You can indicate when you are using an abbreviated form by placing the abbreviation between opening
<abbr>
and closing
</abbr>
tags.
When possible, consider using a
title
attribute whose value is the full version of the abbreviations. If
you are abbreviating a foreign word, you can also use the
xml:lang
attribute in XHTML (or the
lang
attribute in HTML).
For example, if you want to indicate that Bev is an abbreviation for Beverly, you can use the
<abbr>
ele
ment like so:
I have a friend called <abbr title=”Beverly”>Bev</abbr>.
The <acronym> Element Is for Acronym Use
The
<acronym>
element allows you to indicate that the text between an opening
<acronym>
and closing
</acronym>
tags is an acronym.
When possible use a
title
attribute whose value is the full version of the acronyms on the
<acronym>
element, and if the acronym is in a different language, include an
xml:lang
attribute in XHTML docu-
ments (or a
lang
attribute in HTML documents).
For example, if you want to indicate that XHTML was an acronym, you can use the
<acronym>
element
like so (
ch01_eg13.html
):
This chapter covers marking up text in <acronym title=”Extensible Hypertext
Markup Language”>XHTML</acronym>.
As you can see from Figure 1-15, Firefox gives the
<abbr>
and
<acronym>
elements a dashed-underline,
and when you hover your mouse over the word, the value of the title attribute shows as a tooltip. Internet
Explorer 7 does not change the appearance of the element, although it does show the title as a tooltip.
Figure 1-15
31
Chapter 1: Creating Structured Documents
59313c01.qxd:WroxPro 3/22/08 2:32 PM Page 31
Please purchase PDF Split-Merge on www.verypdf.com to remove this watermark.
The <dfn> Element Is for Special Terms
The
<dfn>
element allows you to specify that you are introducing a special term. Its use is similar to
the
words that are in italics in the midst of paragraphs in this book when new key concepts are
intro
duced.
Typically, you would use the
<dfn>
element the first time you introduce a key term and only in that
instance. Most recent browsers render the content of a
<dfn>
element in an italic font.
For example, you can indicate that the term “XHTML” in the following sentence is important and should
be marked as such:
This book teaches you how mark up your documents for the Web using
<dfn>XHTML</dfn>.
Figure 1-15, on the previous page, shows the use of the
<dfn>
element (
ch01_eg13.html
).
The <blockquote> Element Is for Quoting Text
When you want to quote a passage from another source, you should use the
<blockquote>
element.
Note that there is a separate
<q>
element for use with smaller quotations, as discussed in the next sec-
tion. Here’s
ch01_eg14.html
:
<p>The following description of XHTML is taken from the W3C Web site:</p>
<blockquote> XHTML 1.0 is the W3C’s first Recommendation for XHTML,
following on from earlier work on HTML 4.01, HTML 4.0, HTML 3.2 and HTML
2.0. </blockquote>
Text inside a
<blockquote>
element is usually indented from the left and right edges of the surround-
ing text, and sometimes uses an italicized font (but it should be used only for quotes; if you simply
want
this effect on a paragraph of text, you should use CSS). You can see what this looks like in
Figure 1-
16.
Using the cite Attribute with the <blockquote> Element
You can use the
cite
attribute on the
<blockquote>
element to indicate the source of the quote. The
value of this attribute should be a URL pointing to an online document, if possible the exact place in
that
document. Browsers will not actually do anything with this attribute, but it means the source of the
quote is there should you need it in the future—it could also be used by other processing applications
(
ch01_eg14.html
).
<blockquote cite=” XHTML 1.0 is the W3C’s first
Recommendation for XHTML, following on from earlier work on HTML 4.01, HTML
4.0, HTML 3.2 and HTML 2.0.</blockquote>
At the time of this writing, some validators had trouble with the
cite
attribute, such as the W3C
validator, which does not recognize the presence of the
cite
attribute on the
<blockquote>
element.
32
Chapter 1: Creating Structured Documents
59313c01.qxd:WroxPro 3/22/08 2:32 PM Page 32
Please purchase PDF Split-Merge on www.verypdf.com to remove this watermark.
Figure 1-16
The <q> Element Is for Short Quotations
The
<q>
element is intended to be used when you want to add a quote within a sentence rather than as
an indented block on its own (
ch01_eg14.html
):
<p>As Dylan Thomas said, <q>Somebody’s boring me. I think it’s me</q>.</p>
The HTML and XHTML recommendations say that the text enclosed in a
<q>
element should begin and end
in double quotes. Firefox inserts these quotation marks for you, whereas IE7 does not. So, if you want your
quote to be surrounded by quotation marks, be warned that inserting them in the document will result in
two sets of quotes in Firefox. Neither IE nor Firefox changes the appearance of this element in any other way.
The
<q>
element can also carry the
cite
attribute. The value should be a URL pointing to the source of
the quote.
The <cite> Element Is for Citations
If you are quoting a text, you can indicate the source by placing it between an opening
<cite>
tag and
closing
</cite>
tag. As you would expect in a print publication, the content of the
<cite>
element is
rendered in italicized text by default (
ch01_eg12.html
).
This chapter is taken from <cite>Beginning Web Development</cite>.
33
Chapter 1: Creating Structured Documents
59313c01.qxd:WroxPro 3/22/08 2:32 PM Page 33
Please purchase PDF Split-Merge on www.verypdf.com to remove this watermark.
If you are referencing an online resource, you should place your
<cite>
element inside an
<a>
element,
which, as you’ll see in Chapter 2, creates a link to the relevant document.
There are several applications that potentially could make use of the
<cite>
element. For example, a
search application could use
<cite>
tags to find documents that reference certain works, or a browser
could collect the contents of
<cite>
elements to generate a bibliography for any given document,
although at the moment it is not widely enough used for either feature to exist.
You can see the
<blockquote>
,
<q>
, and
<cite>
elements in Figure 1-16.
The <code> Element Is for Code
If your pages include any programming code (which is not uncommon on the Web), the following four
elements will be of particular use to you. Any code to appear on a web page should be placed inside a
<code>
element. Usually the content of the
<code>
element is presented in a monospaced font, just like
the code in most programming books (including this one).
Here you can see an example of using the
<code>
element to represent an
<h1>
element and its content
in XHTML (
ch01_eg15.html
):
<p><code><h1>This is a primary heading</h1></code></p>
Figure 1-17 shows you how this would look in a browser.
The use of the
<code>
element could theoretically allow search applications to look at the content of
<code>
elements to help them find a particular code segment. The
<code>
element is often used in conjunction
with the
<pre>
element so that the formatting of the code is retained.
The <kbd> Element Is for Text Typed on a Keyboard
If, when talking about computers, you want to tell a reader to enter some text, you can use the
<kbd>
element to indicate what should be typed in, as in this example (
ch01_eg15.html
):
<p>Type in the following: <kbd>This is the kbd element</kbd>.</p>
The content of a
<kbd>
element is usually represented in a monospaced font, rather like the content of the
<code>
element. Figure 1-17 shows you what this would look like in a browser.
Note that you cannot just use the opening and closing angle brackets inside these
elements if you want to represent XHTML markup. The browser could mistake
these characters for actual markup. You should use
<
instead of the left-angle
bracket
<
, and you should use
>
instead of the right-angle bracket
>
. A list of all
these character entities is in Appendix F.
34
Chapter 1: Creating Structured Documents
59313c01.qxd:WroxPro 3/22/08 2:32 PM Page 34
Please purchase PDF Split-Merge on www.verypdf.com to remove this watermark.
Figure 1-17
The <var> Element Is for Programming Variables
The
<var>
element is another of the elements added to help programmers. It is usually used in conjunction
with the
<pre>
and
<code>
elements to indicate that the content of that element is a variable that can be
supplied by a user (
ch01_eg15.html
).
<p><code>document.write(“<var>user-name</var>”)</code></p>
Typically the content of a
<
var
>
element is italicized, as you can see in Figure 1-17.
If you are not familiar with the concept of variables, they are covered in Chapter 11.
The <samp> Element Is for a Program Output
The
<samp>
element indicates sample output from a program, script, or the like. Again, it is mainly used
when documenting programming concepts. For example (
ch01_eg15.html
):
<p>If everything worked you should see the result <samp>Test completed
OK</samp>.</p>
This tends to be displayed in a monospaced font, as you can see in Figure 1-15.
35
Chapter 1: Creating Structured Documents
59313c01.qxd:WroxPro 3/22/08 2:32 PM Page 35
Please purchase PDF Split-Merge on www.verypdf.com to remove this watermark.
The <address> Element Is for Addresses
Many documents need to contain a snail-mail address, and there is a special
<address>
element that is
used to contain addresses. For example, here is the address for Wrox, inside an
<address>
element
(
ch01_eg16.html
):
<address>Wrox Press, 10475 Crosspoint Blvd, Indianapolis, IN 46256</address>
A browser can display the address differently than the surrounding document, and IE, Firefox, and Safari
display it in italics, as you can see in Figure 1-18 (although you can override this with CSS).
Figure 1-18
Indicating who wrote a document or who is responsible for it adds credibility to a document that is other-
wise anonymous. The
<address>
element is a good way to add this at the end of the document. It can
also help automated applications read addresses from documents.
That brings you to the end of the phrase elements, but not quite the end of all the text elements.
Lists
There are many reasons why you might want to add a list to your pages, from putting your five favorite
albums on your home page to including a numbered set of instructions for visitors to follow (like the steps
you follow in the Try It Out examples in this book).
You can create three types of lists in XHTML:
❑ Unordered lists, which are like lists of bullet points
❑ Ordered lists, which use a sequence of numbers or letters instead of bullet points
❑ Definition lists, which allow you to specify a term and its definition
I’m sure you will think of more uses for the lists as you meet them and start using them.
Using the <ul> Element to Create Unordered Lists
If you want to make a list of bullet points, you write the list within the
<ul>
element (which stands for
unordered list). Each bullet point or line you want to write should then be contained between opening
<li>
tags and closing
</li>
tags (the
li
stands for list item).
36
Chapter 1: Creating Structured Documents
59313c01.qxd:WroxPro 3/22/08 2:32 PM Page 36
Please purchase PDF Split-Merge on www.verypdf.com to remove this watermark.
You should always close the
<li>
element, even though you might see some HTML pages that leave off
the closing tag. This is a bad habit you should avoid.
If you want to create a bulleted list, you can do so like this (
ch01_eg17.html
):
<ul>
<li>Bullet point number one</li>
<li>Bullet point number two</li>
<li>Bullet point number three</li>
</ul>
In a browser, this list would look something like Figure 1-19.
Figure 1-19
The
<ul>
and
<li>
elements can carry all the universal attributes and UI event attributes.
The
<ul>
element could also carry an attribute called
compact
in HTML 4.1—which is still allowed in
Transitional XHTML but not in Strict XHTML 1.0—the purpose of which was to make the bullet points
vertically closer together. Its value should also be
compact
, like so:
<ul compact=”compact”>
<li>Item one</li>
<li>Item two</li>
<li>Item three</li>
</ul>
Ordered Lists
Sometimes, you want your lists to be ordered. In an ordered list, rather than prefixing each point with a bullet
point, you can use either numbers (1, 2, 3), letters (A, B, C), or Roman numerals (i, ii, iii) to prefix the list item.
An ordered list is contained inside the
<ol>
element. Each item in the list should then be nested inside
the
<ol>
element and contained between opening
<li>
and closing
</li>
tags (
ch01_eg18.html
).
<ol>
<li>Point number one</li>
<li>Point number two</li>
<li>Point number three</li>
</ol>
37
Chapter 1: Creating Structured Documents
59313c01.qxd:WroxPro 3/22/08 2:32 PM Page 37
Please purchase PDF Split-Merge on www.verypdf.com to remove this watermark.
The result should be similar to what you see in Figure 1-20.
Figure 1-20
If you would rather have letters or Roman numerals than Arabic numbers, you must use the now-deprecated
type
attribute on the
<ol>
element.
Using the type Attribute to Select Numbers, Letters, or Roman
Numerals in Ordered Lists (deprecated)
The
type
attribute on the
<ol>
element allows you to change the ordering of list items from the default of
numbers to the options listed in the table that follows, by giving the
type
attribute the corresponding character.
For example, here is an ordered list that uses small Roman numerals (
ch01_eg18.html
):
<ol type=”i”>
<li>This is the first point</li>
<li>This is the second point</li>
<li>This is the third point</li>
</ol>
You can see what this might look like in Figure 1-21.
The
type
attribute was deprecated in HTML 4.1 in favor of the CSS
list-style-type
property; it will
therefore work only in Transitional XHTML not Strict XHTML 1.0. The CSS replacement will work only
in browsers since IE4 and Netscape 4 browsers.
Value for type Attribute Description Examples
1 Arabic numerals (the default) 1, 2, 3, 4, 5
A Capital letters A, B, C, D, E
a Small letters a, b, c, d, e
I Large Roman numerals I, II, III, IV, V
i Small Roman numerals i, ii, iii, iv, v
38
Chapter 1: Creating Structured Documents
59313c01.qxd:WroxPro 3/22/08 2:32 PM Page 38
Please purchase PDF Split-Merge on www.verypdf.com to remove this watermark.
Figure 1-21
You used to be able to use the
type
attribute on
<li>
elements, which would override the value in the
<ol>
element, but it was deprecated in HTML 4.1 and its use should be avoided. All of the universal
attributes and UI event attributes can be used with the
<ol>
elements, and also a special attribute
start
,
to control the number a list starts at.
Using the start Attribute to Change the Starting Number in Ordered
Lists (deprecated)
If you want to specify the number that a numbered list should start at, you can use the
start
attribute on
the
<ol>
element. The value of this attribute should be the numeric representation of that point in the list,
so a D in a list that is ordered with capital letters would be represented by the value 4 (
ch01_eg18.html
).
<ol type=”i” start=”4”>
<li>Point number one</li>
<li>Point number two</li>
<li>Point number three</li>
</ol>
You can see the result in Figure 1-22 .
Figure 1-22
The
start
attribute was deprecated in HTML 4.1; it will therefore work in Transitional XHTML 1.0 but
not in Strict XHTML 1.0.
Definition Lists
The definition list is a special kind of list for providing terms followed by a short text definition or
description for them. Definition lists are contained inside the
<dl>
element. The
<dl>
element then contains
alternating
<dt>
and
<dd>
elements. The content of the
<dt>
element is the term you will be defining.
39
Chapter 1: Creating Structured Documents
59313c01.qxd:WroxPro 3/22/08 2:32 PM Page 39
Please purchase PDF Split-Merge on www.verypdf.com to remove this watermark.
The
<dd>
element contains the definition of the previous
<dt>
element. For example, here is a definition
list that describes the different types of lists in XHTML (
ch01_eg19.html
):
<dl>
<dt>Unordered List</dt>
<dd>A list of bullet points.</dd>
<dt>Ordered List</dt>
<dd>An ordered list of points, such as a numbered set of steps.</dd>
<dt>Definition List</dt>
<dd>A list of terms and definitions.</dd>
</dl>
In a browser, this would look something like Figure 1-23 (
ch01_eg19.html
).
Figure 1-23
Each of these elements can carry the universal attributes and UI event attributes.
Nesting Lists
You can nest lists inside other lists. For example, you might want a numbered list with separate points
corresponding to one of the list items. Each list will be numbered separately unless you specify otherwise
using the
start
attribute. And each new list should be placed inside a
<li>
element (
ch01_eg20.html
):
<ol type=”I”>
<li>Item one</li>
<li>Item two</li>
<li>Item three</li>
<li>Item four
<ol type=”i”>
<li>Item 4.1</li>
<li>Item 4.2</li>
<li>Item 4.3</li>
</ol>
</li>
<li>Item Five</li>
</ol>
40
Chapter 1: Creating Structured Documents
59313c01.qxd:WroxPro 3/22/08 2:32 PM Page 40
Please purchase PDF Split-Merge on www.verypdf.com to remove this watermark.