Tài liệu Practice Templates Photoshop part 1 pptx
Bạn đang xem bản rút gọn của tài liệu. Xem và tải ngay bản đầy đủ của tài liệu tại đây (319.64 KB, 5 trang )
Decorate Your Own Hello Kitty Car
in Photoshop
by Johnson on 04-09-2008
Preparations:
We will need 3 images here, a
car, a Hello Kitty logo and its
face.
You can download the Hello
Kitty images here
.
All rights of these resources
belong to their respective owners.
Step 1 - Setting Up
Background:
Create a document of size 750 by
550px.
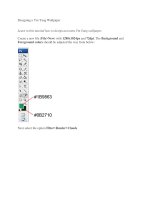
Set your foreground color to
#FF84C3 and background to
#AE1D51.
Fill the background layer with a
linear gradient top-down.
Step 2 - Forming the Floor:
Create a new layer above the
background.
Pick the Rectangle Marquee tool
and make a selection on the lower
half of the document.
Fill the selection with a linear
gradient bottom-up.
Step 3 - Extracting the Car:
Crop out your car from its
background using the Pen tool.
Click here
to understand more
about extraction.
Using the Move tool, place your
car at the center of the document
as shown in the diagram.
Step 4 - Adjusting Colors:
While you are on the car layer, go
to Image > Adjustments >
Hue/Saturation. Set the Hue to -
55, Saturation to 30, Lightness to
0.
Go to Image > Adjustments >
Levels. Set the values to
0,0.85,255.
Step 5 - Defining Pattern:
Open up the Hello Kitty PSD file
you downloaded earlier. Hide all
other layers except for the face
and do a rectangle selection
around it. Go to Edit > Define
Pattern.
Back to your document and create
a new layer above the car. Fill
that layer with the Hello Kitty
pattern. Go to Image >
Adjustments > Invert to turn the
pattern white.
Step 6 - Wrap Pattern on
Front:
Duplicate the Hello Kitty pattern
and hide one of the two layers.
While on the visible pattern layer,
go to Edit > Transform > Warp.
Wrap the pattern to the car front
by shifting the square corners.
Adjust the positions of the points
like shown in the diagram.
Step 7 - Wrap Pattern on Side:
Unhide the other pattern layer and
repeat similar technique used in
Step 6 for the side of car.
Merge both pattern layers. Use
Soft Eraser tool of size 150px and
opacity 50%, fade its border to
blend into the car. Concentrate
more on those area that seem
further away.
Step 8 - Adding Hello Kitty
Logo:
Erase to reveal the engine cover.
Drag Hello Kitty logo into the
document above all layers. Go to
Edit > Transform > Distort the
logo like seen in the diagram.
Use Soft Eraser tool of 100px and
opacity 50%, fade off the left side
of the logo.
Step 9 - Adding the Shadow:
Create a new layer below the car.
Use Soft Brush tool with color
#000000 and opacity 80%, paint
in the shadows.
Step 10 - Adding the Glow:
Duplicate the car layer.
Select the duplicated layer and go
to Filter > Blur > Gaussian Blur.
Set the radius to 5px.
Set the Blending Mode of this
layer to Screen and opacity 50%.
You can increase the opacity if
you wish the car to look even
more dreamy.
Optional:
You can further add a nice
background and some glitters to
the car.
Click here
to view the final
image.