Tài liệu Module 10: Managing Partitions doc
Bạn đang xem bản rút gọn của tài liệu. Xem và tải ngay bản đầy đủ của tài liệu tại đây (863.12 KB, 36 trang )
Contents
Overview 1
Introducing Partitions 2
Creating Partitions 7
Lab A: Creating a Partition in the Sales Cube15
Using Advanced Settings 19
Merging Partitions 24
Lab B: Applying Advanced Settings to
Partitions 26
Review 29
Module 10: Managing
Partitions
BETA MATERIALS FOR MICROSOFT CERTIFIED TRAINER PREPARATION PURPOSES ONLY
Information in this document is subject to change without notice. The names of companies,
products, people, characters, and/or data mentioned herein are fictitious and are in no way intended
to represent any real individual, company, product, or event, unless otherwise noted. Complying
with all applicable copyright laws is the responsibility of the user. No part of this document may
be reproduced or transmitted in any form or by any means, electronic or mechanical, for any
purpose, without the express written permission of Microsoft Corporation. If, however, your only
means of access is electronic, permission to print one copy is hereby granted.
Microsoft may have patents, patent applications, trademarks, copyrights, or other intellectual
property rights covering subject matter in this document. Except as expressly provided in any
written license agreement from Microsoft, the furnishing of this document does not give you any
license to these patents, trademarks, copyrights, or other intellectual property.
2000 Microsoft Corporation. All rights reserved.
Microsoft, BackOffice, MS-DOS, Windows, Windows NT, <plus other appropriate product
names or titles. Replace this example list with list of trademarks provided by copy editor.
Microsoft is listed first, followed by all other Microsoft trademarks in alphabetical order. > are
either registered trademarks or trademarks of Microsoft Corporation in the U.S.A. and/or other
countries.
<This is where mention of specific, contractually obligated to, third party trademarks, which are
added by the Copy Editor>
The names of companies, products, people, characters, and/or data mentioned herein are fictitious
and are in no way intended to represent any real individual, company, product, or event, unless
otherwise noted.
Other product and company names mentioned herein may be the trademarks of their respective
owners.
Module 10: Managing Partitions iii
BETA MATERIALS FOR MICROSOFT CERTIFIED TRAINER PREPARATION PURPOSES ONLY
Instructor Notes
For enterprise-scale online analytical processing (OLAP) cubes developed in
Microsoft
®
SQL Server
™
2000 Analysis Services, partitioning can improve
both processing and query performance. In this module, students learn how to
create partitions, how to define slices and filters, and the benefits of using
partitions in cubes to improve scalability.
After completing this module, students will be able to:
!
Explain the benefits of partitioning.
!
Describe the mechanics of the Partition Wizard.
!
Explain when to define slices and when to define filters.
!
Describe the purpose and mechanics of merging partitions.
Materials and Preparation
This section lists the required materials and preparation tasks that you need to
teach this module.
Required Materials
To teach this module, you need the following materials:
!
Microsoft PowerPoint
®
file 2074A_10.ppt
Preparation Tasks
To prepare for this module, you should:
!
Read all the student materials.
!
Read the instructor notes and margin notes.
!
Practice the lecture presentation and demonstration.
!
Complete the labs.
!
Review the Trainer Preparation presentation for this module on the Trainer
Materials compact disc.
!
Review any relevant white papers that are located on the Trainer Materials
compact disc.
Presentation:
30 Minutes
Labs:
30 Minutes
iv Module 10: Managing Partitions
BETA MATERIALS FOR MICROSOFT CERTIFIED TRAINER PREPARATION PURPOSES ONLY
Other Activities
Difficult Questions
Below are difficult questions that students may ask you during the delivery of
this module and answers to the questions. These materials delve into subjects
that are within the scope of the module but are not specifically addressed in the
content of the student notes.
1. After defining multiple partitions, there are empty spaces in the cube even
though there is data in the fact tables to support the cells. What causes this?
Incomplete partitions can cause missing data. Incomplete partitions
result when a partition is misdefined (perhaps using a member from a
level that is too low for a slice) or not defined at all. Be careful—if a
partition is misdefined and another partition is added to fix the
problem, duplicate data can result.
2. What is the best way to split a partition into one or more different
partitions?
There is no direct way to do this. To split up an existing partition, you
must redefine the partition on a smaller slice or modify the WHERE
clause and then define new partitions.
3. If a different fact table than the one defined for the partition is used for an
incremental load of the partition, what happens when the cube is refreshed
or processed in the future?
The incremental data will not be included. Analysis Services refers to
only one fact table per cube partition.
Module 10: Managing Partitions v
BETA MATERIALS FOR MICROSOFT CERTIFIED TRAINER PREPARATION PURPOSES ONLY
Module Strategy
Use the following strategy to present this module:
!
Introducing Partitions
Start with an explanation of why partitions are used. Emphasize the fact that
partitions are transparent—users and front-end applications see only cubes.
Explain that partitions in a cube may have different storage modes,
aggregation designs, and physical locations. Define remote partitions.
!
Creating Partitions
Explain each step involved in creating a partition—choosing the fact table,
defining a data slice, assigning the partition location, and completing the
partition. Finish by describing how to access commands in Analysis
Manager.
!
Using Advanced Settings
Introduce students to the Advanced settings dialog box. Describe the
settings available—specifying filters, enabling drillthrough options, and
setting the aggregation prefix—and explain when to use each.
!
Merging Partitions
Explain to students why merging partitions can be beneficial. Use the
Current Year/Prior Year/History partition example. Describe the steps
involved in merging partitions. Emphasize the fact that, to be merged, two
partitions must have the same storage mode and aggregation design.
Module 10: Managing Partitions 1
BETA MATERIALS FOR MICROSOFT CERTIFIED TRAINER PREPARATION PURPOSES ONLY
Overview
!
Introducing Partitions
!
Creating Partitions
!
Using Advanced Settings
!
Merging Partitions
For enterprise-scale online analytical processing (OLAP) cubes developed in
Microsoft
®
SQL Server
™
2000 Analysis Services, partitioning can improve
both processing and query performance. In this module, you will learn how to
create partitions, how to define slices and filters, and the benefits of using
partitions in cubes to improve scalability.
After completing this module, you will be able to:
!
Explain the benefits of partitioning.
!
Describe the mechanics of the Partition Wizard.
!
Explain when to define slices and when to define filters.
!
Describe the purpose and mechanics of merging partitions.
Topic Objective
To provide an overview of
the module topics and
objectives.
Lead-in
In this module, you will learn
about partitions and their
use in OLAP cubes.
2 Module 10: Managing Partitions
BETA MATERIALS FOR MICROSOFT CERTIFIED TRAINER PREPARATION PURPOSES ONLY
#
##
#
Introducing Partitions
!
Basic Architecture
!
Partitioning Design
!
Remote Partitions
You create partitions in cubes to help manage cube storage, process cubes, and
query cubes. In this section, you will learn about partition architecture and
design and the use of partitions in OLAP cubes.
Topic Objective
To introduce the concept of
partitions.
Lead-in
In this section, you will learn
about partition architecture
and design and the use of
partitions in OLAP cubes.
Module 10: Managing Partitions 3
BETA MATERIALS FOR MICROSOFT CERTIFIED TRAINER PREPARATION PURPOSES ONLY
Basic Architecture
!
Act As Physical Storage Mediums for Cube Data
!
Improve Cube Performance
$
Cube processing performance
$
Query performance
!
Are Transparent to Users
!
Require SQL Server 2000 Enterprise Edition
$
Analysis Server and Analysis Manager Computers
Partitions are the physical storage mediums for cube data. A cube may have one
or more partitions. Each partition may have a different storage mode with a
different aggregation design. In addition, each partition may be located on a
different server. All cubes initially have a single default partition.
When you design aggregations for a one-partition cube, you are actually
designing aggregations for the partition, not for the cube. When you process a
single-partition cube, you are also processing the partition, not the cube. If a
cube contains more than one partition, attempting to design storage for a cube
opens up a dialog box that requires you to select a single partition for designing
aggregations.
You create partitions to improve cube processing and query performance,
increasing the scalability of a cube. Partitions are processed either as part of a
full cube process or independent from other cube partitions. By processing
partitions independently, you isolate processing to a subset of cube data, and
therefore reduce the processing time. In addition, queries can focus on a single
partition and can perform faster data retrievals due to the smaller data set being
accessed.
Partitions are transparent. Users and application front-ends see only cubes—that
is, they query a cube and not a partition. The cube reflects the combined data
contained in all its partitions.
To create multiple partitions in a cube, you must have the Enterprise Edition of
SQL Server 2000 installed on the Analysis Server and on any computers
administering the server. To install the Enterprise Edition of SQL Server 2000,
the computer requires one of the following operating systems:
!
Microsoft Windows NT
®
Server 4.0 with Service Pack 5
!
Windows NT Server Enterprise Edition 4.0 with Service Pack 5
!
Microsoft Windows 2000 Advanced Server
!
Windows 2000 Data Center Server
Topic Objective
To describe the fundamental
characteristics of cube
partitions.
Lead-in
Partitions are the physical
storage mediums for cube
data.
4 Module 10: Managing Partitions
BETA MATERIALS FOR MICROSOFT CERTIFIED TRAINER PREPARATION PURPOSES ONLY
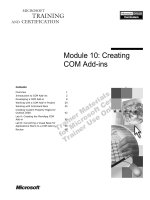
Partitioning Design
History
Prior Year
MOLAP
35% agg
ROLAP
0% agg
Current Year
MOLAP
10% agg
Partitions separate cube data into discrete storage areas. Each partition in a cube
may have different:
!
Storage modes—multidimensional OLAP (MOLAP), relational OLAP
(ROLAP), or hybrid OLAP (HOLAP).
!
Source fact tables—Salesfact2000 for one partition and Salesfact2001 for
another.
!
Aggregation designs—35 percent aggregation in one MOLAP partition
versus 10 percent aggregation in a second MOLAP partition versus 0
percent aggregation in a third ROLAP partition.
!
Storage locations—Server 1 in Pittsburgh, Server 2 in San Francisco, and so
forth.
Because of these factors, partitioning is the principal feature in Analysis
Services for increasing cube scalability and designing storage to reflect user
access and response time needs.
In the preceding illustration, three partitions exist in one cube. The data in the
partitions, representing the entire accounting history for a company, is
organized by current year, prior year, and historical data.
The aggregation design for each of the partitions reflects specific user access
needs and storage considerations. The partitions are designed as follows:
!
Current Year
The current year partition design contains the highest aggregation
percentage using the MOLAP storage mode—the fastest storage method.
The design reflects the high number of users, the high frequency of the
access of each user, and the presumed performance requirements for the
reporting and analysis of current year data.
Topic Objective
To describe the use of
different aggregation and
storage designs in
partitions.
Lead-in
Partitions separate cube
data into discrete storage
areas. Each partition in a
cube may have different
storage modes, aggregation
designs, and physical
locations.
Delivery Tip
Point out that agg stands for
aggregation in the preceding
illustration.
Module 10: Managing Partitions 5
BETA MATERIALS FOR MICROSOFT CERTIFIED TRAINER PREPARATION PURPOSES ONLY
To further enhance response times, the current year partition might
also reside on a more robust server with large amounts of storage and
memory and a fast processor.
!
Prior Year
The prior year partition design also uses MOLAP storage, but with a lower
aggregation level, thus conserving storage while sacrificing reporting
performance. Users access prior year data less frequently than they access
current year data, and data extraction is typically used for printed reports
rather than ad hoc analysis, so response times are less important.
!
History
The history design uses ROLAP with zero aggregations, and is the slowest
of the three partitions in reporting performance—reflecting the low
frequency of access by users for this type of data. While reporting is slow,
ROLAP with no aggregations is the most storage efficient design—
reflecting the need for economical storage of large amounts of historical
data.
In summary, partitioning is an important tool for enhancing overall system
performance. Partitioning allows you to balance data load performance, run-
time reporting performance, and storage needs against user needs, production
cycle times, and hardware availability.
Note
6 Module 10: Managing Partitions
BETA MATERIALS FOR MICROSOFT CERTIFIED TRAINER PREPARATION PURPOSES ONLY
Remote Partitions
!
Remote Partitions Are Stored on a Separate Server
$
Data stored separately
$
Processing performed separately
$
Querying performed separately, but funneled through
local Analysis Server
$
Metadata stored and maintained on local Analysis
Server
$
Administration performed on the local Analysis Server
!
Transparent Setup and Maintenance
A partition assigned to a server that is physically separate from the main
Analysis Server is called a remote partition. The separate server where the
remote partition is stored is called the remote server, and the main server where
the cube definition is stored and administered is called the local server.
The following are the general parameters for the organization and processing of
remote partitions:
!
The data associated with the remote partition is stored on the separate, or
remote, server.
!
All processing of the partition by its own aggregation rules is done on the
remote server.
!
Querying of the partition occurs on the remote server, but is funneled from
the local Analysis Server.
!
Metadata for the partition is stored and maintained on the local Analysis
server—not on the remote server.
!
Administration of a cube and its associated partitions is performed on the
local Analysis Server, and not on the remote server as part of the remote
partition definition. In other words, no administration occurs on the remote
server.
You create remote partitions through the Partition Wizard. In the process of
creating a partition by using the wizard, after you name the remote server for a
remote partition, all other configurations are automatic and transparent—that is,
setup and administration is the same as for a non-remote partition.
Topic Objective
To introduce the concept of
remote partitions.
Lead-in
You have the ability to
define cube partitions as
remote in Analysis Services.
Module 10: Managing Partitions 7
BETA MATERIALS FOR MICROSOFT CERTIFIED TRAINER PREPARATION PURPOSES ONLY
#
##
#
Creating Partitions
!
Choosing the Fact Table
!
Defining a Data Slice
!
Assigning the Partition Location
!
Completing the Partition
!
Accessing Commands
When you first create a cube, by default the cube contains one partition. You
add additional partitions by using the Partition Wizard. This section outlines the
systematic procedure for creating additional partitions, which includes the
following steps:
!
Choosing the data source and the source fact table, if different from the
default source and fact table.
!
Optionally defining a data slice to focus the data included in the partition.
!
Assigning the location of the partition.
!
Completing the partition design by naming it and specifying an aggregation
design.
!
Accessing partitioning commands to administer a partition after you have
created it.
Topic Objective
To introduce the mechanics
of creating partitions.
Lead-in
This section outlines the
systematic procedures for
creating additional
partitions.
Delivery Tip
Present this entire section
as an informal
demonstration. Switch back
and forth between the slides
and the Partition Wizard,
showing students the actual
interfaces as you discuss
the issues.
8 Module 10: Managing Partitions
BETA MATERIALS FOR MICROSOFT CERTIFIED TRAINER PREPARATION PURPOSES ONLY
Choosing the Fact Table
When you create a new partition in a cube, the partition fact table is not
required to be from the same data source or fact table defined in the Cube
Editor. The first step in creating a partition is to choose a data source and fact
table for the partition. The fact table must contain the measures and dimension
keys found in the fact table defined in the Cube Editor.
To add a new partition to a cube, perform the following steps:
1. In Analysis Manager, expand the folder for the cube to which you want to
add a partition.
2. Right-click the Partitions folder, and then click New Partition.
The Partition Wizard opens.
3. Click Next to bypass the Welcome step of the Partition Wizard.
Topic Objective
To describe the action of
choosing a fact table for a
new partition.
Lead-in
The first step in creating a
partition is choosing a data
source and fact table for the
partition.
Module 10: Managing Partitions 9
BETA MATERIALS FOR MICROSOFT CERTIFIED TRAINER PREPARATION PURPOSES ONLY
To confirm or change the fact table and database, perform the following steps:
1. From the Specify data source and the fact table step, note the data source
and fact table default entries.
The Partition Wizard defaults to the same data source and fact table that are
defined in the Cube Editor.
2. Click Change to specify a different fact table.
If you want to use the same data source and fact table as the default
partition, click Next to proceed to the Select the data slice (optional) step.
3. From the Choose a fact table step, select a fact table for the partition to use
from the Tables list, and then click OK.
The Tables list includes all the fact tables associated with available data
sources. The chosen fact table must have the same structure as the fact table
of the default partition. If it does not, Analysis Manager will display an alert
and will not allow you to proceed with the invalid choice.
If you want to define a different data source, in the Choose a fact table
step, click New Data Source.
4. Click Next.
10 Module 10: Managing Partitions
BETA MATERIALS FOR MICROSOFT CERTIFIED TRAINER PREPARATION PURPOSES ONLY
Defining a Data Slice
The next step in designing a partition is determining the partition’s data slice.
You define a data slice for a partition to define which data to include in the
partition. In addition, queries use data slices to determine which partitions to
access when retrieving data. Use data slices to prevent duplication of data and
to optimize query performance.
Choosing the data slice on which to base a partition is an important design
decision, which must take into consideration user reporting and analysis needs,
load and processing cycle times, and server hardware availability.
While the step of defining a data slice is optional in the Partition Wizard, it is
important to specify a data slice if the partition derives from the same data
source and fact table as the default partition. If you do not otherwise specify a
data slice—or a filter, which is discussed in the next section—then the default
partition and the new partition will contain duplicate data, which defeats the
purpose of creating the additional partition.
If the partitions are derived from different fact tables, and the fact tables are
partitioned the same as the cube partitions, specifying a data slice is not
necessary. However, if you define a data slice, queries accessing partition data
do not waste time by searching through partitions that do not contain the
requested data.
Topic Objective
To describe the process of
defining a data slice in a
cube partition.
Lead-in
The next step in designing a
partition is determining the
partition’s data slice.
Delivery Tip
Point out that defining a
data slice for a partition
ensures that queries
achieve the full benefit of
multiple partitions.
Module 10: Managing Partitions 11
BETA MATERIALS FOR MICROSOFT CERTIFIED TRAINER PREPARATION PURPOSES ONLY
To define a data slice, perform the following steps:
1. In the Select the data slice (optional) step, select a dimension for the data
slice from the Dimensions list.
A hierarchical list of members for the selected dimension appears in the
Members list. You can drill down through this list to see various members
in the hierarchy.
2. In the Members list, click a member to define the specific data slice.
The member selected appears under the Data slice column of the
Dimensions list to the right of the selected dimension. Note in the interface
that the data slice maps to a single member definition. You define a data
slice that requires additional complexity by using a filter expression, which
is reviewed later in this module.
3. Click Next.
12 Module 10: Managing Partitions
BETA MATERIALS FOR MICROSOFT CERTIFIED TRAINER PREPARATION PURPOSES ONLY
Assigning the Partition Location
Each partition can reside on a different server. The wizard allows you to specify
whether the partition should remain on the local server or be distributed to
another server.
If you want to define a remote partition for a cube, you must define the
remote partition on a computer running Analysis Services. In addition, you
must have a user name in the OLAP Administrator group on both computers.
Lastly, the logon account for the Analysis Server service must be a domain user
account before creating a remote partition.
Topic Objective
To describe how you can
specify the location for
storing the partition.
Lead-in
The wizard allows you to
specify whether the partition
should remain on the local
server or be distributed to
another server.
Note
Module 10: Managing Partitions 13
BETA MATERIALS FOR MICROSOFT CERTIFIED TRAINER PREPARATION PURPOSES ONLY
Completing the Partition
In the last step of the wizard, you enter the name of the new partition and
specify how you want to design aggregations.
To name and define aggregations for the partition, perform the following steps:
1. In the Finish the Partition Wizard step, enter a descriptive name for the
partition in the Partition name box.
2. Click one of the three What do you want to do? radio buttons.
Following are the behaviors of each of the choices:
• If you click Design the aggregations for your partition now, the
Storage Design Wizard opens after you click Finish.
• If you click Design the aggregations later, when you click the Finish
button, the Partition Wizard closes and you return to the Analysis
Manager. Before processing the cube, you must return to the Storage
Design Wizard to design aggregations. To do so, you right-click the
partition, and then click Design Storage.
• If you click Copy the aggregation design from an existing partition,
you may choose an aggregation design from the list of designs that are
defined for other cube partitions.
3. Select the Process the partition when finished check box to initiate
processing of the partition after you click the Finish button.
4. Click Finish.
Topic Objective
To describe the last step of
the Partition Wizard, in
which you can name the
partition and design
aggregations.
Lead-in
In the last step of the
wizard, you enter the name
of the new partition and
specify how you wish to
design aggregations.
14 Module 10: Managing Partitions
BETA MATERIALS FOR MICROSOFT CERTIFIED TRAINER PREPARATION PURPOSES ONLY
Accessing Commands
!
Right-Click the Partitions Folder
$
New partition
$
Process all partitions
!
Right-Click a Specific Partition
$
Edit
$
Process
$
Design storage
$
Usage-based optimization
$
Merge
The interface for creating, modifying, and processing partitions in Analysis
Manager is very simple and intuitive. All commands are accessed through the
context-sensitive menu system.
By right-clicking the Partitions folder below the specific cube in Analysis
Manager, you can perform the following operations:
!
Create a new partition
!
Process all partitions
To access commands for administering a specific partition, right-click the
partition from in the Partitions folder. The menu allows you to perform the
following operations:
!
Edit the partition.
!
Process the partition.
!
Open the Storage Design Wizard to design or change the storage for the
partition.
!
Open the Usage Based Optimization Wizard to implement usage-based
optimization for the partition.
!
Open the Merge Wizard to merge the partition with another cube partition.
Topic Objective
To describe the process of
updating, creating,
modifying, and processing
partitions in Analysis
Manager.
Lead-in
The interface for creating,
modifying, and processing
partitions in Analysis
Manager is very
straightforward and intuitive.
Module 10: Managing Partitions 15
BETA MATERIALS FOR MICROSOFT CERTIFIED TRAINER PREPARATION PURPOSES ONLY
Lab A: Creating a Partition in the Sales Cube
Objectives
After completing this lab, you will be able to:
!
Create a new partition in a cube.
Prerequisites
Before working on this lab, you must have:
!
Experience working with dimensions.
!
An understanding of dimensions, cubes, and measures.
Estimated time to complete this lab: 10 minutes
Topic Objective
To introduce the lab.
Lead-in
In this lab, you will create a
new partition in the Sales
cube to access data from
another fact table.
Explain the lab objectives.
16 Module 10: Managing Partitions
BETA MATERIALS FOR MICROSOFT CERTIFIED TRAINER PREPARATION PURPOSES ONLY
Exercise 1
Creating a Partition in the Sales Cube
In this exercise, you will add a second partition to the Sales cube and populate
it with data. You will partition the cube by defining a data slice from the Time
dimension. The existing default partition contains 2000 data. The new partition
will contain 2001 data.
!
To restore a new database and define a data source
1. In Analysis Manager, right-click the server, click Restore Database, click
the Look in list, click the file C:\Moc\2074A\Labfiles\L10\Module
10.CAB, click Open, click Restore, and then click Close.
2. Double-click Module 10 to expand the database.
3. Double-click the Data Sources folder below Module 10, right-click the
Module 10 data source, and then click Edit.
4. In the Data Link Properties dialog box, click the Connection tab, and then
verify that localhost is selected in step 1.
5. In step 2, verify that Use Windows NT Integrated security is selected.
6. In step 3, verify that Module 10 is selected.
7. Click Test Connection and verify that the test succeeded. Click OK twice.
!
To browse the Sales cube
1. Open the Cube Editor for the Sales cube.
2. Browse the cube in the Data pane.
Notice the very simple cube structure. The Sales cube contains two
dimensions—Time and State—and one measure—Sales Units.
3. Expand the Time dimension and click 2000. Notice the cube data in USA.
4. Click 2001. Notice that the cube does not contain any data for the year
2001.
5. Click the Schema tab in the Data pane.
Notice the fact table defined in the cube—Salesfact2000. The reason the
cube contains no data for the year 2001 is that the cube retrieves data from
the one fact table, Salesfact2000. Now you will add a new partition to the
Sales cube to incorporate the 2001 data.
6. Close the Cube Editor.
!
To create a new partition.
1. Expand the Sales cube, expand the Partitions folder, and then notice the
default partition in the Sales cube—Sales.
The default partition has the same name as the cube name.
2. Right-click the Partitions folder and then click New Partition. The
welcome page of the Partition Wizard opens. Click Next.
Module 10: Managing Partitions 17
BETA MATERIALS FOR MICROSOFT CERTIFIED TRAINER PREPARATION PURPOSES ONLY
!
To select the fact table and database
1. From the Specify the data source and the fact table step, click Change to
specify a different fact table.
2. From the Choose a fact table dialog box, click the fact table Salesfact2001.
3. Click OK, and then click Next.
!
To define the data slice
1. From the Select the data slice (optional) step, click the Time dimension,
and then click 2001 from the Members pane.
You define a data slice in the new partition to optimize queries made against
2001 data.
2. Click Next twice to move to the Finish the Partition Wizard step.
!
To finish the partition
1. From the Finish the Partition Wizard step, type Sales 2001 in the
Partition name box.
2. From the What do you want to do? pane, click Copy the aggregation
design from an existing partition and then verify that Sales is selected in
the Copy from list.
3. Select the Process partition when finished check box, and then click
Finish.
4. Close the Process dialog box.
!
To browse the Sales cube
1. Open the Cube Editor for the Sales cube.
2. Browse the cube data in the Data pane.
3. Click the 2000 and 2001 members in the Time dimension.
Notice that the cube contains data for both years.
4. View the cube schema for the Sales cube.
Notice that the schema did not change after you created the new partition. In
other words, the schema is based on the Salesfact2000 fact table, and there
is no reference to the Salesfact2001 fact table. The only reference to the
new table is found in the new partition definition identified in the Partition
Wizard.
5. Close the Cube Editor for Sales.
18 Module 10: Managing Partitions
BETA MATERIALS FOR MICROSOFT CERTIFIED TRAINER PREPARATION PURPOSES ONLY
!
To update the data slice for the Sales partition
1. In Analysis Manager, expand the Partitions folder in the Sales cube, right-
click the Sales partition, and then click Edit.
The Partition Wizard opens.
2. Click Next to advance to the Select the data slice (optional) step.
3. Click the Time dimension, and then click 2000 from the Members pane.
You will not see any differences in data values after defining the data slice
for the Sales partition. However, you are optimizing the internal
management of the two partitions. Now, when users query 2000 data, the
Analysis Server searches only the Sales partition instead of searching both
the Sales and Sales 2001 partitions. The same is true for queries accessing
2001 data. The Analysis Server will not need to search through the Sales
partition, because it is defined as containing only 2000 data.
4. Click Next twice, copy the aggregations from the Sales 2001 partition, and
then process the partition.
5. Browse the Sales cube to verify that the data values have not changed.
6. Close the Cube Browser.
Module 10: Managing Partitions 19
BETA MATERIALS FOR MICROSOFT CERTIFIED TRAINER PREPARATION PURPOSES ONLY
#
##
#
Using Advanced Settings
!
Partition Filters
!
Drillthrough Options
!
Aggregation Prefix
You can take advantage of several advanced setting features from the
Advanced settings dialog box, which is accessed from the Finish the Partition
Wizard step. These advanced settings include:
!
Specifying filters for more complex partition definitions.
!
Enabling drillthrough options for the partition.
!
Setting the aggregation prefix to assign a common prefix for aggregation
tables.
Topic Objective
To introduce the use of
advanced settings in the
Partition Wizard.
Lead-in
You can take advantage of
several advanced setting
features from the Advanced
settings dialog box, which
is accessed from the Finish
the Partition Wizard page.
Delivery Tip
Show the Advanced
settings dialog box during
your lecture.