Tài liệu Microprocessor Interfacing Techniques Lab VIEW Tutorial Part 5 ppt
Bạn đang xem bản rút gọn của tài liệu. Xem và tải ngay bản đầy đủ của tài liệu tại đây (38.7 KB, 3 trang )
PHY 406 - Microprocessor Interfacing Techniques
© James R. Drummond - September 1996 25
PHY 406 - Microprocessor Interfacing Techniques
LabVIEW Tutorial - Part V
Loop Variables??
Thanks for the Memory!
One of the things that we often need to do is to refer to values in a previous loop iteration.
Thus we might want to average the last four values of the random number generator. To do this
we need a shift register. A shift register takes an input in one iteration and delivers it as an output
into the next iternation. So why is it called a shift register? Well because it is a little more
elaborate than that. The shift register can be as long as you like and values are shifted down one
element at a time. So there is one input and many outputs.
Suppose we have a shift register with four elements which contain 75,99,63,27. A new
value of 93 is pushed into the shift register and everything moves down one. The shift register
now has 93,75,99,63. At the next iteration 45 is pushed in and the register now has 45,93,75,99
and so on.
We can generate a shift register by popping-up on the right-hand side of the while loop
and selecting add shift register. Two new icons pop-up on the right (input) and left (output) of
the loop. Go to the left one and pop-up - select add element - do it again and you now have
three elements which go in time order down the page, newest on top.
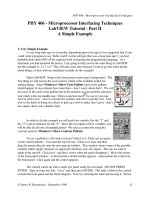
Re-arrange your VI to show the average of the last
four values of the random number generator. The result
should look something like this:
Run the VI and you should get the expected result.
It isn’t going to take a rocket scientist to realise
that doing any significant arithmetic in LabVIEW is going
to be tedious. Evaluating any complex expression will
involve lots of elements and will rapdily get tedious.
Fortunately there is a better way.
Under structures there is an item called a formula node. This is designed to make things
easy. Remove the multipliers and dividers for the averaging and stretch a formula node box into
the space.
The formula node box can have inputs and outputs which must be named like variables in
an algebraic expression - which they are. You then type the formula in the box in terms of the
variables. Create inputs x0, x1, x2, x3 and output y on the formula node box by using the pop-up
PHY 406 - Microprocessor Interfacing Techniques
© James R. Drummond - September 1996 26
on the edge. Then using the text tool type the formula y = (x0+x1+x2+x3)/4; into the box (don’t
forget the semi-colon, it’s important!). You may need ot re-arrange things a bit at this point.
Now run the VI again and all should be well. Although in this example, the two ways are roughly
as bad (or good) as one another, for more complex formulae, the formula box will win. More
importantly, the formula box is clearer and clarity is worth a lot.
More Loops
Now I want to introduce you to another loop and thereby start to introduce the concept of
arrays. The problem we will tackle is to present the average and standard deviation of a number
of the values produced by our VI. We could do this by averaging them explictly, but that would
get tedious and there are better ways. We need to group the numbers into an array and then
analyse them. We will delete all the shift register and averaging code to make things simpler.
The “For” loop is the construct to use, and proves very handy because it automatically
puts some outputs into an array. In order to see this, proceed as follows. Using the select tool
find the for loop in functions>>Structures and drag it over the entire VI inside the while loop
leaving the loop counter and the termination switch outside. A for loop has two numbers
associated with - the Termination count (N is the upper left corner) which is the total number of
times the for loop runs before terminating and the iteration count (i in the lower left corner). Use
the pop-up to attach a control (outside the loop) to the Termination count.
At this time it might be worth pointing out that if you place a control on either panel you
can use find control on the pop-up to locate it on the other panel - very useful as LabVIEW’s
idea of positioning is often “interesting”.
Now you want to stretch out the while loop to take some more stuff and you will probably
want to expand the window at the same time.
Now find functions>>Analysis>>Probability and Statistics>>Standard Deviation.
This VI takes an array as input and produces the mean and standard deviation as output. You will
certainly want a little help with this module as you use the pop-up to create the output indicators
(use Ctrl-H to guide you). Wire the input to the output of the I16 converter in the for loop. As
you do that you will notice two things: first that there is a black square on the boundary of the
loop indicating something is happening, second that the line inside the for loop is thin, but outside
it becomes thick. That is because the black dot is assembling the individual outputs from each
iteration of the for loop into an array whose size is the number of times the loop executes - the
PHY 406 - Microprocessor Interfacing Techniques
© James R. Drummond - September 1996 27
Termination count.
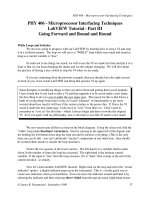
This is most important. Set
the Termination count to a number
>0 and then run the VI. Try
experimenting with with numbers >
0. Why not 0? Well, what is an array
with 0 elements, and how do you
find the mean and standard
deviation? This is a guaranteed error
situation!
We can cope with this situation in two ways: Limit the data range of the Termination
count to be always >0 or install an error handler. I’m going to show you the second way, because
you can already do the first.
Summary
Shift registers enable us to use the results from previous loop iterations
Formula boxes are clearer and more compact for more-than-trivial arithmetic
For loops enable us to form arrays quickly for analysis as a group.
Exercise
Use shift register and some additional indicators to dsiplay the last three values of the
mean as well as the current value.
Use a formula box to mofiy the output of the random number gnerator to ax instead of ax
2
as at present.