Tài liệu Web Programming with HTML, XHTML, and CSS- P5 doc
Bạn đang xem bản rút gọn của tài liệu. Xem và tải ngay bản đầy đủ của tài liệu tại đây (1.01 MB, 50 trang )
Figure 5-20
Structuring Your Forms with <fieldset>
and <legend> Elements
Large forms can be confusing for users, so it’s good practice to group together related form controls. The
<fieldset> and <legend> elements do exactly this — help you group controls.
Both elements were introduced in IE 4 and Netscape 6; however, older browsers will just ignore these
elements, so you are safe to include them in all your forms.
❑ The
<fieldset> element creates a border around the group of form controls to show that they
are related.
❑ The
<legend> element allows you to specify a caption for the <fieldset> element, which acts
as a title for the group of form controls. When used, the
<legend> element should always be
the first child of the
<fieldset> element.
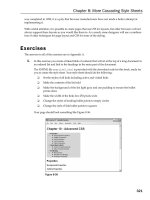
In the following example, you can see how a form has been divided into four sections: contact information,
competition question, tiebreaker question, and enter the competition (ch05_eg17.html).
<form action=” method=”post” name=”frmComp”>
<fieldset>
<legend><em>Contact Information</em></legend>
<label>First name: <input type=”text” name=”txtFName” size=”20” /></label><br />
<label>Last name: <input type=”text” name=”txtLName” size=”20” /></label><br />
<label>E-mail: <input type=”text” name=”txtEmail” size=”20” /></label><br />
</fieldset>
<fieldset>
<legend><em>Competition Question</em></legend>
How tall is the Eiffel Tower in Paris, France? <br />
<label><input type=”radio” name=”radAnswer” value=”584” />
584ft</label><br />
<label><input type=”radio” name=”radAnswer” value=”784” />
784ft</label><br />
<label><input type=”radio” name=”radAnswer” value=”984” />
984ft</label><br />
<label><input type=”radio” name=”radAnswer” value=”1184” />
1184ft</label><br />
</fieldset>
<fieldset>
<legend><em>Tiebreaker Question</em></legend>
171
Chapter 5: Forms
59313c05.qxd:WroxPro 3/22/08 4:37 PM Page 171
Please purchase PDF Split-Merge on www.verypdf.com to remove this watermark.
<label>In 25 words or less, say why you would like to win $10,000:
<textarea name=”txtTiebreaker” rows=”10” cols=”40”></textarea>
</label>
</fieldset>
<fieldset>
<legend><em>Enter competition</em></legend>
<input type=”submit” value=”Enter Competition” />
</fieldset>
</form>
You can see how the <fieldset> elements create borders around the groups of form controls, and how
the
<legend> elements are used to title the groups of controls. Remember that the <legend> element
must be the first child of the
<fieldset> element when it is used. See Figure 5-21.
Figure 5-21
The
<fieldset> element can take the following attributes:
❑ All the universal attributes
❑ The basic event attributes
Note that if you use a table to format your form, the
<table> element must appear inside the
<fieldset> element. If a <fieldset> resides within a table that is used to format the page, then the
entire fieldset must reside within the same cell.
172
Chapter 5: Forms
59313c05.qxd:WroxPro 3/22/08 4:37 PM Page 172
Please purchase PDF Split-Merge on www.verypdf.com to remove this watermark.
The <legend> element can take the following attributes:
❑
accesskey, which you will learn about in the next section
❑
align (which is deprecated — you should use CSS positioning instead)
❑ All of the universal attributes
❑ UI event attributes
Focus
When a web page featuring several links or several form controls loads, you might have noticed that you
are able to use your Tab key to move between those elements (or Shift+Tab to move backward through
elements). As you move between them, the web browser tends to add some form of border or highlight-
ing to that element (be it a link or a form control). This is known as focus.
From what you have learned already about XHTML, you know that not every element in the document
receives this focus. In fact, it is only the elements that a user can interact with, such as links and form con-
trols, that can receive focus. Indeed, if a user is expected to interact with an element, that element must
be able to receive focus.
An element can gain focus in three ways:
❑ An element can be selected using a pointing device such as a mouse or trackball.
❑ The elements can be navigated between using the keyboard — often using the Tab key (or
Shift+Tab to move backward through elements). The elements in some documents can be given
a fixed tabbing order, indicating the order in which elements gain focus.
❑ You can use a system such as a keyboard shortcut known as an access key to select a particular ele-
ment.
For example, on a PC you would likely press the Alt key plus an access key (such as Alt+E),
whereas on a Mac you would press the Control key with an access key (such as Control+E).
Tabbing Order
If you want to control the order in which elements can gain focus, you can use the tabindex attribute to
give that element a number between 0 and 32767, which forms part of the tabbing order. Every time the
user presses the Tab key, the focus moves to the element with the next highest tabbing order (and again,
Shift+Tab moves focus in reverse order).
The following elements can carry a
tabindex attribute:
<a> <area> <button> <input> <object> <select> <textarea>
The tabindex attribute was first supported in Netscape 6 and IE 4, but older browsers just ignore this
attribute, so it is safe to use it in all documents.
After a user has tabbed through all elements in a document that can gain focus, then focus may be given
to browser features (most commonly the address bar).
173
Chapter 5: Forms
59313c05.qxd:WroxPro 3/22/08 4:37 PM Page 173
Please purchase PDF Split-Merge on www.verypdf.com to remove this watermark.
To demonstrate how tabbing order works, the following example gives focus to the checkboxes in a different
order than you might expect (ch05_eg18.html):
<form action=” method=”get”
name=”frmTabExample”>
<input type=”checkbox” name=”chkNumber” value=”1” tabindex=”3” /> One<br />
<input type=”checkbox” name=”chkNumber” value=”2” tabindex=”7” /> Two<br />
<input type=”checkbox” name=”chkNumber” value=”3” tabindex=”4” /> Three<br />
<input type=”checkbox” name=”chkNumber” value=”4” tabindex=”1” /> Four<br />
<input type=”checkbox” name=”chkNumber” value=”5” tabindex=”9” /> Five<br />
<input type=”checkbox” name=”chkNumber” value=”6” tabindex=”6” /> Six<br />
<input type=”checkbox” name=”chkNumber” value=”7” tabindex=”10” />Seven <br />
<input type=”checkbox” name=”chkNumber” value=”8” tabindex=”2” /> Eight<br />
<input type=”checkbox” name=”chkNumber” value=”9” tabindex=”8” /> Nine<br />
<input type=”checkbox” name=”chkNumber” value=”10” tabindex=”5” /> Ten<br />
<input type=”submit” value=”Submit” />
</form>
In this example, the checkboxes receive focus in the following order:
4, 8, 1, 3, 10, 6, 2, 9, 5, 7
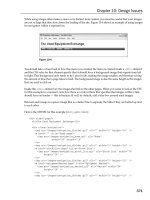
Figure 5-22 shows how Firefox 2 for PC will, by default, give a yellow outline to form elements as they gain
focus (other browsers give different outlines — Internet Explorer uses blue lines). I have zoomed in on the
item in focus so you can see it in closer detail.
Figure 5-22
You should always start your tabindex values with 1 or higher, rather than 0, because elements that could
gain focus but do not have a tabindex attribute are given a value of 0 and are navigated in the order in
which they appear after those with a
tabindex have been cycled through. If two elements have the same
value for a
tabindex attribute, they will be navigated in the order in which they appear in the document.
Note that if an element is disabled, it cannot gain focus and does not participate in the tabbing order.
174
Chapter 5: Forms
59313c05.qxd:WroxPro 3/22/08 4:37 PM Page 174
Please purchase PDF Split-Merge on www.verypdf.com to remove this watermark.
Access Keys
Access keys act just like keyboard shortcuts. The access key is a single character from the document’s
character set that is expected to appear on the user’s keyboard. When this key is used in conjunction with
another key (such as Alt on Windows and Control on an Apple), the browser automatically goes to that
section (exactly which key must be used in conjunction with the access key depends upon the operating
system and browser).
The access key is defined using the
accesskey attribute. The value of this attribute is the character (and
key on the keyboard) you want the user to be able to press (in conjunction with the other key that is
dependent upon the operating system and browser).
The following elements can carry an access key attribute:
<a> <area> <button> <input> <label> <legend> <textarea>
The accesskey attribute was first supported in Netscape 6 and IE 4, but older browsers just ignore these
attributes, so it is safe to use them in all documents.
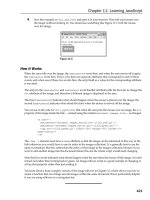
To see how access keys work, you can revisit the example of a competition form (ch05_eg17.html), which
was covered in the section “Structuring Your Forms with <fieldset> and <legend> Elements” earlier in this
chapter. Now the accesskey attributes can be added to the <legend> elements:
<legend accesskey=”c”><u>C</u>ontact Information (ALT + C)</legend>
<legend>Competition Question</legend>
<legend accesskey=”t”><u>T</u>iebreaker Question (ALT + T)</legend>
<legend>Enter competition</legend>
The new version of this file is ch05_eg19.html in the download code. (Extra <br /> elements have been
added to show how the screen scrolls to the appropriate section when an access key is used.) As a hint to
users that they can use the access keys as shortcuts, information has also been added to the information
in the
<legend> element in two ways:
❑ In brackets after the title
❑ By underlining the access key itself
Figure 5-23 shows how this updated example looks in a browser.
The effect of an access key being used depends upon the element that it is used with. With <legend>
elements, such as those shown previously, the browser scrolls to that part of the page automatically and
gives focus to the first form control in the section. When used with form controls, those elements gain
focus. As soon as the element gains focus, the user should be able to interact with it (either by typing in
text controls or pressing the Enter or Return key with other form controls).
When using letters a–z, it does not matter whether you specify an uppercase or lowercase access key,
although strictly speaking it should be lowercase.
175
Chapter 5: Forms
59313c05.qxd:WroxPro 3/22/08 4:37 PM Page 175
Please purchase PDF Split-Merge on www.verypdf.com to remove this watermark.
Figure 5-23
Disabled and Read-Only Controls
Throughout the chapter you have seen that several of the elements can carry attributes called disabled
and readonly:
❑ The
readonly attribute prevents users from changing the value of the form control themselves,
although it may be modified by a script. A name/value pair of a
readonly control will be sent
to the server. Its value should be
readonly.
❑
The disabled attribute disables the form control so that users cannot alter it. A script can be used
to re-enable the control, but unless a control is re-enabled, the name/value pair will not be sent
to the server. Its value should be
disabled.
The readonly and disabled attributes were implemented in Netscape 6 and IE 5, although older browsers
ignore them, so you can add these attributes to all documents. You should be aware, however, that because
older browsers ignore these attributes, users with older browsers would still be able to interact with form
controls that have
readonly or disabled attributes.
176
Chapter 5: Forms
59313c05.qxd:WroxPro 3/22/08 4:37 PM Page 176
Please purchase PDF Split-Merge on www.verypdf.com to remove this watermark.
A readonly control is particularly helpful when you want to stop visitors from changing a part of the
form, perhaps because it cannot change (such as in the case of terms and conditions) or because you want
to indicate to a user something that they have already said, or when. You often see
readonly controls for
user agreements and in the body of e-mail forms that allow you to e-mail a web page to a friend.
The
disabled attribute is particularly helpful when preventing users from interacting with a control until
they have done something else. For example, you might use a script to disable a submit button until all of
the form fields contain a value.
The following table indicates which form controls work with the
readonly and disabled attributes.
The following table indicates the main differences between the
readonly and disabled attributes.
Attribute readonly disabled
Can be modified
Yes by script, not by user Not while disabled
Will be sent to server
Yes Not while disabled
Will receive focus
Yes No
Included in tabbing order
Yes No
Element readonly disabled
<textarea>
Yes Yes
<input type=”text” / >
Yes Yes
<input type=”checkbox” />
No Yes
<input type=”radio” / >
No Yes
<input type=”submit” / >
No Yes
<input type=”reset” />
No Yes
<input type=”button” />
No Yes
<select>
No Yes
<option>
No Yes
<button>
No Yes
177
Chapter 5: Forms
59313c05.qxd:WroxPro 3/22/08 4:37 PM Page 177
Please purchase PDF Split-Merge on www.verypdf.com to remove this watermark.
Sending Form Data to the Server
You’ve already learned about the submit button, which the user presses to initiate the sending of form data
to the server, but this book has not yet covered the difference between the HTTP
get and HTTP post meth-
ods.
You might remember that you can specify which of these two methods is used by adding the method
attribute to the <form> element — just as all of the examples in this chapter have done.
The
method attribute can take one of two values, either get or post, corresponding to the HTTP methods
used to send the form data. If the
<form> element does not carry a method attribute, then by default the
get method will be used. If you are using a file upload form control, you must choose the post method
(and you must set the
enctype attribute to have a value of multipart/form-data).
HTTP get
When you send form data to the server using the HTTP get method, the form data is appended to the
URL specified in the
action attribute of the <form> element.
The form data is separated from the URL using a question mark. Following the question mark you get
the name/value pairs for each form control. Each name/value pair is separated by an ampersand (
&).
For example, take the following login form, which you saw when the password form control was introduced:
<form action=” method=”get”>
Username:
<input type=”text” name=”txtUsername” value=”“ size=”20” maxlength=”20”><br />
Password:
<input type=”password” name=”pwdPassword” value=”“ size=”20” maxlength=”20”>
<input type=”submit” />
</form>
When you click the submit button, your username and password are appended to the URL http://www
.example.com/login.aspx
like so in what is known as the query string:
/>Note that, when a browser requests a URL with any spaces or unsafe characters (such as /, \ , =, &, and +,
which have special meanings in URL), they are replaced with a hex code to represent that character. This
is done automatically by the browser, and is known as URL encoding. When the data reaches the server,
the server will usually un-encode the special characters automatically.
One of the great advantages of passing form data in a URL is that it can be bookmarked. If you look at
searches performed on major search engines such as Google, they tend to use the
get method so that the
page can be bookmarked.
The
get method, however, has some disadvantages. Indeed, when sending sensitive data such as the
password shown here, or credit card details, you should not use the
get method because the sensitive
data becomes part of the URL and is in full view to everyone (and could be bookmarked).
178
Chapter 5: Forms
59313c05.qxd:WroxPro 3/22/08 4:37 PM Page 178
Please purchase PDF Split-Merge on www.verypdf.com to remove this watermark.
You should not use the HTTP get method when:
❑ You are updating a data source such as a database or spreadsheet (because someone could make
up URLs that would alter your data source).
❑ You are dealing with sensitive information, such as passwords or credit card details (because the
sensitive form data would be visible as part of a URL).
❑ You have large amounts of data (because older browsers do not allow URLs to exceed more than
1,024 characters — although the recent versions of the main browsers do not have limits).
❑ Your form contains a file upload control (because uploaded files cannot be passed in the URL).
❑ Your users might enter non-ASCII characters such as Hebrew or Cyrillic characters.
In these circumstances, you should use the HTTP
post method.
HTTP post
When you send data from a form to the server using the HTTP post method, the form data is sent trans-
parently in what is known as the HTTP headers. While you do not see these headers, they are sent in clear
text and cannot be relied upon to be secure (unless you are sending data under a Secure Sockets Layer, or SSL).
If the login form you just saw was sent using the post method, it could look something like this in the
HTTP headers:
User-agent: MSIE 5.5
Content-Type: application/x-www-form-urlencoded
Content-length: 35
other headers go here
txtUserName=Bob&pwdPassword=LetMeIn
Note that the last line is the form data, and that it is in exactly the same format as the data after the ques-
tion mark in the
get method — it would also be URL — encoded if it contained spaces or any characters
reserved for use in URLs.
There is nothing to stop you using the
post method to send form data to a page that also contains a query
string. For example, you might have one page to handle users that want to subscribe to or unsubscribe from
a newsletter, and you might choose to indicate whether a user wanted to subscribe or unsubscribe in the
query string. Meanwhile, you might want to send their actual contact details in a form that uses the
post
method because you are updating a data source. In this case, you could use the following <form> element:
<form action=” />method=”post”>
The only issue with using the HTTP post method is that the information the user entered on the form
cannot be bookmarked in the same way it can when it is contained in the URL. So you cannot use it to
retrieve a page that was generated using specific form data as you can when you bookmark a page gen-
erated by most search engines, but it is good for security reasons.
179
Chapter 5: Forms
59313c05.qxd:WroxPro 3/22/08 4:37 PM Page 179
Please purchase PDF Split-Merge on www.verypdf.com to remove this watermark.
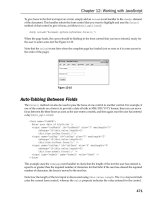
Try It Out The Registration Form Revisited
It is time to revisit the registration form from the earlier Try It Out section in this chapter. This time you
add some more fields into it, and make it more usable.
1.
Open the file registration.html that you made earlier in the chapter and save it as
registration2.html so that you have a different copy to work with.
2.
You should create <label> elements for all of the form controls. This involves putting the
instructions for that control inside a <label> element. This element should carry the for attrib-
ute, whose value is the value of the
id attribute on the corresponding form control, like this one:
<tr>
<td><label for=”userName”>User name:</label></td>
<td><input type=”text” name=”txtUserName” size=”20” id=”username” /></td>
</tr>
3. You have to label the two radio buttons individually:
<tr>
<td>Gender:</td>
<td><input type=”radio” name=”radSex” value=”male” id=”male” />
<label for =”male”>Male</label></td>
</tr>
<tr>
<td></td>
<td><input type=”radio” name=”radSex” value=”female” id=”female” />
<label for=”female”>Female</label></td>
</tr>
If you remember the last chapter’s discussion of table linearization for screen readers, then this should
work fine for most users. If, however, another column were to the right with unrelated information (such
as ads) this could confuse readers, so the table for the form controls should hold only the controls and
their labels.
4. Next you are going to add four new text boxes after the username and password. The first text
input will be to confirm the password and then there will be an empty row. This will be followed
by two text inputs: one for the user’s first name and one for the user’s last name. Then there will
be another empty row, followed by an input for the user’s e-mail address:
<tr>
<td><label for=”confPwd”>Confirm Password:</label></td>
<td><input type=”password” name=”pwdPasswordConf” size=”20”
id=”confPassword” /></td>
</tr>
<tr><td> </td><td> </td></tr>
<tr>
180
Chapter 5: Forms
59313c05.qxd:WroxPro 3/22/08 4:37 PM Page 180
Please purchase PDF Split-Merge on www.verypdf.com to remove this watermark.
<td><label for=”firstName”>First name:</label></td>
<td><input type=”text” name=”txtFirstName” size=”20” id=”firstName” /></td>
</tr>
<tr>
<td><label for=”lastName”>Last name:</label></td>
<td><input type=”text” name=”txtLastName” size=”20” id=”lastName” /></td>
</tr>
<tr><td> </td><td> </td></tr>
<tr>
<td><label for=”email”>Email address:</label></td>
<td><input type=”text” name=”txtEmail” size=”20” id=”email” /></td>
</tr>
5. Now it is time to split the form into two sections using the <fieldset> element. The first section
will indicate that it is for information about the user (containing username, password, name, e-mail,
and gender details). The second section is for information about the company (how the user found
the site and if they want to be on the mailing list).
Both <fieldset> elements will carry access keys. Here is the <fieldset> element for the second
section of the form:
<fieldset>
<legend accesskey=”u”>About <u>U</u>s (ALT + U)</legend>
<table>
<tr>
<td><label for=”referrer”>How did you hear about us?</label>:</td>
<td>
<select name=”selReferrer” id=”referrer”>
<option selected=”selected” value=”“>Select answer</option>
<option value=”website”>Another website</option>
<option value=”printAd”>Magazine ad</option>
<option value=”friend”>From a friend</option>
<option value=”other”>Other</option>
</select>
</td>
</tr>
<tr><td> </td><td> </td></tr>
<tr>
<td><label for=”mailList”>Please select this box if you wish<br /> to be
added to our mailing list
<br /><small>We will not pass on your details to any third
party.</small></label></td>
<td><input type=”checkbox” name=”chkMailingList” id=”mailList” /></td>
</tr>
</table>
</fieldset>
This extended registration form is now a lot more usable. If you save the file again and open it in your
browser, you should find something that resembles Figure 5-24.
181
Chapter 5: Forms
59313c05.qxd:WroxPro 3/22/08 4:37 PM Page 181
Please purchase PDF Split-Merge on www.verypdf.com to remove this watermark.
Figure 5-24
How It Works
You should be familiar with most of what is going on here, but let’s just address a few key points.
❑ The form has been divided up into sections using the
<fieldset> element. This added structure
makes it easier to use the form, as the user knows what section he or she is in.
❑ The accesskey attributes, which provide keyboard shortcuts, are particularly helpful if you
are creating long forms, so that users can immediately go to the relevant section. In reality, the
accesskey attributes are more likely to be of use when creating a site that people will use fre-
quently, rather than a form that users will use only a few times. Users tend to use the shortcuts
only if they are familiar with the form already and want to skip between the sections.
❑ As you will see in Chapter 10, if you are creating a particularly long form, it may be a good idea
to split the form up into several pages.
❑ The
<label> elements are of particular help to those who use screen readers. It ensures that the
users know what they are supposed to be entering into which form control.
❑ When splitting up your page using the
<fieldset> element, make sure that your elements nest
correctly. You cannot just place
<fieldset> elements between rows of a table.
182
Chapter 5: Forms
59313c05.qxd:WroxPro 3/22/08 4:37 PM Page 182
Please purchase PDF Split-Merge on www.verypdf.com to remove this watermark.
Summary
This chapter has introduced you to the world of creating online forms, which are a vital part of many sites.
In most cases when you want or need to directly collect information from a visitor to your site you will
use a form, and you have seen several different examples of forms in this chapter.
From simple search boxes and login pages to complex online order forms and registration processes, forms
are a vital part of web design.
You have learned how a form lives inside a
<form> element and that inside a form there are one or more
form controls. You have seen how the
<input> element can be used to create several kinds of form con-
trols, namely single-line text input controls, checkboxes, radio buttons, file upload boxes, buttons, and
hidden form controls. There are also the
<textarea> elements for creating multiple line text inputs and
the
<select> and <option> elements for creating select boxes.
Once you have created a form with its form controls, you need to ensure that each element is labeled
properly so that users know what information they should enter or which selection they will be making.
You can also organize larger forms using the
<fieldset> and <label> elements and aid navigation
with
tabindex and accesskey attributes.
Finally, you learned when you should use the HTTP
get or post methods to send form data to the server.
Next, it is time to look at the last of our core XHTML chapters, which covers framesets. You will see more
about form design in Chapter 12, which covers some design issues that will make your forms easier to
understand.
Exercises
The answers to all of the exercises are in Appendix A.
1. Create an e-mail feedback form that looks like the one shown in Figure 5-25.
Figure 5-25
183
Chapter 5: Forms
59313c05.qxd:WroxPro 3/22/08 4:37 PM Page 183
Please purchase PDF Split-Merge on www.verypdf.com to remove this watermark.
Note that the first text box is a readonly text box so that the user cannot alter the name of the
person the mail is being sent to.
2. Create a voting or ranking form that looks like the one shown in Figure 5-26.
Figure 5-26
<head>
Note that the following <style> element was added to the <head> of the document to make
each column of the table the same fixed width, with text aligned in the center (you’ll see more
about this in Chapter 7).
<title>Voting</title>
<style type=”text/css”>td {width:100; text-align:center;}</style>
</head>
184
Chapter 5: Forms
59313c05.qxd:WroxPro 3/22/08 4:37 PM Page 184
Please purchase PDF Split-Merge on www.verypdf.com to remove this watermark.
6
Frames
Frames divide a browser window into several separate pieces or panes, each pane containing a
sep
arate XHTML page. One of the key advantages that frames offer is that you can then load and
reload single panes without having to reload the entire contents of the browser window. A collection
of frames in the browser window is known as a frameset.
The window is divided into frames much as tables are organized: into rows and columns (although
they are usually relatively basic in structure). The simplest of framesets might just divide the screen
into two rows, whereas a complex frameset could use several rows and columns.
In this chapter you learn the following:
❑ How to create a frameset document with multiple frames
❑ How to create inline frames (or iframes), which are single windows that sit within
another page
❑ How to deal with users whose browsers cannot use frames
Introducing the Frameset
To help you understand frames, Figure 6-1 shows you a frameset document in a browser. This
frameset divides the page into three parts, and each separate part of the page is a separate XHTML
document.
I should warn you early on that there are actually very few cases in which I would
consider using frames, although this is a matter of preference and I explain my
reasons why in the second section of this chapter — after a simple example that
helps you understand what frames really are.
59313c06.qxd:WroxPro 3/24/08 11:35 PM Page 185
Please purchase PDF Split-Merge on www.verypdf.com to remove this watermark.
Figure 6-1
You may remember from Chapter 1 that, when writing a frameset document, you use a different DOCTYPE
declaration. This is because frameset documents use a few elements in different ways than other XHTML
documents.
To create a frameset document, first you need the <frameset> element, which is used instead of the <body>
element. The frameset defines the rows and columns your page is divided into. Each frame is then repre-
sented by a
<frame> element.
You also need to learn the
<noframes> element, which provides a message for users whose browsers do
not support frames.
To get a better idea of how frames work, here is the code for the frameset shown previously in Figure 6-1
(
ch06_eg01.html):
<?xml version=”1.0” encoding=”iso-8859-1”?>
<!DOCTYPE html PUBLIC “-//W3C//DTD XHTML 1.0 Frameset//EN”
“ /><html>
<head>
<title>Frames example</title>
</head>
<frameset rows=”150, *, 100”>
<frame src=”top_frame.html” />
186
Chapter 6: Frames
59313c06.qxd:WroxPro 3/24/08 11:35 PM Page 186
Please purchase PDF Split-Merge on www.verypdf.com to remove this watermark.
<frame src=”main_frame.html” />
<frame src=”bottom_frame.html” />
<noframes><body>
This site uses a technology called frames. Unfortunately, your
browser does not support this technology. Please Please upgrade
your browser and visit us again!
</body></noframes>
</frameset>
</html>
In practical terms, the new DOCTYPE declaration does little more than allow you to use these frame-
related elements.
You already know that there is no
<body> element as it has been replaced with the <frameset> element;
also, there should be no markup between the closing </head> tag and the opening <frameset> tag, other
than a comment if you want to include one.
As you will see shortly, the
<frameset> element must carry the two attributes rows and cols, which
specify the number of rows and columns that make up the frameset. In our example there are just three
rows, the first being 150 pixels high, the third just 100 pixels high, and the second taking up the rest of
the page (the asterisk is used to indicate that the remaining part of the page should be used in this place).
<frameset rows=”150, *, 100”>
Inside the <frameset> element are the empty <frames /> elements. The <frames /> elements indicate
a URL of the document that will be loaded into that frame; the URL is specified using the
src attribute
(this is very similar to the way an image file is specified in an <img /> element). There is also a <noframes>
element whose contents will be displayed if the user’s browser does not support frames.
Three separate documents are displayed in the one browser window in this example:
❑
top_frame.html
❑ main_frame.html
❑ bottom_frame.html
You should be able to see which part of the window each of these pages corresponds to fairly easily in
Figure 6-1, shown previously.
To see you another idea of how frames can work, look at Figure 6-2, which shows a page that uses horizontal
and vertical frames. (This shows the similarity between the way in which simple tables are sometimes
used to divide up pages and how frames can be used.)
Even though Netscape has supported frames since version 2, and IE introduced them in version 3,
frames didn’t make it into HTML until version 4.0.
Now that you have a good idea of how a frameset document appears, before you take a closer look at
the syntax, let’s just have a look at when you might want to use frames.
187
Chapter 6: Frames
59313c06.qxd:WroxPro 3/24/08 11:35 PM Page 187
Please purchase PDF Split-Merge on www.verypdf.com to remove this watermark.
Figure 6-2
When to Use Frames
It is quite rare to see frames in use these days. Personally, there are very few circumstances in which
I
would suggest that you use frames in a page. The cases in which I think frames are useful include:
❑ When you want to display a lot of content in one single page and you cannot split the document
into separate pages, then a frame might be of use to create a navigation bar that links to the sub-
sections of the long document.
❑
When you have a lot of data in one part of the page that you do not want the user to have to reload
while another part of the page changes. Examples might include a photography site where you have
lots of thumbnails in one frame, and the main picture in another. Rather than reloading the thumb-
nails each time if a visitor wants to look at a new main picture, you can just reload the main picture.
As you have seen in the first example, for each frame you have in a layout, you need to have a file that
acts as its content (each frame is essentially its own web page), so the number of files in your site quickly
grows. You therefore need to be particularly careful with your file structure so that you do not get lost in
a sea of extra files.
A couple of other drawbacks you should be aware of with frames are as follows:
❑ Search engines often link to the content of individual frames rather than the frameset (or group
of frames) that the user sees (and you have to use JavaScript in each frame to reload the frameset
if a visitor lands on an individual frame).
❑ Some browsers do not print well from framesets (and will just print one frame at a time).
❑ The browser’s Back button might not work as the user expects.
188
Chapter 6: Frames
59313c06.qxd:WroxPro 3/24/08 11:35 PM Page 188
Please purchase PDF Split-Merge on www.verypdf.com to remove this watermark.
❑ Some smaller devices cannot cope with frames, often because their screen is not big enough to
be divided up.
❑ It can be hard to achieve a nice layout because users with a lower resolution monitor than the
designer can end up seeing only a portion of what you intend them to see, while users with a higher
resolution monitor than the designer may end up with large gaps around the edges of the frames.
❑ If you have a navigation frame loading different pages into a “main frame,” it is hard to create a
navigation bar that tells users which page they are on (because the other frame loads the new page
without telling the navigation bar).
I should also mention that when a web developer wants to create a page where only part of the page is
refreshed (rather than the whole page), it is becoming increasingly common to use a technique referred
to as AJAX (Asynchronous JavaScript and XML).
While you know my opinion on frames, if you think their advantages outweigh the disadvantages, then
you should use them. So let’s take a look at the syntax for using frames in a little more detail.
The <frameset> Element
The <frameset> element replaces the <body> element in frameset documents. It is the attributes of the
<frameset> element that specify how the browser window will be divided up into rows and columns.
These attributes are as follows:
❑
cols specifies how many columns are in the frameset.
❑
rows specifies how many rows are in the frameset.
The
<frameset> element contains a <frame> element for each frame of the document (or each cell of the
grid constructed by the <frameset> element) and a <noframes> element to indicate what should be
displayed if the user’s browser does not load frames.
In addition to the
rows and cols attributes, the frameset element can also take the following attributes:
class id onload onunload rows style title
Most browsers also support the following well-used attributes (some of which are covered here because
of their popularity). They are not, however, part of the W3C recommendation.
onblur onfocus border bordercolor frameborder framespacing
The cols Attribute
The cols attribute specifies how many columns are contained in the frameset and the size of each column.
You have to provide a value to indicate the width for each of the columns in your frameset, and the
number of values you provide (each separated by a comma) indicates how many columns there are in
the document. For example, here there are three columns: the first takes up 20 percent of the width of the
browser window, the second takes up 60 percent, and the third takes the last 20 percent:
cols=”20%, 60%, 20%”
189
Chapter 6: Frames
59313c06.qxd:WroxPro 3/24/08 11:35 PM Page 189
Please purchase PDF Split-Merge on www.verypdf.com to remove this watermark.
Because there are three values, the browser knows that there should be three columns.
You can specify the width of each column in one of four ways:
❑ Absolute values in pixels
❑ A percentage of the browser window (or parent frame if you have one frameset sit inside
another — which is known as a nested frame)
❑ Using a wildcard symbol
❑ As relative widths of the browser window (or parent frame)
You can mix and match these different ways of specifying column widths, but note the precedence they
take (discussed after the four methods).
If you do not specify a
cols attribute, then the default value is 100 percent, so if you do not specify a cols
attribute, then there will be one column that takes up 100 percent of the width of the browser.
Absolute Values in Pixels
To specify the width of a column in pixels, you just use a number. (You do not need to use px or any other
characters after the number.) For example, here are three columns: the first is 100 pixels, the second is
500 pixels, and the third takes up the remainder of the page (using the wildcard symbol *).
cols=”100, 500, *”
If you use absolute values only, and the width of the window is less or more than the specified values,
then the browser will adjust the width of each column in proportion to the width of the browser window.
So, if you want three columns of 100 pixels, you might specify it like this:
cols=”100, 100, 100”
However, if the browser window were 600 pixels wide, you would end up with three columns of 200 pixels.
Therefore if you really want to specify fixed absolute widths that won’t grow, use a wildcard character
after the third column and either make the content of the fourth frame blank or do not include a <frame />
element for it:
cols=”100, 100, 100, *”
Interestingly, if you have four columns 200 pixels wide, and the browser window is only 600 pixels wide,
your columns would all be squashed proportionately to 150 pixels wide; the window will not use scroll-
bars to make the page 800 pixels wide.
A Percentage of the Browser Window or Parent Frame
To specify the width of a column as a percentage of a window (or, if you use nested frames, which you will
meet later in the chapter, a percentage of the parent frame) you use a number followed by the percent sign.
For example, the following attribute value specifies two columns, one of 40 percent and another of 60 per-
cent of the browser window:
cols=”40%, 60%”
190
Chapter 6: Frames
59313c06.qxd:WroxPro 3/24/08 11:35 PM Page 190
Please purchase PDF Split-Merge on www.verypdf.com to remove this watermark.
If you specify widths as percentages, but they are more or less than 100 percent, the browser will adjust
widths proportionately.
The Wildcard Symbol
The asterisk, or wildcard symbol, indicates the “rest of the window” when used with an absolute value
or percentage. Here, the first column is 400 pixels wide and the second frame takes up the remainder of
the browser window:
cols=”400, *”
If two rows or columns are given the wildcard symbol, then the remaining width is divided by these two
columns.
Relative Widths Between Columns
As an alternative to percentages, you can use relative widths of the browser window, which are best
illustrated with an example. Here, the window is divided into sixths: the first column takes up half of the
window, the second takes one third, and the third takes one sixth:
cols=”3*, 2*, 1*”
You can tell that the window is divided up into sixths by adding up the values of the relative widths.
Value Priorities and Resizing Windows
Absolute widths always take priority over relative widths. Consider the following example with three columns:
cols=”250, *, 250”
If the window is only 510 pixels wide, then the center frame will be only 10 pixels wide. This demonstrates
why you have to be careful when designing frames so that your users will be able to see what you intend
them to see.
Furthermore, if the user resizes his or her window to less than 500 pixels wide, the browser will try to show
as much of the columns defined using absolute widths as possible, ignoring any columns defined using
relative widths.
Whenever a user resizes his or her window, relative widths and percentages are recalculated, but absolute
widths remain the same.
If you specify too many columns for the number of frames you want, the rightmost column ends up being
a blank space; if you specify too many
<frame /> elements the extra ones will be ignored.
The rows Attribute
The rows attribute works just like the cols attribute and can take the same values, but it is used to specify
the rows in the frameset. For example, the following
rows attribute will specify three rows: the top row
191
Chapter 6: Frames
59313c06.qxd:WroxPro 3/24/08 11:35 PM Page 191
Please purchase PDF Split-Merge on www.verypdf.com to remove this watermark.
should be 100 pixels tall, the second should be 80 percent of the screen, and the bottom row should take
up the screen that is left (if anything):
rows=”100, 80%, *”
The default value for the rows attribute is 100 percent so, if you do not specify a rows attribute, one row
will take up 100 percent of the height of the browser.
Browser-Specific Extensions to the <frameset> Element
Most common browsers (such as IE, Firefox, and Safari) support some very important extensions to the
<frameset> element that really deserve mention here. As you might have noticed in the first example, by
default a frame creates a border and you will likely want to control the appearance of this border. While
you can now use CSS to control these properties, you are likely to come across some of these attributes
if you look at older code.
The border Attribute
The border attribute specifies the width of the border of each frame in pixels. It was introduced in
Netscape 3 and IE 4.
border=”10”
Figure 6-3 shows you what the first example looks like with a border of 10 pixels. If you compare this with
Figure 6-2, you will be able to see a taller gray line between each of the frames (
ch06_eg02.html):
Figure 6-3
If you do not want a border, you can give this attribute a value of
0.
192
Chapter 6: Frames
59313c06.qxd:WroxPro 3/24/08 11:35 PM Page 192
Please purchase PDF Split-Merge on www.verypdf.com to remove this watermark.
When you are first creating a frameset document, it can be a good idea to set this attribute to have a value
of 1, even if you do not want borders, as it makes the frames clear when you are building the site; you can
easily remove them by altering this one attribute on the
<frameset> element.
The frameborder Attribute
The frameborder attribute specifies whether a three-dimensional border should be displayed between
frames. The following indicates that there should not be any borders (which is the same as if the
border
attribute is given a value of 0):
frameborder=”0”
The table that follows shows possible values for the frameborder attribute.
Figure 6-4 shows what the frames would look like without a border — you cannot see where one frame
ends and another begins — unless you have different images or background colors for the pages in the
frames (
ch06_eg04.html).
Figure 6-4
Value Purpose
1 or yes Indicates borders should be shown, the default value (yes is not part of HTML 4 but
is still supported by common browsers)
0 or no Indicates borders should not be shown (no is not part of HTML 4 but is still supported
by common browsers)
193
Chapter 6: Frames
59313c06.qxd:WroxPro 3/24/08 11:35 PM Page 193
Please purchase PDF Split-Merge on www.verypdf.com to remove this watermark.
The framespacing Attribute
The framespacing attribute specifies the amount of space between frames in a frameset. The value should
be given in pixels and the default value is 2 if not otherwise specified.
framespacing=”25”
Figure 6-5 shows what the first example from this chapter (shown in Figure 6-1) would look like with a
framespacing attribute indicating a 25-pixel gap between frames (ch06_eg05.html).
Figure 6-5
If you need to make sure that older browsers do not have a border, you should use the border, frameborder
,
and
framespacing attributes together, each with a value of 0. (This will ensure that you do not get a
border in browsers released after Netscape 3 and IE 3.)
border=”0” frameborder=”0” framespacing=”0”
Several other browser-specific attributes are covered in Appendix I.
The <frame> Element
The <frame> element indicates what goes in each frame of the frameset. The <frame> element is
always an empty element, and therefore should not have any content, although each <frame> element
should always carry one attribute,
src, to indicate the page that should represent that frame.
194
Chapter 6: Frames
59313c06.qxd:WroxPro 3/24/08 11:35 PM Page 194
Please purchase PDF Split-Merge on www.verypdf.com to remove this watermark.
The <frame> element can carry any of the universal attributes, and the following attributes:
frameborder marginwidth marginheight noresize scrolling longdesc src name
Note that there are no CSS styles related to the <frame> element.
The src Attribute
The src attribute indicates the file that should be used in the frame.
src=”main_page.html”
The value for the src attribute is a normal XHTML page, so you must have a corresponding page for each
<frame /> element.
While the value of this attribute will generally be a file on your server, its value can be any URL, so you
can use the
src attribute to specify another site.
You might find that some search engines on the Internet (such as the image search on Google) will create
a frameset whereby the top of the page remains the search site and the bottom of the page is the page you
requested.
If you use a frame like this, it is good practice to offer a link that will close the top frame and allow the
viewer to view just the content of the main frame (as Google does).
The name Attribute
The name attribute allows you to give a name to a frame; it is used to indicate which frame a document
should be loaded into. This is especially important when you want to create links in one frame that load
pages into a second frame, in which case the second frame needs a name to identify itself as the target of
the link. You will see more about making links between frames later in the chapter.
name=”main_frame”
You should note that the name attribute has not been replaced by the id attribute (in the same way that
the
name attribute on some other HTML elements was replaced by the id attribute when XHTML was
introduced as the successor to HTML).
The frameborder Attribute
The frameborder attribute specifies whether or not the borders of that frame are shown; it over-
rides
the value given in the frameborder attribute on the <frameset> element if one is given, and
the possible values are the same. The table that follows shows the possible values of the frameborder
attribute.
195
Chapter 6: Frames
59313c06.qxd:WroxPro 3/24/08 11:35 PM Page 195
Please purchase PDF Split-Merge on www.verypdf.com to remove this watermark.