Tài liệu Web Programming with HTML, XHTML, and CSS- P7 pdf
Bạn đang xem bản rút gọn của tài liệu. Xem và tải ngay bản đầy đủ của tài liệu tại đây (1.19 MB, 50 trang )
Figure 7-36
2. Take a look at the following XHTML page:
<?xml version=”1.0” encoding=”iso-8859-1”?>
<!DOCTYPE html PUBLIC “-//W3C//DTD XHTML 1.0 Transitional//EN”
“ /><html xmlns=” lang=”en”>
<head>
<title>Font test</title>
<link rel=”stylesheet” type=”text/css” href=”tableStyles.css” />
</head>
<body>
<table>
<tr>
<th>Quantity</th>
<th>Ingredient</th>
</tr>
<tr class=”odd”>
<td>3</td>
<td>Eggs</td>
</tr>
<tr>
<td>100ml</td>
<td>Milk</td>
</tr>
271
Chapter 7: Cascading Style Sheets
59313c07.qxd:WroxPro 3/24/08 11:40 PM Page 271
Please purchase PDF Split-Merge on www.verypdf.com to remove this watermark.
<tr class=”odd”>
<td>200g</td>
<td>Spinach</td>
</tr>
<tr>
<td>1 pinch</td>
<td>Cinnamon</td>
</tr>
</table>
</body>
</html>
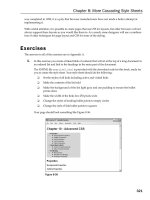
Now create the tableStyles.css style sheet that makes this example look like it does in
Figure 7-37.
Figure 7-37
Don’t worry about getting the sizes exactly the same as the screenshot, but do make sure you
have padding in the cells and a border around the outside. The white border is created by
default in IE and you find out how to remove this in Chapter 8.
272
Chapter 7: Cascading Style Sheets
59313c07.qxd:WroxPro 3/24/08 11:40 PM Page 272
Please purchase PDF Split-Merge on www.verypdf.com to remove this watermark.
8
More Cascading
Style Sheets
In this chapter, you learn more about working with CSS. You will start by working through many
of the remaining properties from the CSS specifications that allow you to control presentation of
links, backgrounds, list styles, table styles, and outlines around boxes (the last of which are different
from borders). You then learn about the
:before and :after pseudo-classes that allow you to add
content that was not in the source document that you are styling before or after a specified element.
Finally, you will see how CSS can be used to position boxes on the page — and therefore how they
can be used to create layouts instead of using tables.
By the end of the chapter, you will know more about how to use CSS to control the following:
❑ Presentation of links
❑ Backgrounds of document
❑ Styles of bullet points and numbered lists
❑ Appearance of tables
❑ Outlines around boxes
❑ Boxes that can gain focus or are active
❑ Addition of content to the XHTML document before or after an element
❑ The three positioning schemes that allow you to determine where on a page a box will
appear — something that prepares you to use CSS to create layouts
Some of the features you learn about in this chapter are not yet widely supported in browsers.
They are, however, worth learning about so that you are aware of the direction in which CSS
is going.
59313c08.qxd:WroxPro 3/22/08 5:14 PM Page 273
Please purchase PDF Split-Merge on www.verypdf.com to remove this watermark.
Links
You have already seen that the color property can change the color of the text inside any element, and
web designers commonly use this property in rules that apply to
<a> elements in order to change the
colors of links. When you do this, however, the link will always be that one color — even the links that
you have visited, are hovering over, or are clicking on.
The ability to change slightly the color of links you have visited can help users navigate your site, and
changing the color when someone hovers over a link can encourage the user to click it. So, when you
create a rule that changes the color of links, the pseudo-classes listed in the table that follows can help dif-
ferentiate styles associated with links in different states.
The following are properties you will likely use with these pseudo-classes:
❑
color: Often used to change the colors of the links. As mentioned, it is helpful to differentiate
slightly between different links that have already been visited and those not yet visited, as this
helps users see where they’ve been. Furthermore, changing the color slightly when a user hovers
over a link can help encourage clicking on the link.
❑
text-decoration: Often used to control whether the link is underlined or not. Links always
used to be underlined on the Web, although since the late 1990s it has been more popular not to
underline links. Using the
text-decoration property, you can specify that your links should
not be underlined, and you can even set them to be underlined only when the user hovers over
the link or selects it.
❑
background-color: Highlights the link, as if it had been highlighted with a highlighter pen. It
is most commonly used when the user hovers over a link, just offering a slight change in color.
Here is an example that will change the styles of links as users interact with them (
ch08_eg01.css):
body {background-color:#ffffff;}
a {
font-family: arial, verdana, sans-serif;
font-size:12px;
font-weight:bold;}
a:link {
color:#0000ff;
text-decoration:none;}
a:visited {
color:#333399;
Pseudo-class Purpose
link
Styles for links in general
visited
Styles for links that have already been visited
active
Styles for links that are currently active (being clicked)
hover
Styles for when someone is hovering over a link
274
Chapter 8: More Cascading Style Sheets
59313c08.qxd:WroxPro 3/22/08 5:14 PM Page 274
Please purchase PDF Split-Merge on www.verypdf.com to remove this watermark.
text-decoration:none;}
a:active {
color:#0033ff;
text-decoration:underline;}
a:link:hover {
background-color:#e9e9e9;
text-decoration:underline;}
Figure 8-1 gives you an idea of how this style sheet will look with (ch08_eg01.html), although it is
rather hard to see the full effect of this in print, with the links changing as the user rolls the mouse over
links and visits the sites, so try the example out with the downloaded code for this chapter.
Figure 8-1
There are also two pseudo-classes called
:focus and :active that alter the style of an element as it
gains focus or becomes active. You learn about these pseudo-classes later in the chapter.
Backgrounds
The table that follows lists the six properties in CSS that allow you to specify how the background of
either the whole browser window or any individual box should appear.
Continued
Property Purpose
background-color
Specifies a color that should be used for the background of the
page or box
background-image
Sets an image to be in the background of a page or box
background-repeat
Indicates whether the background image should be repeated across
the page or box
275
Chapter 8: More Cascading Style Sheets
59313c08.qxd:WroxPro 3/22/08 5:14 PM Page 275
Please purchase PDF Split-Merge on www.verypdf.com to remove this watermark.
You might be interested to note that the shorthand background property is better supported in older ver-
sions of some browsers than the individual properties, but you need to learn what values the properties
can take before going on to use the shorthand.
The background-color Property
The background-color property allows you to specify a single solid color for the background of your
pages and the inside of any box created by CSS.
The value of this property can be a hex code, a color name, or an RGB value (colors are covered in
greater depth in Appendix D). For example (
ch08_eg02.css):
body {background-color:#cccccc; color:#000000;}
b {background-color:#FF0000; color:#FFFFFF;}
p {background-color: rgb(255,255,255);}
When the background-color property is set for the <body> element, it affects the whole document,
and when it is used on any other element it will use the specified color inside the border of the box cre-
ated for that element. Figure 8-2 shows the preceding styles used with (
ch08_eg02.html):
Figure 8-2
I add a rule for the
<body> element to set the background-color property for nearly every style
sheet I write, for the simple reason that some people set their computers to have a background other than
plain white (often because it causes less strain on their eyes). When the background color of an operat-
ing system is changed, the background color of the web browser is usually that color (as are applications
such as word processors). If you do not specify this property, you cannot guarantee that the visitor to
the site has the same background color as you.
Property Purpose
background-attachment
Indicates a background image should be fixed in one position on
the page, and whether it should stay in that position when the user
scrolls down the page or not
background-position
Indicates where an image should be positioned in either the window
or the containing box
background
A shorthand form that allows you to specify all of these properties
276
Chapter 8: More Cascading Style Sheets
59313c08.qxd:WroxPro 3/22/08 5:14 PM Page 276
Please purchase PDF Split-Merge on www.verypdf.com to remove this watermark.
The background-image Property
As its name suggests, the background-image property allows you to add an image to the background
of any box in CSS, and its effect can be quite powerful. The value it takes is as follows, starting with the
letters
url, and then holding the URL for the image in brackets and quotes:
body {background-image: url(“images/background.gif);” }
The background-image property overrides the background-color property. It is good practice, how-
ever, to supply a
background-color property with a value that is similar to the main color in the image
even when you want to use a background image, because the page will use this color while the page is
loading or if it cannot load the image for any reason.
Here is an example of using a single background image which is 200 pixels wide and 150 pixels high.
By default, this image is repeated all across the page (ch08_eg03.css). The background-color
prop
erty is set to be the same color as the background of the image (just in case the image cannot be
loaded):
body {
background-image: url(“images/background.gif”);
background-color: #cccccc;}
Figure 8-3 shows what this looks like in a browser (ch08_eg03.html).
Figure 8-3
This is not a great example of a background image, but it makes an important point. The problem is that
there is not enough contrast between the colors used in the background image and the text that appears
on top of it, which makes the text harder to read.
You must make sure that there is sufficient contrast between any background image and the writing that
appears on top of it; otherwise, users will have trouble reading the text. Furthermore, low-contrast images
(images that are made up of similar colors) often make better backgrounds because it is harder to find a
color that will be readable on top of a high-contrast image.
Figure 8-4 shows an improved example of the background image, where the text is on a solid color,
which makes it easier to read. This time I have also used a larger image (
ch08_eg03b.html).
277
Chapter 8: More Cascading Style Sheets
59313c08.qxd:WroxPro 3/22/08 5:14 PM Page 277
Please purchase PDF Split-Merge on www.verypdf.com to remove this watermark.
Figure 8-4
You should note that there is no way to express the intended width and height of a background image,
and it is not able to have an
alt attribute (alternate text for those not able to see the image for any reason);
therefore, a background image should never be used to convey any important information because it is not
accessible to those unable to see the image.
You should also be wary of using large files as background images because they can be slow to load.
The
larger the file size of the image, the longer it takes to load and render.
The background-image property works well with most block-level elements, although some older
browsers can have problems showing background images in tables.
The background-repeat Property
By default, the background-image property repeats across the whole page, creating what is affection-
ately known as wallpaper. The wallpaper is made up of one image that is repeated over and over again,
and which (if the image is designed well) you will not see the edges of. Therefore, it is important that
any patterns should tessellate, or fit together, well. Wallpaper is often made up of textures such as paper,
marble, or abstract surfaces, rather than photos or logos.
If you do not want your image to repeat all over the background of the page, you should use the
background-repeat property, which has four helpful values, as you can see in the table that
follows.
278
Chapter 8: More Cascading Style Sheets
59313c08.qxd:WroxPro 3/22/08 5:14 PM Page 278
Please purchase PDF Split-Merge on www.verypdf.com to remove this watermark.
These different properties can have interesting effects. It is worth looking at each in turn. You have already
seen the effect of the repeat value, so the next one to look at is repeat-x, which creates a horizontal
bar following the browser’s x-axis (
ch08_eg04.css):
body {
background-image: url(“images/background_small.gif”);
background-repeat: repeat-x;
background-color: #ffffff;}
You can see the result of using this property in Figure 8-5.
Figure 8-5
The
repeat-y value works just like repeat-x but in the other direction: vertically following the
browser’s y-axis (
ch08_eg05.css):
body {
background-image: url(“images/background_small.gif”);
background-repeat: repeat-y;
background-color: #ffffff;}
Value Purpose
repeat
This causes the image to repeat to cover the whole page.
repeat-x
The image will be repeated horizontally across the page (not down the whole
page vertically).
repeat-y
The image will be repeated vertically down the page (not across horizontally).
no-repeat
The image is displayed only once.
279
Chapter 8: More Cascading Style Sheets
59313c08.qxd:WroxPro 3/22/08 5:14 PM Page 279
Please purchase PDF Split-Merge on www.verypdf.com to remove this watermark.
In Figure 8-6, you can see the result with the sidebar coming down the left.
Figure 8-6
The final value was
no-repeat, leaving one instance of the image that by default will be in the top-left
corner of the browser window (
ch08_eg06.css):
body {
background-image: url(“images/background_small.gif”);
background-repeat: no-repeat;
background-color: #eaeaea;}
You can see the result in Figure 8-7; note how the background color of the page has been set to the same
color as the image we have been using.
Figure 8-7
280
Chapter 8: More Cascading Style Sheets
59313c08.qxd:WroxPro 3/22/08 5:14 PM Page 280
Please purchase PDF Split-Merge on www.verypdf.com to remove this watermark.
The background-position Property
(for fixing position of backgrounds)
When the background-color property is the same as the background color of the image, you cannot see
the edge of the image (as in Figure 8-7). However, you may want to alter the position of this image, and you
can do so using the background-position property, which takes the values shown in the table that follows.
Here is an example of fixing the position of the image as shown in Figure 8-8 (ch08_eg07.css):
body {
background-image: url(“images/background_small.gif”);
background-position: 50% 20%;
background-repeat: no-repeat;
background-color: #eaeaea; }
This image will be centered (because it should be 50 percent of the screen’s width from the left-hand side
of the page) and a fifth of the way down from the top of the screen (because it is positioned 20 percent of
the window height from the top of the screen).
Figure 8-8
Value Meaning
x% y%
Percentages along the x (horizontal) and y (vertical) axis
xy Absolute lengths along the x (horizontal) and y (vertical) axis
left
Shown to the left of the page or containing element
center
Shown to the center of the page or containing element
right
Shown to the right of the page or containing element
top
Shown at the top of the page or containing element
center
Shown at the center of the page or containing element
bottom
Shown at the bottom of the page or containing element
281
Chapter 8: More Cascading Style Sheets
59313c08.qxd:WroxPro 3/22/08 5:14 PM Page 281
Please purchase PDF Split-Merge on www.verypdf.com to remove this watermark.
The background-attachment Property (for watermarks)
The background-attachment property allows you to specify an image known as a watermark. The
key
difference with this setting is that the background image can stay in the same position even
when
the user scrolls up and down a page or scrolls with all of the other elements of the page.
The
background-attachment property can take two values, as you can see from the table that
follows.
Here is an example where the image will stay in the middle of the page even when the user scrolls further
down (
ch08_eg08.css):
body {
background-image: url(“images/background_small.gif”);
background-attachment: fixed;
background-position: center;
background-repeat: no-repeat;
background-color: #eaeaea; }
Figure 8-9 shows that the user has scrolled halfway down the page and the image remains in the
center.
Figure 8-9
Value Purpose
fixed
The image will not move if the user scrolls up and down the page.
scroll
The image stays in the same place on the background of the page. If the user scrolls
up or down the page, the image moves too.
282
Chapter 8: More Cascading Style Sheets
59313c08.qxd:WroxPro 3/22/08 5:14 PM Page 282
Please purchase PDF Split-Merge on www.verypdf.com to remove this watermark.
The background Property (the well-supported shorthand)
The background property allows you to specify all five of the background properties at once. If you do
not supply one of the values, the default value will be used. The values can be given in any order:
❑
background-color
❑ background-image
❑ background-repeat
❑ background-attachment
❑ background-position
For example, you can just write:
body {background: #cc66ff; url(images/background_small.gif) fixed
no-repeat center;}
This creates exactly the same effect as the example shown in Figure 8-9.
Lists
You learned about lists in Chapter 1. Lists are very helpful in conveying a set of either numbered or bulleted
points, and it is simple enough to use the <ul> and <li> elements to create unordered lists, or the <ol>
and <li> elements to create ordered lists, but CSS allows you great control over how they are presented.
Note that the bullet point, or number in the case of numbered lists, is referred to as the marker.
In this section you learn about the list properties shown in the table that follows.
Property Purpose
list-style-type
Allows you to control the shape or appearance of the marker
(bullet point or number)
list-style-position
Specifies whether a long item that takes up more than one line of
text and therefore wraps to a second line should align with the first
line or start underneath the start of the marker
list-style-image
Specifies an image for the marker rather than a bullet point or
number
list-style
Serves as shorthand for the preceding properties
marker-offset
Specifies the distance between a marker and the text in the list
283
Chapter 8: More Cascading Style Sheets
59313c08.qxd:WroxPro 3/22/08 5:14 PM Page 283
Please purchase PDF Split-Merge on www.verypdf.com to remove this watermark.
The list-style-type Property
The list-style-type property allows you to control the shape or style of bullet point (also known as
a marker) in the case of unordered lists, and the style of numbering characters in ordered lists. The table
that follows shows the standard styles for an unordered list.
The table that follows lists the popularly supported values for ordered lists.
The
list-style property can either be used on the <ul> and <ol> elements or on the <li> element.
The following example demonstrates all these styles (
ch08_eg09.html):
li.a {list-style:none;}
li.b {list-style:disc;}
li.c {list-style:circle;}
li.d {list-style:square;}
li.e {list-style:decimal;}
li.f {list-style:lower-alpha;}
li.g {list-style:upper-alpha;}
li.h {list-style:lower-roman;}
li.i {list-style:upper-roman;}
Value Meaning Example
decimal
Number 1, 2, 3, 4, 5
decimal-leading-zero
0 before the number 01, 02, 03, 04, 05
lower-alpha
Lowercase alphanumeric characters a, b, c, d, e
upper-alpha
Uppercase alphanumeric characters A, B, C, D, E
lower-roman
Lowercase Roman numerals i, ii, iii, iv, v
upper-roman
Uppercase Roman numerals I, II, III, IV, V
Value Marker
none
None
disc (default)
A filled-in circle
circle
An empty circle
square
A filled-in square
284
Chapter 8: More Cascading Style Sheets
59313c08.qxd:WroxPro 3/22/08 5:14 PM Page 284
Please purchase PDF Split-Merge on www.verypdf.com to remove this watermark.
You can see the result with examples of each kind of bullet in Figure 8-10.
Figure 8-10
The list-style-position Property
The list-style-position property indicates whether the marker should appear inside or outside
of
the box containing the bullet points.
The real difference comes when the text for a bullet point wraps onto more than one line because this
property sets whether the text on the new line wraps underneath the bullet point or in line with the posi-
tion of the first line of text. There are two values for this property, as you can see in the table that follows.
Here you can see how this property is written; in this case it is given on the
<ul> or <ol> elements
(
ch08_eg10.css):
ul {list-style-position:outside; }
ol {list-style-position:inside; }
Figure 8-11 shows you what this would look like in a browser.
You can see here that the
list-style position property with the value outside creates bullet points
to the left of the text, whereas the
inside value starts the list item where the writing would have started
if the value had been outside and adds the marker to the text rather than keeping it separate.
Value Purpose
inside
If the text goes onto a second line, the text will wrap underneath the marker. It
will also appear indented to where the text would have started if the list had a
value of
outside.
outside
If the text goes onto a second line, the text will be aligned with the start of the
first line (to the right of the bullet).
285
Chapter 8: More Cascading Style Sheets
59313c08.qxd:WroxPro 3/22/08 5:14 PM Page 285
Please purchase PDF Split-Merge on www.verypdf.com to remove this watermark.
Figure 8-11
The list-style-image Property
The list-style-image property allows you to specify an image so that you can use your own bullet
style. The syntax is as follows, similar to the
background-image property with the letters url starting
the value of the property followed by the URL in brackets and quotation marks (
ch08_eg11.css):
li {list-style-image: url(“images/bulletpoint.gif”);}
You can see an example of some triangular bullet points in Figure 8-12.
Figure 8-12
If the image cannot be displayed, the browser should just display a dot rather than a broken image symbol.
If you are using nested lists, this value will inherit from its parent element. To prevent this from
happening, you can give the property a value of
none.
The list-style Property (the shorthand)
The list-style property is a way of expressing the other three properties at once. They can appear in
any order. For example:
ul {list-style: inside circle;}
Remember that you can also set the border, padding, and margin properties for <ul>, <ol>, <li>,
<dl>, <dt>, and <dd> elements, as each element has its own box in CSS.
286
Chapter 8: More Cascading Style Sheets
59313c08.qxd:WroxPro 3/22/08 5:14 PM Page 286
Please purchase PDF Split-Merge on www.verypdf.com to remove this watermark.
The marker-offset Property
The marker-offset property allows you to specify the distance between the marker and the text relating
to that marker. Its value should be a length, as follows:
li {marker-offset:2em;}
Unfortunately, this property is not supported in IE7 or Firefox 2.
Tables
In the last chapter, you saw a couple of examples that use CSS with tables. Properties that are commonly
used with the
<table>, <td>, and <th> elements include the following:
❑
padding to set the amount of space between the border of a table cell and its content — this
property is very important to make tables easier to read.
❑
border to set the properties of the border of a table.
❑
text and font properties to change the appearance of anything written in the cell.
❑
text-align to align writing to the left, right, or center of a cell.
❑
vertical-align to align writing to the top, middle, or bottom of a cell.
❑
width to set the width of a table or cell.
❑
height to set the height of a cell (often used on a row as well).
❑
background-color to change the background color of a table or cell.
❑
background-image to add an image to the background of a table or cell.
You should be aware that, apart from the
background-color and height properties, it is best to avoid
using these properties with
<tr> elements, as browser support for these properties on rows is not as good
as it is for individual cells.
Take a look at the table in Figure 8-13; it might look familiar because you saw it at the beginning of the
last chapter, but this time it has an added
<caption> element (ch08_12.html).
Figure 8-13
287
Chapter 8: More Cascading Style Sheets
59313c08.qxd:WroxPro 3/22/08 5:14 PM Page 287
Please purchase PDF Split-Merge on www.verypdf.com to remove this watermark.
Now take a look at the style sheet for this table (ch08_eg12.css):
body {color:#000000; background-color:#ffffff;}
h1 {font-size:18pt;}
p {font-size:12pt;}
table {
background-color:#efefef;
width:350px;
border-style:solid;
border-width:1px;
border-color:#999999;
font-family:arial, verdana, sans-serif;}
caption {
font-weight:bold;
text-align:left;
border-style:solid; border-width:1px; border-color:#666666;
color:#666666;}
th {
height:50px;
font-weight:bold;
text-align:left;
background-color:#cccccc;}
td, th {padding:5px;}
td.code {
width:150px;
font-family:courier, courier-new, serif;
font-weight:bold;
text-align:right;
vertical-align:top;}
Here are some key points to note about this example, some of which you will be altering with new table
properties you are about to meet:
❑ The <table> element has a width property to fix the width of the table to 350 pixels; other-
wise
it would take up as much of the screen as needed to show as much text as possible on
one
line.
❑ The <table> element also has a border property set, which creates a single pixel border all
around the table. Note, however, that none of the other cells in the table inherit this property.
❑ The
<caption> element has its font-weight, border, and text-align properties set. By
default the text is normal (not bold), aligned in the center, and have no border.
❑ The
<th> element has a height of 50 pixels specified, and the text is aligned left (rather than
centered, which is the default).
❑ The
<th> and <td> elements both have a padding property set to 5 px (5 pixels) so that the
content of the cells does not reach where the border of those cells would be. Creating space
around the cells is very important and makes the table more readable.
❑ The
<td> elements whose class attribute has a value of code are given a width property whose
value is
150 px (150 pixels). This ensures that the content of this whole column remains on one
line. Unfortunately, there is no way to assign a style to a column, but in the case of the
width
property, once it has been set on one element it does not need to be set on all of the others in the
column.
288
Chapter 8: More Cascading Style Sheets
59313c08.qxd:WroxPro 3/22/08 5:14 PM Page 288
Please purchase PDF Split-Merge on www.verypdf.com to remove this watermark.
Support for styling tables with CSS is still a bit patchy in different browsers; for example, while you can
set
border properties for a caption, you cannot set a height for it, so you should try out your examples
in as many browsers as possible.
You should make note of the gap between the two columns (which is apparent between the table header
cells). By default, a border is created between each cell of the table to create a bit of space between each
cell in case there are no rules specified to create this essential gap. You can, however, remove this gap
using a property called
border-spacing, which you learn about in the next section.
Table-Specific Properties
Several properties relate to tables only; these are listed in the table that follows. There are also some
special values the border-style property can carry, and when learning about borders it is particularly
helpful to learn how borders are rendered through one of two models that are controlled using the
bor
der-collapse property.
The border-collapse Property
The border-collapse property specifies whether the browser should display every border — even if
there are two cells with different border properties in adjacent cells — or whether the browser should
automatically decide which border to display based upon a built-in complex set of rules. The table that
follows shows the possible values for the
border-collapse property.
Value Purpose
collapse
Horizontal borders will be collapsed and vertical borders will abut one another.
(There are complex rules about conflict resolution for different border rules in the
recommendation, but you should try them out and see how they work.)
separate
Separate rules are observed and different properties are available to further control
appearance.
Property Purpose
border-collapse
Indicates whether the browser should control the appearance of adjacent
borders that touch each other or whether each cell should maintain its style
border-spacing
Specifies the width that should appear between table cells
caption-side
Specifies which side of a table the caption should appear on
empty-cells
Specifies whether the border should be shown if a cell is empty
table-layout
Allows browsers to speed up layout of a table by using the first width
properties it comes across for the rest of a column (rather than having to
load the whole table before rendering it)
289
Chapter 8: More Cascading Style Sheets
59313c08.qxd:WroxPro 3/22/08 5:14 PM Page 289
Please purchase PDF Split-Merge on www.verypdf.com to remove this watermark.
Here you can see two tables: the first has a border-collapse property with a value of collapse, the
second has a value of
separate, and both tables contain adjacent cells with dotted and solid lines:
table.one {border-collapse:collapse;}
table.two {border-collapse:separate;}
td.a {border-style:dotted; border-width:3px; border-color:#000000;
padding:
10px;}
td.b {border-style:solid; border-width:3px; border-color:#333333;
padding:
10px;}
Figure 8-14 shows you how, with a value of collapse, the browser collapses borders into each other so
that the solid border takes precedence over the dotted border. This, of course, wouldn’t look as odd if the
borders were both solid, but it does illustrate the point well. (Indeed, you probably would not want the
internal lines to be thicker than the outer lines — so this may well be the effect that you want.)
Figure 8-14
You may remember that at the beginning of this section you saw a table that had a light gray gap between
the table heading cells. It would be this property that you would change to get rid of that gap. Figure 8-15
shows you the example from the beginning of the chapter with the borders collapsed.
Figure 8-15
290
Chapter 8: More Cascading Style Sheets
59313c08.qxd:WroxPro 3/22/08 5:14 PM Page 290
Please purchase PDF Split-Merge on www.verypdf.com to remove this watermark.
If you use the value of separate for this property, two further properties control border presentation:
❑
border-spacing
❑ empty-cells
The following sections discuss these properties.
The border-spacing Property
The border-spacing property specifies the distance that separates adjacent cells’ borders. It can take
either one or two values; these should be units of length.
If you provide one value, it will apply to both vertical and horizontal borders:
td {border-spacing:15px;}
Or you can specify two values, in which case the first refers to the horizontal spacing and the second to
the vertical spacing:
td {border-spacing:2px; 4px;}
You can see what this looks like in Figure 8-16 (ch08_eg15.html styled with ch08_eg15.css):
Figure 8-16
Note that Internet Explorer did not support this property until IE7.
291
Chapter 8: More Cascading Style Sheets
59313c08.qxd:WroxPro 3/22/08 5:14 PM Page 291
Please purchase PDF Split-Merge on www.verypdf.com to remove this watermark.
The caption-side Property
The caption-side property allows you to specify where the content of a <caption> element should be
placed in relationship to the table. The table that follows lists the possible values.
For example, here you can see the caption being set to the bottom of the table (
ch08_eg16.css):
caption {caption-side:bottom}
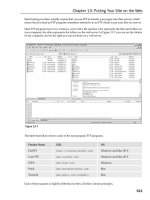
Unfortunately, IE did not start supporting this property until IE7. But Figure 8-17 shows you the caption-
side property at work; you can see that the caption for this table has moved to the bottom of the table
(rather than the top).
Figure 8-17
The empty-cells Property
The empty-cells property indicates whether a cell without any content should have a border displayed.
It can take one of three values, as you can see in the table that follows.
Value Purpose
top
The caption will appear above the table (the default).
right
The caption will appear to the right of the table.
bottom
The caption will appear below the table.
left
The caption will appear on the left side of the table.
292
Chapter 8: More Cascading Style Sheets
59313c08.qxd:WroxPro 3/22/08 5:14 PM Page 292
Please purchase PDF Split-Merge on www.verypdf.com to remove this watermark.
If you want to explicitly hide or show borders, you should use this attribute because IE and Netscape
treat empty cells differently.
Here you can see a table with two empty cells: an empty
<th> element and an empty <td> element
(
ch08_eg17.html):
<table>
<tr>
<th></th>
<th>Title one</th>
<th>Title two</th>
</tr>
<tr>
<th>Row Title</th>
<td>value</td>
<td>value</td>
</tr>
<tr>
<th>Row Title</th>
<td>value</td>
<td></td>
</tr>
</table>
The following code shows the empty-cells property used to hide borders of empty cells in the
<table> element (ch08_eg17.css):
table {
background-color:#efefef;
width:350px;
border-collapse:separate;
empty-cells:hide;}
td {padding:5px;
border-style:solid;
border-width:1px;
border-color:#999999;}
Figure 8-18 shows what the table looks like without borders for empty cells.
Whether or not you use this property is a matter of taste, and if you have specified no borders anyway,
it will, of course, be irrelevant.
Value Purpose
show
Borders will be shown even if the cell is empty (the default in Firefox).
hide
Borders will be hidden if cell is empty (the default in IE).
inherit
Borders will obey the rules of the containing table (only of use in nested tables).
293
Chapter 8: More Cascading Style Sheets
59313c08.qxd:WroxPro 3/22/08 5:14 PM Page 293
Please purchase PDF Split-Merge on www.verypdf.com to remove this watermark.
Figure 8-18
The table-layout Property
The table-layout property is supposed to help you control how a browser should render or lay out a
table (although support in browsers is weak). See the table that follows for the three possible values this
property can take.
Unless your tables are very large or contain a lot of images that will be slow to load, you can avoid using
this property.
Several other properties, not discussed in this chapter, allow you to specify rules for groups of elements,
although support for these is patchy. These properties are as follows:
❑ IE 5 and later supports
table-header-group and table-footer-group.
❑ Netscape 6 and Firefox support inline-table, table-row, table-column-group,
table-column, table-row, and table-cell.
Outlines
Outlines are similar to the borders that you met in the last chapter, but there are two crucial differences:
❑ An outline does not take up space.
❑ Outlines do not have to be rectangular.
Value Purpose
fixed
The browser will calculate the layout by taking the first width specified for a
column (if any are given) and use that to calculate the width of all other cells in
that column. This speeds up rendering if you have a large table and you specify
the widths on the first row.
auto
The browser looks at each cell before rendering the table and then calculates the size
based upon the settings for all cells. This is slower at rendering, but more useful if
you do not know the exact size of each column. This is the default value.
inherit
Will obey the rules of the containing table (only of use in nested tables).
294
Chapter 8: More Cascading Style Sheets
59313c08.qxd:WroxPro 3/22/08 5:14 PM Page 294
Please purchase PDF Split-Merge on www.verypdf.com to remove this watermark.
The idea behind the outline properties is that you might want to highlight some aspect of a page for the
user; and this property will allow you to do that without affecting the flow of the page (where elements
are positioned) in the way that a physical border would take up space. It is almost as if the outline style
sits on top of the page after it has been rendered.
Unfortunately, the outline properties are not supported by Internet Explorer 7, although they do work
in Firefox.
The table that follows lists the four outline properties.
Note that the outline is always the same on all sides; you cannot specify different values for different
sides of the element.
The outline-width Property
The outline-width property specifies the width of the outline to be added to the box. Its value should
be a length or one of the values
thin, medium, or thick — just like the border-width attribute:
input {border-width:2px;}
The outline-style Property
The outline-style property specifies the style for the line (solid, dotted, or dashed) that goes around
the box. Its value should be one of the values used with the
border-style property you learned about
in Chapter 7. For example:
input {outline-style:solid;}
The outline-color Property
The outline-color property allows you to specify the color of the outline. Its value should either be a
color name, a hex color, or an RGB value, as with the
color and border-color properties you learned
about in Chapter 7. For example:
input {outline-color:#ffoooo;}
Property Purpose
outline-width
Specifies the width of the outline
outline-style
Specifies the line style for the outline
outline-color
Specifies the color of the outline
outline
Shorthand for above properties
295
Chapter 8: More Cascading Style Sheets
59313c08.qxd:WroxPro 3/22/08 5:14 PM Page 295
Please purchase PDF Split-Merge on www.verypdf.com to remove this watermark.